Have you ever walked through your yard at dusk and wished it felt just a little more magical? Solar lights might be the easiest way to get there, no wiring, no electricity bills, and endless charm.
Whether you’re dressing up a walkway, brightening your flower beds, or adding a cozy glow to your patio, these DIY solar light ideas make it simple and affordable.
From whimsical garden accents to modern porch lights, these 26 beautiful projects will light up your space and your heart.
#1. Beaded Dragonfly Solar Light
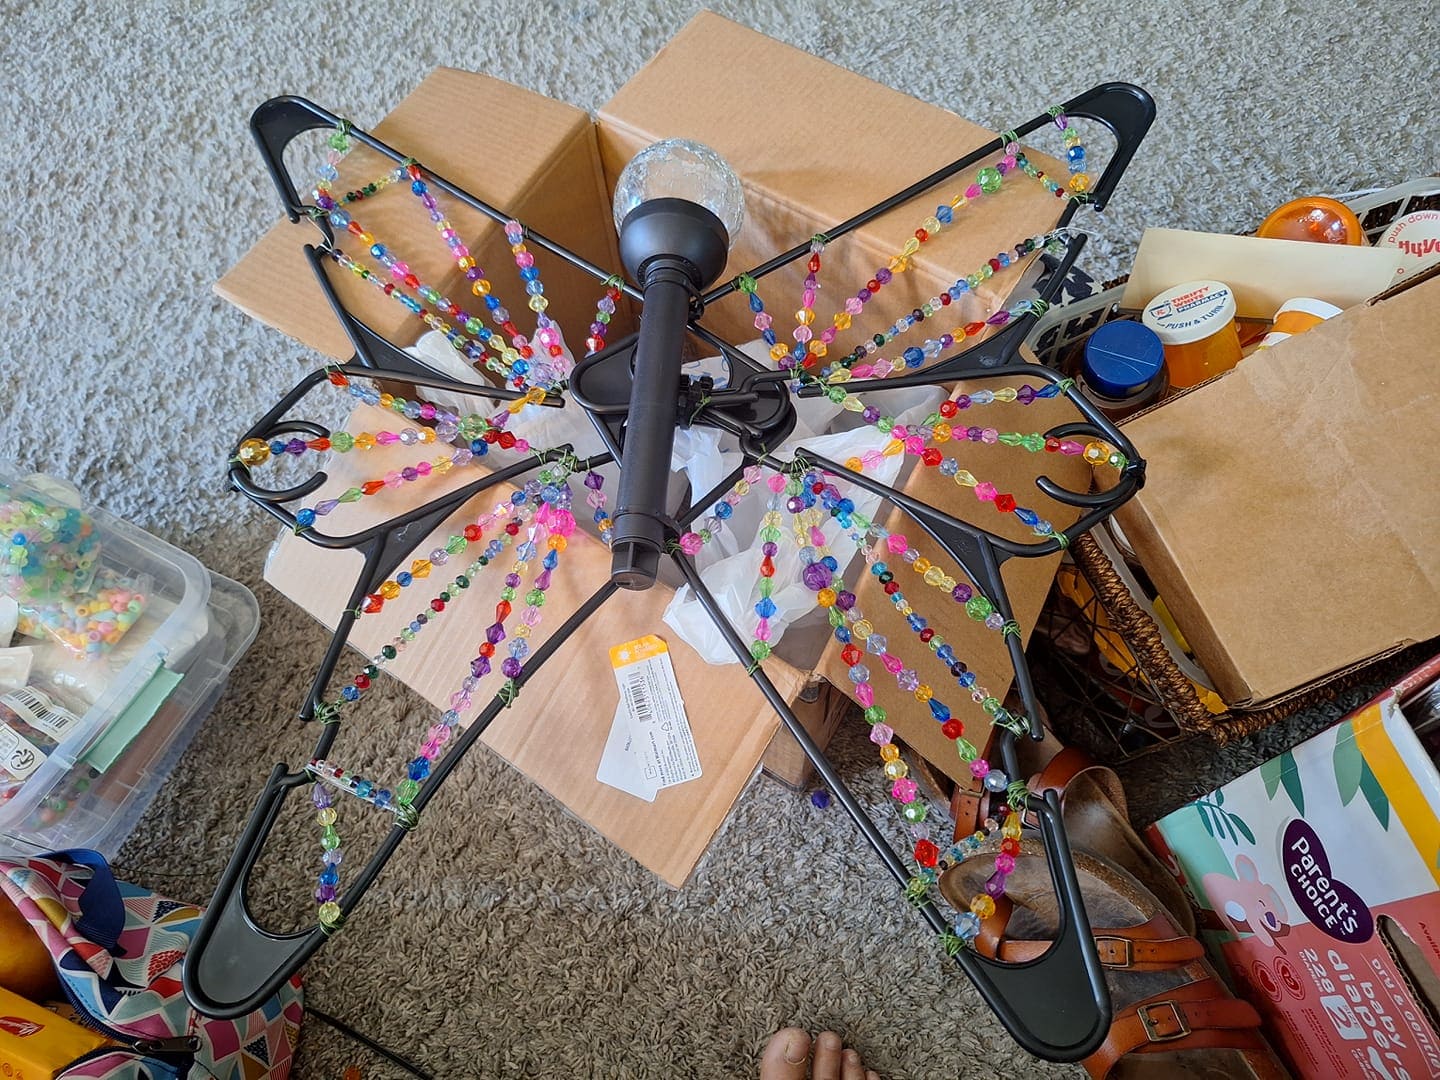
This dragonfly owns wings shimmering in the daylight thanks to the vibrant beads, and at night, the solar light brings it to life like a magical firefly.
Materials Needed:
- 4 plastic coat hangers
- 1 solar garden light
- Colorful plastic beads (assorted shapes and sizes)
- Sturdy wire
- Zip ties or hot glue
Step-by-step Guide:
Step 1: Arrange the coat hangers in a dragonfly wing shape, two on each side and secure them at the center using wire or zip ties.
Step 2: Wrap or string beads along the edges of each hanger using wire. Secure both ends tightly so the strands stay in place.
Step 3: Attach the solar light upright in the center where the hangers meet, forming the body and head of the dragonfly.
Step 4: Add extra wire for hanging, or mount it on a garden stake.
#2. Vintage Glass Bell Solar Lights
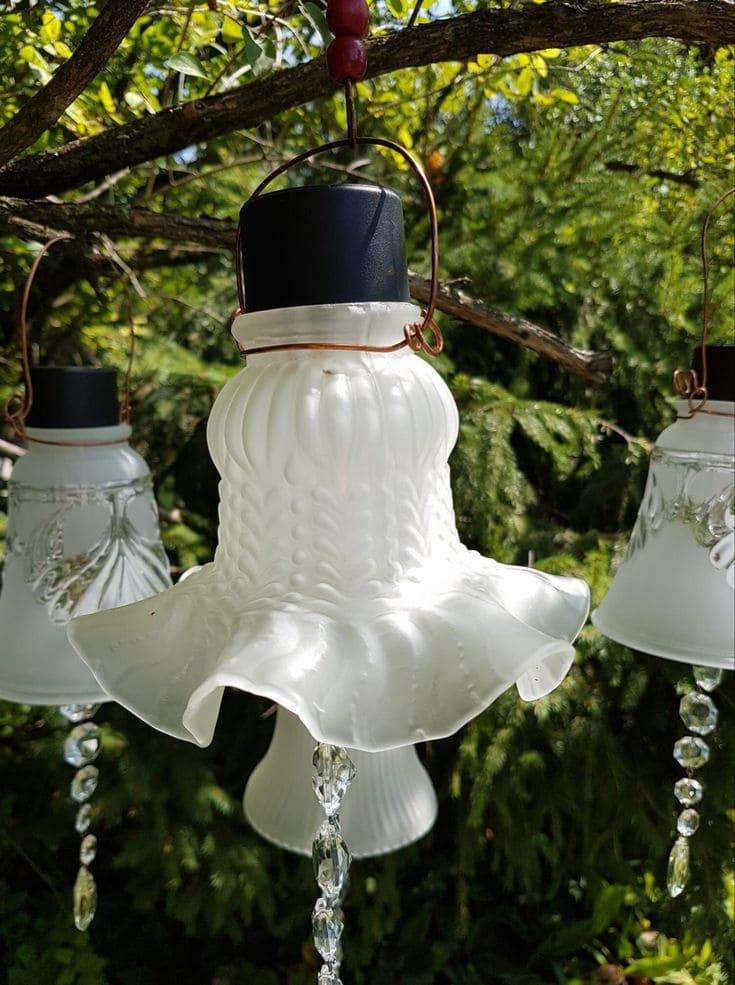
These charming hanging lights feel like something plucked from a fairytale. They look like glass bells or flower petals frozen mid-bloom.
Materials Needed:
- 1 vintage glass lamp shade
- 1 small solar garden light
- Decorative beads
- Jewelry wire
- Hanging hook
Step-by-step Guide:
Step 1: Thread wire around the top edge of the glass shade and twist to form a secure handle for hanging.
Step 2: Insert or glue the solar light into the top opening of the shade, making sure the panel faces upward.
Step 3: Attach a string of beads or crystals to the bottom hole or inside rim for added sparkle.
#3. Painted Bowl Mushroom Solar Lights
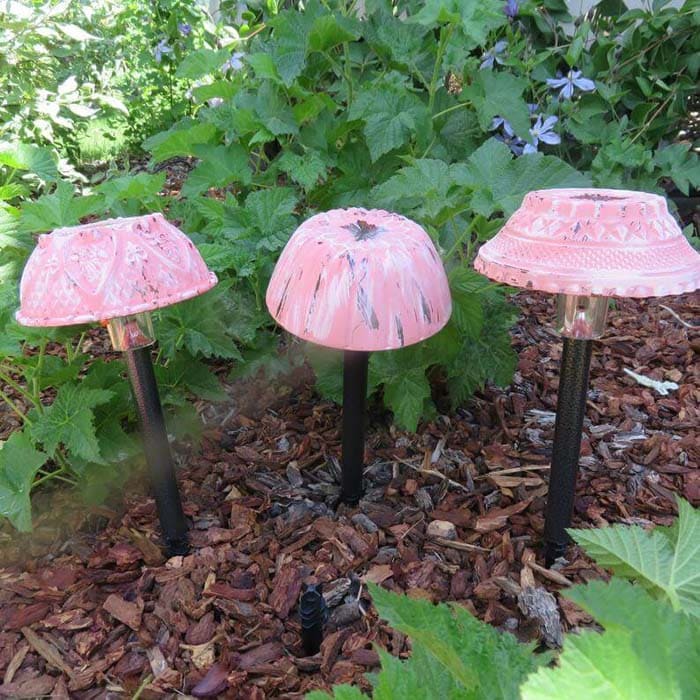
These quirky little lights are made using simple solar path lights and thrifted bowls, and yet the end result adds so much charm among the greenery.
Materials Needed:
- 3 small glass bowls (various patterns)
- 3 solar garden stake lights
- Outdoor spray paint (color of your choice)
- Strong adhesive
Step-by-step Guide:
Step 1: Spray paint the outside of each bowl and let dry completely.
Step 2: Remove the tops from the solar lights if needed and apply adhesive to the rim of each bowl.
Step 3: Press the bowl gently onto the light head, then stake the lights into the ground in your flower bed or mulch area.
#4. Copper Farmhouse Solar Lantern
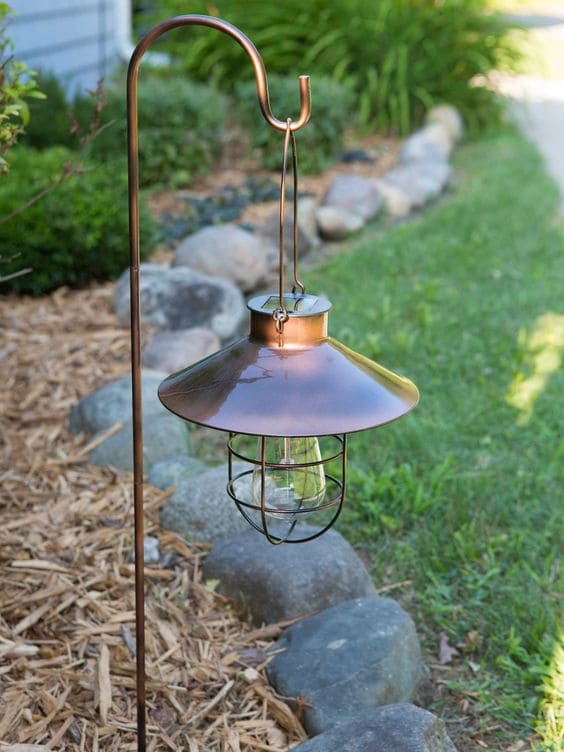
The copper finish and protective cage give this project that old farmhouse feel, while the solar light hidden inside keeps things low-maintenance and energy-efficient.
Materials Needed:
- 1 solar hanging lantern with copper finish
- 1 shepherd’s hook
- Optional: Clear coat spray
Step-by-step Guide:
Step 1: Unpack or assemble your solar lantern and make sure the light is functioning.
Step 2: Hang it from a shepherd’s hook positioned along a walkway or near garden beds.
#5. Elegant Solar Globe Tower
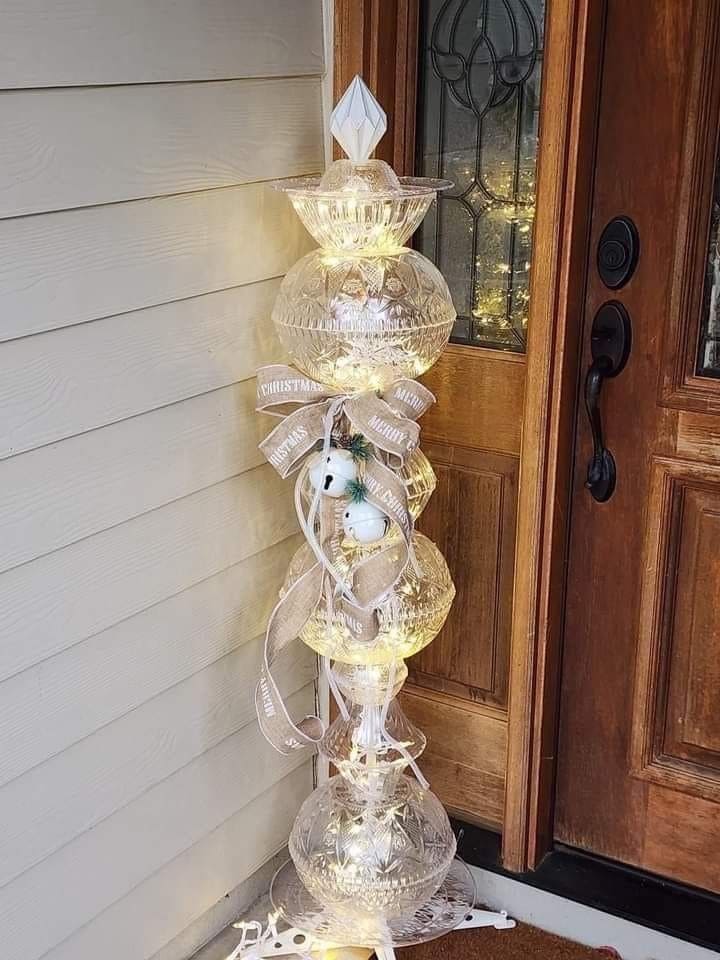
This lighted tower looks like something straight out of a winter wonderland, but it’s actually a simple and stunning DIY using repurposed glass bowls and solar lights.
Materials Needed:
- 4–5 large clear plastic or glass bowls (mix of sizes)
- 1 solar garden light
- Decorative ribbon
- Clear adhesive
- Plastic snowflake base
Step-by-step Guide:
Step 1: Stack the bowls upside down and right-side up in alternating layers to form a tower, gluing them securely between each layer.
Step 2: Insert solar fairy lights through the center or layer them inside each bowl as you stack.
Step 3: Add ribbons, bells, or ornaments for decoration and top it with a faux crystal or finial.
#6. Orbital Hanging Solar Lights
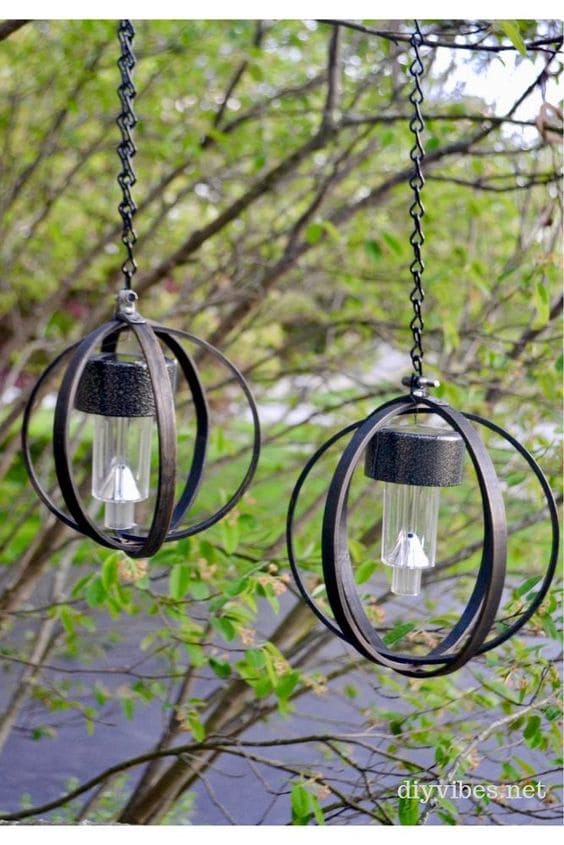
I made a pair for our back patio using old hanging basket frames, and the way they sway in the breeze adds a quiet elegance to the yard.
Materials Needed:
- 2 metal hanging basket frames
- 2 solar pathway lights
- Small chain
- Metal screw hook
Step-by-step Guide:
Step 1: Disassemble the basket frames and arrange the metal rings in a globe shape, securing them at the top.
Step 2: Remove the stake from each solar light and slide the light into the center of the orb.
Step 3: Use a small hook or chain to hang each orb from a tree branch or porch beam.
#7. Repurposed Basket Solar Chandeliers
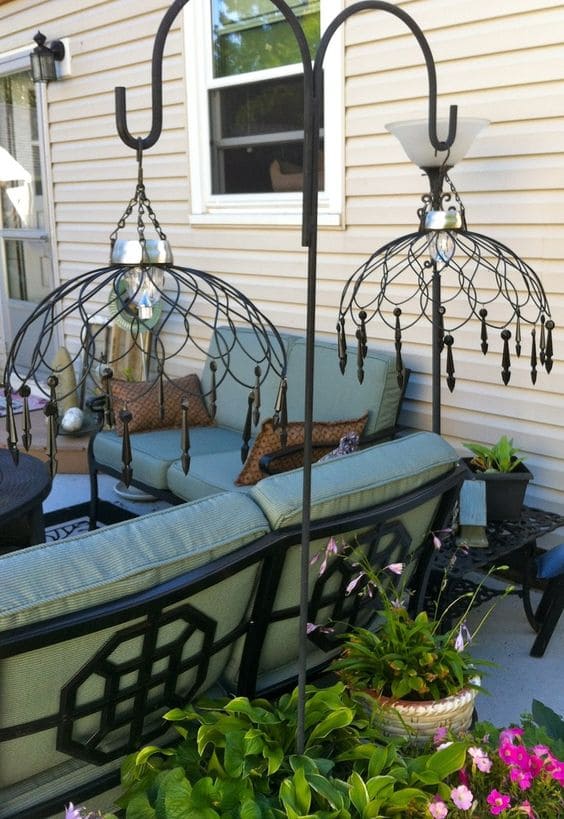
Once lit these chandeliers, the shimmer of the beads mixed with the glow creates a cozy, enchanting vibe that makes any space feel like an outdoor lounge.
Materials Needed:
- 2 hanging wire baskets
- 2 solar mason jar lights
- Decorative beads or pendants
- Shepherd’s hooks
- Chain
Step-by-step Guide:
Step 1: Turn the baskets upside down and attach the beads or pendants to the wire edges.
Step 2: Place or hang the solar mason jar lights inside the basket centers.
Step 3: Secure each basket to a shepherd’s hook using chain or strong wire.
#8. Rustic Solar Post Lanterns
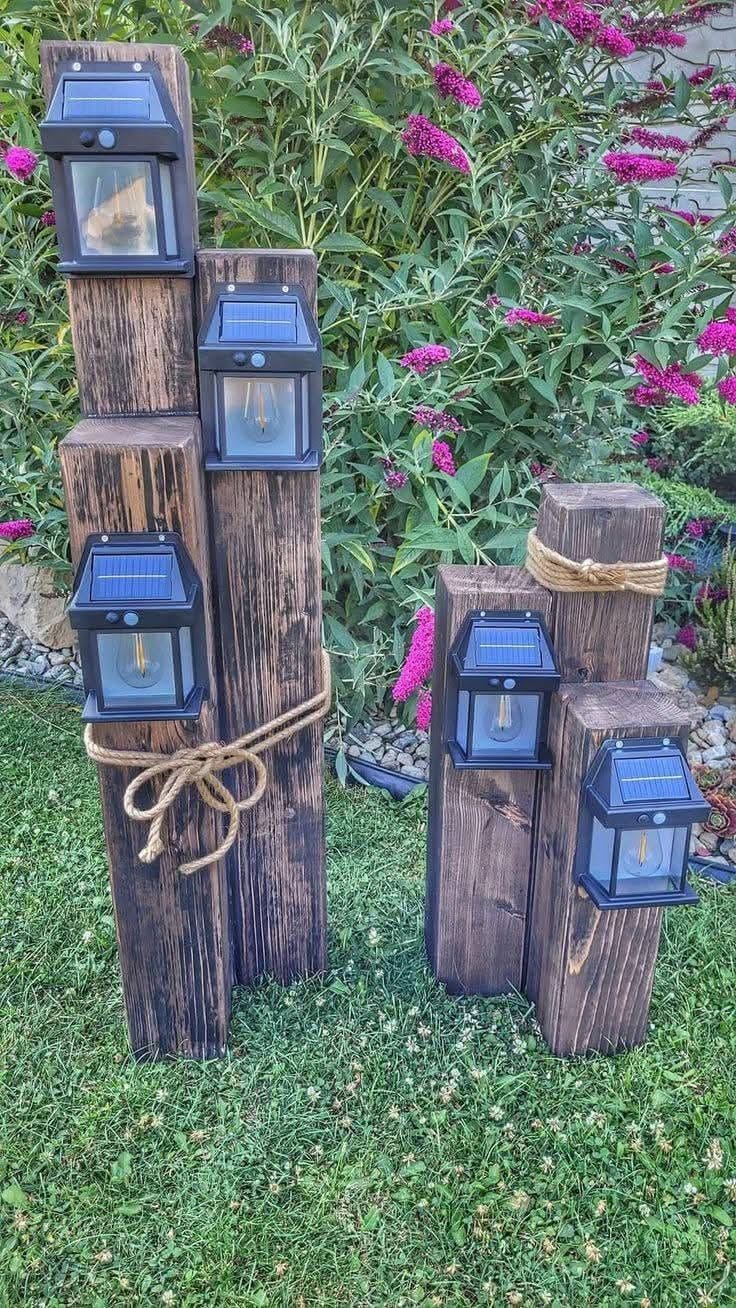
These chunky wood pillars bring serious curb appeal, with just a few planks, rope, and solar lights, you can build a set that’s both functional and striking.
Materials Needed:
- 3–6 pressure-treated wood posts (4×4″ or 6×6″, various heights)
- 3–6 wall-mounted solar lanterns
- Wood stain (optional)
- Outdoor rope
- Screws and drill
Step-by-step Guide:
Step 1: Cut and sand the wood posts to different heights for a staggered effect.
Step 2: Torch or stain the wood for a darker rustic finish, then let dry.
Step 3: Attach the solar lanterns to the front of each post using screws.
Step 4: Wrap the rope decoratively around one or more posts, then arrange them in groups where they’ll get full sun.
#9. Upcycled Solar Greenhouse Lantern
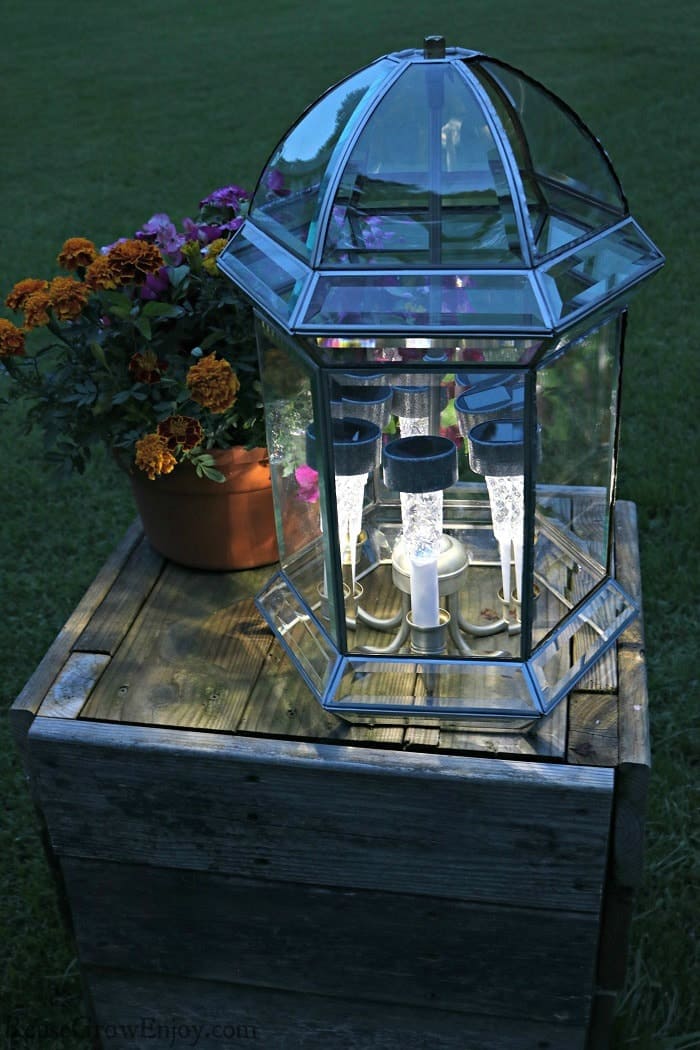
This enchanting DIY light looks like a miniature greenhouse glowing from within, an absolute showstopper after sunset.
Materials Needed:
- 1 display lantern
- 4–6 solar stake lights
- Optional: old chandelier base
Step-by-step Guide:
Step 1: Remove stakes from the solar lights, keeping just the light heads.
Step 2: Arrange the lights upright inside the terrarium or display case. You can use a candle holder or base to help keep them evenly spaced.
#10. Mason Jar Solar Path Lights
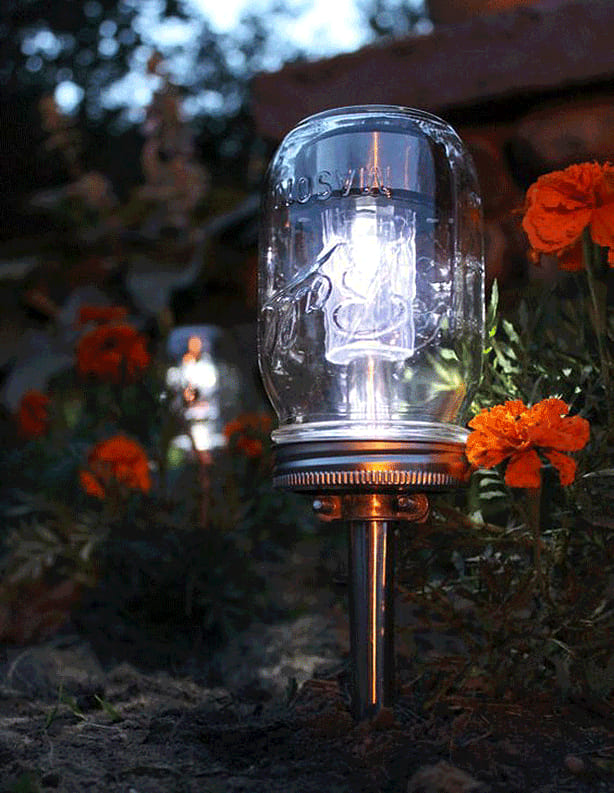
I lined our flower bed with a few of these and loved how they added that warm, nostalgic glow without needing to run a single wire.
Materials Needed:
- 1 mason jar with lid
- 1 solar garden stake light
- Epoxy
- Optional: decorative filler (pebbles, glass beads)
Step-by-step Guide:
Step 1: Remove the stake from the solar light and secure the light head into the mason jar lid with adhesive.
Step 2: Once dry, screw the lid onto the jar with the light inside.
Step 3: Reattach the light to the remaining portion of the stake or mount it on a post.
Step 4: Place the mason jar light along your garden path in full sun to charge by day and glow all night.
#11. Emoji Bucket Solar Lights

Made with inexpensive yellow buckets and stick-on emoji faces, this project is perfect if you want something playful and easy.
Materials Needed:
- 4 small yellow plastic buckets
- 4 emoji face stickers
- 4 solar cage lights
- Hot glue
Step-by-step Guide:
Step 1: Apply emoji face stickers to the front of each bucket.
Step 2: Remove the stakes from the solar lights and attach the lights on top of each bucket using hot glue or tape.
Step 3: Arrange the buckets on porch steps or along a path where they’ll get full sunlight.
#12. Solar Light Flower Pot
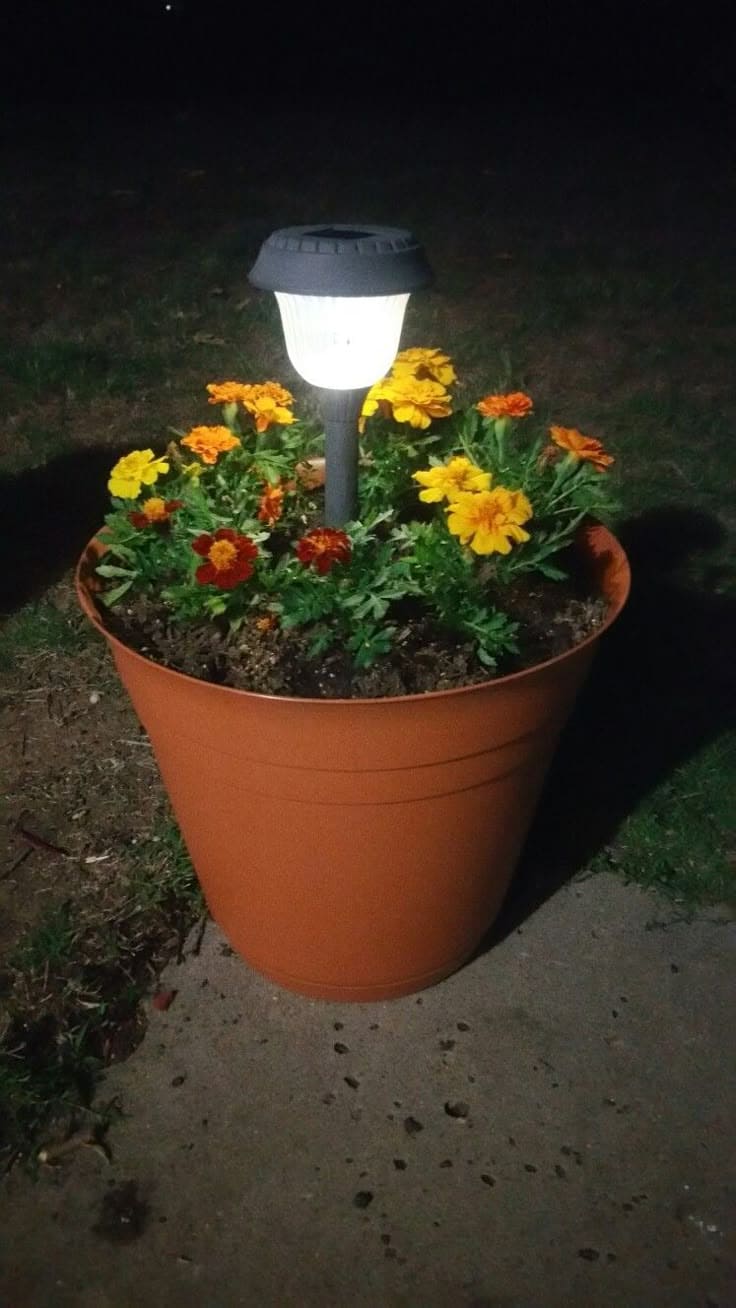
Simple, affordable, and surprisingly effective, this solar flower pot light is perfect for brightening a dark corner or guiding guests to your door.
Materials Needed:
- 1 large plastic or terra cotta flower pot
- 1 solar garden stake light
- Potting soil
- Flowers of your choice (like marigolds or pansies)
Step-by-step Guide:
Step 1: Fill the flower pot with soil and plant your flowers evenly around the edges.
Step 2: Insert the solar light into the center of the pot, pushing it firmly into the soil.
#13. Rustic Wooden Solar Lantern Tower
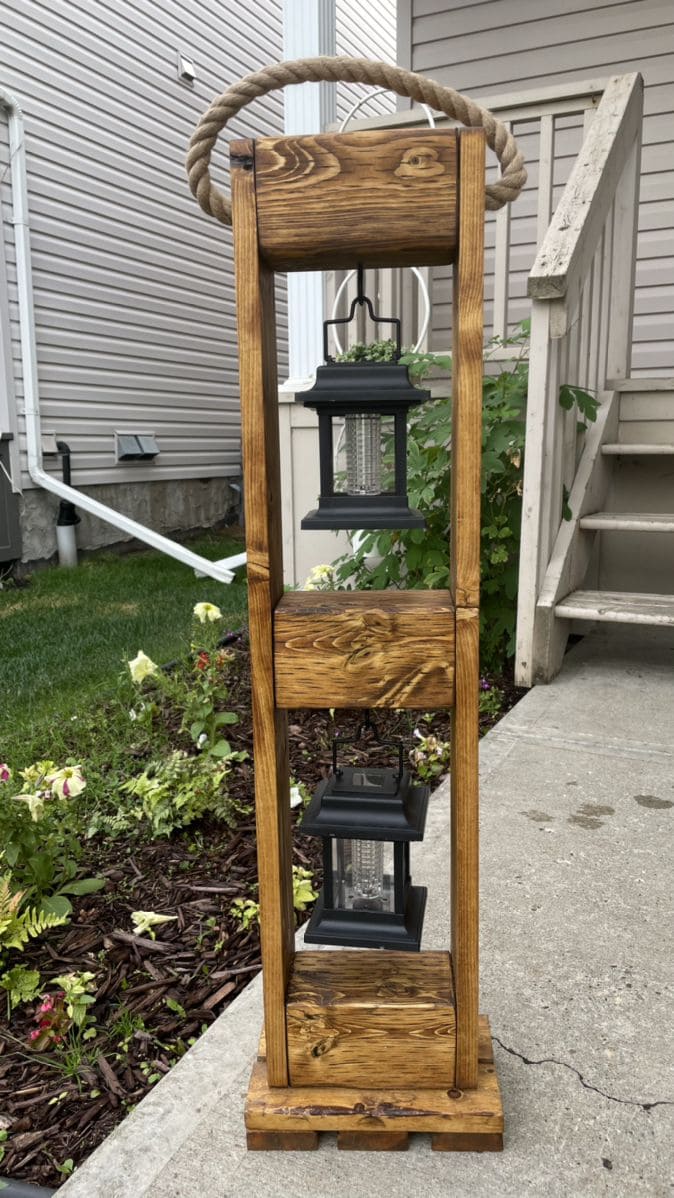
I made mine from leftover wood in the garage, and it instantly became the highlight of our walkway. The rope handle adds a bold, nautical feel, while the natural wood tones keep it grounded and warm.
Materials Needed:
- 3 solar lantern lights (approx. 6–8 inches tall each)
- Wood boards (2×2″ and 1×6″, approx. 6 ft total)
- Rope handle (1″ thick, 18–24″ long)
- Wood screws (1.5–2″)
- Wood stain (optional)
- Hooks
Step-by-step Guide:
Step 1: Cut and sand all your wood pieces , four legs, three cross beams, and a solid base.
Step 2: Screw the legs into the base and attach the cross beams evenly along the height.
Step 3: Install hooks under each beam and hang the solar lanterns.
Step 4: Attach the rope handle to the top beam and place the tower where it gets full sunlight.
#14. Crackle Globe Solar Path Lights
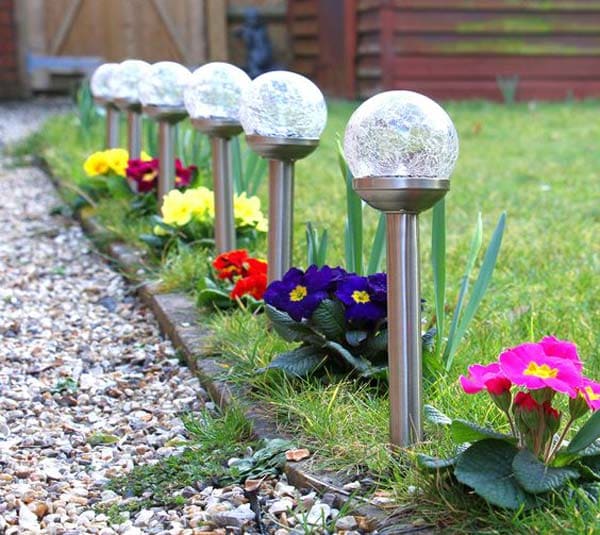
The way the textured glass catches the sun during the day and sparkles like tiny stars at night is what makes this setup truly shine.
Materials Needed:
- 6–8 crackle glass globe solar path lights
- Garden trowel
- Optional: flowers or edging plants
Step-by-step Guide:
Step 1: Plan and mark the spacing for the lights along your pathway.
Step 2: Use a trowel to create holes, then stake the solar lights firmly into the ground.
Step 3: Add flowers around the base if desired for an extra pop of color.
#15. Diamond Jar Solar Lantern
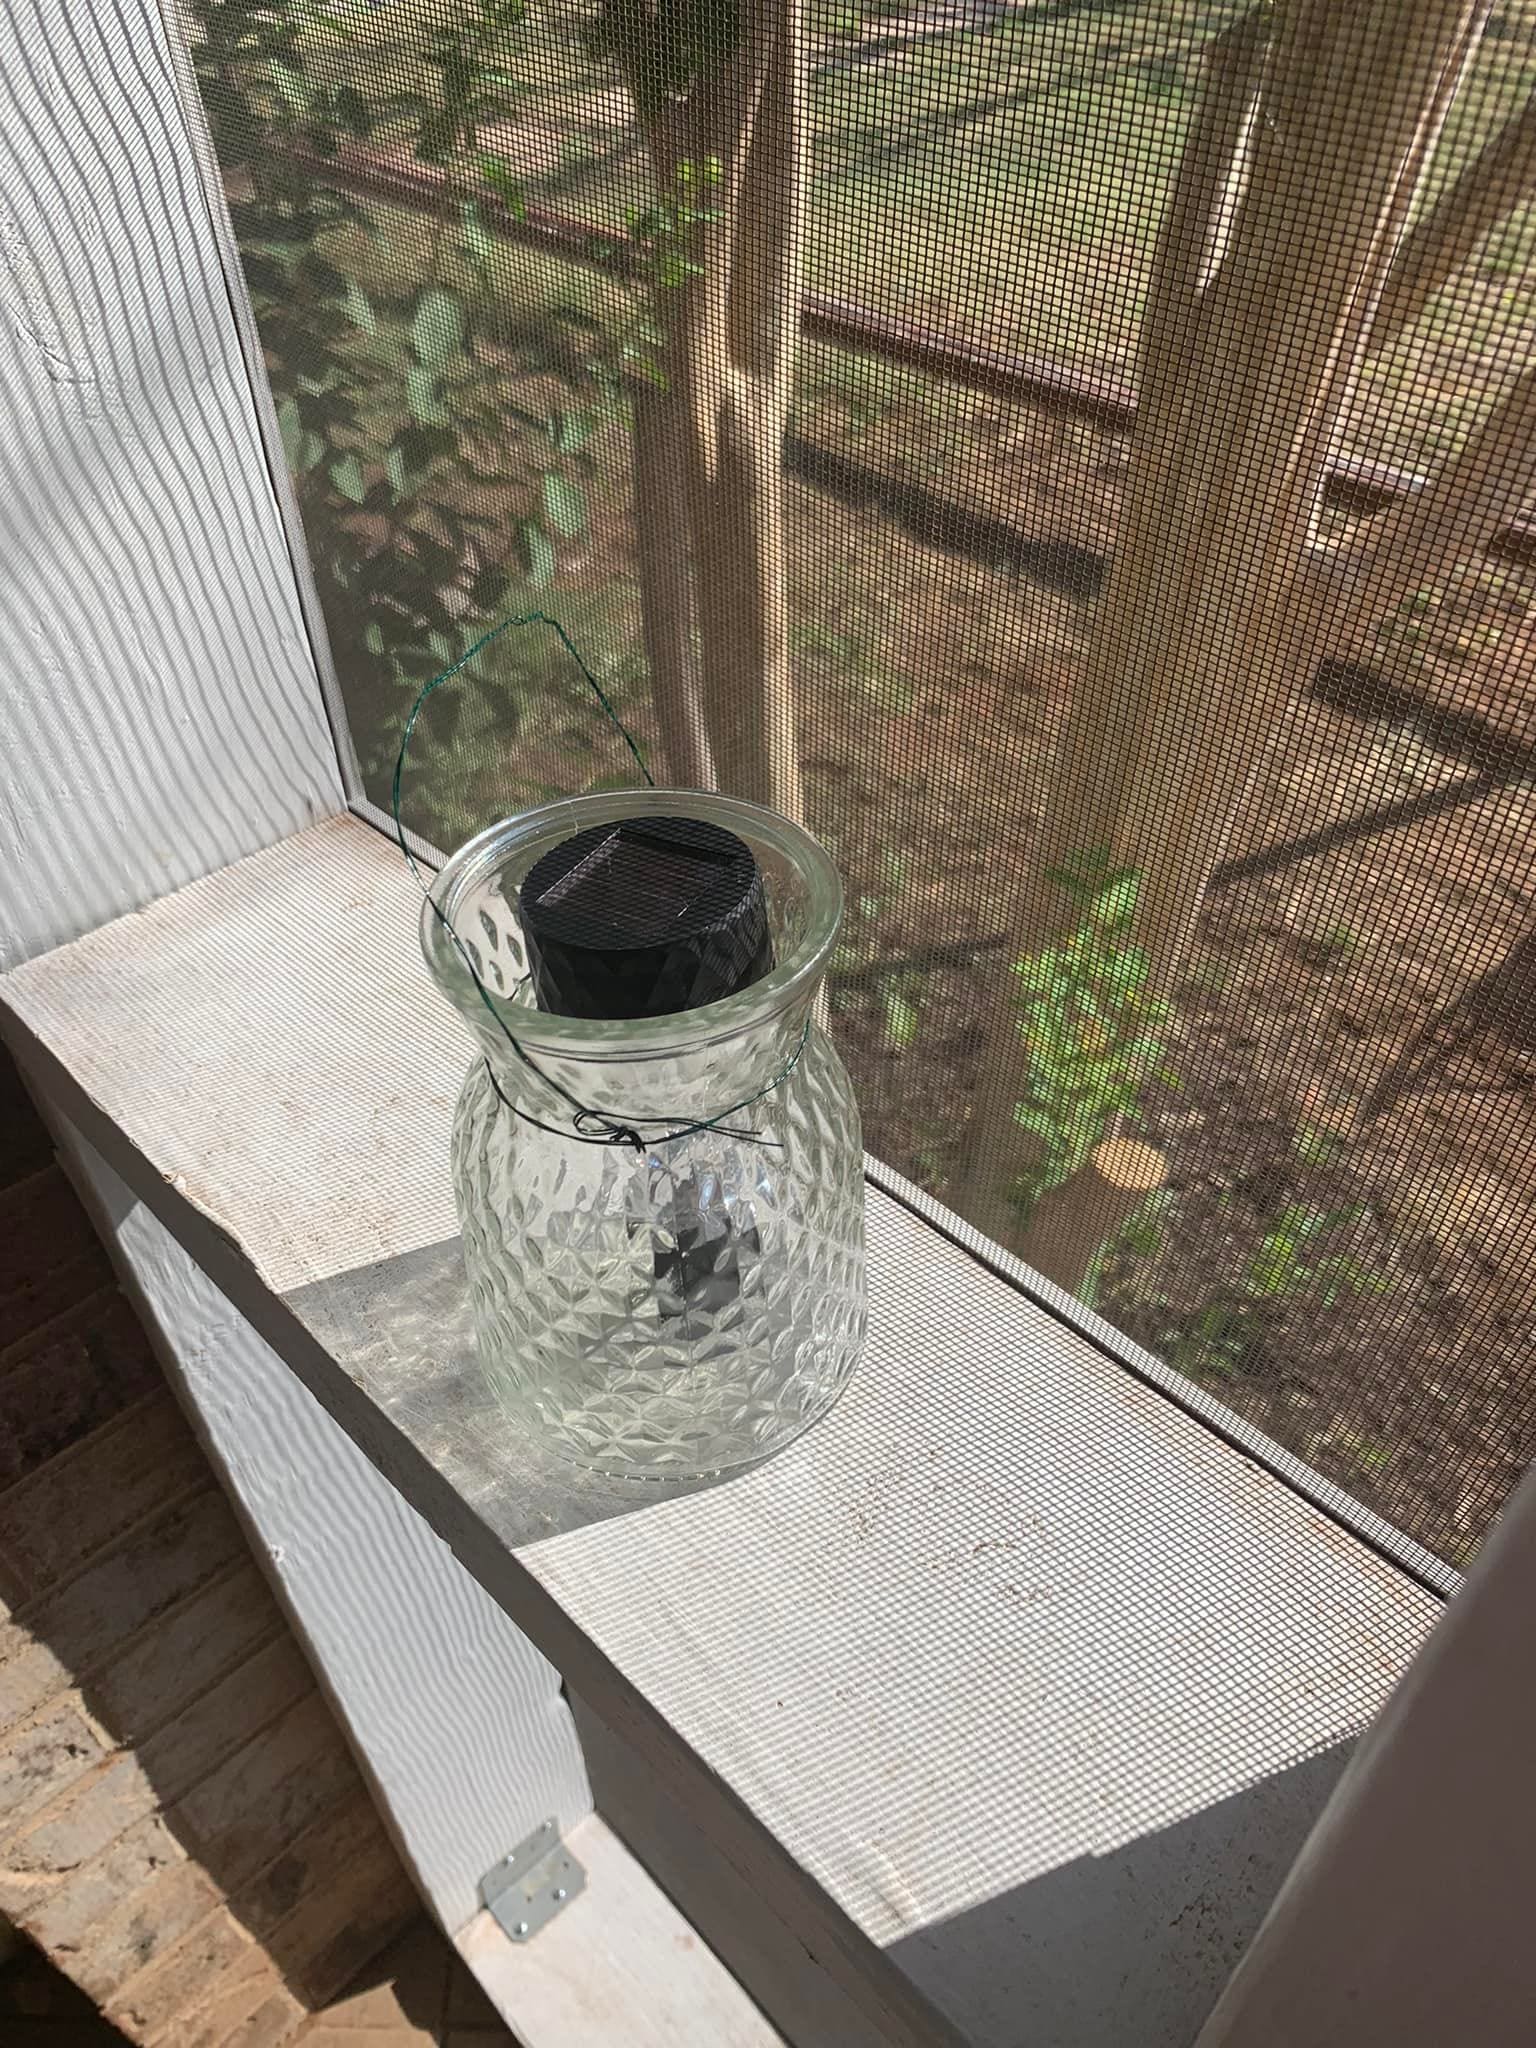
Sometimes the simplest ideas bring the most charm. This solar lantern made from a vintage-style glass jar has that timeless look.
Materials Needed:
- 1 clear glass jar with textured pattern
- 1 small solar garden light
- Jewelry wire
Step-by-step Guide:
Step 1: Remove the stake from the solar light and place the top portion snugly into the jar opening.
Step 2: Wrap wire around the neck of the jar and twist to secure a handle for hanging.
Step 3: Place the lantern on a sunny windowsill or porch ledge to charge.
#16. Glam Garden Solar Lamp
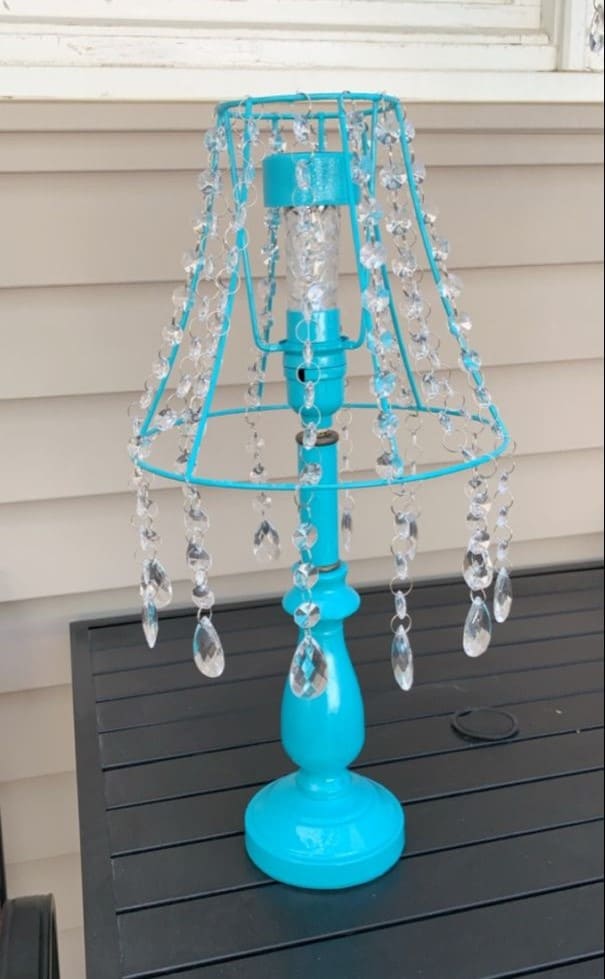
I loved how the crystals catch the light, even without the solar bulb lit, it feels cheerful and fancy. It’s a perfect centerpiece for a patio table, or even a statement piece for a garden nook.
Materials Needed:
- 1 old lamp base
- 1 wire lampshade frame
- 1 solar garden light
- Spray paint (color of your choice)
- Crystal garland
Step-by-step Guide:
Step 1: Remove all wiring from the old lamp base and clean the surface.
Step 2: Spray paint the base and lampshade frame, then let dry completely.
Step 3: Attach crystal strands to the lampshade frame using hooks, wire, or hot glue.
Step 4: Insert the solar light where the bulb used to go.
#17. Solar-Powered Wire Lantern Glow
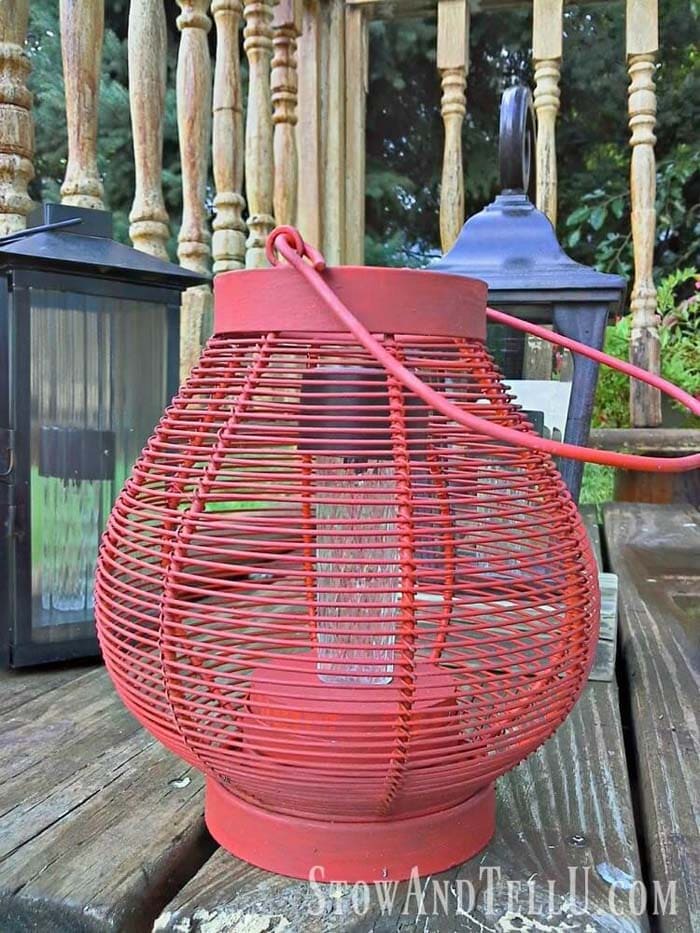
I found this red wire basket at a flea market and immediately pictured it glowing under the stars. It’s got that farmhouse-meets-modern look, with clean curves and an industrial touch.
Materials Needed:
- 1 wire lantern or round metal basket
- 1 solar garden light
- Spray paint (optional)
- Hot glue
Step-by-step Guide:
Step 1: Clean and paint the wire lantern if desired. Let it dry completely.
Step 2: Remove the stake from the solar light and secure the light inside the lantern using glue.
Step 3: Make sure the solar panel is exposed at the top, or cut a small opening if needed.
#18. Solar Bloom Garden Light
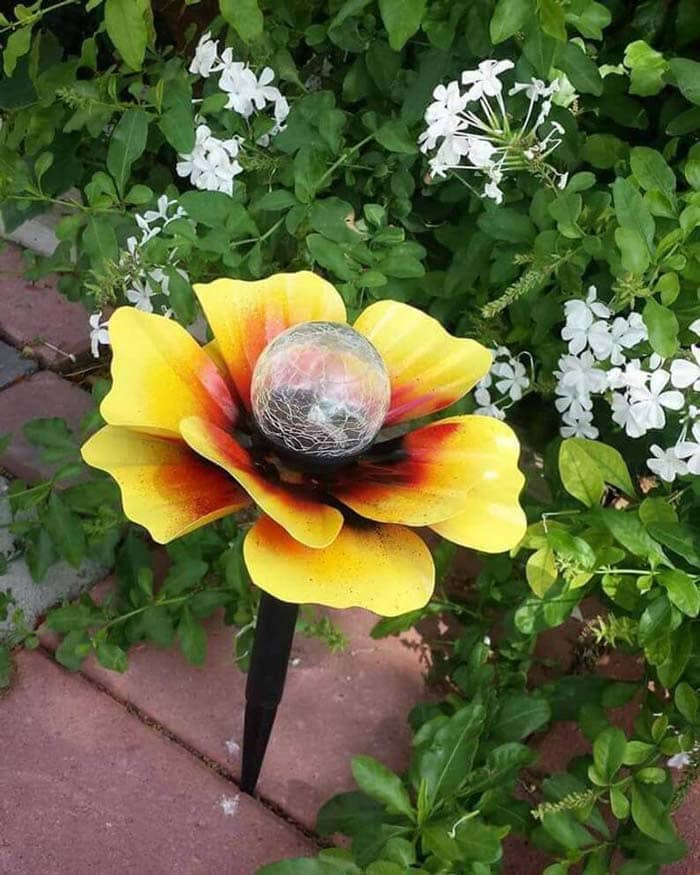
The bold yellow petals surround a crackled glass globe that holds a solar light, creating a vibrant daytime feature and a gentle nightlight in one.
Materials Needed:
- 1 metal flower stake with wide petals
- 1 crackled glass solar light globe
- Strong adhesive
Step-by-step Guide:
Step 1: Secure the solar globe in the center of the flower using adhesive if needed.
Step 2: Stake the flower into the ground in a sunny area of your garden.
#19. Frosted Globe Solar Light

When placing this on your patio, the soft blue swirls and scattered flecks give it a peaceful, oceanic vibe, something between beach glass and moonlight.
Materials Needed:
- 1 frosted or colored glass globe
- 1 puck-style solar light
- Clear adhesive (optional)
Step-by-step Guide:
Step 1: Clean the globe and make sure it’s free of dust or residue.
Step 2: Position the solar puck light underneath or inside the globe, facing upward.
Step 3: Use adhesive or putty to keep the light in place if needed.
#20. Garden Chandelier Solar Light
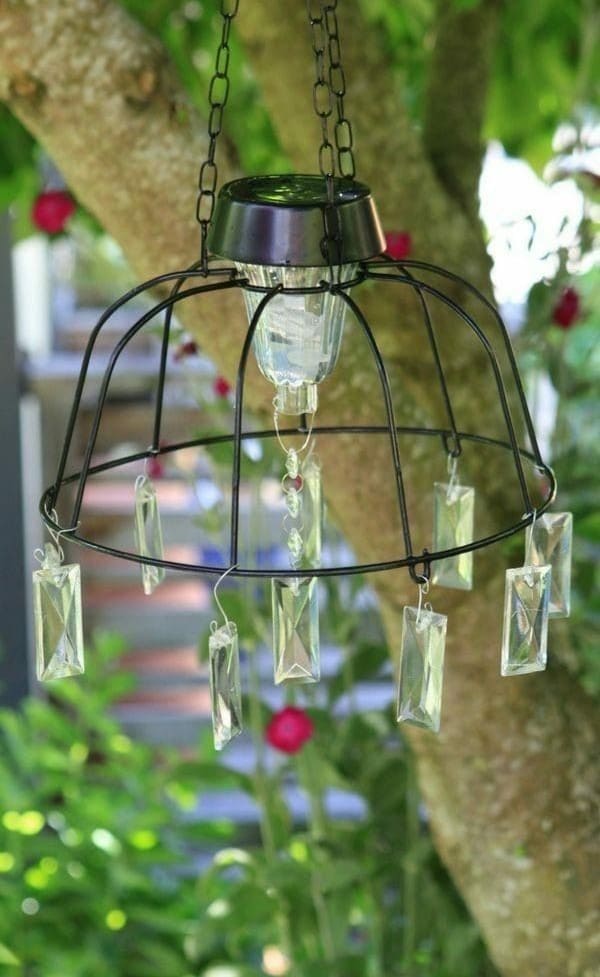
Made from a simple wire lampshade and draped in crystal-like beads, it’s surprisingly easy but looks high-end.
Materials Needed:
- 1 wire lampshade frame
- 1 small solar garden light
- Acrylic crystal pendants
- Hanging chain
- Small S-hooks
Step-by-step Guide:
Step 1: Attach crystal beads to the lampshade frame using wire or hooks.
Step 2: Remove the stake from the solar light and secure it at the top center of the frame.
Step 3: Use chain or twine to hang the chandelier from a tree branch or pergola.
#21. Solar Light House Planters
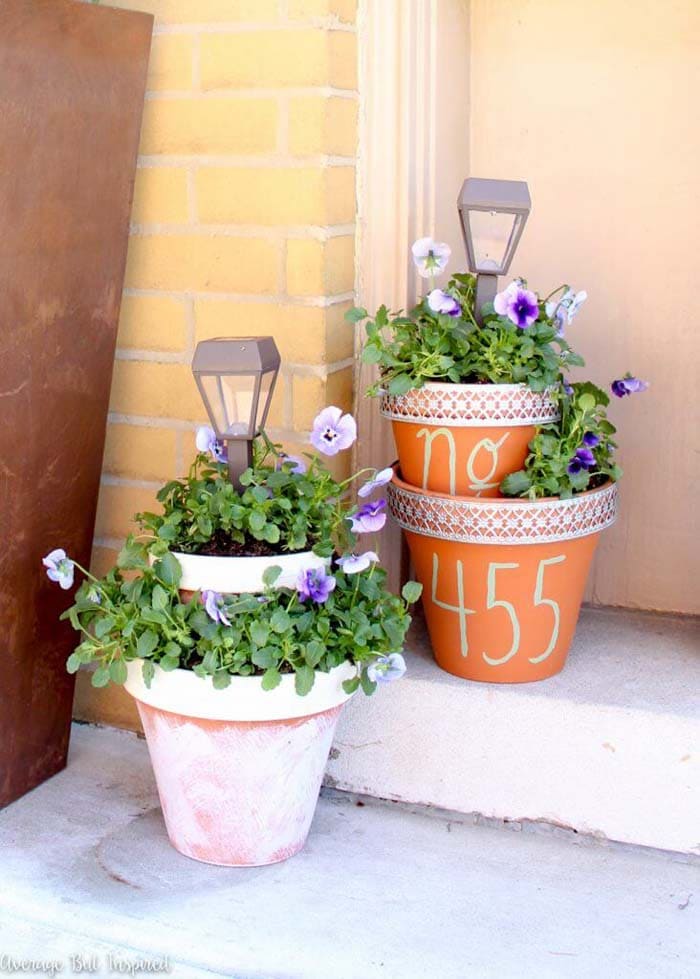
I made a similar trio to match our porch colors, and not only do they help guide guests to the right door, but they make the entrance feel instantly warm and homey.
Materials Needed:
- 3–4 terra cotta or plastic flower pots (various sizes)
- 2–3 solar garden lights
- Outdoor acrylic paint
- House numbers (painted or stenciled)
- Potting soil and flowers
Step-by-step Guide:
Step 1: Paint the pots in your desired colors and add house numbers with stencils or freehand.
Step 2: Stack smaller pots inside larger ones with soil in between for planting.
Step 3: Add flowers to each layer, filling out the sides for a full look.
Step 4: Insert solar lights into the center or corners, then place the setup by your door where it can get sunlight during the day.
#22. Mini Rock-Filled Solar Pot Lights
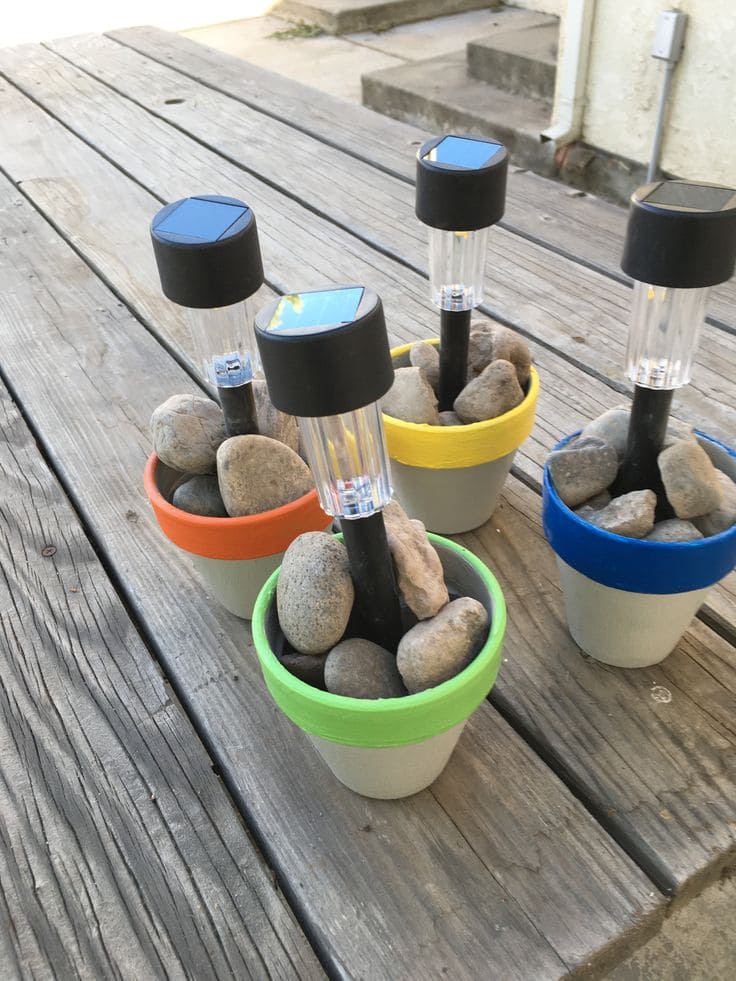
With just a small clay pot, some river rocks, and a basic solar stake, you’ve got a set of portable, no-dig lights perfect for patios, picnic tables, or even as party decor.
Materials Needed:
- 4 small clay pots
- 4 solar stake lights
- Small river rocks
- Acrylic paint (optional)
Step-by-step Guide:
Step 1: Paint the rims of each pot in different colors if desired, then let dry.
Step 2: Insert the solar stake light into the center of the pot.
Step 3: Fill the pot with rocks to hold the light upright and add a decorative touch.
#23. Tabletop Solar Trough Lights
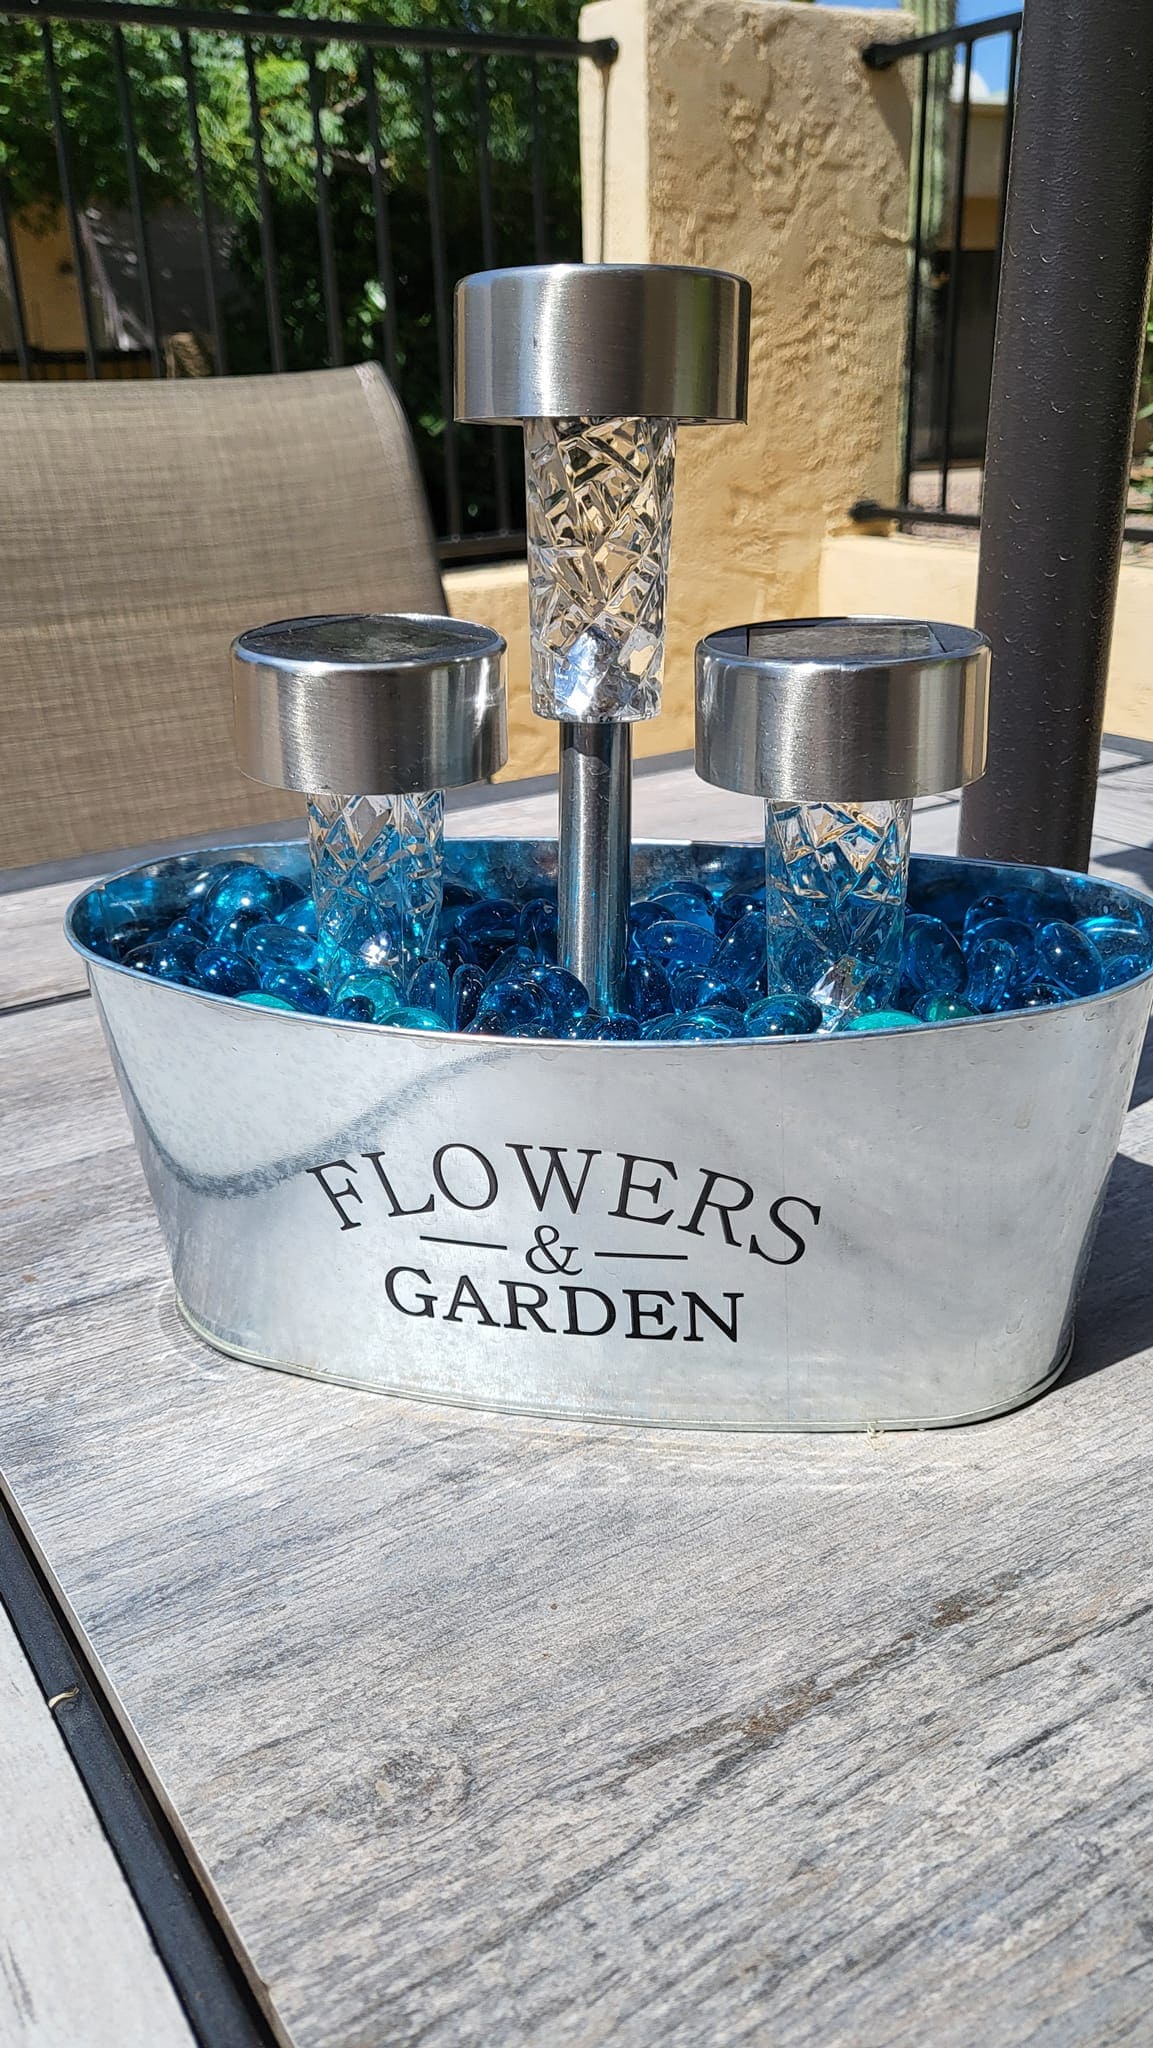
Set in a galvanized trough and surrounded by sparkling blue glass gems, the three solar lights make it look like a mini garden fountain without the water or wiring.
Materials Needed:
- 1 metal trough planter (approx. 10–12″ long)
- 3 mini solar garden lights
- Blue glass pebbles
- Optional: floral foam
Step-by-step Guide:
Step 1: Remove the stakes from the solar lights, keeping just the top and stem.
Step 2: Place a foam base or filler in the bottom of the trough to support the lights.
Step 3: Insert the lights evenly spaced and fill around them with glass pebbles to hide the base.
#24. Magical Solar Water Faucet Light
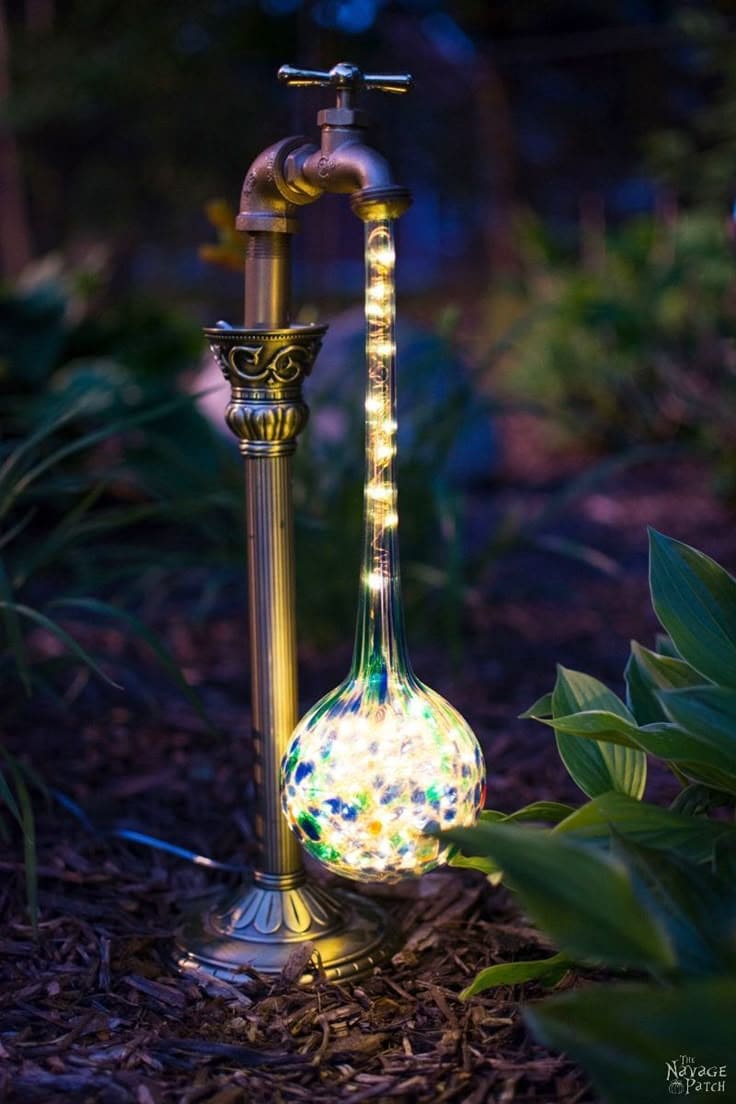
This is an optical illusion that turns a simple solar light and some clever tubing into pure garden enchantment. It’s mesmerizing, unexpected, and guaranteed to get compliments.
Materials Needed:
- 1 decorative faucet stand
- 1 strand of solar fairy lights
- 1 clear rigid tube
- 1 decorative glass
- Epoxy
Step-by-step Guide:
Step 1: Attach the clear tube to the faucet spout using glue, making it look like flowing water.
Step 2: Insert the solar fairy lights into the tube, running the strand down into the globe.
Step 3: Place the globe at the bottom and fill it with the remaining lights.
#25. Hanging Globe Garden Solar Light
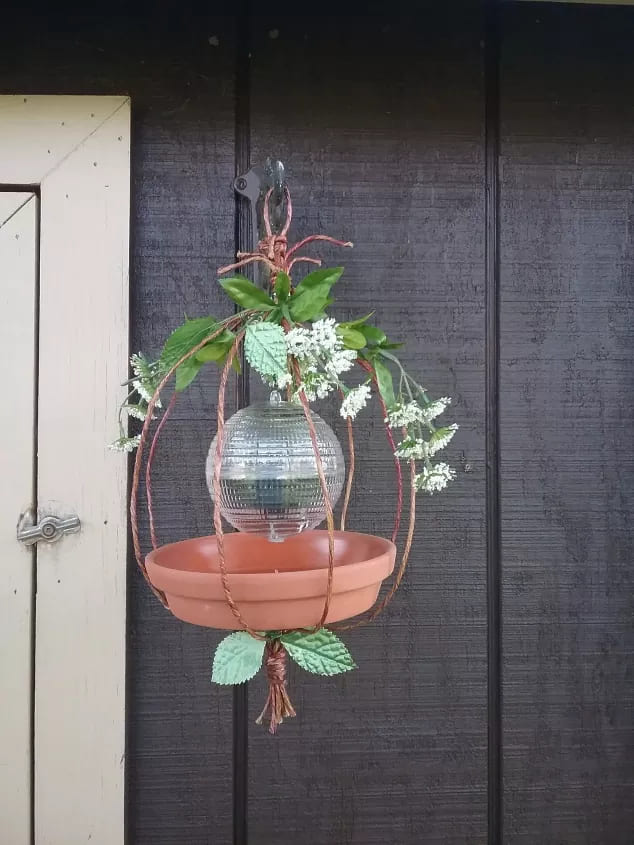
I love how it gently sways with the breeze and gives off a soft light that feels both whimsical and peaceful, perfect for hanging near a porch, fence, or shed.
Materials Needed:
- 1 wire hanging plant frame
- 1 solar globe light
- 1 terracotta saucer
- Twine
- Faux flowers (optional)
Step-by-step Guide:
Step 1: Place the terracotta saucer at the bottom of the wire frame and secure it using twine or wire.
Step 2: Position the solar globe in the center, making sure the solar panel is facing up.
Step 3: Decorate the wire frame with faux greenery or flowers for added charm.
#26. Upcycled Solar Chandelier
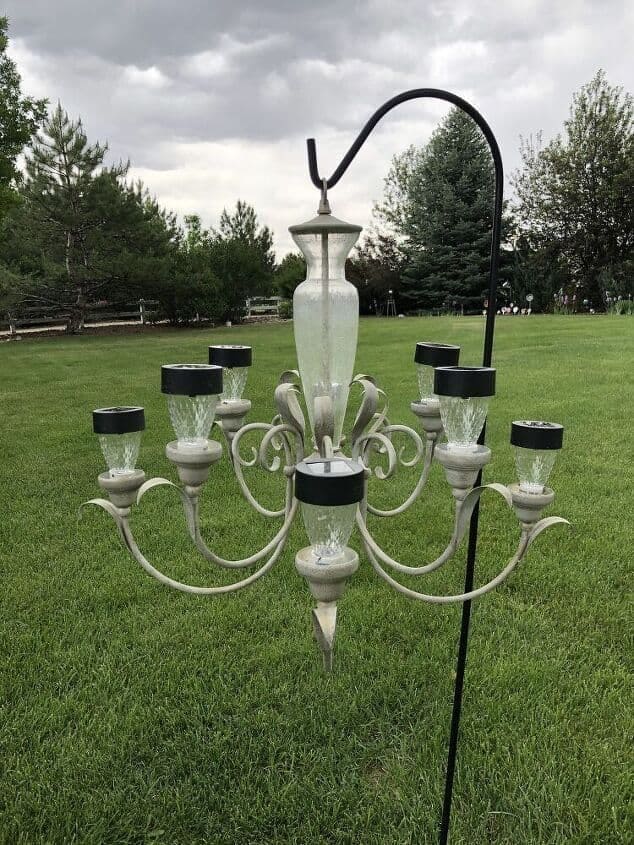
This show-stopping garden light blends elegance with eco-friendliness by turning an old chandelier into a solar-powered centerpiece.
Materials Needed:
- 1 old chandelier frame
- 6–8 solar garden lights
- Outdoor spray paint (optional)
- Epoxy
- Shepherd’s hook
Step-by-step Guide:
Step 1: Remove any old wiring and clean the chandelier thoroughly.
Step 2: Spray paint the frame if you want a fresh look, then let dry.
Step 3: Remove the stakes from the solar lights and glue each light head into the candle sockets.
