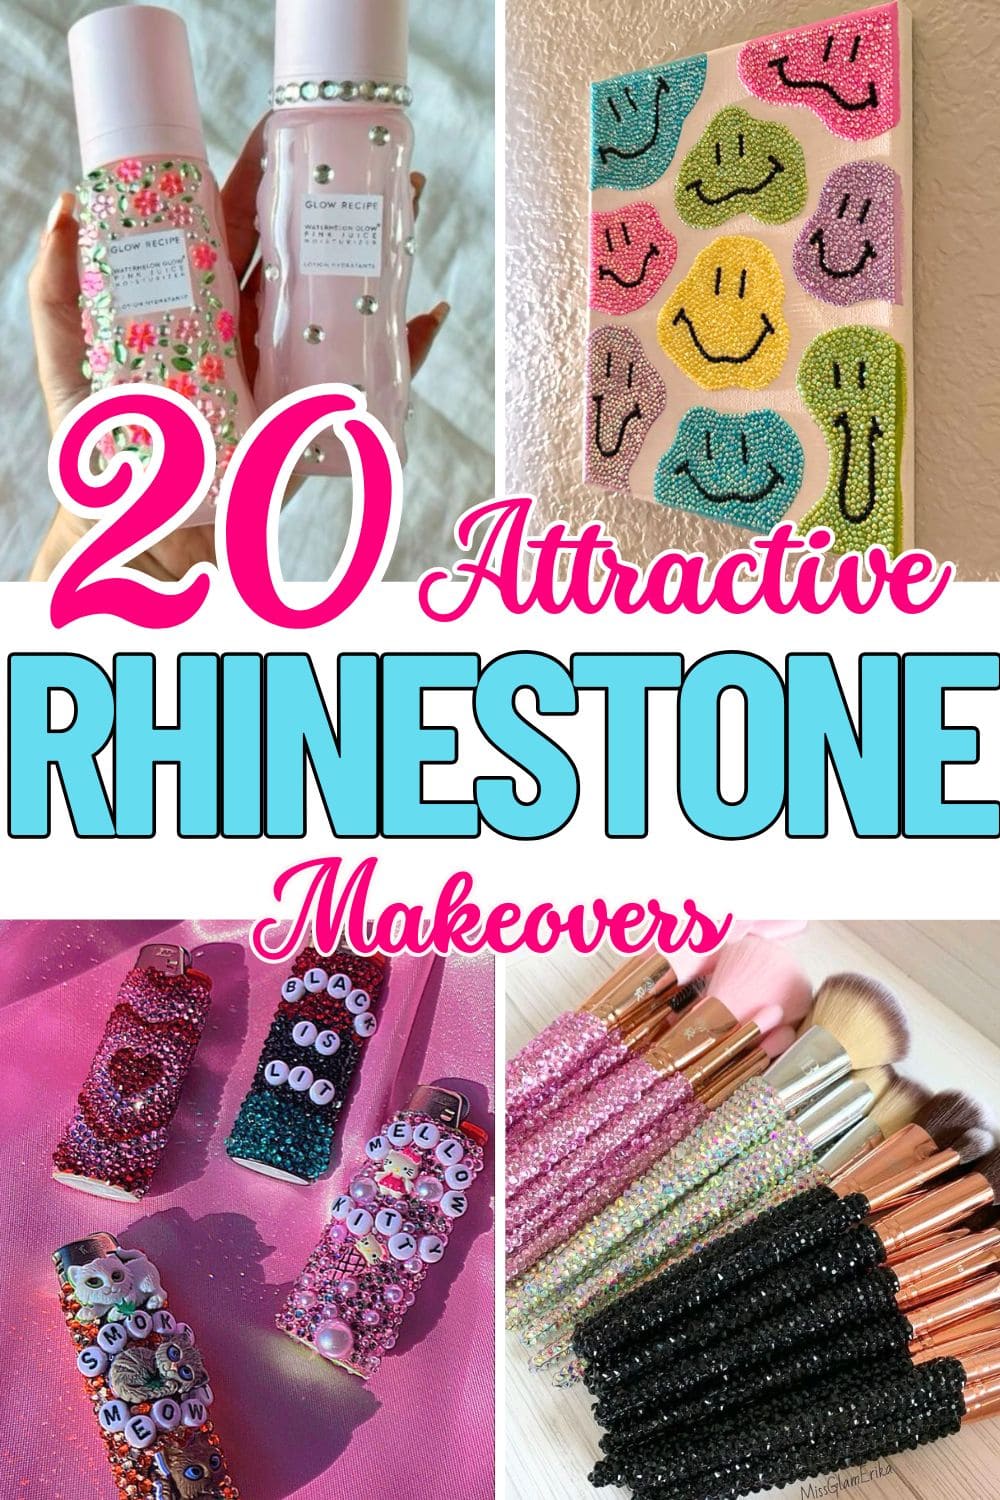
I believe you are irresistible about rhinestones. Maybe it’s the way they catch the light, or how they instantly make anything feel a little more playful, a little more extra. Whatever it is, adding rhinestones to your stuff just makes life more fun.
This collection of 20 DIY rhinestone makeovers is all about turning the ordinary into something that sparkles.
Whether you’re into full-on glitter mode or just want to give something a subtle shine, these ideas are easy, bold, and seriously satisfying.
#1. Extra AF Lighters That Deserve Their Own Playlist
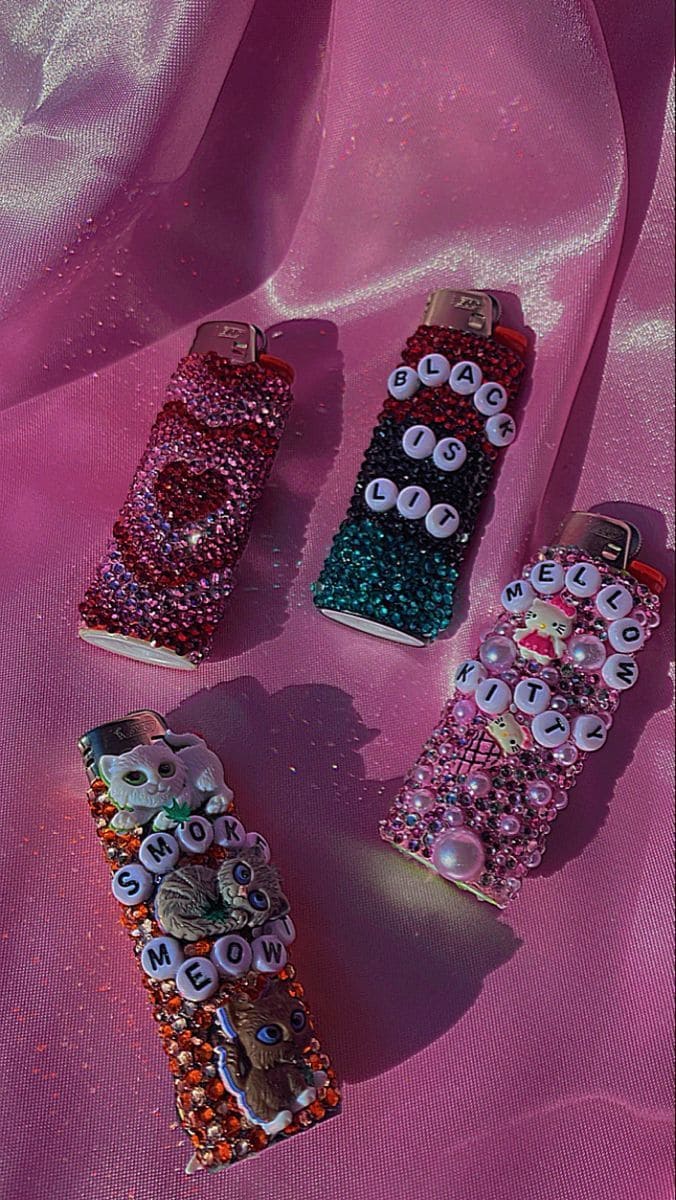
These aren’t just lighters, they’re tiny statements of who you are. Covered in vibrant rhinestones, sassy phrases, and chunky charms, each one is its own vibe.
Whether you’re into “Mellow Kitty” sweetness or “Smoke Meow” chaos, this is a perfect pocket-size DIY for when your creativity needs an outlet. It’s surprisingly therapeutic too, letting you build something that feels both rebellious and cute.
Materials Needed:
- Standard BIC lighter
- Flat-back rhinestones (3mm-5mm mixed sizes)
- Alphabet beads (approx. 6-10 per lighter)
- Mini embellishments (resin charms, pearls, plastic figures)
- Strong craft glue (E6000 works best)
- Tweezers and toothpicks
Step-by-step Guide:
Step 1: Wipe down your lighter with rubbing alcohol to remove oils or dust. This helps the glue grip better.
Step 2: Start from the bottom or top. Apply glue in small sections and press rhinestones one by one with tweezers. Then stick to a color gradient or go wild with random pops.
Step 3: Once the rhinestones are set, layer your alphabet beads on the flattest surface area. You can use a toothpick to apply glue underneath each bead and press down gently.
Step 4: Add fun embellishments like kitty charms, little toys, or resin icons.
#2. Pink Rhinestone Bow Canvas Wall Art
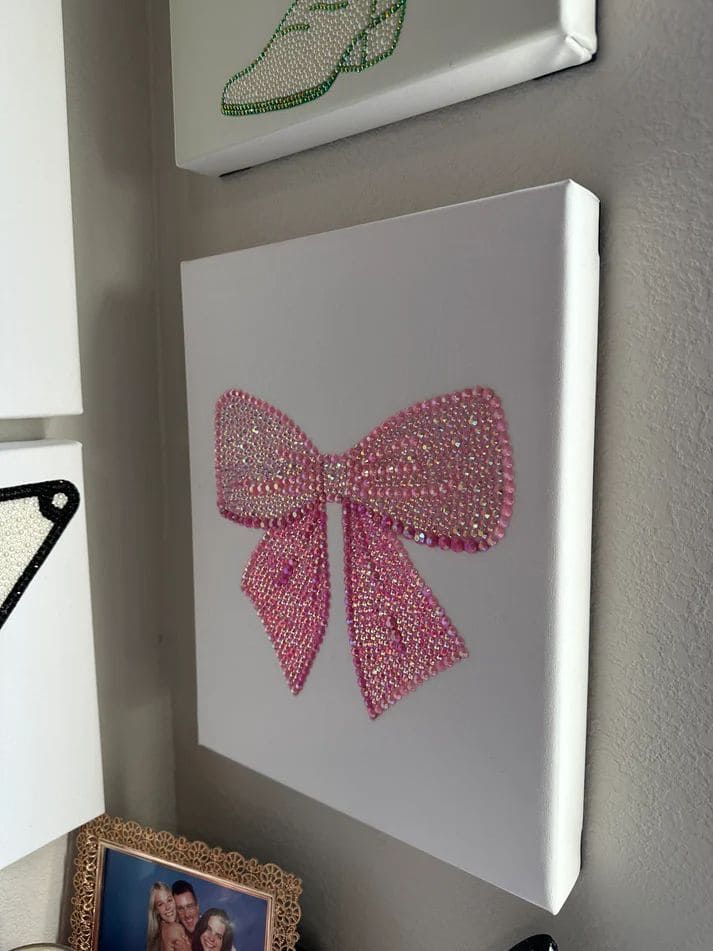
Wow, this sparkling pink bow canvas adds instant glam to any room. Whether you’re decorating a vanity corner, a girl’s bedroom, or an artsy gallery wall, this dazzling wall art combines simplicity with serious shimmer.
A carefully outlined bow, covered in rhinestones, turns a plain white canvas into a standout, handcrafted piece with texture, dimension, and charm.
Materials Needed:
- 1 blank white canvas (12×12 in size)
- Pink rhinestones (flat-back, mixed sizes)
- Strong adhesive (E6000)
- Pencil and eraser
- Tweezers
- Optional: pink marker
Step-by-Step Guide:
Step 1: Lightly sketch a bow shape onto your blank canvas using a pencil. If you prefer, trace from a printout or stencil to ensure symmetry.
Step 2: Optional, you can fill in the bow shape using a pink marker to add a base color. This helps cover gaps between rhinestones later.
Step 3: Working in small sections, apply glue along the outline and begin placing your rhinestones from the center outward. Then use smaller gems for the inner folds and larger ones for wider parts of the ribbon.
Step 4: Continue filling in the shape until the entire bow is covered in pink rhinestones. Let the canvas dry flat for 6-12 hours to prevent stones from sliding.
Step 5: Once dry, hang it or gift it. This sparkly bow canvas is a charming way to add a little luxury to any wall.
#3. Glam-Up Your Lip Therapy
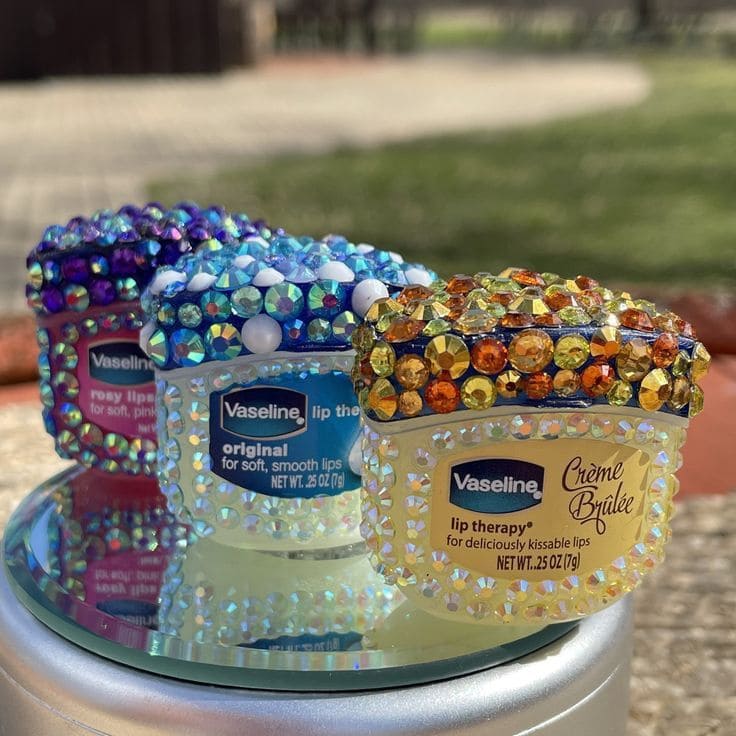
If you’ve ever wished your beauty essentials looked as fabulous as they felt, this is your sign. These mini Vaseline jars just got a glittering glow-up with rhinestones in rich hues, each one like a tiny treasure chest for your lips.
No matter how you go with fiery golds or cool-toned pearls and sapphires, decorating these lids is oddly satisfying and gives a luxe twist to something so everyday.
Materials Needed:
- 1 mini Vaseline jar (0.25 oz)
- Flat-back rhinestones in various colors and sizes (4mm-8mm mix works great)
- Small white pearls (optional)
- Strong glue (Gem-Tac or E6000)
- Tweezers
Step-by-step Guide:
Step 1: Clean the surface of the lid and jar gently with rubbing alcohol. Let it dry completely before applying anything.
Step 2: Plan your design by arranging the rhinestones on a flat surface. You can mix colors, layer tones, or go with a gradient.
Step 3: Using a toothpick or fine-tip applicator, dab glue onto a small section of the lid. Then carefully place rhinestones with tweezers or a wax pencil.
Step 4: Continue working in sections until the lid is covered. If you want extra sparkle, add stones to the jar itself, just not near the label or seal.
Step 5: Allow it to dry overnight. Once set, it’s ready to shine on your vanity or in your purse like a gem in disguise.
#4. Blooming Bottle Rhinestone DIY
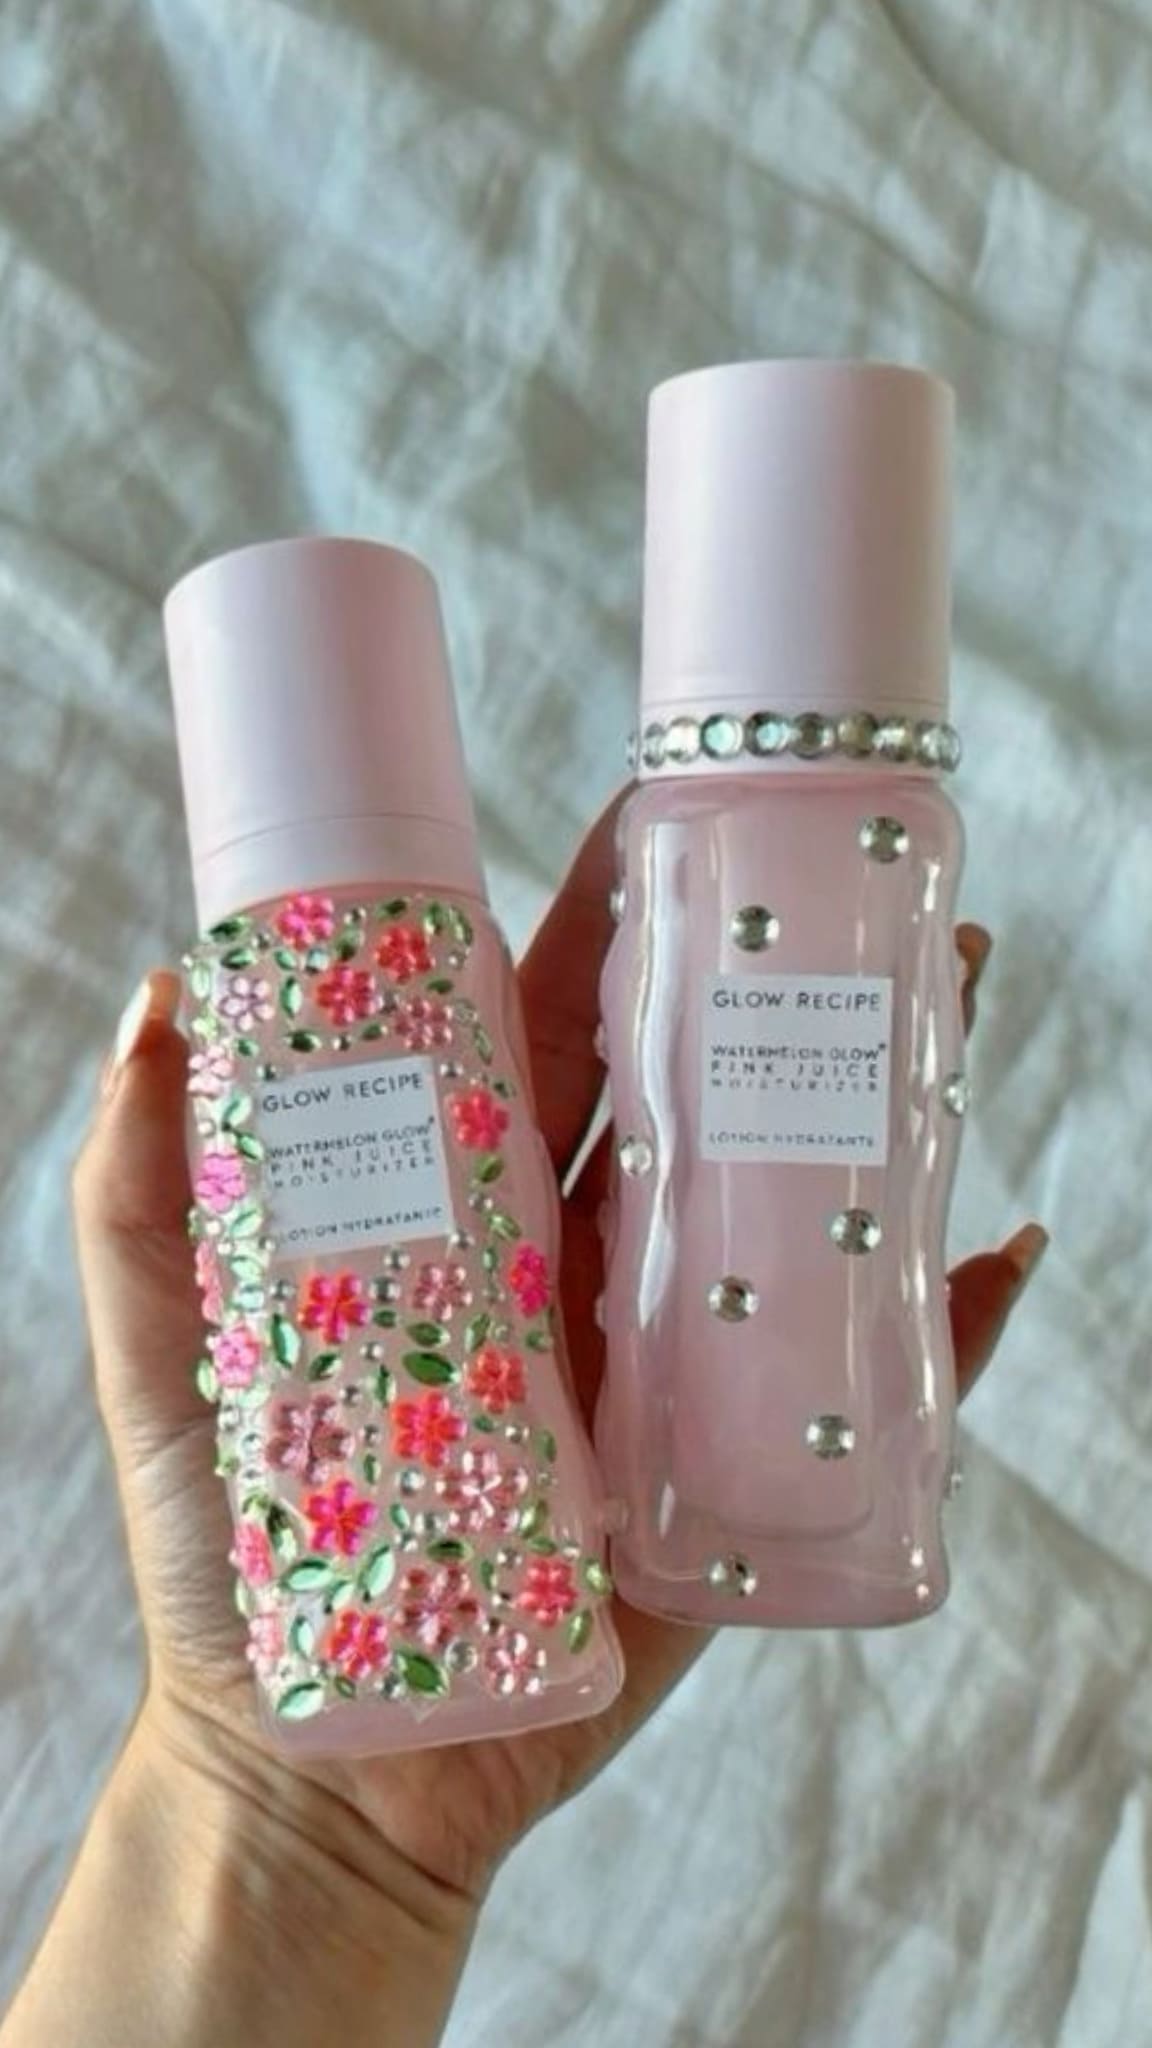
Who says your skincare routine can’t feel like a celebration? These glow recipe bottles got a dreamy floral glow-up using rhinestones and a bit of love.
One is adorned in a full-on garden of sparkly blossoms, while the other is sprinkled with sleek crystal dots for that quiet luxury look.
Moreover, you don’t need to be a professional crafter to pull this off, just a steady hand, a little patience, and your imagination. This project feels like decorating cupcakes except it’s your vanity you’ll be sweetening.
Materials Needed:
- 1 bottle of strong adhesive (E6000)
- Floral rhinestone stickers
- Round rhinestones (5mm or 8mm size, silver or iridescent)
- Tweezers
- Optional: toothpick
Step-by-step Guide:
Step 1: Start by wiping down the bottle with rubbing alcohol to remove any oils or residues, this helps the glue and stickers stick better.
Step 2: Plan your design. For a floral garden, mix flower-shaped rhinestones with leafy ones and scatter them organically. For the minimal look, space out the dots evenly.
Step 3: Apply glue in small sections and press on the rhinestones gently with tweezers or your fingers. If using stickers, press firmly to ensure they stay put.
Step 4: Let your masterpiece dry flat overnight before handling.
#5. Glam Grip Makeup Brushes
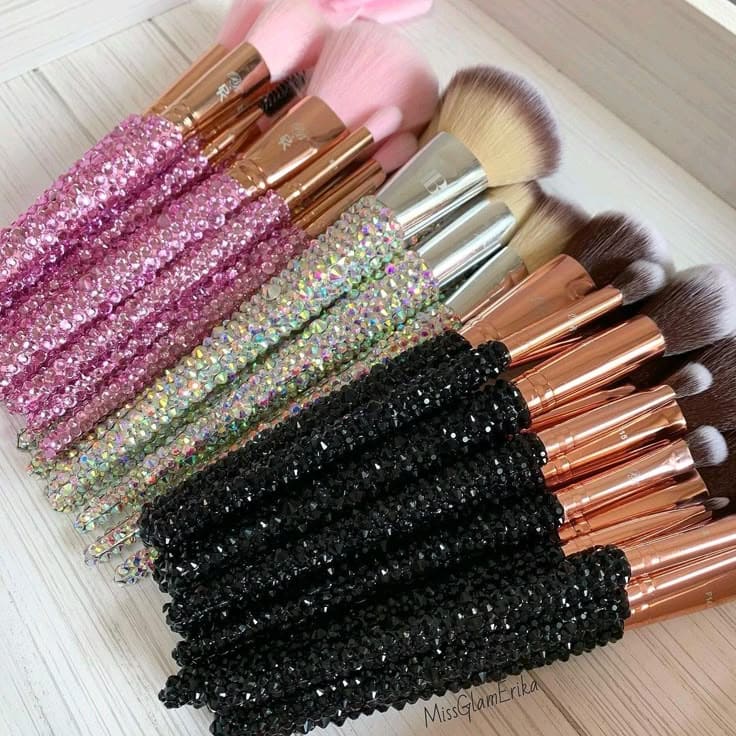
If you’ve ever felt your makeup routine needed a touch more drama, rhinestone-covered brushes might just be your new obsession. It’s about turning everyday tools into something that feels personal, extra, and fun to use.
Whether you’re blending bronzer or dusting highlighter, these jeweled handles make the whole ritual feel a little more fabulous. And yes, they’re surprisingly easy to make, no crafting degree required.
Materials Needed:
- Basic makeup brush set
- Flat-back rhinestones (approx. 3mm-5mm, your choice of color)
- Strong glue
- Tweezers
- Toothpick
- Rubbing alcohol and cotton pads
Step-by-step Guide:
Step 1: Wipe each brush handle with rubbing alcohol to remove oils or residue. Let them dry completely before decorating.
Step 2: Apply a small amount of glue to the base of the brush handle. Then work in sections so the glue doesn’t dry out before you place the rhinestones.
Step 3: Using tweezers, carefully press each rhinestone into the glue, row by row. You can go full glam with an all-over sparkle, or just cover half for a dipped effect.
Step 4: Let the brushes rest on a flat surface until the glue fully cures, at least 6 hours or overnight. You should avoid using them until they’re completely set.
#6. Evil Eye Bejeweled Stanley Cup Tumbler
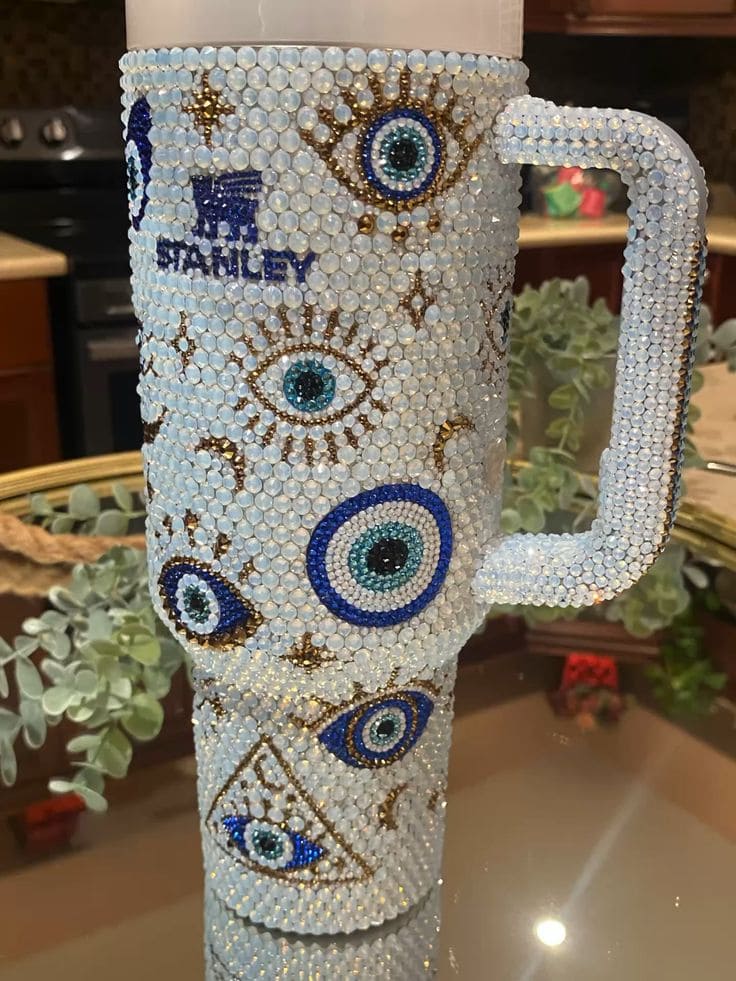
Interesting, this show-stopping tumbler takes hydration to haute couture levels. Covered in shimmering rhinestones and detailed with captivating evil eye designs in blues, golds, and whites, it’s more than a drink container.
Not only does it keep your drinks cold, but it also sparkles like no other on your desk, gym bench, or kitchen counter.
Materials Needed:
- 1 Stanley-style tumbler (40 oz)
- Mixed-size flat-back rhinestones (white opal, blue, teal, black, gold)
- Rhinestone glue (Gemtac or B-7000 recommended)
- Wax pencil
- Evil eye pattern printed
- Tweezers (optional)
- Small tray
- Sealer spray (optional)
Step-by-Step Guide:
Step 1: Clean the tumbler thoroughly to remove dust or oil.
Step 2: Using a pencil or light washable marker, sketch out the evil eye pattern around the cup, you use reference images for symmetry. Start with the largest center eyes, then scatter small ones and decorative stars or lines around them.
Step 3: Begin gluing rhinestones starting from the center of each evil eye. Then use black for the pupil, teal or turquoise for the iris, and white for the sclera. You also need to outline with gold rhinestones for dramatic effect.
Step 4: Fill in the background areas with solid white or opalescent rhinestones. Then work in small sections so the glue doesn’t dry before placing the stones.
Step 5: Let the tumbler cure for at least 24-48 hours. Now you apply sealer spray for extra hold if desired.
#7. Bikini Rhinestone Wall Art
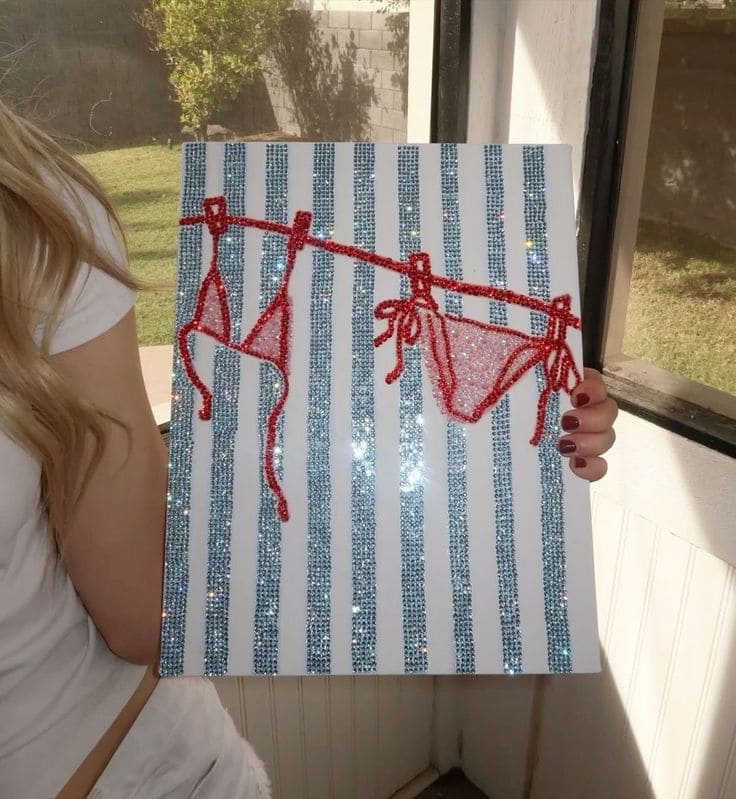
This cheeky, sun-kissed artwork captures a red rhinestone bikini strung across a glittering clothesline, all set against shimmering blue-and-white vertical stripes.
Specially, it’s playful, summery, and full of sparkle, perfect for beach lovers, pool party decor, or as a bold statement piece for your wall.
Materials Needed:
- 1 canvas (12×16 inchese)
- Red rhinestones
- Silver or iridescent rhinestones
- Blue rhinestones (medium size)
- Strong rhinestone glue (like Gemtac or B-7000)
- Pencil and ruler
- Tweezers
- Paper towel
Step-by-Step Guide:
Step 1: Lightly sketch vertical stripes on your canvas using a pencil and ruler. Then keep equal spacing between blue stripes and leave white space between each one.
Step 2: Glue blue rhinestones in straight vertical lines to create a striped background. Let dry completely before moving on to the bikini.
Step 3: Sketch a simple bikini top and bottom hanging from a line. You need to include the strings and loops to give it a natural hanging shape.
Step 4: Outline the bikini using red rhinestones. Then use slightly larger ones for the main lines and smaller ones for the ties.
Step 5: Fill in the bikini cups and bottoms with tiny silver or iridescent stones to give it a glittery fabric look. Then, finish the red rhinestone clothesline across the top to complete the look.
Step 6: Finally, allow the entire piece to cure flat overnight. Once dry, you can hang it up in your space and enjoy the sparkle.
#8. Hello Sparkle Kawaii Switchplate Cover
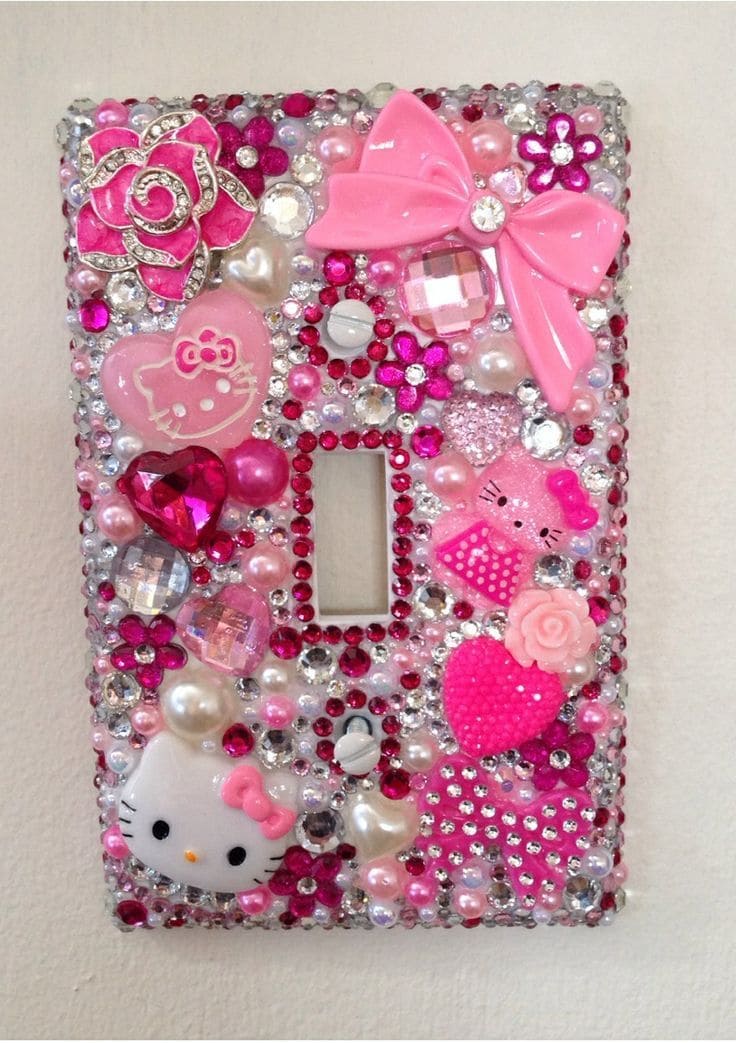
This switchplate is the ultimate tribute to everything sweet, sparkly, and unapologetically extra. Drenched in rhinestones, faux pearls, and adorable cabochons, it transforms a basic light switch into a full-blown bedazzled statement piece.
Moreover, this project is perfect for a kid’s room, glam vanity, or anyone embracing their inner kawaii queen.
Materials Needed:
- Standard plastic switchplate cover
- Assorted flatback rhinestones
- Cabochon charms (Hello Kitty, bows, hearts, flowers, cupcakes)
- Flatback faux pearls
- E6000 or industrial-strength glue
- Tweezers
- Optional: white or pink base paint
Step-by-Step Guide:
Step 1: Clean the surface of your switchplate with rubbing alcohol to remove any oil or dust. Let it dry completely.
Step 2: If you want a clean base color underneath, paint the cover and let it dry thoroughly before decorating.
Step 3: Start by placing the larger cabochons first—these will be your focal points. Use a strong adhesive to secure them.
Step 4: Once the big pieces are in place, begin filling in the gaps with smaller rhinestones and pearls. Work in small sections to keep glue from drying too fast.
Step 5: Outline the switch cutout and screw holes carefully with tiny gems for a polished look. Let the entire piece dry overnight.
#9. DIY Rhinestone Party Sunglasses
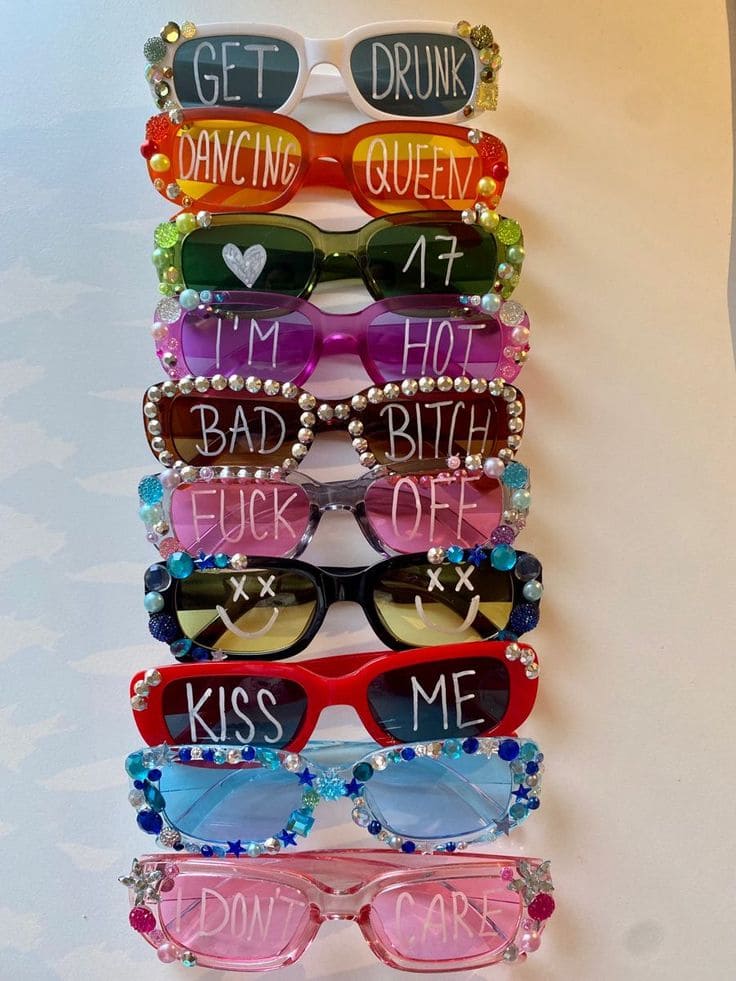
These sunglasses aren’t just for blocking UV rays, they’re for making bold statements.
Whether you’re channeling your inner “Dancing Queen” or letting the world know you “Don’t Care,” these party shades combine colorful lenses, playful lettering, and dazzling rhinestones into the ultimate bachelorette, birthday, or music festival accessory.
Plus, crafting them is a blast and wearing them is even better. Customize your own messages and bedazzle with abandon.
Materials Needed:
- 10 pairs of plastic sunglasses in various colors
- Acrylic paint pens (white or metallic work best)
- Rhinestones, pearls, mini charms
- Strong adhesive
- Tweezers
- Optional: Glitter glue, mini stickers, stars or beads
Step-by-Step Guide:
Step 1: Wipe your sunglasses clean so glue and paint adhere well. You plan out your phrases beforehand and short, fun words work best on the lenses.
Step 2: Using the paint pen, carefully write your message across the lenses. Let dry fully before decorating the frames.
Step 3: Add a dab of glue to each frame area where you want rhinestones or embellishments. Then use tweezers to set them in place. You also need to create patterns, clusters, or borders as you like.
Step 4: Let all glue dry for at least 2-4 hours. Once set, your shades are ready to shine at your next party or photo op.
#10. Pink Luxe Henny Rhinestone Bottle Display
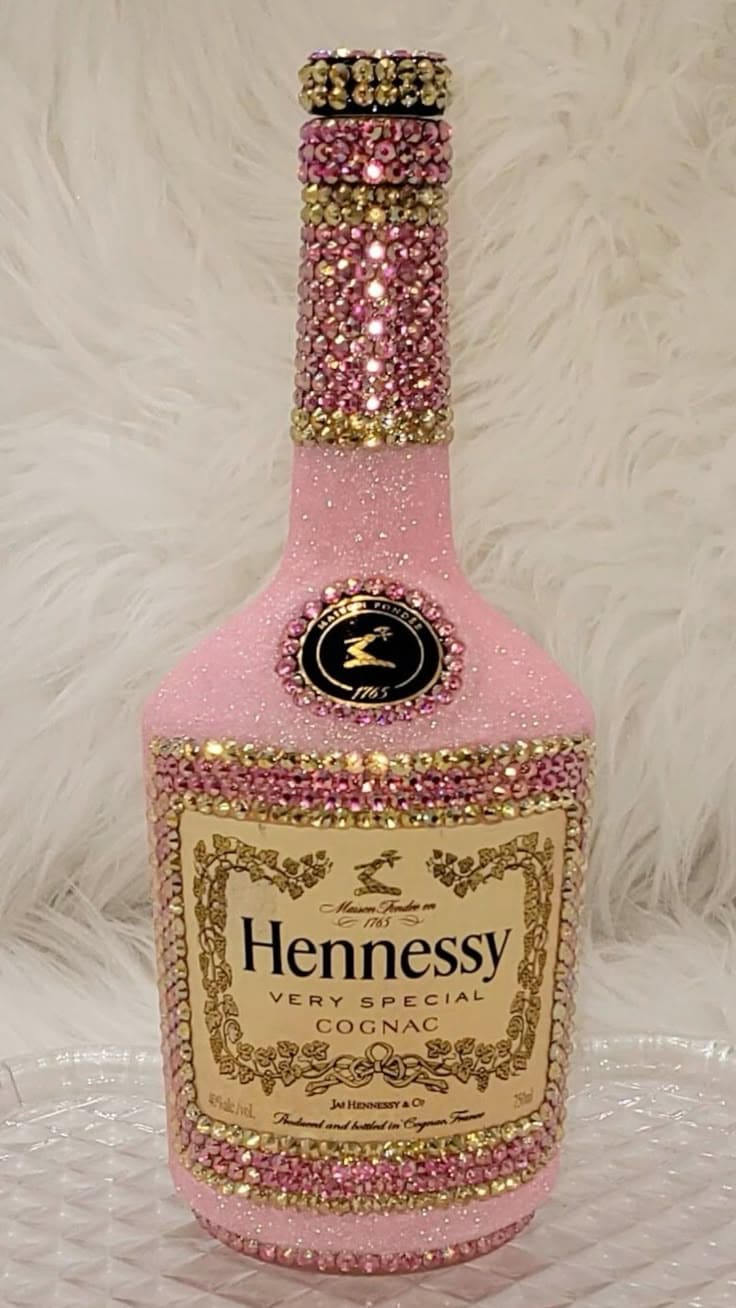
This isn’t just a bottle, it’s a bold celebration of glitz and glam. Coated in sparkling baby pink and wrapped in rows of golden and rose rhinestones, this Hennessy bottle has transformed into a luxurious centerpiece.
No matter how it’s a bar cart statement, a dazzling party prop, or an unforgettable gift, this piece demands attention with every shimmer. Classy with a little sass, just like its muse.
Materials Needed:
- Empty or full Hennessy bottle
- Extra-fine pink glitter
- Flatback rhinestones: metallic gold, rose pink, and iridescent pink
- Strong adhesive
- Mod Podge
- Paintbrush
- Rhinestone picker tool or wax pencil
- Small tray
Step-by-Step Guide:
Step 1: Start by wiping the bottle down with alcohol to remove oils. If using a full bottle, be careful around the label and cap.
Step 2: Using Mod Podge and a sponge brush, coat the body of the bottle in sections and immediately sprinkle pink glitter evenly. Allow it to dry, then repeat for a second coat for better coverage. Shake off excess.
Step 3: Once the glitter is dry and sealed, begin adding rhinestones. You should start from the top of the neck and work down in neat rows. You can use alternating colors like rose pink and gold for a glamorous layered effect.
Step 4: Outline the label, logo emblem, and bottle base with fine rhinestones. This adds depth and frames the sparkle beautifully. You should use smaller stones around tight curves.
Step 5: Let the entire bottle dry for at least 24 hours. Once set, gently wipe with a dry soft cloth to remove any loose glitter.
#11. Rhinestone Lipstick Sculptures
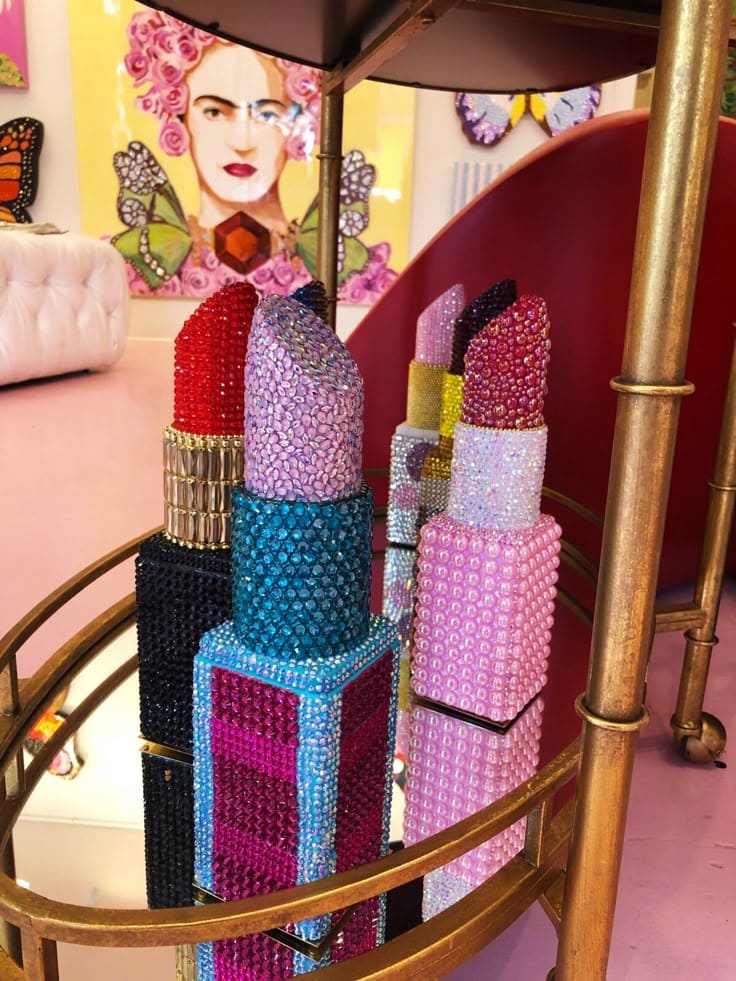
These oversized lipstick sculptures are an unapologetic celebration of glamour. Each piece is hand-embellished with sparkling rhinestones and faux pearls in electric pinks, shimmering reds, midnight blacks, and icy blues.
Bonus, standing tall and proud, they look like high-fashion totems on a mirrored altar, equal parts bold art and playful beauty tribute. Perfect for salon decor, vanity displays, or anyone who believes makeup is magic.
Materials Needed:
- Foam or wood block in lipstick shape (12-18 inches tall)
- Rhinestones in varying colors and sizes (flat-back)
- Faux pearls (optional)
- Strong adhesive
- Tweezers
- Acrylic paint
- Clear sealer (optional)
Step-by-Step Guide:
Step 1: Shape or purchase your lipstick base. If creating from foam, carve the lipstick bullet shape and flat sides for the case. Sand smooth.
Step 2: Paint the base in colors matching the rhinestone palette. This helps any gaps blend and adds vibrance.
Step 3: Start with the lipstick bullet (top rounded part). Then you apply glue in small sections and carefully press rhinestones row by row.
Step 4: Move to the casing. Use color-blocking with bold rhinestone colors like black, blue, or hot pink. For contrast, add gold or silver rhinestones for the twist section or decorative bands.
Step 5: Finish the base and bottom edges. Let dry fully, then optionally spray with a clear gloss sealant for extra protection.
#12. Blinged-Out Fanta Can Decor
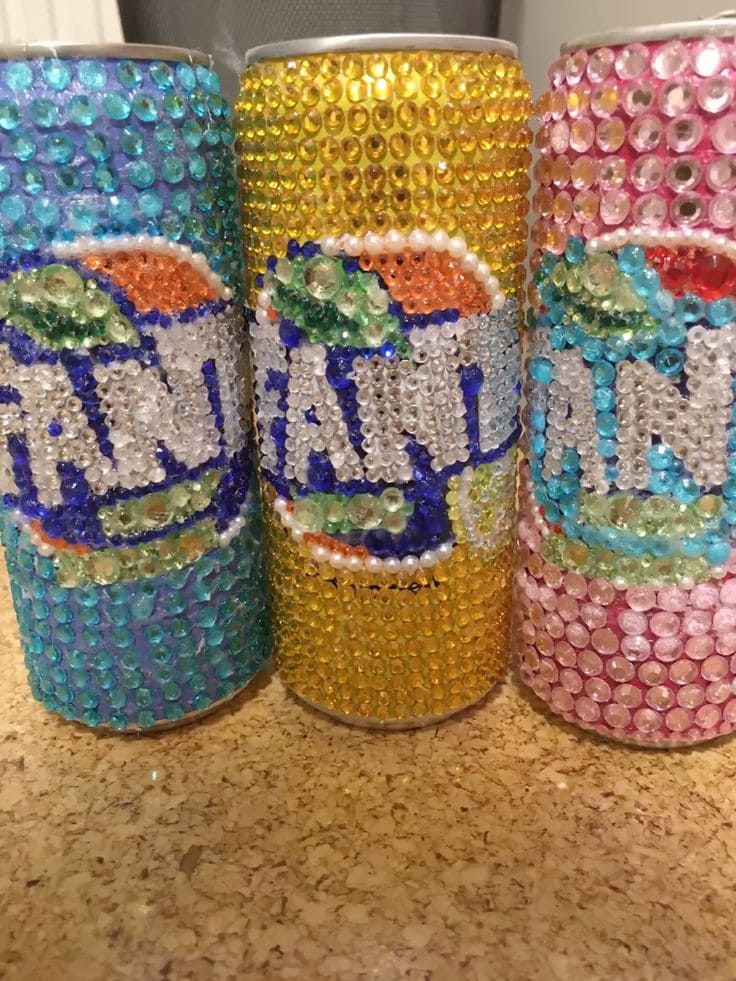
How about turning empty soda cans into dazzling statement pieces with a full rhinestone makeover? These colorful Fanta cans aren’t just eye-catching, they’re a brilliant way to upcycle and add personality to your desk, vanity, or party decor.
I believe if you’re team Grape, Pineapple, or Strawberry, these sparkly cans can be bursting with charm (and a whole lot of glam).
Materials Needed:
- Empty soda cans
- Flat-back rhinestones in multiple sizes and colors
- Alphabet or pearl accents (optional)
- Strong adhesive glue (E6000 works best)
- Tweezers
- Clear sealant spray (optional)
Step-by-Step Guide:
Step 1: Rinse and dry your soda can thoroughly. You now remove the label or wipe down the surface to prep for decoration.
Step 2: Begin by outlining the Fanta logo using coordinating rhinestone colors. Then use tweezers to place the pieces precisely. It’s easiest to start with larger sections like the white and blue letters first.
Step 3: Fill in the background color of the can using consistent rhinestone shades like blue for Grape, yellow for Pineapple, pink for Strawberry, etc.
Step 4: Add detail to the fruit elements (orange slice, green leaves) using smaller accent gems or pearls.
Step 5: Let dry completely overnight. Optionally, you can spray a light sealant over the can to help the gems stay in place long term.
#13. Blinged-Out Roku Remote Makeover
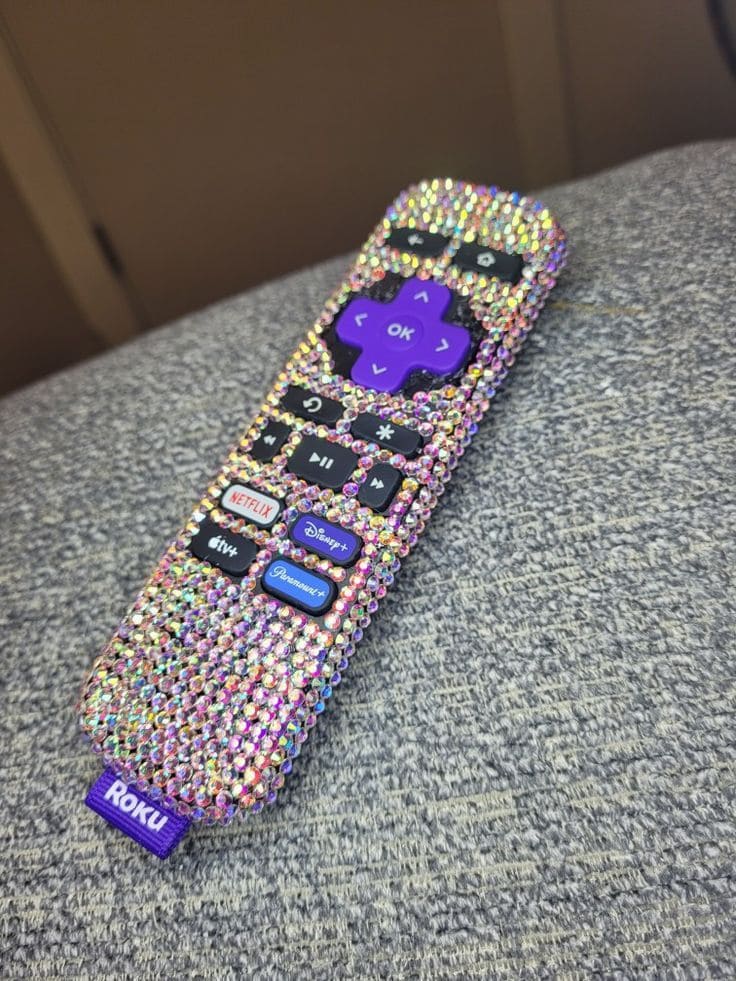
It’s great to turn your plain Roku remote into a dazzling centerpiece of your living room with this easy rhinestone DIY. This project is perfect if you love a little sparkle and want to add a personal, glamorous touch to your everyday gadgets.
Every time you reach for your remote, it’ll feel like you’re holding a mini treasure.
Not only is this makeover fun and stylish, but it also makes it easier to find your remote when it inevitably slips between the couch cushions.
Materials Needed:
- 1 Roku remote
- ~800-1000 flatback rhinestones (3mm-5mm, multi-faceted or AB finish)
- Strong craft adhesive
- Tweezers
- Rubbing alcohol + cotton pad
- Small dish or tray
- Optional: painter’s tape
Step-by-Step Guide:
Step 1: Clean the surface of your Roku remote using rubbing alcohol and a cotton pad. You need to make sure it’s dry before moving to the next step.
Step 2: Sort your rhinestones by color or size if using a mixed pack. This helps you plan the layout or create a gradient effect.
Step 3: Begin from the back or a less visible edge. Apply a small section of adhesive, then use your wax pencil or tweezers to place rhinestones one by one. You now press gently for better adhesion.
Step 4: Continue covering the surface of the remote, leaving space around the buttons unless you want to glam those up too. If needed, use painter’s tape to block off functional buttons.
Step 5: Let it cure for 12–24 hours. Once fully dry, admire your sparkly, customized remote!
#14. Obsessed Kiss Mirror by BlingedBySteph
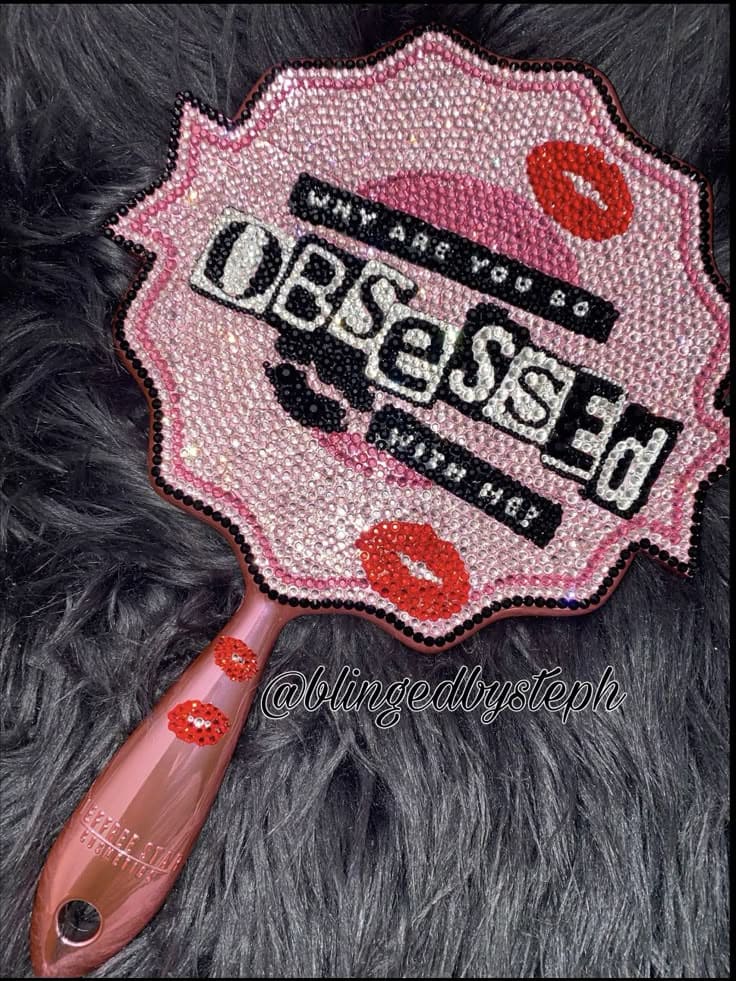
Featuring the bold, sassy phrase “Why Are You So Obsessed With Me?” in crystal-clear rhinestone typography, this piece is dripping with attitude and sparkle.
Complete with lip print accents and a soft pink handle decked out in more kisses, it’s a fierce blend of glam, pop culture, and personal flair. It turns any mirror moment into a mini performance.
Materials Needed:
- 1 hand mirror
- Flatback rhinestones in pink, red, black, white, and silver (varied sizes)
- Strong adhesive
- Wax pencil
- Small detail paintbrush (optional)
- Tweezers (optional)
- Printed or stenciled design
Step-by-Step Guide:
Step 1: Clean the surface of the mirror thoroughly with a soft cloth to remove any oils or dust.
Step 2: If needed, lightly sketch your text and lip layout using a pencil or use a stencil to mark placement for accuracy.
Step 3: Apply a thin layer of glue in small sections, starting with the text area. Then carefully place rhinestones using your picker tool, following the shape and contrast of each letter.
Step 4: Move on to the lips and background next. Start from the inner areas and work outward to maintain even spacing. For lips, you can use bold red rhinestones and smaller black ones for the outline.
Step 5: Fill in the rest of the design with pink and light-toned gems to create the full backdrop, working in tight rows to ensure maximum sparkle.
Step 6: Finish by decorating the handle with a few kiss-print details using red stones. Now you allow everything to cure for 24 hours.
#15. Rhinestone Xbox Controller
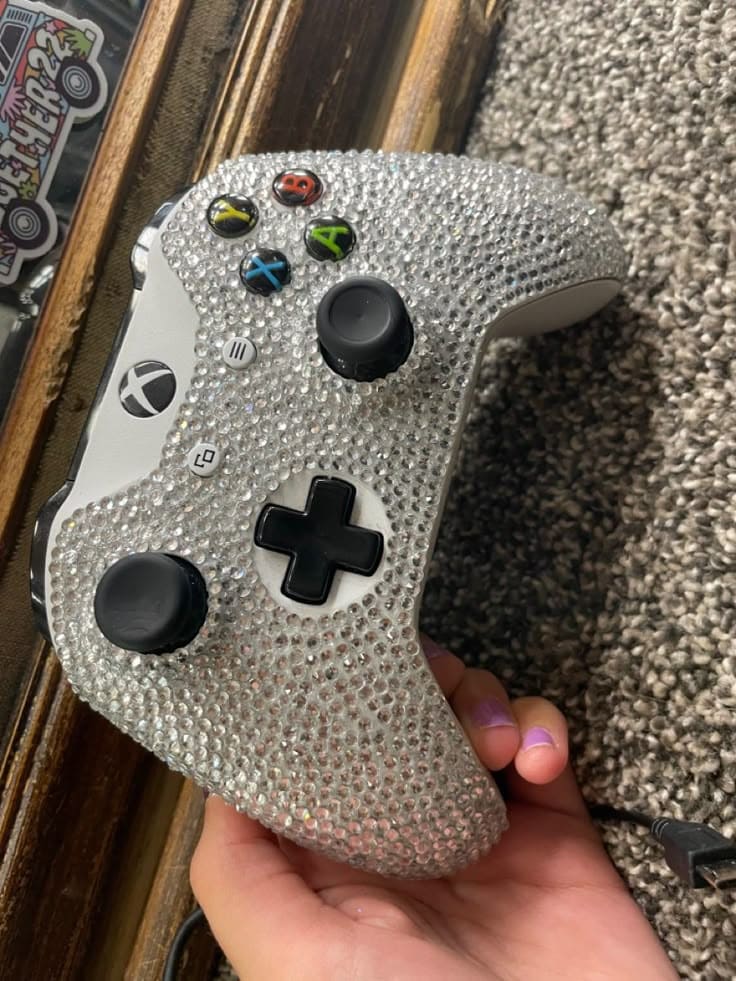
Gaming just got glamorous. This blinged-out Xbox controller combines tech and sparkle in the most fabulous way possible. It’s perfect for gamers who like their kill streaks with a side of shimmer.
Whether it’s for a statement piece, Instagram-worthy setup, or just pure joy, this DIY adds serious style points to your console collection.
Materials Needed:
- Xbox controller (white or light-colored works best)
- Silver or iridescent flat-back rhinestones (3mm-4mm size)
- Strong adhesive
- Tweezers
- Rubbing alcohol + cotton pads
- Optional: clear sealant spray
Step-by-Step Guide:
Step 1: Wipe down the controller using rubbing alcohol to remove oils, dust, and grime.
Step 2: Start with one section, as most people begin at the grips or center and carefully add glue in small sections. Then use tweezers to place rhinestones snugly side by side for full coverage.
Step 3: Continue around the front shell of the controller, being mindful not to cover buttons, thumbsticks, or trigger areas.
Step 4: If desired, use a finer-size gem to outline the Xbox logo or button edges for extra definition. Let the controller dry completely for 24 hours.
Step 5: (Optional) Lightly mist with clear sealant to protect from hand oils or light wear but avoid the button areas!
#16. Kawaii Decorated Pill Bottles
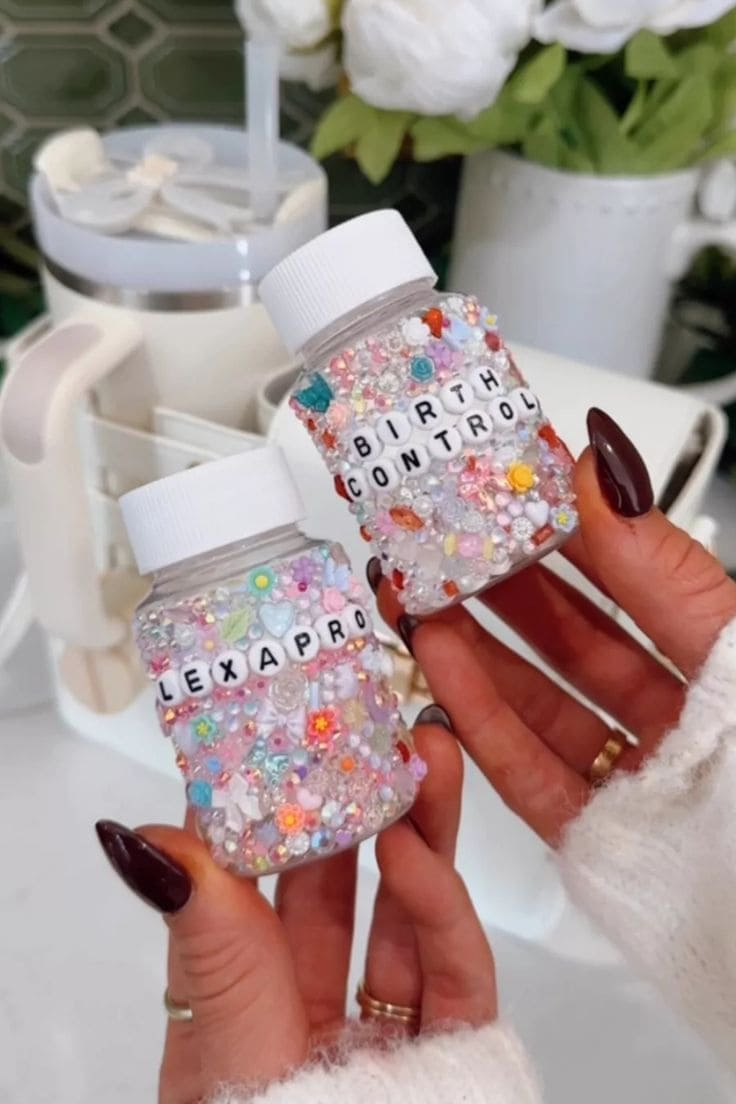
Who said medicine bottles have to be boring? These cutely decorated Lexapro and Birth Control containers turn everyday items into cheerful, aesthetic accessories you’ll actually want to reach for.
With a pastel explosion of beads, gems, and tiny flowers, these bottles make self-care look like self-expression.
Materials Needed:
- Empty or full plastic pill bottles
- Flat-back embellishments: hearts, flowers, stars, pearls, rhinestones
- Alphabet bead letters
- Strong craft glue
- Tweezers
- Toothpick
Step-by-Step Guide:
Step 1: Clean and dry the pill bottle thoroughly. Peel off any labels if you’re using an empty container or apply decorations over existing labels if appropriate.
Step 2: Start by gluing down the alphabet beads to spell out names like “LEXAPRO” or “BIRTH CONTROL.” You should center them for best visual impact.
Step 3: Apply a thin layer of glue to small sections of the bottle, working in zones to prevent the glue from drying too fast.
Step 4: Use tweezers or a picker tool to carefully place flat-back embellishments, start with larger pieces and fill in the gaps with tiny pearls, rhinestones, and flowers.
Step 5: Let dry for several hours or overnight before handling. You also should avoid wet environments unless sealed with a resin topcoat.
#17. Crystal Pop Princess Crocs
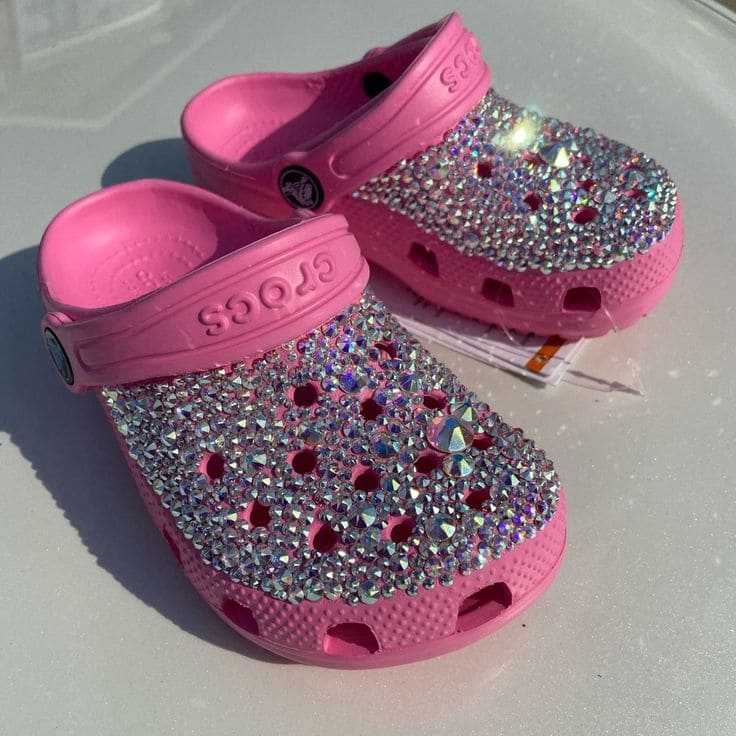
How about turning your everyday Crocs into a sparkling fashion statement with this rhinestone makeover?
These bubblegum pink Crocs are covered in high-shine AB (aurora borealis) crystals that catch the light with every step.
This project is perfect for glam-loving kids or bold adults who love to shine from the toes up. They’re comfy, cute, and completely unforgettable.
Materials Needed:
- 1 pair of Crocs
- Flatback AB rhinestones (sizes SS16-SS30)
- Industrial-strength adhesive
- Rhinestone picker tool
- Small tray
- Cotton swabs and alcohol
- Optional: Sealer spray
Step-by-Step Guide:
Step 1: Clean the tops of the Crocs with rubbing alcohol to remove any dirt or oil.
Step 2: Starting from the toe area, apply a thin layer of adhesive to a small section at a time. Avoid covering the holes if you want to keep them functional.
Step 3: Use your rhinestone picker to place each rhinestone carefully into the adhesive. Mix sizes as you go to create a dimensional, gemstone-like effect.
Step 4: Continue covering the surface area in small sections until you’ve completed both shoes. Avoid touching the glue too much to prevent clouding or smudging.
Step 5: Let the Crocs sit undisturbed for 24-48 hours to ensure full curing.
#18. Ace of Hearts Pearl Canvas Art
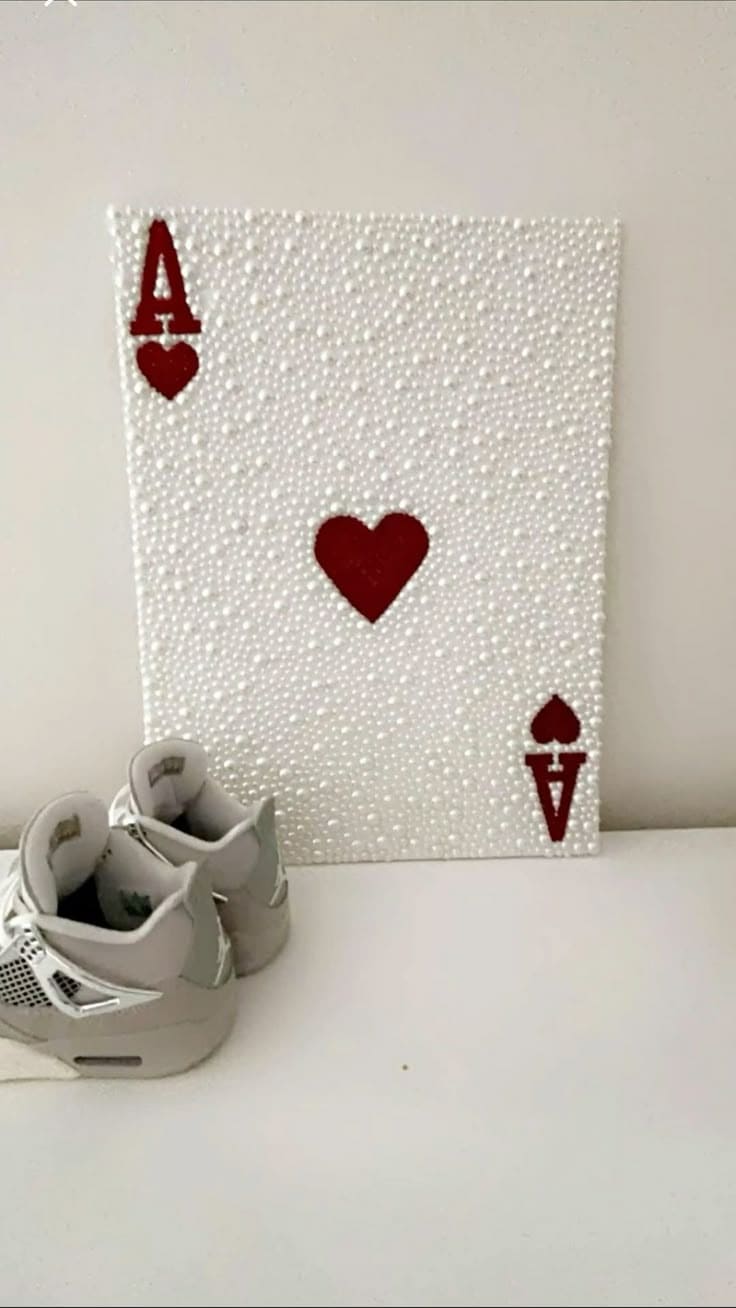
This stunning Ace of Hearts canvas transforms a classic playing card into a glamorous piece of wall art.
Covered in shimmering white pearls and finished with deep red accents, it’s bold yet romantic. Ideal for bedrooms, dressing rooms, or any space that needs a touch of chic casino glamour with a soft, feminine edge.
Materials Needed:
- 1 blank white canvas (12″x16″)
- Half pearls in assorted sizes
- Strong craft glue
- Red acrylic paint
- Paintbrush
- Playing card (Ace of Hearts)
- Tweezers (optional)
- Pencil
Step-by-Step Guide:
Step 1: Lightly sketch the Ace of Hearts layout on the canvas using a pencil. Mark where the large heart in the center and the smaller suits/symbols will go in each corner.
Step 2: Paint the large heart and the two smaller “A” and heart symbols using red acrylic paint. Let it dry completely. You may need a second coat for boldness.
Step 3: Begin attaching pearls around the symbols, starting from the edges and working your way out. Then mix small and medium pearl sizes for dimension and texture. Use strong glue and press each pearl down firmly.
Step 4: Continue covering the entire canvas with pearls, making sure they’re aligned tightly for a seamless look. You can use tweezers for tricky edges or to fill in gaps.
Step 5: Let the canvas dry flat for 24 hours. Once set, your Ace of Hearts glam art is ready to hang or lean against the wall.
#19. Rhinestone Glam Soccer Ball Display
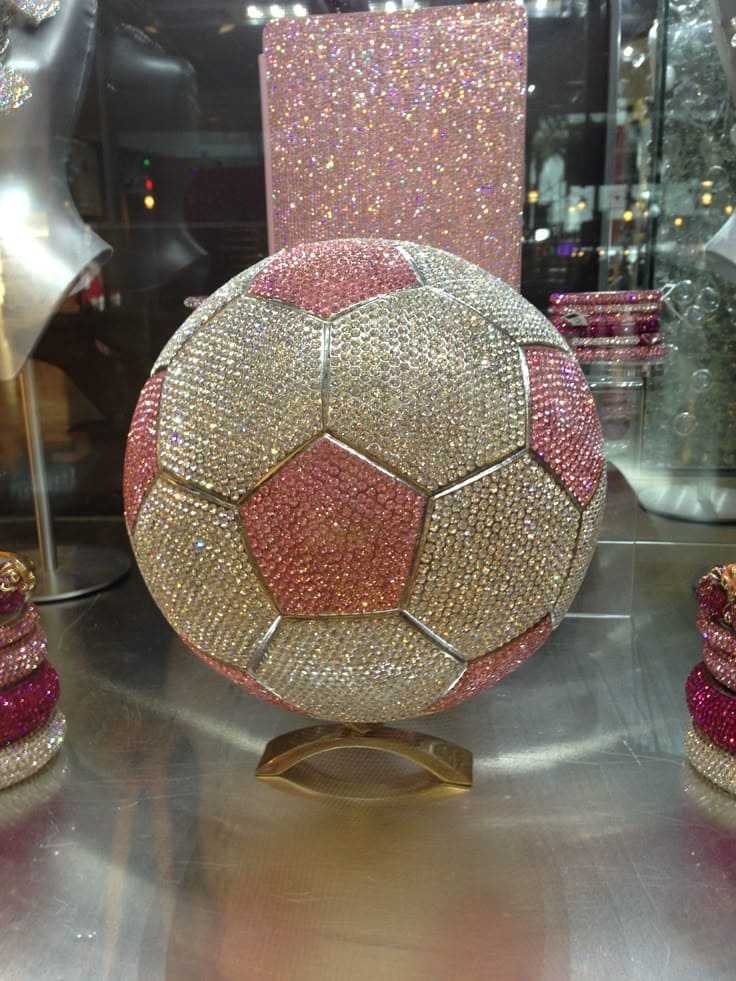
This isn’t just a soccer ball, it’s a full-blown celebration of sparkle and flair. Perfect for display shelves, sports-themed glam rooms, or as a one-of-a-kind gift, this rhinestone soccer ball transforms a sporty icon into a radiant showpiece.
The alternating pink and silver panels shimmer under light like a trophy made for a queen.
If you’ve got a love for both bedazzling and the beautiful game, this DIY hits the sweet spot between passion and polish.
Materials Needed:
- 1 standard soccer ball
- 3000-5000 flatback rhinestones (3mm-5mm; pink and silver)
- Industrial-strength adhesive
- Wax pencil
- Ruler and chalk (optional)
- Sturdy ball stand (optional)
Step-by-Step Guide:
Step 1: Make sure the surface of your soccer ball is clean and dry. If textured, lightly sand glossy areas to help glue adhere better.
Step 2: Decide on your color pattern. Use tape or chalk to section off alternating pentagons or hexagons if you want a neat layout like the original ball shape.
Step 3: Working one panel at a time, apply adhesive and begin placing rhinestones with a picker tool. You should start at the center of each panel and work outward for even coverage.
Step 4: Repeat for each section, alternating between pink and silver rhinestones. Then allow each section to dry for 30-60 minutes before moving to the next to avoid smudging.
Step 5: Once complete, let the entire ball cure for 24-48 hours.
#20. Sparkle Blobs Smiley Face Canvas Art
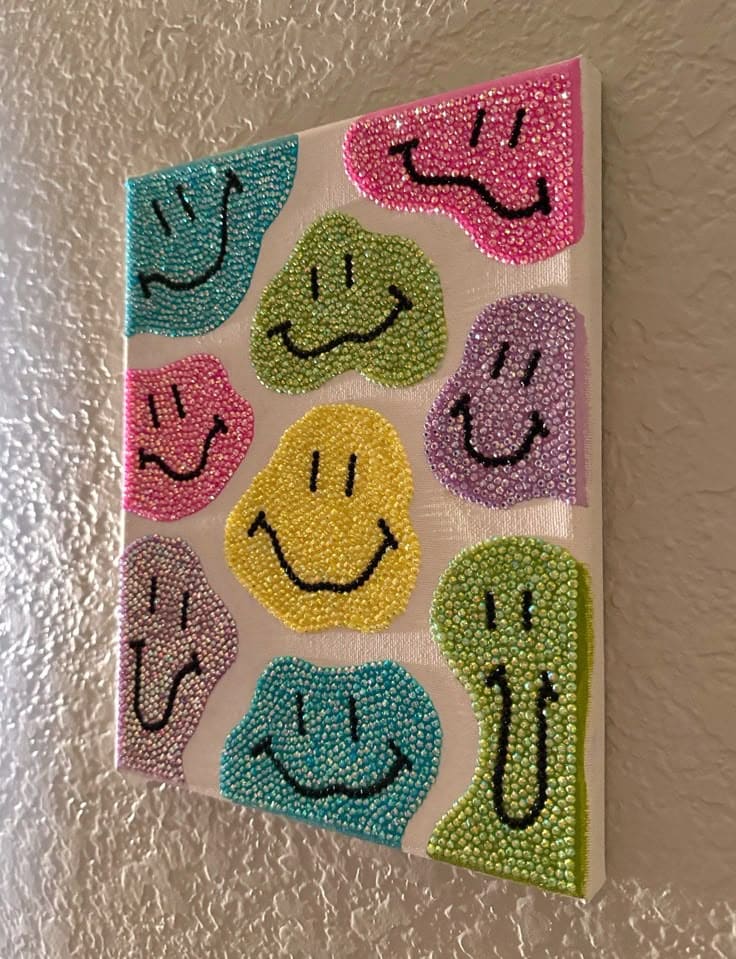
This quirky rhinestone canvas is pure serotonin. Each colorful blob comes to life with a goofy smile and a vibrant personality, sparkling from every angle.
Plus, the mismatched faces add a touch of chaos and joy, like a glittery mood board straight from your inner child. Whether hung in a dorm, a craft room, or a bright hallway, it’s a bold reminder not to take life too seriously.
Materials Needed:
- 1 blank canvas (8×10 inches)
- Rhinestones or flatback gems
- Black seed beads
- Strong adhesive
- Tweezers
- Pencil
- Paint (optional)
Step-by-Step Guide:
Step 1: Sketch out 9-10 irregular blob shapes across the canvas. Make sure they vary in shape and size for a playful look.
Step 2: Paint each blob with a base color that matches your rhinestones (optional but recommended).
Step 3: Begin gluing rhinestones within each blob outline. You should work one color at a time, applying glue in small sections and carefully placing each gem.
Step 4: Once blobs are filled, use black seed beads or a fine brush with black paint to create fun smiley faces. You can vary the expressions slightly for personality.
Step 5: Let everything dry thoroughly before hanging or displaying.
