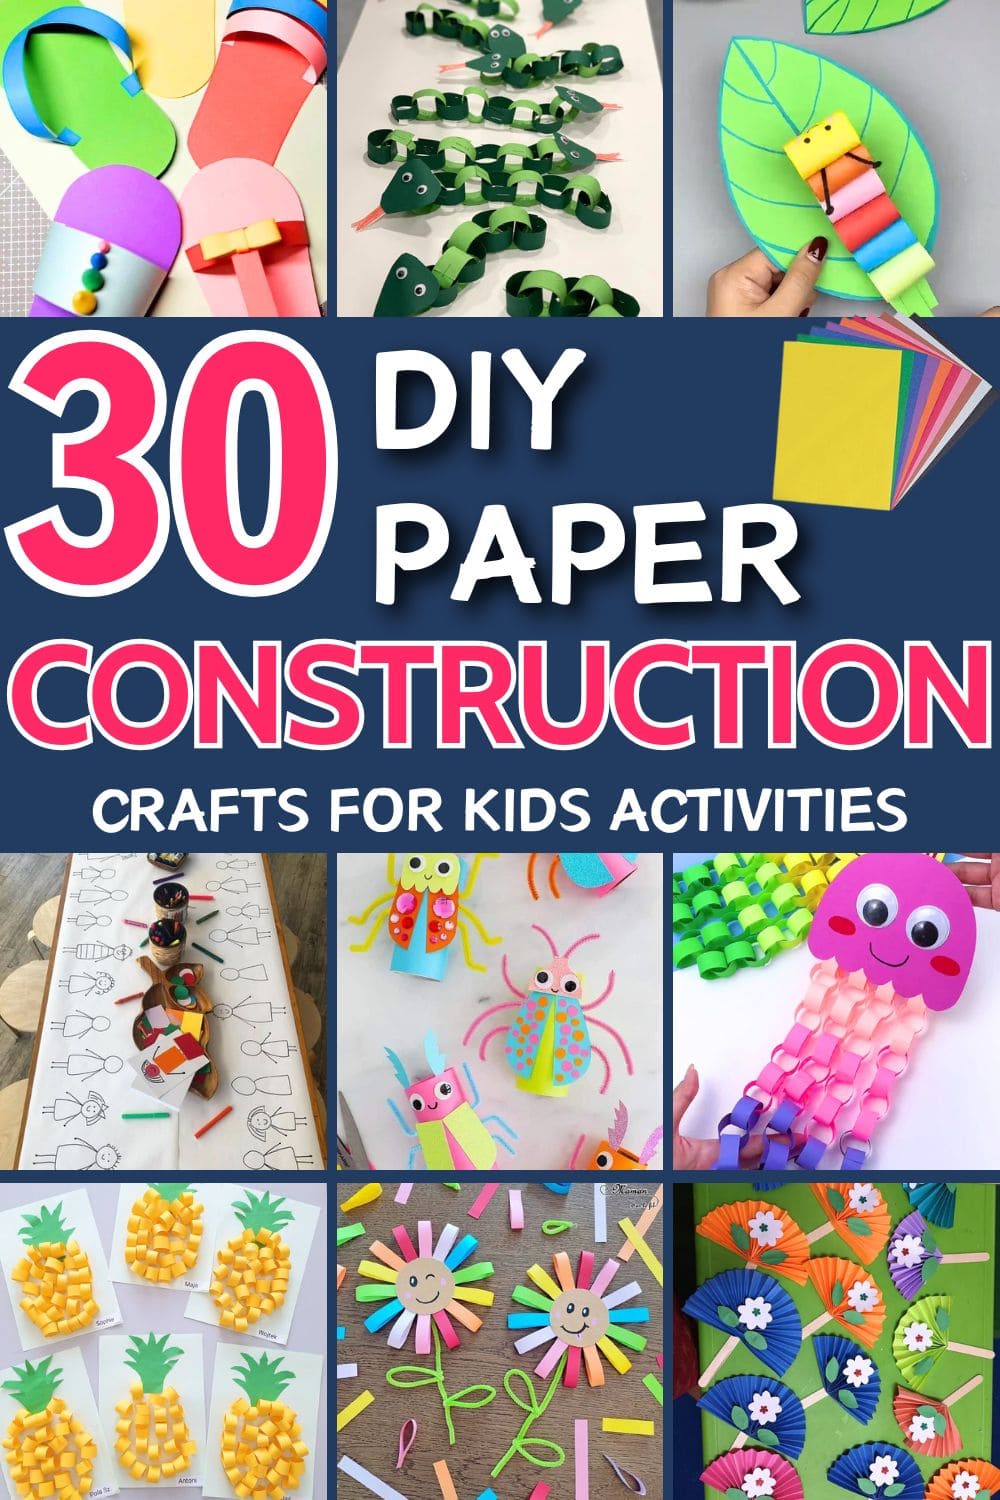
When summer hits and school’s out, the excitement quickly turns into a familiar phrase “I’m bored!” With so much free time and not enough structured activities, kids can end up restless or glued to screens.
But there’s a simple, colorful fix already sitting in your craft drawer: construction paper. Affordable, mess-free, and bursting with possibilities, it’s the perfect way to turn those long, lazy afternoons into moments of imagination and joy.
Whether it’s silly animals, cheerful flowers, or creative decorations, these 30 cute and easy construction paper crafts will keep little hands busy and little minds inspired.
#1. Smiley Paper Loop Flowers
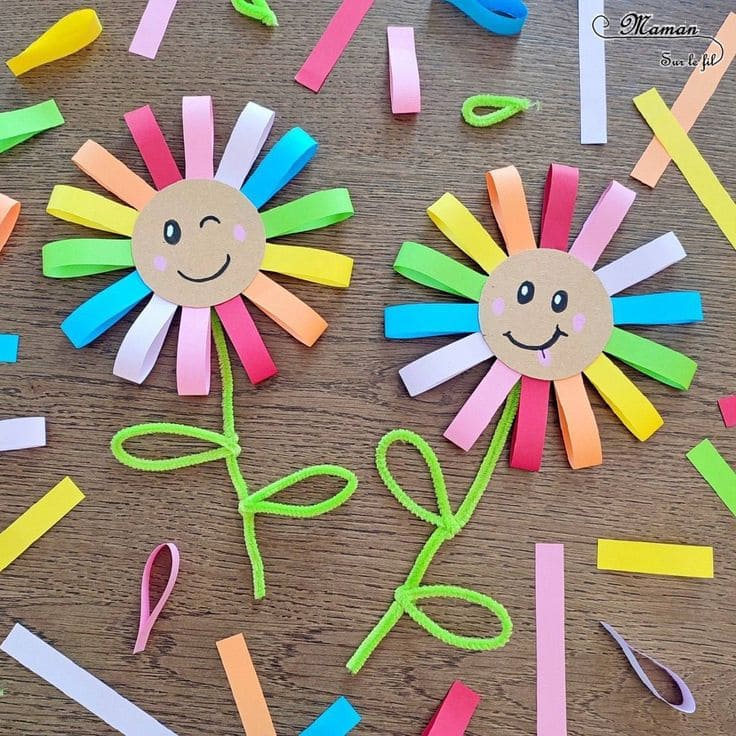
With a few strips of construction paper, a bit of glue, and a dash of creativity, kids can create bright blooms that smile right back at them.
It’s perfect for a spring day, rainy afternoon, or any moment you want to brighten up the room. Best of all, it’s mess-free and budget-friendly, using supplies you likely already have.
Materials Needed:
- Construction paper in assorted colors (cut into 1” x 4” strips)
- Circle cutouts (2-3″ wide)
- Black and pink marker
- 1 green pipe cleaners per flower
- Glue stick
Step-by-Step Guide:
Step 1: Choose about 14 paper strips in different colors, then loop each one and glue the ends together to make little petals.
Step 2: Glue the petals around the edge of a circle cutout to create your flower’s face.
Step 3: Draw a happy face or a wink right in the center with a black marker. Now you can add pink cheeks for extra charm!
Step 4: Twist a green pipe cleaner into a stem shape with a couple of leaves. Then, glue or tape it to the back of your flower.
#2. Paper Chain Jellyfish Friends
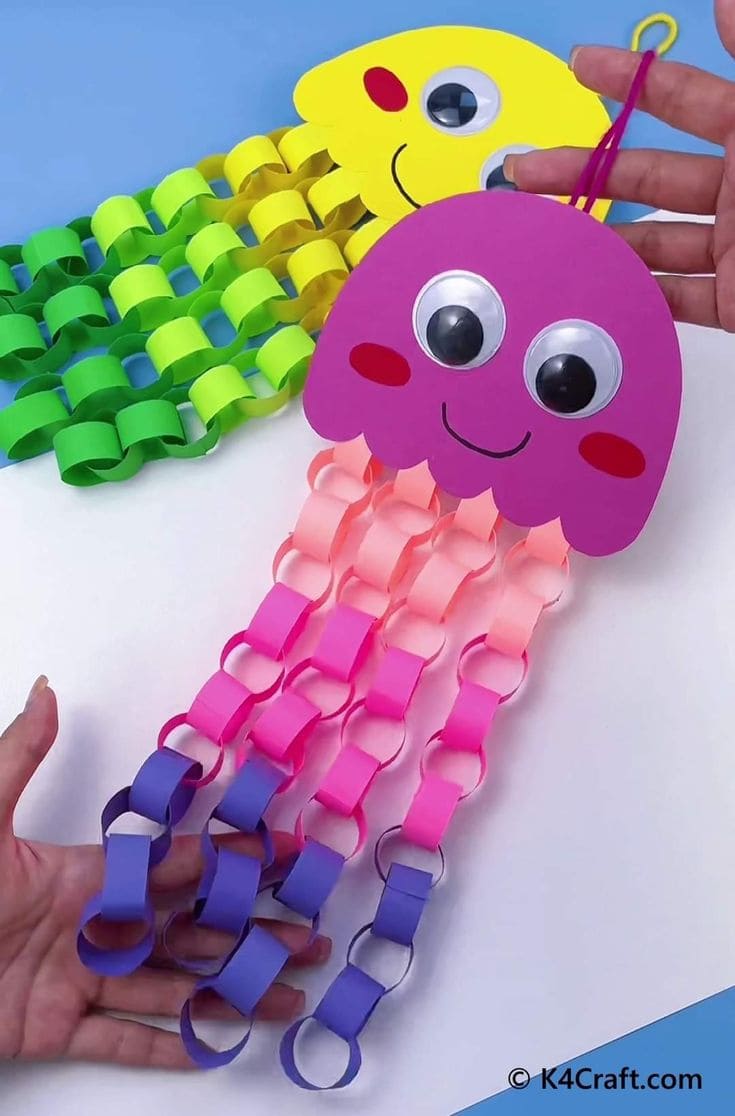
Looking for an under-the-sea craft that’s fun, easy, and full of smiles? These paper chain jellyfish are just the thing!
They’re bright, bouncy, and impossible not to love. Kids can explore colors, fine motor skills, and even a little counting as they link each jellyfish tentacle.
Materials Needed:
- Colorful construction paper (6-8 colors, 1 sheet each)
- 2 googly eyes per jellyfish
- Scissors
- Glue stick
- Black marker
- Hole punch and yarn (optional)
Step-by-Step Guide:
Step 1: Cut several strips of paper about 1 inch wide and 4–5 inches long. Choose any color combo you like as more colors, more fun!
Step 2: Start forming paper chains by gluing or stapling the ends of each strip to make loops. Link them together like jellyfish tentacles. You an make 5 or 6 for each jellyfish.
Step 3: Cut out a jellyfish head shape from paper, then add googly eyes and draw on a big smile and rosy cheeks.
Step 4: Attach the chains to the back of the jellyfish head and add a loop of yarn to hang it up.
#3. Easy Paper Ladybug Craft for Kids
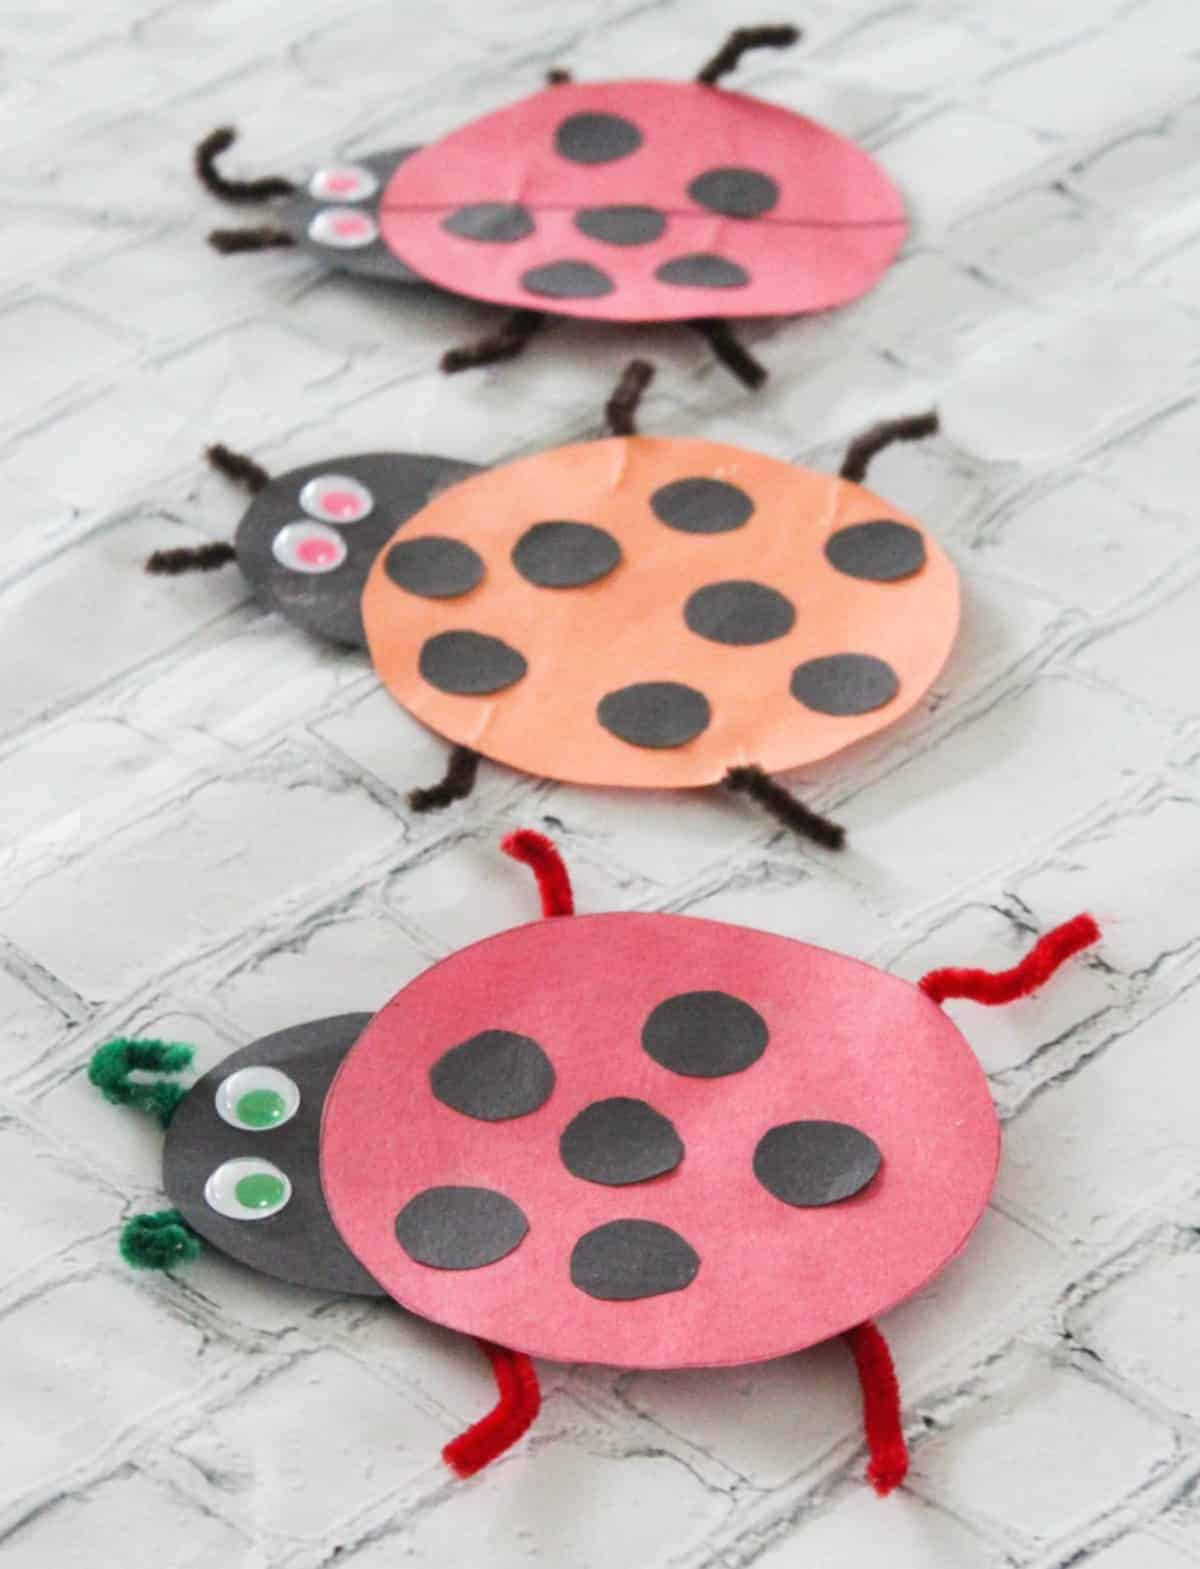
With their cheerful spots, wiggly antennae, and pipe cleaner legs, these little ladybugs bring a whole lot of charm to your craft table.
Whether you’re learning about insects or just need a simple, hands-on project, these paper ladybugs are an instant hit with kids of all ages.
Materials Needed:
- Red, orange, and black construction paper
- Googly eyes
- 6 pipe cleaners per ladybug
- Glue stick
- Scissors
- Pencil or marker
Step-by-Step Guide:
Step 1: Cut out a large oval for the ladybug body (red or orange) and a smaller black circle for the head.
Step 2: Glue the head onto one end of the body, then add googly eyes and a little smile if you like!
Step 3: Cut small black circles and glue them onto the body as spots. Let your child decide the number as they’re in charge!
Step 4: Cut pipe cleaners into short pieces. Glue 2 on each side of the body for legs and two small ones on the head for curly antennae.
#4. Cardboard Roll Rocket Craft
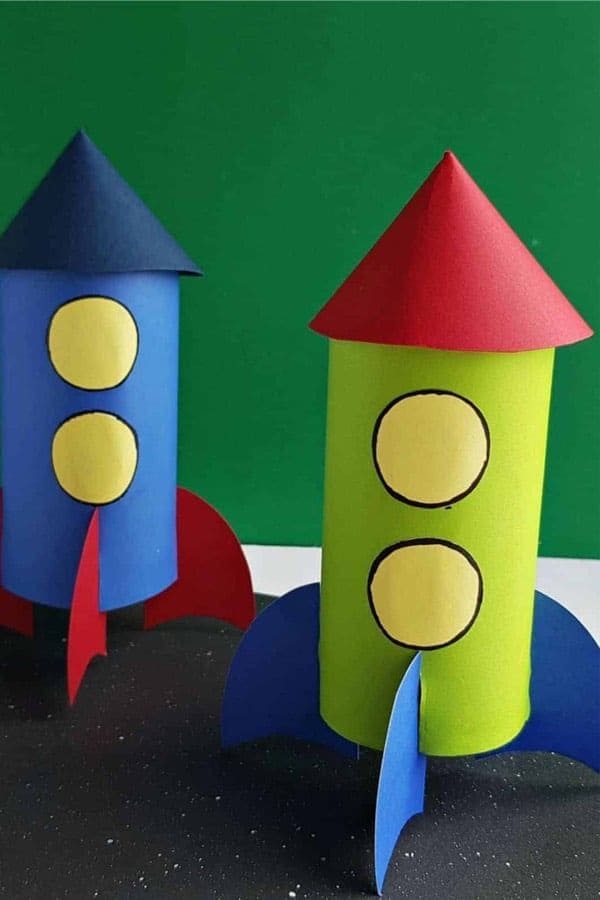
Perfect for curious little astronauts, this cardboard rocket is a hands-on adventure into space-themed play. Kids will love choosing their favorite colors and piecing it all together like mission control prepping for launch.
Materials Needed:
- 1 toilet paper roll
- Construction paper (blue, red, yellow, or any fun colors)
- Scissors
- Glue stick
- Black marker
- Tape (optional for extra hold)
Step-by-Step Guide:
Step 1: Wrap your cardboard roll in colored paper and glue it down smooth.
Step 2: Cut out a cone shape from paper and roll it into a pointy rocket tip, then glue it to the top of the roll.
Step 3: Draw and cut out three windows using yellow paper, then glue them down one above the other.
Step 4: Snip out three fins and glue them to the base to stabilize your rocket.
#5. Colorful Paper Fan Flowers
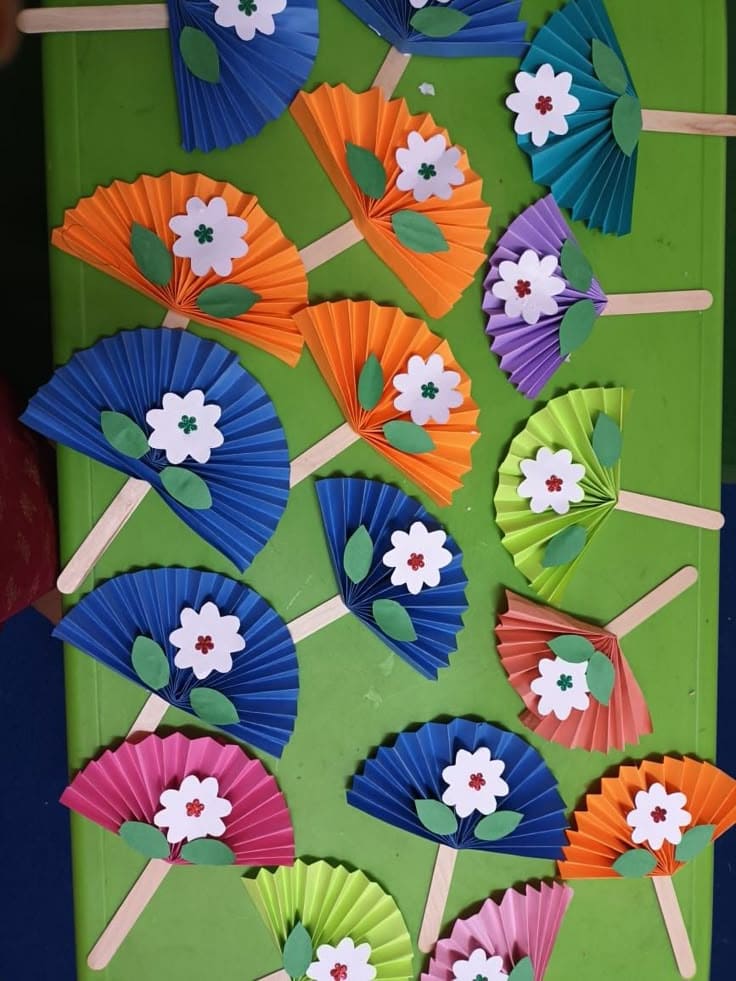
Kids get to fold, decorate, and create their own mini hand fans that look like blooming flowers. It’s the kind of activity that feels part craft, part pretend play.
In addition, this project is great for classrooms, birthdays, or lazy afternoons at home. And the best part is that you only need paper, glue, and pay for 6$.
Materials Needed:
- Bright construction paper (cut into 2 rectangles per fan – approx. 6×4″)
- 1 popsicle sticks per fan
- White paper
- 2-3 small green paper leaves per fan
- Glue stick
- Optional: stickers, glitter, or markers
Step-by-Step Guide:
Step 1: Start by folding the two colored rectangles accordion-style (just like a paper fan!). Then squeeze them together in the center and glue one side of each to form a semicircle.
Step 2: Stick both folded pieces together to create a full fan shape. It should look like a pretty flower opening up.
Step 3: Glue a popsicle stick to the bottom as the handle, then decorate the center with a paper flower and add a couple of green leaves.
#6. Stick Figure Paper Doll Dress-Up Table
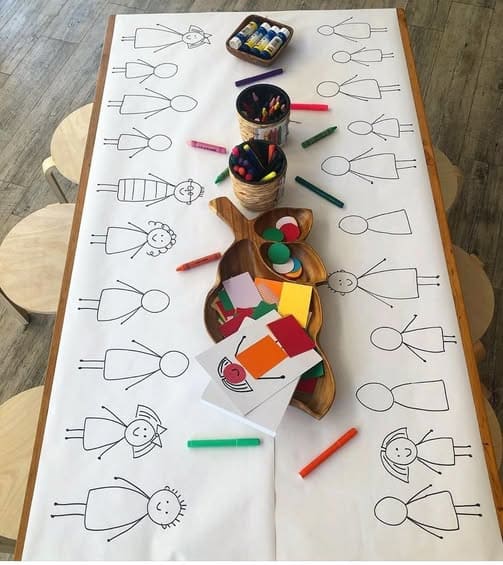
Wow, this simple setup turns a blank table into a whole world of creativity. Perfect for rainy days, fall classrooms, or just a quiet afternoon, this activity lets kids use their imagination while working on fine motor skills.
Moreover, each stick figure becomes a little canvas to decorate, maybe one will wear a superhero cape, another a princess dress, or maybe even a dinosaur costume! You’ll love seeing the characters come to life one outfit at a time.
Materials Needed
- White craft paper roll
- Black marker
- Colored construction papers
- Glue sticks (1 per child works best)
- Kid-safe scissors (1 pair per 2–3 children)
- Crayons (at least 1 set in the center)
Step-by-Step Guide
Step 1: Roll out the white paper and tape it securely to the table.
Step 2: Use a black marker to draw simple stick people around the border, then leave room for kids to add clothes and accessories.
Step 3: Set out trays of colored paper, glue, and crayons.
Step 4: Let kids cut and glue clothing onto their chosen stick figures, and decorate with markers or extras like googly eyes.
#7. Rolled Paper Snail Craft
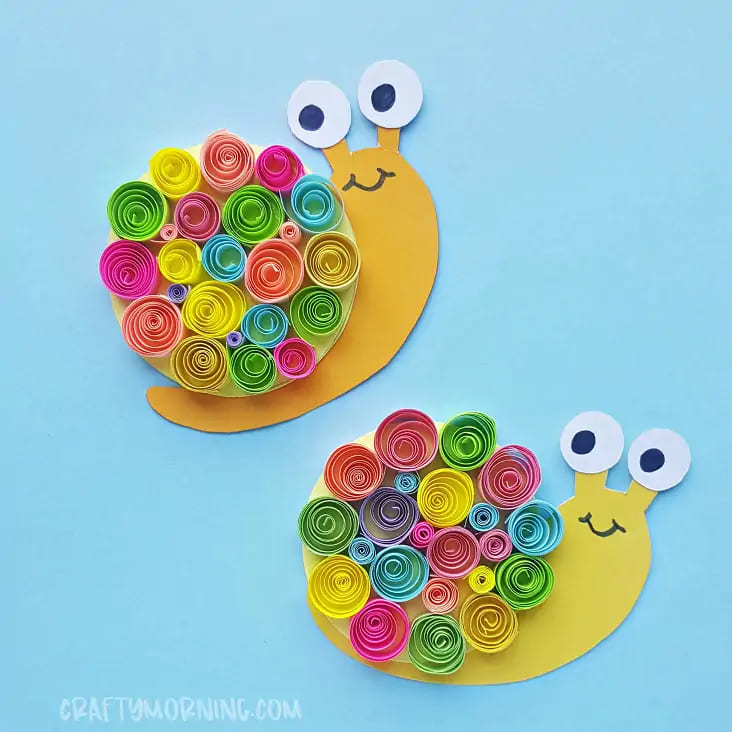
These adorable snails are made with colorful spirals that pop right off the page. Kids absolutely love rolling the little strips as it feels a bit like making paper candy!
Materials Needed:
- Colored paper (cut into 1cm x 10cm strips)
- Yellow or orange construction paper
- White paper
- Black marker
- Glue stick
Step-by-Step Guide:
Step 1: Cut out a snail body shape from yellow or orange paper and set it aside.
Step 2: Roll your colorful paper strips into tight little spirals, just use your fingers or wrap around a pencil tip.
Step 3: Glue each spiral onto the snail’s shell area, packing them closely like a rainbow puzzle.
Step 4: Finally, add big, silly paper eyes and draw on a happy smile.
#8. Paper Sandal Parade Craft
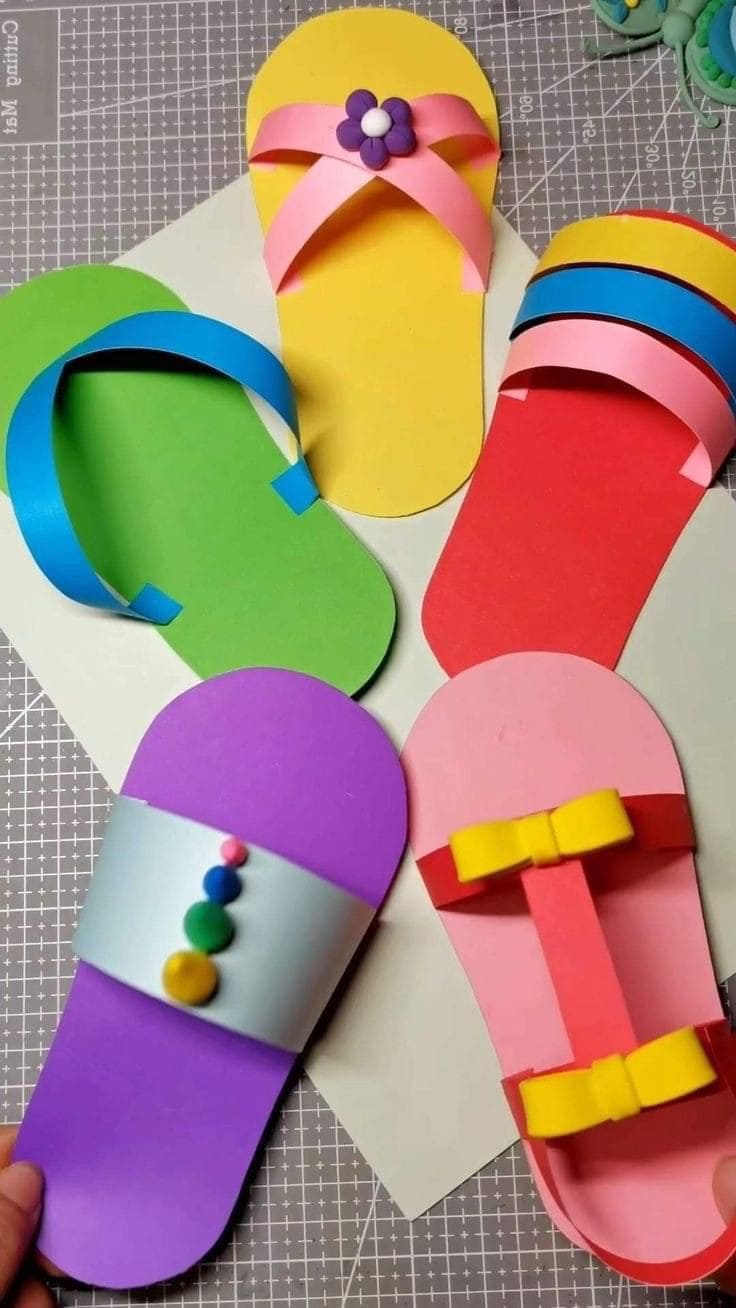
Who says flip-flops are just for the beach? With these colorful paper sandals, summer fun comes straight to your craft table with no sunscreen needed!
This project is playful, easy, and absolutely perfect for little hands. Each sandal can be decorated with bows, beads, buttons, or pom-poms, letting your kid’s creativity run wild.
Materials Needed:
- 1 colored construction paper perproject
- Small embellishments: pom-poms, buttons, foam stickers
- Glue stick
- Scissors
- Pencil
Step-by-Step Guide:
Step 1: Start by drawing a flip-flop sole on a piece of paper, you can use your own foot as a fun guide or trace a slipper, then cut it out.
Step 2: Choose your strap style like classic flip-flop, sporty band, or fancy bow and glue it across the top.
Step 3: Now the fun part! Decorate with colorful gems, mini pom-poms, or anything sparkly from your craft stash.
#9. 3D Paper Loop Pineapple Craft
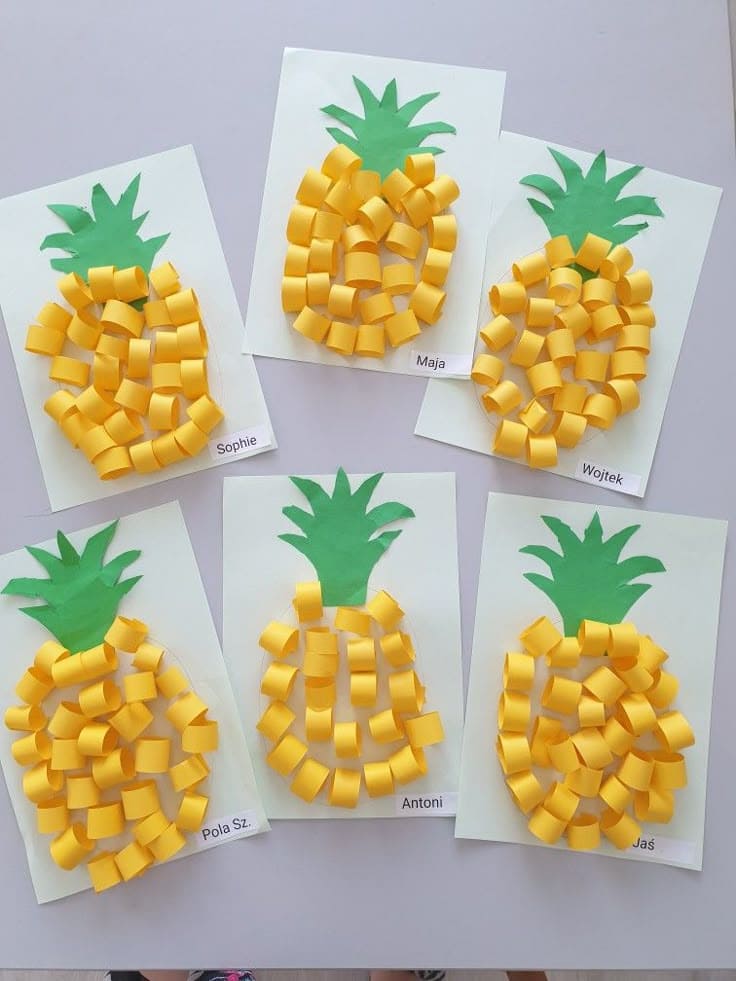
This pineapple craft is a cheerful, hands-on project that helps kids build fine motor skills while playing with colors and textures. It’s easy enough for preschoolers and exciting enough for older kids too. Plus, it brings a tropical twist to any bulletin board or summer-themed unit.
Materials Needed:
- 1 sheet light cardstock (8.5”x11”)
- Yellow construction paper (cut into 1”x4” strips)
- Green construction paper
- Glue stick
- Scissors
- Pencil for tracing
Step-by-Step Guide:
Step 1: Draw or trace a pineapple shape in the center of your cardstock.
Step 2: Cut out the green leafy top and glue it above the fruit shape.
Step 3: Take each yellow strip, curl it into a loop, and glue both ends down inside the pineapple shape.
Step 4 (optional): Add your name or decorate the background with sun, clouds, or even a tiny pair of sunglasses for your pineapple!
#10. Sparkly Paper Roll Bugs
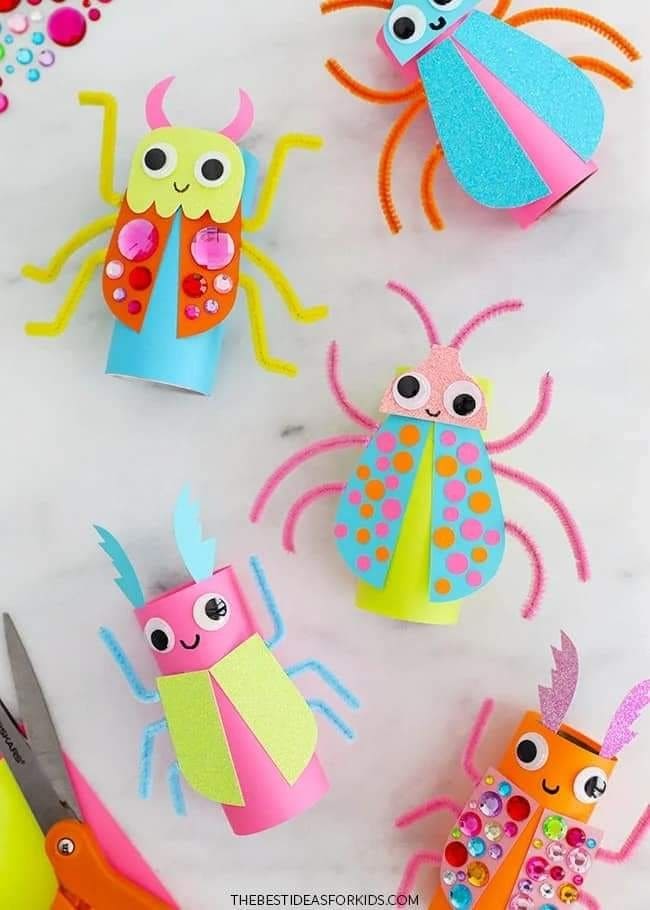
Whether you’re planning a spring craft day, a bug-themed birthday, or just need a screen-free afternoon activity, these cheerful insects will delight kids of all ages.
Each one has its own personality and you’ll be amazed how a simple cardboard tube turns into something magical with just a few colorful materials and a splash of imagination.
Materials Needed:
- 3-6 empty toilet paper rolls
- Colored construction paper
- 12 pipe cleaners in different colors
- Craft jewels
- 2 googly eyes per bug (medium size )
- Scissors and glue stick
- Black marker
- Glitter paper (optional)
Step-by-Step Guide:
Step 1: Wrap a toilet paper roll in bright construction paper and glue the edges down.
Step 2: Cut out a set of wings in a fun shape. Let your little one go wild with glitter paper, stickers, or colorful dots for decoration.
Step 3: Add pipe cleaner legs by poking tiny holes or taping them inside the tube. You can curl or bend them for extra flair!
Step 4: Glue on some googly eyes, draw a smile, and if you’re feeling extra playful, stick on some antennae made from more pipe cleaner.
Step 5: Decorate the body with gems, sequins, or sparkly dots.
#11. Adorable Paper Strip Chick Craft
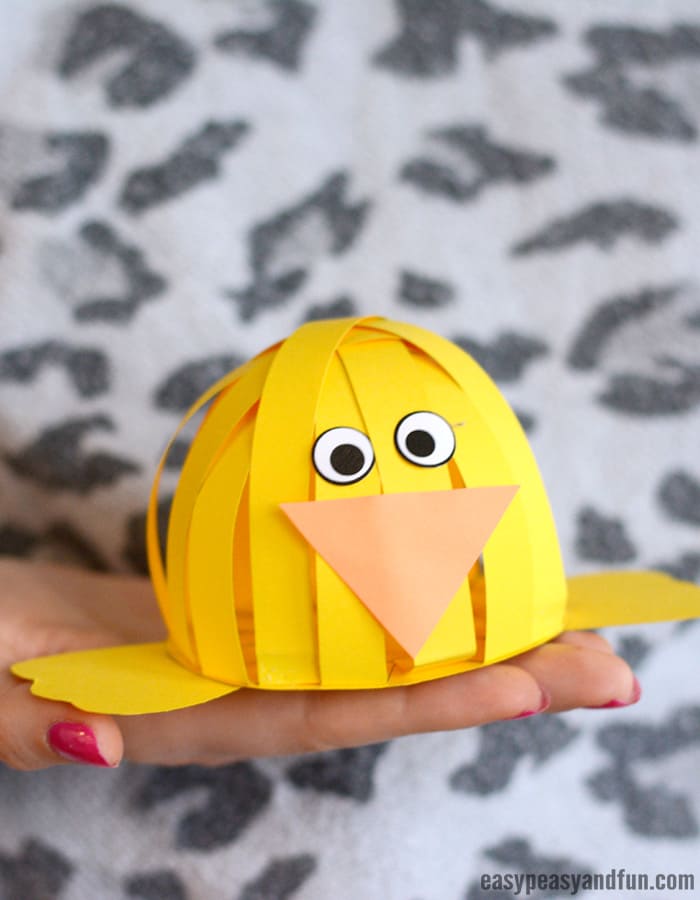
This paper strip chick is a cheerful, hands-on craft that turns ordinary paper into a charming 3D chick. It’s a perfect pick for Easter, rainy-day fun, or even farm-animal week at school.
Materials Needed:
- 5 yellow paper strips (about 1″x6″)
- 1 orange triangle
- 2 googly eyes or hand-drawn paper eyes
- 2 yellow paper wings
- Glue or double-sided tape
- Stapler (optional)
Step-by-Step Guide:
Step 1: Take the yellow paper strips and gently curve them to create an open sphere, then glue or staple the ends at the top and bottom.
Step 2: Cut out two yellow wing shapes and attach one on each side of the ball.
Step 3: Glue the googly eyes onto the front, right where the paper strips meet.
Step 4: Add the orange triangle for a beak.
#12. Wiggle the Paper Caterpillar
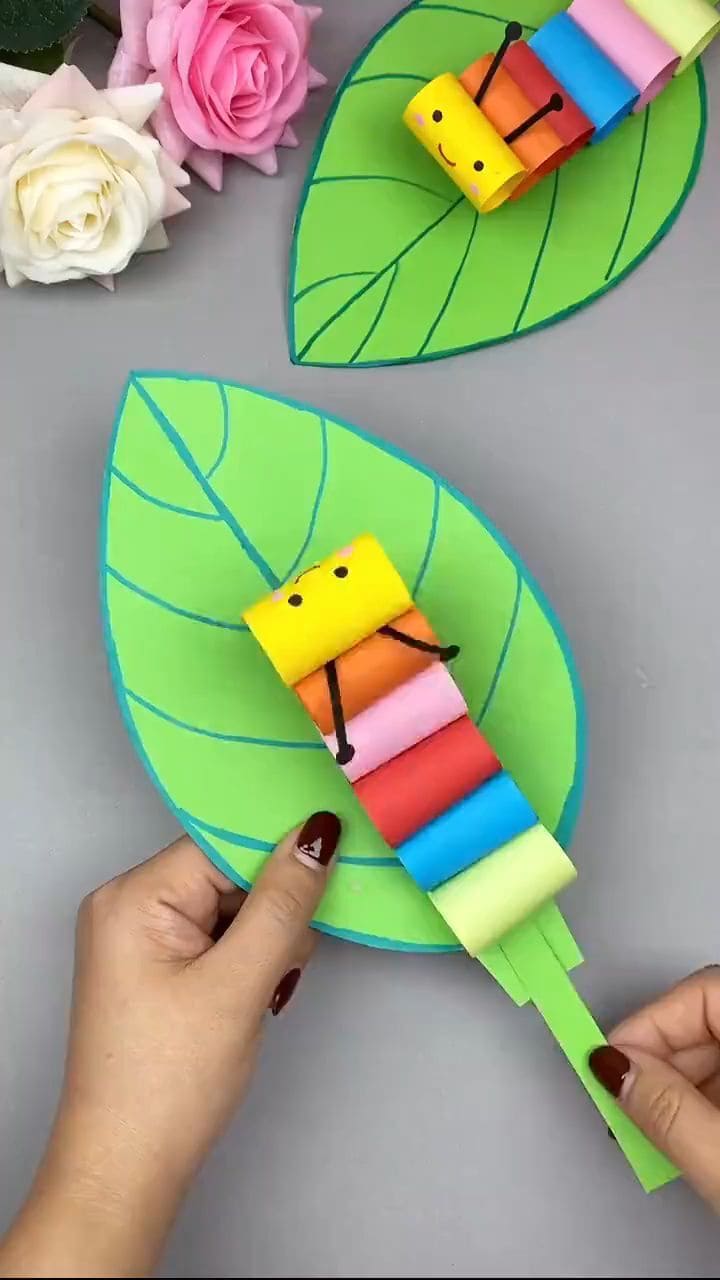
This colorful caterpillar on a leaf is more than just cute, it actually moves! Kids love seeing their handmade critter wiggle across the leaf when they gently pull the paper tab. It’s an exciting mix of crafting and play that teaches color patterns, fine motor skills, and a bit of magic.
Materials Needed:
- Colored paper (6–7 strips, 1″ wide × 4″ long each)
- 1 green construction paper
- Glue stick
- Black marker
- Googly eyes or small dot stickers
- Scissors
Step-by-Step Guide:
Step 1: Cut out your caterpillar body by making colorful paper strips, then roll each one into a loop and glue the ends to make rings.
Step 2: Glue the rings one after another to form a little rainbow caterpillar. The yellow ring should go first as it’s the head!
Step 3: On a piece of green paper, draw a big leaf and cut it out, then add veins using a blue or green marker.
Step 4: Glue the caterpillar onto the leaf, leaving the last ring free, then attach a paper strip to the last ring to make a pull tab.
Step 5: Finally, draw on a happy face and antennae.
#13. Colorful Paper Kites for Kids
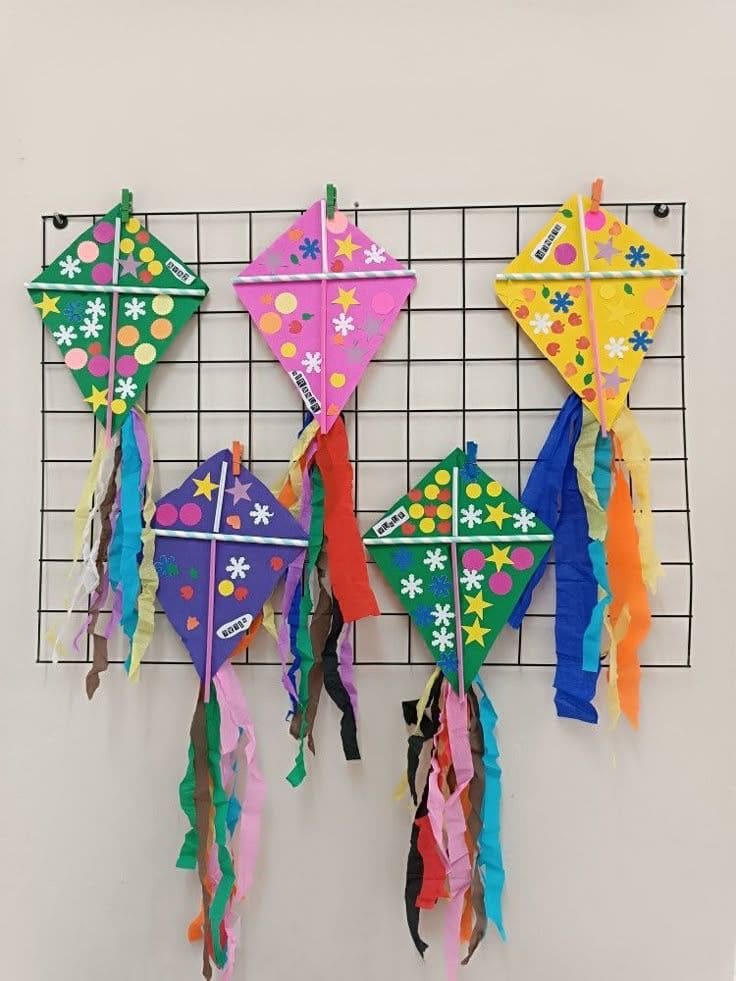
These cheerful little paper kites won’t fly in the sky, but they’ll soar on the wall and in your kid’s heart! This is a low-cost, high-smile project that’s perfect for creative afternoons.
Materials Needed:
- 1 bright-colored construction paper per kite
- 2 craft sticks per kite
- Glue stick
- 6 tissue paper strips per kite
- Foam stickers
- Scissors
Step-by-Step Guide:
Step 1: Start by cutting your paper into a kite shape, a simple diamond works great. Don’t worry about perfection; wobbly edges give it charm.
Step 2: Glue one craft stick vertically and the other horizontally across the center to create the kite frame.
Step 3: Add your favorite stickers or decorate with stars, dots, flowers or whatever your little artist dreams up!
Step 4: Cut colorful tissue strips and glue them to the bottom of the kite, these become the flowy tails that bring the kite to life.
#14. Torn Paper Rainbow Art
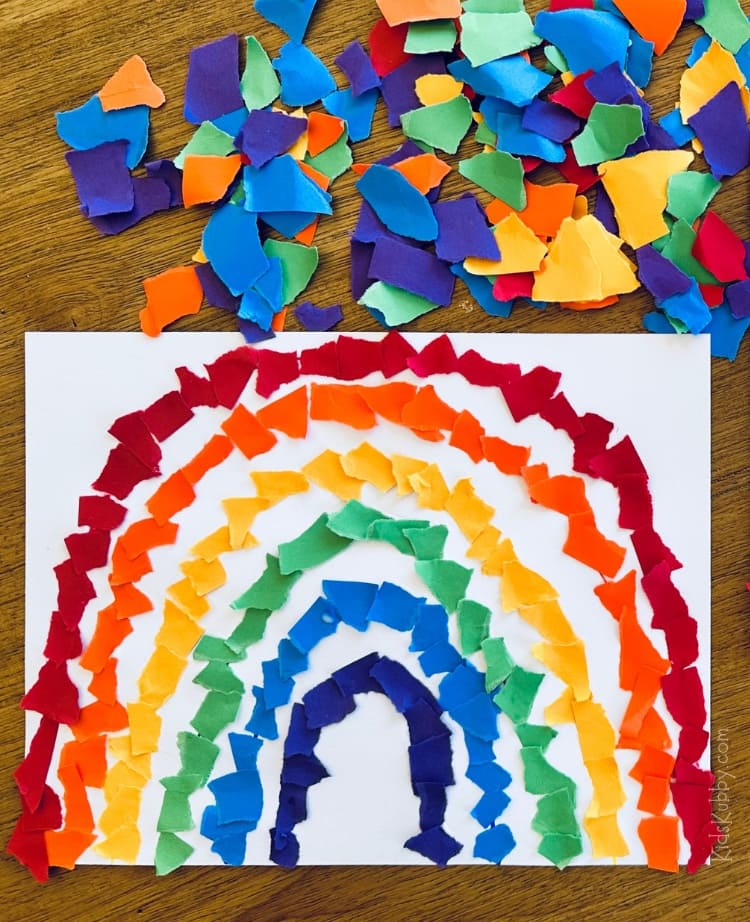
This colorful torn paper rainbow is a fantastic project that mixes sensory fun with creativity. Tearing paper into tiny pieces feels surprisingly satisfying for little hands, and the final product is pure sunshine!
Materials Needed:
- Colored construction paper (red, orange, yellow, green, blue, purple)
- 1 white sheet of cardstock
- Glue stick
Step-by-Step Guide:
Step 1: Tear the colored paper into small chunks. Don’t worry about perfect pieces as imperfection adds charm!
Step 2: Draw a light rainbow arch guide on the white paper with pencil if your little one needs help with spacing.
Step 3: Start gluing the red pieces on the outermost arch and work your way inward through the rainbow like orange, yellow, green, blue, and finally purple.
#15. Colorful Paper Plate Parrot Craft
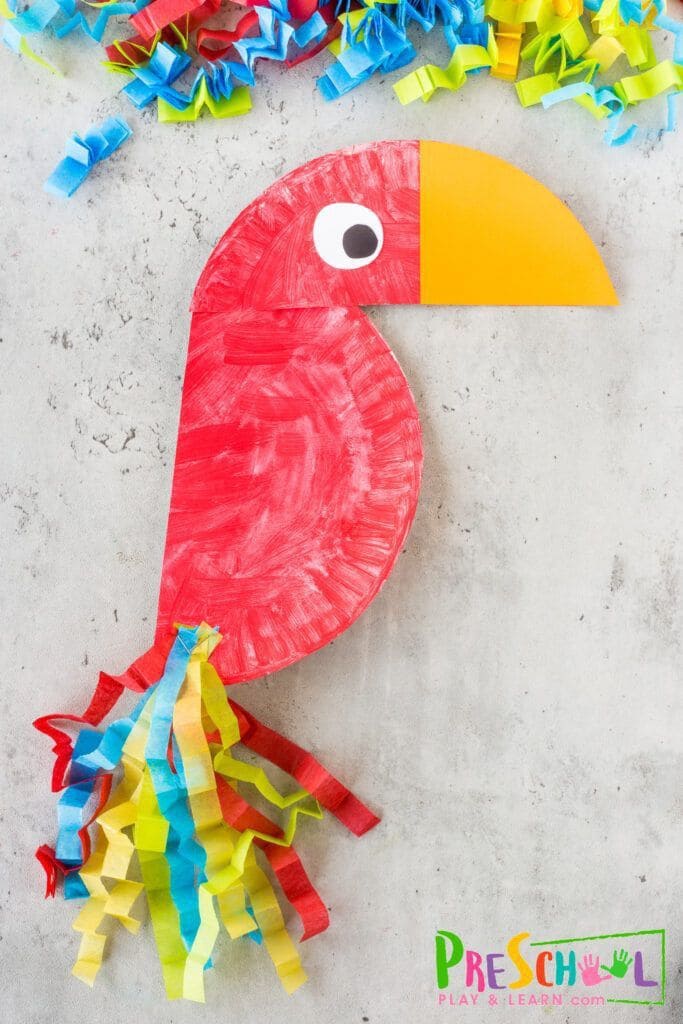
In just 5$, your little one can create a bright, feathery friend perfect for jungle themes, story time companions, or a playful wall display. This craft is especially great for building scissor skills and exploring colors. Plus, who doesn’t love giving a paper plate a second life?
Materials Needed:
- 1 paper plate
- Red paint or crayon
- Colored construction paper
- 1 googly eye 1 per parrot
- Crepe paper streamers (various colors)
- Glue stick
- Scissors
Step-by-Step Guide:
Step 1: Paint or color the paper plate red and let it dry, then cut out a large yellow triangle for the beak and glue it on the side of the plate.
Step 2: Add a googly eye above the beak.
Step 3: Cut strips of colorful crepe paper, curl or crinkle them a bit, then glue them to the bottom back side of the plate for a fluttery tail.
#16. Paper Bowl Turtle Craft
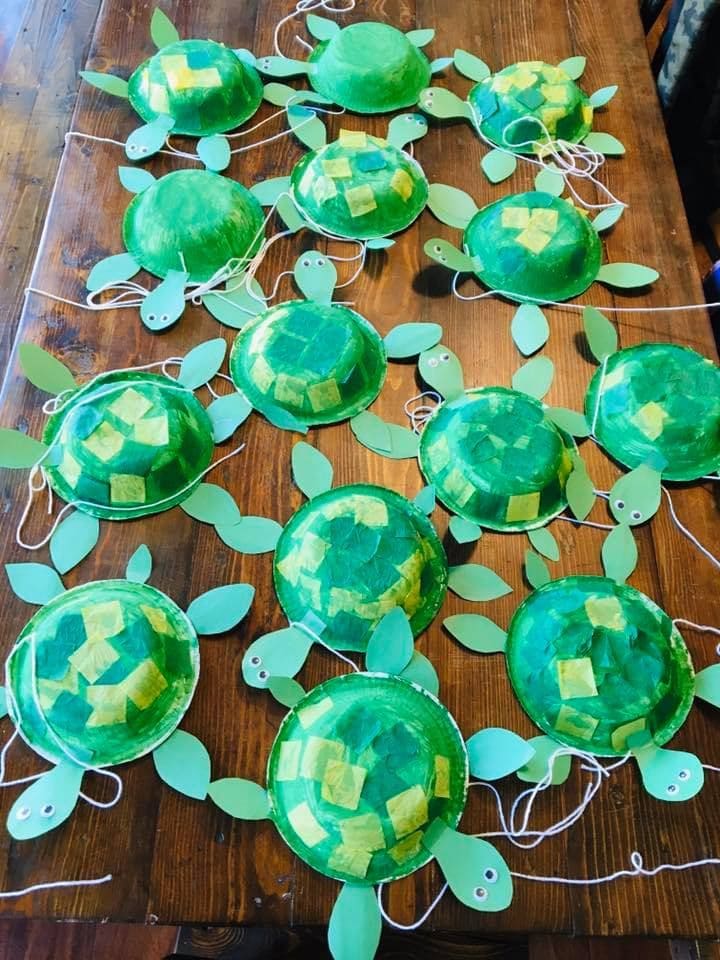
Perfect for preschoolers and early elementary kids, this project blends painting, gluing, and a bit of fine motor magic. Each turtle ends up with its own personality, and once you lay them out all together, you’ll have your own adorable turtle family.
Materials Needed:
- 1 paper bowl per turtle (standard size)
- Green paint + brush or sponge
- Green and yellow tissue paper squares
- Green construction paper
- Glue stick
- Black marker
- String (optional)
Step-by-Step Guide:
Step 1: Flip your paper bowl upside down and paint it green, then let it dry for a few minutes.
Step 2: Add pieces of tissue paper on top to create a fun, textured turtle shell.
Step 3: Cut out a small head, four legs, and a tail from green paper. You can glue them around the bowl’s edges.
Step 4: Add googly eyes or draw your own, then tie a string if you’d like to hang them.
#17. Wiggle Wiggle Paper Chain Snake Craft
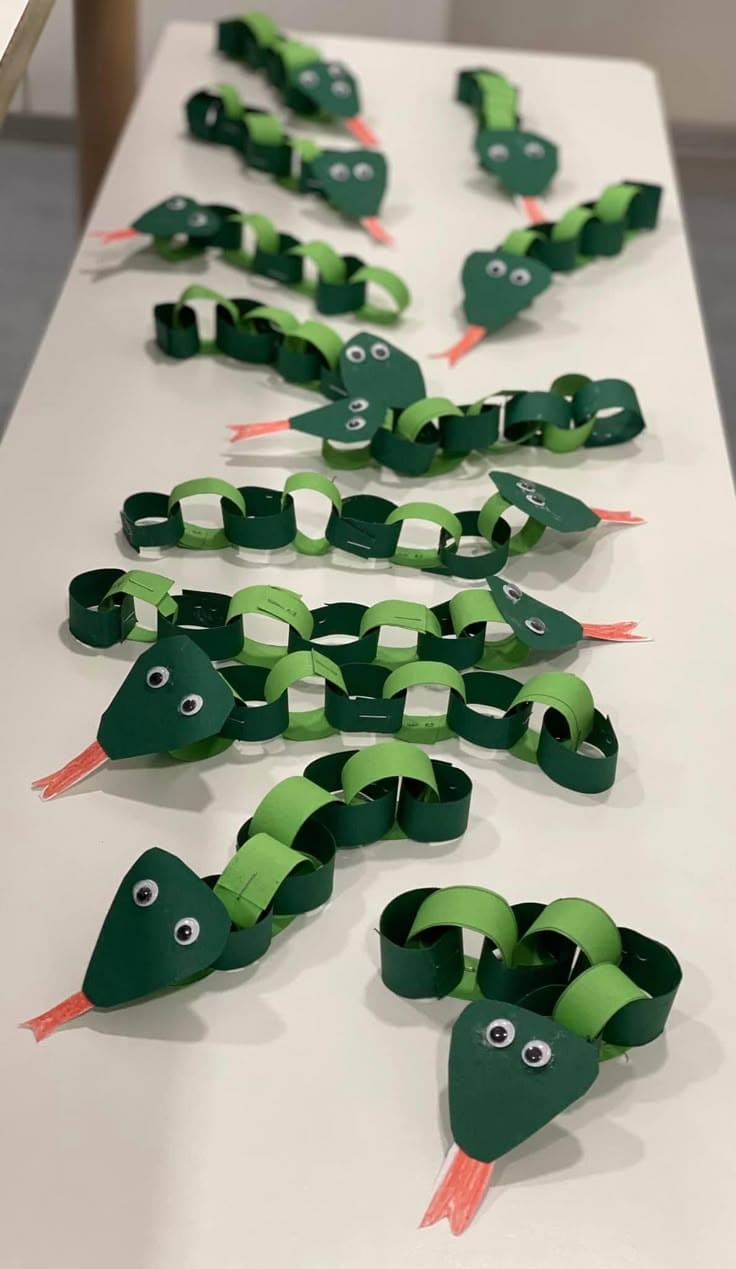
If your little one loves animals and is ready for some hands-on fun, this paper chain snake is the perfect project! It’s super simple, totally wiggly, and secretly great for practicing fine motor skills in just 10 minutes.
Materials Needed:
- Dark green and light green construction paper (cut into 1”x5” strips)
- Green or black paper
- 2 googly eyes per snake
- Red paper or crayon
- Glue stick
- Scissors
Step-by-Step Guide:
Step 1: Start by curling one paper strip into a loop and glue or staple it closed.
Step 2: Loop the next strip through and close it the same way, then keep linking until your snake is as long as you want.
Step 3: Cut out a rounded triangle or oval for the head, then add googly eyes and a little red forked tongue for extra fun.
Step 4: Glue the head to one end of the chain and you’re done!
#18. Hanging Rainbow Mobile
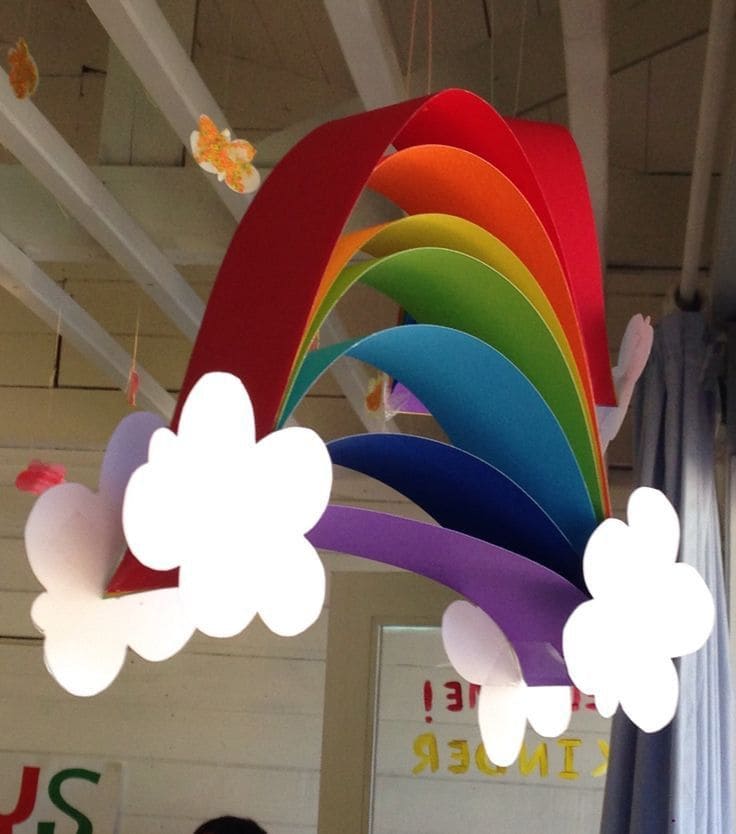
This dreamy rainbow mobile brings a burst of color wherever it goes, perfect for a classroom corner, playroom ceiling, or a rainy-day mood lifter. Bonus, it’s great for teaching colors, order, and fine motor skills while keeping little hands happily busy.
Materials Needed:
- Construction paper in red, orange, yellow, green, blue, indigo, and violet (1 strip per color, about 2” wide and 12” long)
- White cardstock
- String
- Glue stick
- Hole punch (optional)
Step-by-Step Guide:
Step 1: Cut one strip of each rainbow color, then gently curve each into an arch without folding.
Step 2: Glue or tape the ends of the strips together in rainbow order, layering them slightly to create a 3D arch effect.
Step 3: Cut out two large, fluffy cloud shapes and glue them to each end of the rainbow stack.
Step 4: Punch a hole at the top or tape a loop of string, and hang your beautiful rainbow in the air!
#19. Rainbow Fish Craft
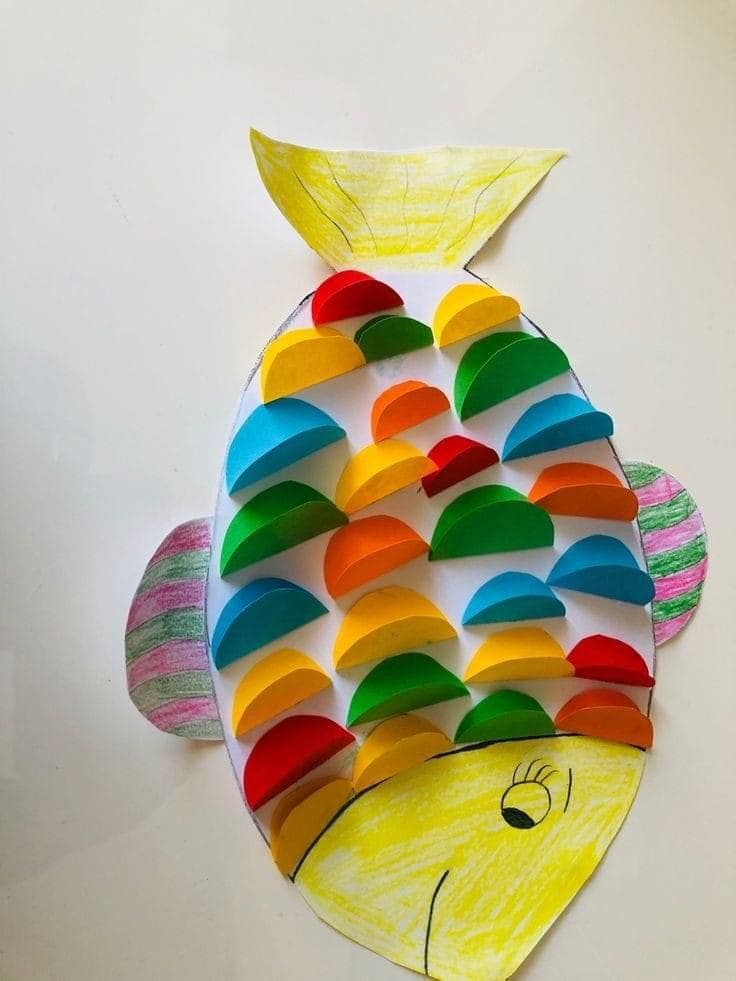
This project’s a fun way to sneak in color recognition, fine motor skills, and even a sweet lesson about sharing. Plus, it’s made from basic materials you probably already have at home!
Materials Needed:
- White cardstock (1 fish body per child)
- 10-15 construction paper cut into 1.5″ circles
- Crayons or colored pencils
- Glue stick
- Scissors
Step-by-Step Guide:
Step 1: Start by drawing a large fish shape on the white paper and cut it out. Don’t forget the fins and a gentle smile!
Step 2: Use crayons to color the tail, fins, and the fish’s face.
Step 3: Now take your folded paper circles, these are your scales. Glue them on the body, overlapping a little, like real fish scales.
Step 4: Keep layering until your fish is bright, bold, and full of personality!
#20. Smiling Acorn Mosaic Craft
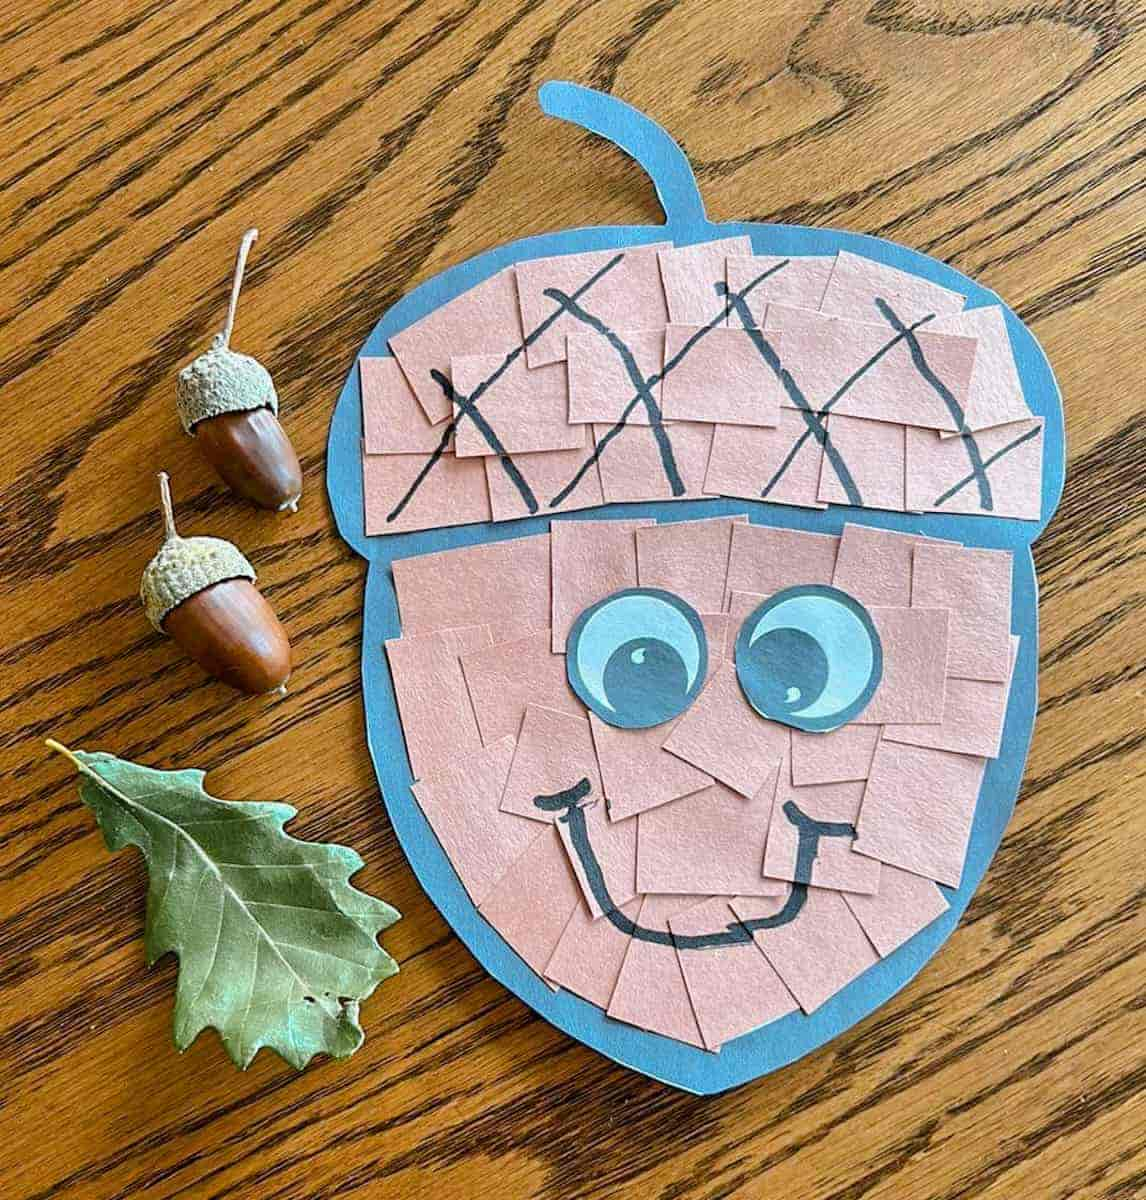
Who says acorns have to be serious? This happy little guy is proof that even the simplest autumn treasures can bring joy.
Perfect for a fall afternoon or a preschool classroom activity, this paper mosaic acorn lets kids explore shapes, practice fine motor skills, and create something delightfully cheerful.
Materials Needed:
- 1 sheet brown construction paper and 1 sheet black or dark brown paper
- Googly eyes or paper eyes
- Glue stick
- Black marker
- Scissors
Step-by-Step Guide:
Step 1: Cut out a large acorn shape from dark brown paper, then tear or cut brown paper into small squares.
Step 2: Cover the top and bottom sections of the acorn with the squares using glue. Don’t worry about perfection as it’s the layering that makes it fun!
Step 3: Add big eyes and a happy smile with a marker. You can even draw a criss-cross cap pattern for that classic acorn style.
#21. Paper Loop Frog Craft
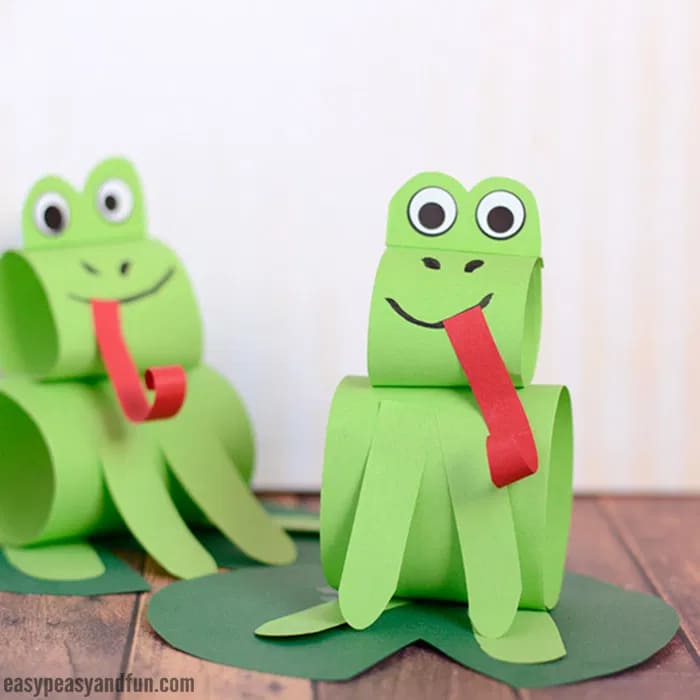
This craft is a fun and friendly way to explore shapes, animals, and storytelling. With just a few paper strips, your little one can bring a cheerful frog to life by completing with a silly tongue that looks ready to catch flies.
Materials Needed:
- 2 green paper strips (1.5″ x 8″)
- 1 small red paper strip
- Scrap green paper
- 2 googly eyes
- Glue stick
- Black marker
Step-by-Step Guide:
Step 1: Curl both green strips into rings and glue the ends together, one for the frog’s head, the other for its body, then stack and glue them.
Step 2: Cut out arms and legs from green scraps., then continue to attach the arms to the head loop and legs to the bottom of the body loop.
Step 3: Roll the red strip slightly and glue it inside the mouth as the tongue.
Step 4: Add eyes on top, then draw a big smile and nostrils with your marker.
#22 Spooky Paper Mummy Craft
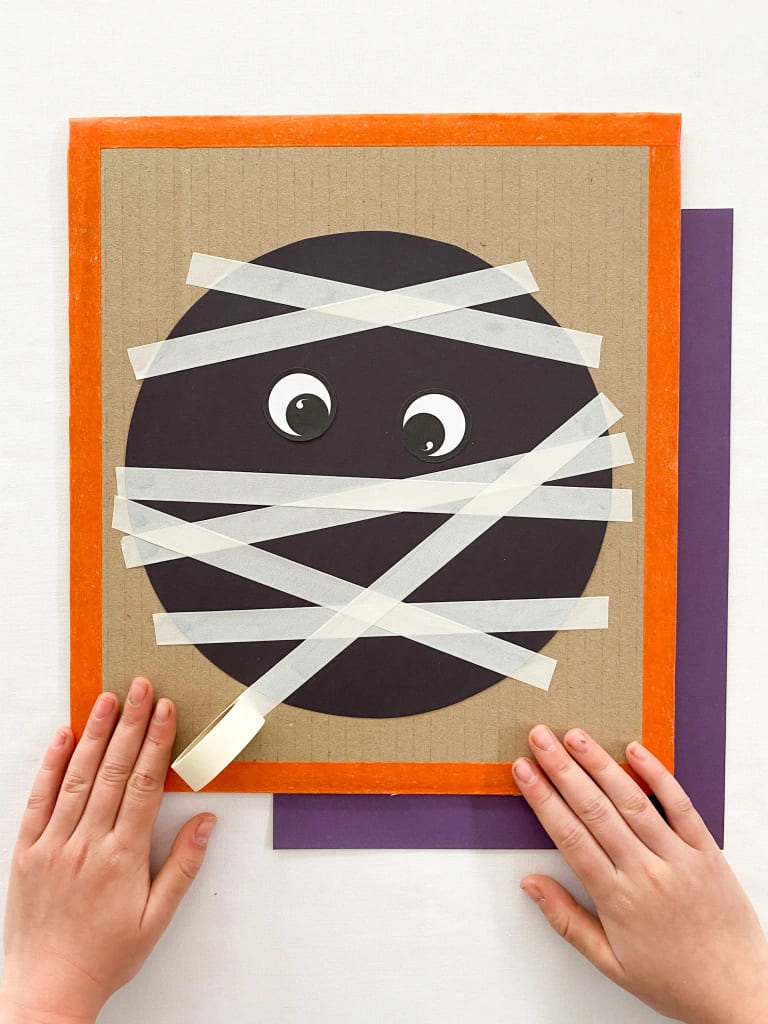
This silly paper mummy is the kind of Halloween fun that even the youngest crafters can enjoy. With nothing but paper, tape, and a bit of imagination, you’ll wrap up your afternoon in giggles and googly eyes.
Materials Needed:
- Black construction paper (1 sheet)
- 6-10 white masking tape (6–10″ long)
- Googly eyes or white paper circles + black dots
- Cardboard
- Optional: orange and purple paper
Step-by-Step Guide:
Step 1: Cut a big circle out of black construction paper, this will be your mummy’s head.
Step 2: Place it on a cardboard or paper background. Now the fun begins: let kids criss-cross masking tape over the face like mummy bandages.
Step 3: Add googly eyes or make your own with paper circles. Stick them between the bandages so your mummy looks like it’s peeking out!
Step 4: Add some spooky framing with colored paper for that festive Halloween pop.
#23. 3D Paper Chain Christmas Tree Craft
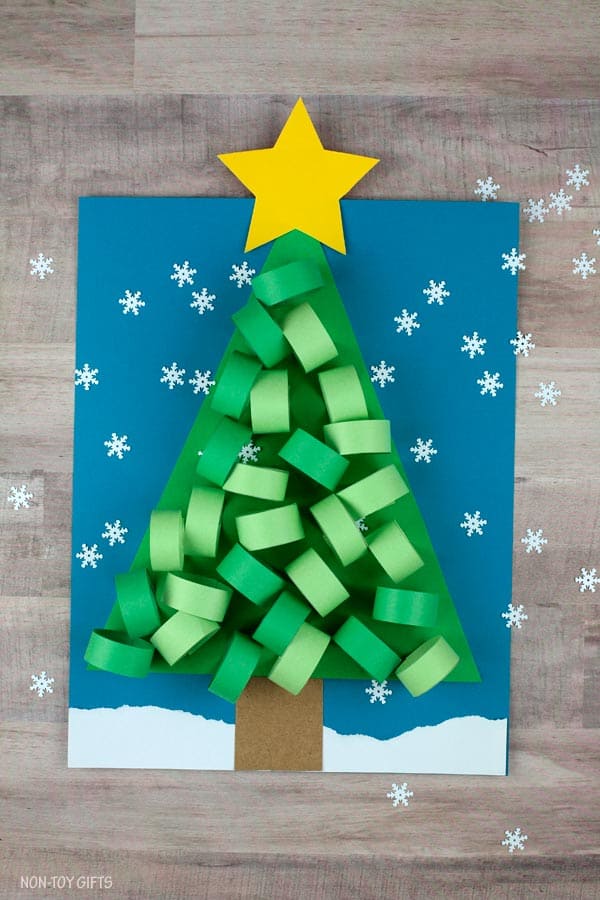
This cheerful 3D paper tree is the perfect way to welcome winter magic into your home or classroom. It’s simple, joyful, and oh-so-festive.
The best part is that little hands will love looping the green paper links together like puzzle pieces. Kids can hang it on the wall or give it as a handmade holiday card.
Materials Needed:
- Green construction paper (two shades)
- Blue background paper
- White, brown and yellow construction paper
- Small snowflake stickers
- Glue stick and scissors
Step-by-Step Guide:
Step 1: Cut strips of green paper (around 1 inch wide), then form loops and glue or staple the ends to make paper chains.
Step 2: Glue your loops onto the blue background in the shape of a Christmas tree, starting from the bottom and layering as you go up.
Step 3: Cut out a trunk from brown paper and glue it at the base of your tree. Then top it all off with a bright yellow star!
Step 4: Decorate with paper snowflakes or draw your own wintry flurries around the tree.
#24. Shark Cootie Catcher
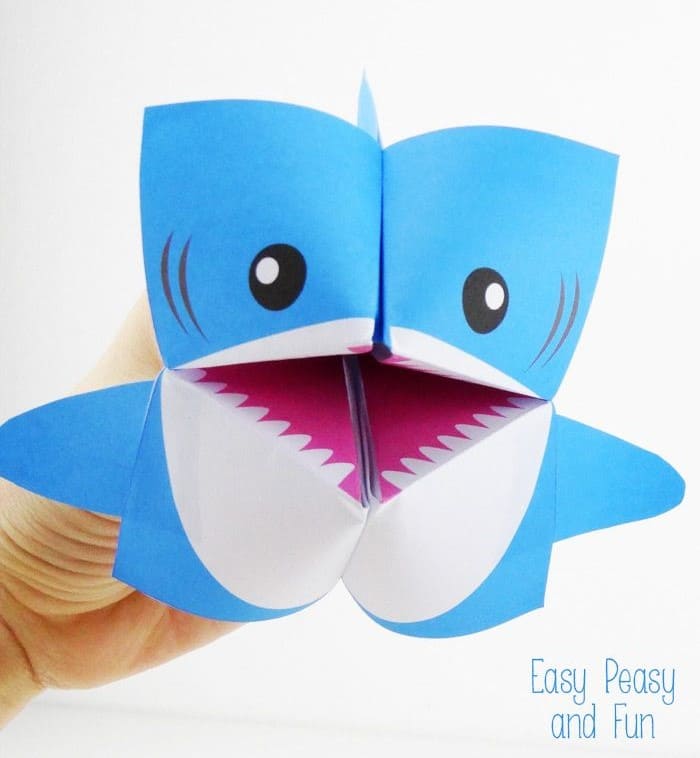
This shark cootie catcher is part game, part puppet, and all fun! Kids will love folding, decorating, and giving this paper predator a playful personality.
Materials Needed:
- 1 square piece of blue paper (8.5″x8.5″)
- White, pink, and black markers
- Glue stick
- Scissors
Step-by-Step Guide:
Step 1: Fold your square paper into a classic cootie catcher shape (fold in half both ways, then bring each corner to the center, then flip and fold corners again).
Step 2: Flip it open and draw a toothy shark mouth inside. You can use pink or red for the gums and add spiky white teeth all around.
Step 3: On the outside flaps, draw the shark’s eyes and cheeky expression, then add fins by gluing on extra blue paper pieces to the sides.
Step 4: Slip your fingers inside, and your shark is ready to bite!
Bonus tip: Print or draw mini sea creatures inside for a fun guessing game because this shark loves a little snack!
#25. Bunny Corner Bookmark
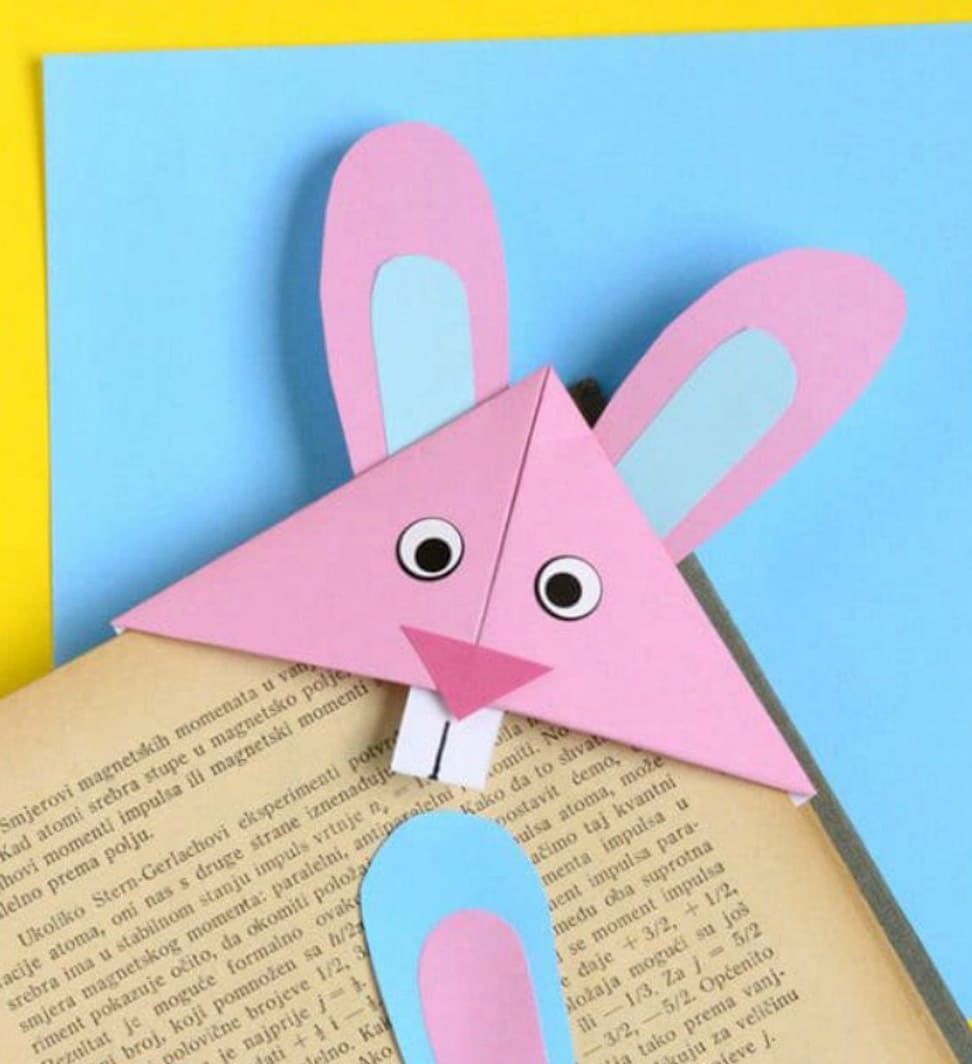
If your little reader loves books and bunnies, this adorable bunny corner bookmark is the perfect blend of cute and crafty. Made from simple construction paper, this little guy peeks out from the corner of your book with floppy ears and a sweet smile.
Materials Needed:
- 1 pink square paper (6″x6″)
- Scrap paper in white, black, and blue
- Pink and blue construction paper
- Glue stick and scissors
- Black marker
Step-by-Step Guide:
Step 1: Fold your square paper into a corner bookmark. Start by folding it diagonally into a triangle. Fold both bottom corners up to the top, crease, and unfold. Next, fold the top layer down, then tuck the corners inside to create a pocket.
Step 2: Cut two bunny ears from pink paper and smaller blue inner ear shape, then glue the blue parts onto the pink ones and attach them behind the bookmark.
Step 3: Cut out two white teeth, a triangle nose, and draw two googly eyes (or use stick-on googly eyes), then continue to glue them all onto the front.
Step 4: Finally, slide it onto the corner of your page.
#26. Superhero Handprint Crafts
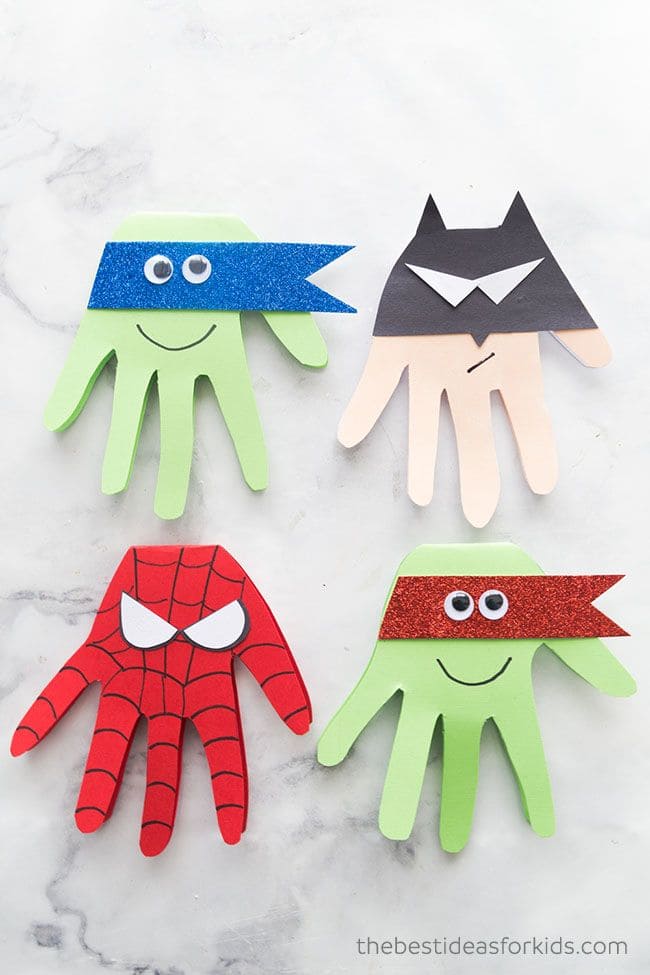
Whether your child loves Spider-Man, Batman, or the Ninja Turtles, this craft lets them create their own team of pint-sized protectors using just colored paper, scissors, and a few googly eyes.
Materials Needed:
- Colored construction paper (red, green, blue, beige, black, etc.)
- White and black paper scraps
- Googly eyes (optional)
- Glue stick and scissors
- Pencil and black marker
Step-by-Step Guide:
Step 1: Help your child trace their hand onto colored paper and carefully cut it out.
Step 2: Cut out masks, capes, or pointy ears depending on the hero you’re making (red with webs for Spidey, glittery bands for TMNT, or bat ears for Batman).
Step 3: Add eyes either drawn or googly nd sketch on webbing, smiles, or serious superhero expressions with a marker.
Step 4: Once your heroes are complete, line them up and get ready for a tiny hand-powered rescue mission!
#27. Giant Ice Cream Cone Craft
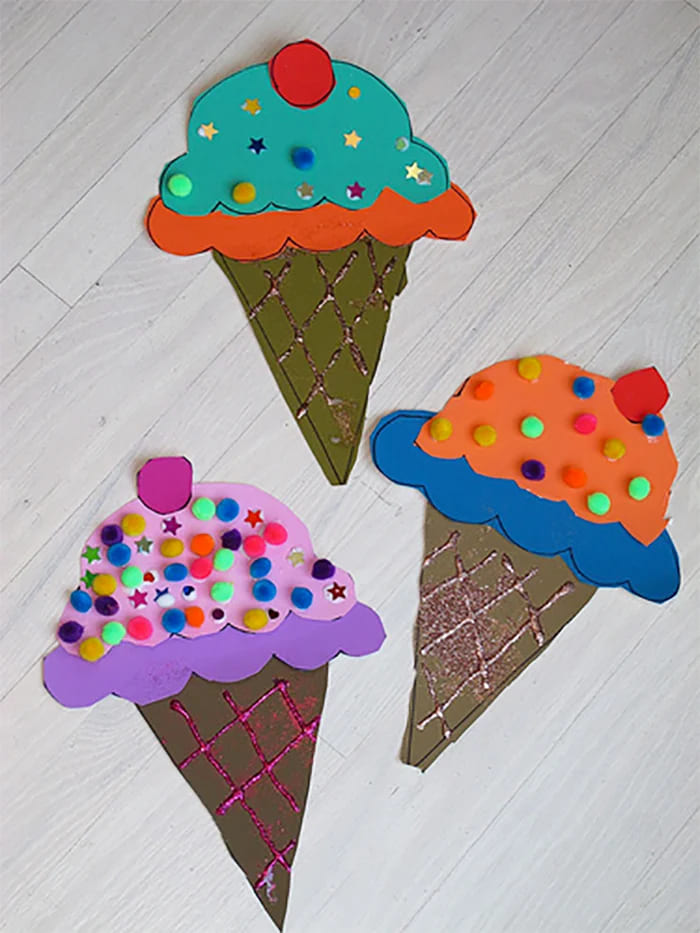
Who’s ready for a scoop of creativity? This ice cream craft is the perfect hands-on project to brighten up any summer afternoon or bring some sweet cheer to your classroom walls.
Furthermore, kids get to build their own oversized ice cream cones using colorful paper scoops, pom-pom “sprinkles,” and glittery cones. It’s fun, affordable, and loaded with personality!
Materials Needed:
- Brown construction paper
- Colored paper
- Pom-poms
- Glue, scissors, markers, glitter glue
Step-by-Step Guide:
Step 1: Cut a large triangle from brown paper to make your cone, then add crisscross waffle lines with a marker or glitter glue.
Step 2: Cut scoop shapes from colored paper, you can make as many layers as you like!
Step 3: Decorate your ice cream with pom-poms, star stickers, or sparkles. Then top it off with a paper cherry.
Step 4: Glue everything together and let it dry flat.
#28. Heart Wings Butterfly Craft
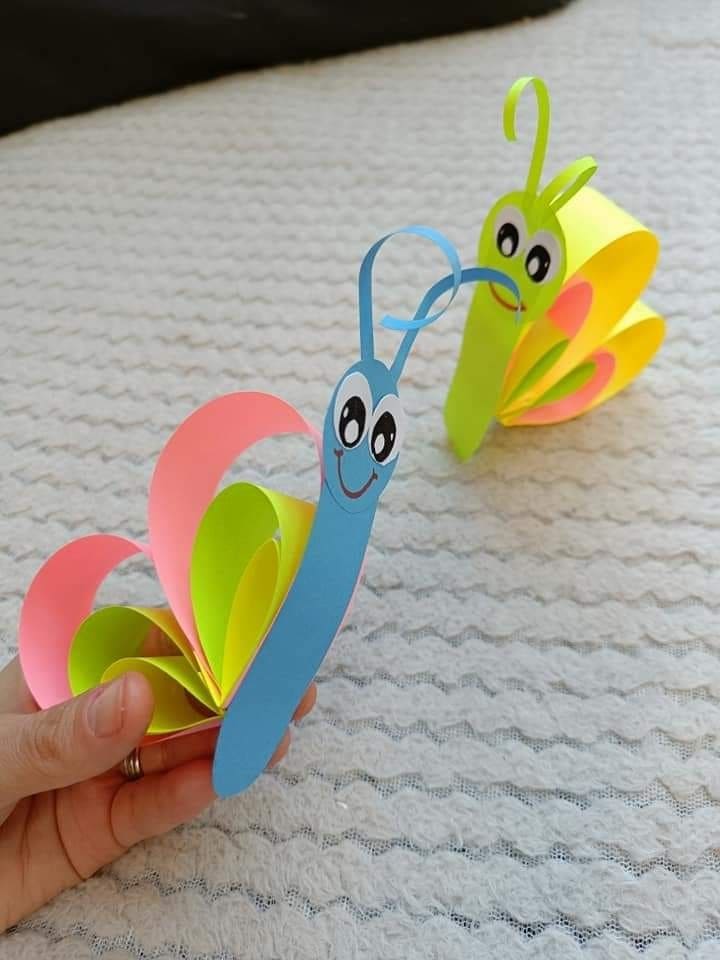
Made entirely from colorful paper strips, this butterfly’s heart-shaped wings and wide-eyed smile are enough to brighten anyone’s day.
And of course this is a perfect choice for parents who want to teach their children about welcoming spring, learning about insects, or just looking for a low-cost, high-fun paper craft.
Materials Needed
- 1 sheet each of neon pink, yellow, green, and blue construction paper
- Pencil or black marker
- Scissors
- Glue stick
- Googly eyes (or white paper)
- Optional: Double-sided tape
Step-by-Step Guide
Step 1: Cut long strips of colored paper, around 1 inch wide and 6 inches long. You’ll need about 6 strips per butterfly, 2 of each color.
Step 2: Fold each strip in half without creasing the center, so it makes a soft heart shape. Glue the ends together to hold the shape.
Step 3: Stack and glue your heart shapes together to form the wings, then arrange them with the points facing in and the curves facing out for a fluttery look.
Step 4: Cut out the butterfly’s body by using blue or green paper for contrast. You can make it about the same height as your wing bundle and round off the top to form a friendly head.
Step 5: Cut two thin strips to curl into antennae and glue behind the head, then add googly eyes and draw a sweet smile with marker.
Step 6: Finally, glue the wings to the back of the body and your butterfly is ready to fly!
#29. Ladybug Pinwheel Craft
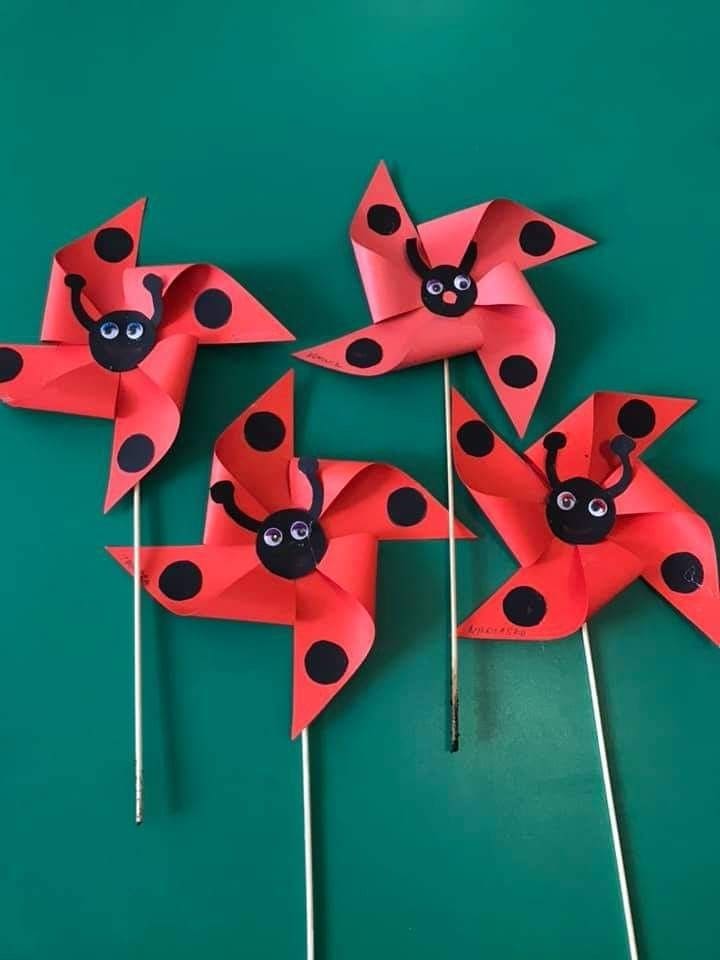
Combining the fun of pinwheels with the charm of ladybugs, this craft is perfect for kids to celebrate spring or to learn more about these beloved creatures.
Materials Needed
- 1 sheet of red construction paper and 1 sheet of black construction paper
- 2 googly eyes per pinwheel
- 1 craft stick
- Scissors
- Glue stick
- Black marker (optional)
- Paper brads
Step-by-Step Guide
Step 1: Begin by cutting a square shape out of the red construction paper, approximately 6 x 6 inches. You will need one square for each ladybug pinwheel.
Step 2: Draw five or six evenly spaced black dots on the red square. You can either use a black marker or cut out small circles from black paper to glue on.
Step 3: To create the pinwheel effect, cut diagonally from each corner of the square towards the center, but stop about an inch from the center.
Step 4: Fold every other corner towards the center of the square and glue them down. Then cut out a small circle from black construction paper and glue it to the center of the pinwheel.
Step 6: Attach the googly eyes to the black circle to give your ladybug a cute face. You can also use a black marker to draw tiny antennae on top of the black circle.
Step 7: Poke a hole through the center of the pinwheel and insert a paper brad to attach it to the top of a craft stick or wooden dowel.
#30. Handprint Flower Bookmark
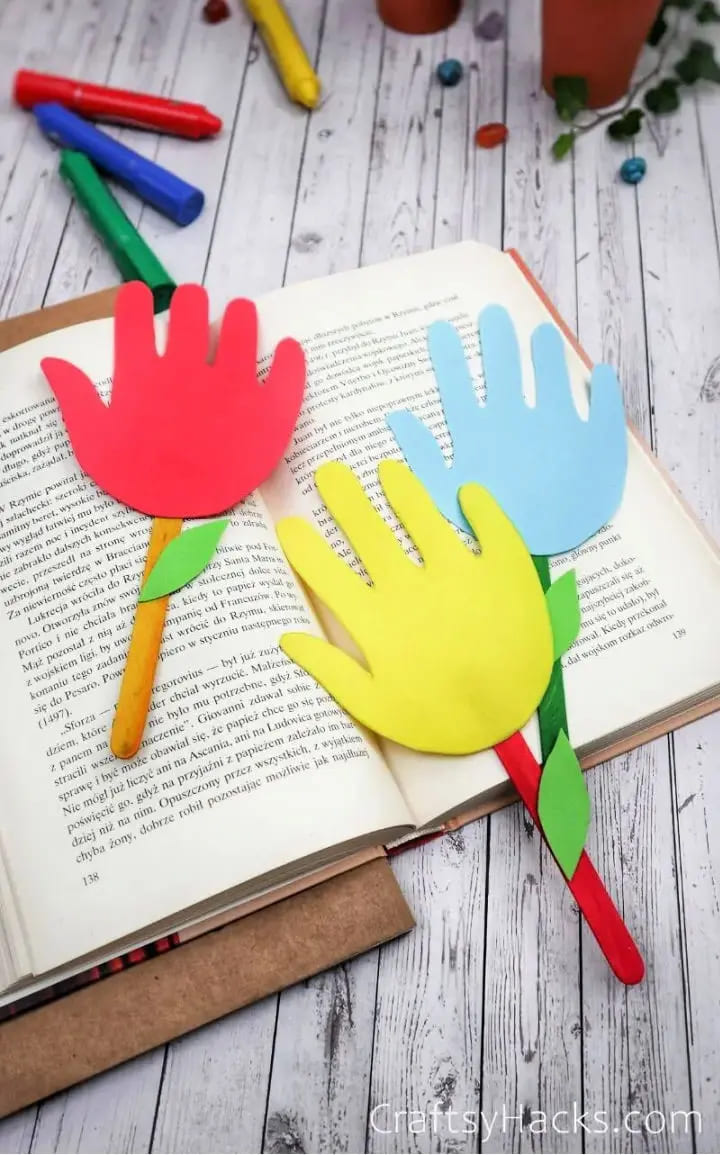
This charming flower bookmark is as sentimental as it is simple. It’s a heartwarming way for kids to create something personal using their own handprint as the bloom.
Materials Needed
- Colorful construction paper (assorted colors)
- 1 popsicle stick per bookmark (any color)
- Green paper for leaves
- Pencil
- Scissors
- Glue stick
- Optional: markers
Step-by-Step Guide
Step 1: Lay your hand flat on a piece of colored construction paper, then use a pencil to carefully trace around your fingers.
Step 2: Cut out the traced handprint and this will be your flower’s petals.
Step 3: Glue the base of the handprint to the top of a popsicle stick to form the stem.
Step 4: Cut out two small leaves from green paper and glue them onto the sides of the stick. If you want, decorate the petals with doodles or glitter.
