When October rolls in, crochet lovers feel that familiar spark, yarn baskets fill with black, orange, and purple, and hooks start flying as spooky ideas take shape.
Halloween isn’t just about costumes and candy; it’s a chance to turn soft skeins into charming pumpkins, friendly ghosts, and playful spiders.
The joy comes in watching each stitch transform into something magical for the season. Cozy evenings become creative escapes, with a cup of tea nearby and the satisfying rhythm of loops and chains.
These 20 cute Halloween crochet ideas capture that feeling, giving you projects you’ll be excited to start and proud to display.
#1. Crochet Ghost with Headwrap
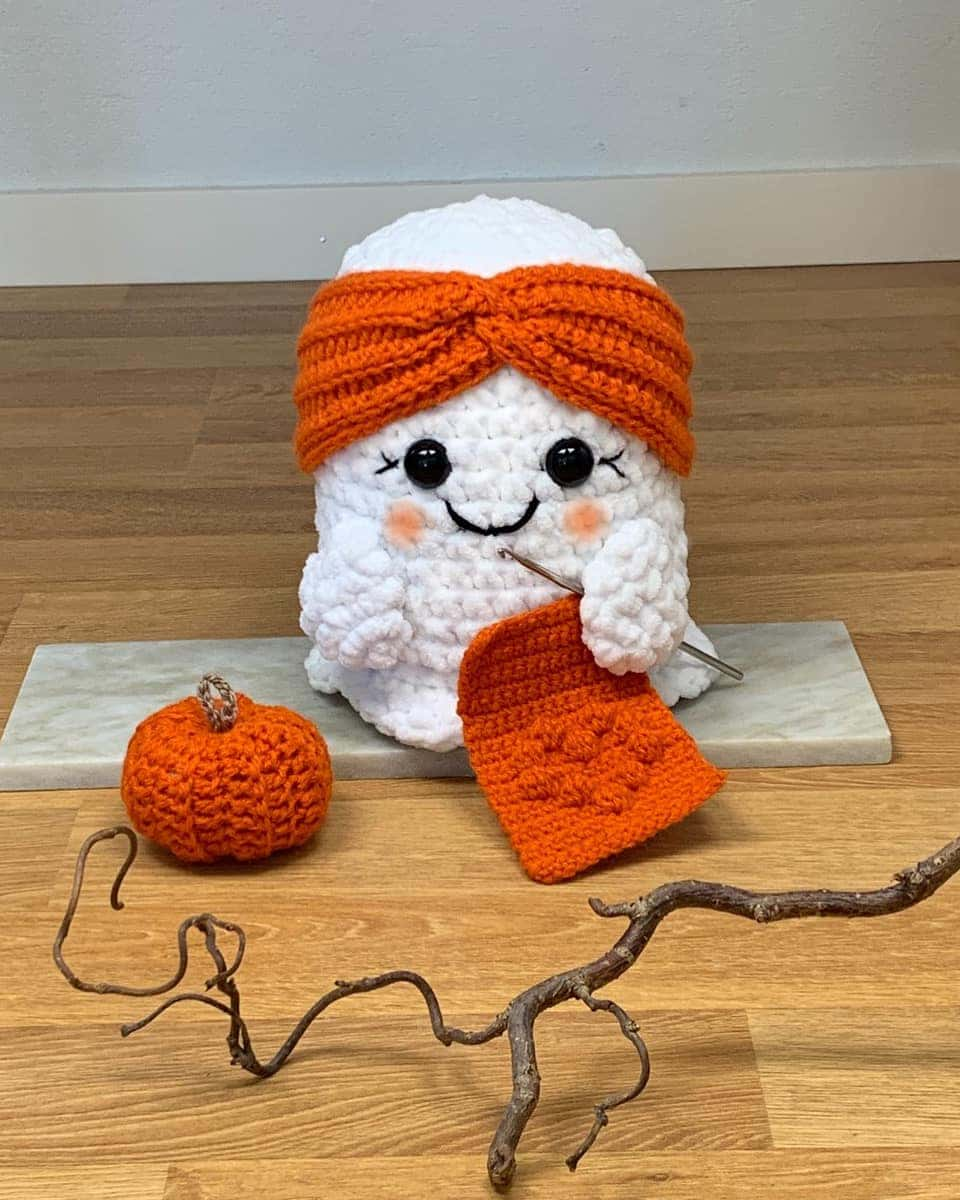
With rosy cheeks, a warm orange headwrap, and a matching work-in-progress, this friendly spirit brings pure joy to your Halloween decor.
The chunky yarn gives it a soft, plush feel, while the oversized safety eyes and embroidered smile add just the right amount of charm.
It’s the kind of project that makes people smile instantly, perfect for gifting or adding personality to a shelf or windowsill.
Materials Needed
- 100g white bulky chenille yarn (approx. 8-10mm)
- 30g orange bulky yarn (headwrap and project piece)
- 2 large black safety eyes (20mm)
- Black embroidery thread (mouth)
- Pink embroidery thread or blush (cheeks)
- 6mm crochet hook
- Yarn needle
- Polyfill stuffing
- Scissors
Step-by-step Guide
Step 1: Start the ghost body in white yarn by crocheting a round base, then work upward in continuous rounds, gradually narrowing toward the top.
Step 2: Stuff as you go to keep the shape plump and even.
Step 3: Add the safety eyes and stitch the mouth with black thread. Then lightly add blush or pink thread to the cheeks.
Step 4: For the headwrap, crochet a long strip in orange yarn and wrap it around the ghost’s head, sewing ends together at the front.
Step 5: Crochet a small square in orange for the in-progress piece and attach it to the ghost’s hands with a mini hook (real or made from wire).
Step 6: Shape and adjust everything so it sits neatly before displaying.
#2. Crochet Sugar Skull Picks
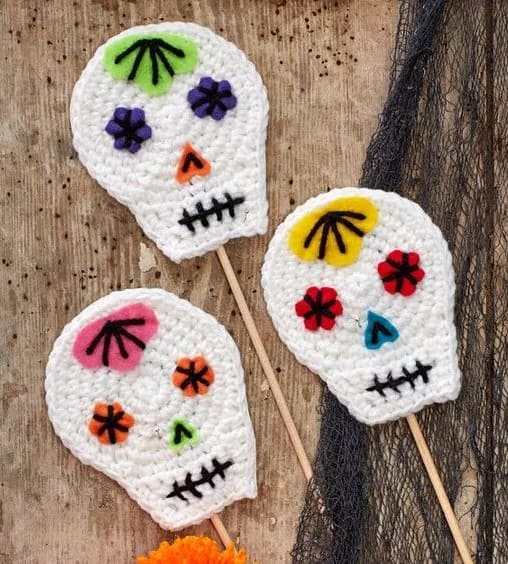
These crochet sugar skull picks are inspired by Día de los Muertos, blending Halloween fun with colorful, traditional skull designs.
Each skull is brightened with felt appliqués and embroidery, making them stand out as table centerpieces, cake toppers, or potted plant decorations.
Plus, they’re a great way to practice shaping and surface embroidery on crochet, and you can customize the colors to match your party theme.
Materials Needed
- 20g white acrylic yarn (approx. 4mm thickness)
- Scrap felt in bright colors for eyes, nose, and accents
- Black embroidery thread for mouth and outline
- 4mm crochet hook
- Yarn needle
- Fabric glue or hot glue gun
- Wooden skewers or craft sticks
- Scissors
Step-by-step Guide
Step 1: Crochet a flat oval shape in white yarn, slightly narrowing at the bottom to create a skull outline.
Step 2: Cut felt shapes for the eyes, nose, and decorative forehead patches. You should use bright, contrasting colors for a festive look.
Step 3: Sew or glue the felt pieces in place on the skull.
Step 4: Embroider the mouth and any additional decorative stitches with black thread.
Step 5: Attach a wooden skewer or stick to the back with hot glue, making sure it’s secure.
Step 6: Repeat in different colors and patterns to create a set of unique skull picks.
#3. Chunky Crochet Pumpkins
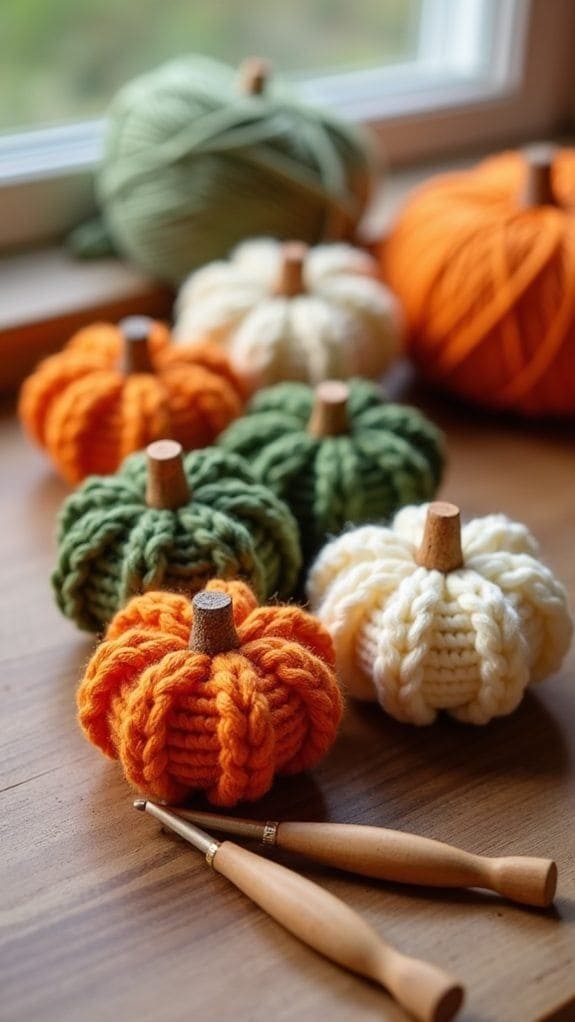
These chunky crochet pumpkins bring cozy autumn vibes to any space, whether they’re lined up on a windowsill, stacked in a basket, or scattered across your dining table.
The thick yarn gives them a plush, squishable texture, while the ribbed pattern adds a realistic pumpkin look.
Moreover, they’re quick to make, addictive to stitch, and perfect for using up leftover bulky yarn. Add a small wooden stem for a rustic finish that makes them look fresh from the pumpkin patch.
Materials Needed
- 40-60g bulky yarn in desired pumpkin colors (approx. 8-10mm thickness)
- Small wooden sticks or corks
- 8mm crochet hook
- Yarn needle
- Polyfill stuffing
- Scissors
Step-by-step Guide
Step 1: Crochet a rectangle in your chosen yarn color using a simple ribbed stitch, adjusting the size depending on how big you want the pumpkin.
Step 2: Sew the short sides of the rectangle together to form a tube.
Step 3: Gather one end of the tube and pull tight to close the bottom.
Step 4: Stuff the pumpkin with polyfill until plump.
Step 5: Gather the top and pull tight to close, then weave yarn through the center from top to bottom several times to create the pumpkin segments.
Step 6: Insert a small wooden stem in the top and secure with a few stitches or hot glue.
#4. Crochet Spider Web Blanket
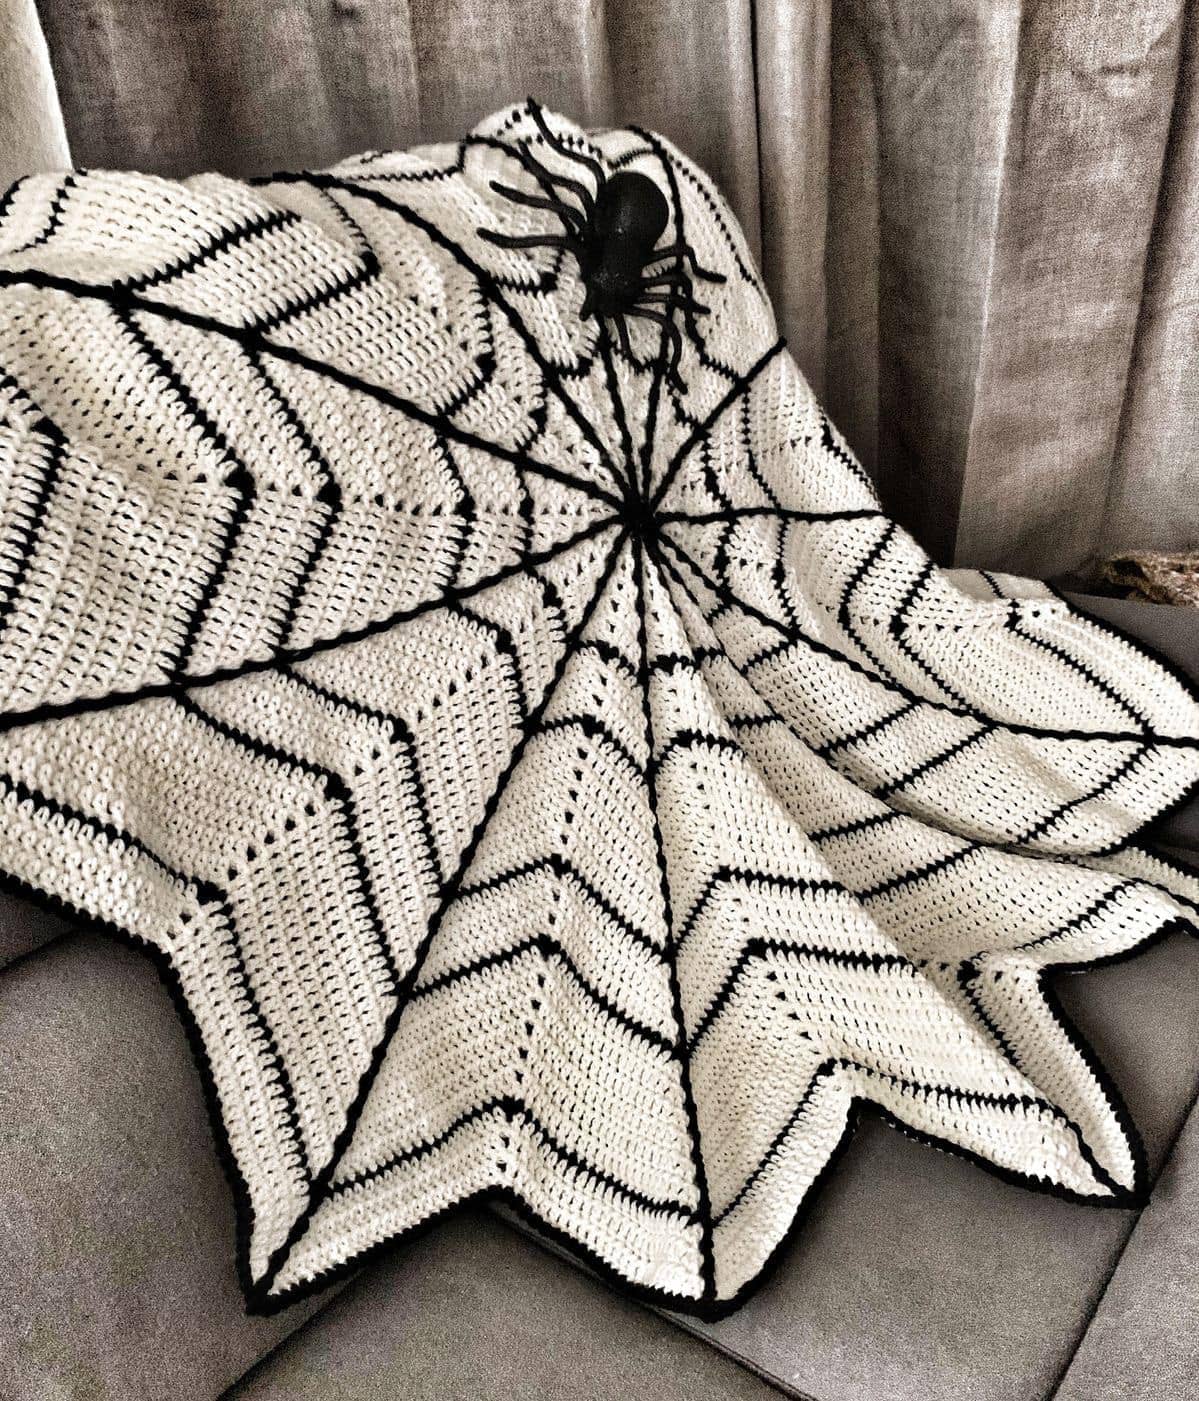
When you drape this spider web blanket over your sofa, it’s like Halloween itself has wrapped your home in a whisper of mystery.
The bold black lines form a perfect web across a creamy backdrop, making it both striking and surprisingly elegant.
And the best part is that it’s warm, soft, and far more welcoming than any real spider web. Add a large crochet or toy spider for that extra gasp factor.
Materials Needed
- 400g acrylic yarn in cream or white (approx. 4mm thickness)
- 100g acrylic yarn in black (web lines and edging)
- 5mm crochet hook
- Yarn needle
- Scissors
- Optional: large crochet or plastic spider
Step-by-step Guide
Step 1: Start with a magic ring in cream yarn and work in double crochet stitches, increasing evenly to form a large circular shape.
Step 2: As you work outward, create points by adding chain spaces and grouped stitches to mimic web angles.
Step 3: Once you’ve reached your desired blanket size, switch to black yarn and surface crochet along the stitch lines to form the web pattern.
Step 4: Finish with a black single crochet border around the entire blanket for a neat edge. If desired, sew or pin a large spider onto one section for an extra Halloween touch.
#5. Halloween Character Bunting
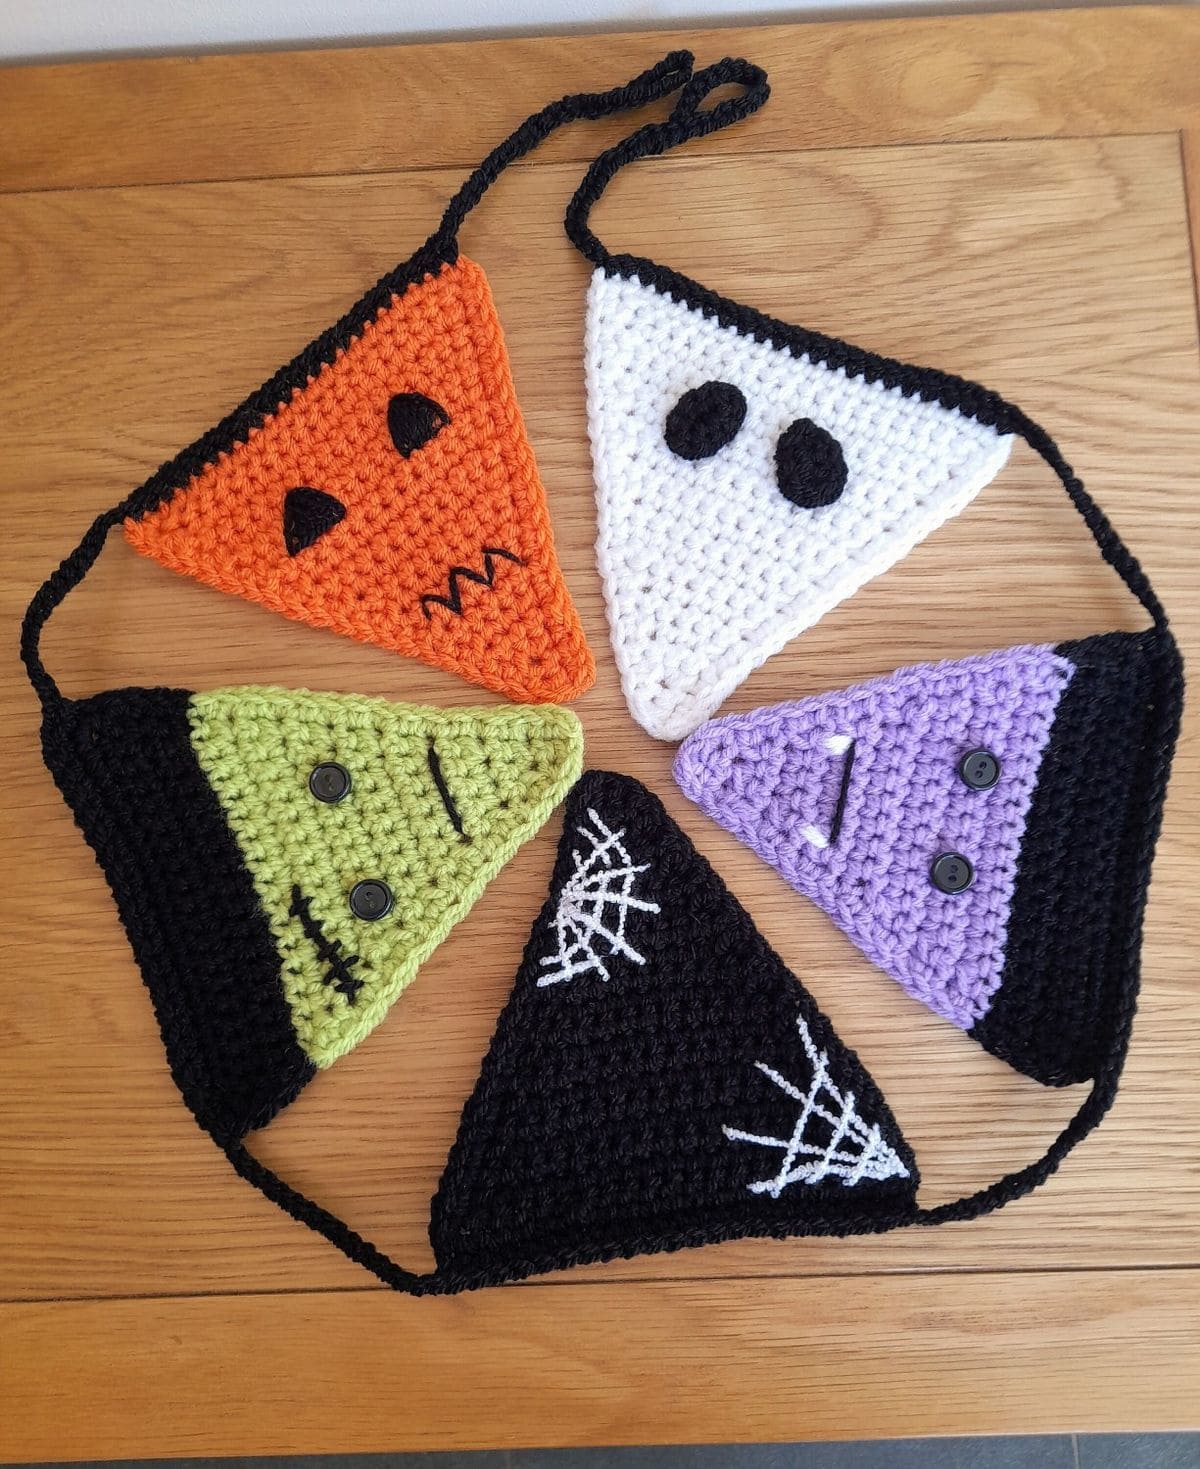
This crochet Halloween bunting is pure seasonal cheer with a string of colorful, spooky-fun triangles featuring all your favorite Halloween faces.
From the cheeky pumpkin and playful ghost to Frankenstein, a web-covered flag, and a smiling vampire, each pennant adds personality to your garland.
Bonus, it’s the perfect decoration to hang across a mantel, doorway, or party table, and it’s a fantastic stash-busting project since you can use leftover yarn for each character.
Materials Needed
- Small amounts of acrylic yarn in orange, green, white, black, purple, and accent colors (approx. 4mm thickness)
- Black buttons for eyes
- White embroidery thread for web and details
- 4mm crochet hook
- Yarn needle
- Scissors
Step-by-step Guide
Step 1: For each flag, start at the tip and crochet in rows, increasing one stitch at the start of each row until you reach the desired width (about 14-15cm).
Step 2: Add a row or two in black yarn at the top for a neat finish.
Step 3: Decorate each flag such as embroider faces, stitch on buttons, or add details like webs and fangs.
Step 4: Crochet a long chain for the garland string, then attach each flag evenly along it by slip stitching through the top edges.
Step 5: Weave in all ends and hang your bunting where everyone can enjoy it.
#6. Crochet Mini Ghost Treat Bags
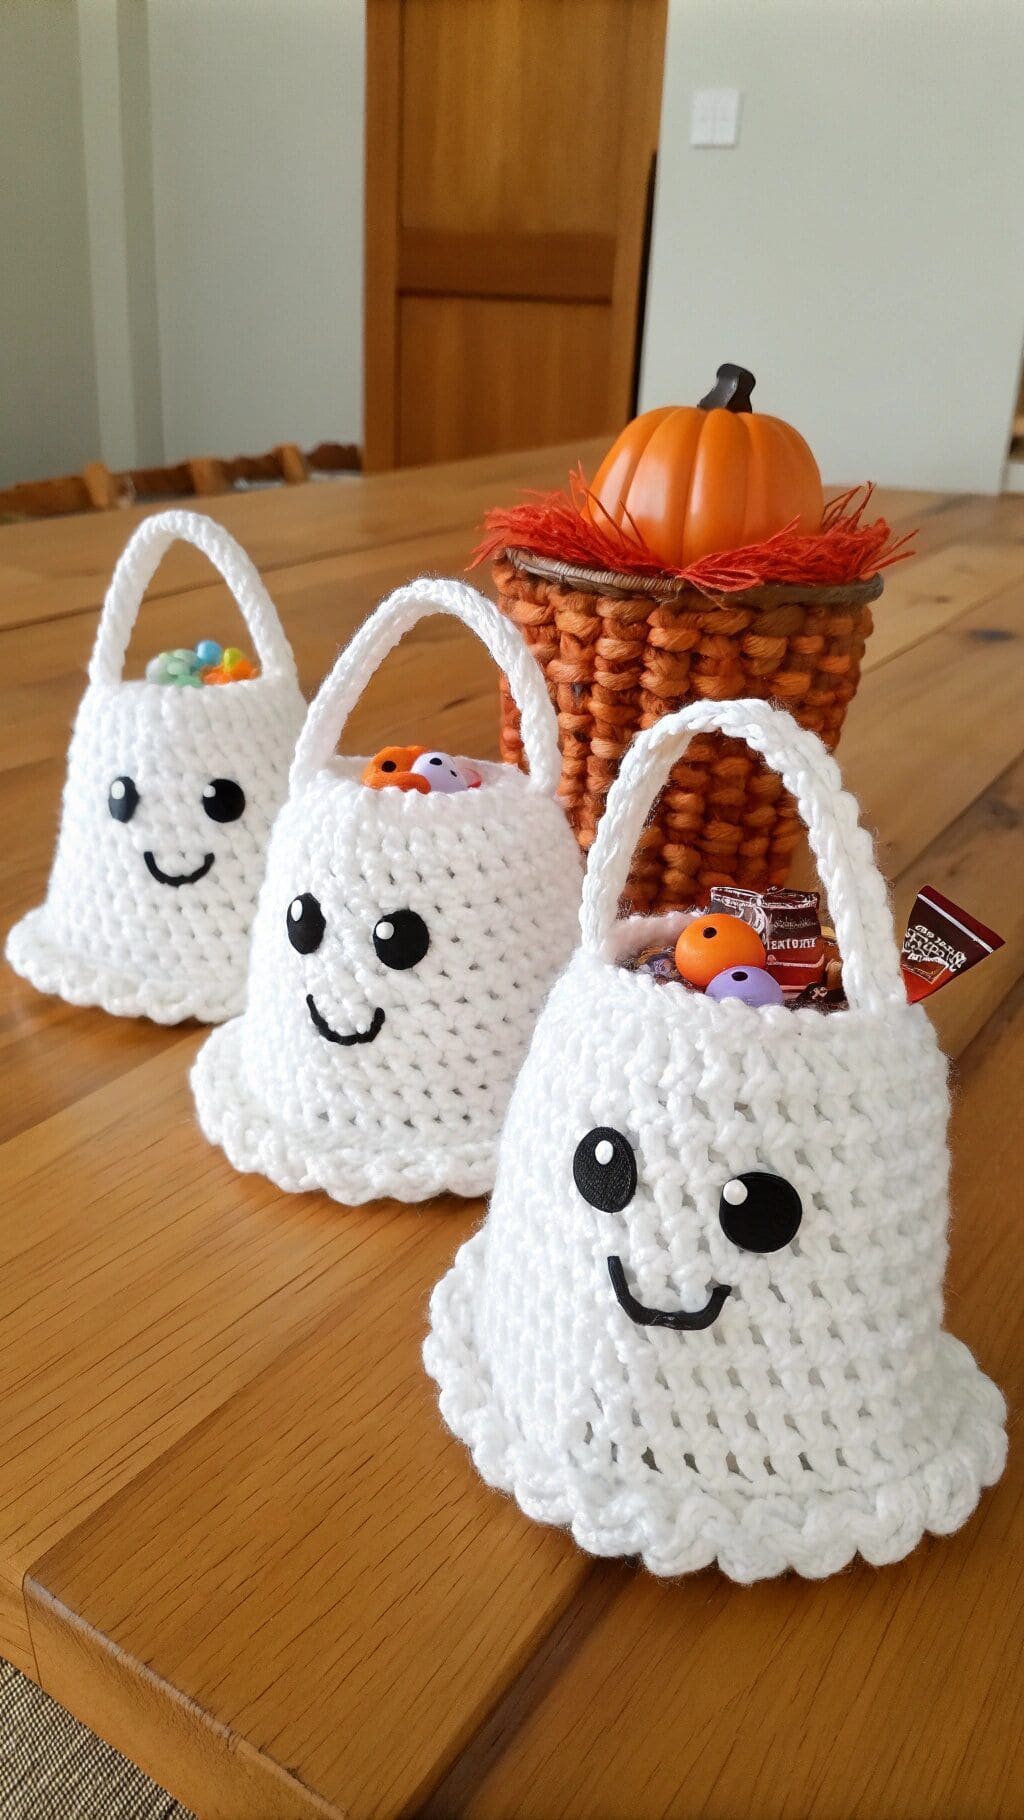
With their bright smiles and scalloped edges, these cheerful mini ghost bags are just the right size for handing out candy or giving small Halloween party favors.
The white yarn gives them a clean, crisp look, while the big safety eyes and stitched smile make them downright adorable.
They’re quick to crochet and perfect for beginners, so you can whip up a whole group of them in no time
Materials Needed
- 40g white acrylic yarn (approx. 4mm thickness)
- 2 large black safety eyes per bag (12-14mm)
- Black embroidery thread (mouth)
- 4mm crochet hook
- Yarn needle
- Scissors
- Polyfill stuffing (optional)
Step-by-step Guide
Step 1: Start with a magic ring and crochet in the round, increasing evenly until the base reaches about 6-7cm wide.
Step 2: Continue working upward without increases to form the body of the bag.
Step 3: Add a scalloped edge by working a sequence of double crochets and slip stitches around the top.
Step 4: Crochet a short, sturdy handle and attach it to opposite sides of the opening.
Step 5: Attach the safety eyes and stitch the mouth with black thread. Then fill with candy or treats and get ready to spread ghostly cheer.
Refer to: 24 Adorably Spooky Halloween Ghost Crafts to Try This Season
#7. Crochet Witch Face Coaster
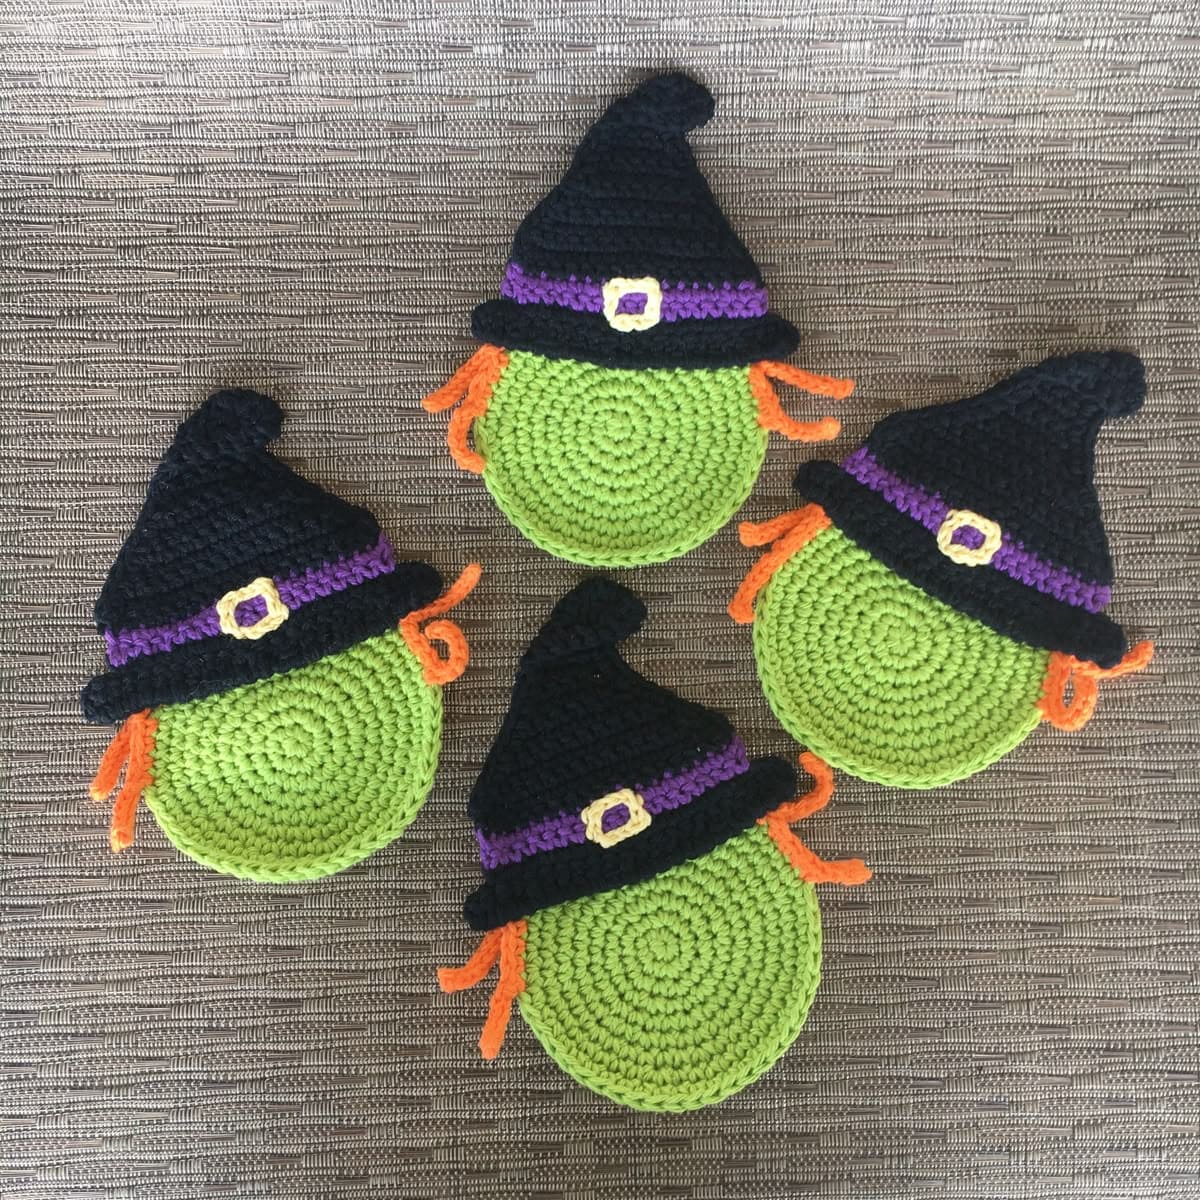
Nothing says “Halloween is here” like a cheeky little witch smiling up. These crochet witch face coasters bring playful mischief to your autumn décor while protecting your surfaces from hot drinks.
The bright green face, topped with a tilted black hat and orange yarn hair, instantly sets a whimsical mood. They’re lightweight, easy to store, and a fantastic way to use up leftover yarn from other projects.
Even beginners can follow along, and once you’ve made one, you’ll want to stitch a whole coven.
Materials Needed
- 20g cotton yarn in lime green (approx. 3-4mm)
- 15g cotton yarn in black (hat)
- 5g cotton yarn in purple (hat band)
- 2g cotton yarn in yellow (buckle)
- 5g cotton yarn in orange (hair)
- 3.5mm crochet hook
- Yarn needle
- Scissors
Step-by-step Guide
Step 1: Begin with a magic ring in lime green yarn and crochet in the round, increasing evenly until your circle measures about 9-10cm across.
Step 2: For the hat, use black yarn to create a flat triangle shape, starting from the base and working up to a point. Then add a slight curve by adjusting stitch counts on one side.
Step 3: Crochet a short strip in purple yarn for the hat band, and a small yellow rectangle for the buckle.
Step 4: Attach the hat to the top of the green face, then sew on the hat band and buckle.
Step 5: For hair, cut short strands of orange yarn and knot them along each side of the hat’s brim.
Step 6: Finally, weave in all loose ends and lightly block your coaster for a neat, flat finish.
#8. Crochet Ghost Garland
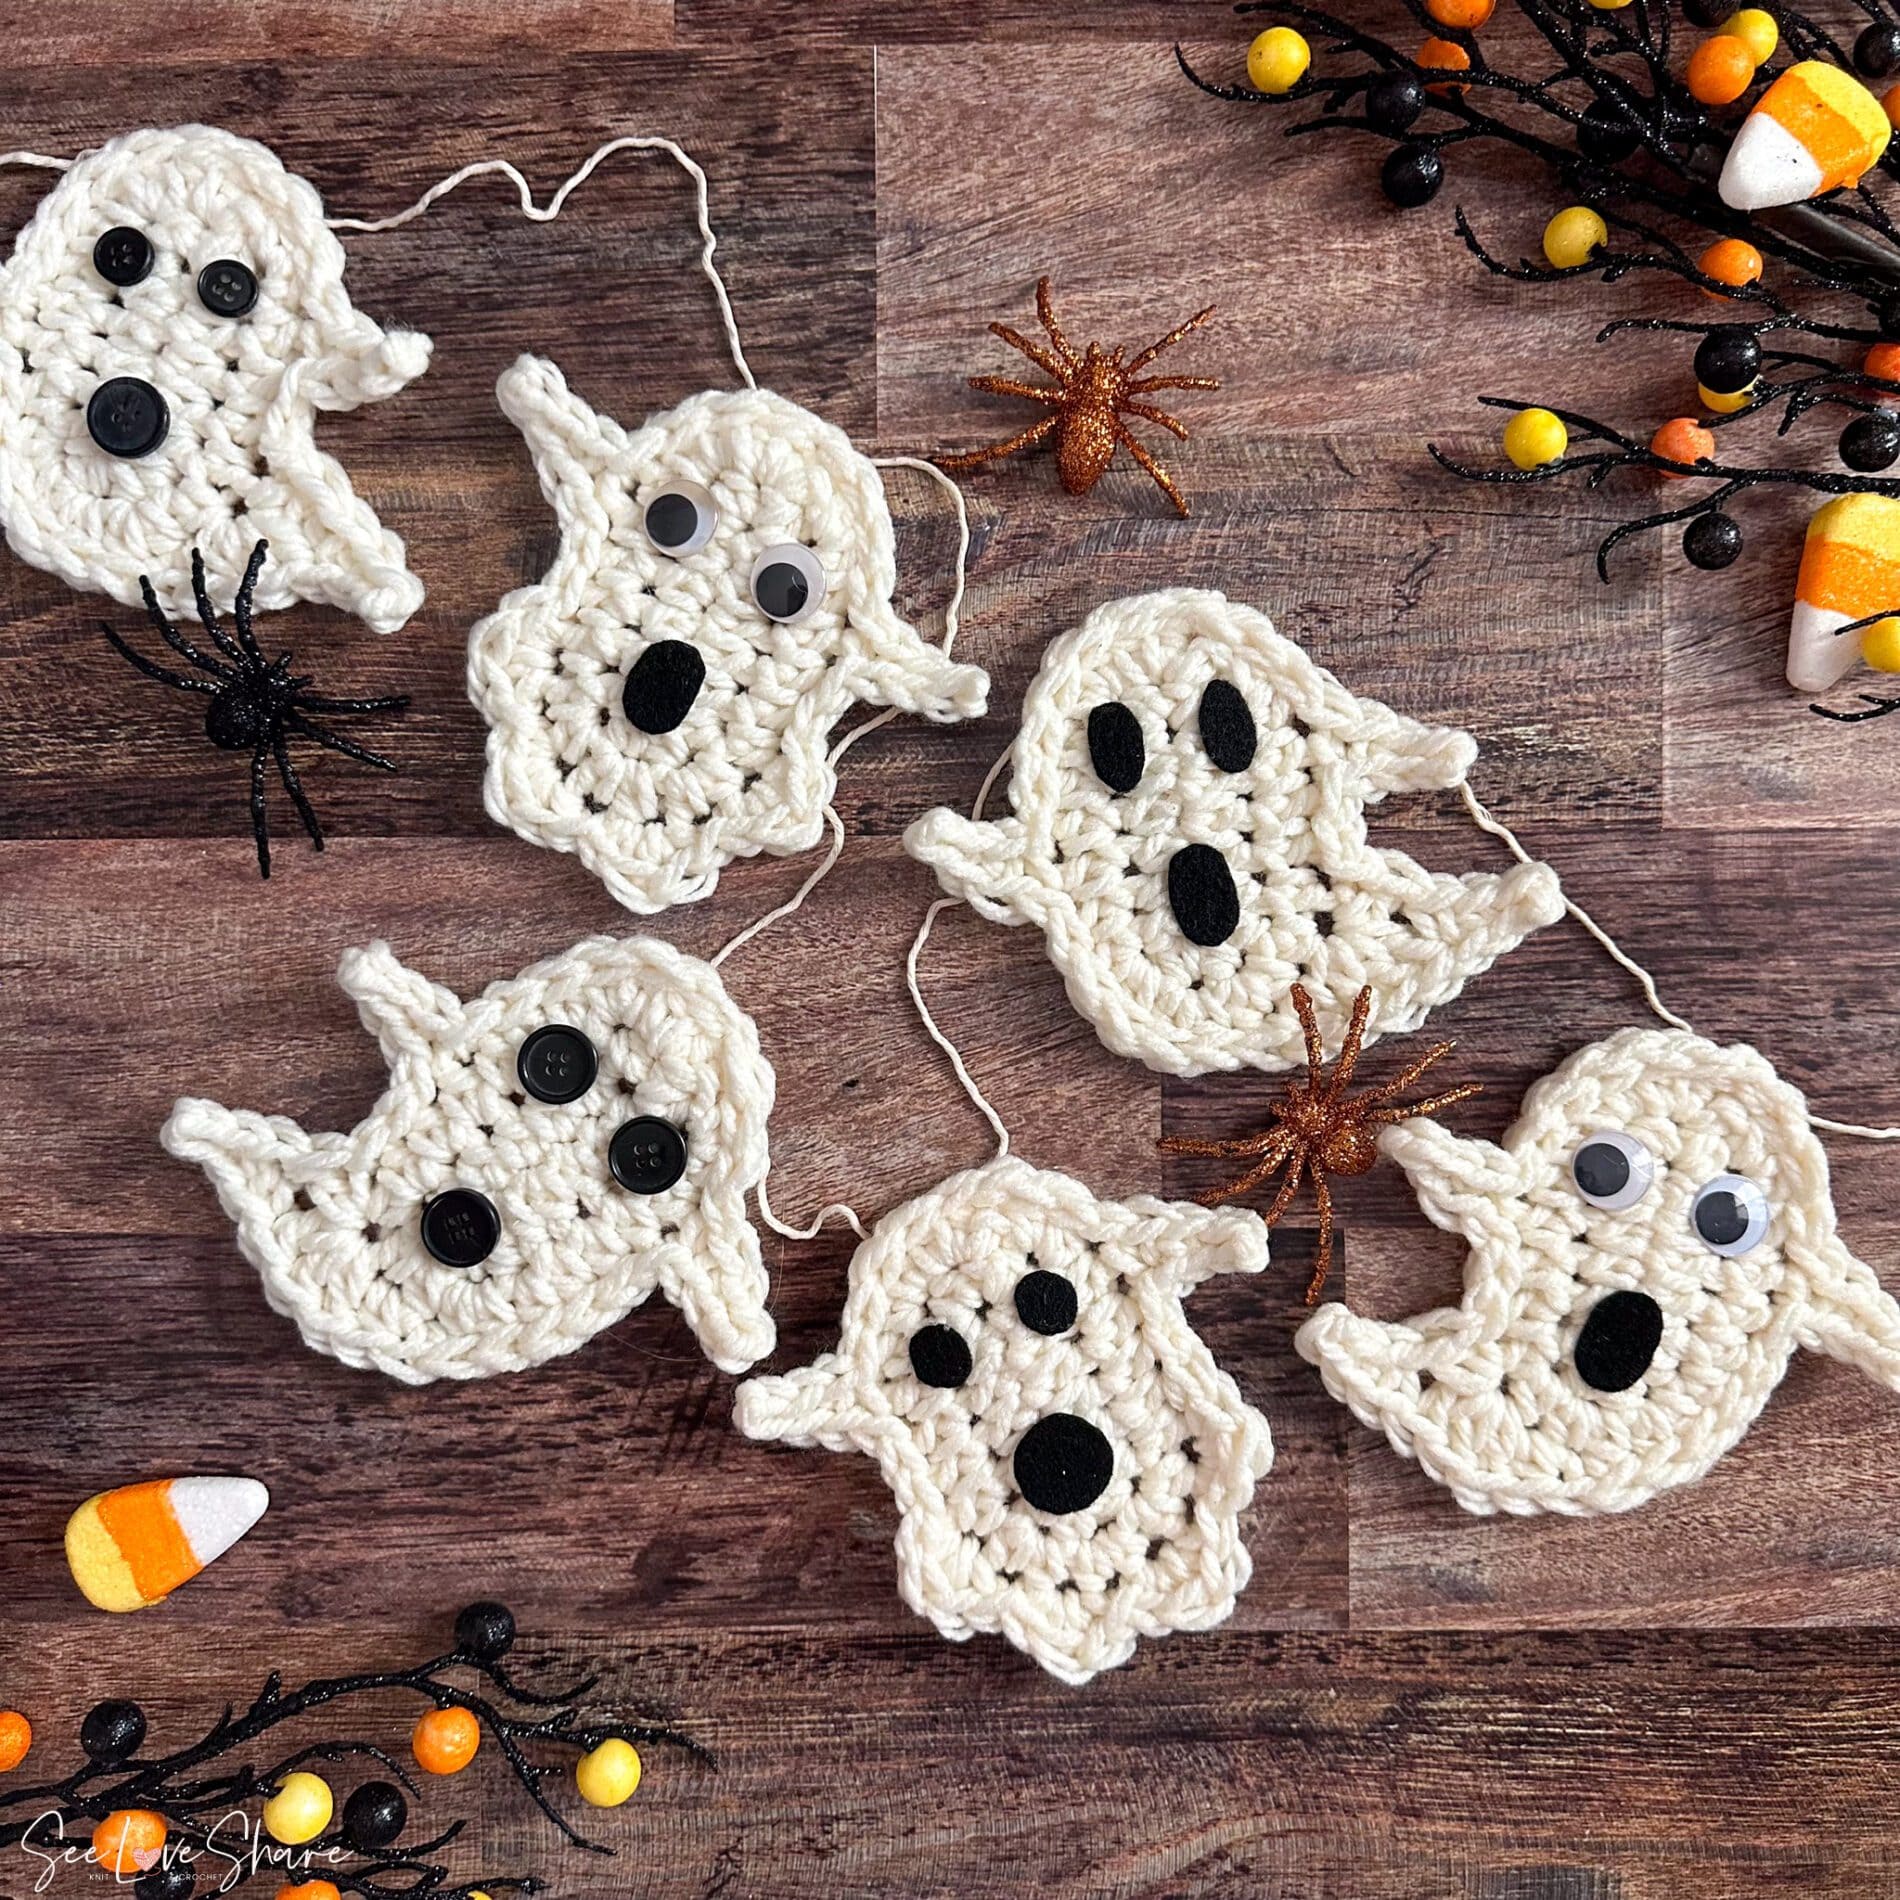
This crochet ghost garland is the kind of Halloween décor that makes everyone smile as it’s friendly, a little silly, and perfect for adding a touch of whimsy to your home.
Each little ghost has its own personality thanks to different button eyes, felt features, or googly eyes.
You can also string them together for a festive mantelpiece, hang them across a doorway, or drape them around a Halloween party table.
Materials Needed
- 50g white acrylic yarn (approx. 4mm thickness)
- Scrap black felt or buttons for eyes and mouth
- Googly eyes (optional)
- 4mm crochet hook
- Yarn needle
- Scissors
- String or chain
Step-by-step Guide
Step 1: Crochet a small oval or teardrop-shaped base for the ghost’s head.
Step 2: Continue crocheting downward, increasing slightly for the body, then creating wavy edges by alternating stitch heights.
Step 3: Add arms by chaining and slip stitching along the sides of the ghost’s body.
Step 4: Attach button eyes, felt eyes, or googly eyes, and add a felt or stitched mouth.
Step 5: Make multiple ghosts and evenly space them along a crocheted chain or piece of string. Now, hang your garland where it can flutter and catch attention.
#9. Crochet Pumpkin Treat Bag
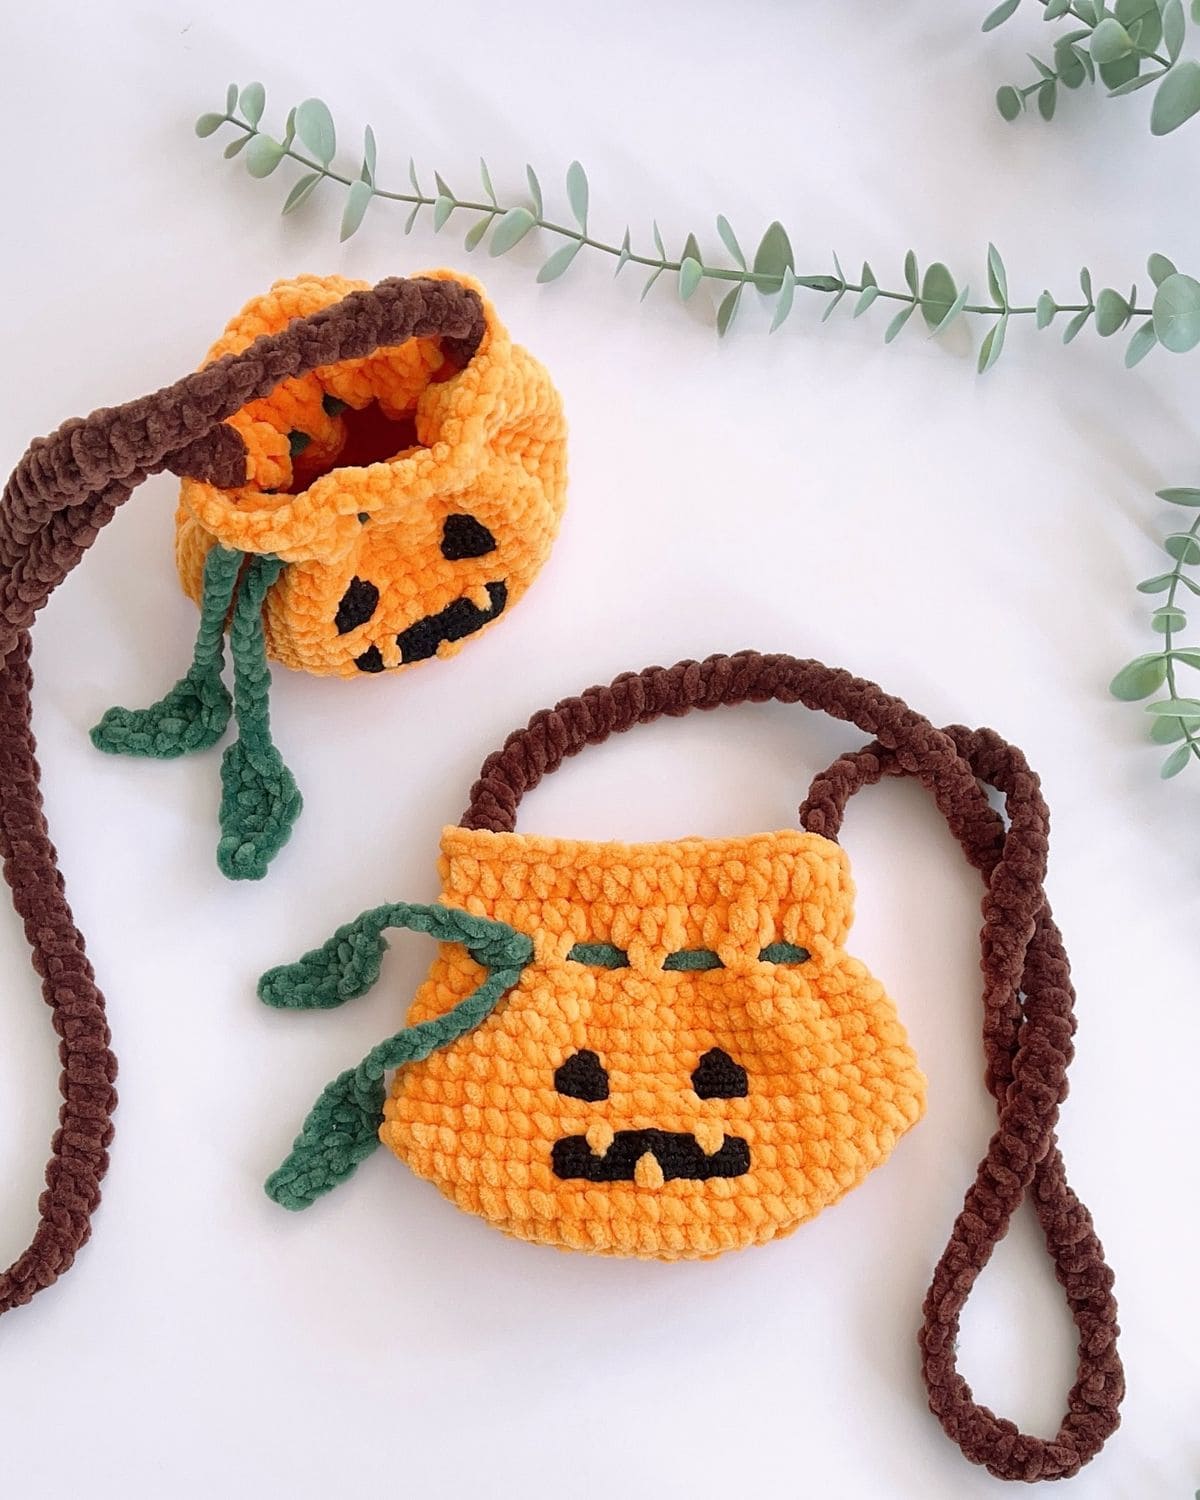
You can see this squishy, cheerful little tote isn’t just for candy, it’s a soft companion for trick-or-treat adventures, tiny keepsakes, or even a cozy home for your crochet hooks.
The plump orange stitches mimic the texture of a real pumpkin, while the green leaf ties and sturdy strap give it that rustic harvest charm.
As you work the yarn through your fingers, you’ll feel like you’re weaving autumn itself into every loop.
Materials Needed
- 100g bulky chenille yarn in orange (approx. 8-10mm)
- 20g bulky chenille yarn in brown (strap)
- 15g bulky chenille yarn in green (leaves)
- Scrap black yarn
- 6mm crochet hook
- Yarn needle
- Scissors
Step-by-step Guide
Step 1: Begin with a magic ring in the orange yarn. Crochet six single crochets into the ring and pull it tight.
Step 2: Work in continuous rounds, increasing evenly until the base reaches around 12cm across.
Step 3: Continue crocheting without increases to build the sides. Stop when the height is about 12cm, or your desired size.
Step 4: Switch to green yarn to crochet small leaf ties. These will act as a drawstring to close the bag while adding a pumpkin stem vibe.
Step 5: Using black yarn, stitch on the jack-o’-lantern face.
Step 6: For the strap, crochet a long chain with the brown yarn, then work back across with single crochets to make it sturdy. Then, attach each end securely to the top sides of the bag.
#10. Crochet Eyeball Spider
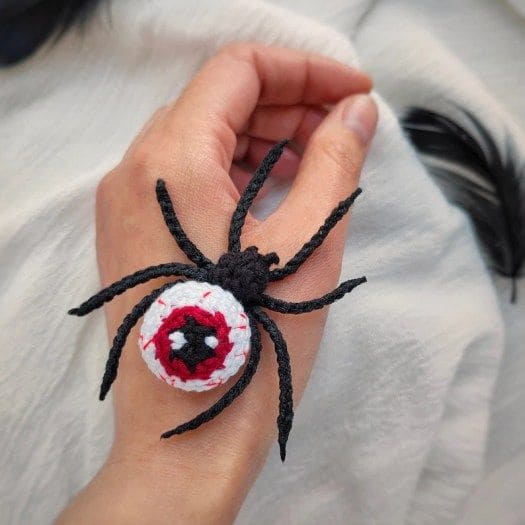
This crochet eyeball spider is the ultimate mix of creepy and creative. It’s the kind of decoration that makes people lean in for a closer look and then shiver a little.
Lightweight and flexible, it can perch on your shoulder for a costume, crawl along your Halloween table centerpiece, or hang from a thread for a jump-scare effect.
With a simple sphere for the eyeball and basic crochet chains for the legs, it’s easier to make than it looks.
Materials Needed
- 10g white cotton yarn (approx. 3mm thickness)
- Small amounts of red, black, and colored yarn
- 10g black yarn for legs
- 3mm crochet hook
- Yarn needle
- Polyfill stuffing
- Scissors
- Optional: thin craft wire
Step-by-step Guide
Step 1: Crochet a small sphere in white yarn, increasing and then decreasing to form the eyeball shape. Then stuff lightly with polyfill.
Step 2: Stitch the pupil in black yarn at the center front, then crochet or embroider the iris in your chosen color.
Step 3: Add thin red yarn lines around the iris to create a bloodshot effect.
Step 4: For each leg, chain the desired length in black yarn and slip stitch back to make it sturdier. Make eight legs in total.
Step 5: Attach the legs evenly around the sides of the eyeball. Also, bend into shape if using wire, or leave flexible for a softer, dangly look.
#11. Halloween Snow Globe Appliqués
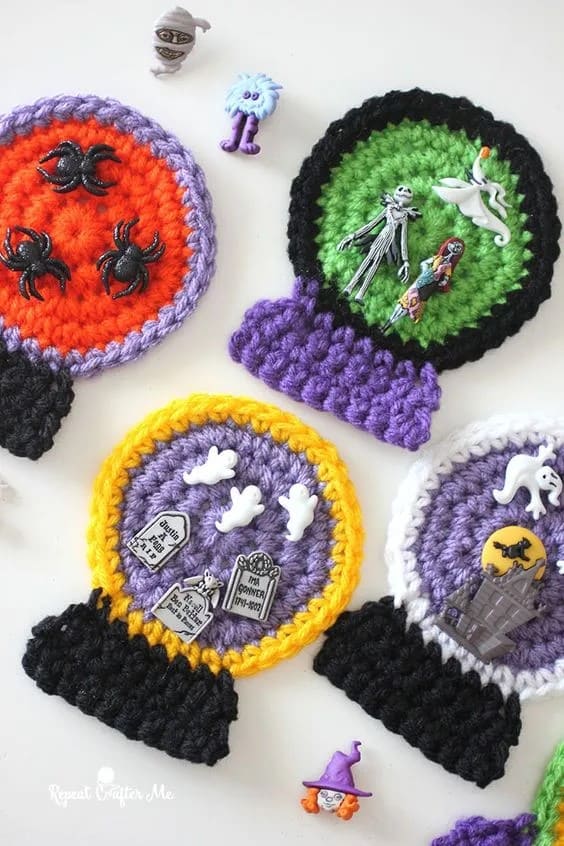
These Halloween snow globe appliqués are a charming twist on a classic winter decoration, except instead of snow, you’ve got ghosts, spiders, pumpkins, and haunted houses floating inside.
They’re perfect for stitching onto tote bags, adding to a Halloween quilt, or using as wall décor.
The base is quick to crochet, and then you can go wild with embellishments like tiny charms, felt cutouts, or even buttons.
Materials Needed
- Small amounts of acrylic yarn in orange, green, purple, black, white, and yellow (approx. 4mm thickness)
- 4mm crochet hook
- Yarn needle
- Scissors
- Assorted Halloween charms or felt shapes
- Hot glue gun or sewing thread
Step-by-step Guide
Step 1: Crochet a flat circle in your chosen background color, about 8-10cm across.
Step 2: Switch to a contrasting yarn and work a single crochet border around the circle for a framed look.
Step 3: Create the snow globe base by crocheting a small rectangle in black yarn, then stitch it to the bottom of the circle.
Step 4: Arrange your charms or felt shapes in the globe area. Play with layouts until you like the scene.
Step 5: Attach decorations using hot glue or by sewing them directly onto the crochet background.
Step 6: Weave in any remaining yarn ends and your spooky snow globe is ready to display or attach to other projects.
#12. Witch Hat Eyeball Amigurumi
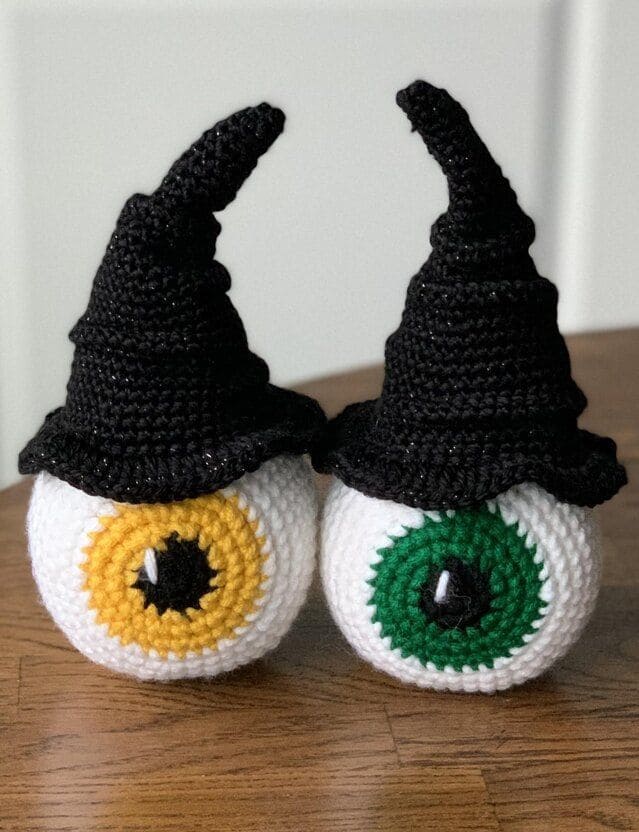
These wide-eyed little characters are equal parts spooky and silly, making them a perfect conversation starter for your Halloween décor.
With oversized crocheted irises and jaunty witch hats, they seem like magical eyeballs that have rolled right out of a wizard’s spellbook.
You can make them in different iris colors to create a whole watchful crew, and they look fantastic on a mantel, as table centerpieces, or peeking out from a bookshelf.
Materials Needed
- 30g white acrylic yarn (approx. 4mm thickness)
- 10g black acrylic yarn (pupil and hat)
- 10g yarn in chosen iris color (yellow, green, blue, etc.)
- 4mm crochet hook
- Yarn needle
- Polyfill stuffing
- Scissors
Step-by-step Guide
Step 1: Start the eyeball with white yarn, crocheting in the round and increasing until you have a sphere about 7-8cm wide.
Step 2: For the iris, switch to your chosen color yarn and crochet a flat circle, then attach it to the front of the eyeball.
Step 3: Add the pupil in black yarn, either crocheted as a small flat circle or stitched directly onto the iris.
Step 4: Stuff the eyeball firmly with polyfill and close the opening.
Step 5: For the witch hat, crochet a small cone in black yarn, gradually increasing until it forms the brim. Next, add a few extra rounds for a floppy look.
Step 6: Place the hat on top of the eyeball and sew in place or leave it removable for a fun twist.
#13. Crochet Dripping Candle Decoration
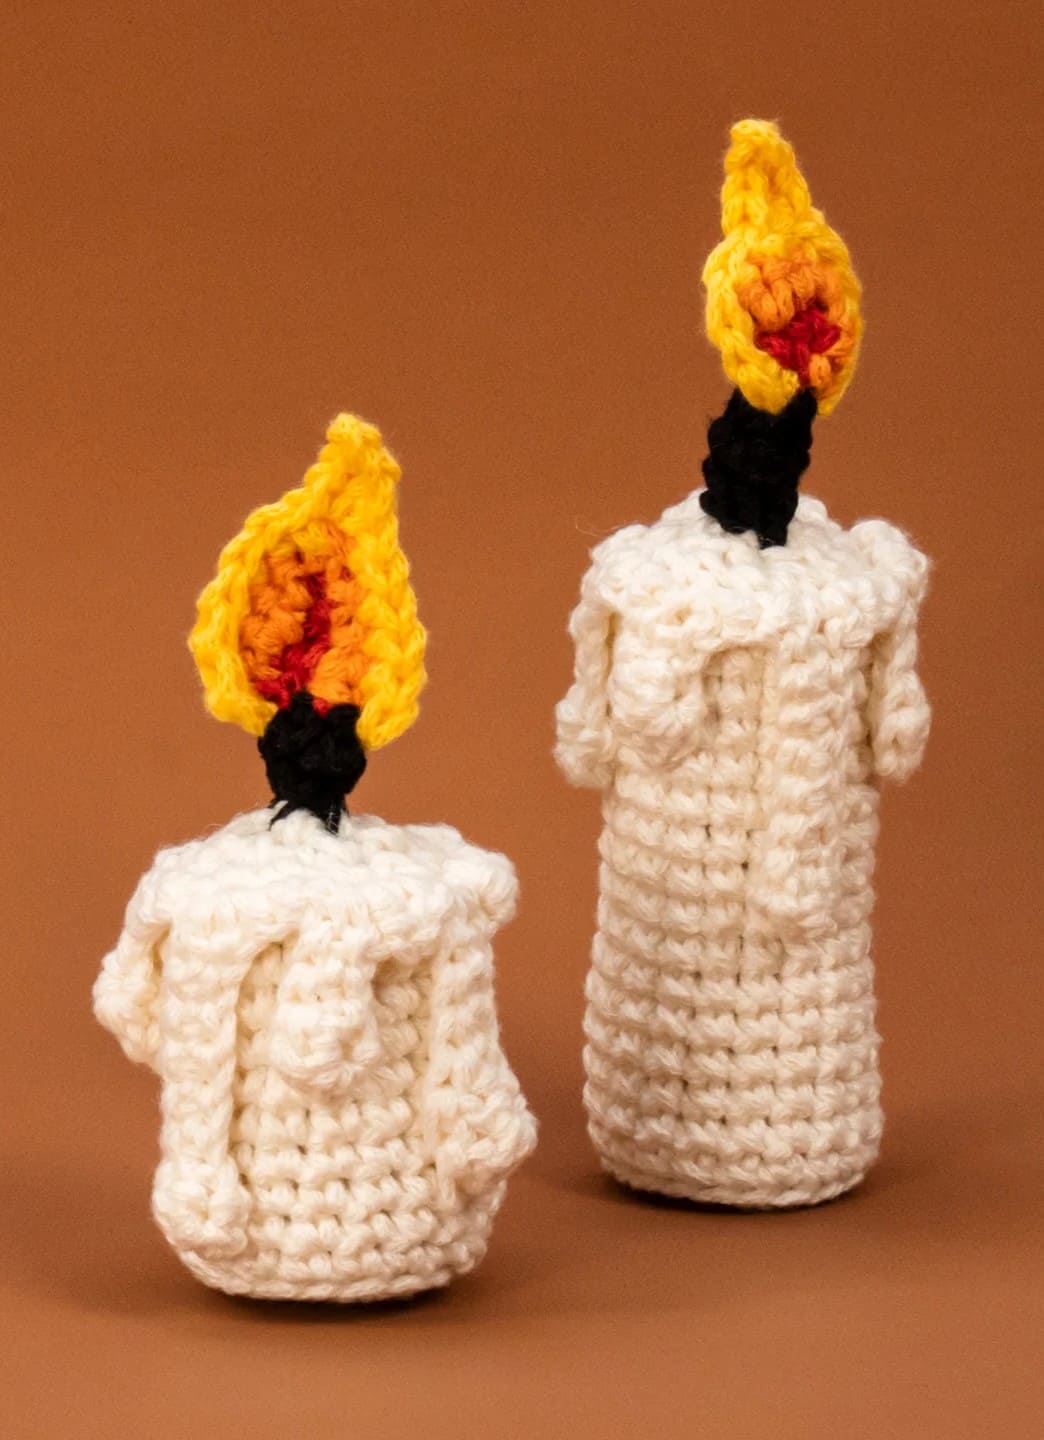
Nothing sets a Halloween mood quite like the flicker of candlelight, except here, the glow is made from yarn, so it’s safe to place anywhere.
These crochet dripping candles look eerily realistic with their textured wax drips and vibrant flames.
They’re perfect for a spooky dinner table, haunted mantle. You can make them in varying heights for a dramatic effect, and because they’re made entirely from yarn, you can keep them out all season without worry.
Materials Needed
- 30g cotton yarn in cream or white (approx. 4mm thickness)
- 10g cotton yarn in black (wick)
- 5g cotton yarn in red (flame center)
- 10g cotton yarn in orange
- 10g cotton yarn in yellow
- 4mm crochet hook
- Yarn needle
- Scissors
- Polyfill stuffing
Step-by-step Guide
Step 1: Begin with a magic ring in cream yarn and crochet in the round, increasing until you reach the candle’s desired base width.
Step 2: Work in continuous rounds without increases to build the candle’s height, stuffing lightly as you go.
Step 3: To create the drips, crochet small chains and attach them around the top edge, letting them hang slightly.
Step 4: For the flame, start with a small red center, switch to orange for the middle section, and finish with yellow, shaping it into a teardrop.
Step 5: Crochet a short black wick and attach the flame securely to its top.
Step 6: Finally, sew the wick into the candle’s center, adjust the drips, and shape the flame for a lively look.
#14. Plush Crochet Bat with Bow Tie
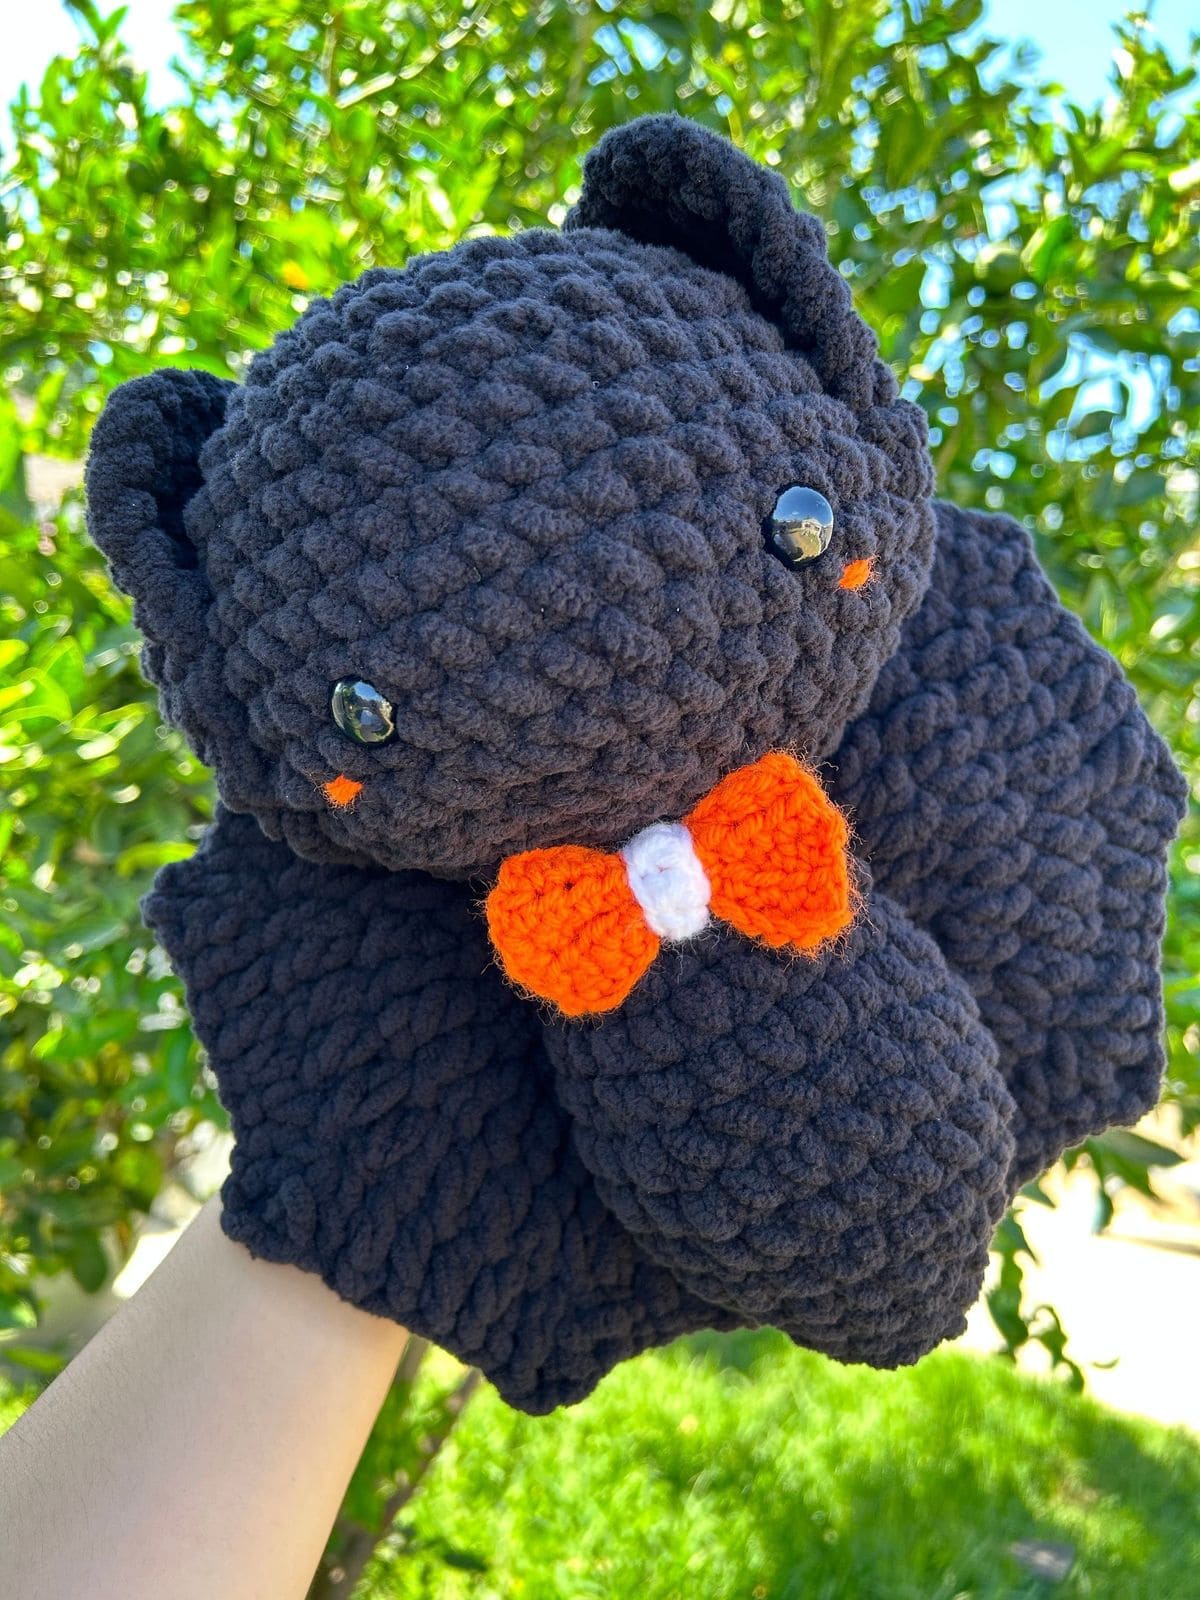
Perfect for cuddling or decorating, this plush crochet bat a wonderful Halloween project for kids and the young-at-heart.
The chunky yarn makes it quick to work up and gives it a cloud-like texture, while the simple shaping keeps it beginner-friendly.
You can make it in classic black, or try purple or gray for a whimsical twist. The little bow tie adds a festive pop of color that makes your bat look party-ready.
Materials Needed
- 150g black bulky chenille yarn (approx. 8-10mm thickness)
- Small amounts of orange and white yarn
- 9mm safety eyes
- 6mm crochet hook
- Yarn needle
- Polyfill stuffing
- Scissors
Step-by-step Guide
Step 1: Crochet the bat’s body as a sphere using black yarn, increasing and then decreasing while stuffing firmly as you go.
Step 2: Make two smaller spheres for the bat’s head and attach it securely to the body.
Step 3: Crochet two wide, flat wing shapes, adding slight curves by adjusting stitch counts on the edges.
Step 4: Attach the wings to the sides of the body so they can wrap forward slightly. Then insert safety eyes into the head, then embroider tiny orange cheeks for a pop of color.
Step 5: For the bow tie, crochet a small rectangle in orange yarn, wrap the center with white yarn, and sew it just under the bat’s chin.
Step 6: Shape the wings and fluff the body before displaying your adorable Halloween companion.
Read more: 20+ Cute Bat Crafts for Adults and Kids to Make This Spooky Season
#15. Crochet Skull Keychain
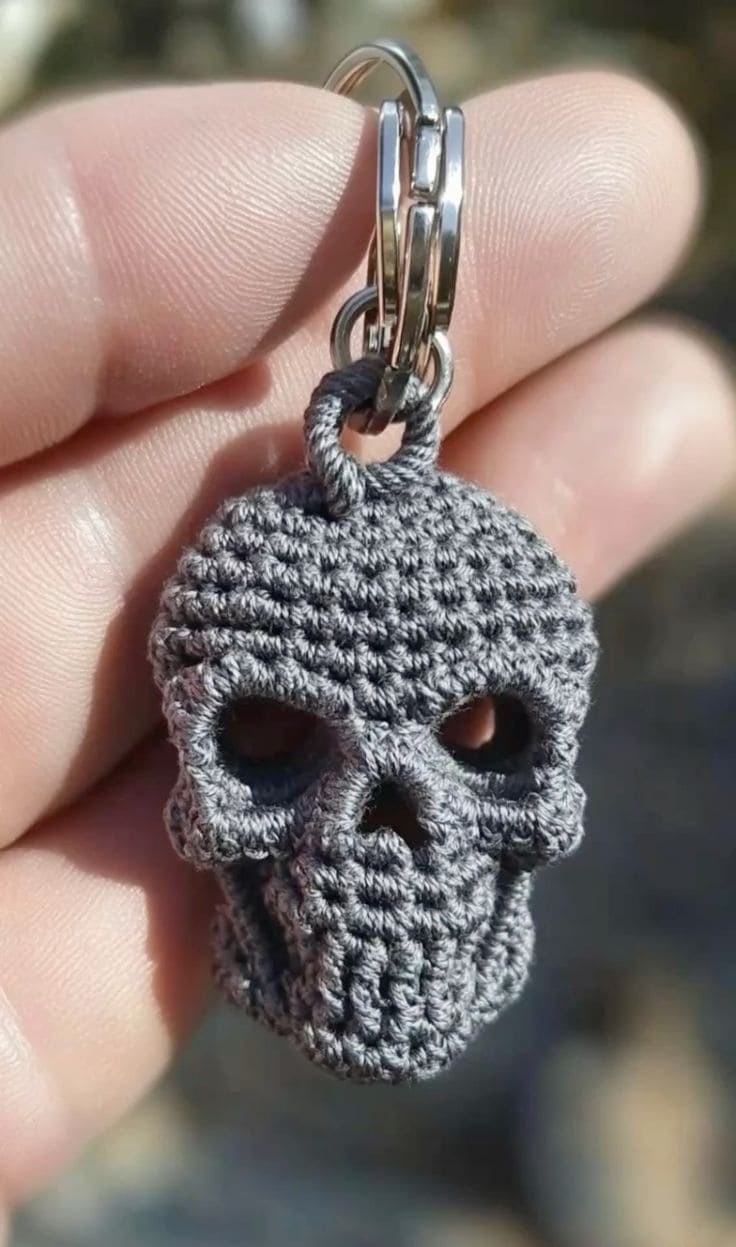
Look at this crochet skull keychain! It is small, bold, and full of attitude, perfect for adding a touch of Halloween spirit to your bag or keys all year round.
The detailed shaping brings out the eye sockets, cheekbones, and teeth, making it an eye-catching little piece.
Despite its intricate look, it’s a manageable project for intermediate crocheters, and the result is a sturdy accessory that’s both spooky and stylish.
Materials Needed
- 10g cotton yarn in gray (approx. 2-3mm thickness)
- 2mm crochet hook
- Yarn needle
- Scissors
- Metal keyring
- Optional: fabric stiffener
Step-by-step Guide
Step 1: Begin with a magic ring and crochet in the round, shaping the top of the skull with gradual increases.
Step 2: Start defining the eye sockets by chaining and skipping stitches, then continuing the round. Work a few rounds without increases to form the midsection of the skull.
Step 3: Shape the jaw by decreasing stitches gradually, adding textured stitches to mimic teeth.
Step 4: Once the skull shape is complete, fasten off and weave in ends neatly.
Step 5: Attach the top of the skull to a metal keyring using a sturdy loop of yarn.
#16. Crochet Halloween Character Treat Buckets
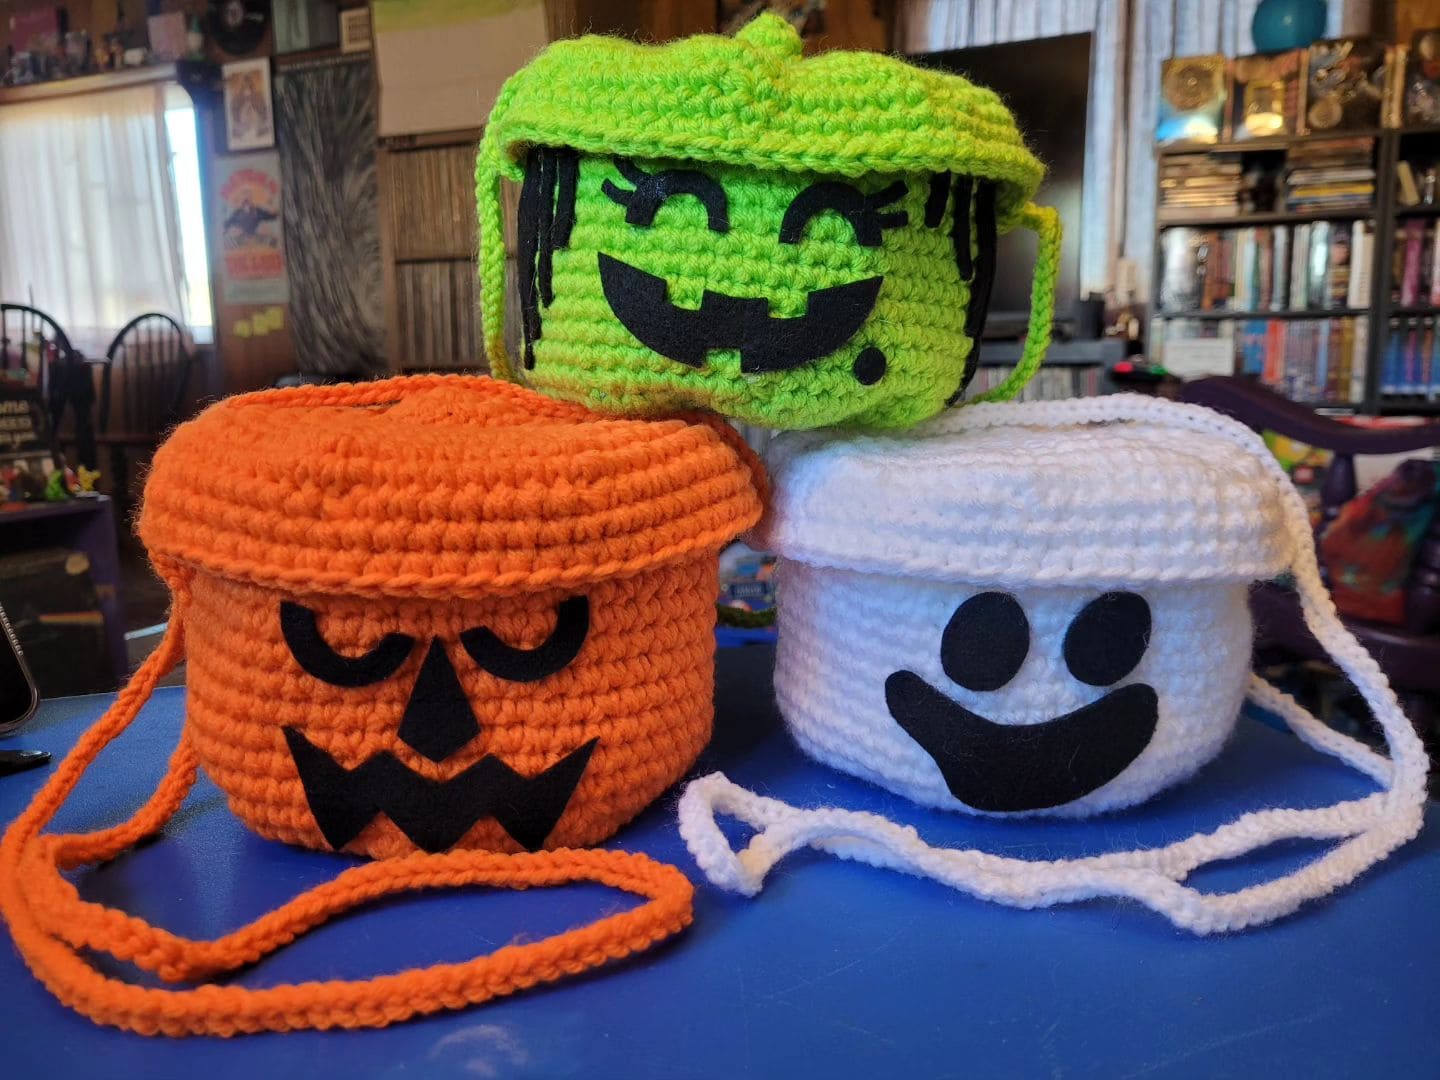
Why settle for plain candy buckets when you can show up with these adorable crochet characters? Each one has its own personality, all ready to collect the night’s sweetest treasures.
They’re lightweight for little hands, yet sturdy enough to carry a serious candy haul. Best of all, you can mix and match colors and facial expressions to make them truly yours.
Whether you’re trick-or-treating or filling them with goodies for a Halloween party, these buckets bring a handmade charm that plastic ones just can’t match.
Materials Needed
- 50g acrylic yarn in orange, green, and white (approx. 4mm thickness)
- 20g black felt
- 4mm crochet hook
- Yarn needle
- Scissors
- Hot glue or fabric glue
Step-by-step Guide
Step 1: Start with a magic ring in your chosen yarn color and crochet in the round, increasing evenly until you reach the bucket’s desired base size (about 12-15cm wide).
Step 2: Work upward without increasing to form the bucket’s height, around 10-12cm tall.
Step 3: For the lid, crochet a flat circle slightly wider than the base, then add a short round of single crochet for a snug fit.
Step 4: Crochet a strap by chaining the desired length and working back with single crochet for sturdiness. Attach it to opposite sides of the bucket.
Step 5: Cut eyes, mouths, and other facial features from black felt. Then glue or stitch them onto the front.
Step 6: Repeat the process in different colors for each character and have fun creating unique expressions.
#17. Crochet Witch Ornament with Broom
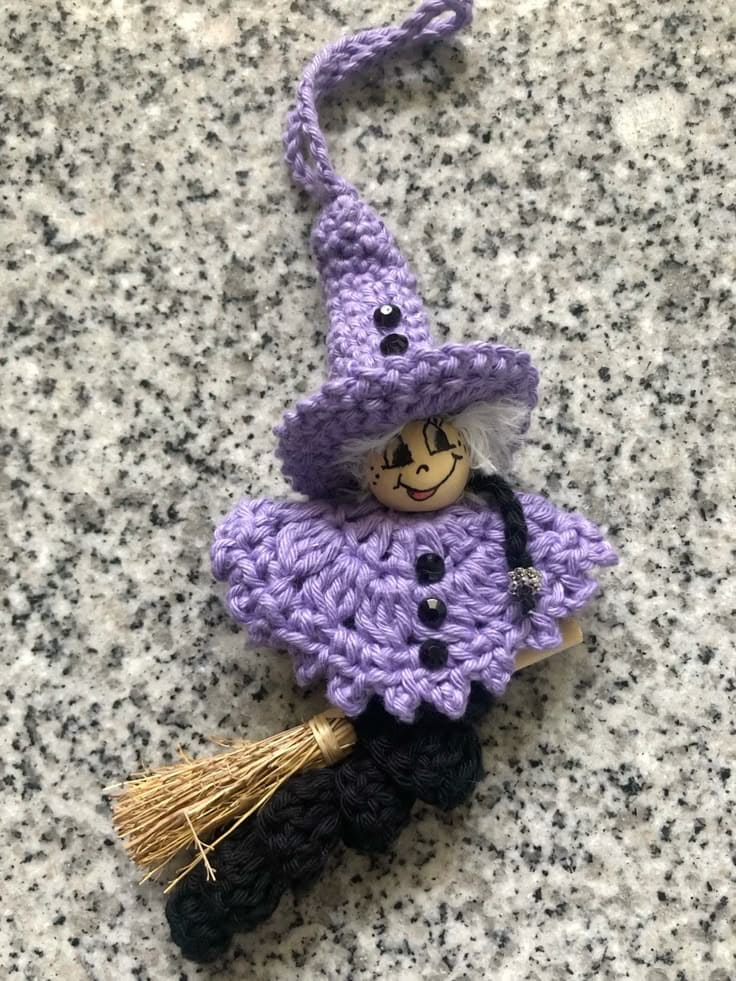
It’s impossible not to smile when you see this little crochet witch flying in for Halloween. With her mischievous grin, and tiny broomstick, she’s the perfect charm to hang on a doorknob, or even on a spooky tree.
The mix of crochet stitches, a painted wooden bead face, and natural straw broom bristles gives her an endearing handmade personality.
She’s light enough to dangle anywhere, yet detailed enough to be a conversation starter. Once you make one, you might find yourself crafting a whole coven to gift to friends.
Materials Needed
- 15g cotton yarn in lavender (approx. 3mm thickness)
- 10g cotton yarn in black (pants and broom handle)
- Small wooden bead (2-3cm)
- Small bundle of natural straw
- Black embroidery thread
- 3mm crochet hook
- Small buttons or beads
- Yarn needle
- Scissors
Step-by-step Guide
Step 1: Start with the hat, crochet a cone shape in lavender yarn, working from the tip down, then widen slightly to form a brim.
Step 2: Crochet a small cape in the same lavender yarn using shell or fan stitches for texture.
Step 3: For the legs, crochet two short black tubes and stitch them together at the top.
Step 4: Paint the wooden bead with the witch’s facial features and let it dry completely before assembling.
Step 5: Attach the bead between the hat and cape, then sew on the legs underneath.
Step 6: Make the broom by tying straw pieces around a short crocheted black handle, securing tightly with thread.
Step 7: Finally, add a crochet loop to the top of the hat for hanging, and decorate with tiny buttons or beads.
#18. Crochet Spider Web Hoop
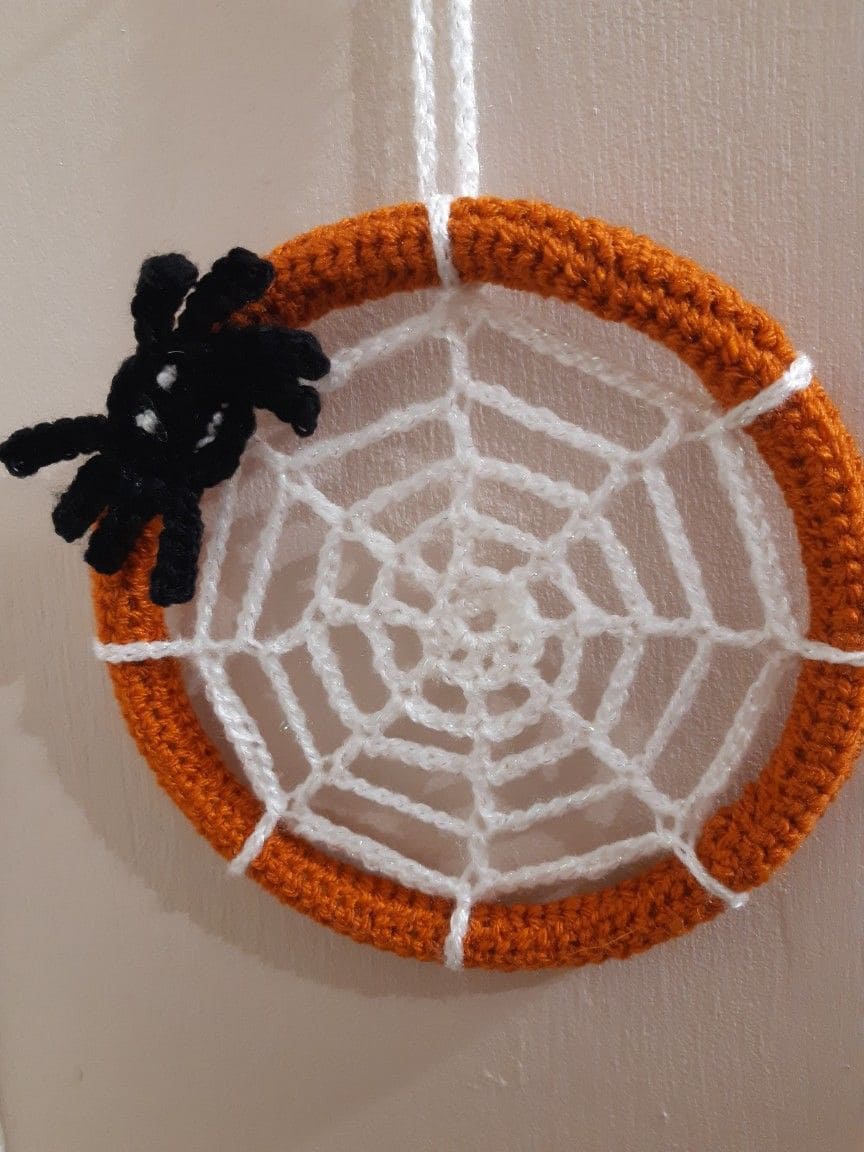
There’s a quiet elegance in a spider’s web. This crochet spider web hoop captures that haunting beauty in yarn form, making it a perfect decoration for your Halloween wall or door.
The warm orange border frames the crisp white web, while a little black spider perches on the edge, ready to welcome guests with a playful fright.
Whether you hang it by itself or pair it with other Halloween pieces, it will draw the eye every time.
Materials Needed
- 30g acrylic yarn in orange (approx. 4mm thickness)
- 20g acrylic yarn in white (web)
- 10g acrylic yarn in black (spider)
- 15–20cm embroidery hoop or metal ring
- 4mm crochet hook
- Yarn needle
- Scissors
Step-by-step Guide
Step 1: Cover the embroidery hoop by crocheting single stitches around it with orange yarn, joining ends neatly.
Step 2: Using white yarn, create the web by chaining from one side of the hoop to the other, forming evenly spaced spokes.
Step 3: Starting from the center, crochet chain loops around the spokes, connecting as you spiral outward to mimic a web pattern.
Step 4: For the spider, crochet a small round body in black yarn, then add short chains for legs and stitch them securely.
Step 5: Attach the spider to one side of the hoop, and add a loop of yarn at the top for hanging.
#19. Crochet Halloween Spider Decoration
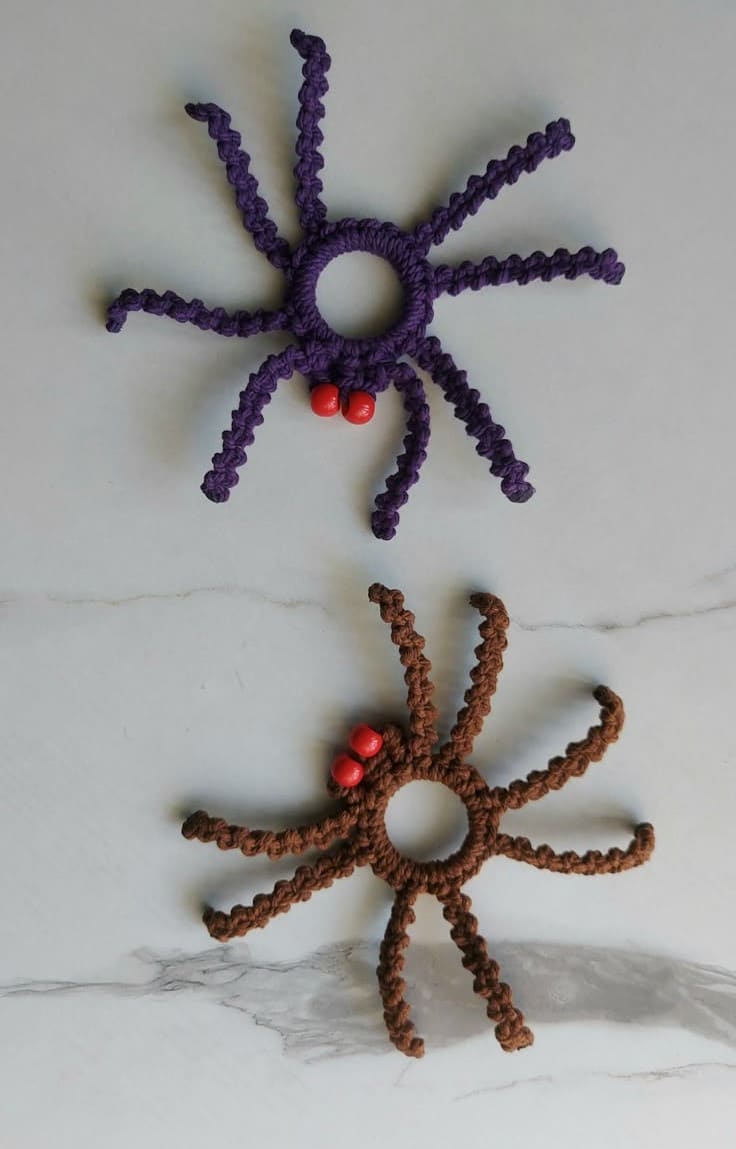
If you’ve ever wanted to add a playful shiver to your Halloween décor, these crochet spiders are the perfect mix of creepy and cute.
You can make them in classic black, earthy brown, or even a spooky purple for a whimsical twist.
Moreover, hang them in doorways, add them to a wreath, or scatter them across your party table, they’ll always get a reaction.
Materials Needed
- 15g cotton yarn in desired color (approx. 2-3mm thickness)
- 8 small red or 2 black beads per spider
- 3mm crochet hook
- Yarn needle
- Scissors
- Optional: clear-drying craft glue
Step-by-step Guide
Step 1: Start by crocheting a small ring (around 6-8 stitches) to form the spider’s body center.
Step 2: Work a few rounds to slightly widen the ring, keeping the body flat. Then scure and weave in the ends.
Step 3: For each leg, chain about 18–20 stitches, then slip stitch back down to the body. Repeat until you have eight legs evenly spaced.
Step 4: Thread two beads onto the yarn and stitch them firmly at the front of the body for the spider’s eyes.
Step 5: If you want firmer legs, lightly brush them with diluted glue and let them dry in a curved position for that lifelike “crawling” effect.
#20. Crochet Spider Web Doily
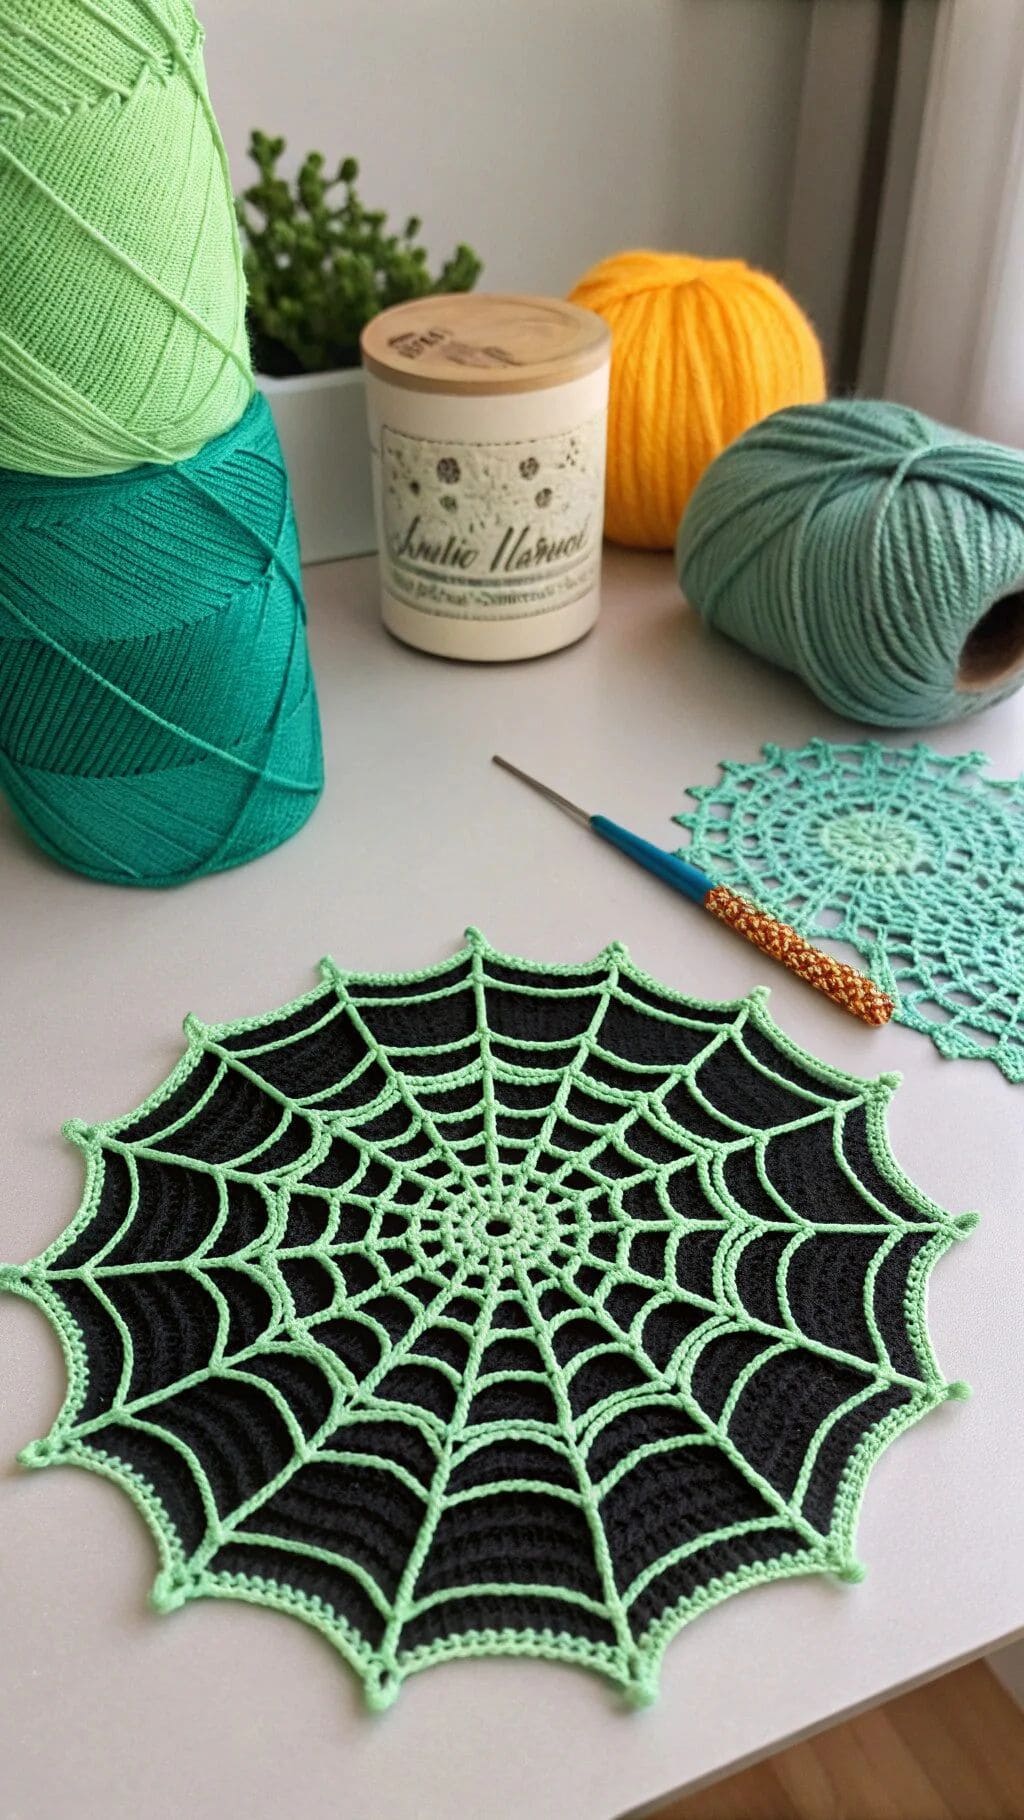
Delicate yet striking, this crochet spider web doily is a perfect way to add subtle Halloween style to your home.
Also, the crisp black base and bright green web lines create a bold contrast that instantly draws the eye, making it ideal for centerpieces, under candles, or as part of a spooky table setting.
The fine stitches give it a lace-like elegance, while the pattern’s symmetry makes it both beautiful and slightly eerie. It’s a great project for practicing precision and tension control.
Materials Needed
- 20g black cotton crochet thread (size 10)
- 15g green cotton crochet thread (size 10)
- 1.75mm steel crochet hook
- Yarn needle
- Scissors
- Blocking mat and pins
Step-by-step Guide
Step 1: Begin with black thread, making a small ring and working in rounds to create a flat circular base.
Step 2: Switch to green thread and crochet evenly spaced chain spokes outward from the center.
Step 3: Connect the spokes with chain loops in an outward spiral to form the web pattern.
Step 4: Continue until the doily reaches your desired size, then fasten off.
Step 5: Block the finished piece by pinning it to shape on a blocking mat and lightly spraying with water to set.
See also: 26 Breathtaking Hand Embroidery Ideas to Inspire Your Next Stitch


