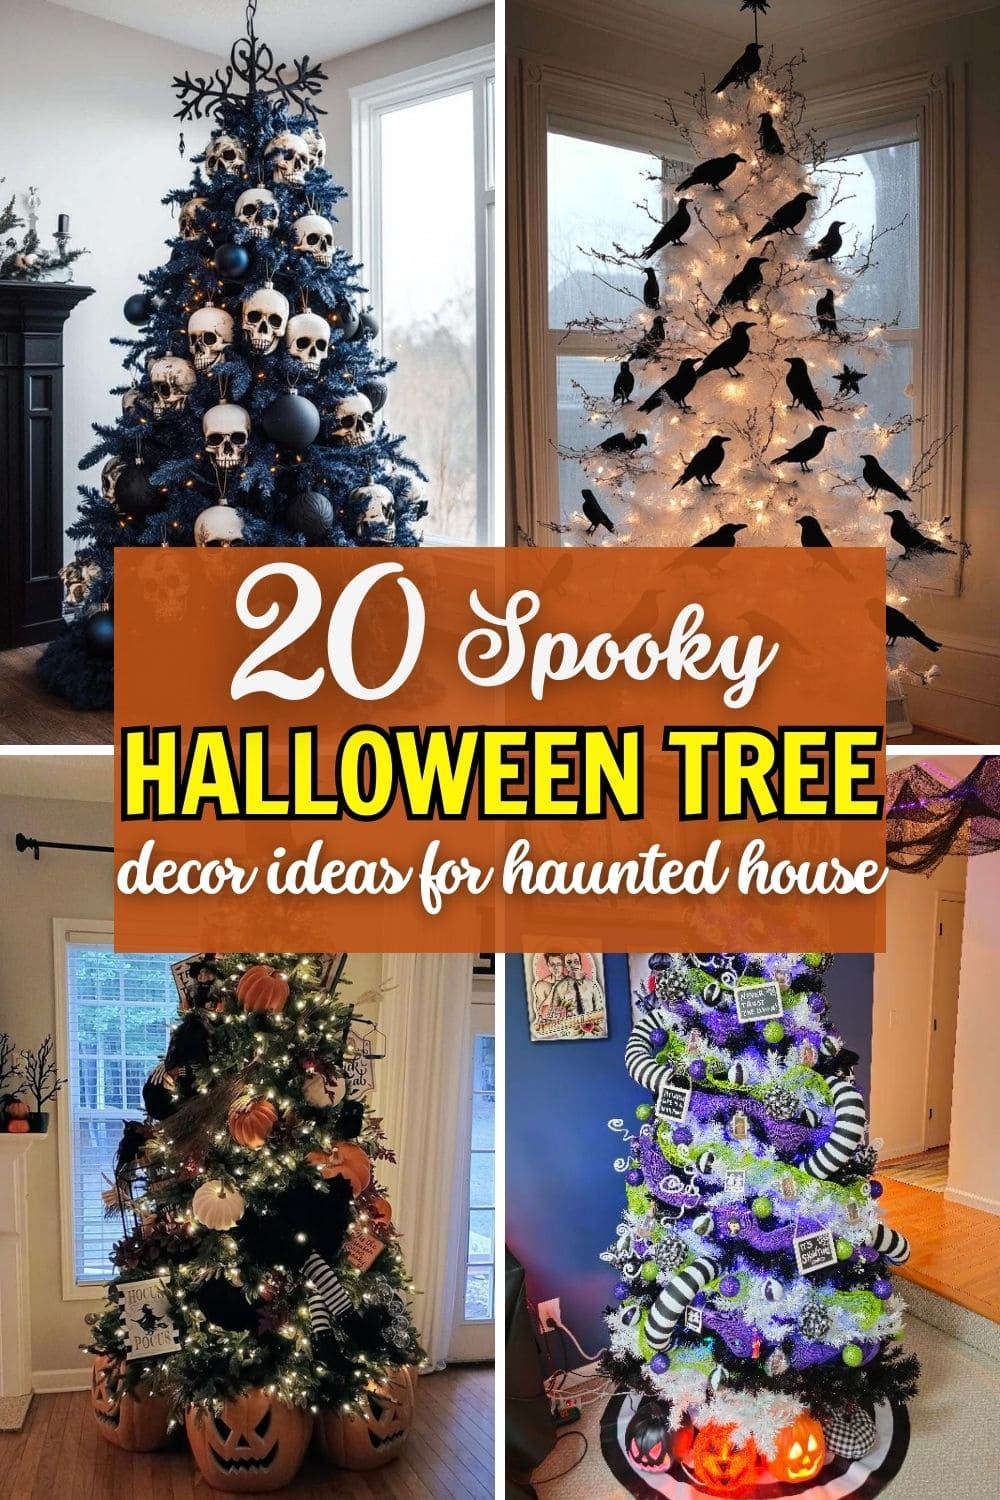
When most people think of a decorated tree, their minds go straight to Christmas but Halloween trees are quickly stealing the spotlight.
These eerie, enchanting creations prove that a tree can be the perfect centerpiece for more than just December celebrations.
Dressed in moody lights, creepy ornaments, and hauntingly beautiful accents, a Halloween tree transforms any corner of your home into a spellbinding scene.
Whether your style leans toward whimsical or wicked, these 20 bewitching Halloween tree ideas will inspire you to craft a show-stopping focal point that captures the spirit of the season.
#1. Bone-Chilling Skull Tree

If you want your Halloween décor to stop guests in their tracks, this skull-covered tree delivers in spades. The deep midnight-blue branches create a moody backdrop that makes every pale skull pop like ghostly apparitions in the dark.
Nestled between the macabre faces are matte and glossy black ornaments, adding depth and mystery.
Plus, warm orange fairy lights snake through the branches, casting an eerie glow on each hollow gaze.
Materials Needed
- 1 dark blue or black artificial tree (6-7 ft tall)
- 2 strings orange LED fairy lights (100 bulbs each, 33 ft)
- 18-20 lightweight plastic skulls (life-size or slightly smaller)
- 12 matte black ornaments (3″)
- 8 glossy or glitter black ornaments (3″)
- Black ornament hooks or floral wire
- Optional: faux cobwebs
Step-by-step Guide
Step 1: Fluff your tree and position it in a spot where it’s visible from multiple angles.
Step 2: Weave the orange fairy lights evenly throughout the branches, making sure to tuck some bulbs near where skulls will hang.
Step 3: Attach the skulls using ornament hooks or floral wire. You position them at varying heights and slightly angled for a lifelike, watchful effect.
Step 4: Fill gaps with matte and glossy black ornaments, creating contrast against the pale skulls.
Step 5: If desired, stretch faux cobwebs sparingly across the branches for an abandoned, haunted feel.
#2. Haunted Witch & Graveyard Tree
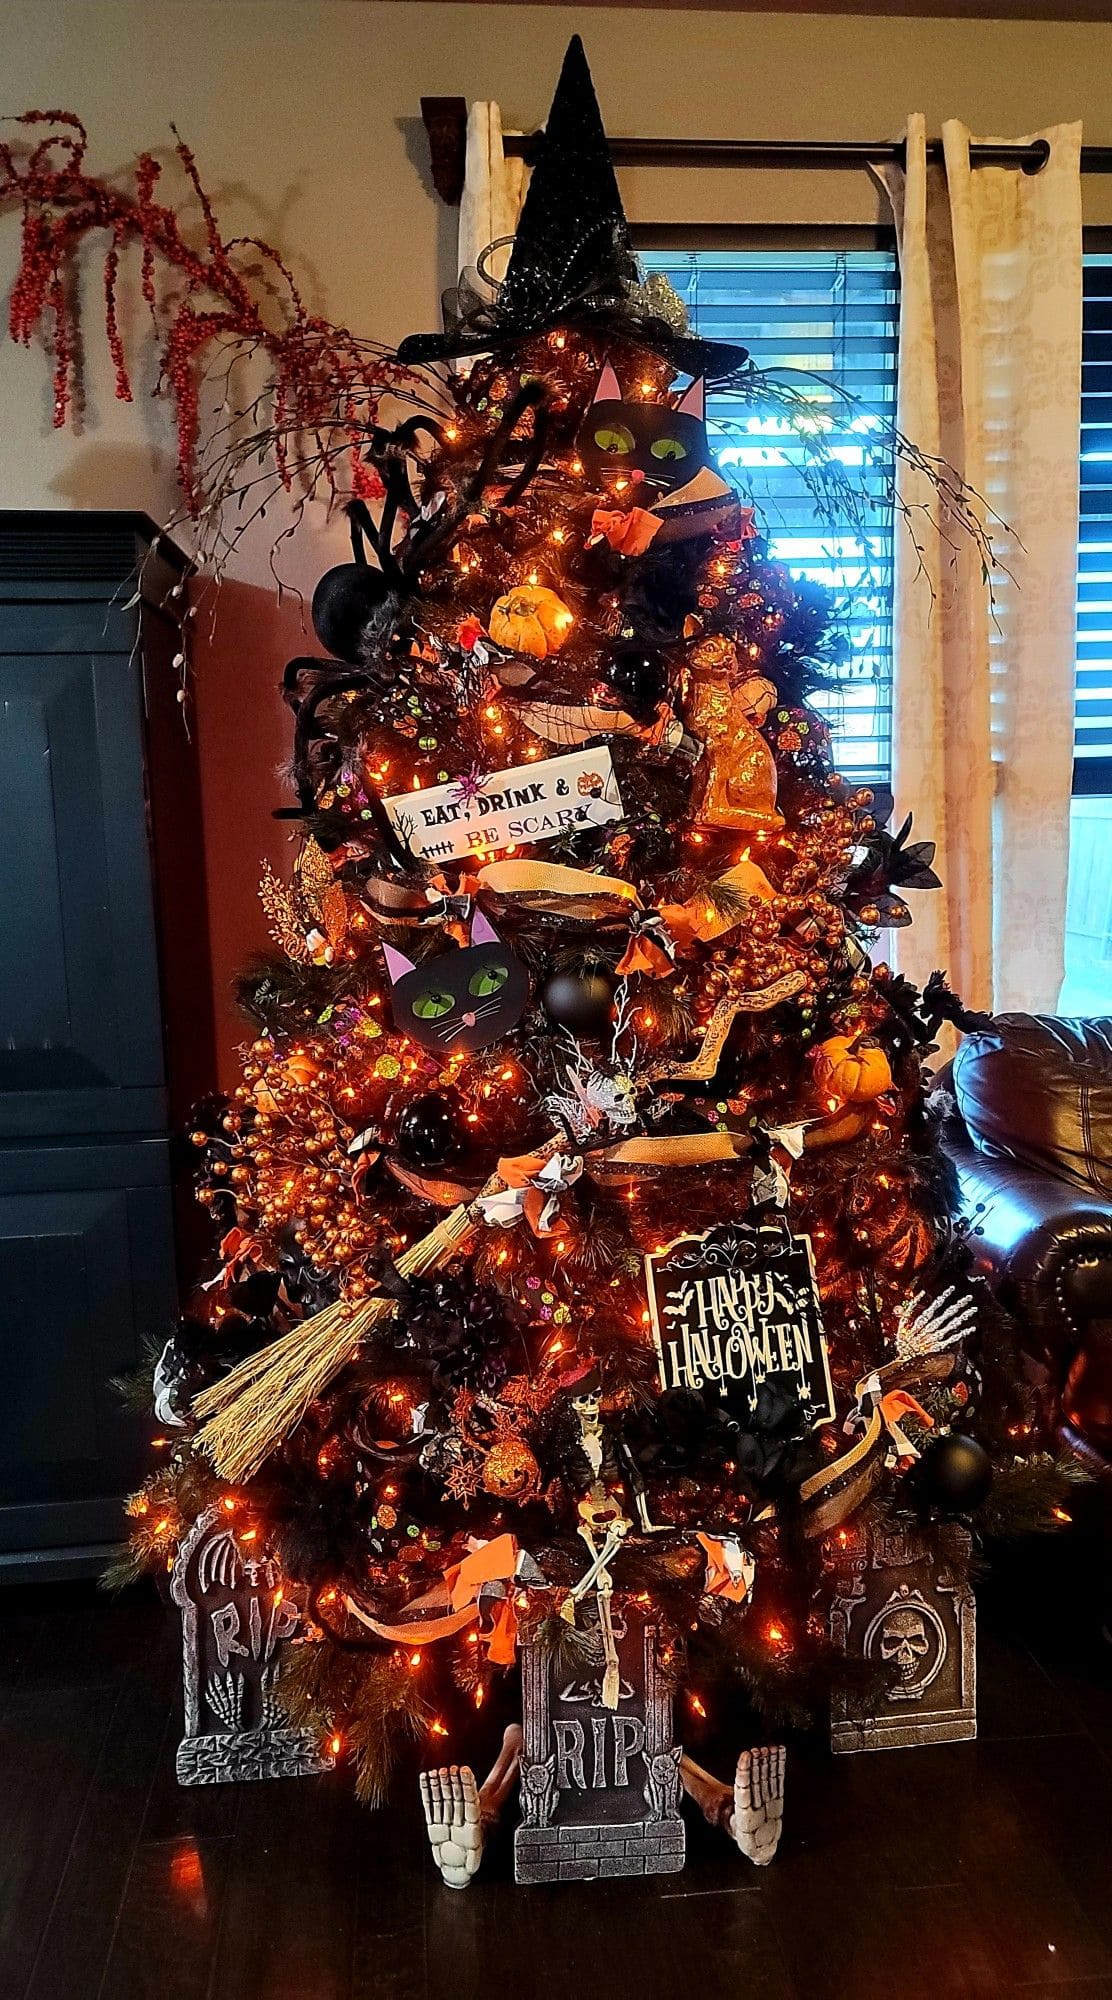
Adorned with witch hats, tombstones, broomsticks, and glittery orange lights, this eerie Halloween tree mixes the whimsical charm of Halloween with spine-chilling cemetery vibes.
Every inch tells a spooky story from skeletal hands reaching out of the ground to watchful black cat faces peeking through the branches.
Materials Needed
- 1 artificial Christmas tree (6-7 ft, preferably black or dark green)
- 1 witch hat tree topper (12-14” height)
- 2-3 faux black cat face decorations (approx. 10” wide)
- 2-3 foam tombstone props (16-20” tall)
- 1-2 pairs of plastic skeleton hands
- 1 witch broom prop (about 30-36” long)
- Assorted large Halloween ribbon (orange, black, and patterned, total 12-15 ft)
- Mini faux pumpkins (8-10 pcs, mix of orange and black, 3-4” size)
- Assorted Halloween ornaments (spiders, bats, glitter balls, approx. 20-25 pcs)
- Orange string lights (200-250 bulbs)
- Optional: glitter sprays, black floral picks, or decorative twigs
Step-by-step Guide
Step 1: Fluff your tree to give it a full, lush look. If your tree isn’t already black, spray it with matte black spray paint to create a haunting backdrop.
Step 2: Wrap the orange string lights evenly throughout the tree, starting from the base and weaving toward the center for a warm glow.
Step 3: Place the witch hat on top as the tree topper. Then add the wide ribbons in a cascading spiral from top to bottom, alternating colors and textures for visual interest.
Step 4: Position the faux cat faces at eye-catching spots around the middle section of the tree.
Step 5: Hang Halloween ornaments like spiders, bats, glitter balls by filling gaps and mixing colors evenly.
Step 6: Nestle mini pumpkins and black floral picks throughout for depth and dimension.
Step 7: At the tree’s base, arrange foam tombstones and skeleton hands to create a mini graveyard scene. Place the broom leaning casually against the lower branches.
Step 8: Finish with any extra details like decorative twigs or glitter sprays to give the tree a final touch of dark magic.
#3. Vintage-Inspired Halloween Tinsel Tree
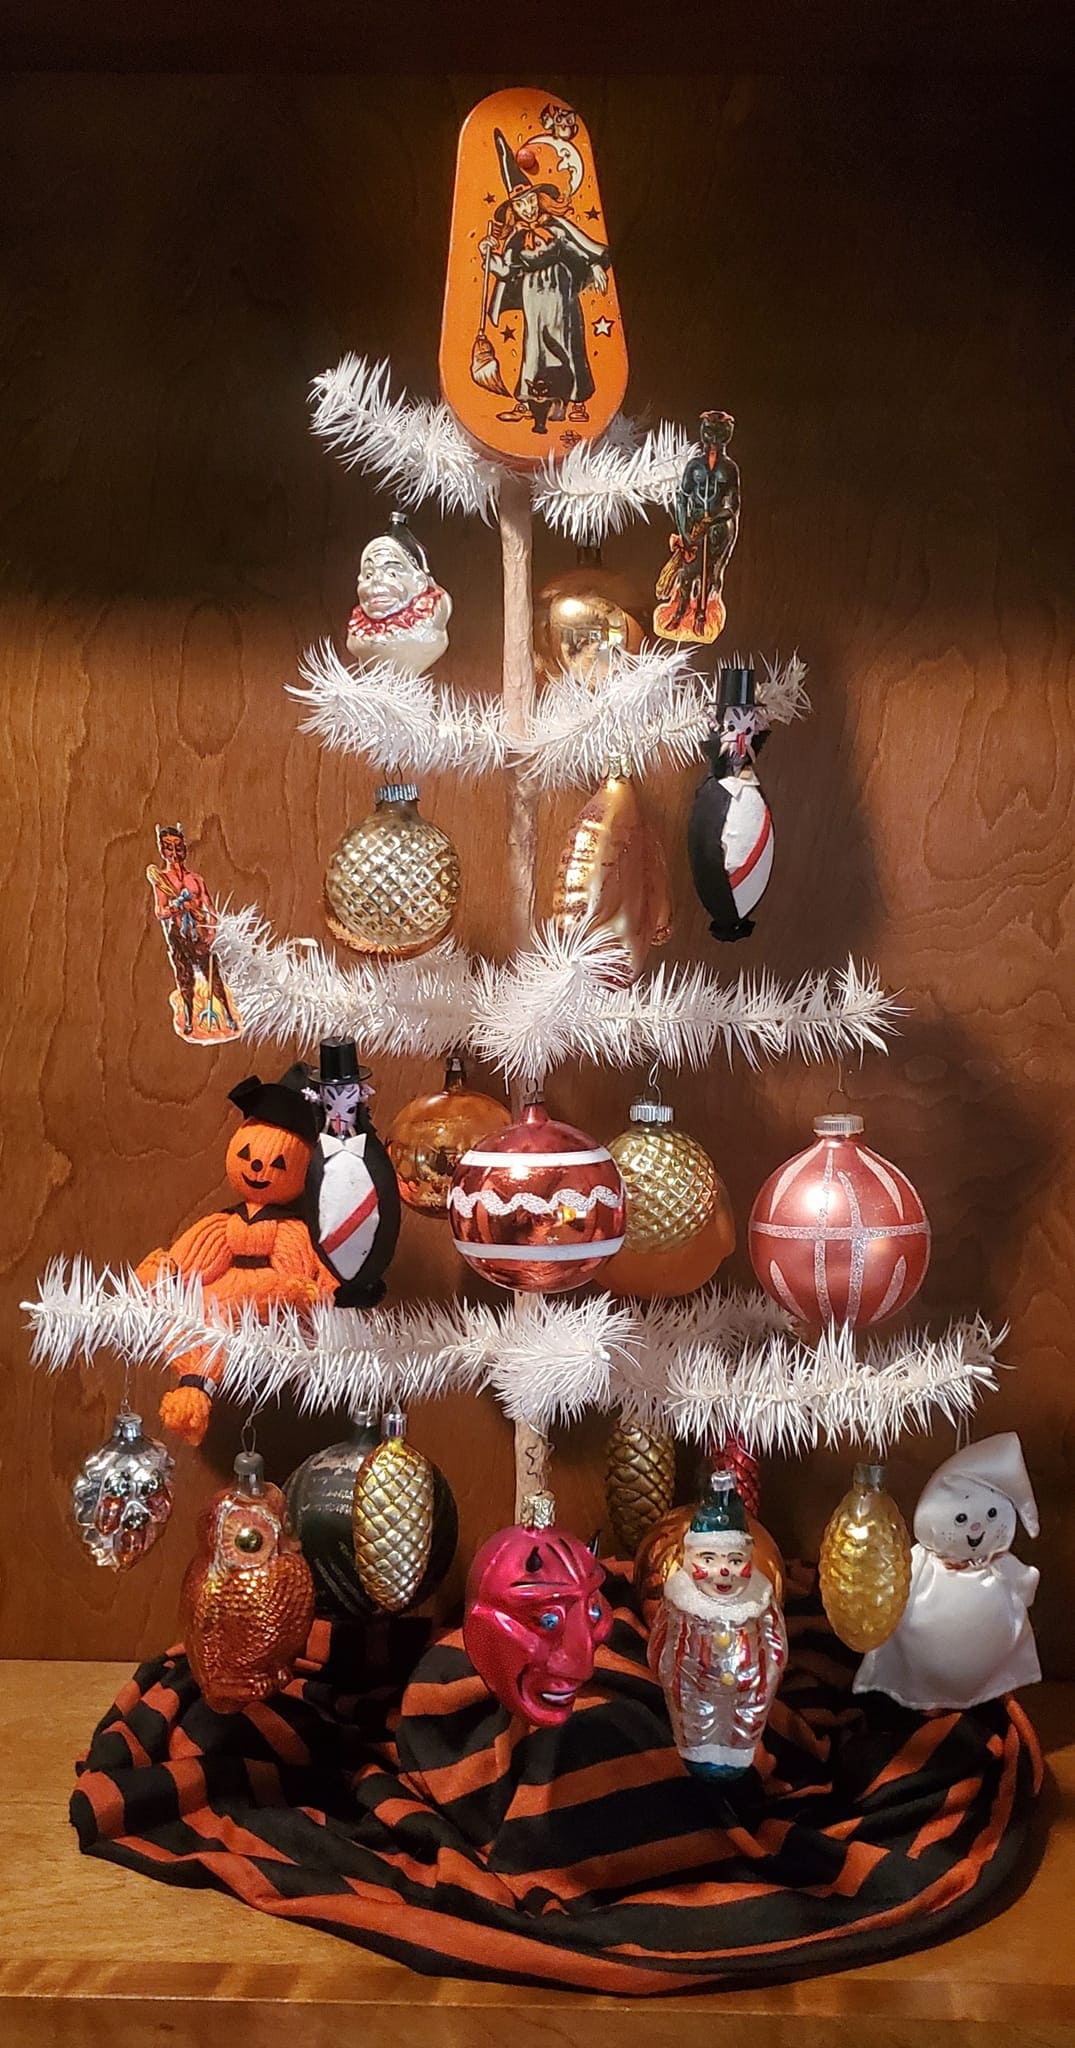
This charming white tinsel tree gets a spooky twist with an eclectic mix of Halloween ornaments. Each branch holds a surprise with shiny pumpkins, creepy clowns, glittery owls, and vintage cutouts of witches and devils.
Specially, the bright orange-and-black striped fabric at the base ties the whole scene together, making it feel like a nostalgic piece from a bygone era.
Perfect for a mantle or entryway, this display blends retro holiday cheer with just the right dose of eerie fun.
Materials Needed
- 1 white tinsel tabletop tree (about 3-4 feet tall)
- 12-15 assorted Halloween ornaments (vintage or reproduction)
- 1 piece of orange-and-black striped fabric (about 36″×36″)
- Scissors
Step-by-step Guide
Step 1: Set up your tinsel tree on a sturdy surface. Then arrange the striped fabric around the base, letting it drape naturally for a soft, finished look.
Step 2: Hang your Halloween ornaments, starting with larger baubles at the bottom and smaller ones toward the top.
Step 3: Add paper cutouts or lightweight vintage decorations for extra character.
#4. Wicked Witch Halloween Tree
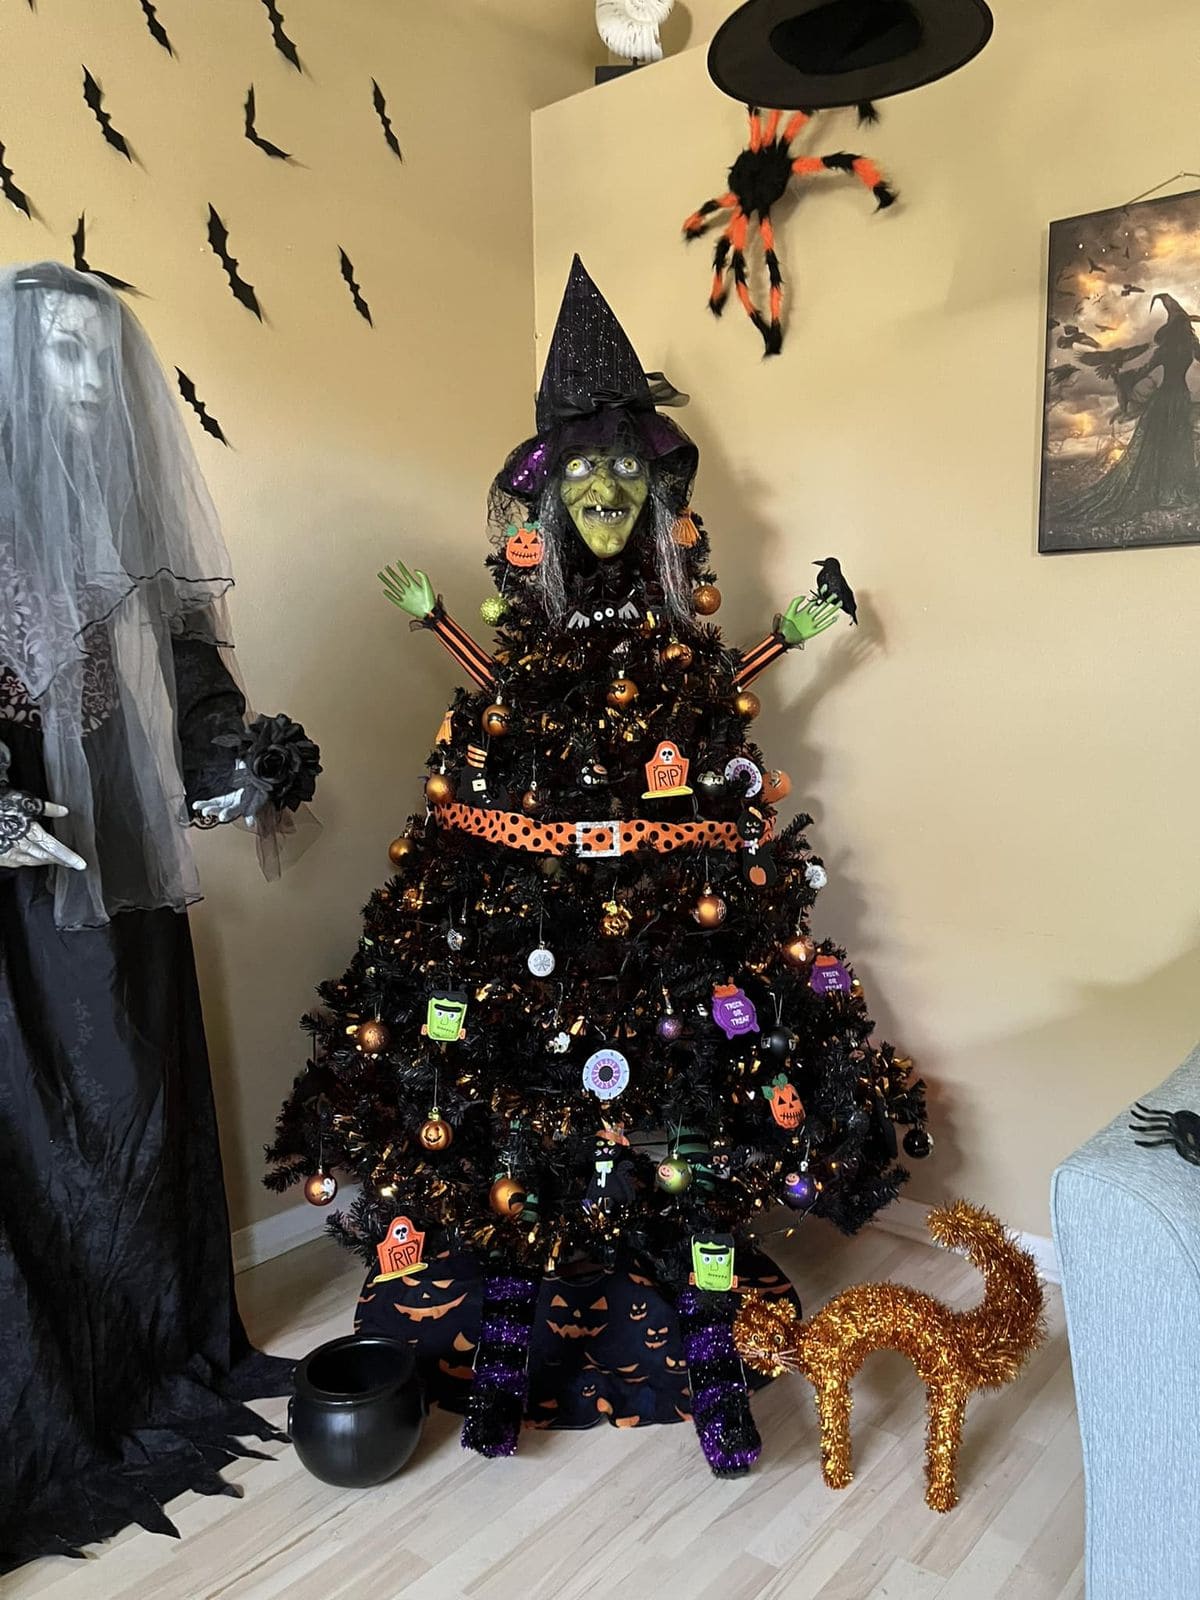
If you’ve ever wished your Halloween decor could cackle, this tree might be your answer.
Standing tall in midnight black, it’s topped with a life-sized witch head, complete with a pointy hat and sinister grin.
Moreover, orange, purple, and black ornaments fill the branches, joined by tiny gravestone signs, pumpkin faces, and a belt of polka-dot ribbon to give her a waistline.
Materials Needed
- 1 black artificial tree (6 ft tall)
- 1 witch head topper (life-size, approx. 12-15″)
- 2 witch hands with arm extensions (12-18″ each)
- 1 small faux crow (6-8″)
- 1 roll orange polka-dot ribbon (2.5″ wide, 9 ft)
- 20 assorted Halloween ornaments in orange, purple, and black (2″-4″)
- 6 miniature Halloween signs or cutouts (gravestones, pumpkins, etc., 4″-6″)
- 2 witch leg props (18″ each)
- 1 golden tinsel cat decoration (approx. 12-14″ tall)
- Black tree skirt with pumpkin print (45-48″)
Step-by-step Guide
Step 1: Set up and fluff the black tree so it’s full and symmetrical. Then secure the witch head firmly at the top, adjusting the hat for a dramatic tilt.
Step 2: Insert the witch hands halfway down the tree, angling them forward for a reaching effect.
Step 3: Attach the crow to one hand using floral wire or clips. Also, wrap the orange polka-dot ribbon around the middle like a belt, securing it discreetly at the back.
Step 4: Hang ornaments evenly, mixing colors and shapes for balance.
Step 5: Add miniature Halloween signs to create storytelling details in the branches.
Step 6: Position the witch legs at the base so they peek out naturally, then place the golden cat alongside.
#5. DIY Matte Black Halloween Tree
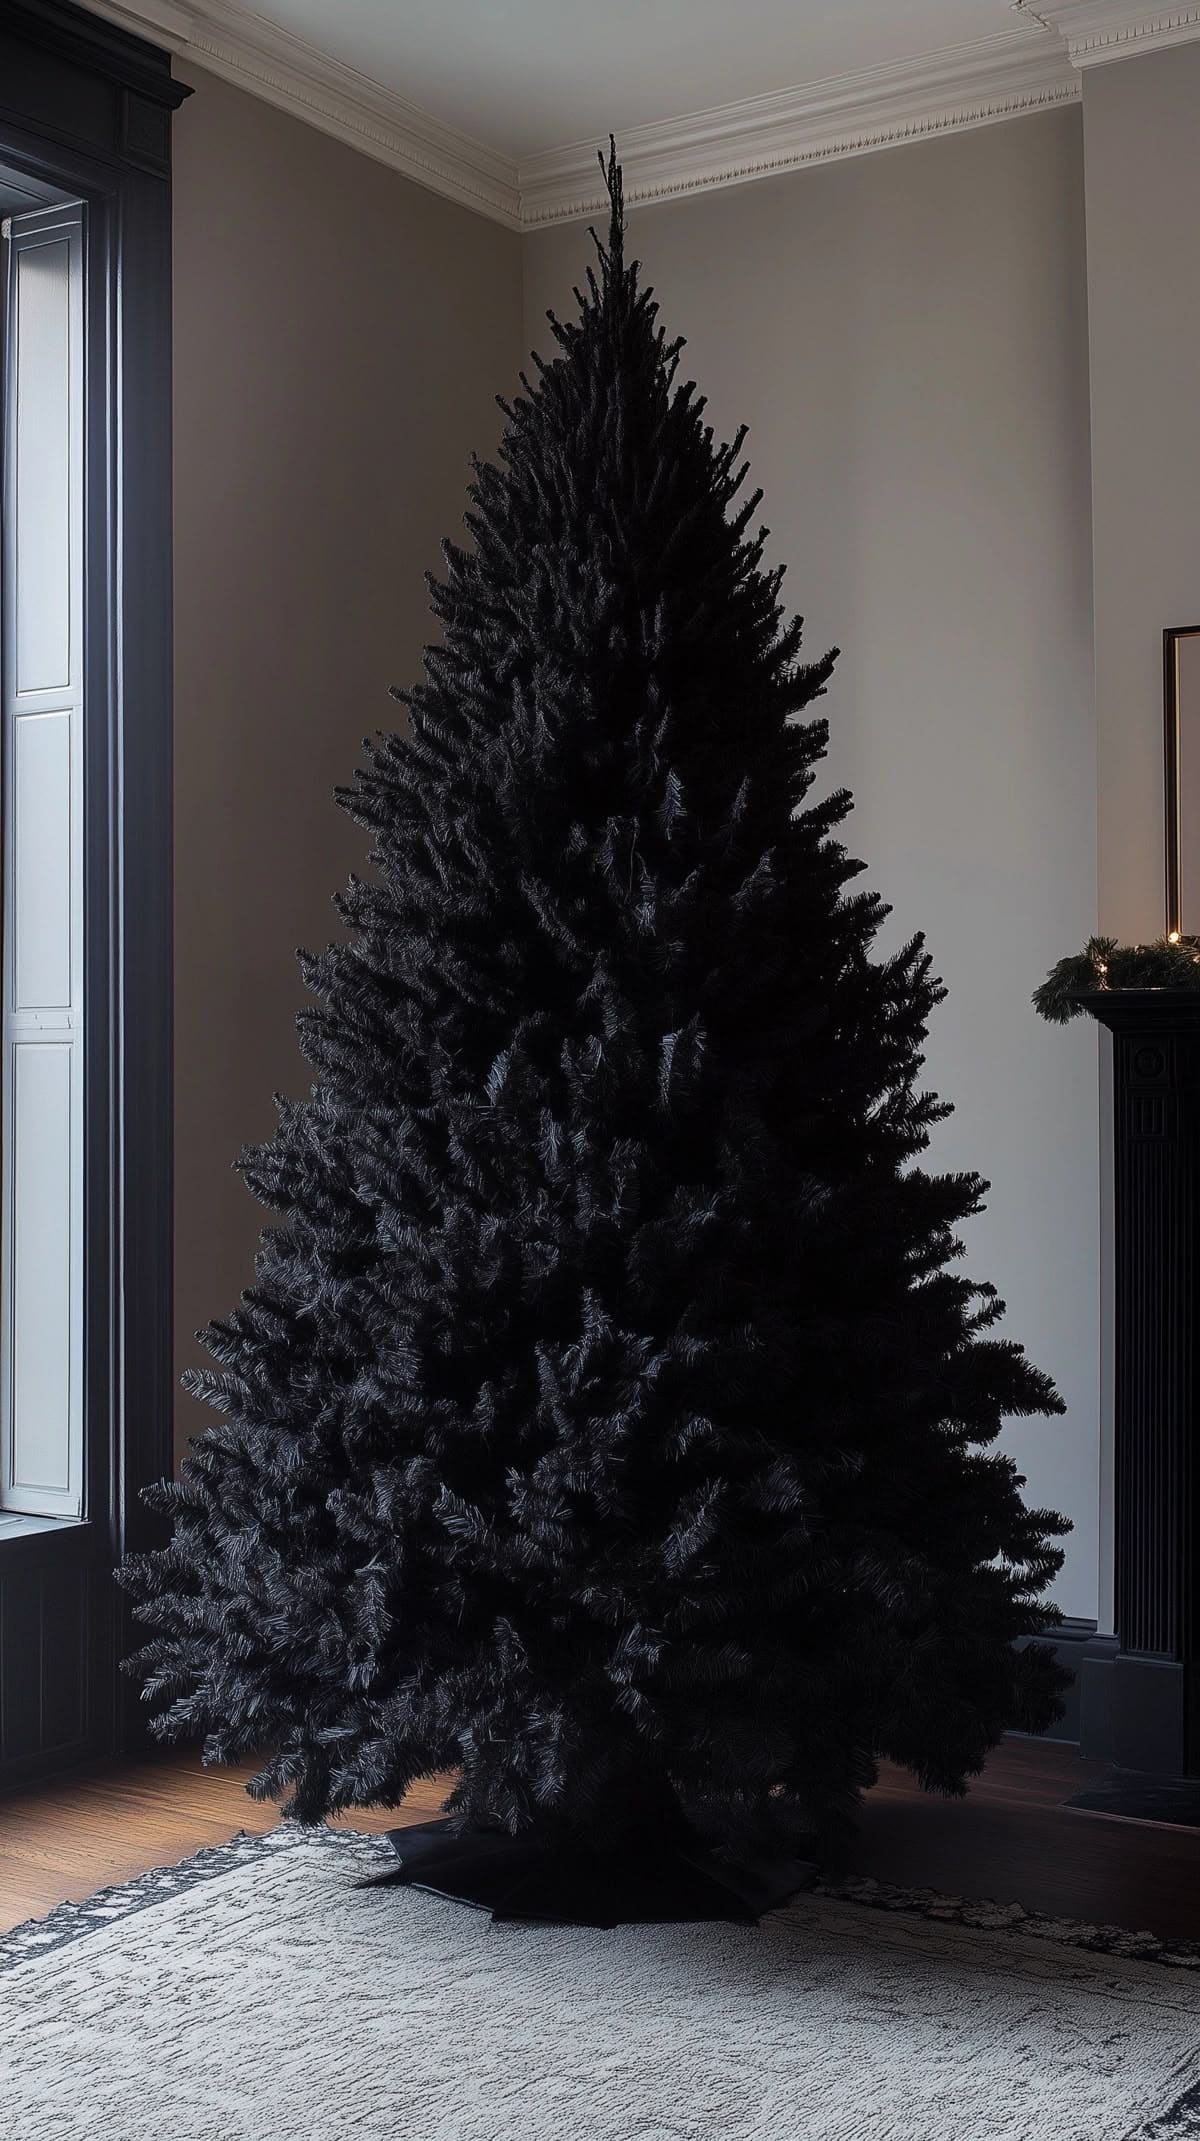
Transforming a regular Christmas tree into this jet-black showpiece instantly gives your space a dose of eerie sophistication.
Specially, the deep black finish swallows light in the most dramatic way, creating a haunting focal point that’s perfect for Halloween or a dark winter aesthetic.
Materials Needed
- 1 artificial Christmas tree (6-7 ft height, any color)
- Matte or satin black spray paint (8-12 cans, depending on size)
- Protective drop cloth or plastic sheeting (9×12 ft)
- Painter’s mask or respirator
- Protective gloves
- Optional: clear matte sealant spray (3-4 cans)
Step-by-step Guide
Step 1: Assemble the tree fully and fluff the branches so every needle is spread out.
Step 2: Shake the spray paint cans well, then start painting from the top down in light, even passes, rotating the tree as you go.
Step 3: Let the first coat dry completely, then apply a second coat to cover any spots that still show the original color.
Step 4: Once dry, spray a clear matte sealant if you want extra protection against scratches or fading.
#6. Gothic Graveyard Halloween Tree
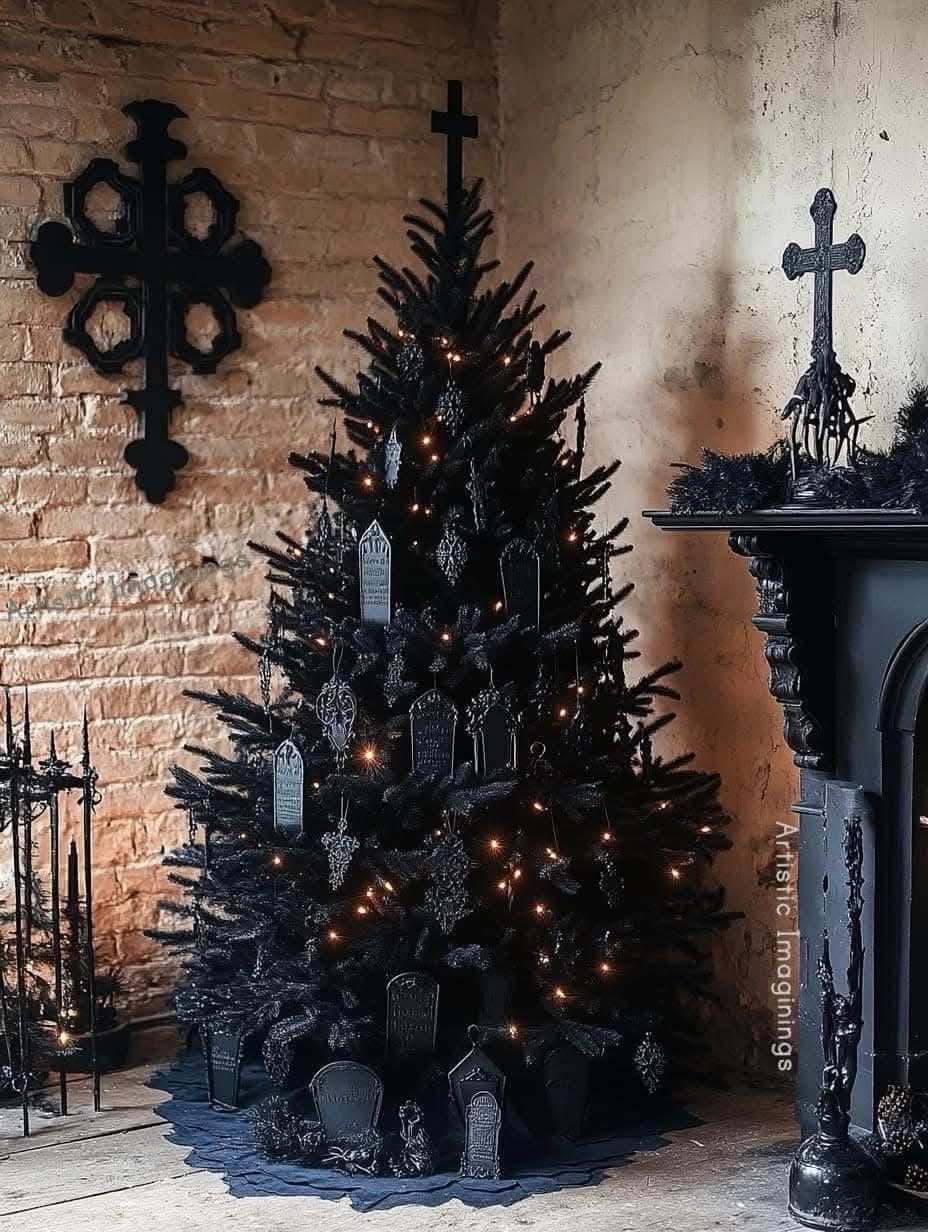
If you want your Halloween décor to make a bold, haunting statement, this Gothic Graveyard Tree will be the centerpiece everyone remembers.
The deep black branches set the perfect stage for eerie tombstone ornaments, tiny coffins, and subtle twinkling orange lights that glow like restless spirits in the dark.
Placed in a dimly lit corner, it transforms the whole space into a scene straight from a Victorian ghost story.
Materials Needed
- 1 artificial black Christmas tree (6-7 ft)
- 12-15 miniature tombstone ornaments (4-6 in each)
- 6-8 miniature coffin decorations (3-5 in each)
- 1 string of 100-150 orange LED fairy lights
- 1 large cross tree topper (10-12 in)
- 1 black tree skirt (50-60 in diameter)
Step-by-step Guide
Step 1: Start by assembling your black tree and fluffing out the branches to give it fullness and shape.
Step 2: Wrap the orange LED lights evenly from the bottom upward, letting some bulbs sit deeper inside for a glowing-from-within effect.
Step 3: Hang tombstone ornaments at varying heights to create visual depth, mixing them with miniature coffins for variety.
Step 4: Place the large cross securely on top, ensuring it’s centered and steady.
Step 5: Finish with a black tree skirt to ground the design and hide the stand, then adjust lighting for the perfect eerie ambiance.
#7. Chic White Boo Halloween Tree
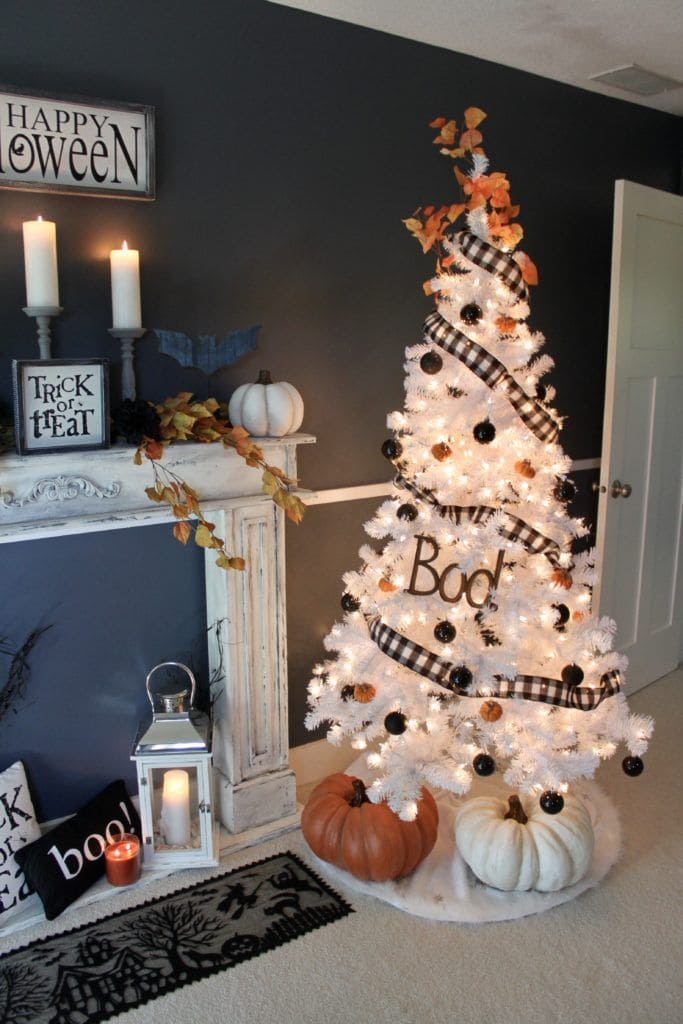
If you love Halloween but want something a little more refined, this white tree strikes the perfect balance between seasonal fun and elegant style.
Its bright white branches shimmer with warm lights, while black-and-white buffalo plaid ribbon spirals gently from top to bottom.
Bonus, a bold “Boo!” sign acts as the playful centerpiece, surrounded by glossy black and metallic orange ornaments.
Materials Needed
- 1 white artificial tree (5-6 ft tall)
- 1 strand of warm white LED lights (50-100 bulbs, if tree isn’t pre-lit)
- 6-8 feet of black-and-white buffalo plaid ribbon (2–3″ wide)
- 1 wooden or foam “Boo!” sign (approx. 8-10″)
- 12 black shatterproof ornaments (2-3″)
- 8 metallic orange ornaments (2-3″)
- 4-6 artificial fall leaves
- 2-3 large decorative pumpkins (mix of white and orange, 10-14″)
Step-by-step Guide
Step 1: Set up your white tree and add warm lights if not pre-lit.
Step 2: Start at the top and weave the buffalo plaid ribbon down the tree, letting it drape naturally between branches.
Step 3: Attach the “Boo!” sign in a central spot using floral wire or ornament hooks. Next, distribute black and orange ornaments.
Step 4: Insert autumn leaves at the top for a rustic seasonal touch.
Step 5: Arrange decorative pumpkins at the base to finish the look.
#8. Spooky Spiderweb Halloween Tree
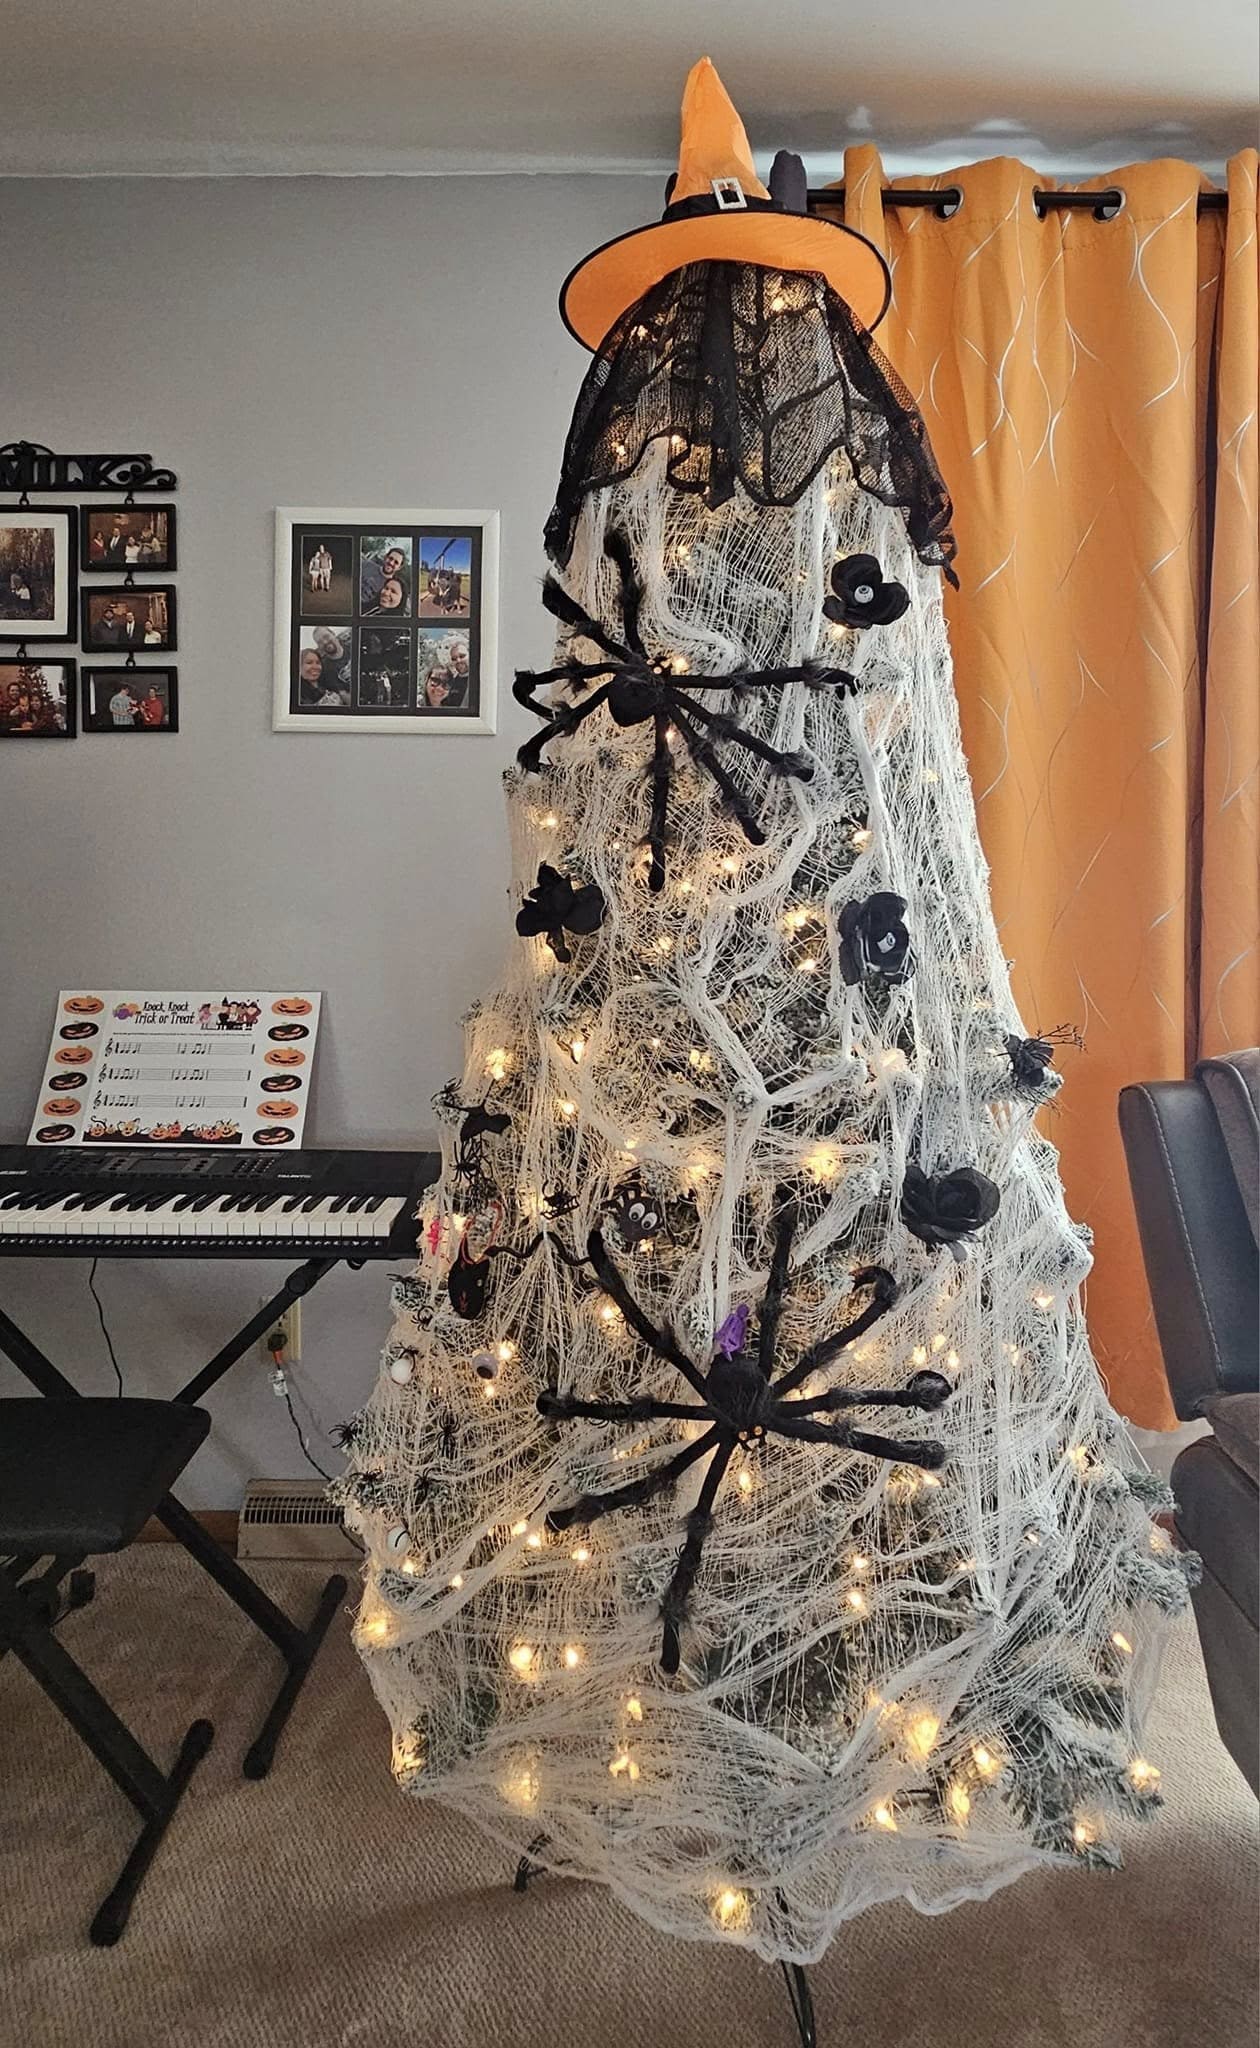
What about transforming your classic tree into a haunting Halloween centerpiece with this eerie spiderweb look?
Draped in white gauze that mimics old cobwebs, the tree is crawling with giant black spiders and decorated with black roses for a dark romantic touch.
Topping it all is a bright orange witch hat with a black lace veil, pulling the whole witchy theme together.
Materials Needed
- 1 artificial or real tree (6-7 ft tall)
- 4-5 packs of white creepy cloth (30″×72″ each)
- 3-4 giant black spider props (12″-18″)
- 10-12 black faux roses
- 1 set of warm white string lights (100-150 bulbs)
- 1 orange witch hat with lace veil
Step-by-step Guide
Step 1: Set up your tree and wrap it evenly with string lights, starting from the base upward.
Step 2: Drape the creepy cloth loosely over the branches, letting it hang and overlap to create a web-like effect.
Step 3: Secure the large spiders at various heights, ensuring they face outward for maximum impact.
Step 4: Insert black roses into gaps, spacing them evenly for contrast against the white webbing.
Step 5: Place the witch hat with lace veil on the top as a tree topper, adjusting the lace to drape over the upper branches.
#9. Nightmare Before Christmas Oogie Boogie Tree
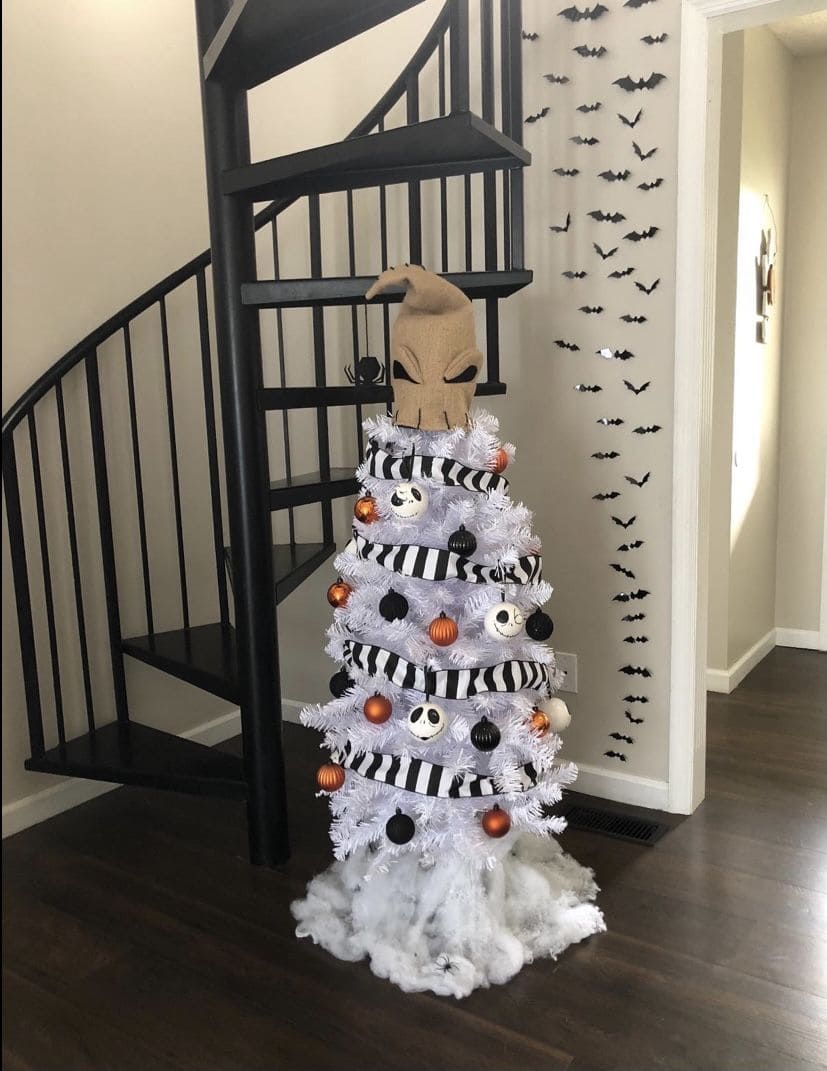
This compact yet striking Halloween tree is inspired by the whimsical and eerie world of The Nightmare Before Christmas.
Standing in crisp white, it’s wrapped in bold black-and-white striped ribbon that echoes the film’s iconic patterns. Orange and black baubles add seasonal contrast, while Jack Skellington’s grinning face peeks from the branches.
Specially, the topper steals the show, bringing a mischievous, villainous edge. At the base, fluffy white fog creates the illusion of a haunted, misty night.
Materials Needed
- 1 white artificial tree (4-5 ft tall)
- 6-8 ft of black-and-white striped ribbon (2-3″ wide)
- 8 black shatterproof ornaments (2-3″)
- 8 orange ornaments (2-3″)
- 4-5 Jack Skellington face ornaments
- 1 Oogie Boogie burlap head tree topper (approx. 12–14″)
- Polyester spiderweb or cotton batting (about 2 oz)
Step-by-step Guide
Step 1: Set up your white tree in a visible spot and fluff the branches.
Step 2: Starting at the top, wrap the black-and-white ribbon around in a spiral, letting it drape loosely. Evenly hang black and orange ornaments, alternating colors for balance.
Step 3: Add Jack Skellington ornaments, spacing them so each face is clearly visible.
Step 4: Place the Oogie Boogie head topper securely on the top branch. Then arrange spiderweb or batting around the tree base to mimic eerie ground fog.
#10. Beetlejuice-Inspired Halloween Tree
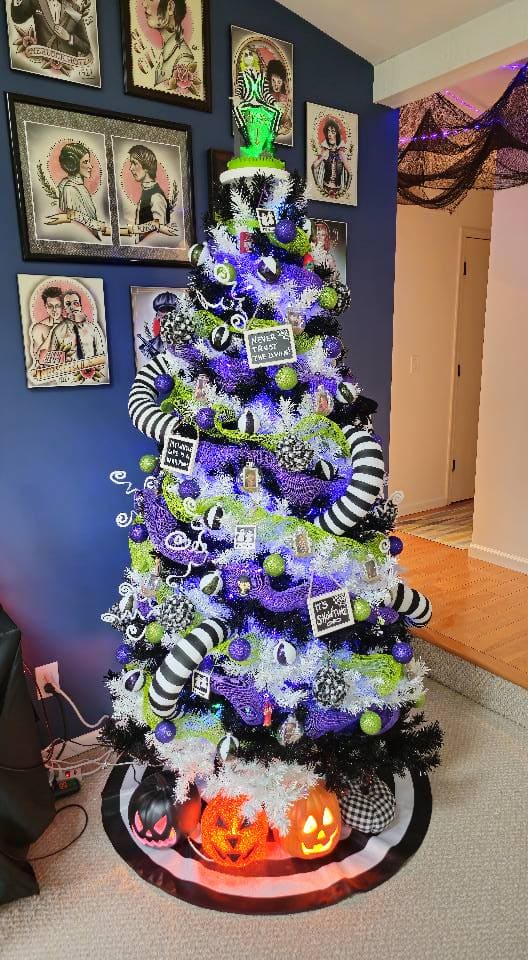
If you’re ready to mix a little creepy with a lot of quirky, this Beetlejuice-inspired Halloween tree is pure perfection.
You can almost hear “It’s showtime!” the moment you walk into the room. The tree is layered with spiraling ribbon, strange tentacle-like accents, and cheeky Beetlejuice quotes.
At the base, glowing jack-o’-lanterns set the stage, while a green-lit topper pulls your eyes upward.
Materials Needed
- 1 artificial Christmas tree (6-7 ft)
- 3 rolls black-and-white striped ribbon (2.5″ wide)
- 2 rolls lime green mesh (10″ wide)
- 2 rolls purple mesh (10″ wide)
- Set of 3 jack-o’-lantern lights (medium size)
- 30-40 assorted green, purple, and black ornaments
- 3 Beetlejuice-themed quote signs
- 1 neon green lighted tree topper
Step-by-step Guide
Step 1: Start by fluffing your tree to give it a full, lush shape.
Step 2: Drape the black-and-white striped ribbon in spirals from top to bottom, letting it weave naturally through the branches.
Step 3: Add the lime green and purple mesh in alternating sections, tucking and fluffing to create volume.
Step 4: Place your ornaments evenly. Then insert Beetlejuice quote signs and quirky striped tentacle accents for that signature vibe.
Step 5: Arrange glowing jack-o’-lanterns at the base and top it all with the green-lit decoration.
Read more: 22 DIY Halloween Ghost Decor Ideas to Haunt Every Corner of Your Home
#11. White Raven Tree of Shadows
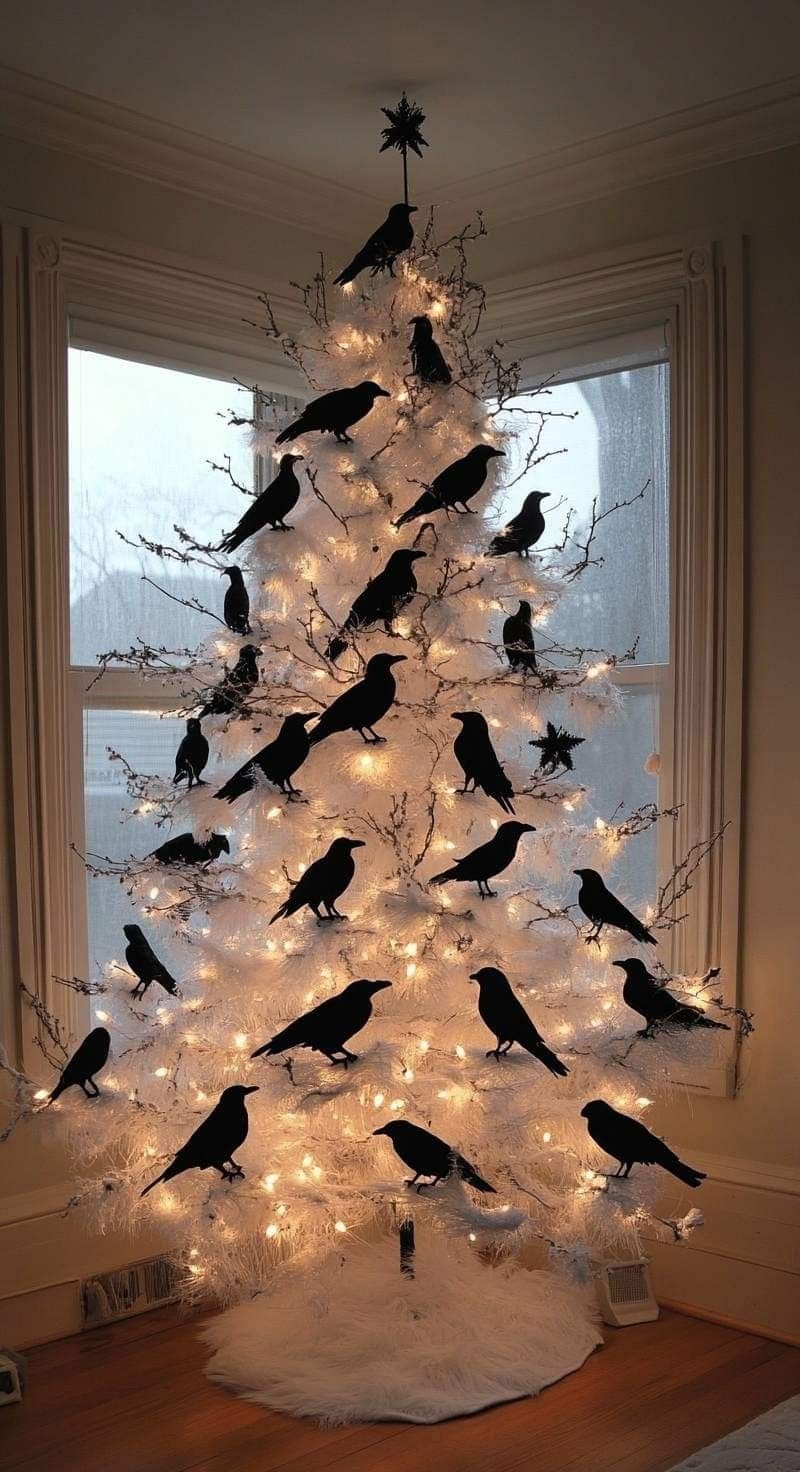
Wow, this hauntingly elegant Halloween tree transforms a snowy white canvas into a scene straight from a gothic fairytale.
Perched among the branches are jet-black ravens, each one poised as if whispering secrets of the night.
Specially, the contrast between the pure white tree and the dark silhouettes creates a striking visual drama, heightened by the warm glow of soft white lights.
Materials Needed
- 1 white artificial tree (6-7 ft tall)
- 2-3 strands warm white LED string lights (100 bulbs each, 33 ft)
- 15-20 artificial black raven or crow decorations (8″-10″)
- 8-10 faux branches or twigs (12″-18″)
- Ornament hooks or floral wire
- White faux fur tree skirt (36″)
Step-by-step Guide
Step 1: Assemble and fluff your white artificial tree to create a full base. Then place it where natural light can enhance the contrast.
Step 2: Wrap the warm white lights evenly around the branches, starting from the inside and working outward.
Step 3: Insert faux branches or twigs into the tree at varied angles to mimic a more natural, windswept look.
Step 4: Position the ravens on branches at different heights, facing various directions for a realistic effect. You can secure them with floral wire if needed.
Step 5: Spread the birds evenly but leave some open spaces for dramatic negative space.
Step 6: Finish with a fluffy white tree skirt to enhance the snowy illusion and ground the design.
#12. Pumpkin & Spider Haunted Tree
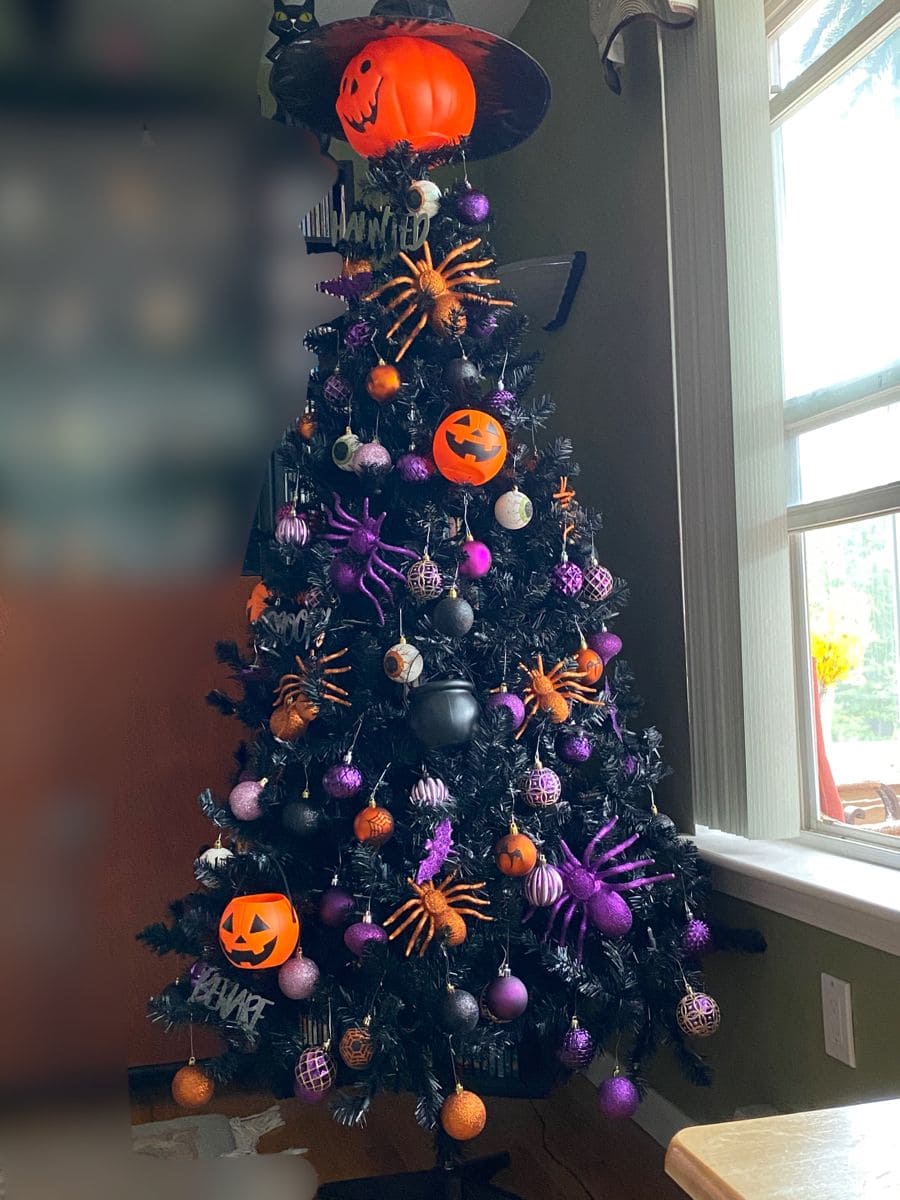
This eerie black tree bursts with vibrant Halloween energy, mixing bold pops of orange, purple, and creepy crawlies.
The oversized spiders and glowing pumpkin faces give it a spooky but playful charm, while metallic ornaments add just enough shimmer to catch candlelight or fairy lights.
Materials Needed
- 1 matte black Christmas tree (6-7 ft, pre-painted or sprayed black)
- 3-4 large plastic pumpkin head decorations (6-8” diameter)
- 6-8 oversized plastic spiders (orange and purple, 8-10” across)
- 3-4 plastic cauldron ornaments (4-6” diameter)
- 30 assorted Halloween ball ornaments (purple, orange, black, 2-3” size)
- 6-8 mini pumpkin ornaments (orange, 2-3” diameter)
- “Haunted” or “Boo” hanging signs (2-3 pcs)
- Optional: eyeball ornaments (4-6 pcs)
- String lights (warm white or orange, 200-300 bulbs)
Step-by-step Guide
Step 1: Begin by wrapping the black tree with string lights, starting from the top and weaving in toward the trunk for an even glow.
Step 2: Place a large plastic pumpkin head as the tree topper, securing it in place. If desired, add a witch hat on top for extra flair.
Step 3: Position the oversized spiders evenly across the tree, alternating between orange and purple to keep the look balanced.
Step 4: Hang the plastic cauldrons and larger statement ornaments (eyeballs, pumpkin faces) at eye level and lower sections for maximum visibility.
Step 5: Fill in with assorted Halloween ball ornaments, spreading colors evenly to maintain visual harmony.
Step 6: Tuck in mini pumpkin ornaments and themed signs where branches look sparse, letting them peek out playfully.
#13. Nightmare Before Christmas Whimsical Tree
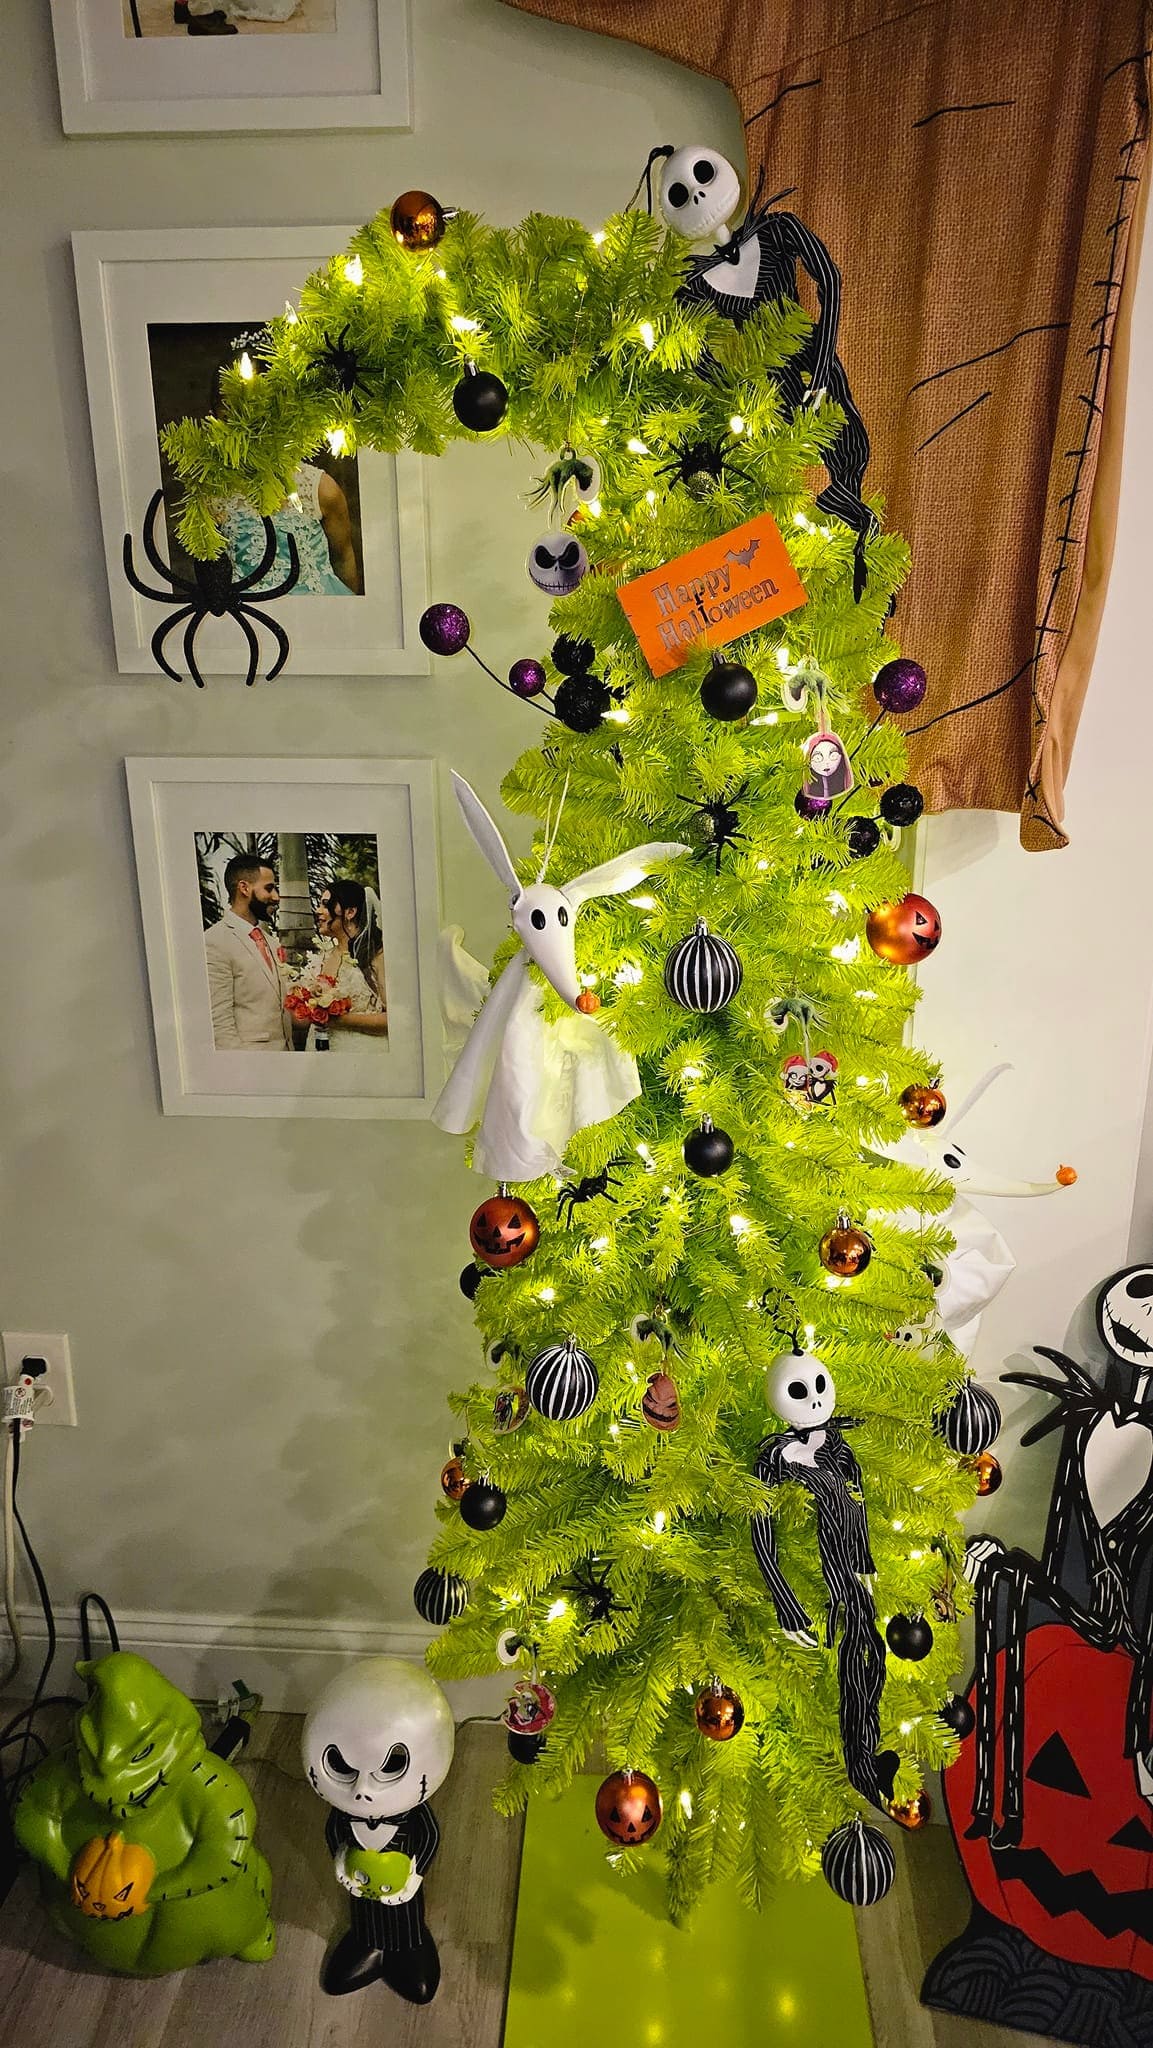
This twisted lime-green tree brings Halloween Town right into your living room. The curved top, draped in warm fairy lights, feels like it stepped straight out of Tim Burton’s world.
Jack Skellington, Zero, and the mischievous Oogie Boogie peek out from branches, while black, purple, and orange baubles swirl through the glowing greenery.
Bonus, the striped ornaments and “Happy Halloween” sign add that perfect mix of eerie charm and playful spirit.
Materials Needed
- 1 curved artificial green Christmas tree (5-6 ft)
- 20-25 string lights (warm white)
- 10 black ornaments (3″ diameter)
- 8 orange pumpkin ornaments (3″ diameter)
- 6 purple glitter ornaments (2″ diameter)
- 5 striped black-and-white ornaments (3″ diameter)
- Jack Skellington plush (12″)
- Zero ghost dog plush (12″)
- Oogie Boogie figurine (10″)
- Halloween sign (8″×5″)
Step-by-step Guide
Step 1: Set up your curved green Christmas tree on a sturdy base and fluff the branches for fullness.
Step 2: Wrap the warm white string lights evenly, starting from the bottom and spiraling up to the tip.
Step 3: Hang the black, orange, purple, and striped ornaments in a scattered yet balanced pattern.
Step 4: Position Jack Skellington plush figures climbing the tree. Then add Zero plush ornaments so they look like they’re floating among the branches.
Step 5: Place Oogie Boogie near the base as a ground-level character element.
Step 6: Finish by attaching the “Happy Halloween” sign near the top for a festive focal point.
#14. Playful Boo Halloween Tree
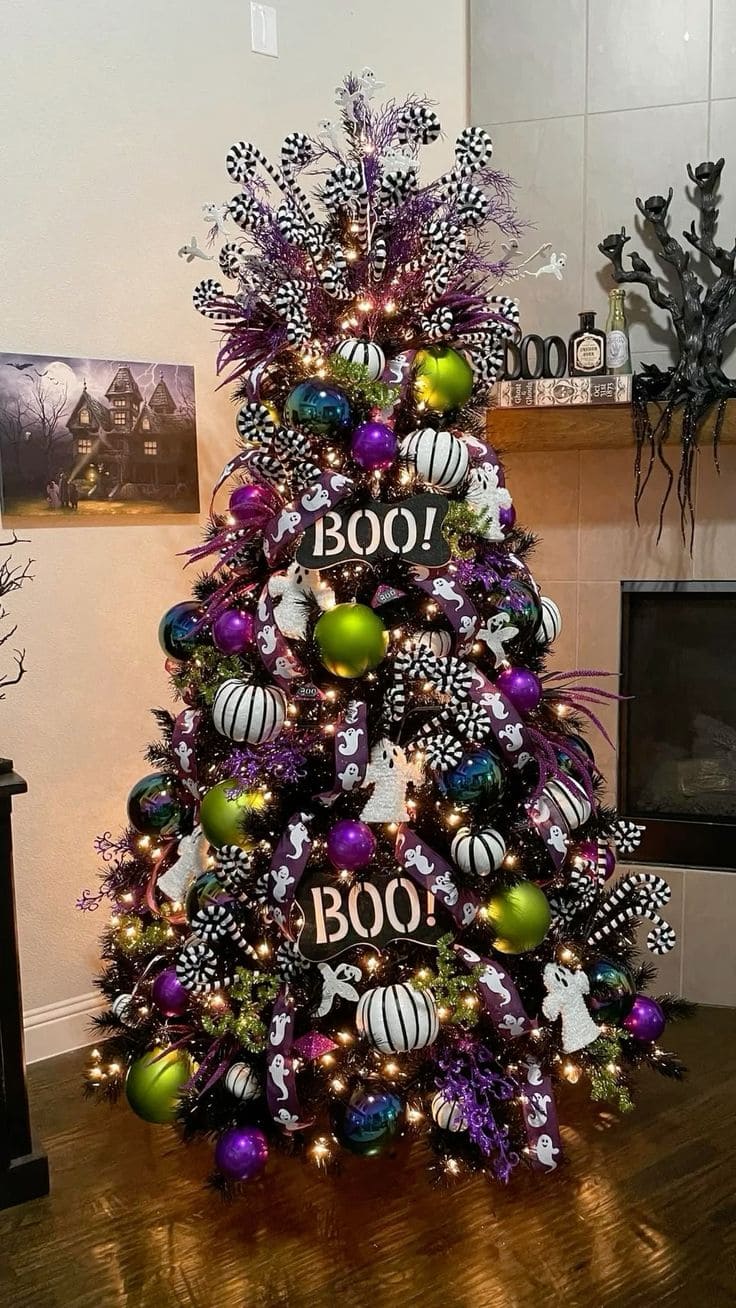
If you’re drawn to Halloween’s more playful side, this vibrant tree bursts with personality.
You can see the bold mix of lime green, purple, black, and white gives it a candy-coated feel, while the “BOO!” signs, striped accents, and sparkly ghosts keep the energy light and festive.
Also, peppermint-like spirals and glittery ribbons wind through the branches, making the whole display look like it leapt out of a whimsical haunted carnival.
Materials Needed
- 1 artificial black or dark green tree (6-7 ft tall)
- 3-4 strands warm white string lights (100 bulbs each, 33 ft)
- 4-5 “BOO!” sign ornaments (10″–12″)
- 10-12 large shatterproof ornaments in lime green, purple, and teal (4″–6″)
- 6-8 white pumpkin ornaments (4″)
- 8-10 glitter ghost ornaments (6″)
- 6-8 black and white striped spiral picks (12″–16″)
- 2-3 rolls of ghost-print ribbon (2.5″ wide, 9 ft each)
- Assorted glitter sprays
Step-by-step Guide
Step 1: Assemble your tree and add warm white lights, weaving them from the trunk outward to the tips for depth.
Step 2: Drape the ghost-print ribbon in loose waves or zigzags from the top to bottom, tucking it into branches for a layered look.
Step 3: Place the largest ornaments first, spacing them evenly to create a balanced base of color.
Step 4: Fill in with white pumpkin ornaments and glitter ghosts, alternating heights for visual interest.
Step 5: Insert striped spiral picks and glitter sprays at angles, letting them extend beyond the branches for extra drama.
Step 6: Add your “BOO!” signs at eye-catching spots front and center works best for a playful greeting.
#15. Skeleton Witch Halloween Tree
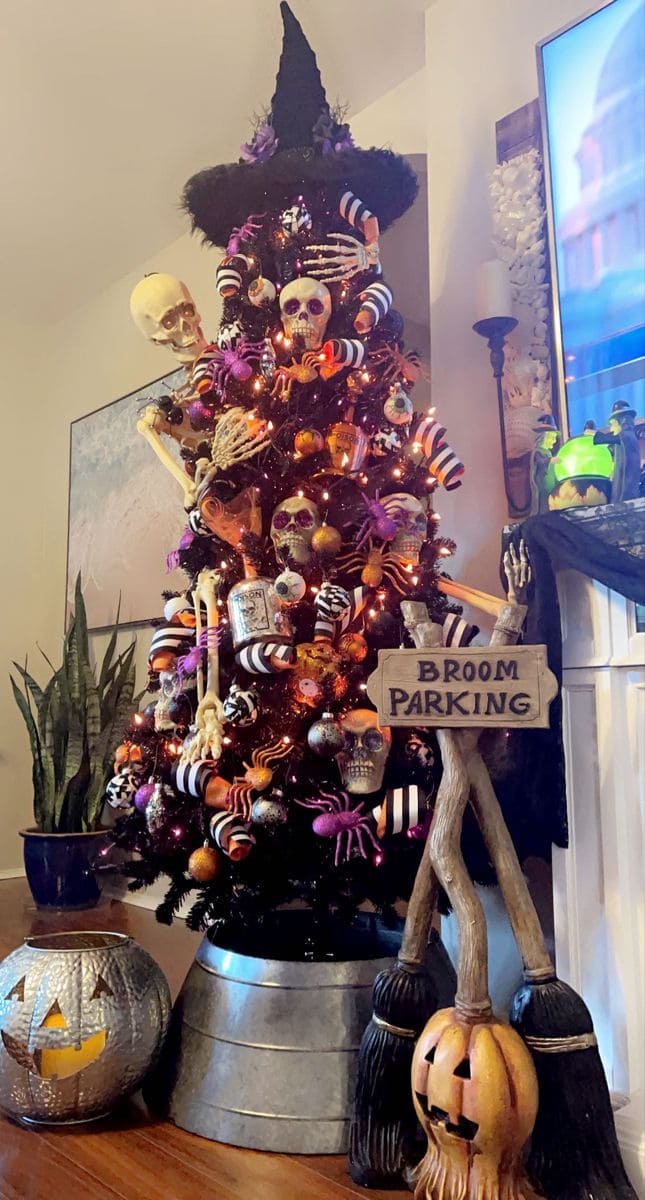
This spooky masterpiece feels like it just stepped out of a haunted forest. A towering black tree is wrapped in strands of orange lights and guarded by bony skeletons.
Moreover, a witch’s hat crowns the top, while striped candy-cane-style decorations coil through the branches like magical serpents.
At the base, a rustic “Broom Parking” sign with pumpkin-topped brooms adds a playful witchy welcome. This tree blends creepy charm with a mischievous sense of humor.
Materials Needed
- 1 black artificial tree (6-7 ft tall)
- 1 witch hat tree topper (approx. 12-14″)
- 2 full-size plastic skeleton props (3-4 ft each)
- 6 glittery skull ornaments (4-6″)
- 4 plastic potion bottles (5-7″)
- 12 striped spiral ornaments (8-10″ long)
- 6 oversized plastic spiders in purple/orange (6-8″)
- 20 assorted Halloween baubles in orange, black, and silver (2″-4″)
- 1 Broom Parking sign with decorative brooms (approx. 2-3 ft tall)
- Orange string lights (100-150 bulbs)
Step-by-step Guide
Step 1: Assemble the black tree and string the orange lights evenly from top to bottom.
Step 2: Secure the witch hat topper with zip ties. Then position the skeleton props so one appears to be climbing and another is partially emerging from the branches.
Step 3: Weave striped spiral ornaments around the tree, mimicking the movement of enchanted vines.
Step 4: Hang glittery skulls and potion bottles in visible spots to create focal points.
Step 5: Scatter oversized spiders throughout for a creepy-crawly surprise effect.
Step 6: Fill in with Halloween baubles to balance color and coverage.
Step 7: Place the “Broom Parking” sign and decorative brooms at the base as a playful finishing touch.
#16. Bat & Bucket Trick-or-Treat Tree
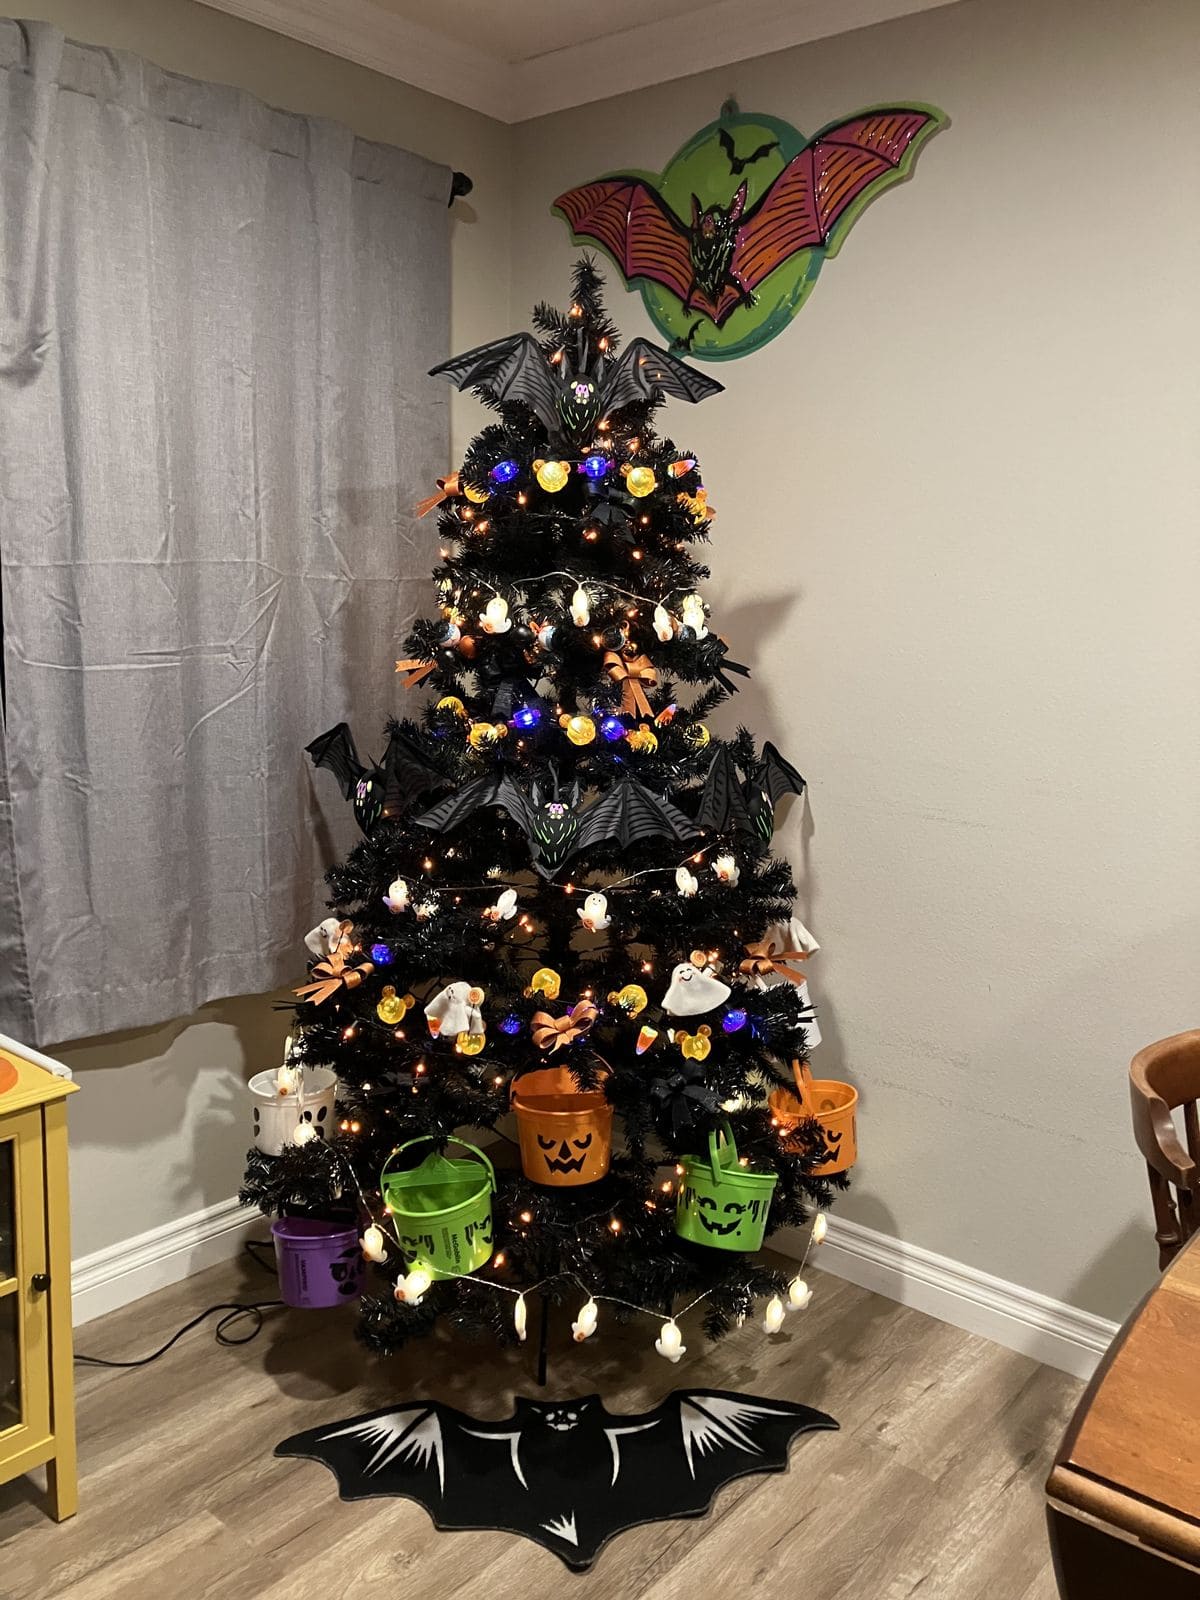
Bold, playful, and a little spooky — this bat-themed Halloween tree turns a classic black tree into a mini haunted forest. Giant bat toppers spread their wings across the branches, while candy buckets and glowing ghost lights make it perfect for a festive trick-or-treat display. It’s equal parts creepy and fun, ideal for families who love decorating with personality.
Materials Needed
- 1 black Christmas tree (5-6 ft)
- 1 large bat wall decoration
- 2-3 large plastic bat toppers (12-16” wingspan)
- 6-8 small plastic candy buckets (orange, green, purple, white, 5-6” tall)
- 8-10 plush or felt ghost ornaments (4-5” tall)
- 8 mini candy corn ornaments (optional)
- 150-200 string lights (warm white or orange)
- 1 string of ghost-shaped lights (-10 lights)
- 10 small orange ribbon bows
- 20 assorted ball ornaments in purple, gold, and orange (2-3” size)
- Black tree skirt with bat design
Step-by-step Guide
Step 1: Place the black tree skirt at the base, ensuring the bat design is facing forward. Then position your tree and fluff the branches for fullness.
Step 2: Wrap the tree with your main string lights, starting from the top and weaving toward the trunk for even glow.
Step 3: Attach the large bat toppers to the upper branches, spreading them to create a dramatic winged effect.
Step 4: Hang the candy buckets evenly around the lower branches, mixing colors for a playful look.
Step 5: Add plush or felt ghost ornaments, spacing them so they peek out between the lights.
Step 6: Fill gaps with purple, gold, and orange ball ornaments. Then add candy corn accents if you have them.
Step 7: Tie small orange ribbon bows randomly throughout the tree for an extra festive touch.
Step 8: Finish by draping the ghost-shaped light string around the bottom third of the tree, letting each ghost dangle freely.
#17. Witch’s Enchanted Pumpkin Tree
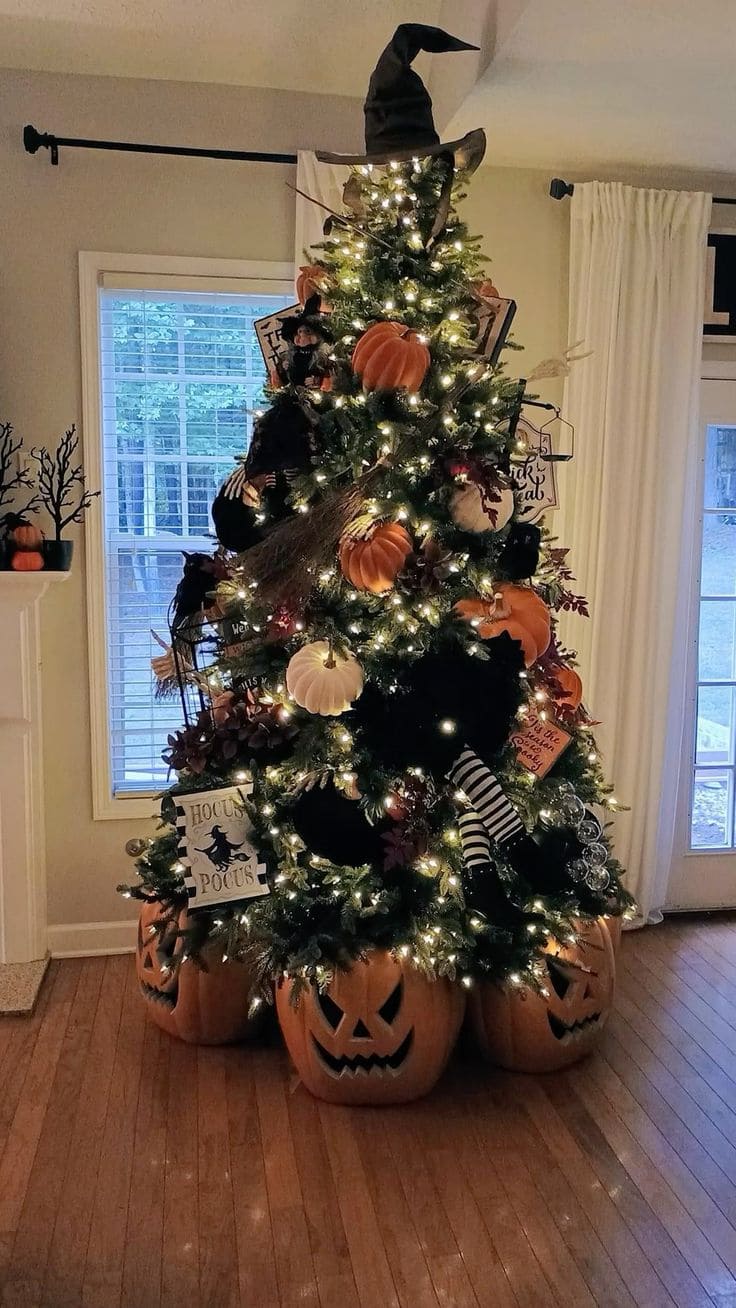
Topped with a crooked witch’s hat and wrapped in glowing strands of warm white lights, this bewitching Halloween tree weaves together rustic charm and spooky elegance.
Plump pumpkins, both orange and white, peek through the branches, while playful details like a broom, striped witch legs, and “Hocus Pocus” signs add a storybook twist.
At the base, giant jack-o’-lanterns grin mischievously, creating a whimsical yet eerie foundation.
Materials Needed
- 1 artificial or real tree (6-7 ft tall)
- 2-3 strands warm white LED lights (100 bulbs each, 33 ft)
- 6-8 artificial pumpkins (varied sizes, 6″-12″)
- 3-4 large hollow jack-o’-lantern props (18″-20″)
- 1 witch hat tree topper (12″-14″)
- 1 witch broom prop (24″-30″)
- 1 pair striped witch legs (with shoes)
- Halloween-themed signs
- Ornament hooks
Step-by-step Guide
Step 1: Place your tree in position and add the warm white lights, starting from the base and working your way up for even coverage.
Step 2: Position the largest jack-o’-lanterns around the base so the tree appears to be growing out of them.
Step 3: Nestle artificial pumpkins of varying sizes into the branches, securing them with floral wire where needed.
Step 4: Attach the witch’s legs sticking out at playful angles, as if she’s had a broomstick mishap.
Step 5: Add the broom and themed signs to fill visual gaps. Now you can crown your creation with the witch’s hat for a finishing touch full of personality.
#18. Mini White Pumpkin Pail Halloween Tree
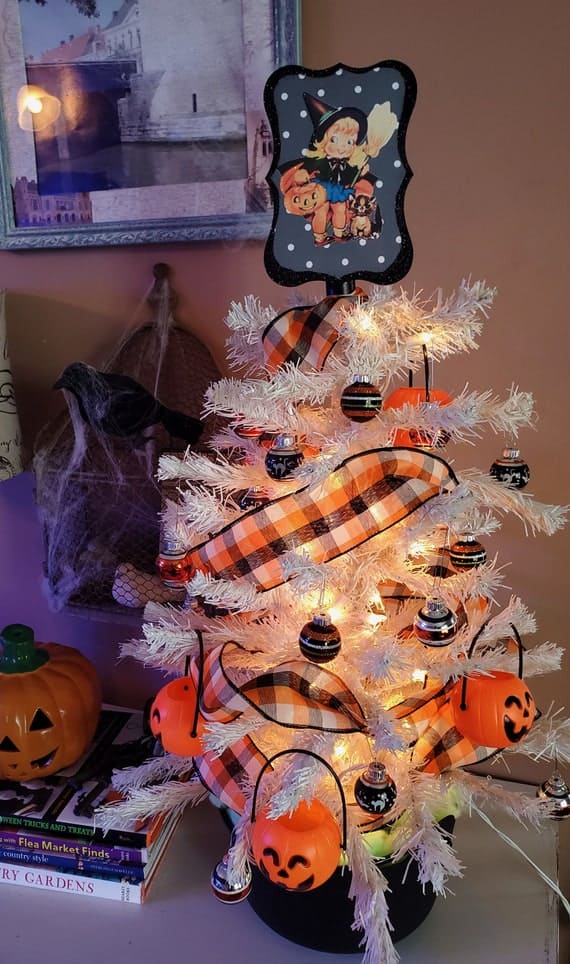
Sometimes the smallest trees deliver the biggest smiles. This charming tabletop tree takes on a bright, cheerful vibe with its white branches wrapped in bold orange-and-black buffalo plaid ribbon.
Tiny jack-o’-lantern pails peek out from the boughs, as if they’re waiting to be filled with treats.
Bonus, shiny striped baubles add sparkle, while a vintage-style witch topper ties the whole nostalgic look together.
Materials Needed
- 1 white tabletop tree (2-3 ft tall)
- 1 strand warm white fairy lights (10-15 ft)
- 1 roll orange-and-black buffalo plaid ribbon (2.5″ wide, 9 ft)
- 6-8 mini plastic jack-o’-lantern pails (3″ diameter)
- 8-10 small striped baubles in black, orange, and silver (1.5″-2″)
- Vintage-style Halloween topper (8″-10″)
Step-by-step Guide
Step 1: Fluff out your white tree branches to make space for decorations. Then wrap the fairy lights evenly from top to bottom for a warm glow.
Step 2: Weave the buffalo plaid ribbon in loose waves around the tree, tucking the edges into branches.
Step 3: Hang the mini jack-o’-lantern pails, spacing them so each is clearly visible.
Step 4: Fill in the gaps with striped baubles to add a glossy finish.
Step 5: Place the vintage witch topper on the highest branch for a final nostalgic touch.
#19. Midnight Shadows Halloween Tree
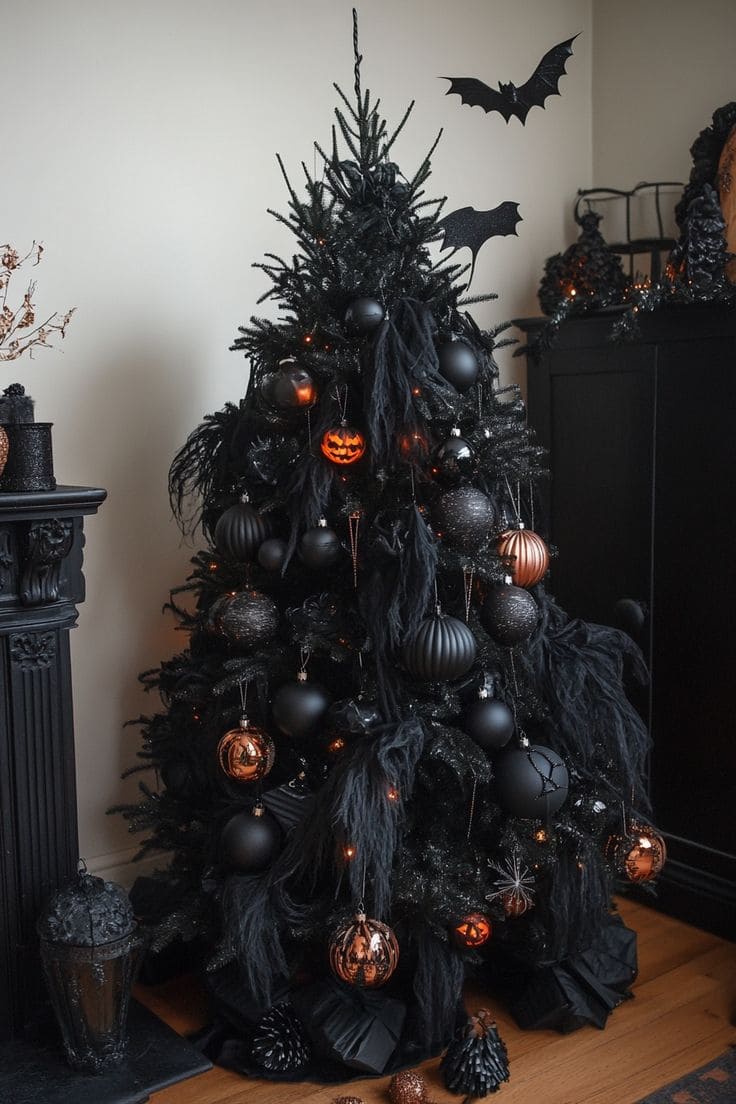
This tree feels like a scene plucked from a gothic fairy tale. The black matte ornaments give depth, while glossy copper ones break the darkness like hidden treasure.
Tattered black cloth cascades like phantom mist, and a glowing jack-o’-lantern face peeks from within.
Add bats swooping above, and it’s as if the tree itself has a secret to tell. Place it in a dim corner, and you’ll have a statement piece that’s less cute Halloween and more mysterious elegance.
Materials Needed
- 1 black artificial tree (6-7 ft tall)
- 2 strings warm orange LED lights (100 bulbs each, 33 ft)
- 2-3 yards black creepy cloth
- 15 matte black ornaments (3″)
- 10 glossy black ornaments (3″)
- 8 copper ornaments (3″)
- 4-6 mini jack-o’-lantern ornaments (2″)
- 5 paper or foam bat cutouts (7″-10″)
- 1 black tree skirt (48″)
- Black ornament hooks and floral wire
Step-by-step Guide
Step 1: Start by fluffing the branches so they look full and natural. Then lay the black tree skirt to hide the stand.
Step 2: String the orange LED lights, beginning from the trunk outward and spiraling up for even coverage.
Step 3: Drape creepy cloth in loose strips between branches. Use floral wire to hold them in place without pulling too tight.
Step 4: Hang matte black ornaments first to create the depth, then layer in glossy black for texture.
Step 5: Add copper ornaments strategically to catch light and guide the eye upward. Then place mini jack-o’-lantern ornaments near light bulbs so they glow softly.
Step 6: Attach bat cutouts to upper branches and the wall behind for movement and atmosphere.
#20. Skeleton & Candy Corn Halloween Tree
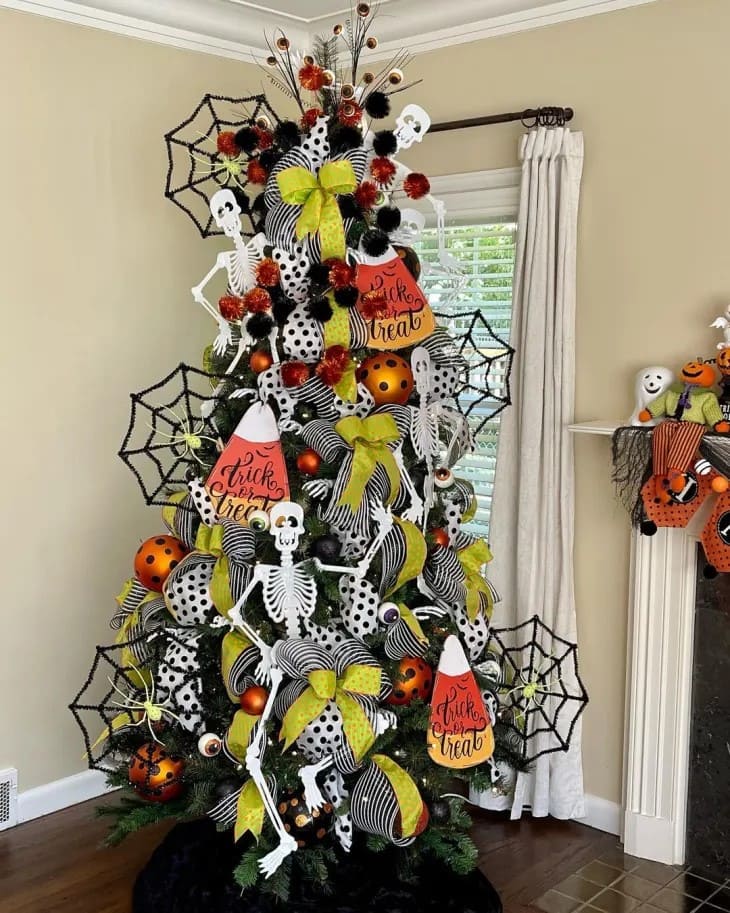
This tree is a playful mix of spooky and sweet, perfect for making a bold statement in your living room. Striped and polka-dotted ribbons swirl around the branches, broken up by pops of bright yellow bows.
Candy corn signs shout “Trick or Treat” while cheerful skeletons dangle as if they’ve joined the party. Also, giant spiderweb frames spread across the sides, adding a dramatic backdrop to the vibrant decorations.
Materials Needed
- 1 artificial tree (6-7 ft tall)
- 2 rolls black-and-white striped ribbon (2.5″ wide, 9 ft each)
- 2 rolls black-and-white polka dot ribbon (2.5″ wide, 9 ft each)
- 6 large yellow bows (8″ wide)
- 3 candy corn “Trick or Treat” signs (10-12″)
- 4-6 skeleton figures (12-18″ tall)
- 6 decorative spiderweb frames (18-24″)
- 20 assorted ornaments in orange, black, and gold (2″-4″)
- 20-25 black and orange pom-poms (2″)
Step-by-step Guide
Step 1: Fluff and shape your tree branches to create an even base for decorating.
Step 2: Drape striped and polka-dot ribbons in alternating spirals from top to bottom. Then attach the large yellow bows in evenly spaced spots to brighten the monochrome patterns.
Step 3: Hang candy corn signs in the center areas where they can be easily seen.
Step 4: Position the skeletons so they appear to be hanging or climbing among the branches.
Step 5: Place spiderweb frames on the outer edges for dramatic dimension.
Step 6: Fill in empty spaces with ornaments and pom-poms for a playful finishing touch.
See more: 20 Hauntingly Cool DIY Halloween Archway Ideas for a Spine-Tingling Welcome
