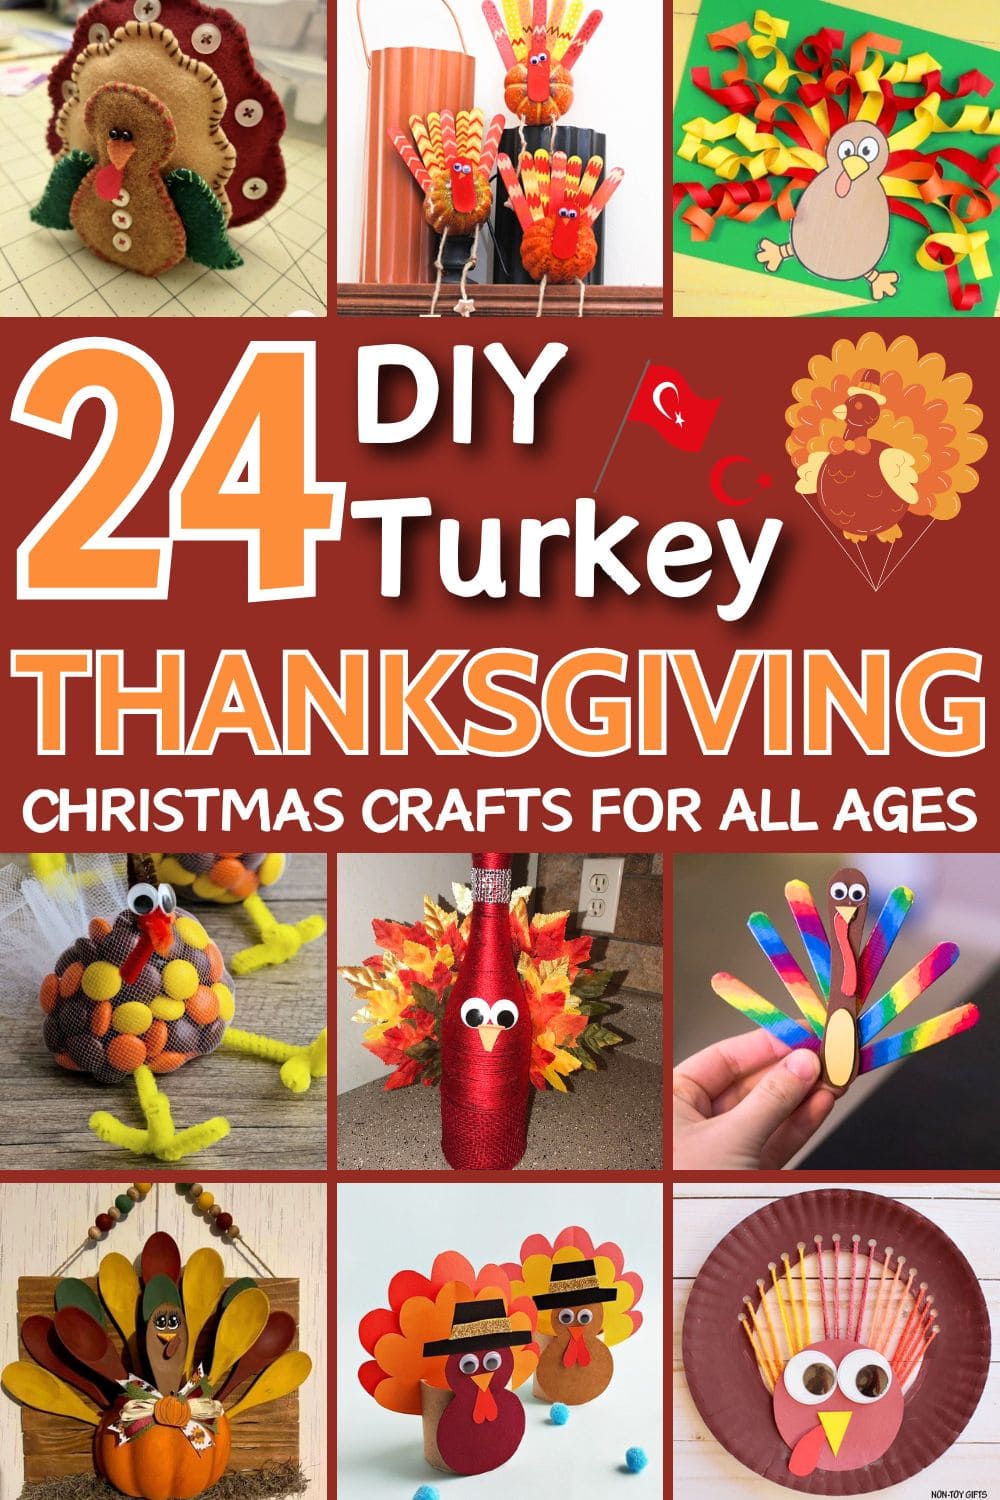
Are you looking for a fun way to add heartwarming charm to your Thanksgiving celebration? Turkey crafts are the perfect blend of creativity and tradition and easy to make.
These adorable projects bring a handmade touch to your holiday décor and give everyone a chance to slow down and connect. You don’t need fancy supplies or artistic skills, just a little imagination and the joy of creating something together.
This collection of 24 charming turkey craft ideas will fill your home with festive spirit and laughter.
#1. Thankful Turkey Envelope Display
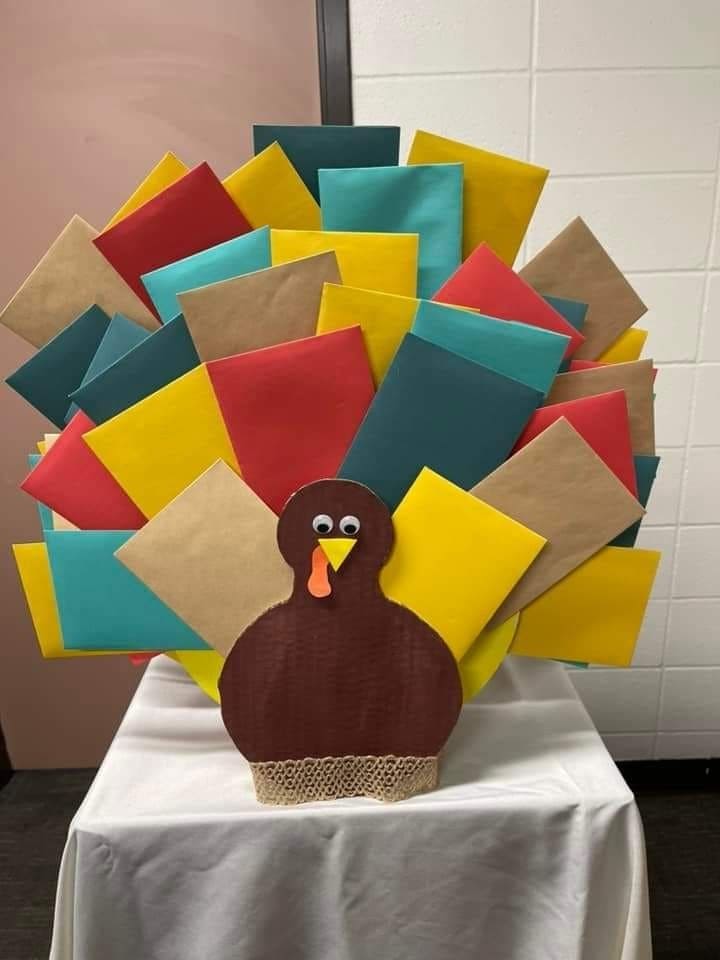
This colorful turkey is more than just festive, it’s interactive and heartwarming. Each tail feather is actually a vibrant envelope, perfect for holding thankful notes, kind words, or acts of kindness.
Whether you’re using it in a classroom, office, or at home, this turkey turns gratitude into a shared experience.
Also, the bold square feather in red, teal, kraft, and yellow add a modern twist to traditional fall decor.
Materials Needed
- Cardboard or foam board (approx. 18″ x 24″)
- 20-30 colored envelopes (standard 4.125″ x 9.5″)
- Brown craft paper or paint
- Googly eyes (1″ diameter)
- Orange and yellow cardstock
- Scrap burlap or lace ribbon (12″)
- Glue gun
- Scissors
Step-by-step Guide
Step 1: Cut a large turkey body shape from the cardboard or foam board and paint or cover it with brown craft paper.
Step 2: Add eyes, beak, and wattle to the turkey’s face using googly eyes and colored cardstock shapes.
Step 3: Arrange the envelopes in a fan shape behind the turkey’s body like feathers and secure each one with glue or tape.
Step 4: Finally, glue a strip of burlap or lace to the bottom edge of the turkey body for a fun, textured detail.
#2. Beaded Pipe Cleaner Turkey Tail Craft
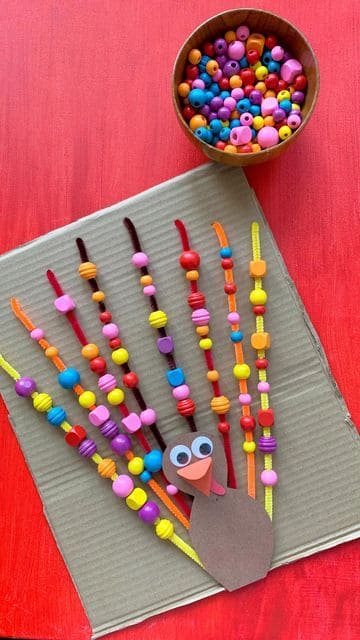
With brightly colored pony beads strung on fuzzy pipe cleaners, this project is both festive and great for fine motor skills.
Moreover, each feather sparkles with texture and color, giving this turkey a 3D personality that pops. It’s the kind of craft that invites kids to be hands-on and playful, while still creating a cheerful Thanksgiving decoration you’ll want to display proudly.
Materials Needed
- 7 pipe cleaners (12″, assorted fall or rainbow colors)
- Assorted plastic beads (approximately 100 beads)
- Cardboard backing (8″ x 8″)
- Brown construction paper (for body)
- Googly eyes (0.5″), red and orange paper
- Glue or hot glue gun
- Scissors
Step-by-step Guide
Step 1: Cut the pipe cleaners to about 10″ and string them with beads, leaving some space at the ends.
Step 2: Glue the beaded pipe cleaners fanned out onto the cardboard base.
Step 3: Cut a round turkey body from brown paper and add eyes, a beak, and a wattle.
Step 4: You now glue the body over the base of the feathers to finish the turkey.
#3. Candy Turkey Treat Bags
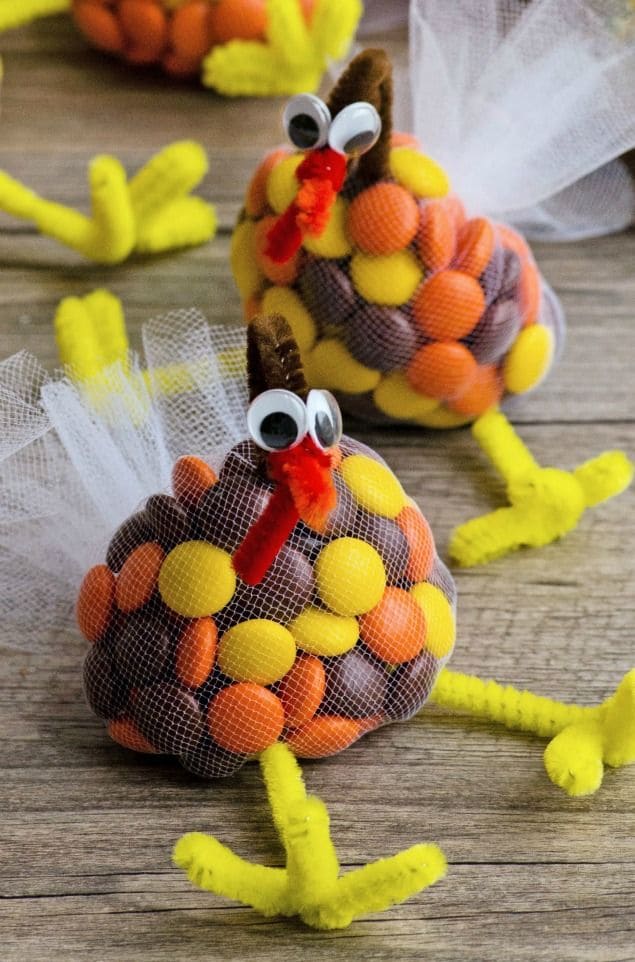
Wow, these candy-filled turkeys are both adorable and edible, making them a sweet addition to any Thanksgiving table or classroom party.
Wrapped in mesh tulle, their colorful bellies burst with fall-colored candies, while pipe cleaner feet and beaks bring them to life. They’re easy enough for kids to help with and impressive enough to double as party favors.
I love how playful they look sitting on a plate or tucked into a basket, they add a lighthearted charm to the holiday setup and satisfy a sweet tooth too.
Materials Needed
- 6″ x 6″ square white tulle fabric (1 per turkey)
- ½ cup of round candy-coated chocolates (orange, brown, yellow)
- 2 yellow pipe cleaners (12″)
- 1 red and 1 brown pipe cleaner (6″)
- 2 googly eyes (0.5″)
- Small rubber band
- Hot glue gun
Step-by-step Guide
Step 1: Place the candy in the center of the tulle square. Gather the edges to form a bundle and secure tightly with a rubber band or twist tie.
Step 2: Twist a brown pipe cleaner into a small upright neck and hot glue it onto the top of the candy bundle. Then add a small red piece as the snood.
Step 3: Glue googly eyes onto the brown pipe cleaner neck.
Step 4: Bend two yellow pipe cleaners into legs with three toes each and glue them underneath the candy bag.
#4. Rainbow Feather Popsicle Stick Turkey
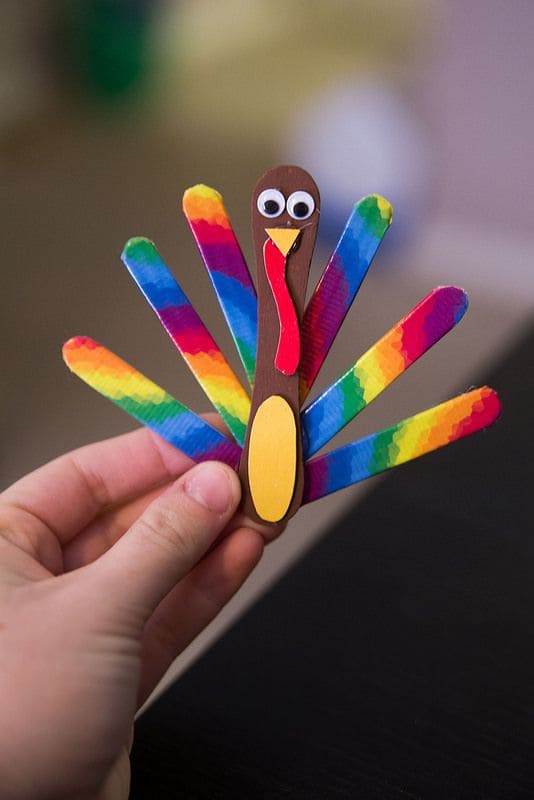
Using rainbow-painted popsicle sticks for the feathers, this craft gives the classic Thanksgiving bird a bright, unexpected twist.
Plus, the contrast between the brown body and the rainbow plumage makes it stand out wherever it’s displayed on a shelf, classroom bulletin board, or Thanksgiving table centerpiece.
Materials Needed
- 6 mini craft sticks (4.5″) painted in rainbow patterns
- 1 jumbo craft stick (6″)
- Brown, yellow, red, and orange cardstock
- Googly eyes (0.5″)
- Glue (tacky or hot glue recommended)
- Scissors and paintbrushes
Step-by-step Guide
Step 1: Paint the small sticks in rainbow designs and let them dry completely.
Step 2: Glue the rainbow sticks in a fan shape onto the back of the jumbo stick.
Step 3: Cut an oval from orange or yellow paper and glue it to the body as the belly.
Step 4: Finally, add googly eyes, a triangle beak, and a red wattle to the top of the stick.
#5. Toilet Paper Roll Turkey Buddies
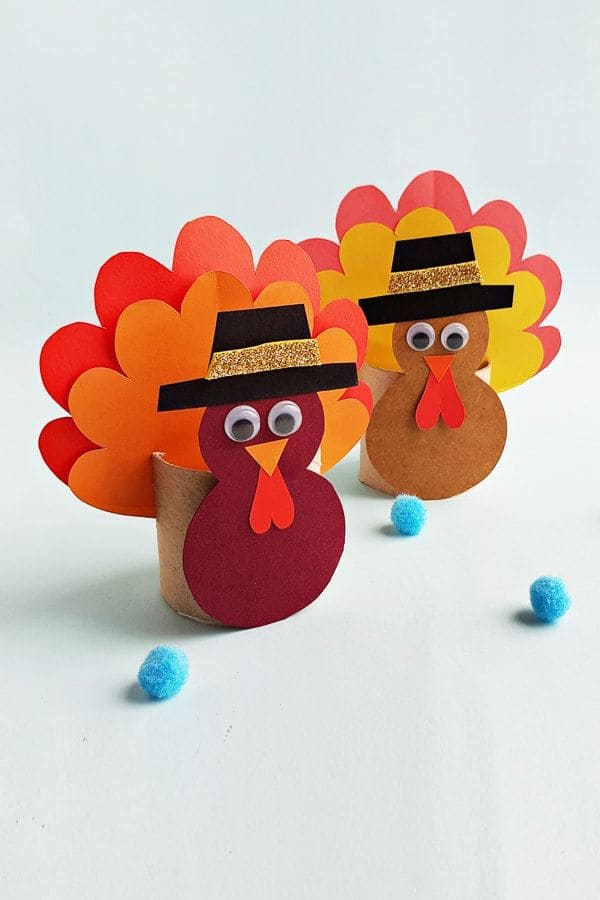
These cheerful turkey pals are the ultimate Thanksgiving craft for kids! All it takes is a humble toilet paper roll, some colorful paper, and a sprinkle of imagination to bring these gobblers to life.
Whether you’re making a whole flock for a school project, a holiday table display, or just some cozy family fun, this project is simple, budget-friendly, and full of charm.
Materials Needed
- 2 toilet paper rolls
- Colored cardstock sheets (red, orange, yellow, brown, black, gold)
- 2 pairs of googly eyes (0.5″)
- Glue stick or white glue
- Scissors
- Pencil
Step-by-step Guide
Step 1: Cut the toilet paper roll in half if you want smaller turkeys, or keep it whole for a tall one. You need to cover the outside with brown paper or leave it as is for a rustic look.
Step 2: Cut feather shapes from red, orange, and yellow cardstock. Then fan them out and glue them to the back of the roll.
Step 3: Cut a round turkey body and glue it to the front of the roll. Next, add a triangle beak, red snood, and two googly eyes.
Step 4: Create a tiny pilgrim hat from black and gold cardstock and glue it on top of the turkey’s head.
#6. Gourd Gobbler Turkeys with Dangle Legs
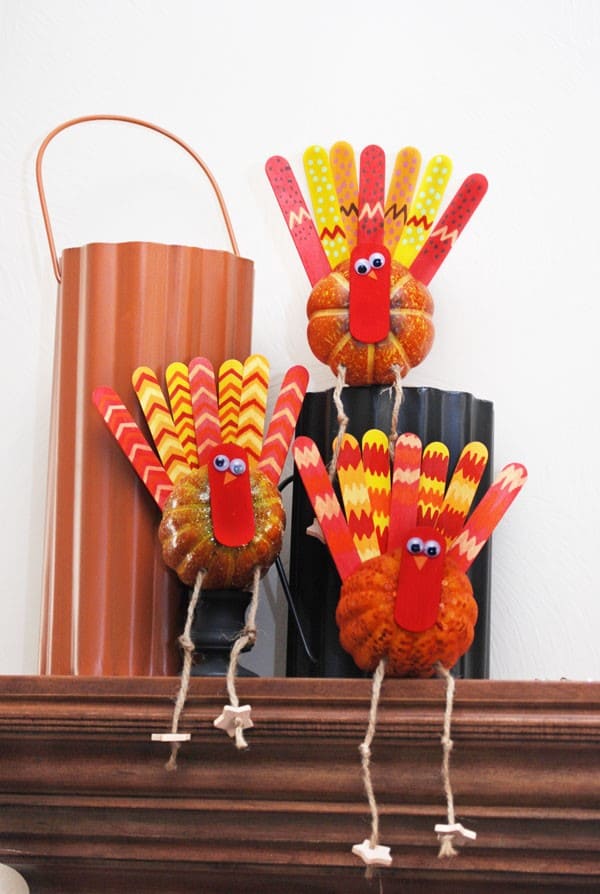
These goofy gourd turkeys are full of autumn charm and personality. Each one uses a mini pumpkin as a plump body, while craft sticks painted in bright zigzags fan out as the tail feathers.
But it’s the dangling legs made with twine and tiny craft stick feet that truly steal the show. This is one of those crafts that kids adore and adults can’t help but smile at.
Materials Needed
- Mini pumpkins or gourds
- 6 craft sticks (standard size) per turkey
- Acrylic paint in red, yellow, orange, black
- 2 googly eyes per turkey
- Twine (two 8″ pieces per turkey)
- 2 mini craft sticks per turkey
- Glue gun or strong craft glue
- Small foam or wood piece
Step-by-step Guide
Step 1: Paint the craft sticks in fun zigzag or polka-dot patterns. Let them dry completely.
Step 2: Hot glue the sticks to the back of the mini pumpkin, fanned out like tail feathers.
Step 3: Attach googly eyes and a small red and yellow foam piece for the beak and wattle on the front.
Step 4: Tie twine for the legs and glue mini craft sticks at the ends to serve as feet. You should secure to the bottom of the pumpkin.
#7. Wooden Plank Turkey Pilgrims
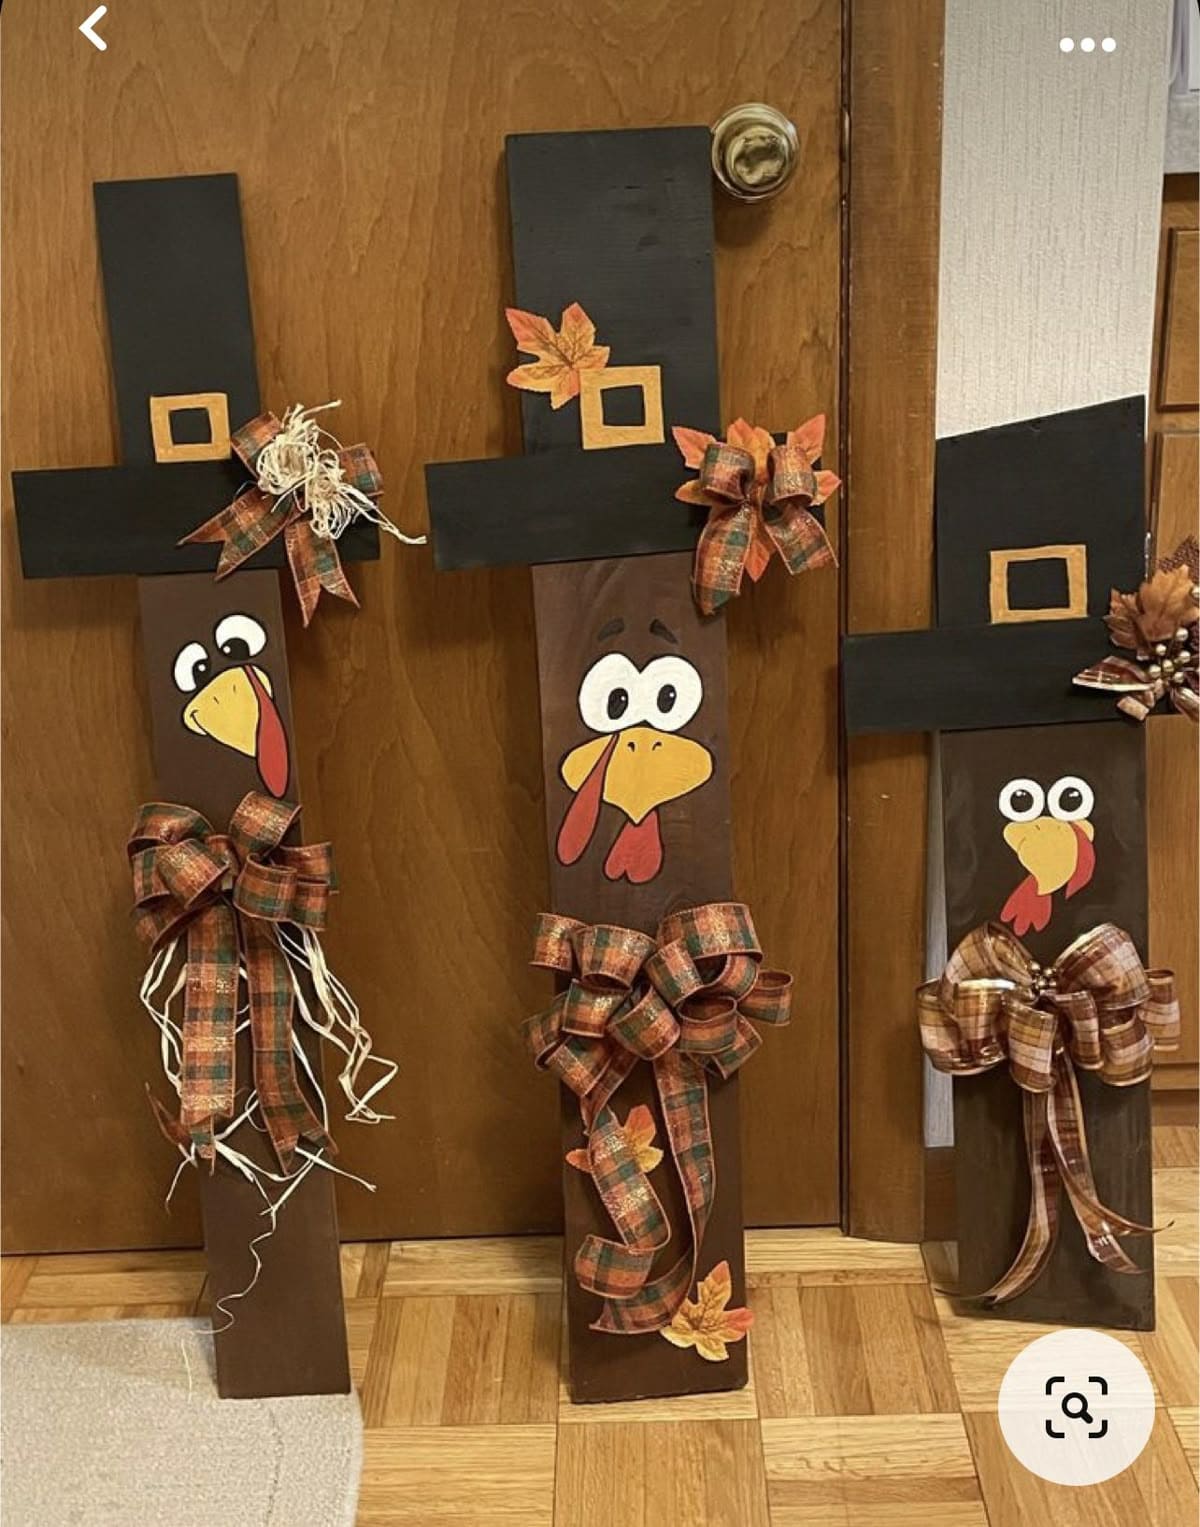
These charming turkey pilgrims are crafted from tall wooden planks, turning simple boards into delightful fall decor with personality.
Each turkey features a painted face with bright cartoon-style eyes, a wide beak, and signature red wattle. Their black pilgrim hats give them a festive harvest flair.
What makes them stand out are the oversized plaid bows with seasonal textures like raffia, adding that country-style warmth perfect for porches, hallways, or by the fireplace.
Materials Needed
- 3 wooden planks (varying sizes: 36″, 30″, and 24″ tall)
- Acrylic paint (brown, black, yellow, red, white)
- Paintbrushes (flat and detail size)
- Plaid ribbon (3 yards total)
- Faux autumn leaves
- Hot glue gun and glue sticks
- Optional: raffia or pinecones
Step-by-step Guide
Step 1: Paint the planks brown for the turkey bodies and black across the top to form hats. Let dry completely.
Step 2: Add cartoon turkey faces using yellow for the beak, red for the wattle, and white/black for the eyes. You should use a small brush for details.
Step 3: Cut and glue ribbon into large bows and attach at neck height. Then layer raffia underneath if desired for extra texture.
Step 4: Finish each with glued-on felt leaves and a yellow felt hat buckle.
#8. Wooden Spoon Turkey Wall Hanging
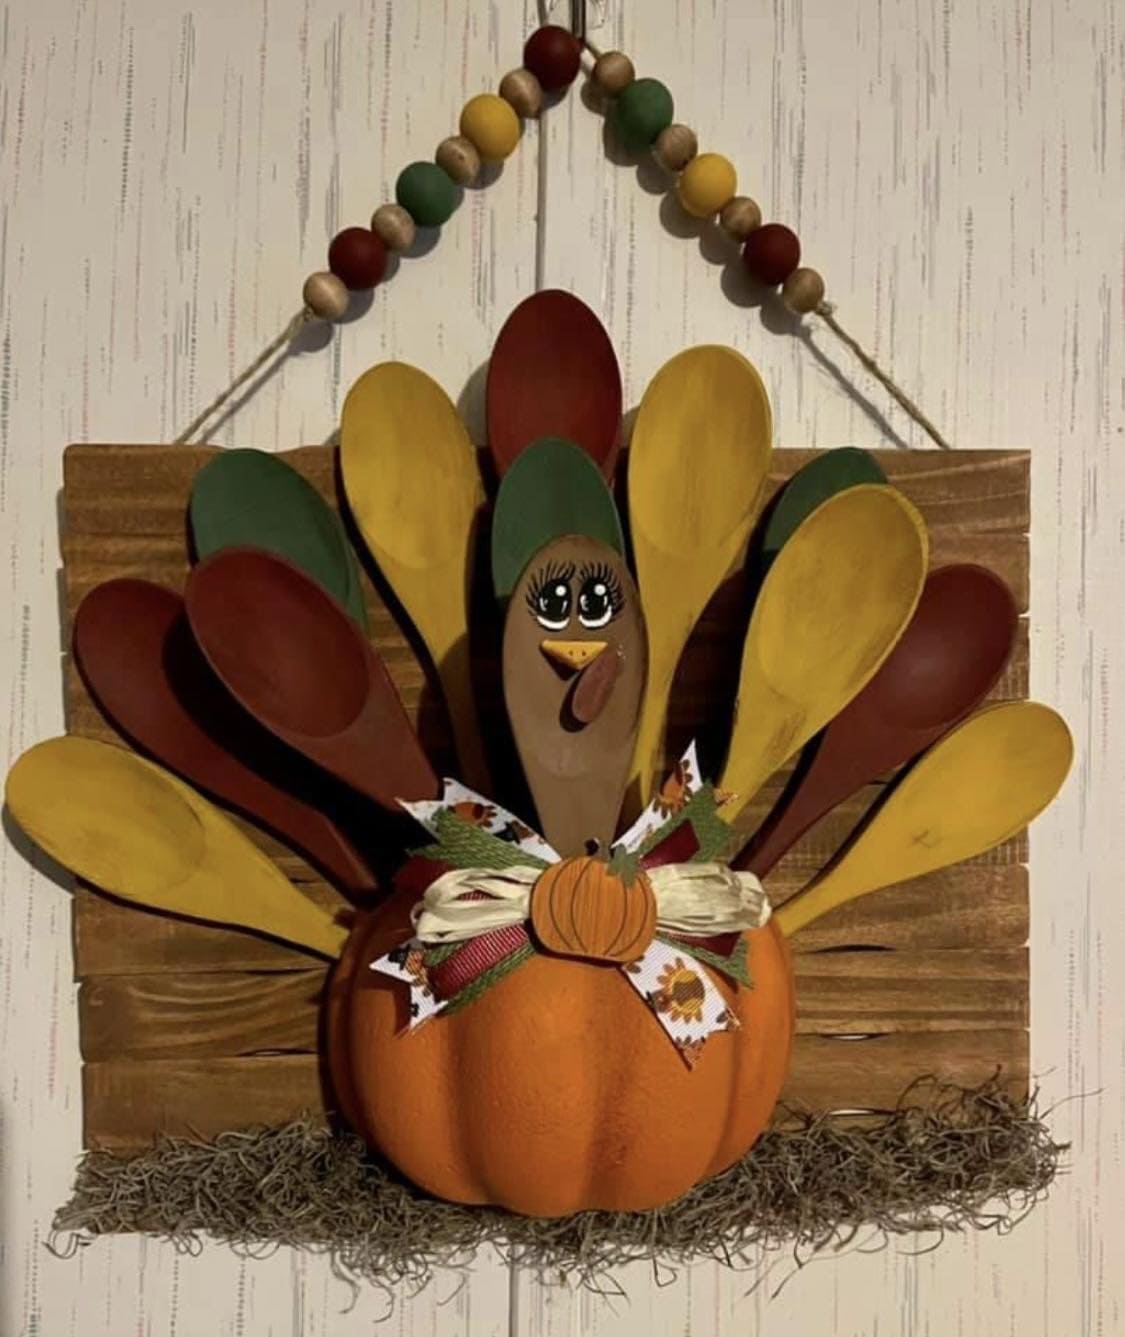
How about giving your Thanksgiving décor a homespun charm with this delightful turkey made entirely from wooden spoons and autumn spirit?
Nestled into a faux pumpkin belly, this cheerful bird is framed against a rustic wood board and topped with a festive bead-hung rope for easy wall display.
This project brings out the playful side of the season and turns ordinary kitchen spoons into a statement of gratitude and creativity.
Materials Needed
- 13 wooden spoons (12″ long)
- 1 wooden board (12″×10″)
- 1 medium foam pumpkin (approx. 6″-8″ wide)
- Acrylic paint (brown, red, yellow, green)
- Paintbrushes (small for details, medium for coverage)
- Hot glue gun and glue sticks
- Assorted ribbon (Thanksgiving-themed, 1″ wide)
- Mini faux pumpkin embellishment
- Decorative moss
- Jute twine and colorful wood beads
Step-by-step Guide
Step 1: Start by painting the spoons including three in each color. Let them dry completely before moving on to assembly.
Step 2: Arrange the spoons in a fan shape behind the foam pumpkin to mimic feathers. Then glue each spoon onto the wooden board, spacing them evenly.
Step 3: Paint a sweet turkey face on one spoon and glue it front and center, slightly overlapping the pumpkin.
Step 4: Add ribbon, a faux pumpkin, and moss around the base to bring softness and seasonal flair.
Step 5: Thread wooden beads onto twine and attach it to the top corners for a charming hanger.
#9. Stained Glass Tissue Paper Turkeys
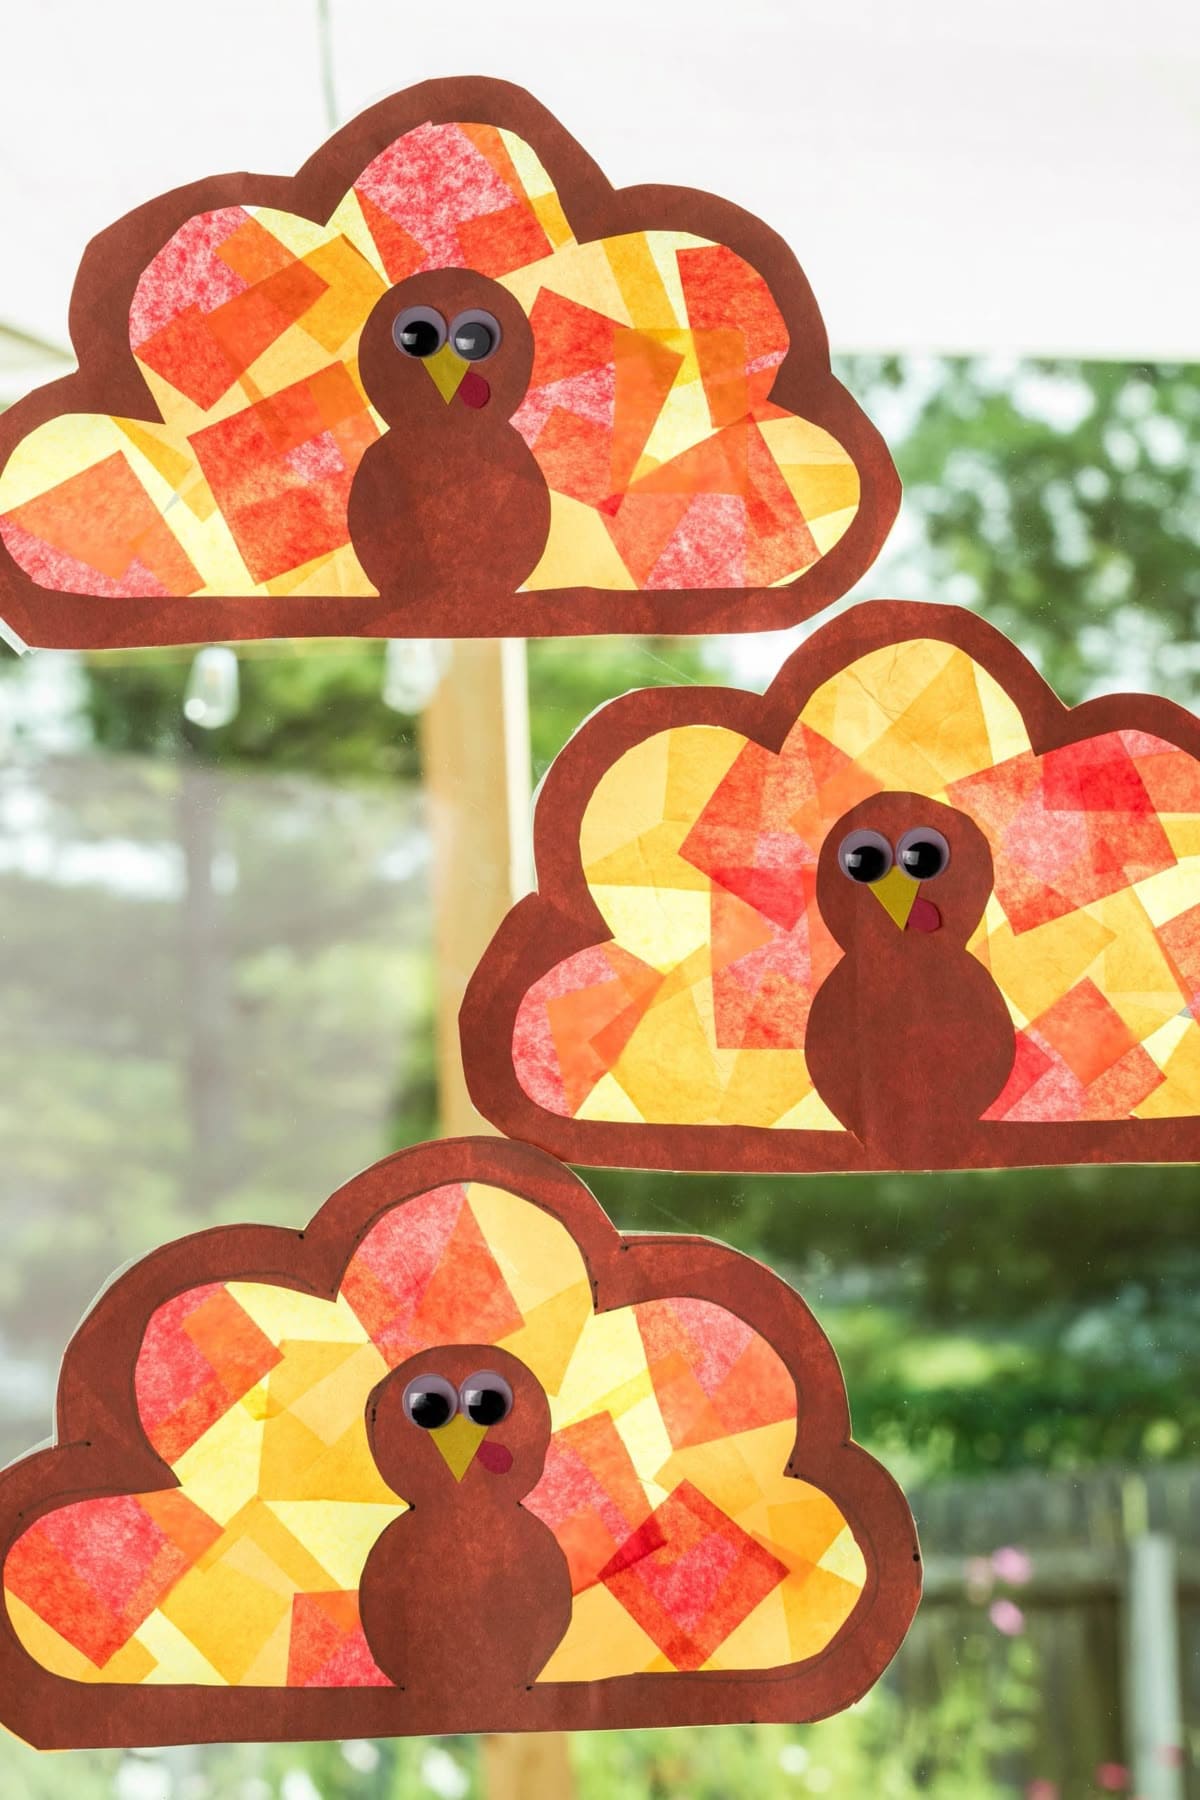
When sunlight streams through these charming stained-glass turkeys, your windows will glow with warm Thanksgiving color.
The magic lies in the translucent tissue paper, layered behind a turkey-shaped frame to create a faux stained-glass effect. It’s a peaceful, meditative craft, cutting, layering, and watching how the light changes everything.
Perfect for kids and adults alike, this one’s great for family crafting time or a quiet moment of creativity.
Materials Needed
- Brown construction paper (9″ x 12″ sheet)
- Tissue paper squares in red, orange, and yellow – approx. 1″ x 1″
- Clear contact paper or laminating sheets (two 9″ x 12″ pieces)
- 2 googly eyes per turkey
- Glue stick or tape
- Scissors
- Pencil
Step-by-step Guide
Step 1: Draw a simple turkey outline on brown paper. Then cut out the shape and carefully cut out the inside to form a frame, leaving a 1″ border.
Step 2: Lay down one sheet of clear contact paper (sticky side up) and place the turkey frame on top.
Step 3: Stick tissue paper squares inside the frame, layering colors however you like. Then fill in all gaps.
Step 4: Seal with a second sheet of contact paper on top, then trim the edges.
Step 5: Finally, glue on googly eyes and draw or cut out a small beak and wattle.
Tip: If you’re doing this with kids, pre-cut the frames to save time and let them focus on the fun part, layering the colors!
#10. Accordion Paper Strip Turkey Puppet
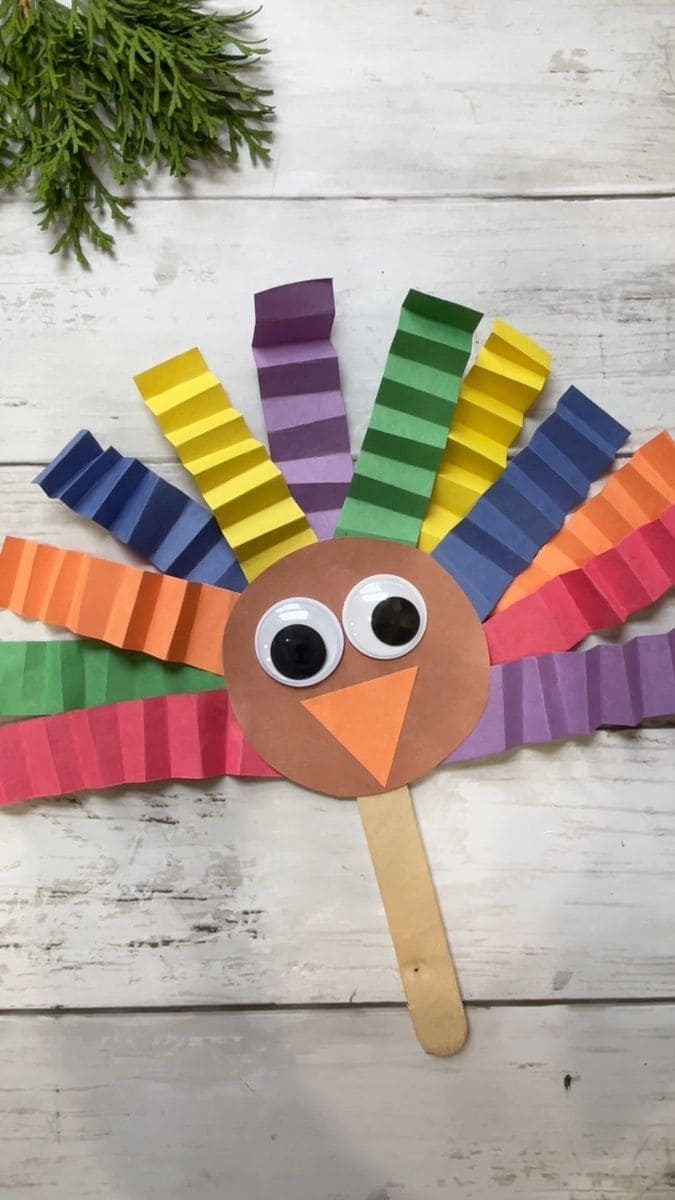
Full of charm and color, this paper strip turkey puppet is a joyful addition to any Thanksgiving crafting table.
What makes it pop is the accordion-folded feathers in rainbow shades, giving it bounce and texture with every wiggle. A simple round face with oversized googly eyes and a triangle beak brings a silly, lovable personality to life.
And with a craft stick handle, it’s ready for parades, puppet shows, or even greeting guests at your front door.
Materials Needed
- Colored construction paper – 8 strips (1.5″ x 8″)
- Brown paper circle (approx. 4″ diameter)
- Orange paper triangle (2″ base)
- Large googly eyes (1.5″ diameter)
- Jumbo craft stick (6″ long)
- Glue stick or tape
- Scissors
Step-by-step Guide
Step 1: Cut strips of colorful paper and accordion fold each one to form the turkey feathers.
Step 2: Glue the ends of each strip to the back of the brown paper circle, spacing them around evenly.
Step 3: Flip over the circle and attach the googly eyes and orange triangle beak to make the turkey’s face.
Step 4: Glue the craft stick to the bottom center of the back to create a handle for your puppet.
#11. Wooden Spoon Turkey Centerpiece
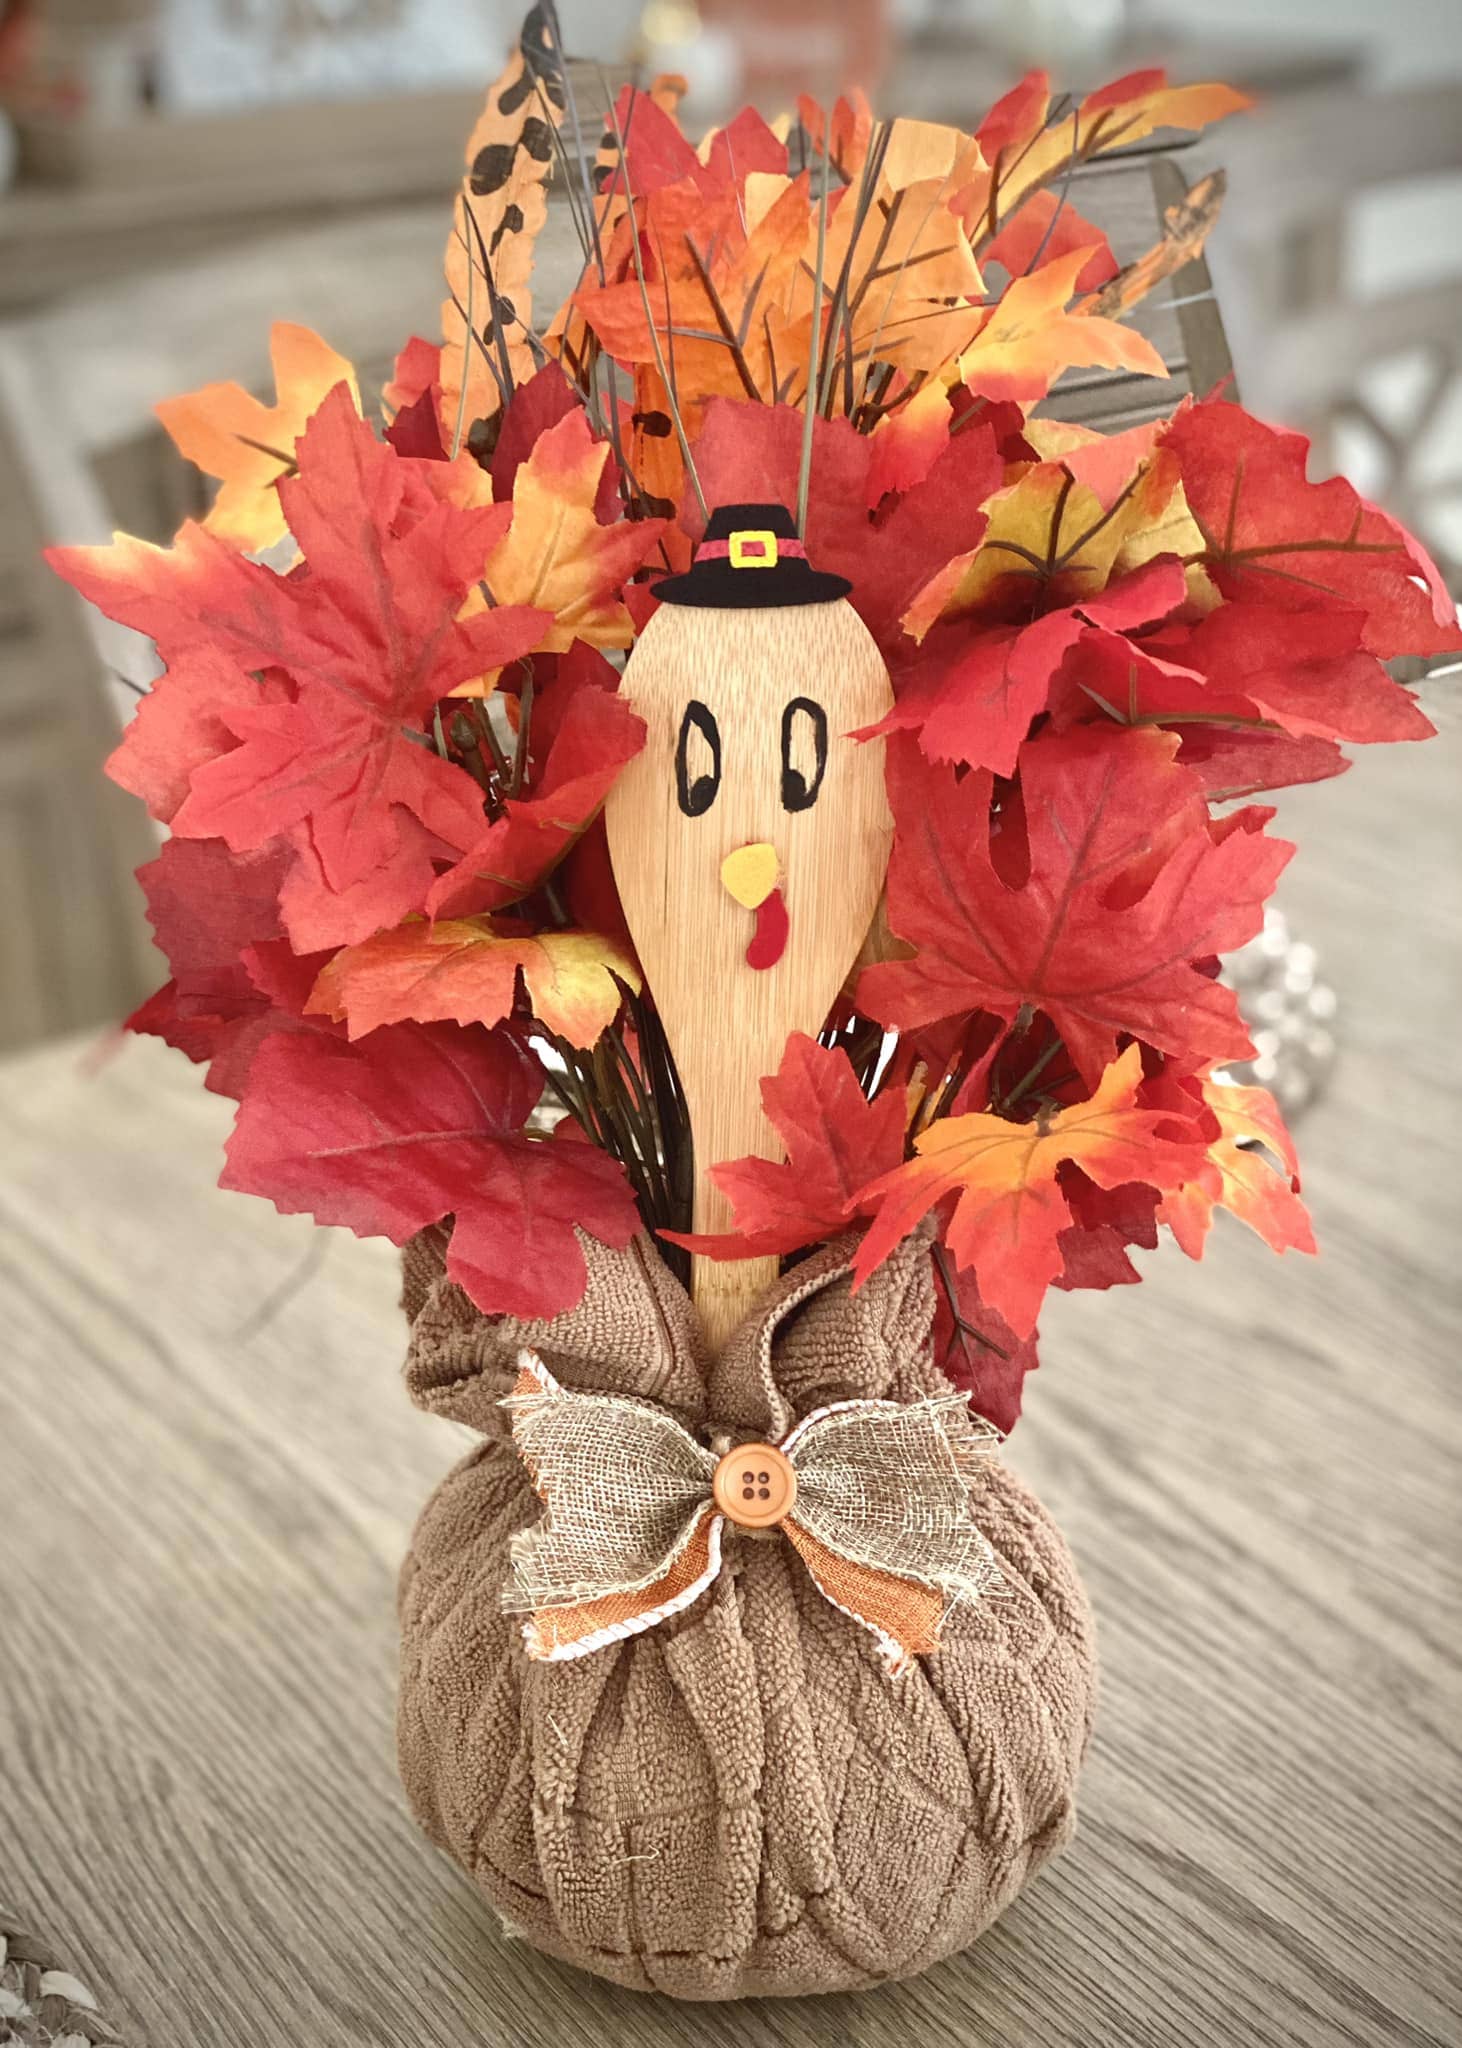
When Thanksgiving rolls around, sometimes all you need is one wooden spoon and a bundle of faux leaves to create a heartwarming centerpiece.
This charming little turkey bursts with fall color and handmade joy. You can repurpose what you already have like an old kitchen spoon, some cozy fabric, and that bag of silk leaves buried in your seasonal stash.
Specially, the spoon becomes the star, dressed up with a pilgrim hat and a hand-drawn face that gives it so much personality.
Materials Needed
- 1 wooden spoon (12″)
- Red, yellow, and black felt
- 1 bunch of faux maple leaves (approx. 20-30)
- Brown washcloth or hand towel (12″x12″)
- Twine or ribbon
- Small button (¾”)
- Rubber band or string (to tie base)
- Black marker
- Hot glue gun
Step-by-step Guide
Step 1: Using black marker, draw two eyes and glue on a small felt beak and snood to turn the spoon head into your turkey’s face. Then cut a little pilgrim hat from black felt and add a yellow buckle for fun.
Step 2: Tuck the spoon into a bunch of faux leaves, arranging them like a fan behind the spoon to mimic feathers.
Step 3: Wrap your towel around the stem end of the leaves and spoon. You need to use a rubber band to secure the bottom tightly, forming a soft round base.
Step 4: Finish by gluing a bow over the rubber band and adding a decorative button in the center.
#12. Pumpkin Turkey with Clothespin Feather Fan
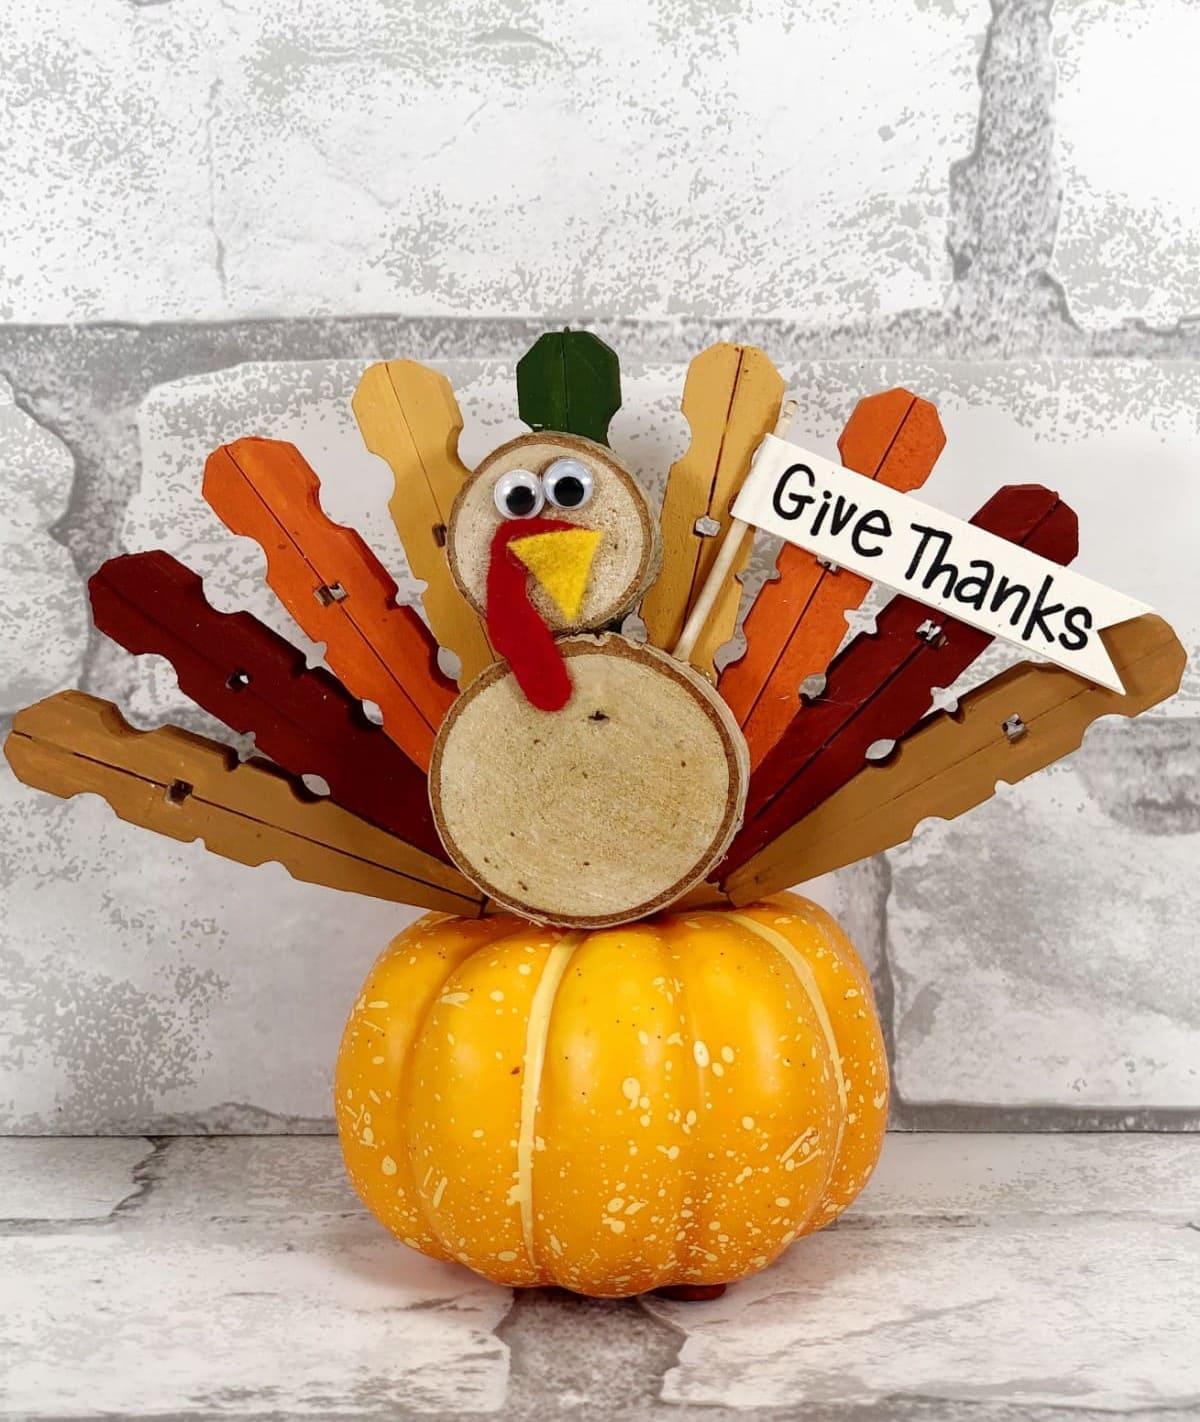
Bright, quirky, and heartwarming, this little turkey makes a big impression perched atop a mini pumpkin. Its body is built from natural wood slices, creating a lovely contrast against the brightly painted clothespins that form the tail fan.
Each clothespin is colored in warm autumn shades, fanned out like real feathers and clipped behind the turkey’s body. Googly eyes and felt accents bring charm and personality.
It’s a festive addition to your fall decor, whether you place it on your Thanksgiving table, a windowsill, or by the entryway to welcome guests with gratitude.
Materials Needed
- 1 mini faux pumpkin (approx. 5″ diameter)
- 2 unfinished wood slices (1 at 3″ and 1 at 2″ diameter)
- 8-10 wooden clothespins (3.25″ standard size)
- Acrylic paint in fall colors (red, orange, yellow, green, brown)
- 1 pair of 0.5″ googly eyes
- Small pieces of red and yellow felt
- Hot glue gun and glue sticks
Step-by-step Guide
Step 1: Paint each clothespin a different fall color. Then let them dry fully before assembling.
Step 2: Clip the clothespins around the edge of the larger wood slice to form the tail fan.
Step 3: Glue the smaller slice on top for the head, then add googly eyes, a yellow felt beak, and a red felt wattle.
Step 4: Secure the entire turkey to the pumpkin using hot glue for a stable finish.
#13. Paper Loop Turkey Art
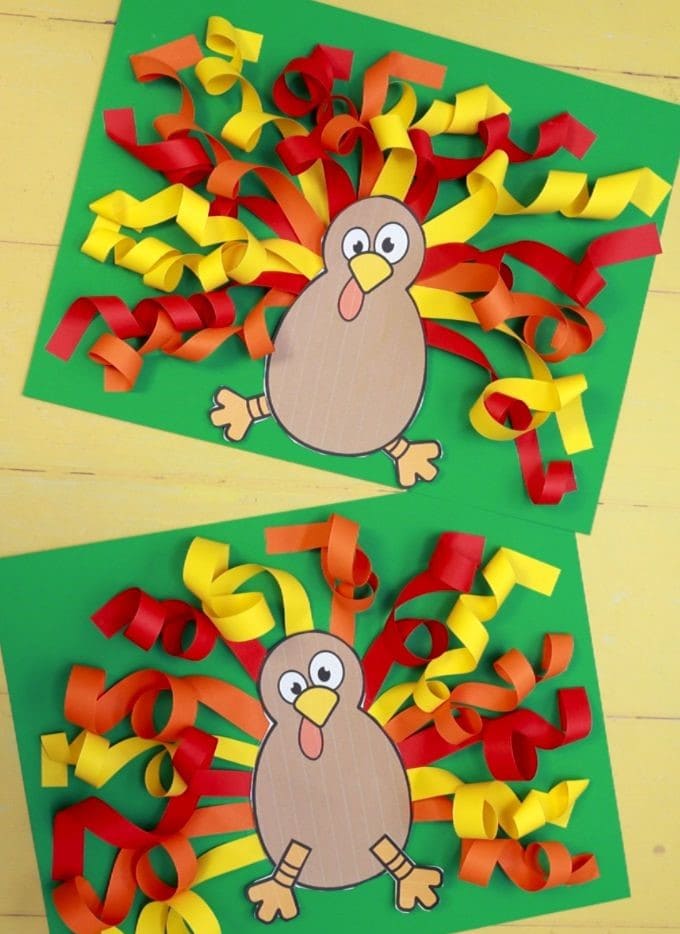
This cheerful turkey craft practically bursts off the page with its playful, curly paper loops. You get to mix bold fall colors like red, orange, and yellow in a way that feels like a swirling leaf pile.
Great for little hands and growing imaginations, this is a fun activity that helps kids explore texture and dimension while celebrating Thanksgiving.
Plus, you’ll love how each finished piece has its own character. Hang them up as part of your fall classroom wall or scatter them across the Thanksgiving table for some festive handmade flair.
Materials Needed
- Green cardstock (8.5″ x 11″)
- Construction paper in red, orange, and yellow (cut into 1″ x 6″ strips)
- Turkey body template printed on light brown paper
- Black marker
- Glue stick or white craft glue
- Scissors
Step-by-step Guide
Step 1: Cut strips of red, orange, and yellow construction paper into 1″ x 6″ pieces. Then loop each strip and glue the ends together to make curly feathers.
Step 2: Arrange and glue the loops in a fan shape onto the top half of the green cardstock to form the turkey’s tail.
Step 3: Cut and color the turkey body, then glue it over the base of the loops.
Step 4: Add eyes, beak, feet, and details with a marker to bring your turkey to life.
#14. Tin Can Turkey Windsock
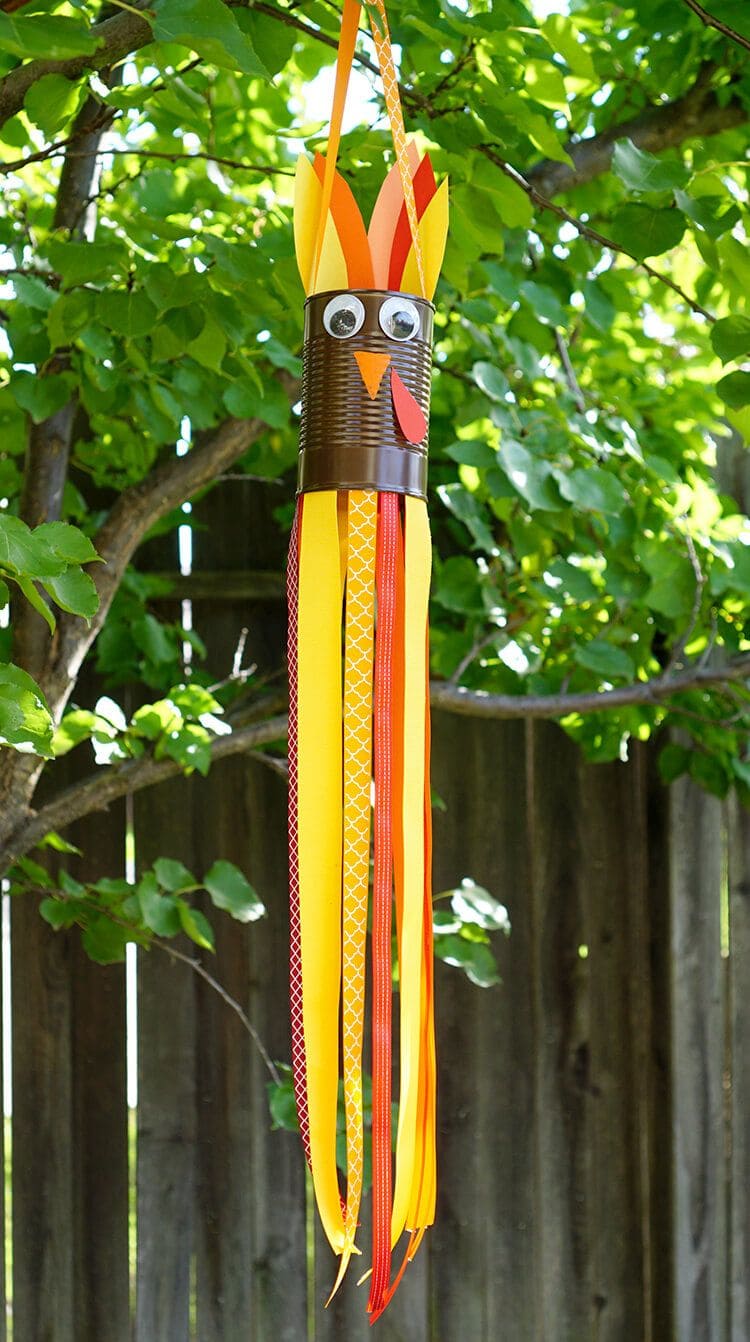
Amazingly, this cheerful turkey windsock turns a simple tin can into a festive fall spinner that dances in the autumn breeze.
Those wide googly eyes and bright beak give it a playful personality that kids absolutely adore.
Moreover, the long ribbons flutter like tail feathers every time the wind picks up, adding motion and joy to your Thanksgiving decor. It’s a fun way to recycle and decorate at the same time, and makes a perfect family afternoon craft.
Materials Needed
- Empty tin can (cleaned, label removed)
- Brown spray paint or acrylic paint
- 2 googly eyes
- Cardstock in red, orange, and yellow
- Assorted ribbons in fall colors (each 18-24 inches long)
- Hot glue gun or strong craft glue
- Hole punch or hammer and nail
- Hanging ribbon or string (12 inches long)
Step-by-step Guide
Step 1: Paint the outside of your tin can brown and let it dry completely.
Step 2: Cut feather shapes from cardstock and glue them to the inside rim of the can so they peek out like a turkey’s tail.
Step 3: Add googly eyes, a yellow triangle beak, and red wattle to the front to form the face.
Step 4: Glue or tie lengths of ribbon to the bottom edge of the can for the flowing tail.
Step 5: Finally, attach a loop of ribbon or string to the top for hanging, and display it where the wind can catch it.
#15. Wine Bottle Turkey Centerpiece
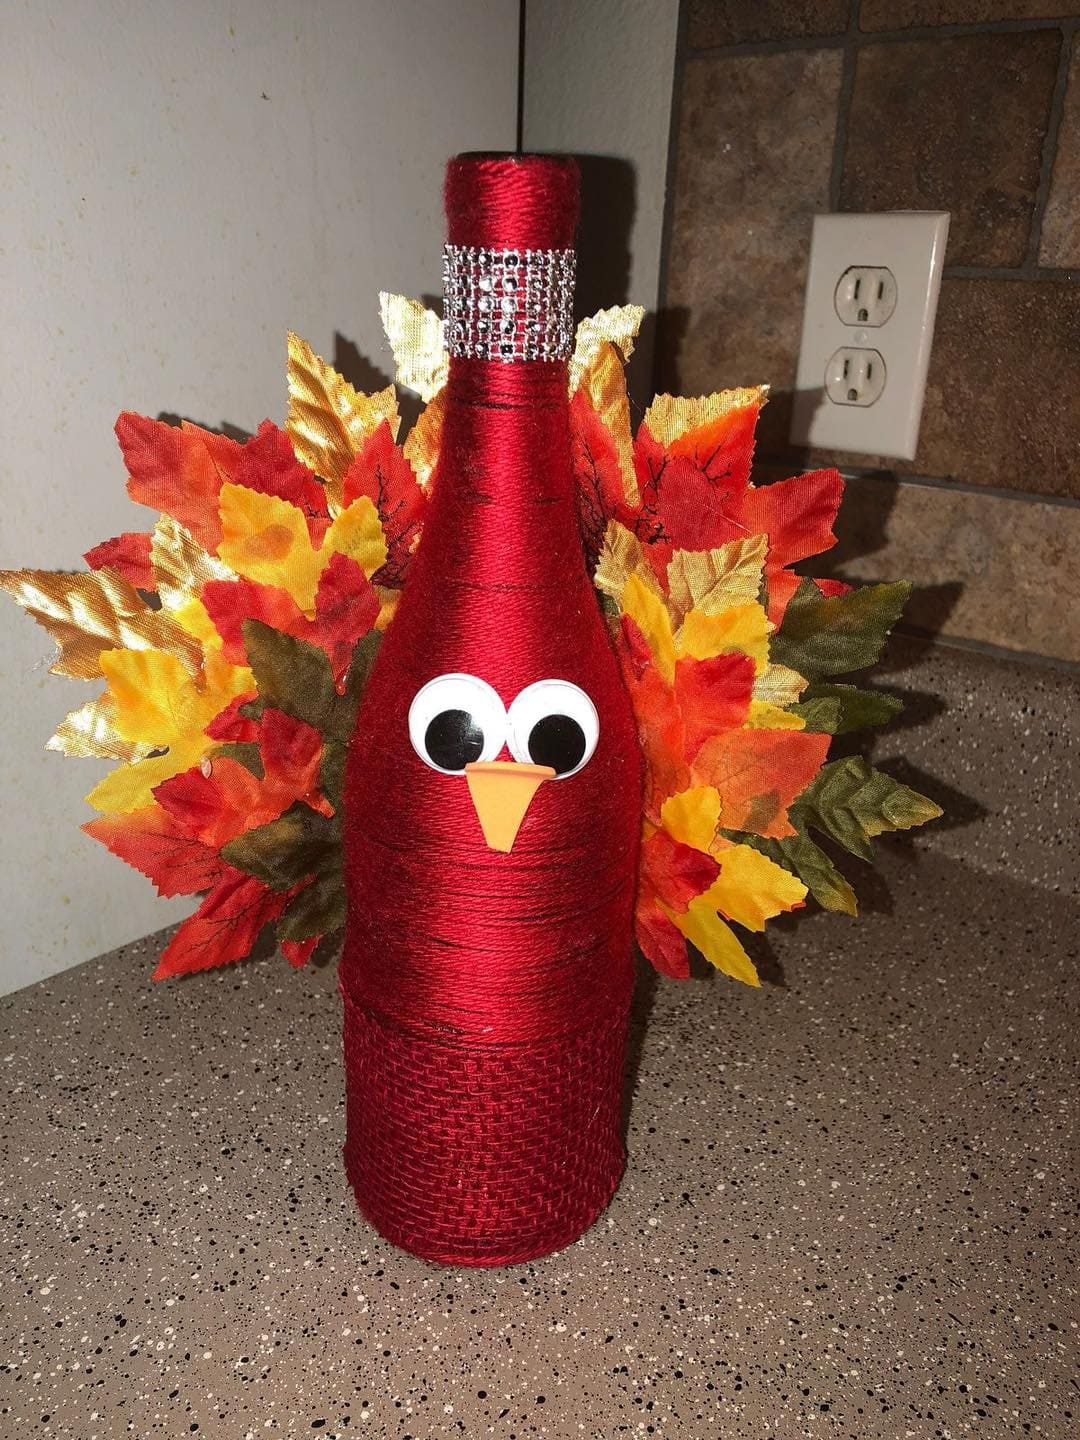
If you’ve got an empty wine bottle lying around, give it a festive second life with this striking Thanksgiving turkey craft.
Wrapped in deep red twine and crowned with sparkling rhinestone trim, this upcycled turkey stands tall with elegance and charm.
The brilliant autumn leaves bursting behind it mimic a proud tail fan, making it the perfect centerpiece for your dining table or a conversation starter on your kitchen counter.
Materials Needed
- 1 empty wine bottle (12″ tall)
- Red yarn or twine (approx. 10-12 yards)
- Red burlap ribbon (3″ wide, 12″ long)
- 2 googly eyes (1″ diameter)
- Orange foam or felt
- Rhinestone ribbon or adhesive gem strip (8″ length)
- 10-12 artificial fall leaves
- Hot glue gun and glue sticks
- Scissors
Step-by-step Guide
Step 1: Clean your wine bottle thoroughly and remove any labels. Then let it dry completely.
Step 2: Starting at the bottom, wrap the bottle tightly in red yarn, securing it with glue every few inches to keep it firm and even.
Step 3: Add a strip of red burlap around the base for extra texture and visual interest.
Step 4: Attach the googly eyes and orange foam beak near the top of the bottle to create your turkey’s face.
Step 5: Hot glue your rhinestone band around the neck of the bottle for that festive pop.
Step 6: Finally, fan out the artificial leaves behind the bottle like turkey feathers and glue them to the back or base for support.
#16. Pinecone Turkey with Feather Tail
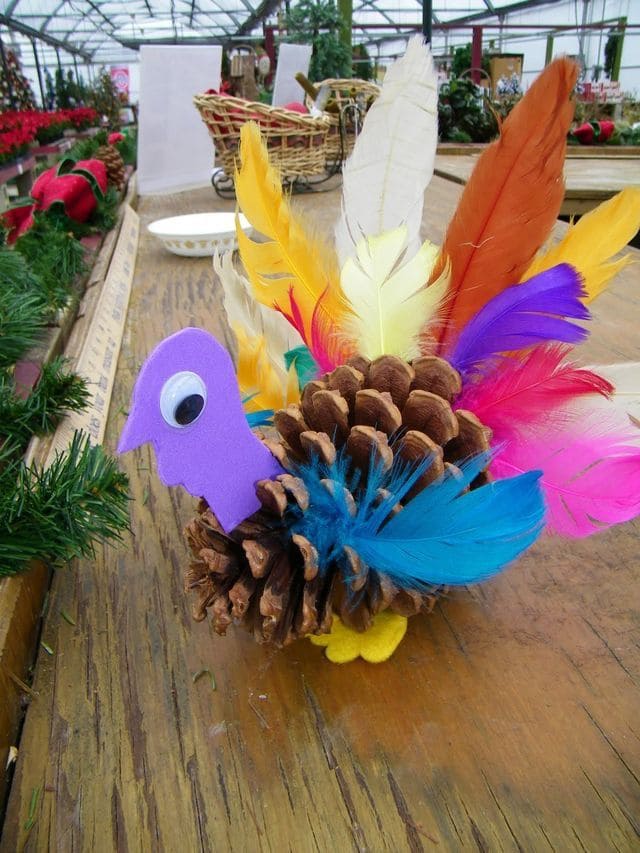
Using real pinecones and bright craft feathers, this project brings together natural textures and a playful pop of color.
The feathers fan out like a proud tail, while the foam head gives this little gobbler a cartoonish flair.
I bet you’ll love how simple it is to make and how each one turns out with its own quirky character.
Materials Needed
- 1 large pinecone (approx. 4″ long)
- 10-12 colorful craft feathers
- 1 foam sheet in purple or orange – 4″ x 4″
- 1 pair of googly eyes – 0.5″ diameter
- Yellow felt – 2″ x 2″ for feet
- Hot glue gun or craft glue
- Scissors
- Black marker (optional)
Step-by-step Guide
Step 1: Cut out a simple turkey head and neck shape from the foam sheet. Then add a small triangle for the beak using marker or another foam piece.
Step 2: Glue on the googly eyes near the top of the foam head.
Step 3: Hot glue the foam head to the front of the pinecone’s narrow end.
Step 4: Insert feathers into the wide back of the pinecone to create a fan tail. You now use glue to secure them in place if needed.
Step 5: Cut two small feet from the yellow felt and attach them under the pinecone to help it stand.
#17. Cozy Mop Head Turkey Wreath
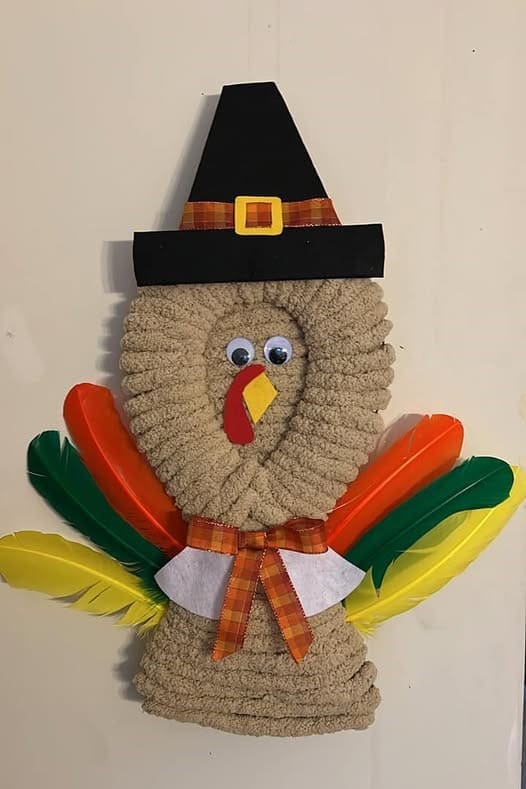
Made from a simple mop head and a few cheerful feathers, this cozy little turkey is proof that rustic charm can also be adorable.
Specially, the texture of the mop gives your turkey that warm, homespun look, while googly eyes and a pilgrim-style hat add a touch of holiday whimsy.
This is a project you’ll genuinely enjoy crafting, especially if you love creating art from everyday materials that most folks overlook.
Materials Needed
- 1 looped mop head (approx. 10″-12″ wide)
- 6-8 large craft feathers (red, yellow, orange, green)
- 2 large googly eyes (1″ diameter)
- Black construction paper
- Orange and red foam sheets
- White cardstock
- 1 roll plaid ribbon (at least 1″ wide, 18″ long)
- Hot glue gun and glue sticks
- Scissors
Step-by-step Guide
Step 1: Fold your mop into an oval turkey body and glue the looped ends together to hold the shape firmly in place.
Step 2: Cut out a pilgrim-style hat from black paper, add a small ribbon band and buckle detail, then glue it to the top of your turkey’s head.
Step 3: Glue the googly eyes, beak, and snood to bring your turkey’s sweet face to life.
Step 4: Fan the feathers behind the mop base and secure each with hot glue. Then angle them slightly for a more natural spread.
Step 5: Add a white collar and tie your ribbon into a festive bow to finish off the look with a cozy farmhouse flair.
Tip: Hang this wreath indoors near the entryway or on an interior door to keep it clean and cuddly through the whole season.
#18. Wine Cork Turkey With Pilgrim Hat
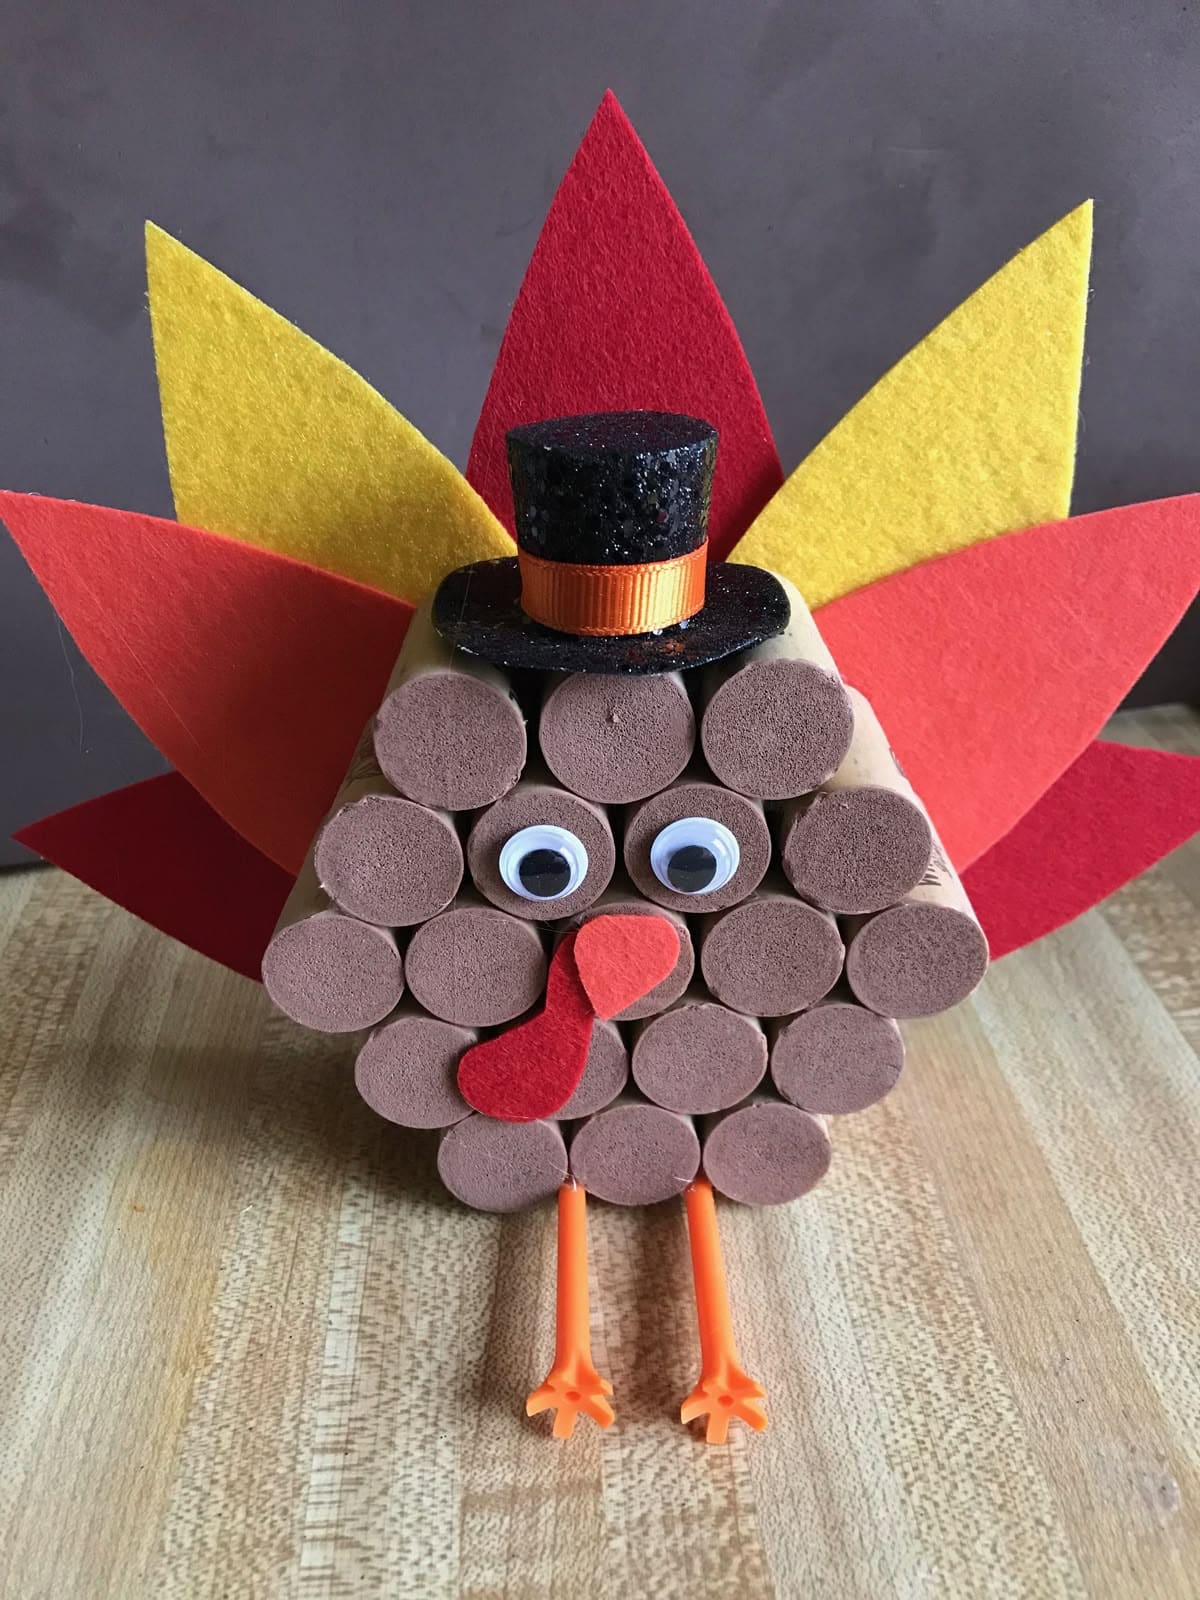
With a neat row of corks forming the body, this dapper little turkey is surprisingly sturdy and adorable.
Felt feathers in vibrant red, orange, and yellow burst behind, while tiny googly eyes and a red wattle add personality. But the best part is that glittery black pilgrim hat topped with an orange ribbon, it makes this turkey party-ready.
With tiny orange feet made from plastic novelty pieces, this cutie stands tall on any Thanksgiving table or mantel.
Materials Needed
- 21 wine corks (standard size)
- Felt sheets (red, yellow, and orange)
- Googly eyes (1″ diameter)
- Mini top hat (black glittered)
- Thin orange ribbon (6″)
- 2 orange plastic novelty feet or pipe cleaners
- Hot glue gun and glue sticks
Step-by-step Guide
Step 1: Arrange and hot glue the corks in a pyramid shape: 6 on the bottom row, 5 above, and so on, until one sits at the top.
Step 2: Cut large feather shapes out of felt and glue them to the back row of corks to fan out like a tail.
Step 3: Attach googly eyes, an orange triangle beak, and a red wattle to the front center cork.
Step 4: Glue the mini top hat on top, then finish by attaching the orange plastic feet underneath.
#19. Recycled Jug and Plate Turkey
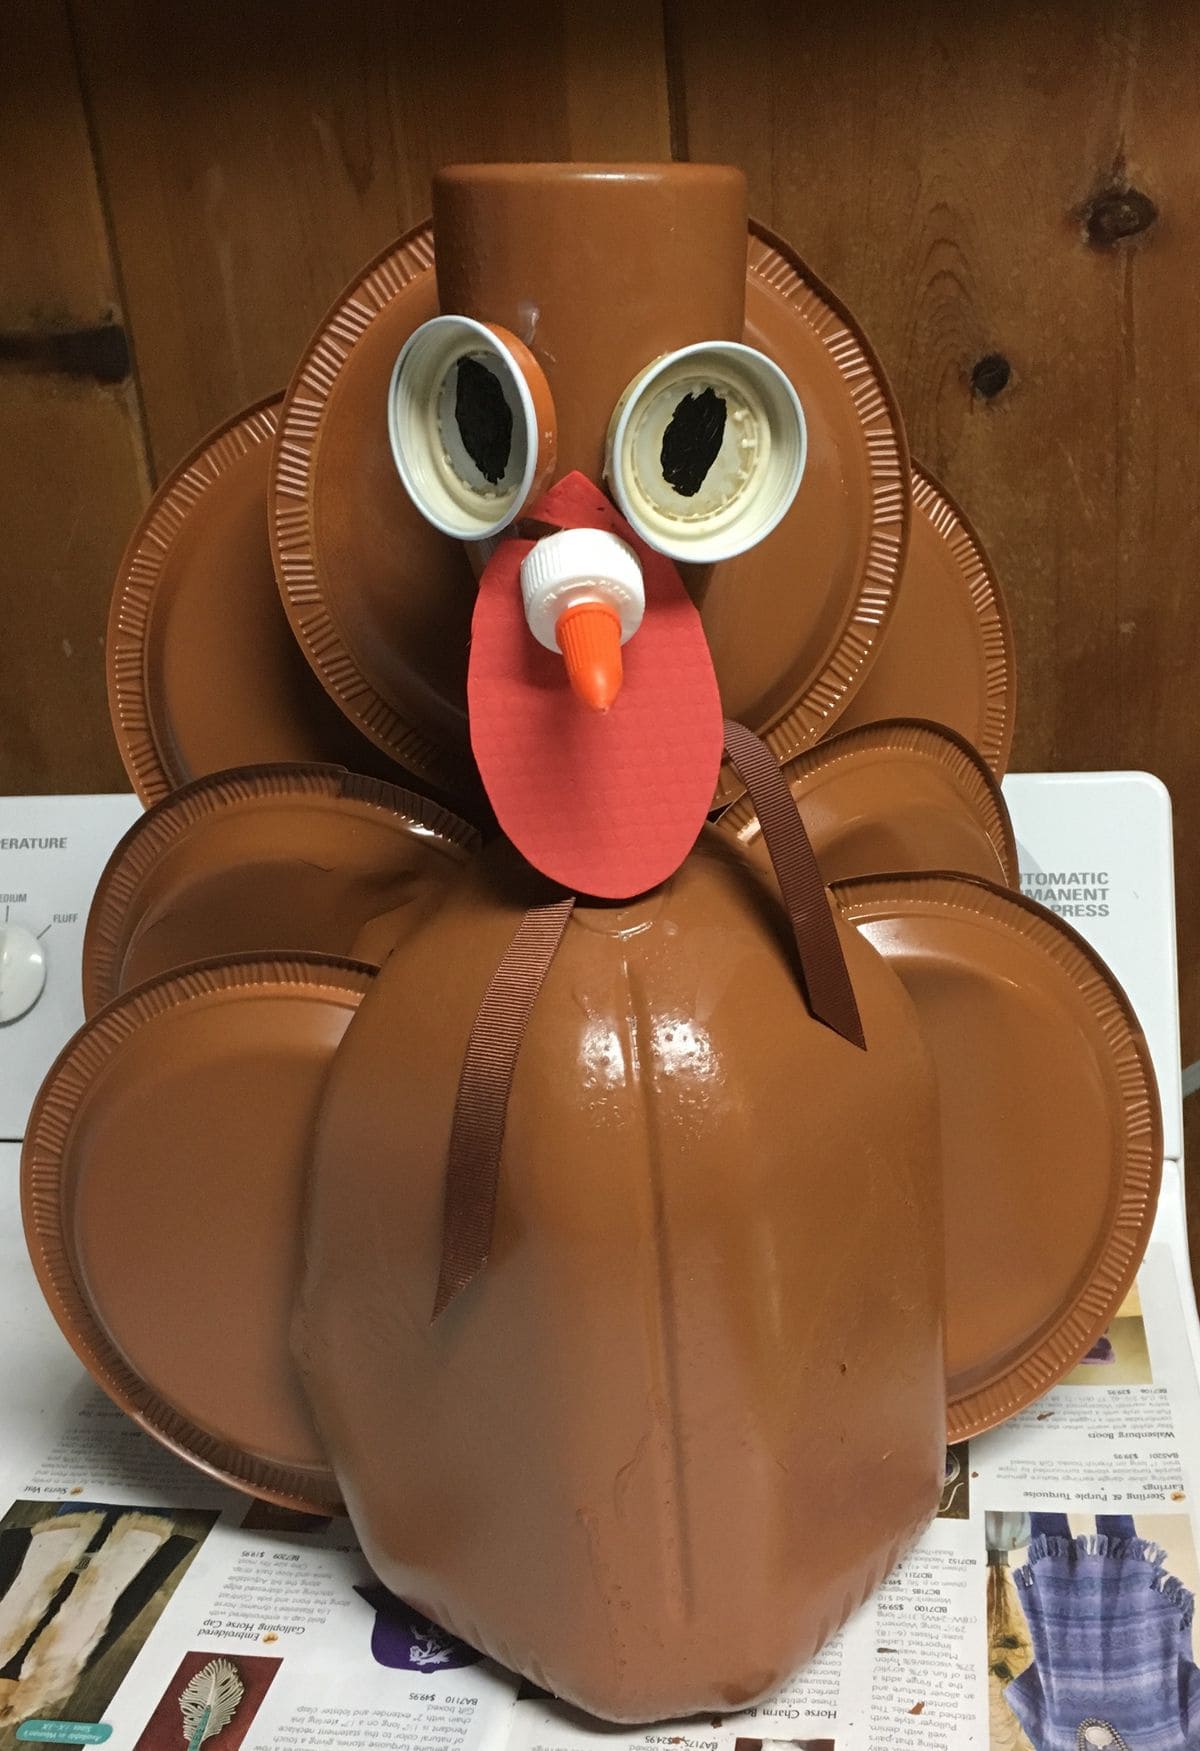
Using a brown-painted plastic jug as the body, stacked plastic plates as feathers, and various bottle caps for the beak and eyes, this craft gives off major upcycled charm.
Furthermore, the contrasting red wattle and bold cartoon eyes give the turkey tons of personality, and it’s surprisingly fun to build with kids or students.
Perfect for classrooms, church halls, or front porch displays, this big bird is a statement piece that turns ordinary recyclables into an eco-friendly fall mascot.
Materials Needed
- 1 plastic jug (gallon-sized, cleaned)
- 6-8 plastic plates (disposable, in brown or painted)
- 2 large plastic lids
- 1 glue cap or condiment cap
- Red craft foam or cardstock
- Brown spray paint or acrylic paint
- Hot glue gun
- Brown ribbon (optional)
- Black marker or paper circles
Step-by-step Guide
Step 1: Paint the plastic jug and all plates brown. Let dry thoroughly.
Step 2: Glue the plates in a fan shape behind the jug to create feathers. Then attach two large plastic lids to the front of the jug for eyes and add black circles for pupils.
Step 3: Glue the glue cap on as the beak, then layer a red wattle underneath.
Step 4: Optional: You can add ribbon wings to the sides for a finishing touch.
#20. Yarn Laced Paper Plate Turkey
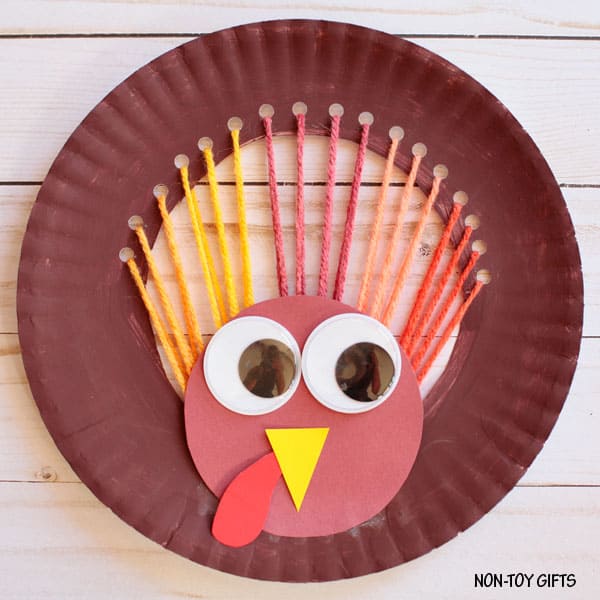
You can see this cheerful yarn laced turkey is an absolute hit for little hands and big imaginations. The simplicity of the paper plate meets the charm of colorful yarn, turning an ordinary craft into a hands-on Thanksgiving keepsake.
The laced yarn creates a beautiful fan of feathers that radiates warmth, mimicking autumn’s soft golden light.
I can already imagine kids feeling proud hanging this up on the fridge or gifting it to Grandma with a big grin.
Materials Needed
- 1 paper plate (9″)
- Brown paint (for base coat)
- Yarn in fall colors (approx. 3 yards total)
- Red, yellow, and brown construction paper
- Googly eyes (1.5″ diameter, 2 pieces)
- Hole punch
- Scissors
- Glue stick or white glue
Step-by-step Guide
Step 1: Paint the front of the paper plate brown and let it dry completely. While waiting, cut a round face, triangle beak, and red snood from colored paper.
Step 2: Punch 12-14 holes along the upper half of the plate, evenly spaced around the edge.
Step 3: Cut yarn into 12″ strands and help your child lace them through the holes from bottom to top, tying knots or taping the ends on the back to secure.
Step 4: Glue on the face parts toward the bottom center of the plate like eyes, beak, and snood to complete your adorable turkey friend.
#21. Rustic Wooden Yard Turkey
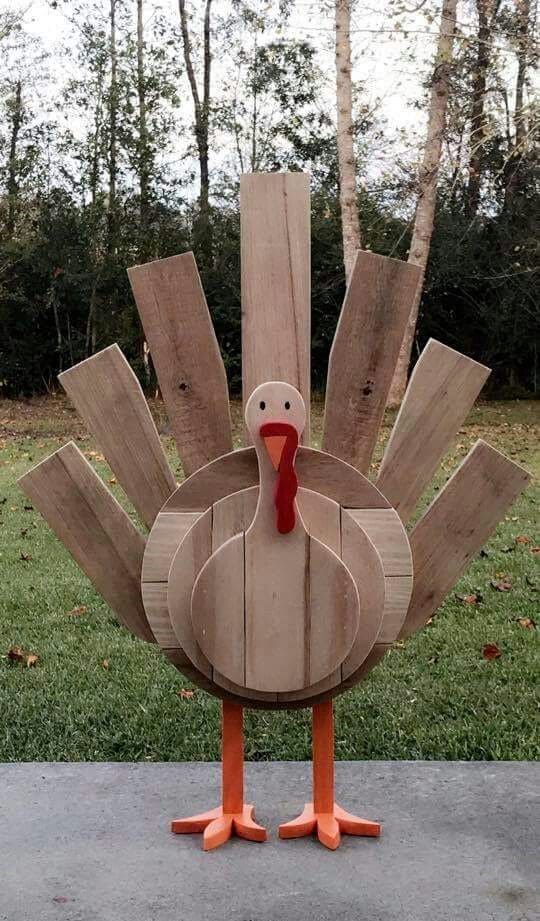
Made entirely from raw, unfinished wood, this rustic wooden turkey brings that farmhouse charm with a handmade feel.
The layered round body, bold feather planks, and orange-painted legs give it structure and personality. Its long tail feathers fan out proudly, while the minimal face keeps the look playful and uncluttered.
This turkey is big enough to stand on its own outdoors and looks amazing surrounded by pumpkins or hay bales.
Materials Needed
- 6 wood planks for feathers (each 20″ x 4″)
- 3 wood rounds (diameters: 10″, 14″, 18″)
- 1 oval or round wood piece (6″ diameter)
- 2 wood boards (each 14″ long, 1″ thick)
- Wood feet cutouts
- Wood glue or screws for assembly
- Paint (orange, red)
- Small black beads or paint
Step-by-step Guide
Step 1: Arrange and secure the large wood planks in a fan shape to form the turkey’s tail, angling each for a natural spread.
Step 2: Center and layer the three circular wood pieces over the base to create the body, using wood glue or screws.
Step 3: Attach the headpiece at the top center, then add painted eyes and a red wattle for expression.
Step 4: Attach orange-painted legs and foot pieces to the base for balance and charm.
#22. Clothespin Turkey Craft with Fall Leaves
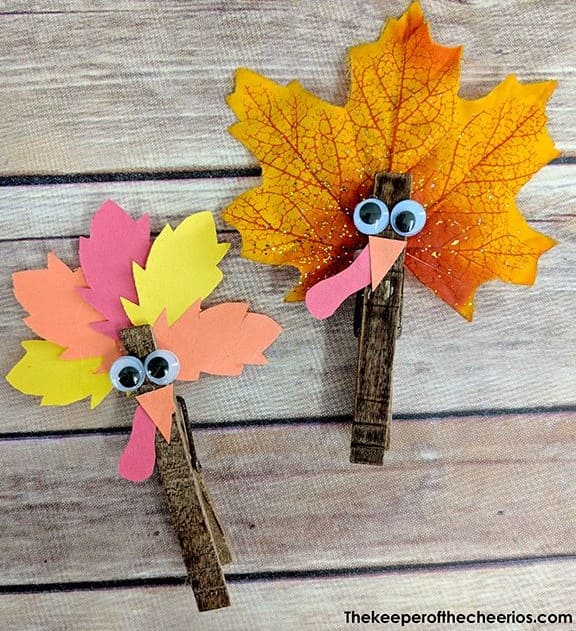
Small in size but full of character, these clothespin turkeys are a delightful craft for kids and adults alike.
Made from real or faux autumn leaves, they capture the colors of fall in a playful, whimsical way. The googly eyes, construction paper beaks, and wiggly wattles bring the birds to life, making them ideal for fridge magnets, place card holders, or classroom fun.
You’ll love how quick they are to create and how much personality each little turkey brings to your Thanksgiving décor!
Materials Needed
- 2-3 artificial fall leaves or colored cardstock leaves (approx. 4-5” each)
- 1 wooden clothespin (3.25″ standard size)
- 2 googly eyes (0.5″)
- Scrap orange and red construction papeR
- Glue stick or hot glue gun
- Brown acrylic paint or marker (optional)
Step-by-step Guide
Step 1: If desired, paint or color the clothespin brown and let it dry.
Step 2: Glue fall leaves to the back of the clothespin so they fan out like turkey feathers.
Step 3: Cut a small triangle from orange paper for the beak, and a teardrop shape from red paper for the wattle.
Step 4: Finally, attach the eyes, beak, and wattle to the top front of the clothespin.
#23. Mason Jar Lid Turkey Magnet
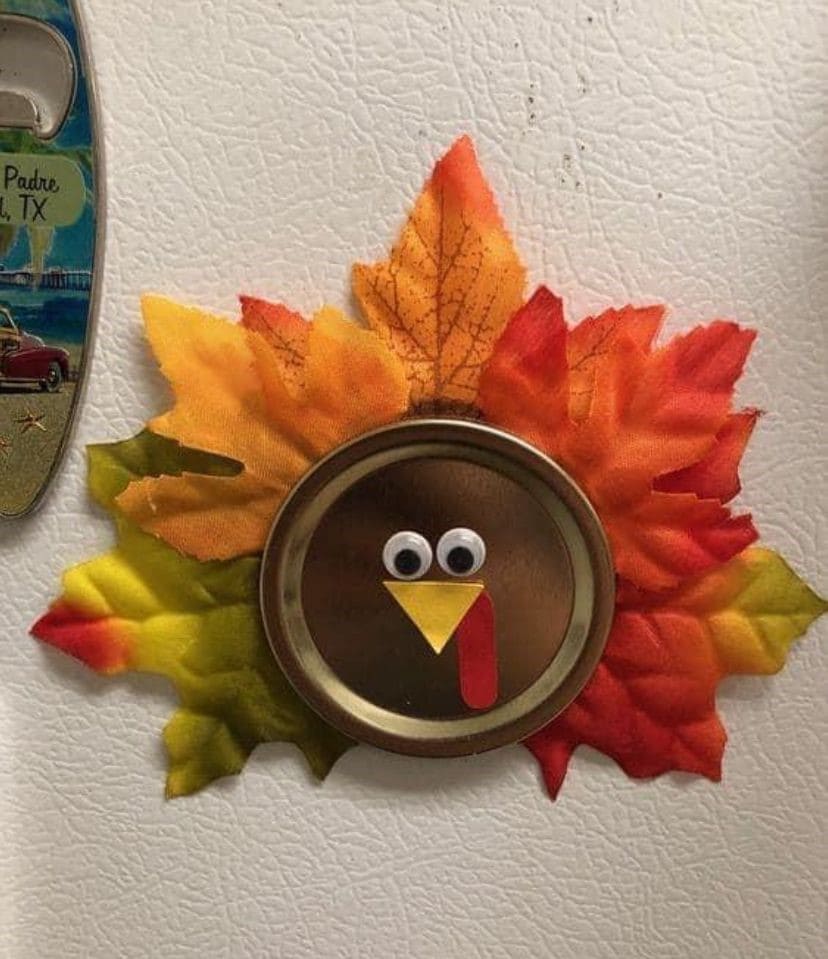
Why not turn your leftover mason jar lids into the cutest Thanksgiving fridge decor with this quick turkey craft?
The circular lid forms the perfect turkey face, while faux autumn leaves fan out from behind, mimicking a colorful tail. Two googly eyes, a simple yellow beak, and a red felt wattle bring the face to life with just a few supplies.
This is a fun craft to make with kids and you can easily turn it into a magnet to stick on the fridge or a name tag for place settings.
Materials Needed
- 1 mason jar lid (standard size, 2.75″ diameter)
- 3–5 faux fall leaves (approx. 4″ wide)
- 1 small magnet or adhesive strip
- 2 small googly eyes (0.5″)
- Yellow and red craft foam or felt
- Hot glue gun or craft glue
Step-by-step Guide
Step 1: Arrange and glue the faux leaves in a fanned-out pattern behind the jar lid to form feathers.
Step 2: Glue googly eyes, a triangle yellow beak, and a red wattle onto the front center of the lid.
Step 3: Attach a small magnet or adhesive to the back for fridge display, or use a loop to hang it up.
#24. Hand-Stitched Felt Turkey with Button Accents
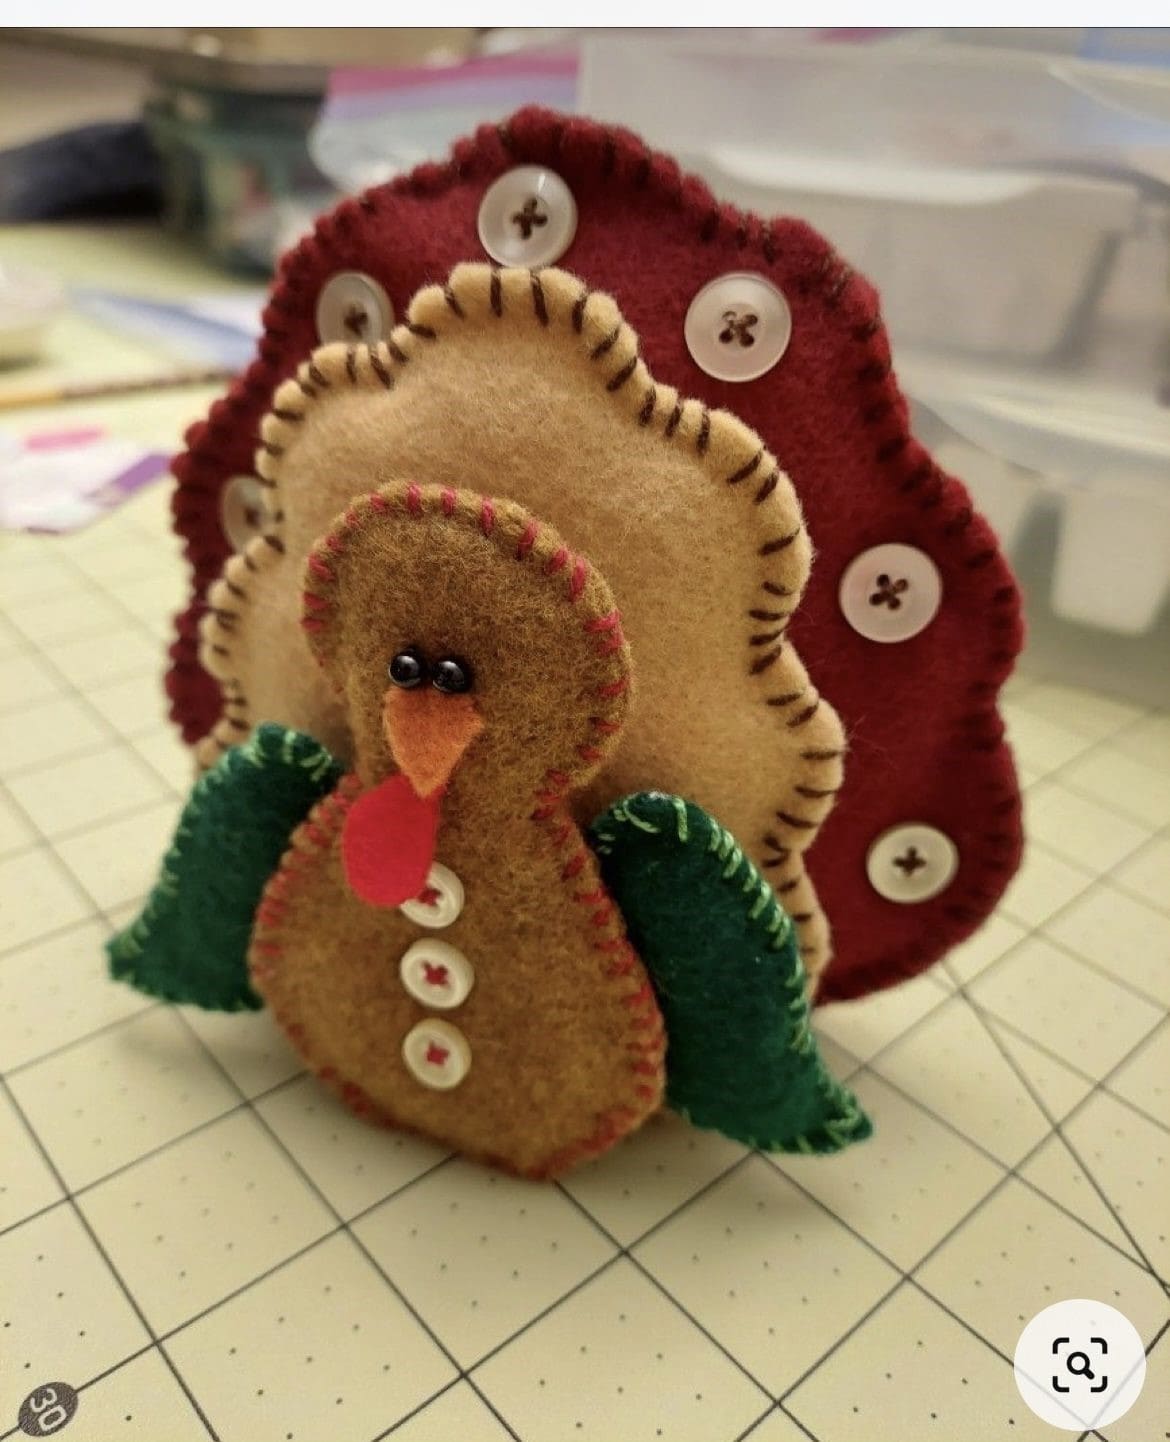
This charming felt turkey is a cozy, heartwarming creation that feels straight out of Grandma’s sewing box. Every detail is lovingly stitched by hand from the scalloped layers of felt feathers to the tiny beaded eyes.
Bonus, rows of buttons add vintage charm and texture to the deep red tail, while smaller ones run down the belly like little turkey shirt buttons.
The contrast stitching along each edge brings out a handmade, heirloom feel. This project is perfect as a Thanksgiving table centerpiece or a festive shelf sitter.
Materials Needed
- Felt sheets in brown, red, green, and orange (approx. 9″ x 12″)
- Embroidery floss in coordinating fall colors
- 6 small white buttons (1/4″ to 1/2″)
- 2 black seed beads for eyes
- Hand sewing needle
- Scissors and pins
- Hot glue (optional)
- Stuffing or scrap felt
Step-by-step Guide
Step 1: Cut out layered feather shapes, body, wings, beak, and wattle from your felt sheets using a simple paper pattern.
Step 2: Stitch the feather layers together using blanket or running stitch, then attach the buttons across the tail for decoration.
Step 3: Sew the turkey’s body pieces together, leaving a small opening to insert stuffing, then close it up neatly.
Step 4: Add the wings, beak, wattle, and eyes using thread or hot glue depending on preference.
Step 5: Stitch or glue the body onto the feathered base so your turkey stands upright and ready to charm.
Read more: 30 Gorgeous Thanksgiving Table Centerpiece Ideas For A Festive Holiday
