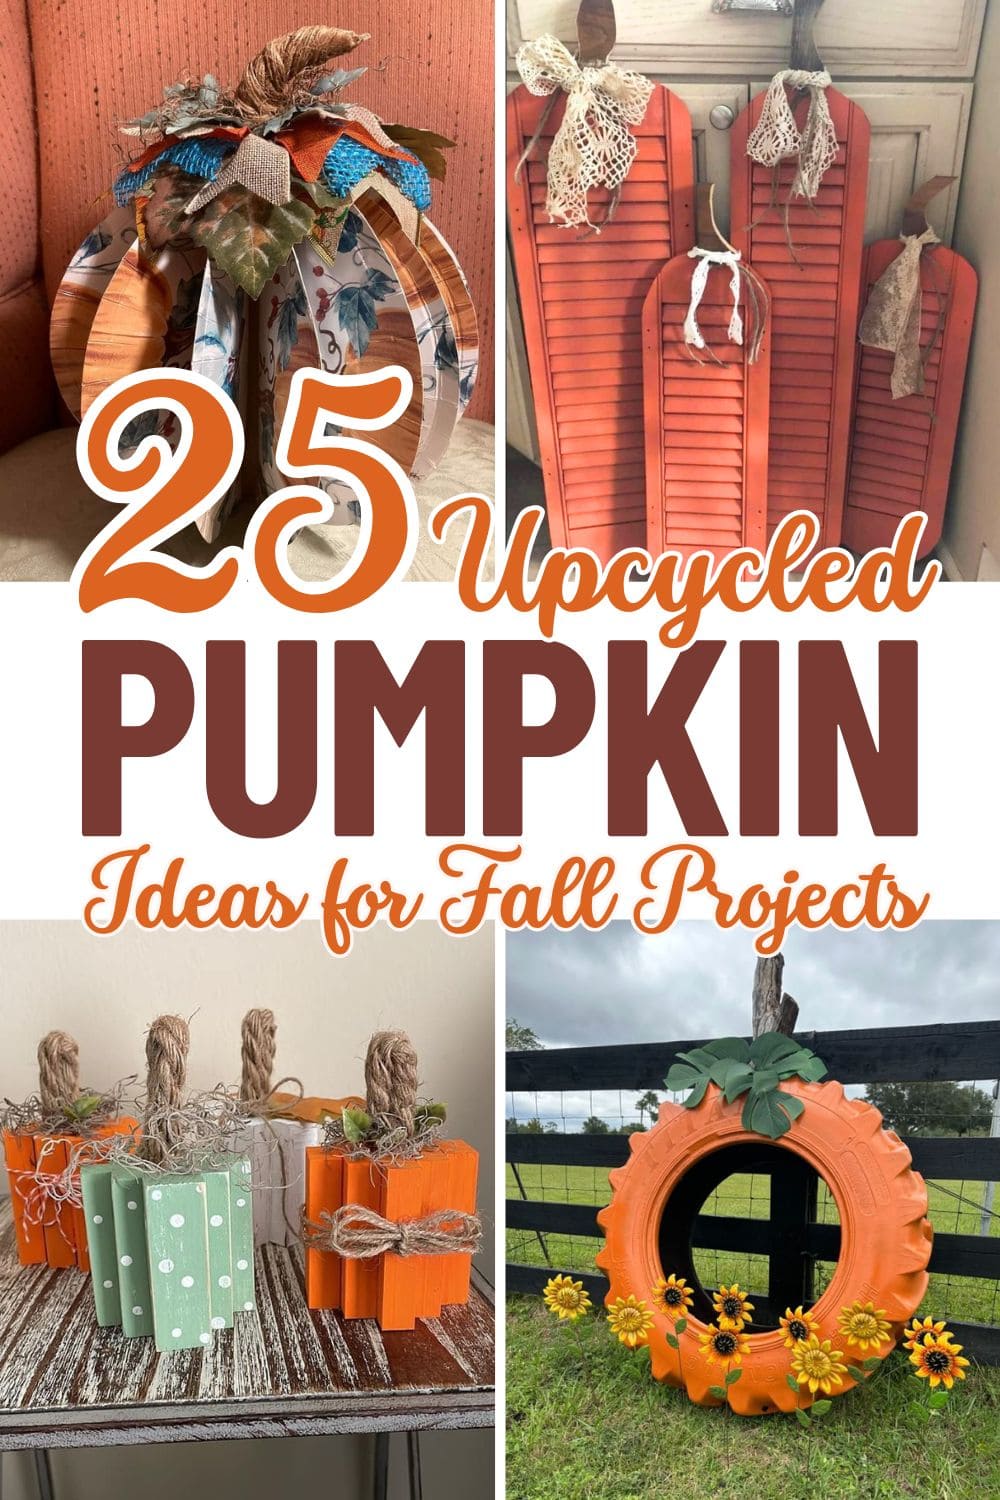
Looking for a way to decorate for fall without spending a dime? These 25 beautiful DIY pumpkins prove that creativity doesn’t need a budget.
With just a little imagination and items you probably already have, you can craft charming, rustic pumpkins perfect for autumn displays.
Whether you’re decorating your porch, dining table, or mantel, these upcycled pumpkin ideas add warmth, character, and handmade charm to your space.
#1. Upcycled Tractor Tire Pumpkin
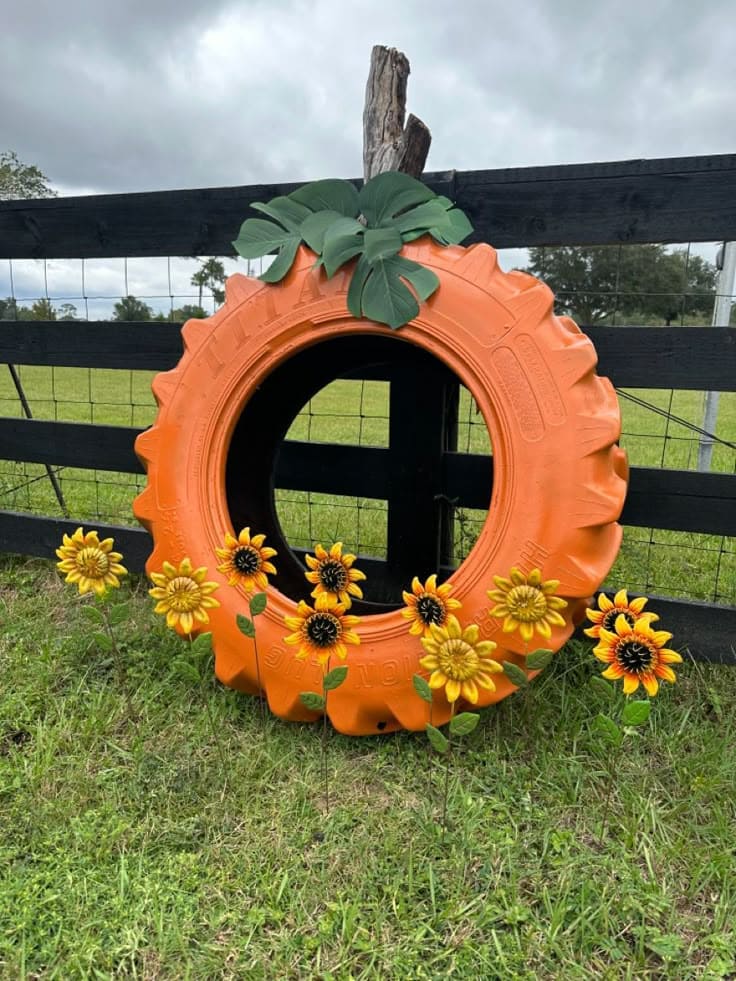
Nothing says bold fall statement quite like transforming an old tractor tire into a giant pumpkin display!
This clever and eye-catching piece adds instant curb appeal to any yard or fence line. It’s rustic, dramatic, and surprisingly easy to put together.
Materials Needed
- 1 large tire (tractor or riding mower size)
- Orange outdoor spray paint
- Green painted wood or foam
- Optional: faux stem (log or pipe) and yard stakes with flowers
Step-by-step Guide
Step 1: Power wash and dry the tire thoroughly. Make sure the surface is clean for painting.
Step 2: Spray paint the entire tire orange. Then apply multiple coats for full coverage, letting each layer dry between coats.
Step 3: Attach large faux leaves at the top and a short log or pipe as a whimsical stem. Lean it against a fence or prop it upright in the yard.
Step 4: Add flower stakes, hay bales, or lights around it for a show-stopping fall photo backdrop or garden décor centerpiece.
#2. Vintage Book Page Pumpkin
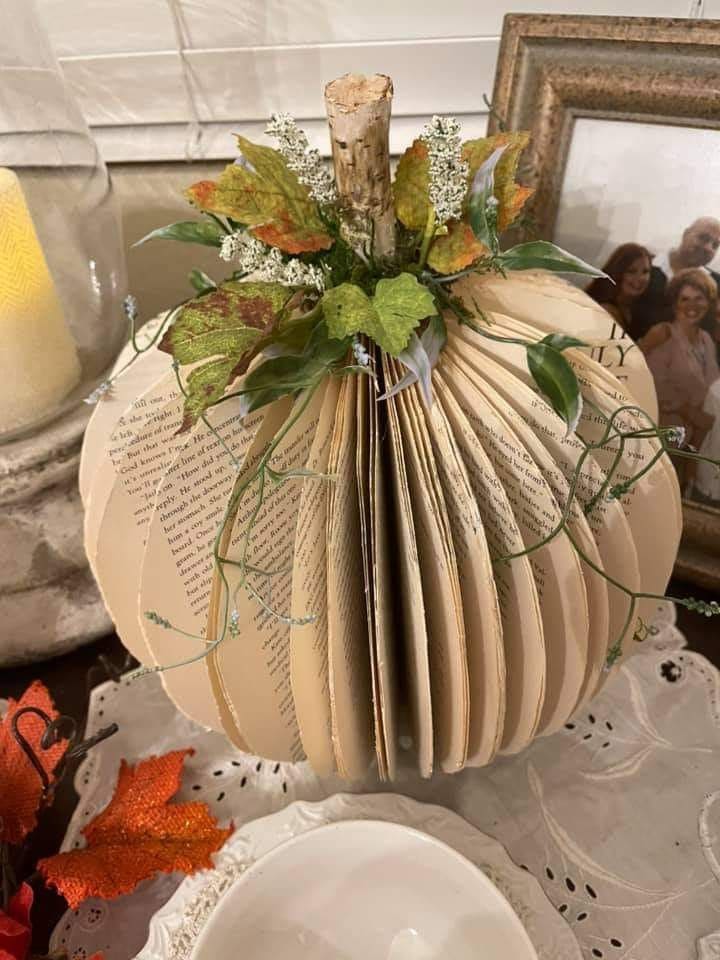
Made from the curved pages of an old book, this pumpkin brings together the quiet nostalgia of literature and the warm texture of autumn.
It’s soft, sculptural, and perfect for those who love crafting with soul.
Whether you’re decorating a mantel or gifting a piece to a book lover, this project adds charm and elegance with just scissors, glue, and a little imagination.
Materials Needed
- 1 old paperback book (at least 100-150 pages)
- Sharp scissors or craft knife
- Hot glue gun or strong craft glue
- 1 small stick or tree branch (2-3″ for stem)
- Faux leaves, berries, or small flowers
- Optional: light orange or brown ink for edges
Step-by-step Guide
Step 1: Remove the book cover and draw half a pumpkin shape on the top page.
You need to cut along the line through all pages (you may need to do this in layers if the book is thick).
Step 2: Fan the pages out into a circle. Then glue the first and last pages together to form a full pumpkin shape that stands on its own.
Step 3: Insert a stick in the center as a stem and glue in place. Next, add faux leaves, vines, or fall embellishments around the base of the stem.
Step 4: (Optional) Lightly dab orange or brown ink along the edges of the pages for a soft fall-tinted finish.
Now you can place it proudly, it’s bookish, beautiful, and totally one-of-a-kind.
#3. Upcycled Wooden Crate Pumpkins
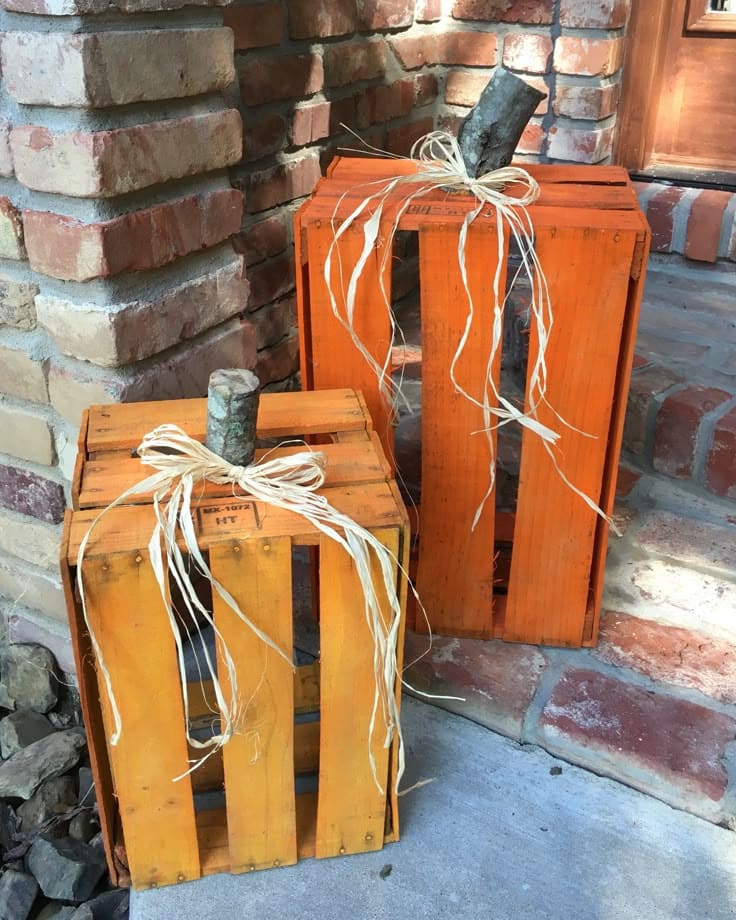
Wow, these wooden crate pumpkins capture the heart of fall with very little effort and a lot of character.
With just a coat of orange paint and a stick for a stem, old crates transform into bold porch décor.
Their height and open slats give them presence without weight and that raffia bow ties it all together with a farmhouse finish.
Materials Needed
- 1-2 wooden crates (fruit crates or small shipping crates work best)
- Orange paint or spray paint (matte or chalky finish preferred)
- Short tree branches or logs (4-6 inches)
- Raffia ribbon
- Hot glue gun or strong craft glue
- Optional: clear sealant
Step-by-step Guide
Step 1: Paint the entire crate orange, including the inside edges and slats. Let dry completely.
You can layer multiple shades of orange for a more weathered look.
Step 2: Glue a short branch upright in the center of the top crate opening. This serves as the pumpkin stem.
Step 3: Tie raffia into a messy, full bow and glue it at the base of the stem. Let some strands fall loose for that naturally gathered feel.
Step 4: Display it outside on your porch, stacked with other pumpkins or standing solo. It’s bold, charming, and built to last all season long.
#4. DIY Rope Pumpkins
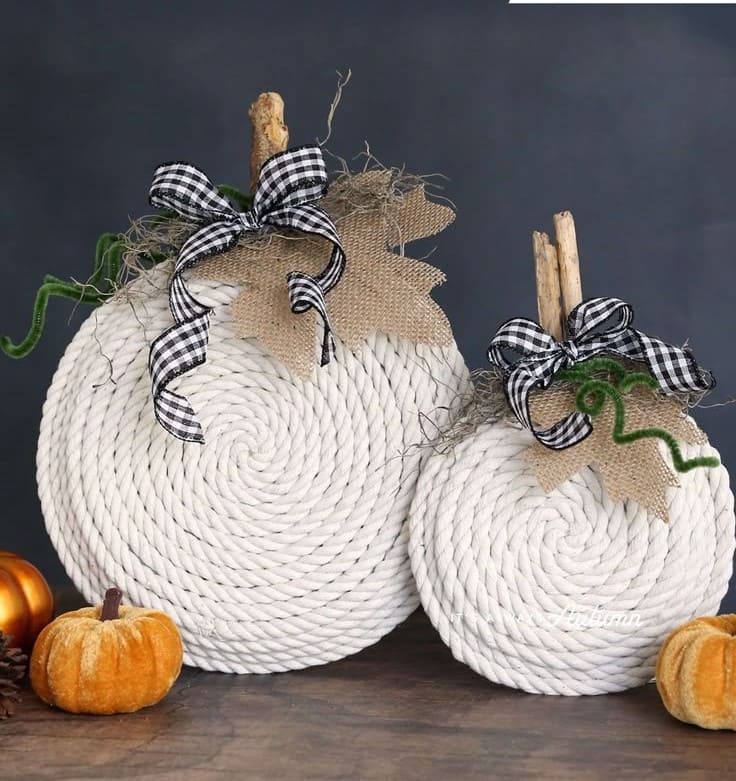
Rustic and charming, these rope pumpkins are a stylish twist on autumn décor.
They combine nautical textures with earthy fall vibes, turning humble household supplies into beautiful seasonal accents.
Materials Needed
- Thick white or cream-colored rope
- Round plate or cardboard as base
- Hot glue gun
- Wooden stick
- Burlap leaves, faux vines, or ribbon
- Scissors
Step-by-step Guide
Step 1: Start from the center of your base (cardboard or plate) and begin coiling the rope tightly in a spiral. Hot glue as you go to keep the coil secure.
Step 2: Once you’ve covered the surface to the desired pumpkin size, trim the end neatly and glue it in place.
Step 3: Glue a short stick or wood piece in the center for a rustic stem.
Step 4: Finally, add burlap leaves, checkered ribbons, or curly twine to elevate the look.
#5. Rustic Wood Slice Pumpkins
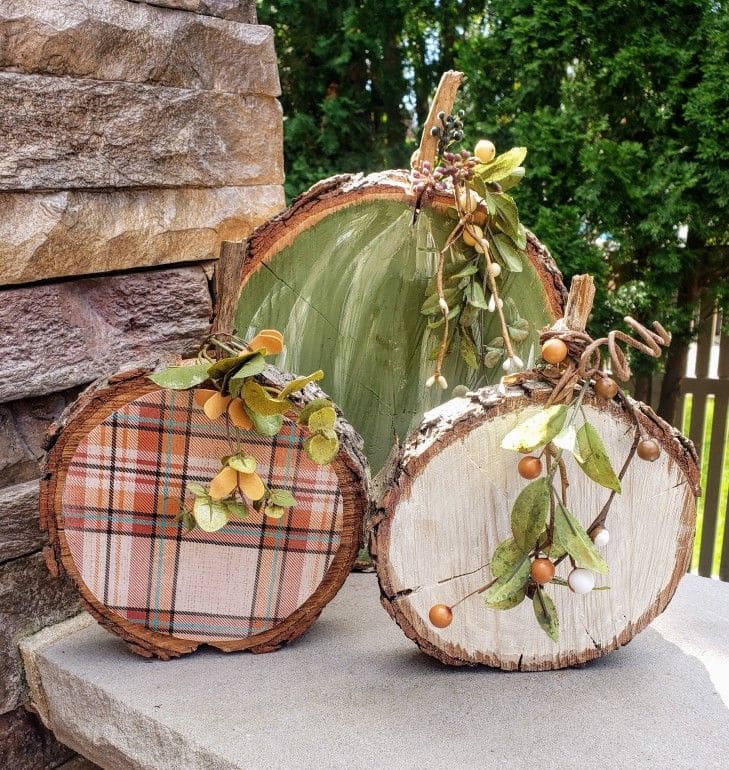
These pumpkins bring the forest indoors with raw bark edges, soft colors, and gentle curves made from natural wood slices.
With a little paint, fabric, and embellishments, you can turn raw rounds into beautiful, seasonal accents that feel like fall in the woods.
Whether displayed on a hearth, porch, or table, these pumpkins are rustic, artistic, and filled with handmade soul.
Materials Needed
- 3 tree trunk slices (6″-12″ diameter, 1-2″ thick)
- Acrylic paint in white, sage green, or muted orange
- Plaid or fall-print fabric (enough to cover one slice)
- Hot glue gun and glue sticks
- Twigs or small sticks (for stems)
- Faux leaves, berries, or florals
- Scissors and craft knife
- Optional: Mod Podge
Step-by-step Guide
Step 1: Clean and dry your wood slices. Paint one or more in soft fall tones (like sage or cream). Let dry.
For one, you trace and cut fabric to fit, then glue it flat onto the surface.
Step 2: Hot glue a short stick to the top edge of each slice to act as the pumpkin stem. You should vary shapes for character.
Step 3: Decorate around the stem with faux leaves, small florals, or berries. Then twirl some wire or raffia to mimic vines for added whimsy.
Step 4: Display them nestled together or tucked into a fall vignette. They’re rustic, simple, and brimming with handmade charm.
#6. Rustic Log Jack-O-Lanterns
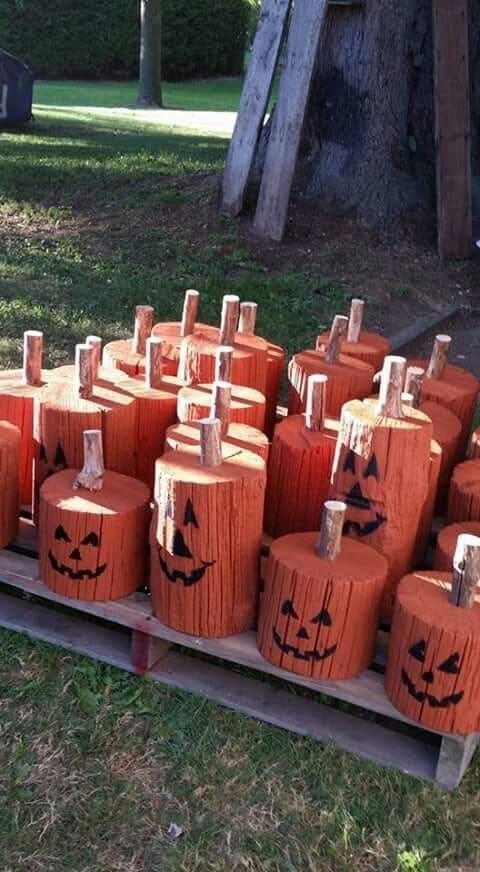
If you’ve got a woodpile, you’ve got a pumpkin patch waiting to happen.
These sturdy jack-o’-lanterns are made from chunky log slices and add instant charm to porches, yards, or fall festivals.
With a splash of orange paint, a hand-painted face, and a wooden stem, each one feels like a little woodland character.
They’re nearly indestructible, eco-friendly, and endlessly fun to make — especially in big batches for gifts, markets, or family crafting days.
Materials Needed
- Tree trunk or large branch slices (6-10 inches tall, 4-8 inches wide)
- Orange outdoor paint or spray paint
- Black paint or marker
- Small sticks or branch pieces (2-4 inches for stems)
- Hot glue gun or wood glue
- Optional: sandpaper or wood sealer
Step-by-step Guide
Step 1: Cut logs or large branches into even chunks. If desired, sand the tops lightly for a smoother finish. Clean off any loose bark or dirt.
Step 2: Paint each log with orange paint and let dry. Don’t worry about full coverage as the natural texture adds character.
Step 3: Use black paint or a permanent marker to draw on a jack-o’-lantern face, go traditional, spooky, or silly depending on your style!
Step 4: Glue a stick into the top center of each log as a rustic stem.
Finally, line them up on your porch, sell them at craft fairs, or use them to build your own outdoor pumpkin patch!
#7. Framed Doily Pumpkins
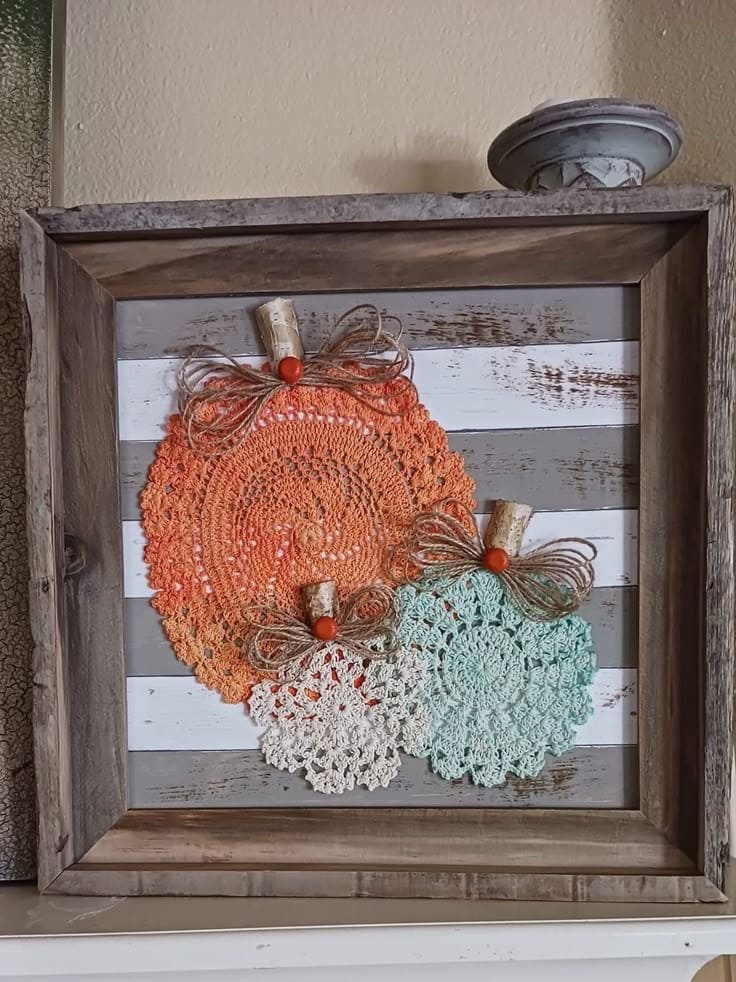
Graceful and unexpected, these framed doily pumpkins turn forgotten lace into standout seasonal art.
With a little paint and thoughtful arrangement, each round doily mimics the gentle curve of a pumpkin.
Cork stems and twine bows add texture and warmth. It’s a brilliant way to upcycle linens and create a one-of-a-kind piece perfect for your mantel or gallery wall.
Materials Needed
- 3 round lace doilies (varied sizes)
- Fabric dye or acrylic paint (orange, teal, etc.)
- Old frame with backing board
- Wine corks
- Hot glue gun
- Twine, mini wooden beads, faux leaves or berries
Step-by-step Guide
Step 1: Dye or paint your doilies in soft fall tones such as burnt orange, vintage teal, or natural white work beautifully. Then allow them to dry completely before assembling.
Step 2: Arrange the doilies on a rustic board or the backing of a wooden frame. You now layer them slightly for dimension, then glue in place.
Step 3: Attach small corks at the top of each doily to act as pumpkin stems.
Next, tie jute twine into bows, add small beads or faux leaves, and glue above the corks for finishing flair.
Step 4: Display your creation proudly! It makes a lovely centerpiece or thoughtful handmade gift for autumn lovers.
#8. Puzzle Piece Pumpkin Sign
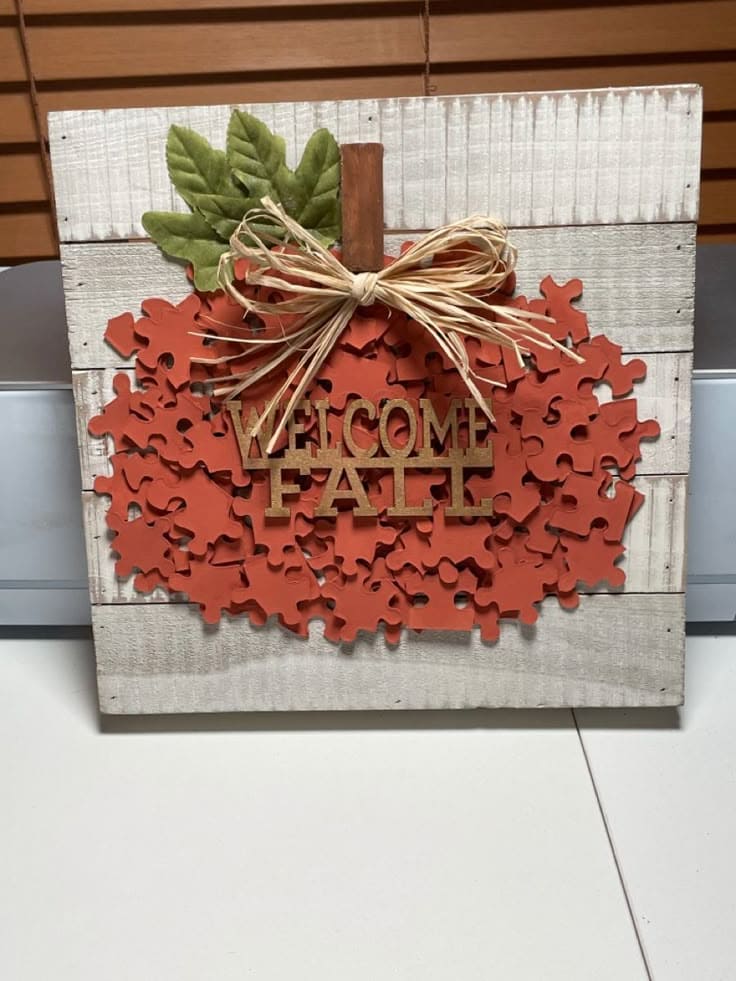
Who knew those leftover puzzle pieces could become the most charming fall sign?
This creative craft turns mismatched or incomplete puzzles into a textured pumpkin masterpiece with rustic flair.
Materials Needed
- Wood sign or scrap wood base
- Loose puzzle pieces
- Orange acrylic paint
- Wood letters or stencil: “Welcome Fall”
- Raffia ribbon, faux leaves, cork or stick stem
- Hot glue gun
Step-by-step Guide
Step 1: Paint the puzzle pieces orange and let them dry completely.
Step 2: Arrange and hot glue the pieces onto your wood base in the shape of a pumpkin. Then overlap for fullness.
Step 3: Add the stem, raffia bow, and leaves for a cozy harvest look.
Step 4: Glue the “Welcome Fall” message front and center, then display it proudly to greet the season with handmade charm.
#9. Mini Clothespin Pumpkins
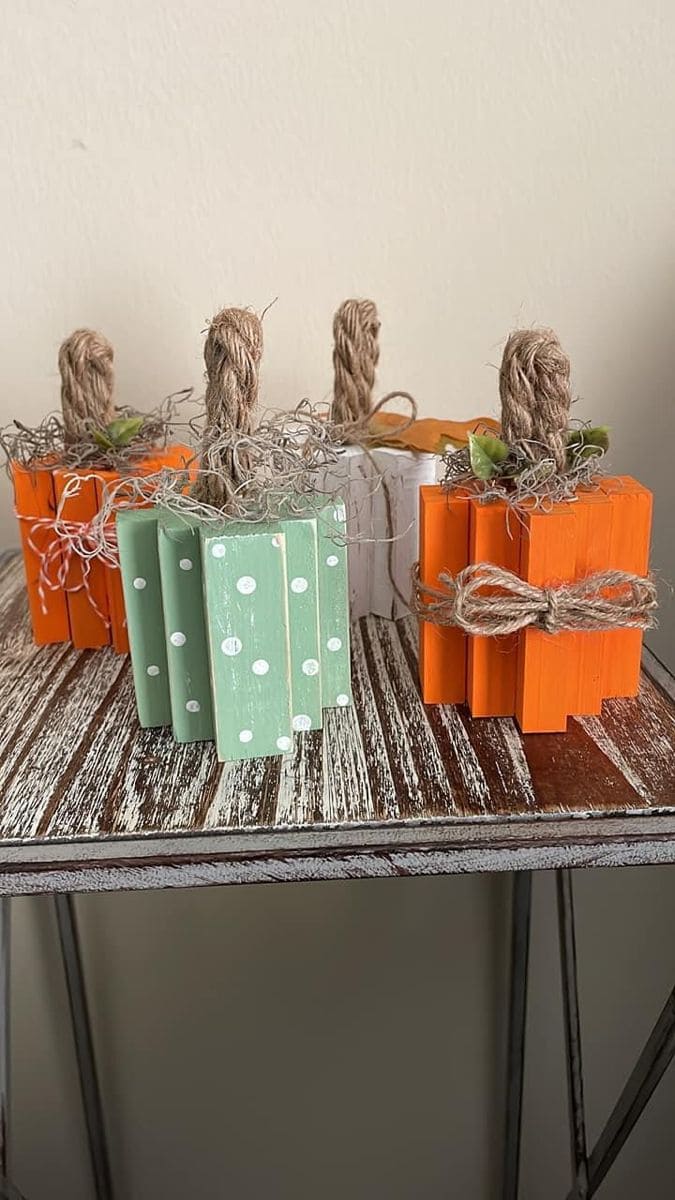
Who would’ve thought clothespins could become the cutest little pumpkins ever? These mini creations are playful, charming, and full of farmhouse personality.
Their compact size makes them perfect for small spaces, and the colors whether polka-dotted green or classic orange bring whimsy to any fall setup.
Plus, add some jute, moss, and a little twine, and you’ve got a rustic masterpiece that’s quick, crafty, and heartwarming.
Materials Needed
- 24 wooden clothespins (8 per pumpkin)
- Hot glue gun and glue sticks
- Acrylic paint (orange, green, white, etc.)
- Paintbrush or foam brush
- Jute rope
- Spanish moss or faux greenery
- Twine or ribbon
Step-by-step Guide
Step 1: Take each clothespin apart and remove the metal spring. Then lue the flat sides of the halves back together to form solid slats – 8 per pumpkin.
Step 2: Paint each set of slats in your chosen color. You can try polka dots for a playful look, or stick to solid colors for classic charm. Let dry completely.
Step 3: Glue the painted pieces side by side to form a blocky pumpkin shape.
Next, wrap jute rope and glue it vertically in a tight twist for the stem, then attach it to the top center.
Step 4: Finish with a bit of moss, greenery, or a twine bow. These are ideal for gifting or tucking into trays, shelves, or festive displays!
#10. Bundt Pan Pumpkin
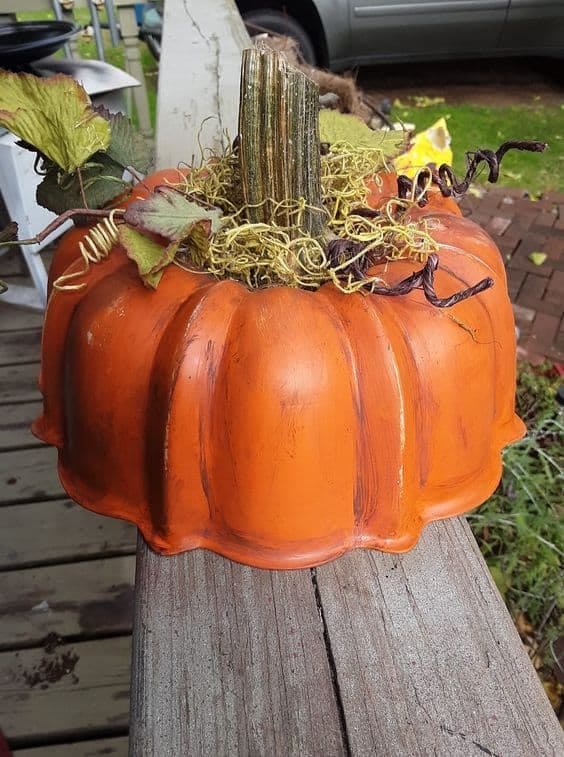
This clever pumpkin craft takes a humble kitchen staple, the metal Bundt pan and turns it into a festive fall decoration.
With a coat of pumpkin-orange paint and some creative embellishments, it becomes a sturdy, eye-catching piece perfect for porch steps, tabletops, or rustic kitchen décor.
Materials Needed
- Metal Bundt pan
- Spray paint or acrylic paint in orange
- Wooden stick or thick twig
- Moss, raffia, or Spanish moss
- Hot glue or strong adhesive
- Optional: faux leaves or vines
Step-by-step Guide
Step 1: Clean and dry your Bundt pan. Then, apply a couple coats of orange paint.
For added depth, you can brush a bit of dark brown or burgundy into the creases.
Step 2: Once dry, flip the pan upside down. Next, glue your wooden stem into the center hole, securing it firmly.
Step 3: Add moss, raffia, or curly vine pieces around the base of the stem. You can tuck in faux leaves or berries for a more decorative finish.
Step 4: Display on a step, shelf, or entry table. This upcycled pumpkin is durable, reusable, and downright adorable!
Read more: 30 Creative No-Carve Pumpkin Painting Ideas You’ll Love to Try
#11. Decorative Light Cover Pumpkin
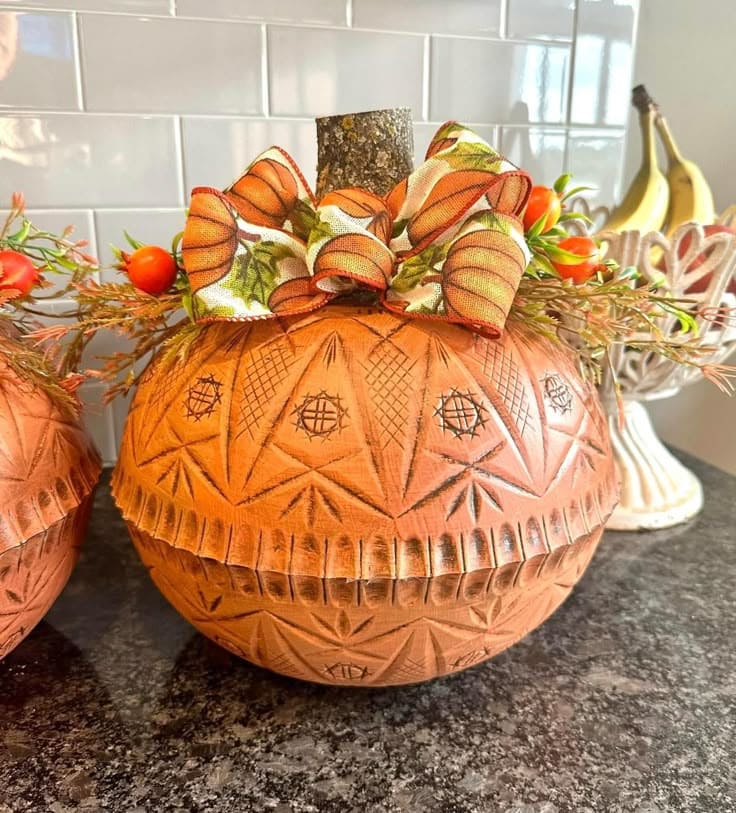
Amazingly, this gorgeous pumpkin looks like it came from a high-end home decor shop, but it’s actually made from two old ceiling light covers or pressed plastic bowls.
The carved texture mimics antique glass, and with a little paint and flair, it transforms into an eye-catching centerpiece.
Bonus, the natural wood stem, autumn ribbon, and berries make it festive yet refined.
Of course, this project is perfect for a countertop or dining table where you want something a bit more elevated and unexpected.
Materials Needed
- 2 matching plastic light covers or embossed plastic bowls (approx. 8–10″ diameter)
- Orange acrylic or spray paint (matte finish preferred)
- Brown/black paint or wax
- Small tree branch or stick (2-3″ for stem)
- Fall-themed ribbon (18-24 inches)
- Faux berry picks, greenery, or leaves
- Hot glue gun and glue sticks
Step-by-step Guide
Step 1: Clean and dry both light covers thoroughly. Then paint them inside and out with orange paint.
Once dry, lightly brush or sponge brown paint or wax into the details to highlight the texture.
Step 2: Glue the rims of the two bowls together to form a closed sphere. Let dry fully and rotate gently to ensure it’s even.
Step 3: Attach the stick stem to the top center with strong hot glue.
Next, you decorate around it with ribbon, faux berries, or foliage to give it a finished seasonal touch.
Step 4: Display it indoors as a classy, unexpected autumn accent that gives old lighting new life.
#12. Rustic Basket Pumpkin Centerpiece
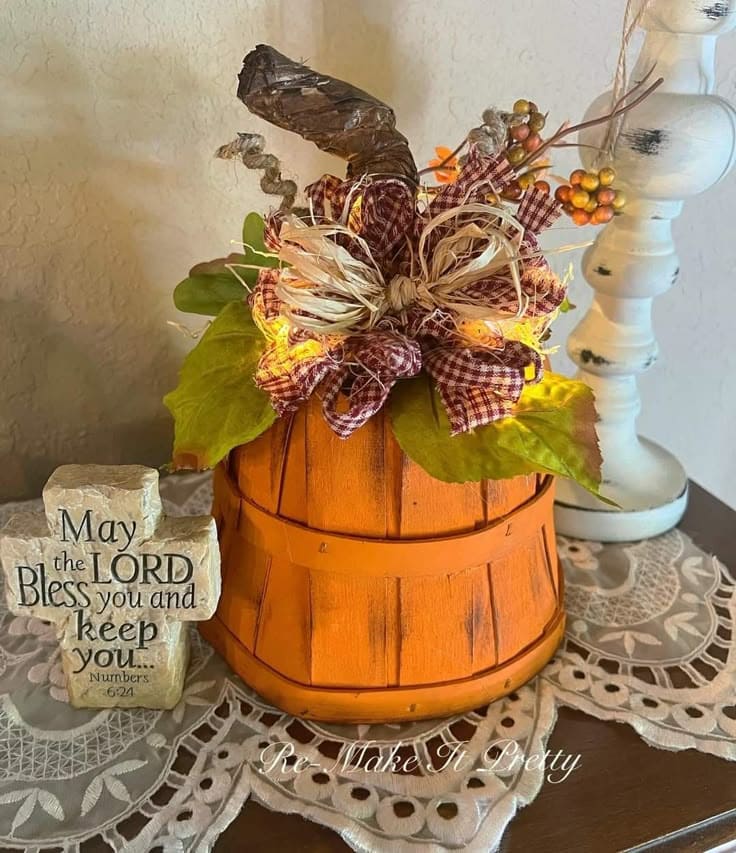
Here’s a fall DIY that turns a humble wooden basket into a charming pumpkin straight off a farmhouse table.
It feels cozy and inviting like something you’d find in Grandma’s kitchen or a vintage harvest festival.
With its gingham bow, raffia sprigs, and glowing lights tucked beneath the leaves, this upcycled piece brings warmth and character to any nook.
It’s simple, creative, and deeply satisfying to make, just the kind of project that makes your home feel like fall.
Materials Needed
- 1 small wooden bushel basket (about 8-10 inches tall)
- Orange acrylic paint or chalk paint (1-2 oz)
- Brown paper bag or twisted kraft paper (for stem)
- 1-2 faux leaves or greenery stems
- 1 bunch of raffia
- 1 strip of gingham ribbon (approx. 18-24 inches)
- Mini faux berries or dried florals (optional)
- Hot glue gun and glue sticks
- Battery-operated fairy lights (optional)
Step-by-step Guide
Step 1: Paint your entire basket orange, covering all slats. Let it dry completely, this gives it that classic pumpkin look with a rustic texture.
Step 2: Flip the basket upside down so the flat base becomes the pumpkin top.
Next, twist brown paper or a kraft bag into a thick stem shape, then hot glue it to the center.
Step 3: Arrange your leaves, faux berries, and raffia around the base of the stem. Then tie a bow from gingham ribbon and glue it front and center for that perfect country charm.
Step 4: (Optional) Tuck a small string of battery-operated lights beneath the leaves to create a soft harvest glow, especially lovely at night.
#13. Glass Bottle Pumpkin
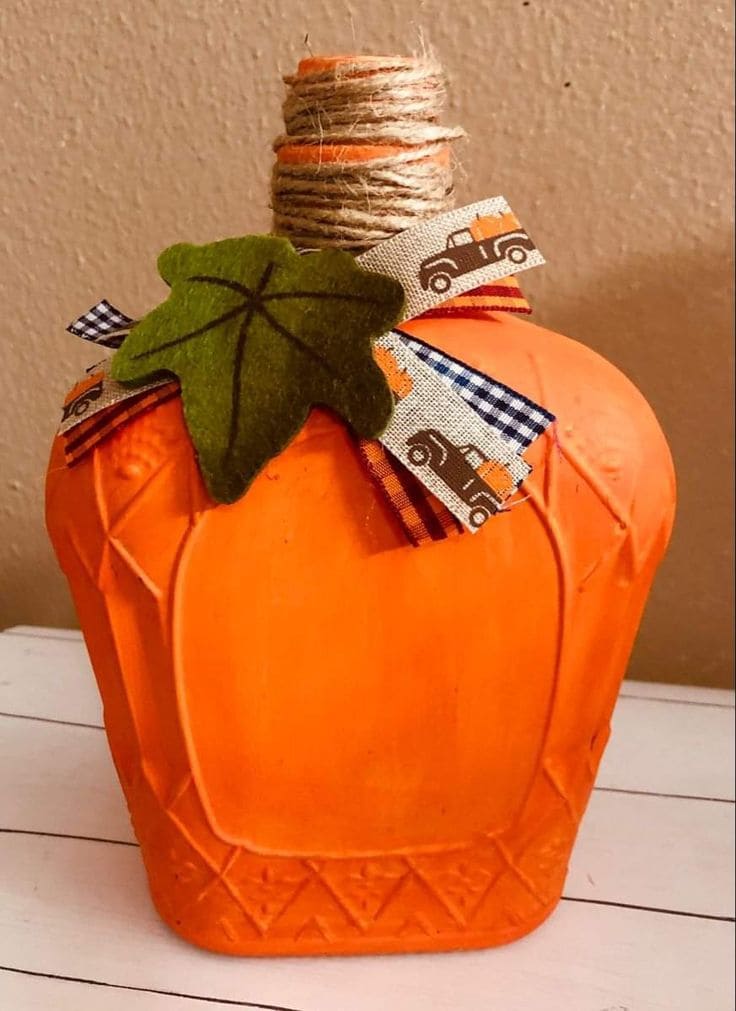
This charming craft turns an old glass bottle into a delightful pumpkin centerpiece.
Painted in warm orange tones and topped with twine and rustic accents, it’s a creative way to reuse materials you already have.
Whether it’s an empty whiskey bottle or an old vase, this DIY gives it a cozy, autumn makeover.
Materials Needed
- Glass bottle (flat-sided or rounded)
- Chalk paint or acrylic paint in orange
- Twine or jute rope
- Felt leaf, ribbon scraps, or fabric ties
- Hot glue
Step-by-step Guide
Step 1: Clean and dry your glass bottle. Then apply 2-3 coats of orange paint for full coverage. Let dry thoroughly.
Step 2: Wrap the neck of the bottle with twine, gluing as you go to create a pumpkin stem. You can also paint the neck brown or green for variety.
Step 3: Cut out a simple leaf from felt or use pre-made ones. Next, add ribbon pieces or raffia for a decorative touch.
Step 4: Glue all accents in place and display your glass pumpkin proudly. It’s an eco-friendly, eye-catching fall accent you’ll love pulling out each year.
#14. Rustic Pumpkin String Art
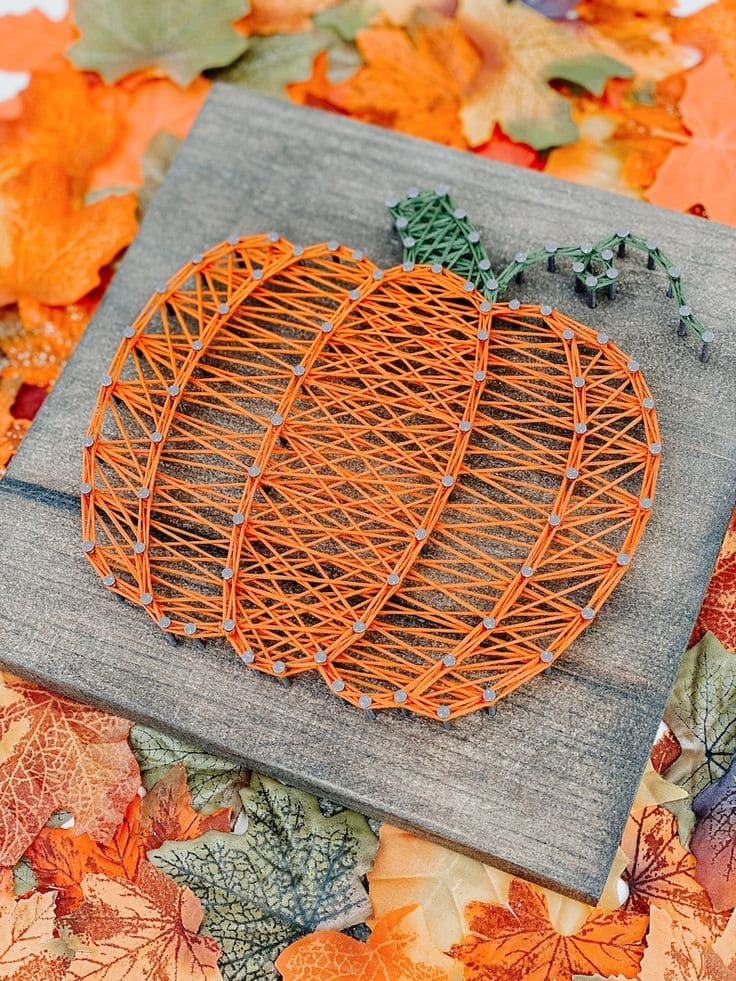
Wow, this pumpkin isn’t carved or painted, it’s stitched into place with nails and thread, forming a perfect blend of rustic charm and modern craft.
It’s an ideal project if you love precision, texture, and clean lines with a seasonal twist.
Whether you hang it in your entryway or prop it on a mantel, this handmade art piece gives your fall decor a touch of farmhouse sophistication with a cozy, handmade soul.
Materials Needed
- 1 wooden board (stained or unfinished, approx. 10×10 to 12×12 inches)
- 50 small nails or wire brads
- Hammer
- Orange embroidery floss or string (approx. 15-20 yards)
- Green string for the stem and vine (2-4 yards)
- Paper template of a pumpkin shape
- Optional: Pencil and tape
Step-by-step Guide
Step 1: Tape your pumpkin template onto the wooden board.
You hammer nails along the outline, about 1/2 inch apart, then remove the paper once complete.
Step 2: Tie one end of your orange string to a nail and begin wrapping, zig-zagging across the design to fill it in. Keep tension even and vary the pattern for texture.
Step 3: Use green string to outline and fill the stem and optional vine. Also, knot securely and trim any excess.
Step 4: Display your artwork upright or lay it flat among other autumn accents. It’s simple, stylish, and completely unique.
#15. Cutting Board Scarecrow Pumpkin
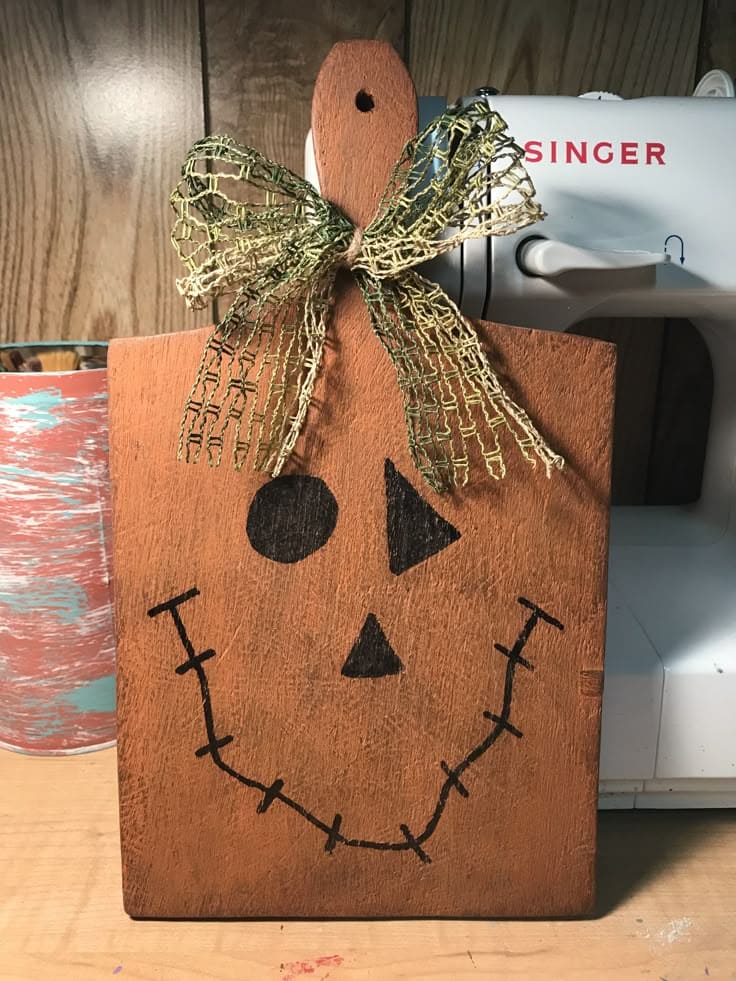
This craft turns an everyday kitchen item into a folksy fall decoration with loads of charm.
By giving an old wooden cutting board a pumpkin-orange makeover and adding a stitched smile and triangle face, you’ve suddenly got a friendly scarecrow jack-o’-lantern that brings a rustic grin to your space
. Topped with a ribbon bow, it’s simple, playful, and perfectly imperfect, just how autumn should feel.
Materials Needed
- 1 wooden cutting board (any shape or size with a handle)
- Orange acrylic paint
- Black paint or permanent marker (for the face)
- Decorative ribbon (wire-edged preferred)
- Hot glue gun or craft glue
- Optional: Sandpaper
Step-by-step Guide
Step 1: Clean your cutting board and give it a solid coat of orange paint. Let dry completely. You can distress the edges with sandpaper for a weathered look if desired.
Step 2: Paint on a stitched jack-o’-lantern face using black paint or a marker. Don’t worry about perfection as uneven lines add to the scarecrow charm.
Step 3: Tie a bow from decorative ribbon and glue it just under the handle. Then add extra raffia or small leaves for texture if you like.
Step 4: Display it on a shelf, hang it on a wall, or tuck it among your fall decor for an easy, homespun accent.
#16. Mini Baseball Jack-O-Lanterns
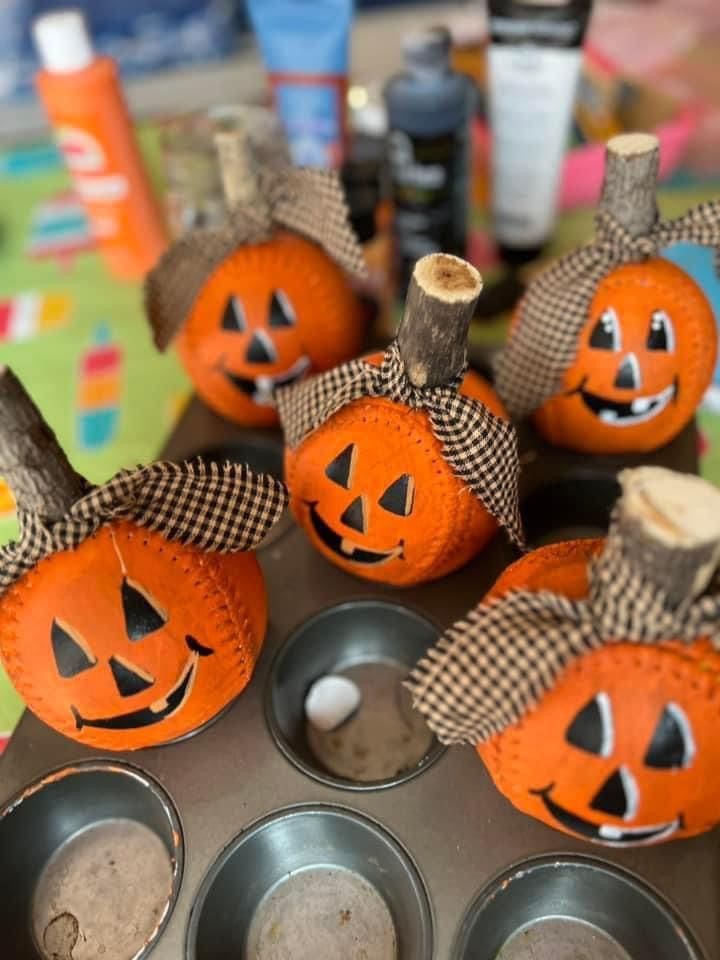
These tiny pumpkins are full of Halloween spirit and made from something you might already have tucked in a garage bin!
With just some paint, fabric scraps, and a touch of personality, these little guys become cheerful jack-o’-lanterns perfect for table decor, party favors, or classroom crafts.
Specially, their small size makes them easy to batch-make, and each one ends up with its own expression.
Materials Needed
- Old baseballs, foam balls, or similarly sized round items
- Orange acrylic paint
- Black and white paint
- Small branch or stick pieces (1-2 inches long for stems)
- Checkered or fall-colored fabric scraps (approx. 4″x4″)
- Hot glue gun and glue sticks
- Paintbrushes (fine tip)
Step-by-step Guide
Step 1: Paint each baseball or foam ball entirely orange. You may need two coats for full coverage. Let dry thoroughly.
Step 2: Use black paint to create triangle eyes, a nose, and a smiley (or spooky) mouth. Then add white accents for a cartoon-style glow.
Step 3: Hot glue a stick to the top of each pumpkin to act as a stem. Also, you tie a small square of fabric around the base of the stem for a cozy scarf or bowtie effect.
Step 4: Arrange them in a muffin tin, basket, or line them up across a table. These cuties are guaranteed to steal a few smiles!
#17. Mason Jar Lid Pumpkin
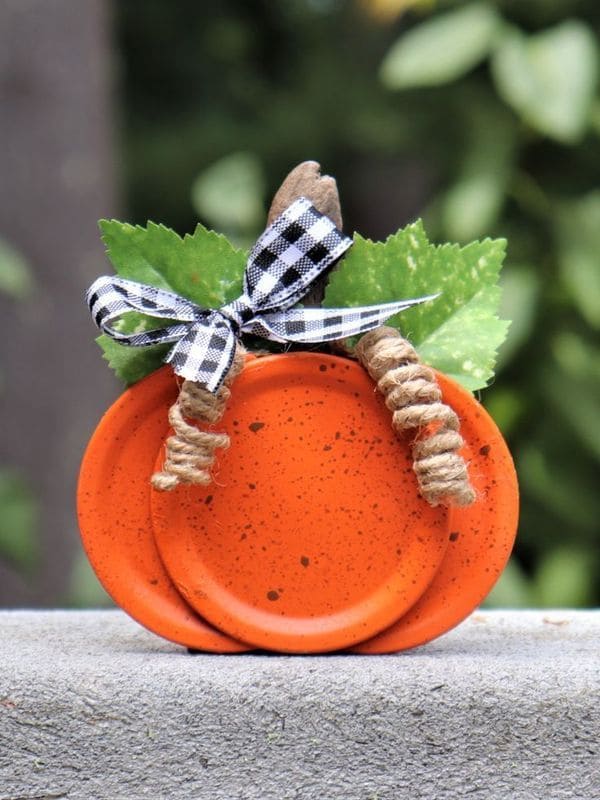
Why not turn ordinary jar lids into a whimsical fall pumpkin in minutes?
This rustic and charming craft uses stacked lids, a bit of twine, and leafy accents to create a delightful tabletop decoration.
It’s a perfect small-space DIY, especially if you’ve got leftover canning supplies.
Materials Needed
- 3 jar lids (mason jar or similar)
- Orange spray paint or acrylic paint
- Twine or thick jute rope
- Hot glue gun
- Faux leaves and small ribbon
Step-by-step Guide
Step 1: Paint all three lids with orange paint and let them dry completely.
Step 2: Arrange the lids overlapping slightly to form a pumpkin shape and glue them together where they meet in the center.
Step 3: Attach a small piece of twine as the “stem,” and use curled jute or raffia for tendrils. Glue faux leaves and a gingham bow to finish the look.
Step 4: Display it on a shelf, tiered tray, or desk for a touch of rustic seasonal flair. Simple, affordable, and full of personality!
Refer to: 20 Fun DIY Pumpkin Halloween Signs That Will Bring Families Together
#18. Upcycled Shutter Pumpkins
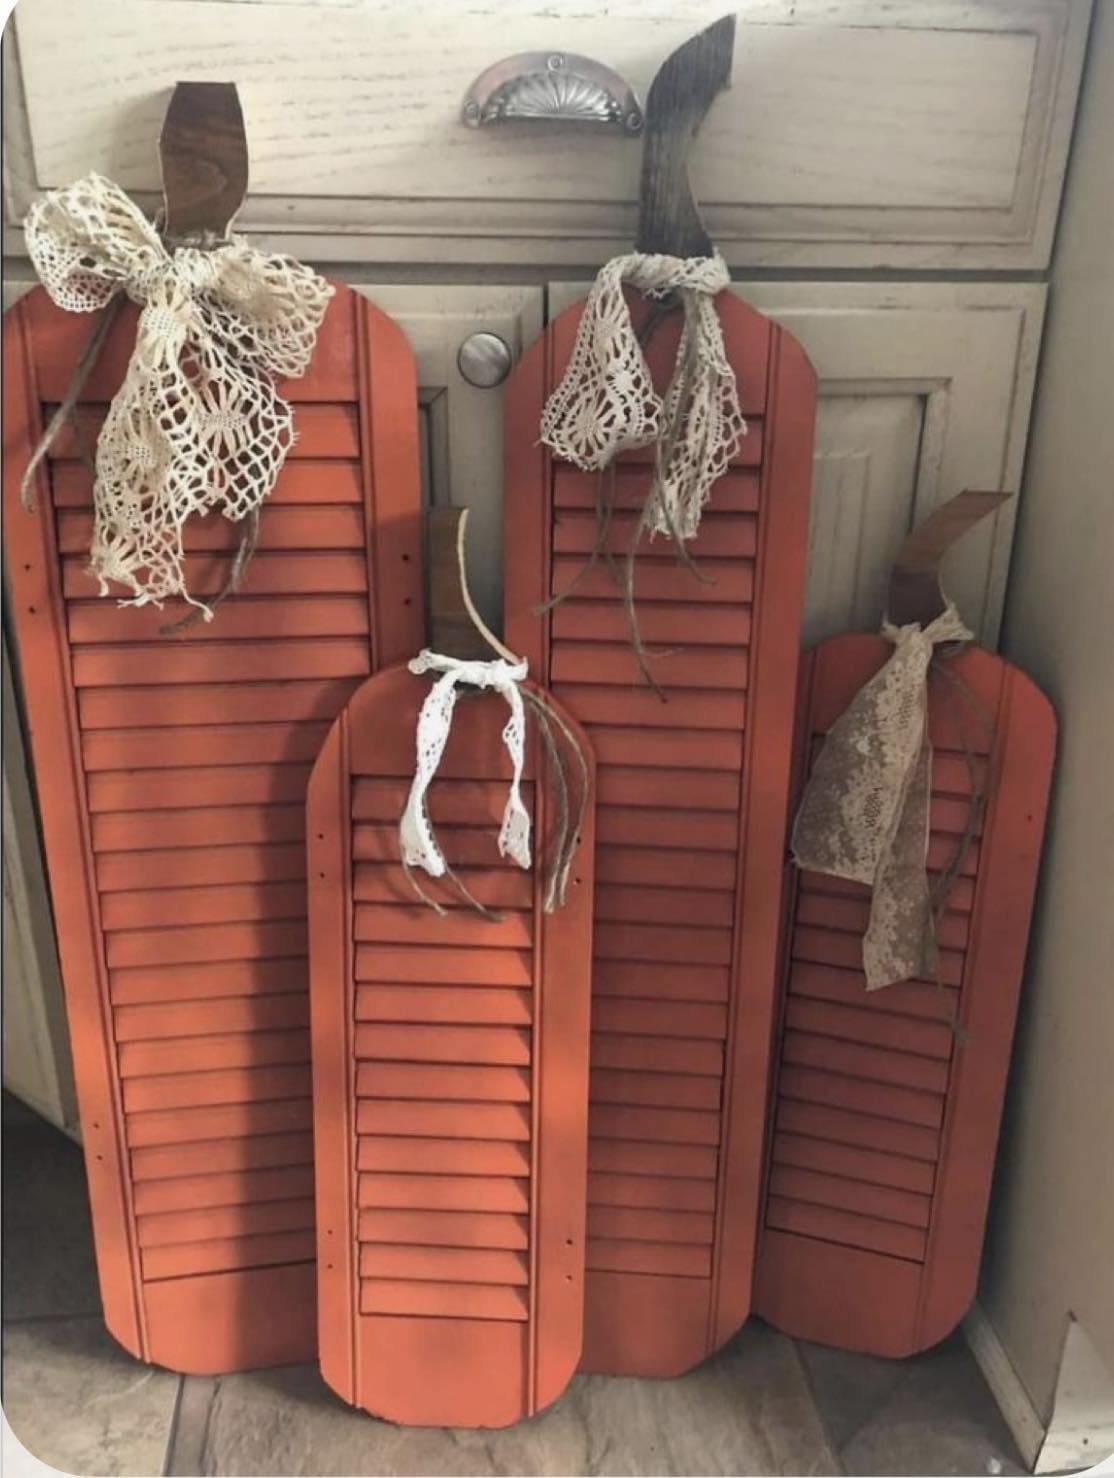
Who knew old shutters could become such stylish pumpkins?
These tall, elegant pieces are full of rustic farmhouse flair and perfect for lining your porch or hearth.
With their slatted texture, curved tops, and twine-wrapped lace bows, they feel like something you’d discover at a charming autumn antique fair.
Bonus, they’re simple to make, easy to customize, and a beautiful way to breathe new life into cast-off wood.
Materials Needed
- 1-4 old wooden shutters (various heights for visual interest)
- Orange chalk paint or acrylic paint (1-2 oz per shutter)
- Sandpaper or sanding block (optional)
- Wood scraps or driftwood pieces
- Twine or jute string
- Vintage lace, ribbon, or burlap strips (for bows)
- Hot glue gun and glue sticks
Step-by-step Guide
Step 1: Clean each shutter and paint with a coat or two of orange. For extra charm, lightly sand the edges once dry to give them a worn, vintage feel.
Step 2: Glue a wooden scrap or curved driftwood piece to the top of each shutter to act as the pumpkin stem.
Step 3: Tie bows from lace, twine, or burlap and secure just under the stem. Then layer textures for a charming, cottagecore finish.
Step 4: Display them leaning against a wall, porch step, or corner nook. Grouped together, they make a stunning vertical pumpkin patch indoors or out.
#19. Rolled Cardboard Pumpkin
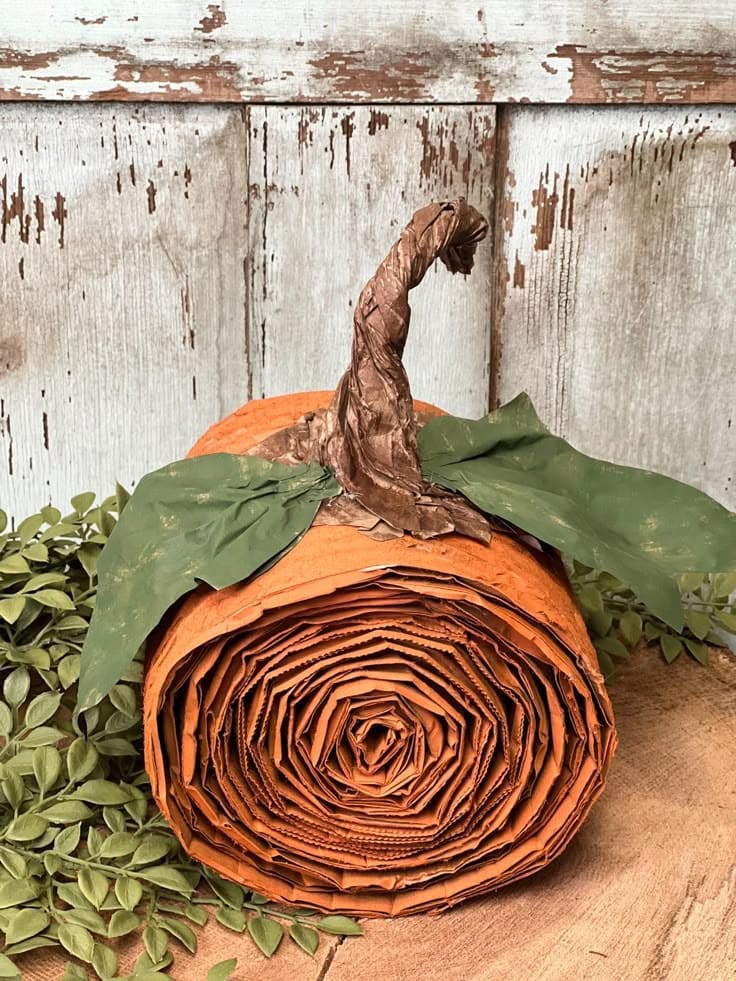
This pumpkin is earthy, raw, and full of texture, just the way fall feels.
Made from corrugated cardboard spiraled into a chunky gourd shape, it’s a brilliant way to reuse shipping scraps while crafting something bold and sculptural.
Bonus, the curled stem and painted leaves bring it to life with a hand-carved look.
Materials Needed
- Several long strips of corrugated cardboard (approx. 3″ wide, total length 12-15 ft)
- Orange acrylic or spray paint
- Brown kraft paper or paper bag
- Green painted cardstock, construction paper, or faux leaves
- Hot glue gun and plenty of glue sticks
- Scissors or box cutter
Step-by-step Guide
Step 1: Cut your cardboard into long, even strips.
Then coil one tightly to form the center, then continue wrapping and hot gluing as you go to create a thick spiral pumpkin body.
Step 2: Once fully formed, paint the entire piece orange, including the ridges. Let it dry thoroughly before handling further.
Step 3: Twist a piece of kraft paper into a whimsical stem and glue it to the top center. You can adjust the bend to give it personality.
Step 4: Cut or shape green paper leaves and attach them around the base of the stem. Finally, add a few vine curls or raffia for extra detail, if desired.
#20. Wicker Charger Pumpkin Wall Hanging
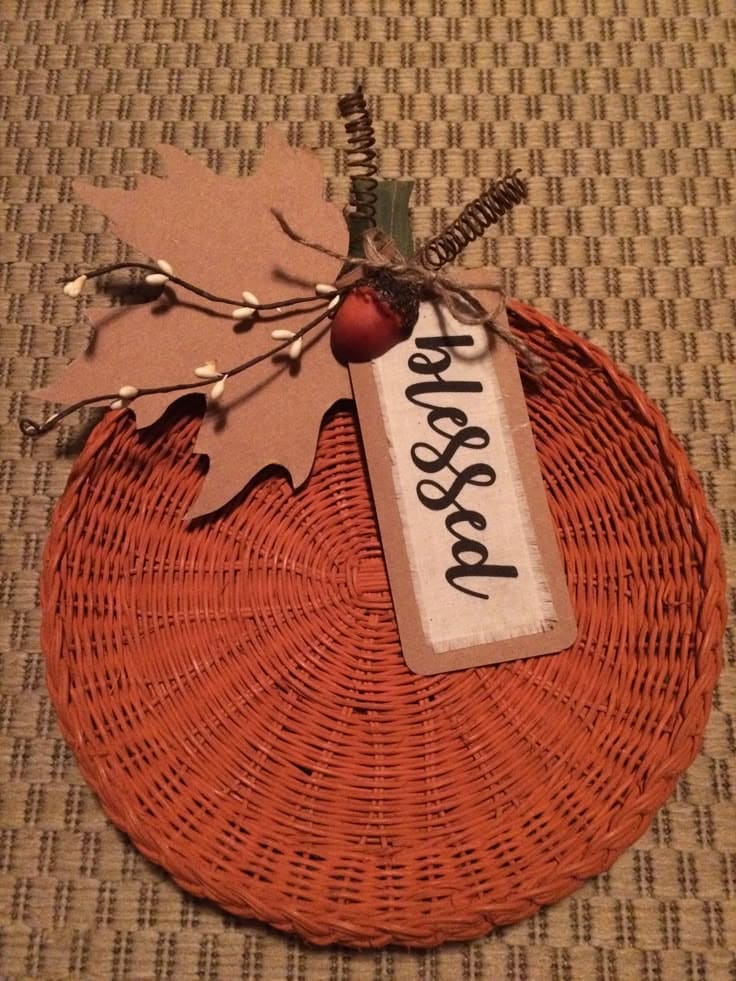
It’s a good idea to give an old wicker charger plate new life by transforming it into a warm, earthy fall wall hanging.
This minimalist pumpkin craft adds instant autumnal charm with just a few cozy embellishments.
Materials Needed
- Wicker plate or charger
- Orange spray paint or acrylic paint
- Craft leaves (paper, felt, or faux)
- Twine, jute, or small embellishments like acorns or faux berries
- Decorative tag or sign (like “Blessed” or “Welcome”)
- Glue gun
Step-by-step Guide
Step 1: Paint the wicker charger orange. Let it dry thoroughly.
Step 2: Cut a small cardboard or wooden tag, decorate it with a message or word, and attach it with hot glue or twine.
Step 3: Decorate the top with faux leaves, twigs, or autumn elements to resemble the pumpkin’s stem and foliage.
Step 4: Use a glue gun to assemble all the details and hang it using ribbon or a hook.
#21. Upcycled Horseshoe Pumpkin
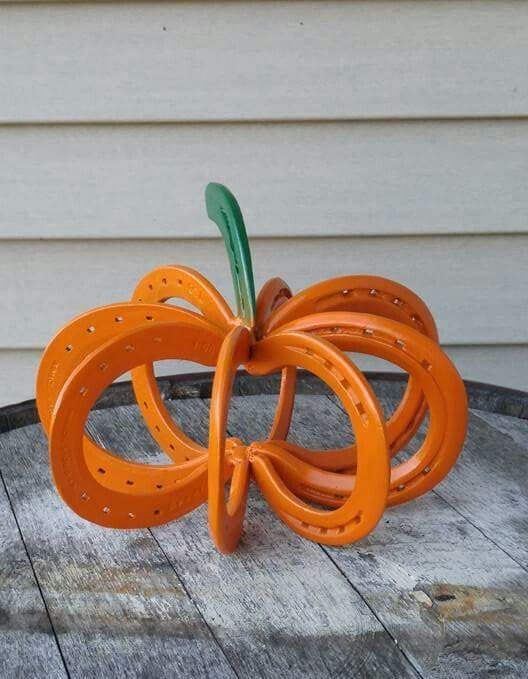
Made entirely from old horseshoes, this pumpkin is heavy-duty fall decor that’s both rugged and refined.
Painted bright orange with a green stem, it takes on the whimsical charm of a pumpkin while keeping its industrial edge.
Whether placed on a porch, barn step, or vintage barrel, it’s a showstopper that blends craftsmanship with creativity and it lasts year after year.
Materials Needed
- 5-6 horseshoes (cleaned and rust-free)
- Orange spray paint (metal-safe)
- Green spray paint
- Welding equipment (or strong metal adhesive if welding isn’t an option)
- Wire brush or sandpaper
- Optional: clear sealant spray
Step-by-step Guide
Step 1: Clean and scrub each horseshoe thoroughly with a wire brush. Also, remove all rust or debris to help paint and bonding adhere well.
Step 2: Arrange the horseshoes in a circle, overlapping the ends slightly to form a pumpkin shape.
Remember to secure the structure by welding or using strong metal adhesive.
Step 3: Once dry and secure, spray paint the entire structure orange.
Let dry fully, then add a touch of green paint on a central horseshoe to represent the stem.
Step 4: (Optional) Apply a coat of clear sealant for weather protection.
#22. Stacked Bushel Basket Pumpkin
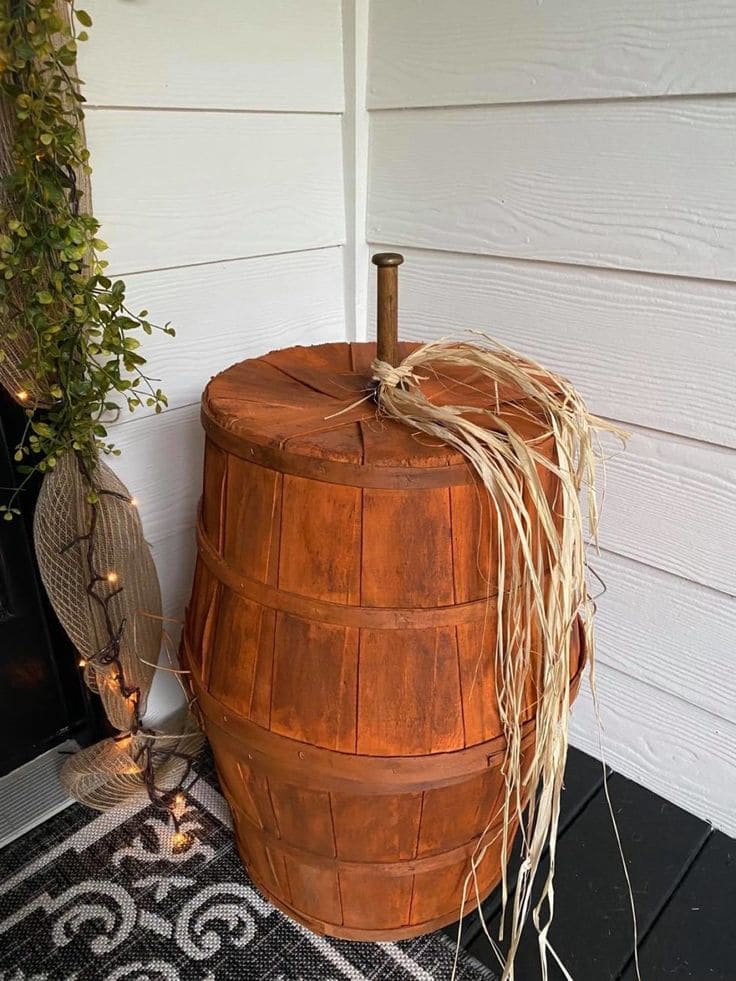
Made by flipping and stacking two wooden bushel baskets, this oversized pumpkin gives you instant fall flair without carving, sewing, or fussing.
The warm, distressed orange finish pairs beautifully with the raffia and stem detail, making it perfect for a front porch, entryway, or cozy corner.
It’s that kind of statement piece that looks like it came from an upscale harvest market, but it’s really just smart, simple upcycling.
Materials Needed
- 2 wooden bushel baskets (same size, approx. 12-14 inches tall)
- Orange and brown acrylic paint (or spray paint)
- 1 small wooden dowel, curtain rod, or furniture leg (6-8 inches for stem)
- Raffia, twine, or burlap strips
- Hot glue gun or wood-safe craft glue
- Sandpaper (optional)
Step-by-step Guide
Step 1: Paint both baskets with orange paint. Then add light strokes of brown to give a weathered, rustic look. Let dry fully.
Step 2: Stack the baskets upside down on top of each other (bottoms facing out). You can glue together where they meet for stability.
Step 3: Insert your stem (wooden dowel or rod) into the top center. Then use glue to secure in place.
Step 4: Tie raffia or burlap around the base of the stem for a natural, harvest feel.
Now you can place near your front door or garden bench for a warm, welcoming touch.
#23. Patchwork Fabric Pumpkin
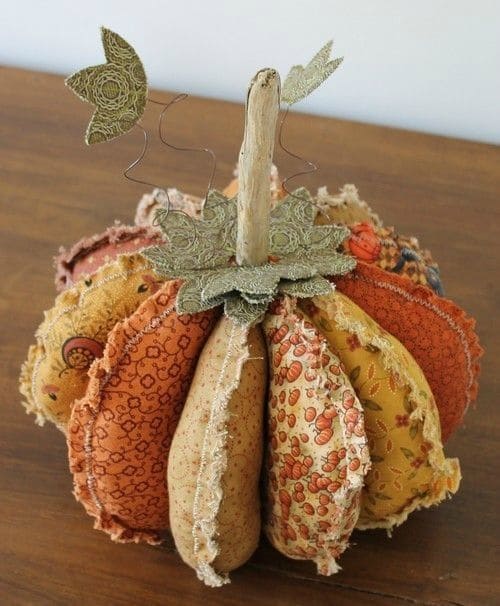
Look at this cozy fabric pumpkin! It embraces the spirit of handmade warmth with soft textures and vintage charm.
Each panel, made from mismatched fabric scraps, comes together in a whimsical harvest palette, perfect for anyone who loves a rustic or cottage-style aesthetic.
Materials Needed
- Assorted fall-themed cotton fabric scraps
- Needle and thread or sewing machine
- Stuffing (polyester fiberfill or scrap fabric)
- Hot glue gun
- Stick or wooden dowel
- Faux leaves, lace, or decorative trim
Step-by-step Guide
Step 1: Cut fabric into symmetrical teardrop-shaped panels. You can use 6-8 for a full look.
Step 2: Sew the panels together side by side, right sides in. You should leave the top open.
Step 3: Turn it right-side out and stuff firmly.
Step 4: Hand-stitch the top closed and hot glue a stick or wooden stem in the center.
Step 5: Embellish with lace leaves, twisted wire tendrils, or vintage buttons for added detail.
#24. Upcycled Paper Plate Pumpkin
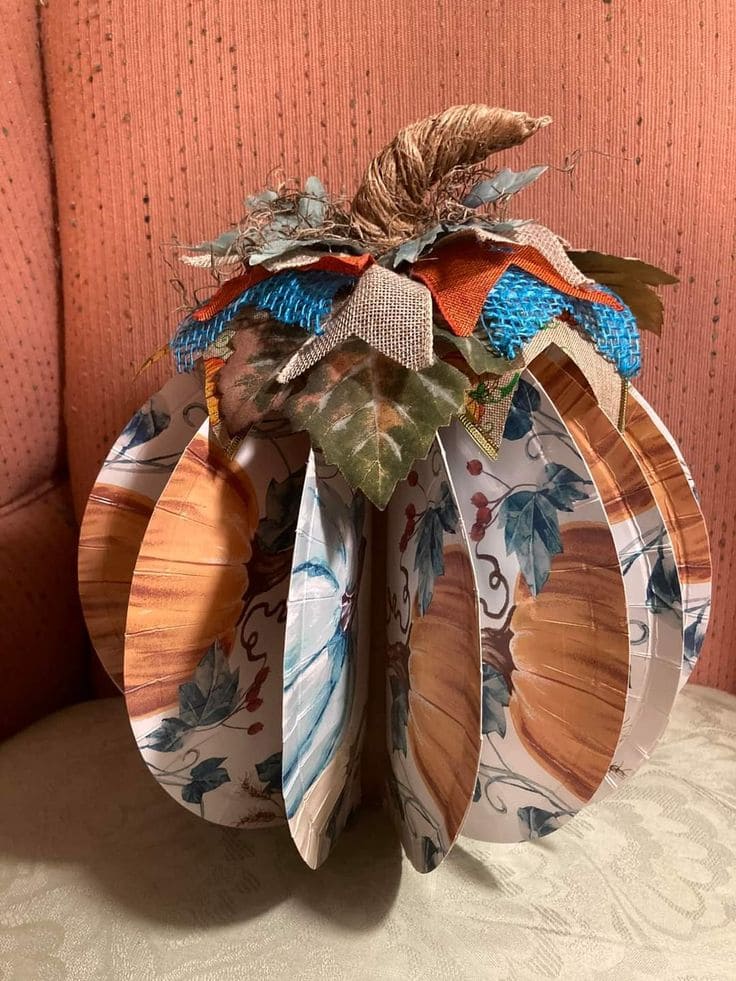
This pumpkin looks like it danced right out of a harvest fairytale.
Made from decorative paper plates and layered with rustic trims, it’s the kind of project that turns throwaway items into heartfelt seasonal décor.
Plus, the mix of florals, wood grain, and leafy textures gives it personality like a handmade treasure passed down from a cozy country home.
Materials Needed
- 6-8 printed paper plates (floral, pumpkin, or woodgrain design)
- Hot glue gun and glue sticks
- 1 small paper towel roll tube
- Scrap fabric pieces (burlap, blue mesh, orange, etc.)
- Faux leaves and florals (optional)
- Twine or brown paper
- Scissors and pencil
Step-by-step Guide
Step 1: Fold each paper plate in half, then crease firmly. Then cut a small slit at the top and bottom so they fit around your center support tube.
Step 2: Attach each folded plate around the paper tube using hot glue, spacing them evenly until it forms a full, round pumpkin shape.
Step 3: Wrap the top of the paper towel tube with twine or twist a piece of brown paper to make a rustic stem. Glue securely in place.
Step 4: Embellish the top with fabric scraps, faux leaves, or even berries, layering to give texture and that handmade harvest charm.
#25. Fabric Scrap Braided Pumpkin
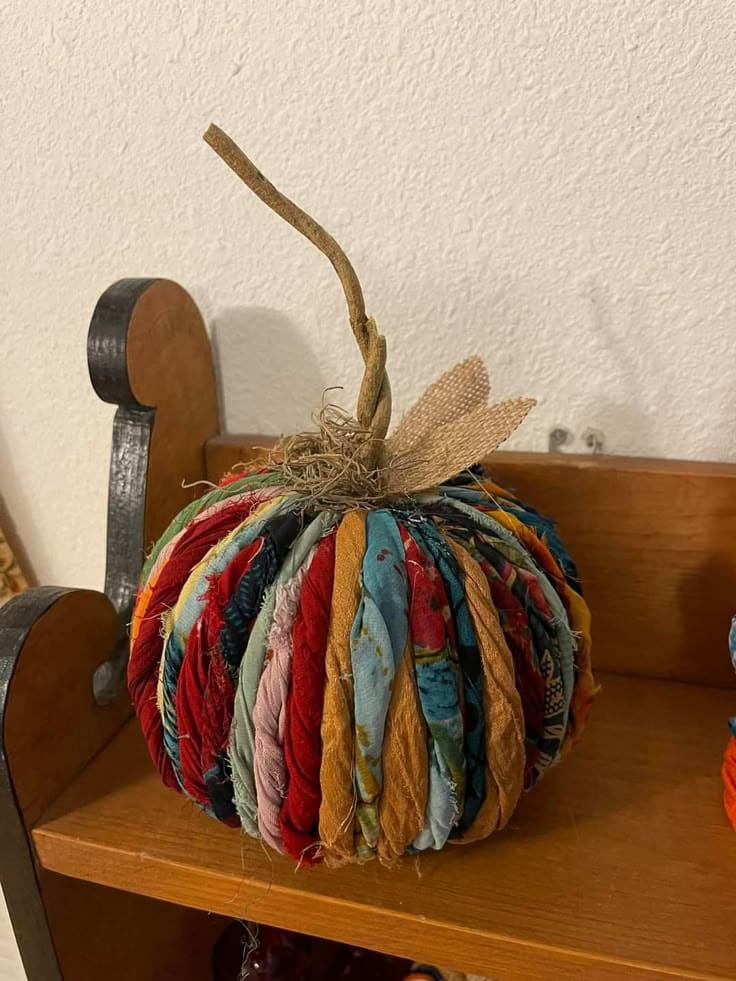
This pumpkin is soft, scrappy, and full of personality. It’s made from twisted fabric strips, each one carrying color, texture, and a story.
This is the kind of craft that feels like comfort: warm colors, old cotton, maybe even upcycled from a loved shirt or dress.
Perfect for adding a handmade touch to a shelf, basket, or fall centerpiece, this no-sew pumpkin brings together nostalgia and creativity in the most delightful way.
Materials Needed
- Fabric scraps in autumn tones (cut into 1–1.5″ x 18–24″ strips)
- Twine, rubber bands, or hot glue to secure ends
- 1 foam ball or small round base (approx. 5–6″ diameter)
- Hot glue gun and glue sticks
- Stick or cinnamon stick for the stem
- Optional: burlap leaves, moss, or raffia for top
Step-by-step Guide
Step 1: Braid or twist your fabric strips. You’ll need enough to fully wrap the base. Then mix textures and patterns for a homespun look.
Step 2: Glue one end of each braid to the bottom center of the foam ball, then pull it tightly over the top and secure the other end at the bottom again, creating pumpkin-like ridges.
Step 3: Repeat until the ball is fully covered. You can overlap slightly for a full, rounded effect.
Step 4: Glue a stick or cinnamon stick to the top for a stem, and add burlap leaves or moss to finish it off.
This pumpkin is ready to brighten your autumn shelves with a handmade soul.
See more: 20 Must-Try Chic Flower-Inspired Pumpkin Ideas for a Stunning Decor
