A car’s journey is full of milestones, first drives, long road trips, daily commutes, and maybe even a few roadside hiccups.
But when its engine finally rests, not every part has to say goodbye. One of the most overlooked treasures is the license plate. It’s still durable, nostalgic, and full of character.
Instead of tossing these little time capsules in the bin, why not turn them into something bold, useful, or downright artistic?
Whether you’ve got a single plate tucked away or a whole stack collected over the years, there’s a creative project waiting for you. Below are 23 eye-catching ways to recycle old license plates and give them a second chance to shine.
#1. License Plate Catch-All Tray
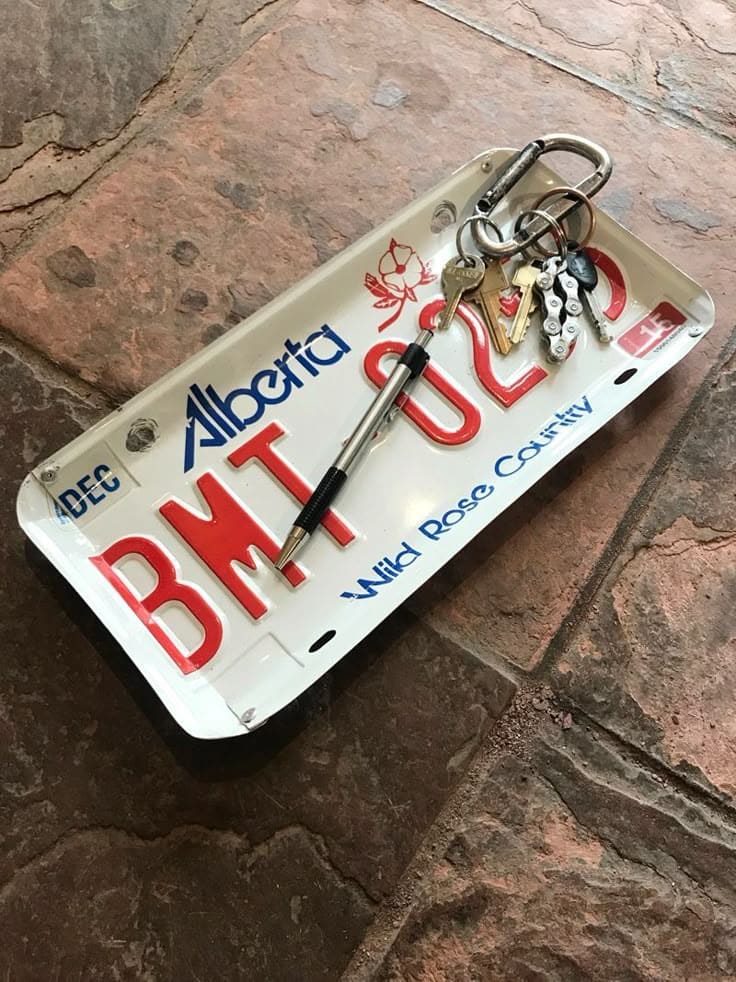
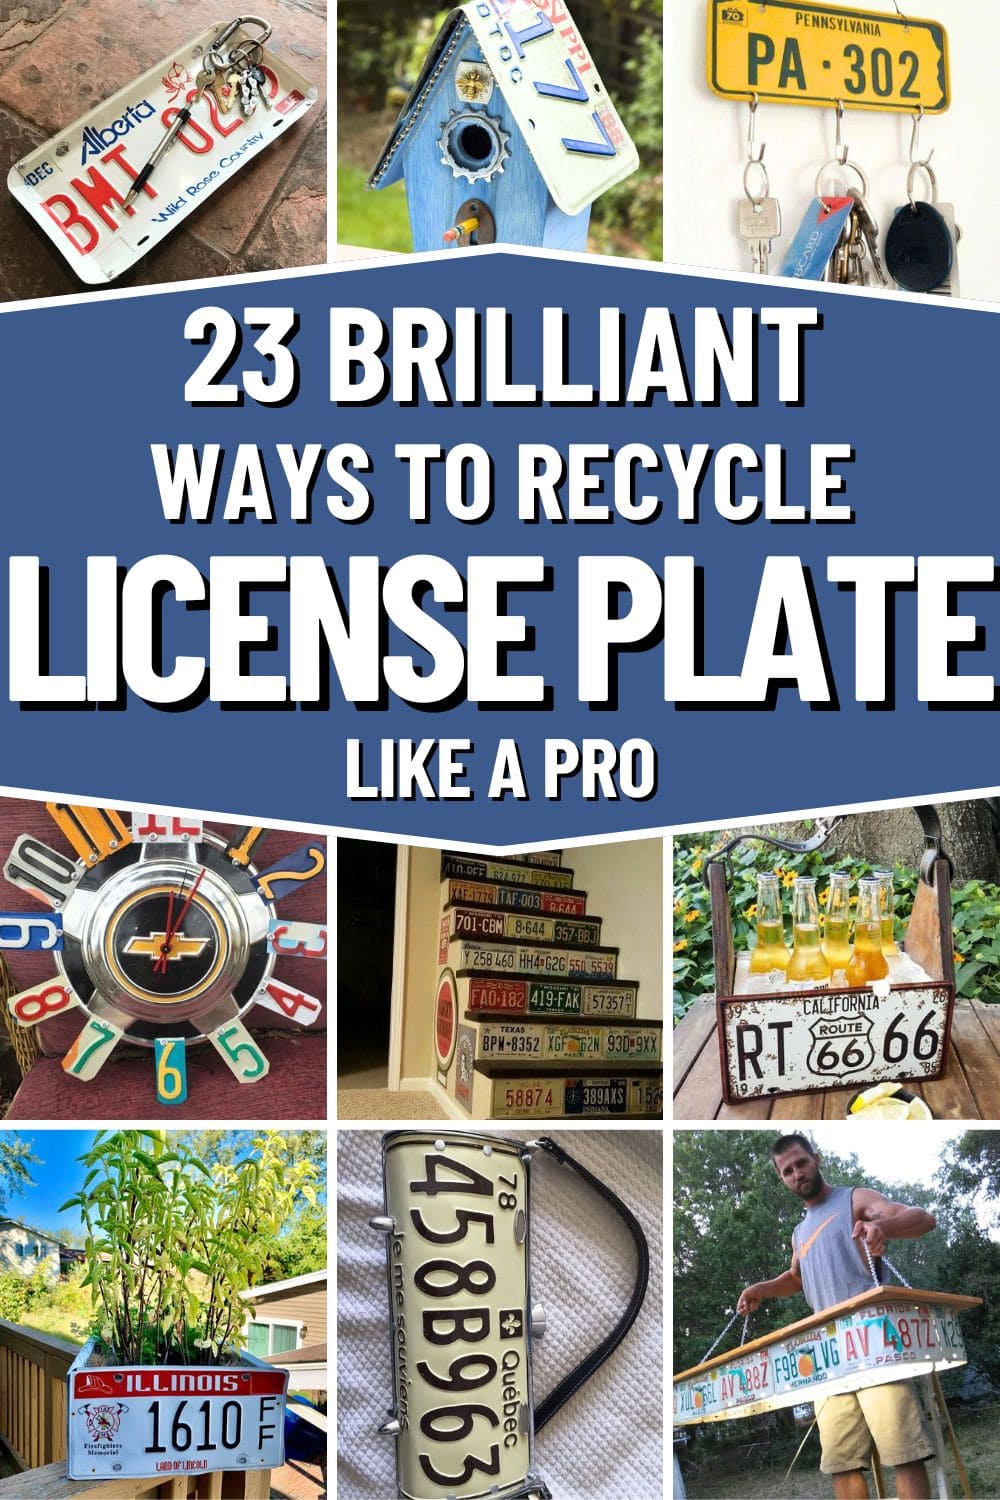
Who knew an old Alberta license plate could become such a stylish little catch-all? With just a few bends and some care, you’ve got yourself the perfect rustic tray for keys, pens, spare change or whatever you tend to toss on the counter.
Materials Needed
- 1 old metal license plate (12” x 6”)
- 4 small rubber or felt bumpers (optional)
- Heat-resistant gloves
- 2 blocks of wood
- Hammer and rubber mallet
Step-by-Step Guide
Step 1: To create the tray shape, place the plate face-down on a firm surface. Now, use two pieces of wood on each long edge and gently bend both sides upward to about 90 degrees. You can use a mallet to help.
Step 2: Repeat with the short edges, this time bending just slightly to form a more shallow front and back.
Step 4: Optional: You can attach rubber bumpers underneath each corner for a soft landing and extra grip on smooth surfaces.
#2. License Plate Hat Rack
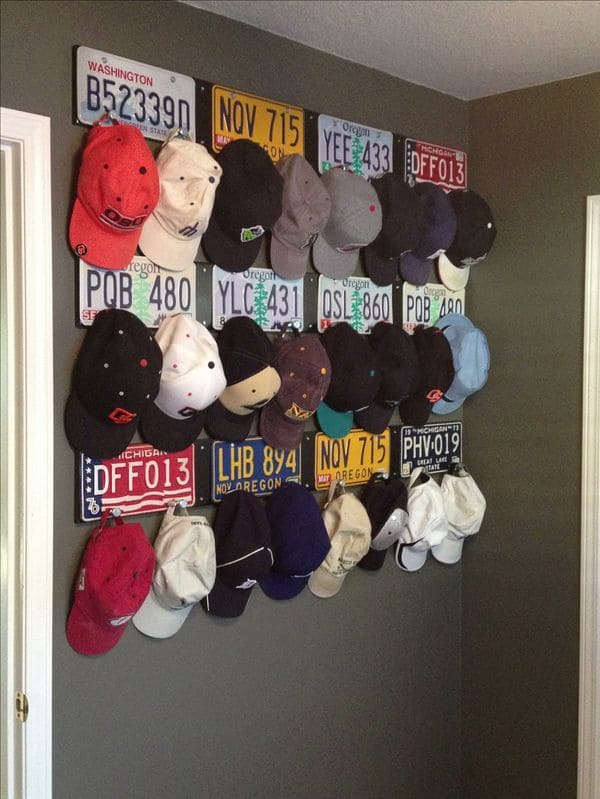
If your caps are always playing hide and seek around the house, this one’s for you. You can turn your wall into a personal gallery with this clever DIY hat rack made from old license plates.
Materials Needed
- 12 vintage license plates (standard size: 6″ x 12″)
- Wall screws or nails
- Measuring tape and level
- Screwdriver or drill
- 32 cup hooks
- Anchors (optional)
Step-by-Step Guide
Step 1: Plan your layout by arranging license plates on the floor first. You should aim for clean rows that fills the space naturally, then measure and mark where each plate will go on the wall.
Step 2: Drill holes in the corners of each license plate if they don’t already have them. Use wall anchors if mounting directly into drywall.
Step 3: Attach the plates to the wall using screws or nails. Make sure they’re secure, especially if you’ll hang heavier items like jackets or loaded keychains.
Step 4: Screw a cup hook into each license plate right near the center or slightly lower. You can even mix it up to match your hat heights.
#3. License Plate Dustpans
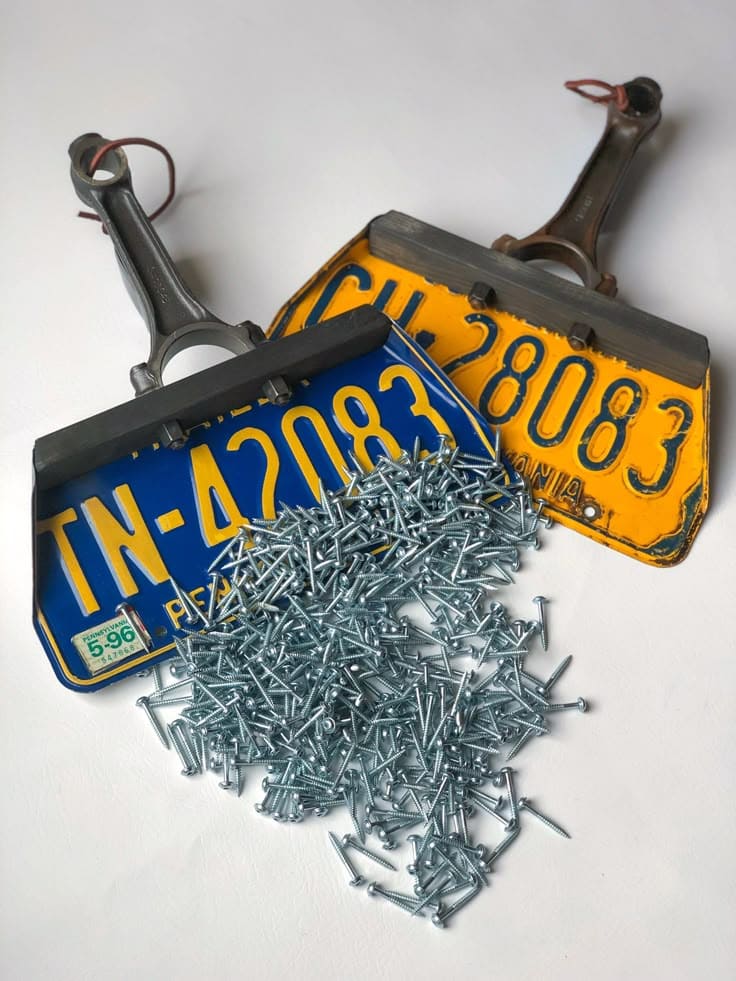
Sometimes the most functional pieces can also be the quirkiest. These DIY dustpans, made from old license plates and forged metal parts, bring a whole new level of personality to your workshop or garage.
Materials Needed
- 1 vintage license plate per dustpan
- 1 used car piston arm
- 2-3 heavy-duty bolts + nuts
- Drill with metal bit
- Wrench or socket tool
Step-by-Step Guide
Step 1: Bend the license plate gently upward using a rubber mallet and a hard edge to form the dustpan base.
Step 2: Align the flat edge of the piston with the back of the plate. Then mark and drill holes through both for mounting bolts.
Step 3: Secure the piston handle using bolts and nuts. You need to tighten firmly to avoid wobbling.
Step 4 (Optional): You can also add a leather cord through the piston eyelet for hanging.
#4. License Plate Chevy Clock
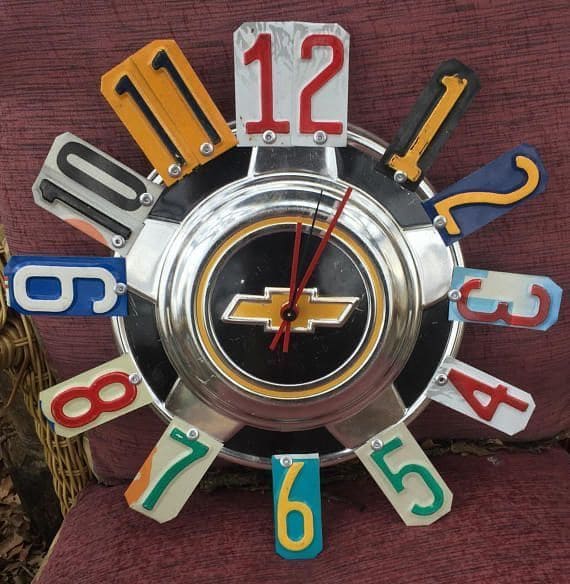
If you’ve got a love for vintage cars and quirky décor, this license plate wall clock hits all the right notes.
With slices of colorful plates forming the hours and a gleaming Chevy hubcap as the center, this piece tells story of speed, nostalgia, and hands-on creativity.
Materials Needed
- 1 vintage Chevy hubcap
- 12 license plate number cutouts (2.5″ x 4″ each)
- Clock mechanism kit with hands
- Drill with metal bit
- Screws
- Wall hook
Step-by-Step Guide
Step 1: Clean the hubcap thoroughly and polish if desired. It will serve as the base of your clock.
Step 2: Cut license plates to get individual digits 1-12. You should make sure they’re uniform in size, or intentionally stagger them for a funky look.
Step 3: Drill holes in each plate piece and attach around the hubcap using screws or epoxy. Then, align them like the numbers on a traditional clock.
Step 4: Install the clock mechanism through the center hole of the hubcap, making sure it’s balanced and secure.
#5. License Plate Stair Risers
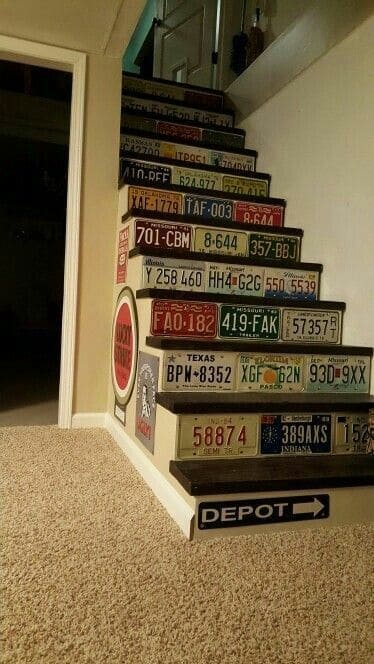
Who needs a runner when your staircase can be a road trip scrapbook? This brilliant idea turns ordinary steps into a gallery of vintage license plates, each one a souvenir from somewhere, somewhen.
Materials Needed
- 12-16 license plates
- Heavy-duty adhesive
- Ruler
- Drill with small bit
- Level (optional)
Step-by-Step Guide
Step 1: Measure the height and width of each stair riser to ensure your plates will fit. Standard plates usually match up nicely, but trim or stagger if needed.
Step 2: Clean each license plate thoroughly. Bend slightly if needed to match any curve in your stairs.
Step 3: Attach the plates to the risers using strong construction adhesive, or pre-drill small holes and use finishing nails for a more secure hold.
#6. License Plate Wind Chime
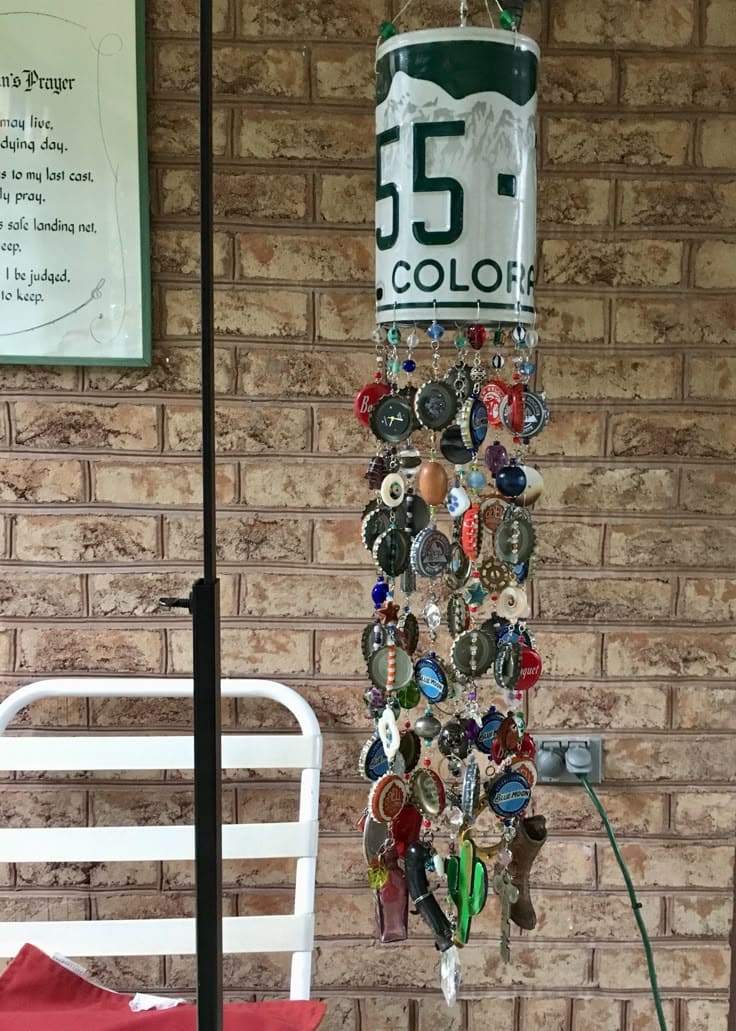
This upcycled wind chime captures the charm of road trips and cold brews all in one breezy symphony.
If you are looking for something to make sound for your porch, garden, or balcony, here is your answer. Made from a license plate top and strands of bottle caps, beads, trinkets, and found treasures, it jingles softly with every gust of wind.
Materials Needed
- 1 vintage license plate (~6-8 inches wide)
- 50-60 bottle caps
- Assorted beads, buttons, charms, keys
- Fishing line
- Drill + small metal bit
- Jump rings, pliers, and hanging hook
Step-by-Step Guide
Step 1: Bend the license plate into a cylinder and secure the ends with screws or rivets. You want to drill 12 small holes around the bottom edge for the hanging strands.
Step 2: String together bottle caps, beads, and charms using jump rings or fishing line. You should vary the textures and lengths to create a rich, layered look.
Step 3: Attach each strand to the plate’s base holes using jump rings or knots.
Step 4: Drill two holes at the top and thread a sturdy wire or cord through to create a hanging loop.
#7. License Plate Hanging Light Fixture
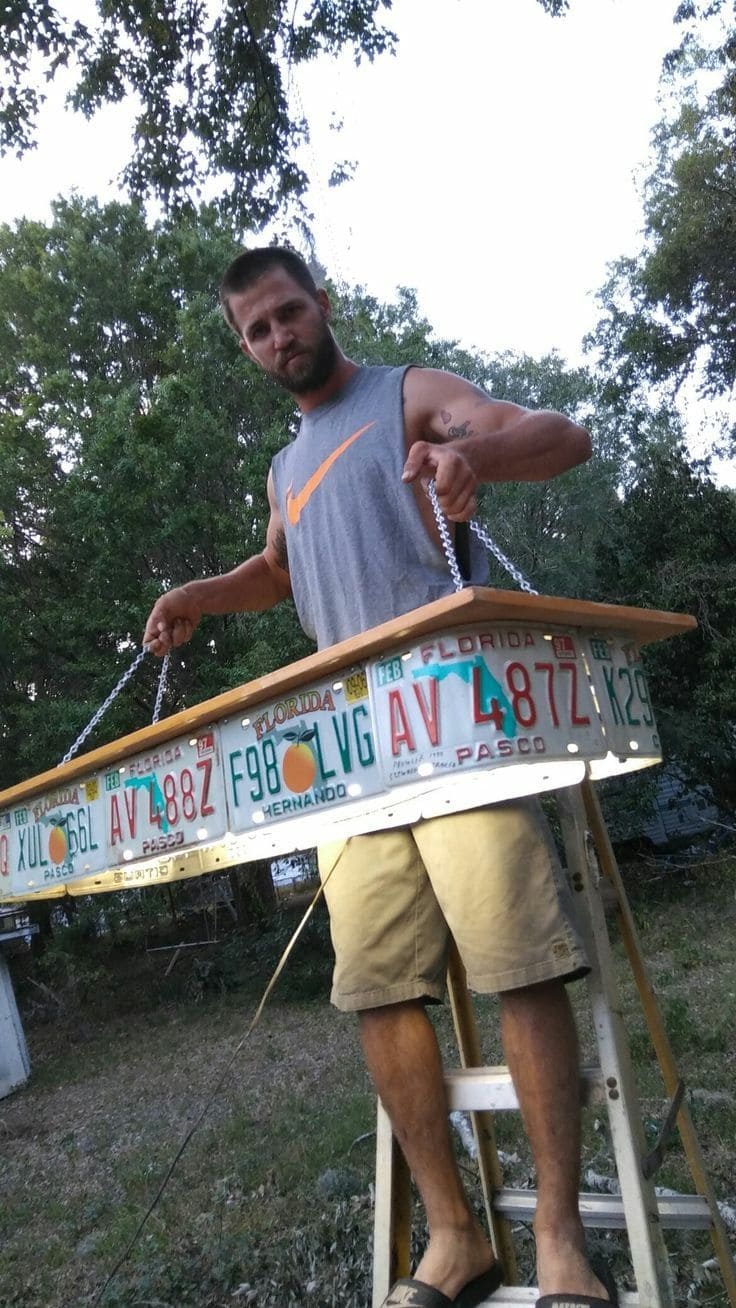
This project is for anyone coming from Florida, and of course any areas all over the world.
Crafted from vintage license plates and reclaimed wood, it adds character, creativity, and just the right amount of industrial charm.
Materials Needed
- 10 vintage license plates
- 1 rectangular wooden board (approx. 36″ x 12″)
- Pendant light fixture with bulb sockets
- Electrical wiring kit (UL-listed)
- Chain (2 lengths, 3-4 ft each)
- Power drill with metal bit
- Screws and washers
- Ceiling hook
- Sandpaper and safety gloves
- Optional: matte clear coat
Step-by-step Guide
Step 1: Sand all wooden pieces to smooth any splinters, and wipe off dust.
Step 2: Drill holes along the sides of the wooden board where the license plates will be attached. Then position plates around the board like a box skirt and bend edges if needed to shape.
Step 3: Attach license plates using screws and washers. You should secure tightly for a uniform look.
Step 4: Drill holes on each end of the board and attach chain lengths with sturdy screw hooks or eyebolts.
Step 5: Mount your lighting fixture under the board with pendant sockets.
Step 6: Finally, hang the fixture from a secure ceiling beam using heavy-duty ceiling hooks and link your chain ends.
#8. Framed License Plate Wall Art
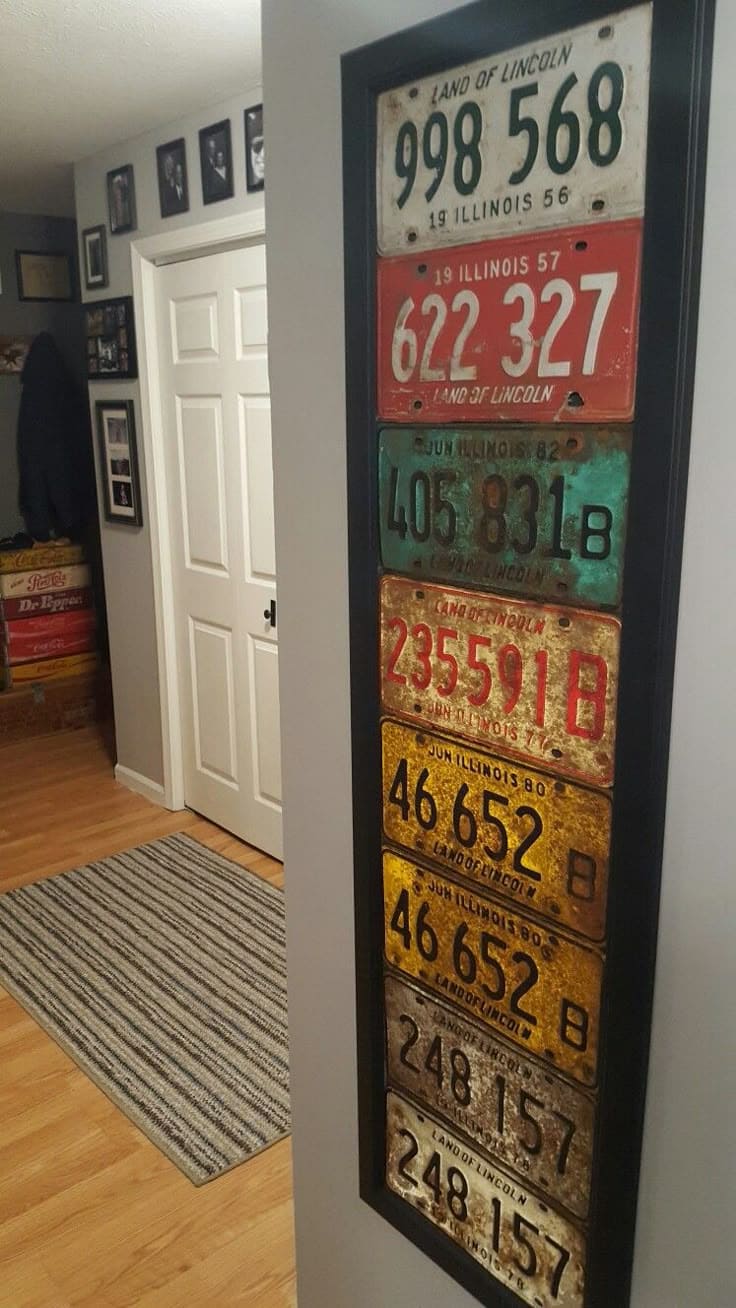
Wow, this framed vertical collage of old Illinois license plates captures more than numbers, it freezes eras in tin and rust, echoing long drives, roadside diners, and memories tucked beneath glove compartments.
Materials Needed
- 8-10 vintage license plates
- 1 large shadow box (approx. 12″ x 36″)
- Thin plywood backing board
- Construction adhesive
- Drill (optional)
Step-by-Step Guide
Step 1: Lay your license plates on the floor to arrange them. You can go by color, date, or just follow what feels right visually.
Step 2: Cut your plywood backing to fit the inner dimensions of your frame. You should paint it black or dark brown to make the plates pop.
Step 3: Use strong adhesive to attach each plate in rows. Let it cure overnight to prevent slippage.
Step 4: Now, place your backing into the frame and secure it. Then hang it up and let the nostalgia radiate.
#9. License Plate Clutch Purse
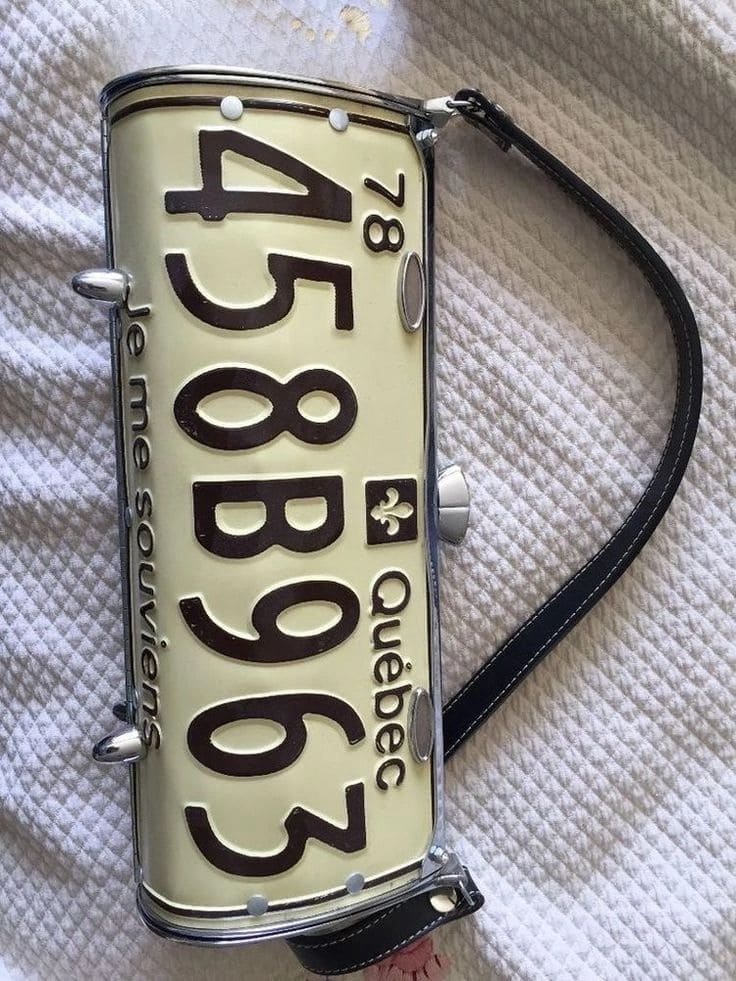
Who says style has to come from a boutique? This purse, built from an authentic Québec license plate, proves that upcycled fashion can be just as striking.
In addition, with its retro metal finish and sleek black strap, it adds rebellious charm to any outfit whether you’re hitting the market or the music festival.
Materials Needed
- 1 vintage license plate
- 2 small purse hinges
- 1 small purse latch
- Leather side panels (approx. 4″ x 10″ each)
- Lining fabric (velvet, canvas, or thick cotton)
- Purse handle
- Rivets
- Metal hole punch
- Screwdriver and pliers
- Optional: edge trim or piping
Step-by-step Guide
Step 1: Sand all sharp edges of the license plate and gently bend it into a curved clutch shape using a rolling pin over a soft surface.
Step 2: Cut two identical leather or vinyl side panels to enclose the ends of the purse, then glue or rivet them to the curved license plate.
Step 3: Attach purse hinges along the bottom seam using screws or rivets, aligning both sides carefully.
Step 4: Line the inside of the purse with your chosen fabric using strong adhesive. You can also pad it slightly for a luxe feel.
Step 5: Add a clasp to the front flap, positioning it so it securely locks your purse closed.
Step 6: Finally, attach a handle using rivets and an old leather belt works beautifully.
#10. License Plate Roof Birdhouse
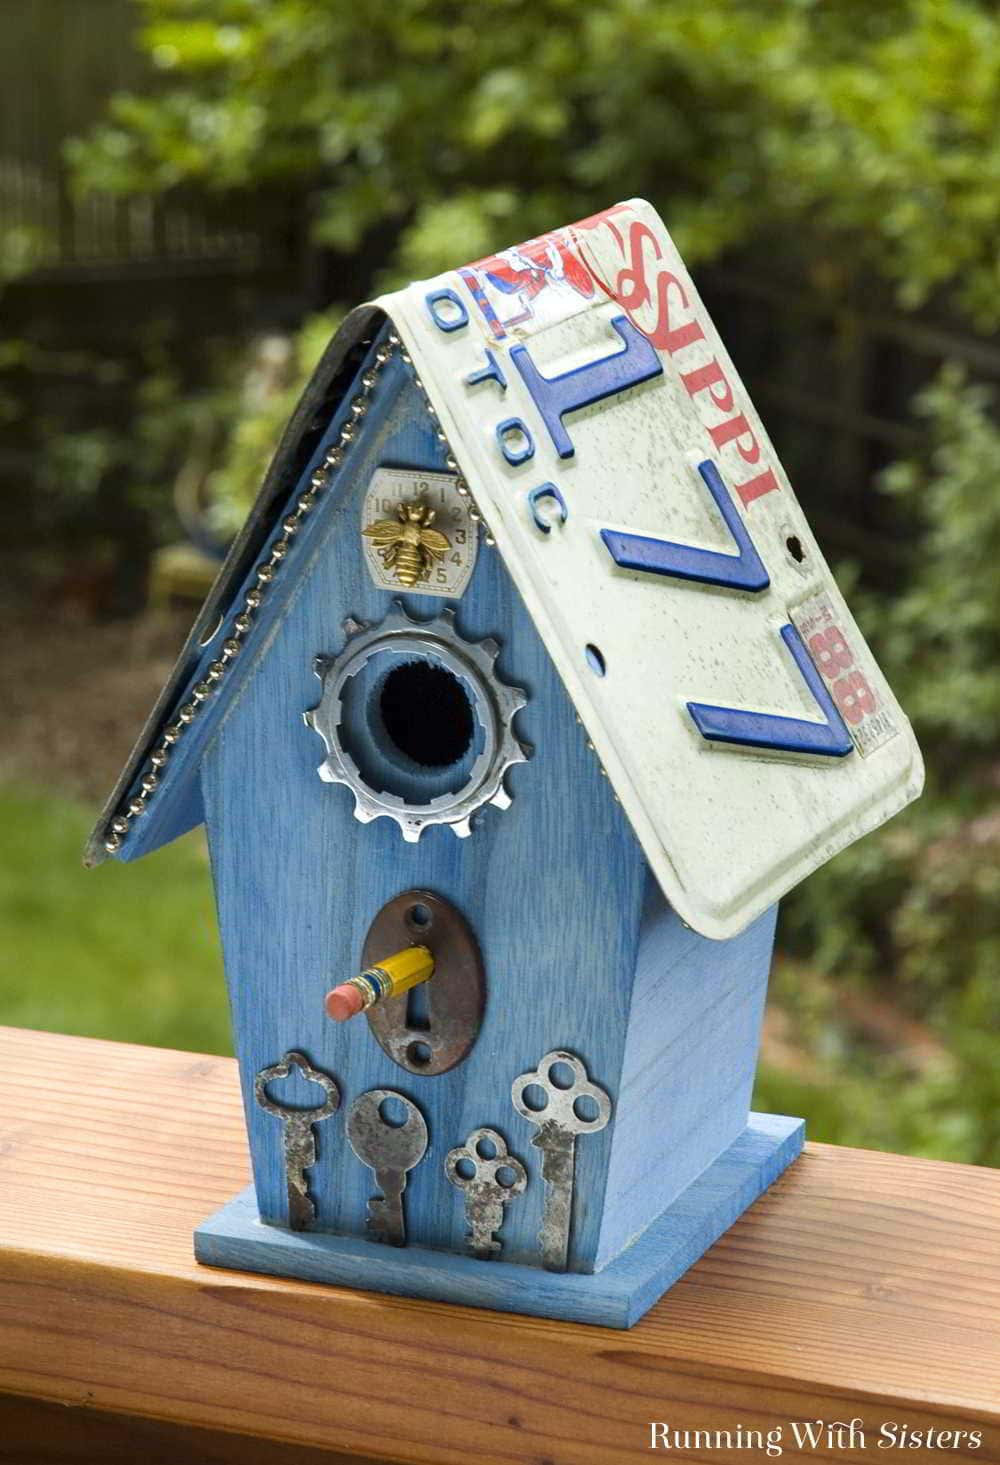
Here’s a project that’s as delightful as it is practical: a handmade birdhouse with a roof made from an old Mississippi license plate.
Specially, the combo of aged metal and painted wood gives it that one-of-a-kind flea market treasure vibe. If you’re a fan of mixing rustic and repurposed, this project sings your tune.
Materials Needed
- 1 wooden birdhouse (approx. 6″ x 8″)
- 1 vintage license plate (standard 6″ x 12″)
- 4 screws and screwdriver
- Paint or stain (your choice of color)
- Drill with small bit
- Assorted decorative hardware (vintage keys, gear, bee charm, etc.)
- Pencil
Step-by-Step Guide
Step 1: If using a plain birdhouse, sand and paint or stain it in your favorite shade.
Step 2: Gently bend the license plate in half to form a peaked roof. You can use the edge of a table or rubber mallet for a clean bend.
Step 3: Drill pilot holes into the sides of the birdhouse roof. Then, carefully screw the license plate down as the new roof.
Step 4: Add whimsical extras like antique keys or a pencil perch using wood glue or small screws.
#11. License Plate Herb Planter
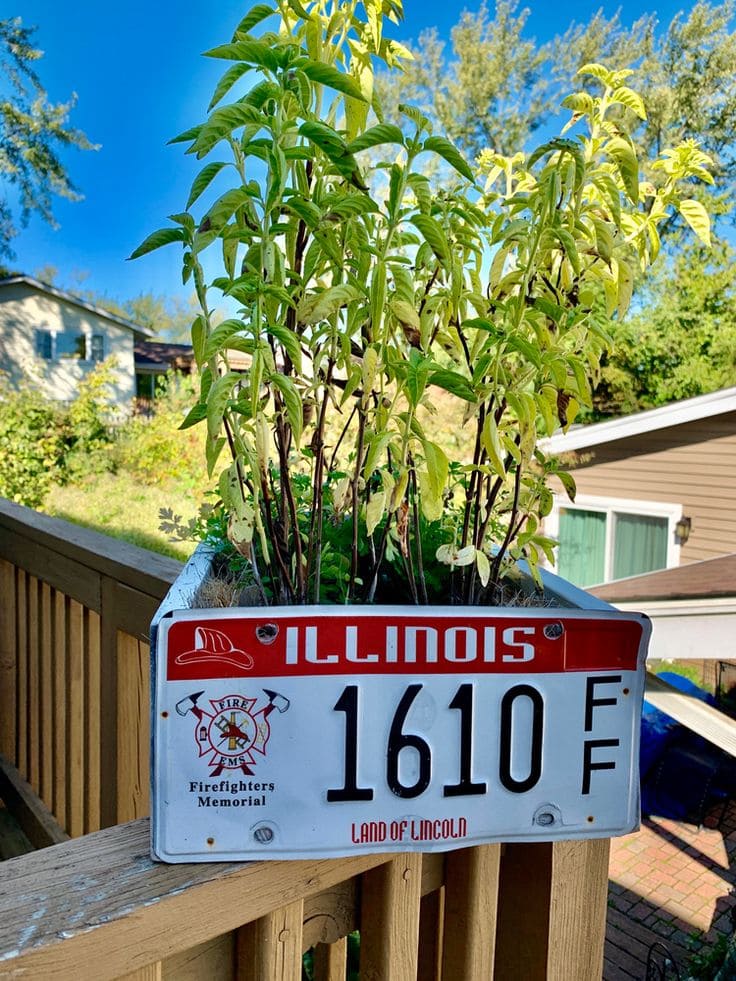
What once rolled down highways now holds a bunch of fresh basil. This upcycled license plate planter is a small but meaningful DIY that brings character to your outdoor space.
Materials Needed
- 2 vintage license plates
- 2 short side pieces (wood or metal)
- 1 bottom panel (roughly 6” x 10”)
- Pop rivets or metal screws
- Drill with metal drill bit
- Metal snips
- Potting soil
- Small herb plants (like basil, parsley, mint)
- Optional: coconut liner
- Rust-resistant spray (optional)
Step-by-step Guide
Step 1: Sand all sharp edges on license plates and metal pieces to avoid injury and clean them if needed.
Step 2: Drill small holes along the sides of your plates where you’ll attach them to each other and to the bottom panel.
Step 3: Use rivets to connect the plates into a rectangular box: license plates on the long front and back, side panels in between, bottom piece underneath.
Step 4: Drill 3-4 small holes in the bottom panel for drainage. If using wood for the base, seal it with waterproof varnish.
Step 5: Line the bottom with a bit of mesh or coconut liner to keep soil from leaking, then fill it with potting mix.
Step 6: Now you can plant your herbs, water gently, and place the planter somewhere with 4-6 hours of sunlight.
#12. License Plate Key Holder
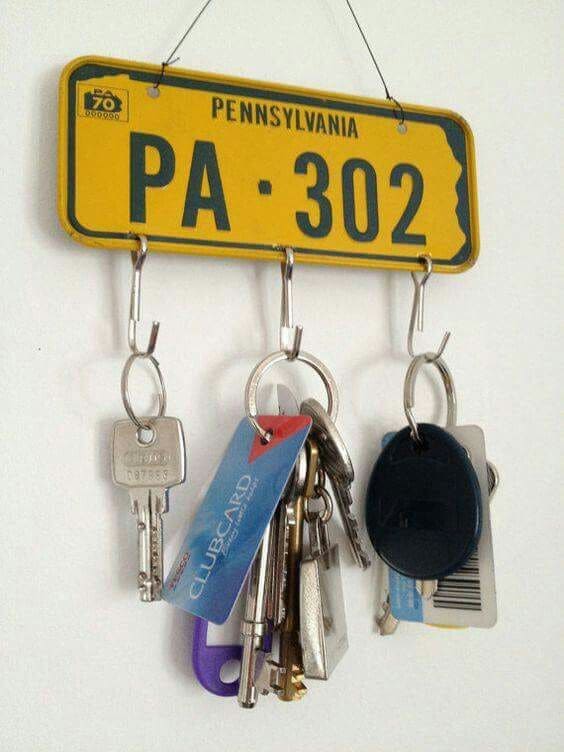
This key holder is a quick upcycle project using a vintage license plate and a few hooks, perfect for that rustic entryway or man cave. Every time you grab your keys, there’s a little reminder of road trips, old cars, and simpler times.
Materials Needed
- 1 vintage license plate
- 3-5 cup hooks or S-hooks
- Drill with metal bit
- Wire or twine
- 2 small screws
- Optional: wall anchors
Step-by-step Guide
Step 1: Sand all edges of the license plate lightly to remove sharpness or rust.
Step 2: Mark evenly spaced points along the bottom where your hooks will go. Then drill small pilot holes at those points.
Step 3: Twist in your cup hooks or install S-hooks if you’ve drilled through completely.
Step 4: Drill two holes at the top corners of the plate for the hanging wire. Next, thread a piece of sturdy wire or twine through both and twist it tight to create a loop.
#13. License Plate Pencil Holder
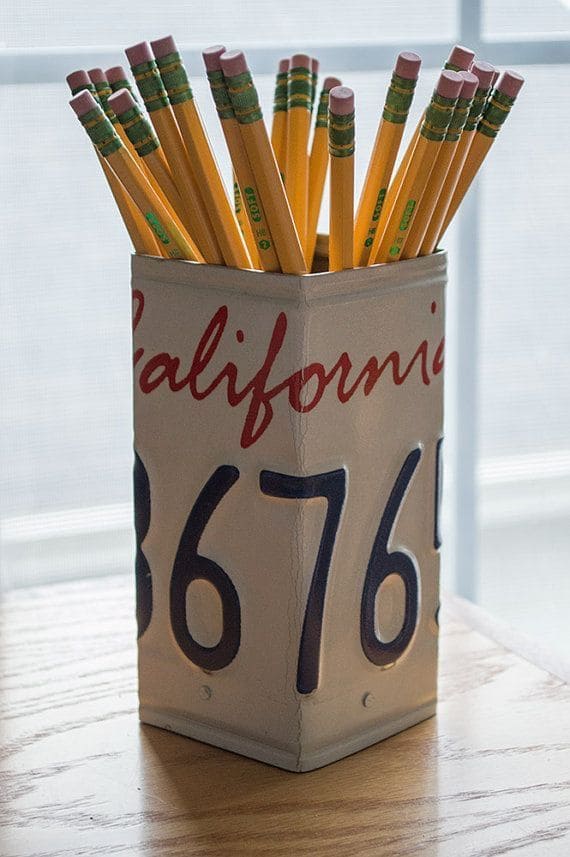
I believe no matter how you’re a vintage collector, a road tripper at heart, or just someone who loves giving forgotten objects a second life, this little DIY will hit the sweet spot.
Materials Needed
- 1 vintage license plate
- Tin snips
- Metal file
- Drill with small metal bit
- 4-6 small metal screws
- 1 small wooden block (approx. 3″ x 3″)
Step-by-Step Guide
Step 1: Use tin snips to carefully cut the license plate into fourths equal panels, then smooth edges with a metal file to prevent cuts.
Step 2: Drill small holes near the edges of each panel for where you’ll connect them. You also test-fold the panels around your chosen base to get your box shape.
Step 3: Use rivets or tiny screws to fasten the license plate panels together, forming a square or rectangle shape.
Step 4: Fit your wooden or cardboard base inside the metal frame and secure it with glue or screws.
#14. License Plate Keychains
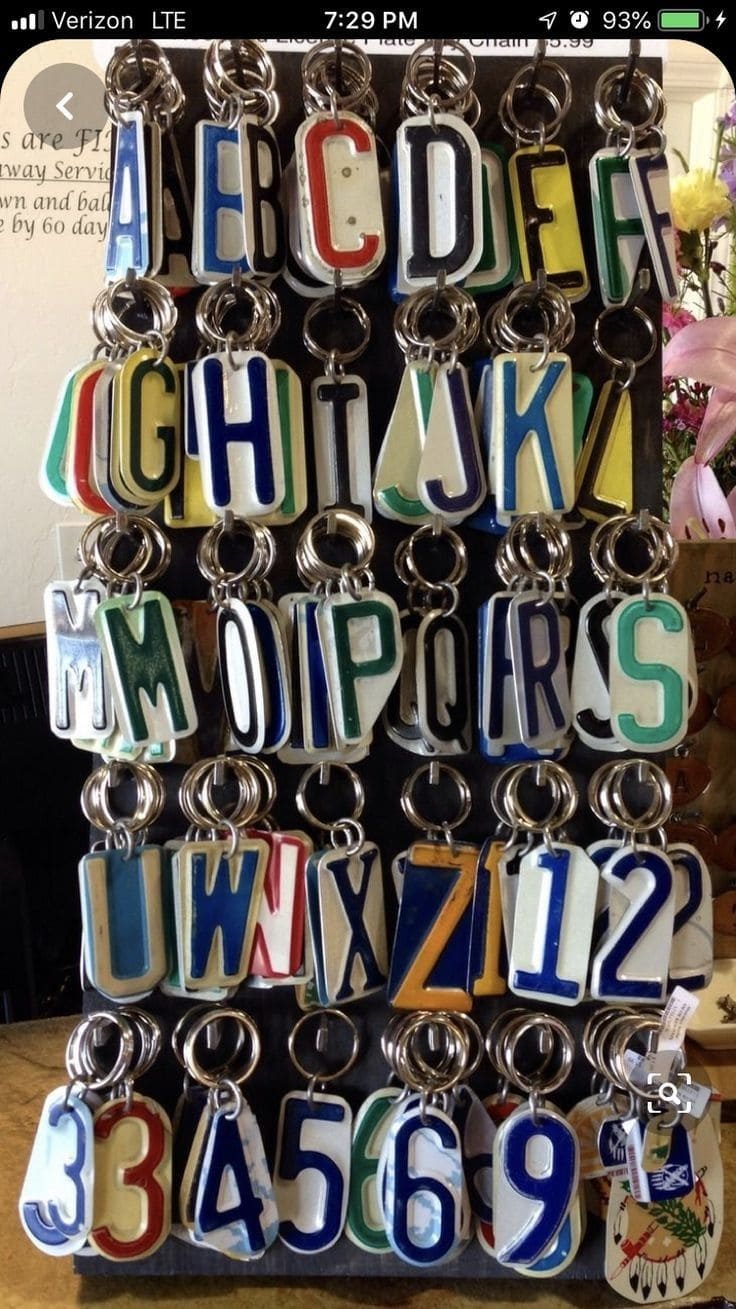
Each of these keychains is cut from authentic, weather-worn license plates that once rolled across states, highways, and dusty backroads.
In addition, holding one feels like carrying a bit of adventure, with its dings and chipped paint telling tales better than words ever could.
Materials Needed:
- Scrap license plates
- Metal letter/number stencil (optional)
- Tin snips
- Keychain rings
- Small hand drill + metal bit
- Fine-grit sandpaper
Step-by-Step Guide:
Step 1: Use tin snips to carefully cut out letter or number shapes from old license plates. You should choose areas with high contrast for extra flair.
Step 2: Smooth the edges using fine-grit sandpaper to prevent sharp corners.
Step 3: Drill a small hole near the top of each piece for the keyring.
Step 4: Slide the cutout onto a keychain ring. You can leave it rustic or coat with a clear enamel spray for a glossy finish and added protection.
#15. License Plate Bathroom Shelf
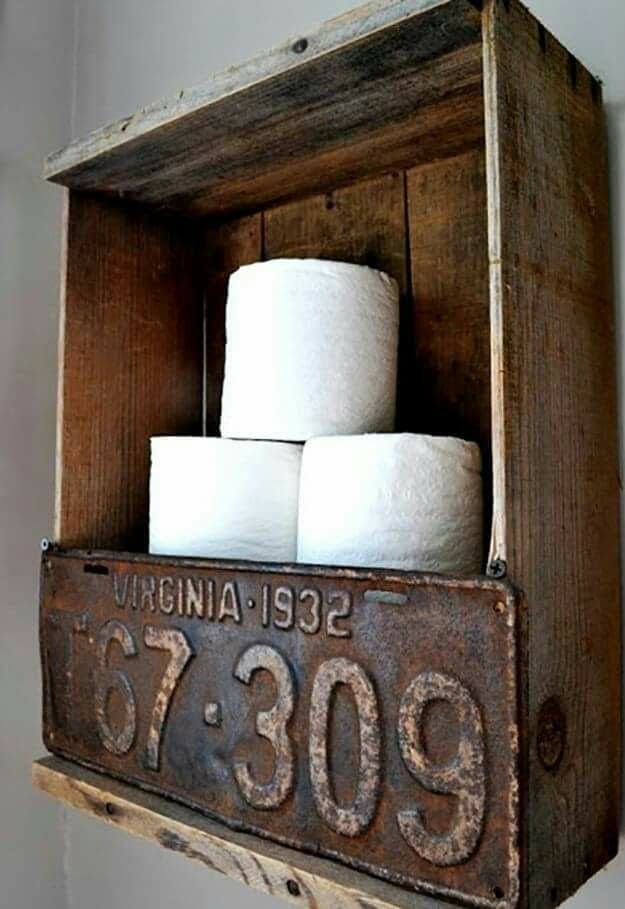
Who said toilet paper storage has to be boring? This genius DIY shelf transforms a salvaged license plate and reclaimed wood into a quirky, conversation-starting piece that screams character.
It’s a nod to vintage Americana, making it perfect for rustic, farmhouse, or industrial-themed bathrooms. And yes, it’s as sturdy as it is stylish.
Materials Needed
- 1 old wooden crate (~12″x12″)
- 1 vintage license plate
- 4 wood screws
- Power drill and bit set
- Sandpaper or wood stain (optional)
Step-by-Step Guide
Step 1: If using individual panels, construct a simple box with 4 sides and a back. You need to make sure the depth fits standard TP rolls.
Step 2: Lightly sand any rough edges and stain or leave raw, depending on your desired finish.
Step 3: Drill pilot holes in the license plate and attach it to the front of the box using wood screws, forming a partial front wall.
Step 4: Mount the shelf to your bathroom wall securely, anchors are recommended if not hitting studs.
#16. License Plate Tool Caddy
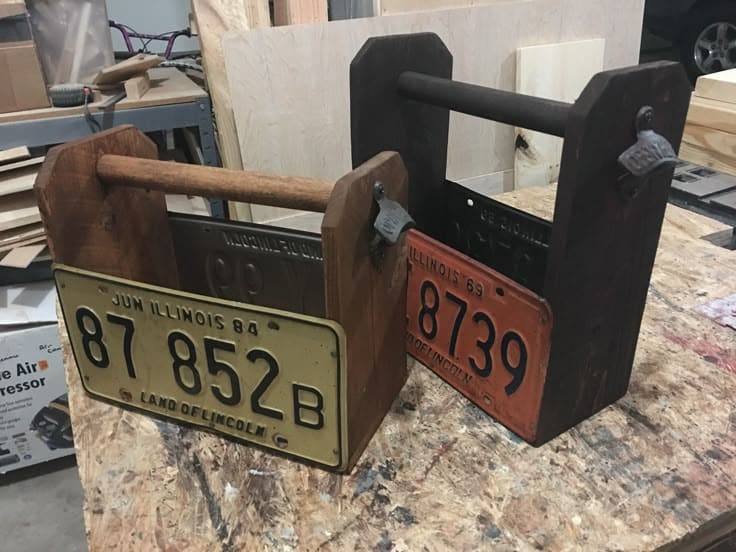
If you’ve ever looked at an old license plate and thought, “Man, there’s still life in that metal,” this project is proof you’re right.
Whether you’re hauling garden tools, art supplies, or even condiments for a backyard BBQ, this handmade caddy turns ordinary storage into a statement piece.
Materials Needed
- 2 vintage license plates
- 2 wooden side panels (approx. 8″ x 10″)
- 1 wooden dowel (approx. 1″ diameter, 12″ long)
- 8 wood screws + washers
- Drill with bits
- Sandpaper or wood stain (optional)
- Screwdriver
Step-by-Step Guide
Step 1: Cut two identical wood pieces for the sides, shaping the tops to a triangle or arch for a more handcrafted look.
Step 2: Stain or paint the wood if desired, then let dry fully.
Step 3: Use a drill to make holes in the license plates and attach them to the wood side panels using screws and washers for one plate at the front, one at the back.
Step 4: Drill holes across the top of each side panel and insert the dowel. Then secure with wood glue or screws to keep the handle in place.
#17. Vintage License Plate Mirror Frame
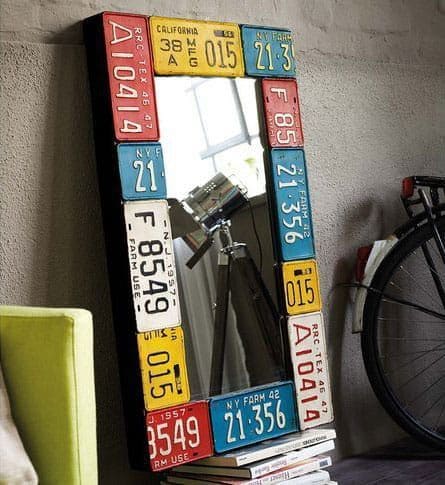
If you’ve got a mirror that feels a little too basic, why not give it a vintage road-trip upgrade?
Wrapping a mirror frame in old license plates brings character, nostalgia, and a splash of Americana into your space. It’s perfect for entryways, living rooms, or even your studio corner.
Materials Needed
- 1 plain wall mirror (around 18″ x 24″)
- 8-12 license plates
- Tin snips
- Metal file or sandpaper
- Construction adhesive
- Protective gloves
Step-by-Step Guide
Step 1: Choose a mirror with a wide enough frame or backing to attach the plates. Then measure the perimeter and plan your plate arrangement so it fits neatly.
Step 2: Using tin snips, cut your plates into sections if needed. Now, round off sharp corners and edges using a metal file to avoid any accidents later.
Step 3: Lay out your pieces around the mirror first. You can mix colors and states for a playful contrast or go tonal for a sleek, cohesive vibe.
Step 4: Apply construction adhesive to the back of each plate section and press it firmly onto the mirror frame. Let it dry for at least 24 hours.
#18. Route 66 Bottle Caddy
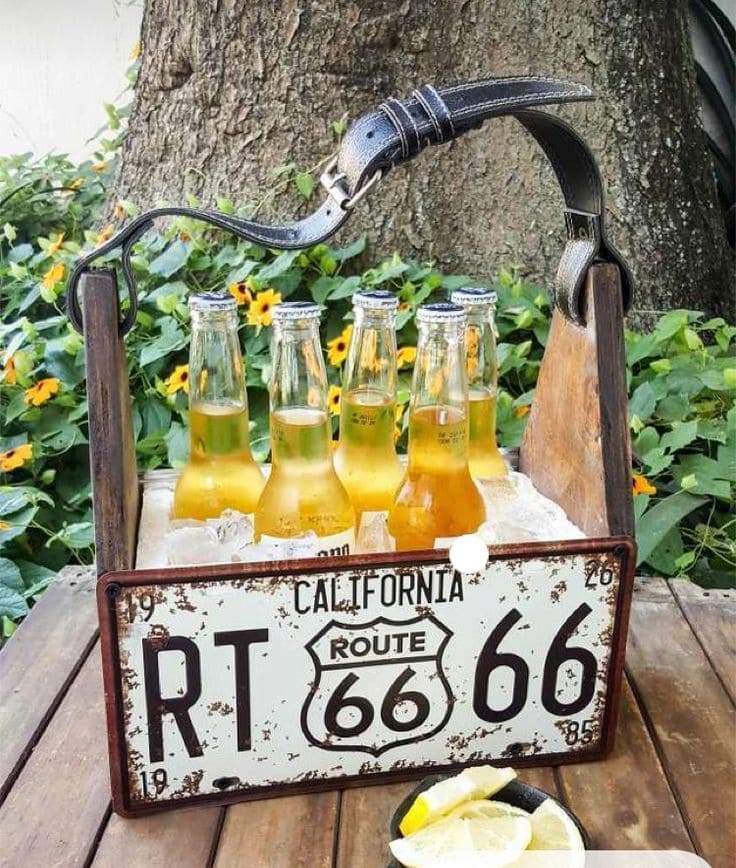
Crafted from reclaimed wood, a weathered Route 66 license plate, and a repurposed leather belt for a handle, this caddy feels like something your grandpa would’ve thrown together for a summer picnic and that’s exactly why it works.
Materials Needed
- 2 wooden side panels (approx. 12″ high × 7″ wide)
- 1 bottom panel (approx. 10″ × 6″)
- 2 shorter front/back slats (approx. 10″ wide × 5″ tall)
- 1 vintage license plate (standard U.S. size 6″ × 12″)
- 1 old leather belt
- Wood screws (1.5″ long)
- Drill & drill bits
- Sandpaper (medium-grit)
- Wood stain (optional)
- Ice and glass bottles
Step-by-step Guide
Step 1: Sand all wooden pieces to smooth out any rough edges or splinters, and stain or seal the wood if you’d like a more finished or aged look.
Step 2: Drill pilot holes and attach the bottom panel to the side panels using wood screws to create the basic box frame.
Step 3: Add the front and back slats to close up the carrier, leaving the front open for the license plate.
Step 4: Align the license plate on the front, using its existing holes to screw it into the wood panel behind it.
Step 5: Cut your leather belt to your desired length, drill holes into the wooden sides, and fasten the belt with screws or decorative bolts to serve as the handle.
Step 6: Give the whole piece a final wipe-down, fill with ice and your favorite drinks, and get ready to show it off.
#19. License Plate Chair and Table Set
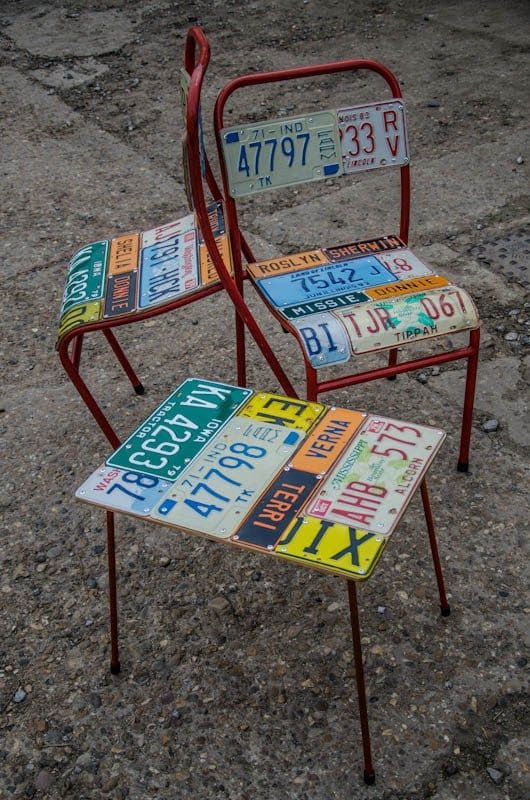
If you love that garage-chic aesthetic or just have a soft spot for Americana, this upcycled chair and table set is a knockout.
What makes this even more lovable is the raw, industrial vibe of the repurposed metal legs and the no-fuss design. This project is super ideal for patios, man caves, or anywhere that could use a spark of character.
Materials Needed
- 6-10 vintage license plates per chair
- Metal frame chairs and small side table
- Short wood screws
- Drill or rivet gun
- Screwdriver
- Metal file
- Clear sealant (optional)
Step-by-step Guide
Step 1: Sand or file down any sharp edges on the license plates to avoid cuts.
Step 2: Arrange the license plates on the chair seat, backrest, or tabletop to get a design you like, then mix colors, states, and orientations for a playful effect.
Step 3: Use a drill to create pilot holes in each corner of the plates.
Step 4: Secure the plates to the metal or wood frame using short screws or pop rivets. You can tighten everything firmly but don’t overtighten, especially if working with old, brittle plates.
Step 5: Apply a clear sealant or rust-resistant coating if the set will live outdoors or in humid areas.
#20. License Plate Dragonfly
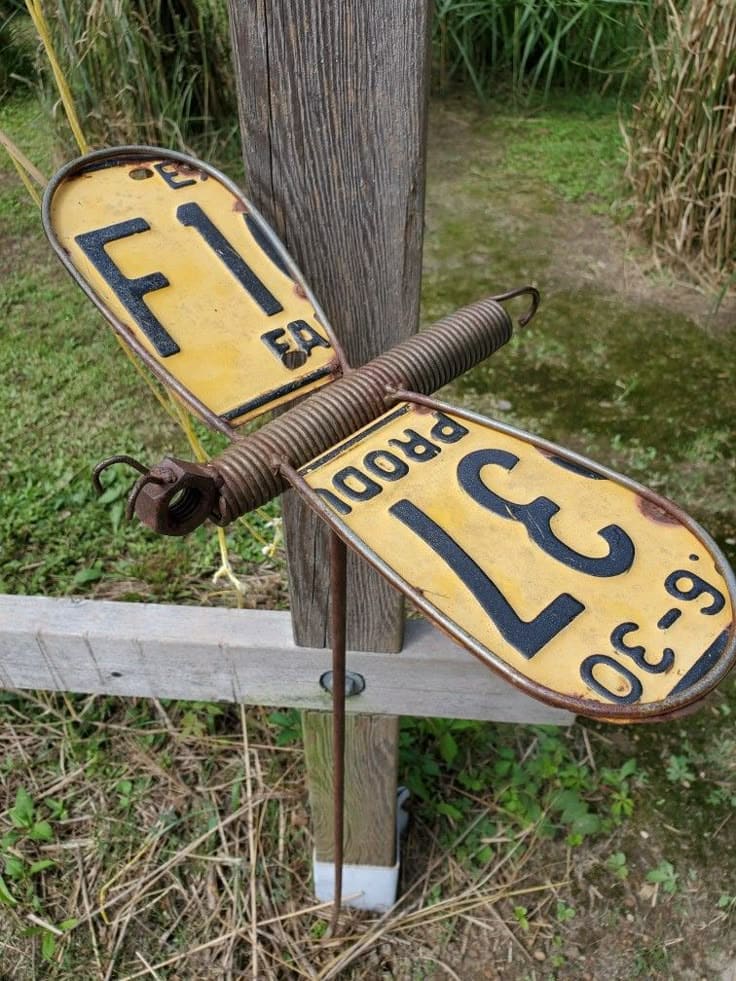
With worn-out license plates for wings and a spring coil for a body, this dragonfly sculpture carries both grit and grace. It’s rustic, bold, and feels like it fluttered out of a mechanic’s daydream.
Also, planted in a garden bed or nestled near a fencepost, it brings instant character and that delightful “Did you make that?!” reaction from anyone passing by.
Materials Needed
- 2 vintage license plates
- 1 large metal spring
- 1 metal rod (~2–3 feet)
- 2 old nuts
- Welding tools
- Rust sealant (optional)
Step-by-step Guide
Step 1: Sand all metal surfaces to remove sharp edges and loose rust. You can keep the weathered look.
Step 2: Slightly bend each license plate lengthwise to create curved wings. A rubber mallet and some patience will help here.
Step 3: Weld or adhere the wings to the sides of the metal spring, spacing them evenly to mimic dragonfly proportions.
Step 4: Attach two large nuts or bolts to one end of the spring to form the eyes. You can weld them or use strong epoxy.
Step 5: Insert or attach a sturdy metal rod to the bottom of the spring to act as the garden stake.
Step 6: Spray the entire sculpture with a clear coat or rust protectant if placing it outdoors.
#21. License Plate Coffee Table
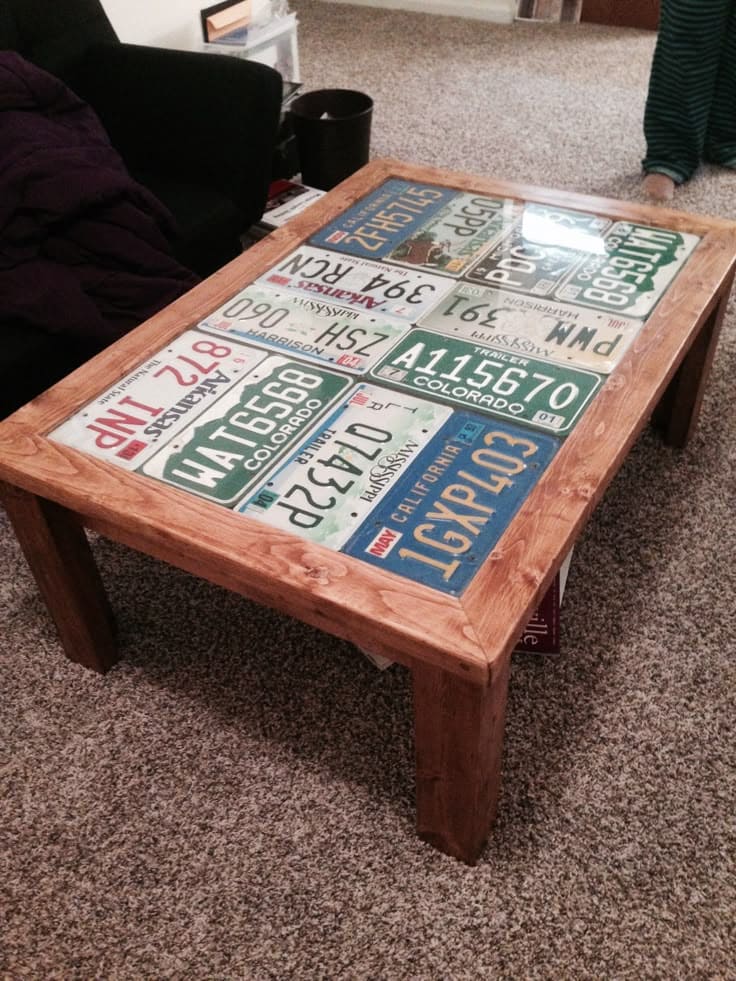
This table is a visual road trip. Each license plate carries a memory, and when sealed beneath a smooth layer of glass, they turn into a storytelling centerpiece.
Ideal for man caves, cabins, or quirky living rooms, this table adds personality that pre-fab furniture just can’t compete with.
Materials Needed
- 12-16 vintage license plates
- Wooden boards (1x4s or 2x4s)
- Four sturdy wooden legs (made from 2x4s)
- Plywood sheet
- Tempered glass cut to fit tabletop size
- Wood screws and L-brackets
- Wood stain (optional)
- Sandpaper and wood glue
- Drill and screwdriver
- Measuring tape and pencil
Step-by-step Guide
Step 1: Sand all wooden pieces to smooth rough edges and prepare them for staining or painting.
Step 2: Build a rectangular frame using the wooden boards for the tabletop perimeter. Then secure with screws and reinforce with corner brackets.
Step 3: Cut a piece of plywood to fit inside the frame snugly and attach it underneath with wood glue and screws.
Step 4: Arrange the license plates in a grid on top of the plywood, trimming or overlapping as needed. You can screw each plate down at the corners to keep them in place.
Step 5: Attach the table legs securely to each corner of the frame using screws and L-brackets.
Step 6: Place a cut-to-fit tempered glass sheet over the license plates to protect them while showcasing their design. You can secure it with corner brackets or rubber bumpers if needed.
#22. License Plate Wall Hanging
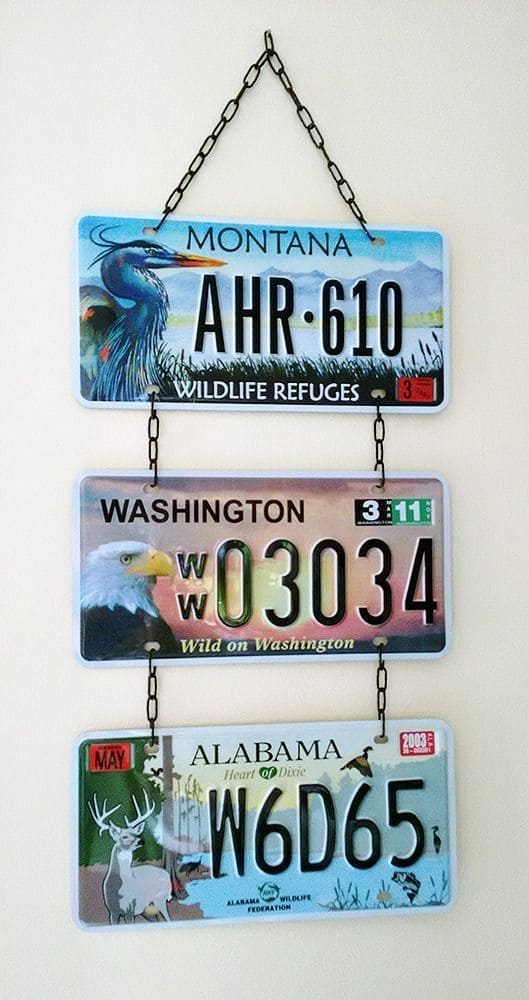
This charming trio of wildlife-themed license plates transforms into a striking piece of wall decor.
Whether you’re a road trip junkie or a nature enthusiast, this DIY project brings a piece of Americana to your space. You can hang it in a hallway, office, or porch, it’s got character and story built right in.
Materials Needed
- 3 decorative license plates
- 2 short lengths of metal chain
- 4-6 small metal jump rings
- Drill with small bit
- Wall hook or nail
- Optional: rust-resistant spray
Step-by-step Guide
Step 1: Sand all license plate edges if needed and clean any dust or residue.
Step 2: Drill two small holes at the bottom of the top and middle plates, and two holes at the top of the middle and bottom plates, aligned for even hanging.
Step 3: Use jump rings or small keyrings to attach the chains between the plates securely. You can adjust length depending on the desired spacing.
Step 4: Add a top chain or hanging loop to the uppermost plate using the same method.
Step 5: Mount it on your wall using a sturdy hook or nail and enjoy the layered, vintage look.
#23. License Plate Flower Yard Art
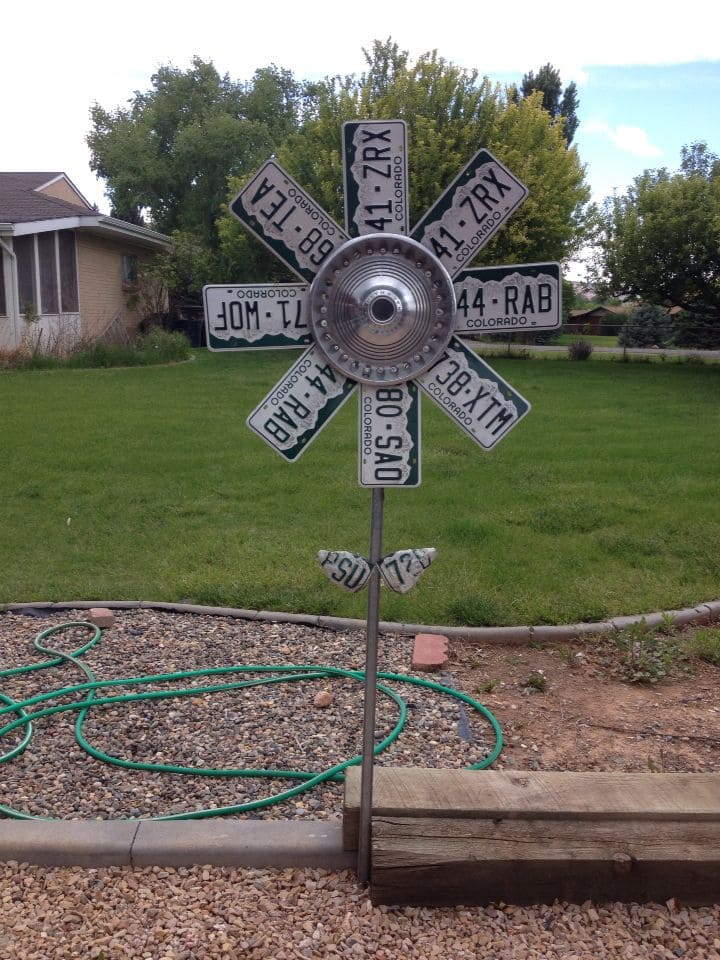
If your garden needs a bold conversation starter, this sculpture delivers charm and character in full bloom.
Made from old Colorado plates and a wheel hub, it’s a fun way to recycle metal while adding sculptural detail to your outdoor space.
Materials Needed
- 8 vintage license plates
- 1 old hubcap
- 1 long metal rod
- 2 small curved license plate pieces
- Nuts, bolts, washers
- Drill with metal bit
- Industrial-strength adhesive (optional)
- Protective gloves and safety goggles
Step-by-step Guide
Step 1: Sand all license plates to remove rust and smooth sharp edges, then clean with degreaser or soapy water.
Step 2: Drill a small hole near one edge of each license plate. You then arrange them in a radial pattern (like petals) around the hubcap.
Step 3: Attach the plates to the hubcap using bolts and washers from behind. You should tighten them evenly so they fan out securely.
Step 4: Drill and attach the hubcap with plates to the top of your metal rod using a bolt or weld for stability.
Step 5: Curve two license plate halves for leaves and bolt or weld them to the lower part of the rod.
Step 6: Stake the rod into the ground or mount it into a concrete base if you need extra support against wind.
