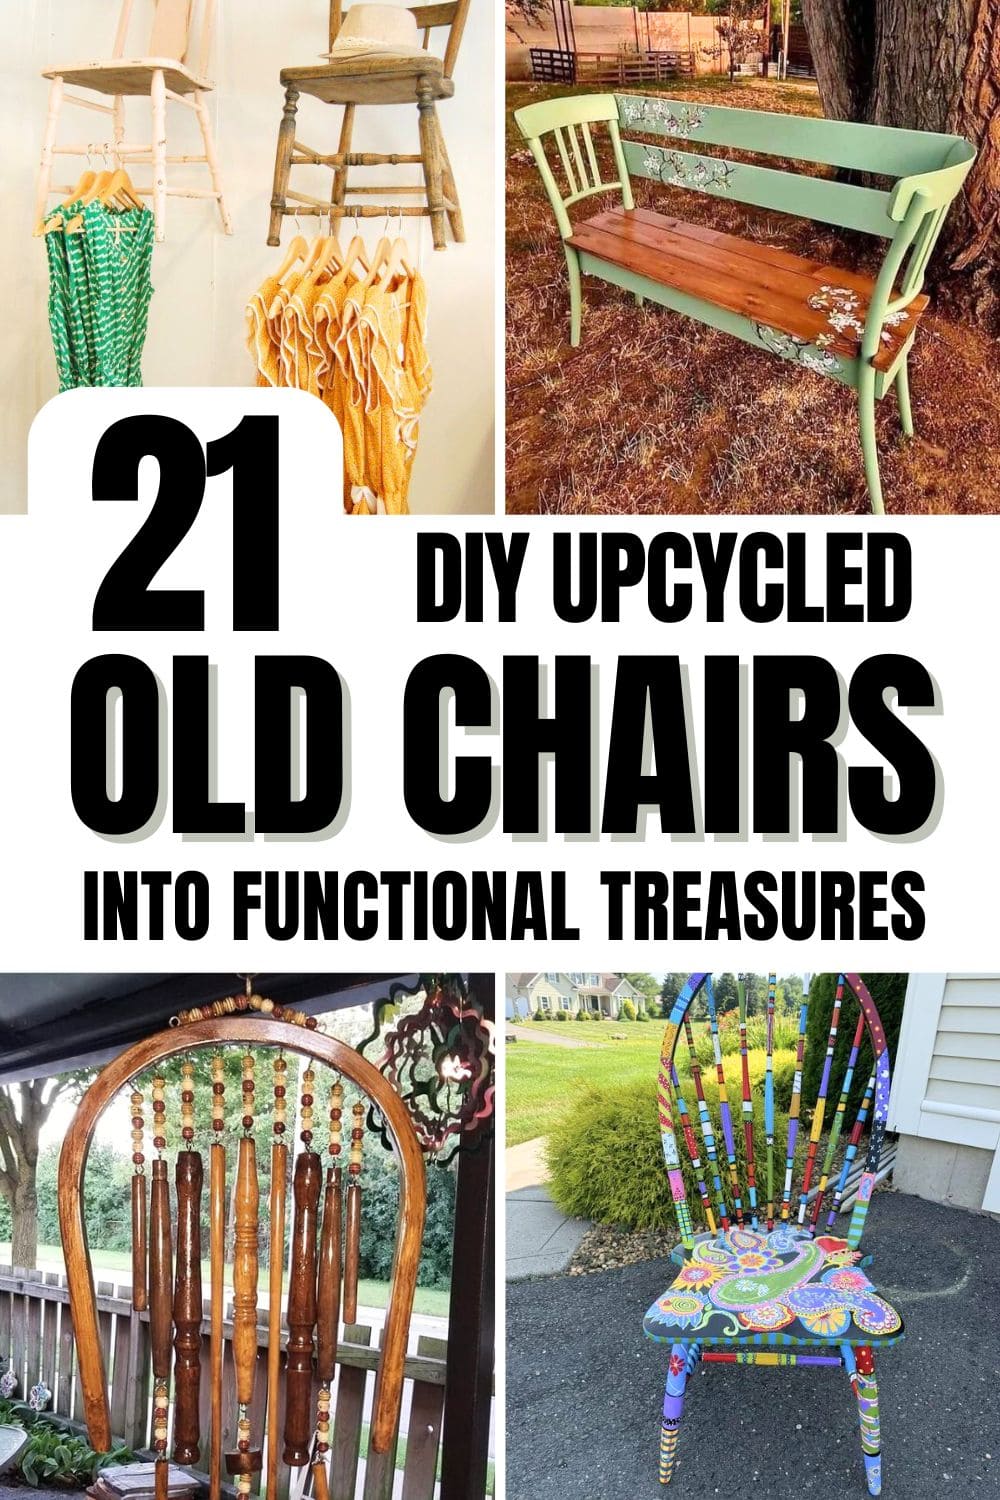
If you’ve got an old chair collecting dust in the garage, don’t toss it just yet. That forgotten piece could be your next favorite home upgrade.
With a little creativity and a few tools, you can transform worn-out or broken chairs into charming, functional treasures. From rustic garden planters to clever towel holders, these DIY ideas breathe new life into old furniture.
The best part is that most of these projects are budget-friendly and beginner-approved. Whether you’re upcycling for fun, sustainability, or style, these 21 chair transformations will inspire you to see potential in every wobbly leg and chipped seat.
#1. Vintage Red Chair Planter
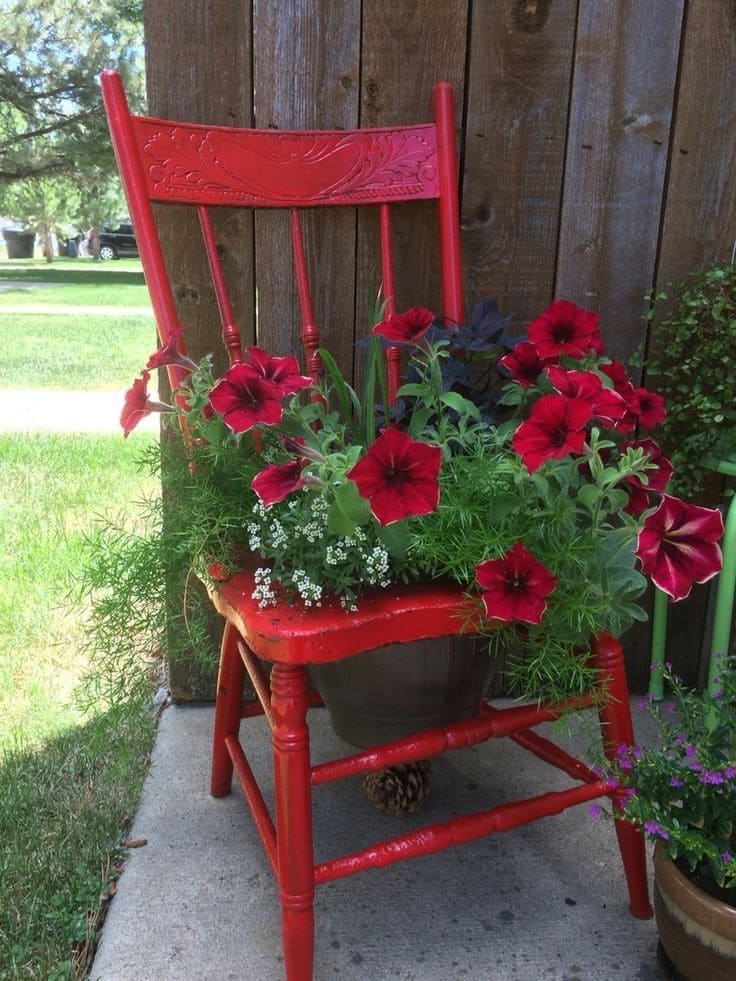
This charming red chair is a blooming burst of joy. By transforming a worn-out chair into a flower display, you breathe new life into forgotten furniture.
Additionally, the weathered red paint contrasts beautifully with deep red petunias and wispy greens, making this piece a cheerful focal point for your porch or yard.
Materials Needed:
- 1 wooden chair
- 1 medium-sized flower pot
- Red outdoor paint and paintbrush
- Screws and drill (optional)
- Potting soil and assorted flowers (petunias, alyssum, ornamental grasses, etc.)
Step-by-Step Guide:
Step 1: Sand the chair lightly and apply red outdoor paint, then let it dry fully before continuing.
Step 2: Remove or cut out the seat portion to make room for the flower pot.
Step 3: Slide your flower pot into the opening. You can screw it into place from underneath if needed.
Step 4: Fill the pot with soil and add your favorite blooms then mix trailing, upright, and colorful varieties for visual impact.
#2. Recycled Chair Spindle Wind Chime
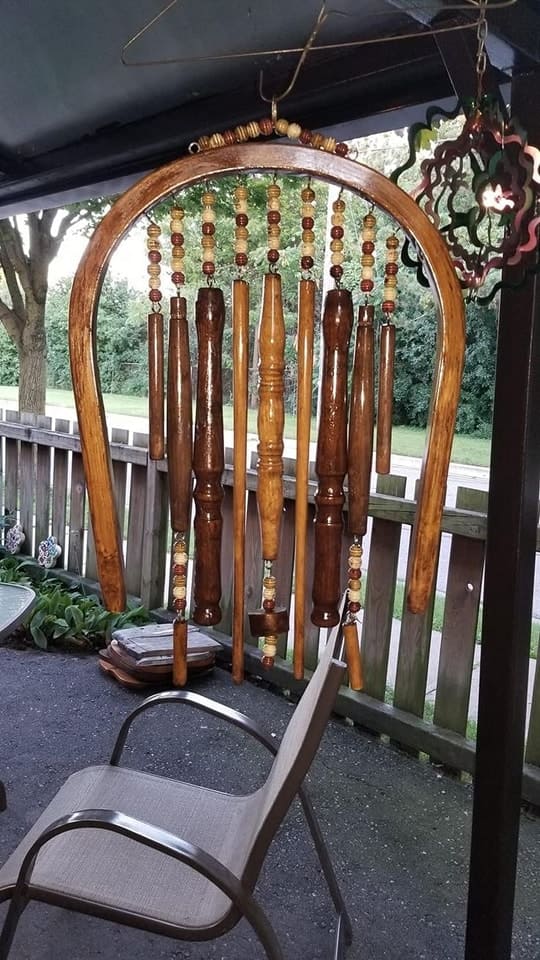
If you’ve got a broken chair gathering dust in the garage, don’t toss it and repurpose its parts into a rustic wind chime like this.
In this project, the rhythm of repurposed wood tapping together in the breeze brings a soothing melody to your porch, and the entire piece tells a story of reuse and creativity.
Materials Needed:
- 1 wooden chair back (approx. 18”-24” wide)
- 10 wooden spindles
- ~30 assorted wood beads (10mm-20mm size, various colors)
- 3 feet of strong twine
- Hanging hook
- Drill with small bit (1/8″ or smaller)
- Wood stain (optional)
- Sandpaper (medium grit)
Step-by-Step Guide:
Step 1: Sand all the wooden pieces to smooth any rough edges. If you like a polished look, apply wood stain or varnish and let it dry fully.
Step 2: Drill small holes into the top of each spindle and along the lower edge of the chair back arch.
Step 3: Cut twine into equal lengths (about 8-10 inches each) and thread them through beads and spindles, knotting as needed to keep items in place. You can alternate bead colors or add more between each spindle for a fuller effect.
Step 4: Tie each spindle strand securely to the arch. Then, attach a final loop of twine to the top center of the chair back to create a hanging point.
#3. Upcycled Chair Dog Feeding Station
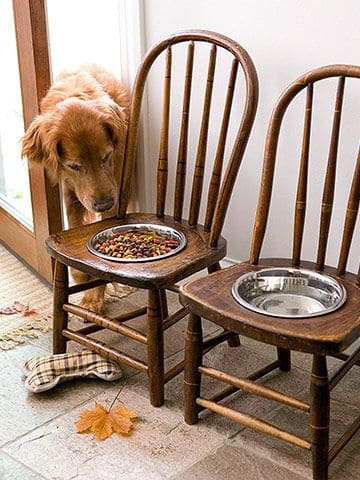
If you’re tired of bowls sliding across the floor every mealtime, this charming DIY solves the problem with rustic flair.
Old wooden chairs become elevated feeding stations, making it easier on your pup’s neck and turning feeding time into a style statement.
Materials Needed:
- 1 or 2 sturdy wooden chairs with solid seats
- 2 stainless steel pet bowls
- Jigsaw
- Sandpaper
- Wood sealant (optional)
- Measuring tape and pencil
Step-by-Step Guide:
Step 1: Flip the bowls upside down on the chair seat and trace around each. Then, measure inwards slightly (about ½ inch) to ensure a snug fit when you cut.
Step 2: Using a jigsaw or hole saw, carefully cut along the inner traced line and and the edges smooth to avoid splinters or wobble.
Step 3: Now you can apply a clear wood sealant to protect the chair surface from moisture and food spills.
Step 4: Drop in the bowls and admire your handiwork.
#4. Upcycled Chair-to-Garden Bench Project
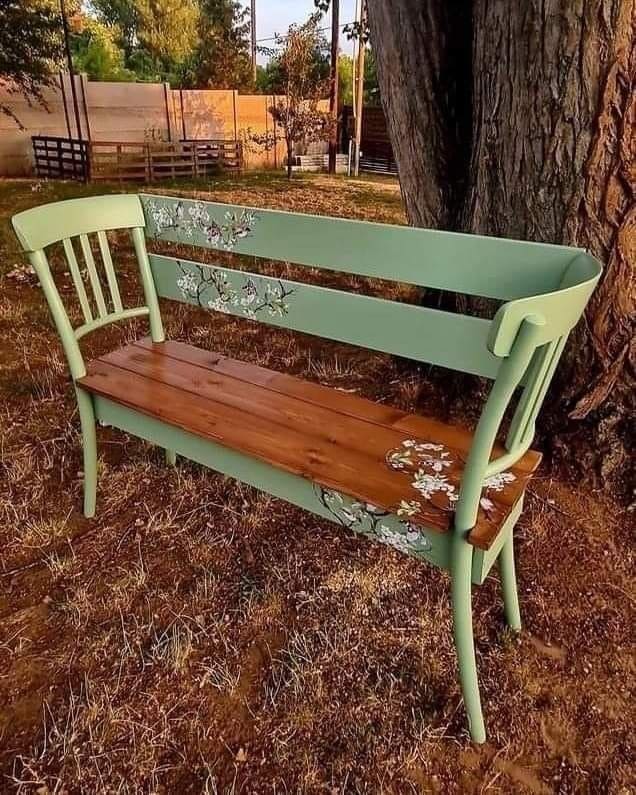
With a little sanding, a splash of mint green paint, and hand-painted blossoms, this bench became a backyard focal point that invites you to sit and slow down.
Plus, the blend of painted detail and rich wooden seat boards creates that cottage-core magic. It’s not only budget-friendly but heartwarming, a piece that feels like it was always meant to be under the tree.
Materials Needed:
- 2 old wooden chairs (same seat height, preferably curved backs)
- 3 pine or cedar planks (each approx. 3.5″ wide, 1″ thick, and 40″ long)
- Wood screws (1.5″ length, about 12 pcs)
- Wood glue
- Mint green outdoor paint (1 small can)
- Clear sealant (1 can)
- Sandpaper (medium and fine grit)
- Small detail brushes and acrylic paints
- Electric drill and screwdriver
- Saw
Step-by-Step Guide:
Step 1: Sand all surfaces of the chairs and planks to smooth rough areas. If the chair legs are uneven, trim to ensure both chairs sit flat and level.
Step 2: Cut the wood planks to the desired length of your bench seat. Lay them across the chairs where the original seats were and secure each plank to the chairs using wood glue.
Step 3: Paint the chair backs and legs with your mint green paint. Let dry, then apply a second coat for even coverage.
Step 4: Once dry, use a fine brush and acrylic paint to add your flower motifs.
#5. Woven Belt Chair Makeover
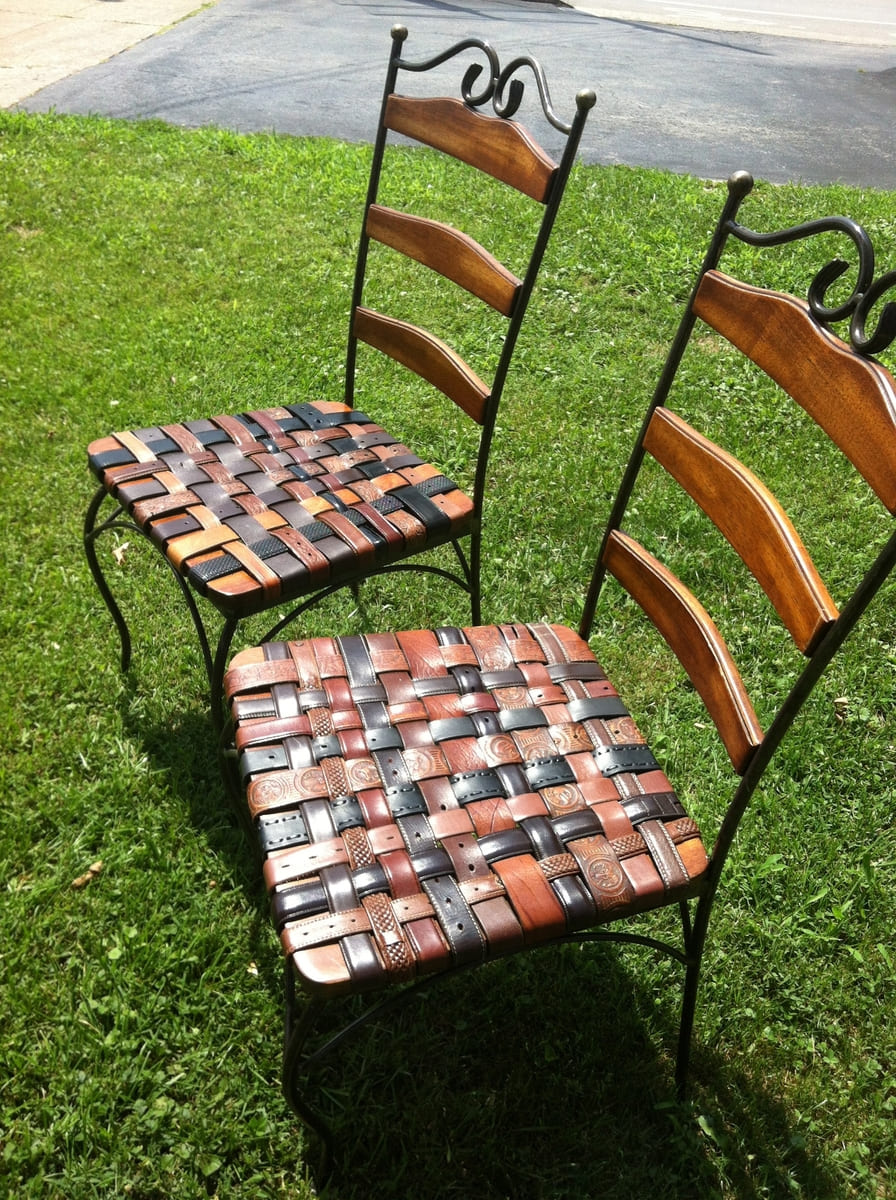
If you’ve got a pile of old leather belts and a chair frame with no seat, you’re already halfway to creating this one-of-a-kind upcycled masterpiece.
This project is as much about nostalgia as it is about practicality as each belt tells a little story, and together, they make your chair not just functional, but unforgettable.
Materials Needed:
- 1 chair frame with no seat panel
- 10-14 leather belts (various colors and patterns)
- Scissors
- Heavy-duty stapler
- Screwdriver or drill
Step-by-Step Guide:
Step 1: Clean the chair frame thoroughly. If needed, reinforce the seat with wooden crossbars underneath for better support.
Step 2: Cut each belt to the correct length, allowing extra for stapling or tacking. Start weaving belts horizontally across the frame, securing each end to the wood or metal with staples or upholstery tacks.
Step 3: Next, weave belts vertically, alternating over and under the horizontal ones to create a tight, woven pattern. You should pull each belt snug before securing it.
Step 4: Trim any loose ends and double-check that everything feels secure.
#6. High Chair Turned Home Library Shelf
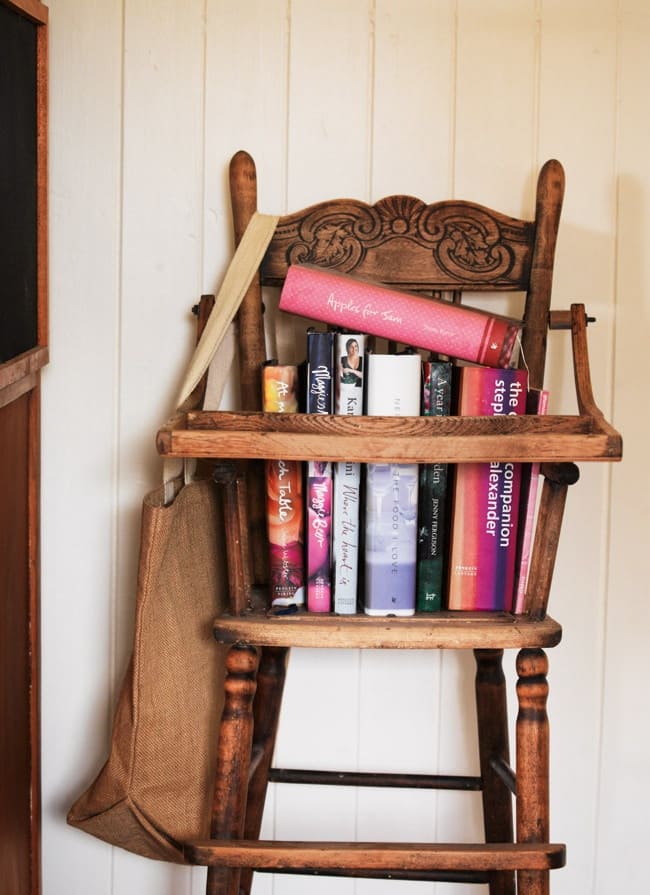
Who says old high chairs are only for babies? This clever repurposing turns a vintage high chair into a charming little library nook.
With its rich wood grain, intricate carving, and unexpected functionality, this project brings personality to even the smallest corners of your home. It’s practical for holding your current reads, favorite cookbooks, or even your journal.
Materials Needed:
- 1 vintage wooden high chair
- Wood polish or cleaner (optional)
- Screws and brackets
- Tote bag or side pouch (optional)
Step-by-Step Guide:
Step 1: Clean the high chair thoroughly and polish or refinish the wood if needed to restore its luster.
Step 2: Remove any tray parts if necessary, or use the existing tray as a top book shelf.
Step 3: Place books neatly across the seat and footrest, adjusting for height. Secure with brackets if you’re worried about stability or balance.
Step 4: Hang a soft canvas tote or pouch over the side for bookmarks, notebooks, or small accessories.
#7. Boho Painted Chair Makeover
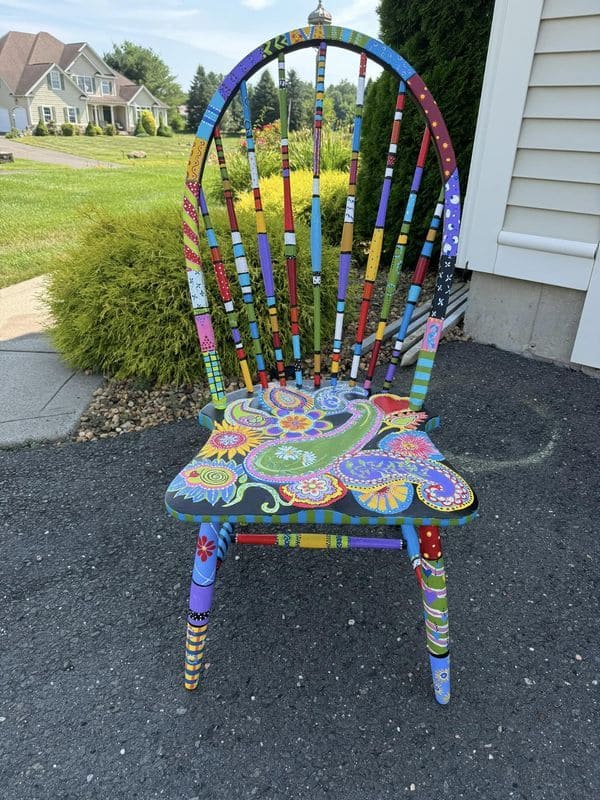
Perfect for brightening up a porch, garden nook, or creative corner, this psychedelic boho-style chair is proof that no piece of furniture is too plain to become a canvas.
Bonus, the mismatched patterns, vibrant hues, and hand-painted details feel deeply personal like a celebration of every crayon box you’ve ever owned.
Materials Needed:
- 1 old wooden chair (preferably with slats or spindles)
- Acrylic craft paints in a variety of bright colors
- Small artist brushes
- Clear acrylic sealant
- Sandpaper (medium grit)
- Optional: painter’s tape
Step-by-Step Guide:
Step 1: Begin by sanding down the entire chair to help paint adhere better and smooths any rough edges.
Step 2: Next, apply a base coat if desired, or dive straight into painting sections in varying colors and patterns. Let your imagination go wild like dots, swirls, paisleys, stripes, florals, or even doodles!
Step 3: Once each layer is dry, add outlines, accent marks, and intricate motifs with smaller brushes.
Step 4: Finally, seal your work with a clear acrylic sealant to protect it from wear and sun fading.
#8. Vintage Memory Chair Display
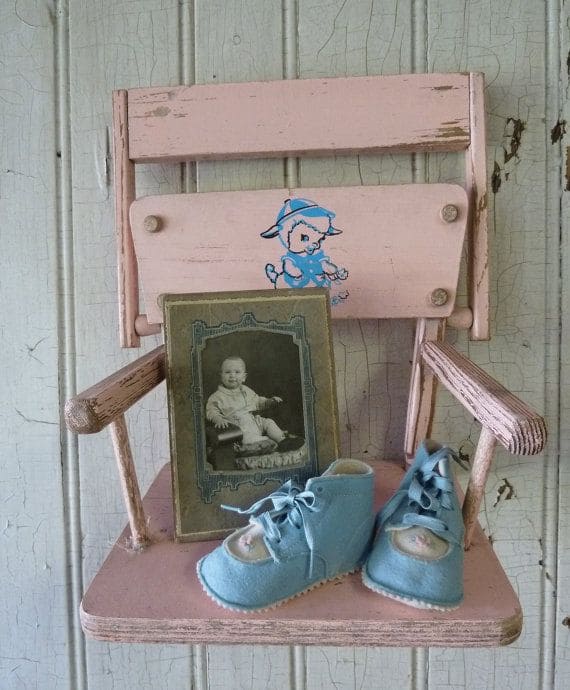
This sweet little upcycled chair, once perhaps a child’s favorite seat, now becomes a heartfelt memory nook.
With its faded lamb illustration, aged paint, and lovingly placed keepsakes, it tells a quiet story, one of baby laughter, early steps, and timeless love.
Materials Needed:
- 1 small vintage wooden chair (preferably a child-sized one)
- Light pink chalk paint (approx. 1 small can)
- Sandpaper
- Vintage baby shoes and framed baby photo
- Optional: decals or hand-painted baby animal designs
Step-by-Step Guide:
Step 1: Clean and lightly sand the chair . Then apply a coat or two of chalk paint, letting it dry between layers.
Step 2: Gently sand edges and arms to give a timeworn, shabby-chic look.
Step 3: Add a decal or hand-paint a small, whimsical design on the backrest (like a lamb or duckling).
Step 4: Style the chair by placing baby shoes and a framed photo. It can sit in a nursery corner or entryway, offering a warm welcome and a nod to the past.
#9. Upside-Down Chair Clothes Rack
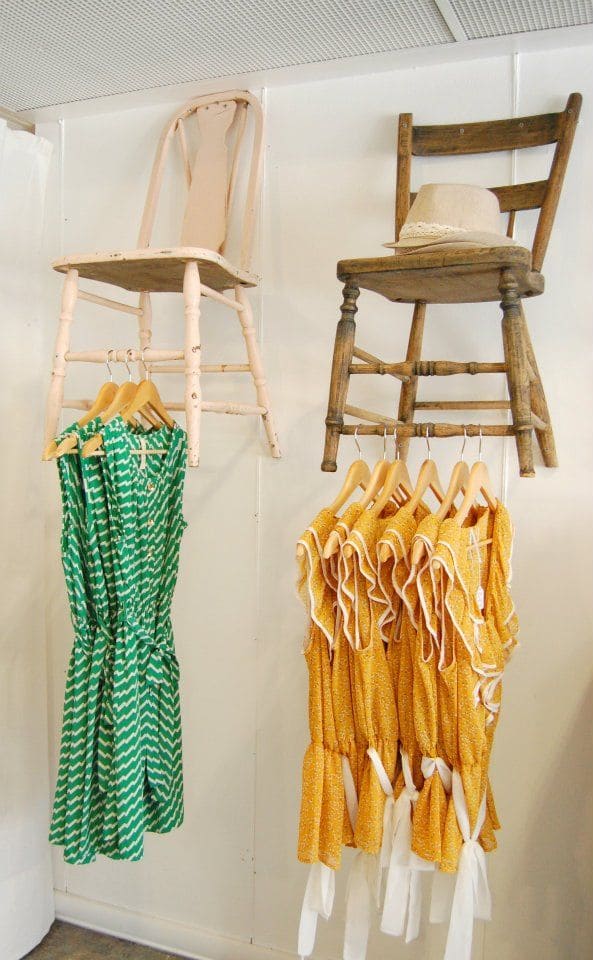
Why settle for ordinary hangers when an old chair can become a whimsical centerpiece in your room or boutique? This recycled chair display turns forgotten furniture into a standout hanging rack that blends charm with function.
By mounting the chairs upside down, the legs serve as rails for hanging clothes, scarves, or accessories, perfect for small closets, vintage shops, or creative studios.
Materials Needed:
- 1 or 2 wooden chairs (preferably sturdy with exposed leg rungs)
- 4 heavy-duty wall anchors and screws 4 per chair
- Wall drill, level, and pencil
- Wood stain (optional, 1 small can)
- Sandpaper (medium grit)
- Clear varnish (optional)
Step-by-Step Guide:
Step 1: Sand down the chairs to smooth out rough areas or prep them for painting. Keep the natural finish if you’re going for rustic appeal.
Step 2: Apply your chosen paint or stain, then allow to dry. For a vintage look, lightly distress the edges with sandpaper before sealing.
Step 3: Measure and mark on the wall where the seat base will be attached. You want to drill in heavy-duty screws through the chair seat into studs or wall anchors for safety.
Step 4: Once secured, use the leg rungs to hang clothing on wooden hangers, and place light items on the seat like hats or baskets.
#10. Repurposed Rolling Chair Scooter
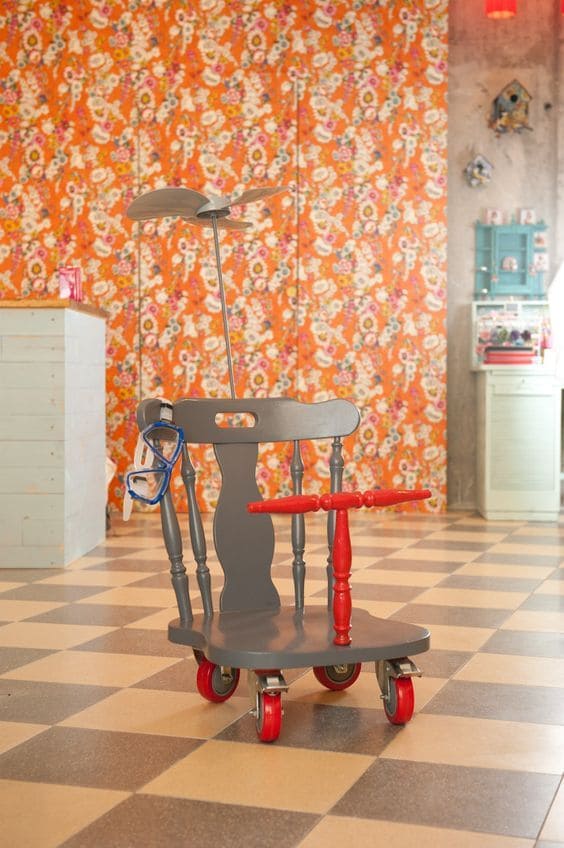
I am sure kids will be interested in their new toys. An old wooden chair gets a brand-new life as a whimsical scooter for kids or even a funky decorative piece for a playroom.
With a splash of bright gray and cherry red paint, and a fun addition like a snorkel mask hook, it’s impossible not to smile when kids see it.
Materials Needed:
- 1 old wooden chair (cut at seat level)
- 1 sheet of thick plywood (~18″x18″)
- 4 swivel caster wheels with brakes (3″ diameter)
- Outdoor-grade paint (gray and red or your color combo)
- Wood screws (1.5″, ~12 pieces)
- Wood glue
- Power drill
- A fun prop (optional: snorkel, umbrella, handlebar)
- Sandpaper (medium grit)
Step-by-Step Guide:
Step 1: Start by sawing off the legs of the chair so it sits flush with the floor. Lightly sand all surfaces, especially where you’ll attach the base.
Step 2: Attach the chair back and side spindles to the plywood using wood glue and screws.
Step 3: Mount the caster wheels on all four corners of the base. For extra stability, choose wheels with locks, especially if kids will ride on it.
Step 4: Paint your chair in two fun contrasting colors. Let it dry thoroughly before adding playful props like handlebars or an umbrella post.
#11. Tree Stump Garden Chair
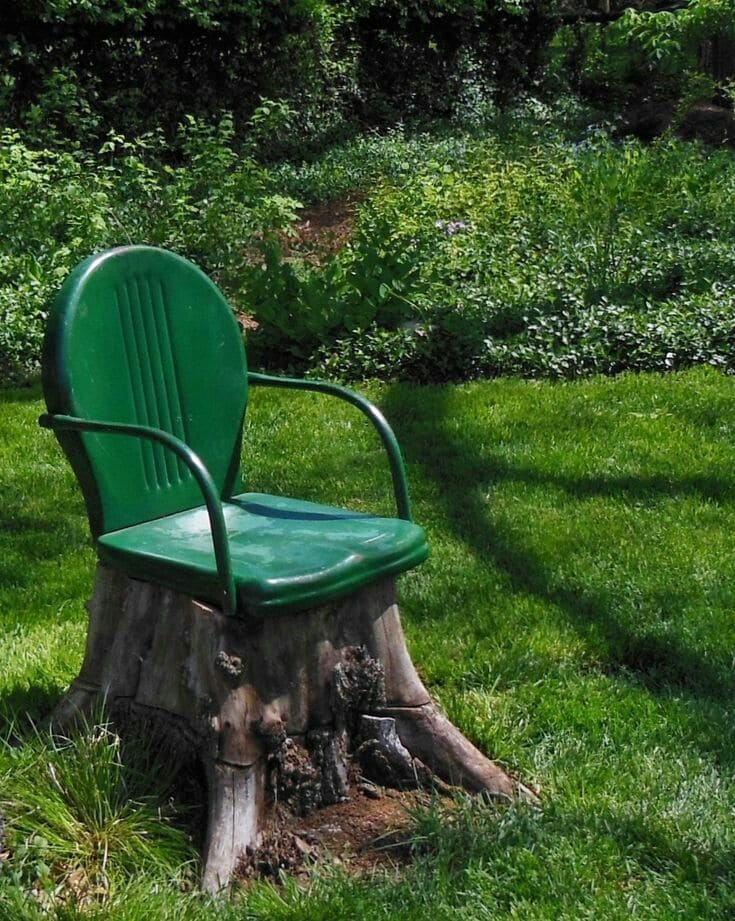
This rustic upcycling idea fuses nature and nostalgia into a seat that feels like it sprouted right from the ground.
Believe or not even an old green metal chair finds new life perched atop a sturdy tree stump. It’s whimsical yet practical, and it invites you to pause, breathe deep, and appreciate the stillness of your backyard haven.
Materials Needed:
- 1 sturdy tree stump (at least 18″ tall and 12-16″ wide)
- Old metal garden chair with seat and backrest intact
- Screws or metal brackets
- Power drill
- Optional: rust-resistant spray paint
Step-by-Step Guide:
Step 1: Clean off the tree stump and level the top surface as much as possible using a hand saw or sandpaper.
Step 2: Detach the legs of the chair carefully, leaving the seat and backrest intact.
Step 3: Center the seat onto the stump and use screws or brackets to secure the frame firmly into the wood.
Step 4: If needed, paint the chair with rust-resistant paint to match your garden aesthetic and prevent corrosion.
#12. Old Chair Turned Chic Sewing Box
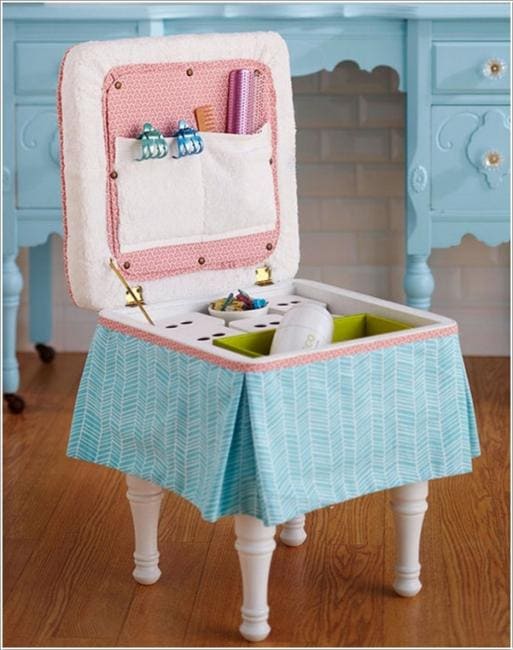
Who knew an old chair and some basic upholstery could blossom into this adorable hidden sewing station?
With a clever lift-top design and neat compartments inside, this upcycled gem brings both charm and function. And don’t worry if you have small space, this project is the best solution for you.
Materials Needed:
- 1 sturdy old wooden chair (seat removed)
- 1 medium wooden box
- 2 hinges, screws, and screwdriver
- Foam padding
- Upholstery fabric (approx. 1 yard total)
- Staple gun and staples
- Hot glue gun
- Optional: storage containers or sewing organizers
Step-by-Step Guide:
Step 1: Begin by cutting off the seat and adding a wooden crate or box that fits snugly inside the frame. You can sand any rough edges.
Step 2: Wrap the exterior with fabric, stapling it neatly around the edges. Then, add batting and a decorative fabric to the underside of the lid, creating a cushioned look.
Step 3: Attach the lid to the box with hinges.
Step 4: Inside the box, add dividers or small containers to organize spools, needles, and your accessories.
#13. Rustic Yellow Chair Planter Wall Decor
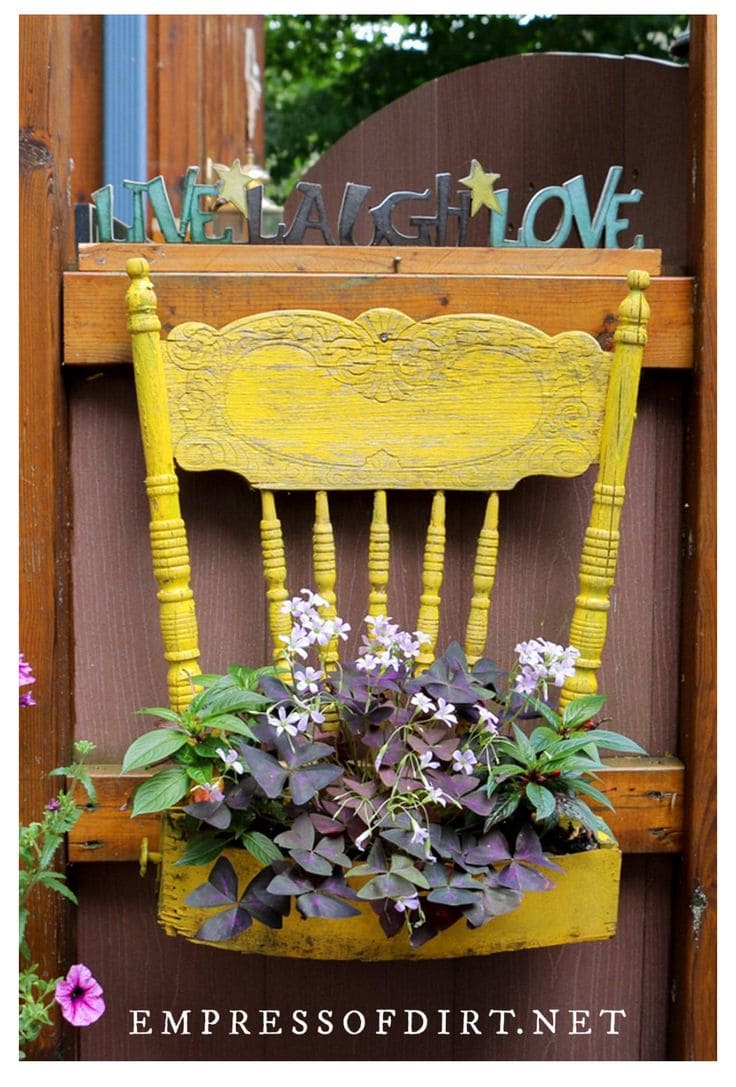
Oh my god, a little sunshine, a splash of paint, and an old chair, that’s all it took to create this radiant wall planter that instantly cheers up any garden corner.
Materials Needed:
- 1 wooden chair back with intact spindles and top rail
- Small wooden crate
- 1 quart exterior paint
- Sandpaper
- Screws or wood glue
- 2-3 L-brackets or mounting screws
- Potting soil + flowering plants (like oxalis, pansies, or petunias)
Step-by-Step Guide:
Step 1: Begin by sanding the chair back and planter box, then apply your chosen paint. Let dry completely.
Step 2: Attach the crate or box securely to the lower rails of the chair using screws or wood glue. You need to ensure it’s level and can support the weight of wet soil and plants.
Step 3: Mount the chair back to a fence, wall, or wooden gate using L-brackets or long screws at the top and bottom.
Step 4: Fill your new planter with soil and your favorite vibrant blooms.
#14. Upside-Down Chair Wall Shelf
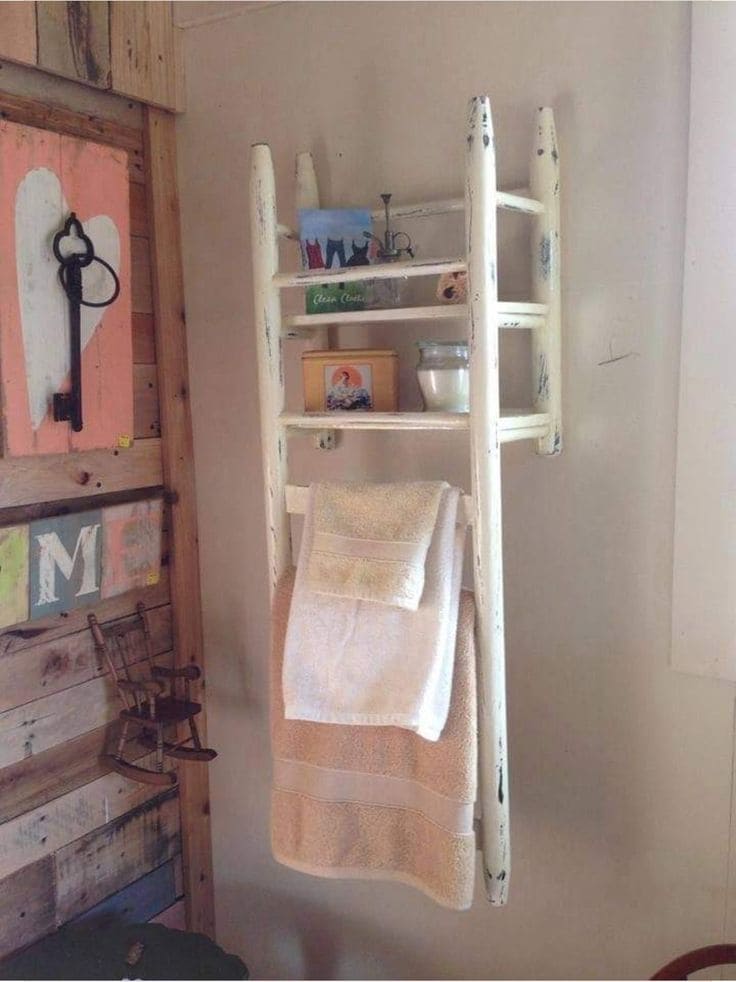
If your old wooden chair has seen better days, don’t toss it just yet as it might just be your next favorite wall shelf. This rustic gem transforms a simple chair into a charming vertical storage unit with a touch of farmhouse soul.
Furthermore, it’s a clever and cozy solution for bathrooms or entryways, especially if you’re working with a small space and a love for repurposed beauty.
Materials Needed:
- 1 wooden chair (sturdy back, with at least 3 rungs)
- 4 all anchors and heavy-duty screws
- Power drill and level
- Sandpaper (medium grit)
- Chalk paint
- Clear matte sealer (optional)
- Wall brackets (optional)
Step-by-Step Guide:
Step 1: Lightly sand down the chair to remove old paint or finish. If you love that aged, distressed look, focus just on smoothing the surface.
Step 2: Paint the chair in your chosen color and let it dry fully. For a vintage finish, use sandpaper to gently distress the edges and high points.
Step 3: Flip the chair upside down and mark the wall where you want to mount it. You can use a level to ensure the chair will sit straight, then drill holes and attach using screws and wall anchors.
Step 4: Add decor, rolled towels, or bathroom supplies on the top rungs, and use the lower legs to hang hand towels or washcloths.
#15. Rustic Chair Drink Station

This clever twist on an old wooden chair brings serious charm to any backyard gathering. Instead of sending that broken-seated beauty to the curb, turn it into a whimsical drink station.
Just drop in a galvanized tub filled with ice and soda, you’ve got a vintage-style cooler that’s both functional and full of character. It’s the kind of DIY that turns a practical party need into a photo-worthy conversation starter.
Materials Needed:
- 1 vintage chair with the seat removed
- 1 galvanized metal bucket or tub (about 12″ height, 15″ diameter)
- Optional: chalkboard sign, ribbon, or tags for labeling
- Ice and bottled beverages
Step-by-Step Guide:
Step 1: Remove the seat panel of the chair, ensuring the frame is still sturdy.
Step 2: Clean and, if desired, lightly sand and stain the wood for a polished look. Or you can leave it weathered for that rustic feel.
Step 3: Insert a galvanized bucket snugly into the open seat. Now, you can add a chalkboard sign with “Drinks” to make it extra inviting.
Step 4: On party day, fill the bucket with ice and your favorite beverages.
#16. Chair Planter Frame
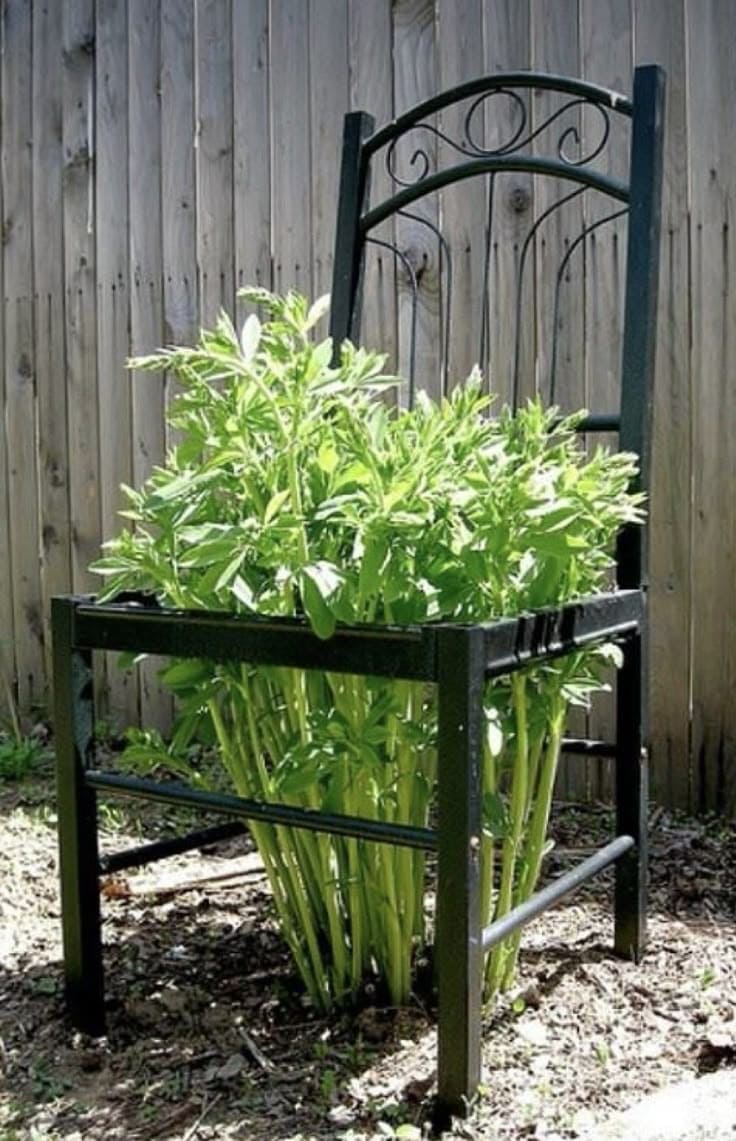
If you’ve got a metal chair frame lying around, here’s a genius way to bring it back to life. This upcycled chair becomes a garden sculpture that lets your plants take the spotlight.
Specially, the missing seat becomes the perfect space to cradle a lush perennial, making it look like the plant is “sitting” down for a garden tea party.
Materials Needed:
- 1 old chair frame
- Rust-resistant outdoor spray paint (1 can, optional)
- Soil and compost (about 1 bag)
- 1 large plant or cluster of perennials (e.g. sage, ferns)
- Optional: chicken wire
Step-by-Step Guide:
Step 1: Remove the seat portion of the chair and clean the entire frame. If needed, sand and paint it for a refreshed look.
Step 2: Place the chair directly into the soil where you’d like it to stay, pushing the legs down for stability.
Step 3: If your plant isn’t growing up through the ground, create a base using chicken wire or a liner inside the frame, then fill it with soil.
Step 4: Plant your greens so they burst through the open frame.
#17. Recycled Chair Back Wall Hook Organizer
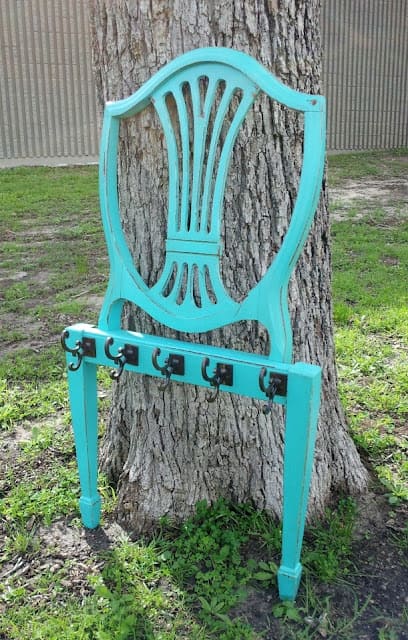
If you are looking for the solution of holding keys, bags, scarves, or even dog leashes near the entryway, this is one of those projects that makes you feel like you rescued both style and function from the landfill.
Moreover, this project is made by repurposed materials that help you save money a lot.
Materials Needed:
- 1 wooden chair back
- 5 metal wall hooks
- 1 small can of chalk or spray paint (approx. 250 ml)
- Sandpaper (medium grit)
- Power drill and screws
- Wall anchors (optional)
- Clear sealant (optional)
Step-by-Step Guide:
Step 1: Start by cutting off the chair seat if still attached. You should lightly sand the frame to smooth out splinters and prep for painting.
Step 2: Apply a fresh coat of bold or neutral paint. Let dry completely, then apply a sealant if your rack will face moisture (like in a mudroom).
Step 3: Screw in the hooks along the front legs, spacing them evenly.
Step 4: Mount the finished piece to your wall with long screws through the backrest frame.
#18. Rustic Chair Back Kitchen Rack
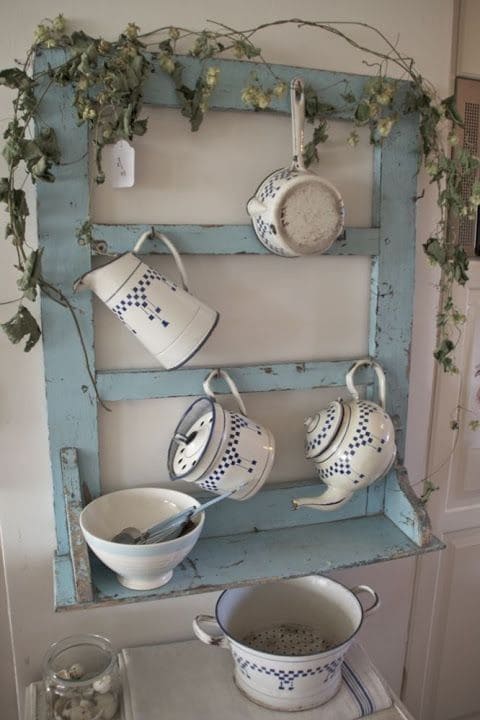
There’s something beautifully poetic about giving an old chair back a new life, especially when it turns into a charming vintage kitchen display like this one.
Hung on the wall and lightly brushed in a weathered pastel blue, this salvaged piece becomes a heartfelt frame for your enamelware treasures.
Materials Needed:
- 1 old chair back with horizontal slats
- Chalk paint (blue or color of choice)
- Sandpaper
- Wall hooks or screws
- Hanging wire
- Optional: trailing faux vines
Step-by-Step Guide:
Step 1: Clean and sand the chair back to remove any dust or loose paint. You can apply chalk paint and let it dry.
Step 2: Secure hooks along the slats where mugs, pitchers, or teapots can hang.
Step 3: Mount the piece on your kitchen using screws or wall anchors. Then use floral wire to add decorative vines for a homier feel.
Step 4: Hang your favorite enamelware, vintage cups, or lightweight pots.
#19. Repurposed Chair Back Chalkboard
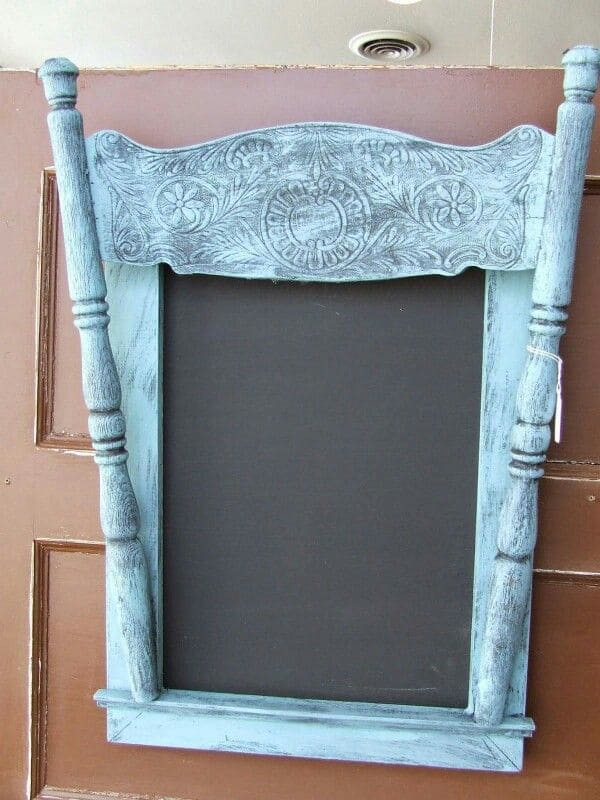
This gorgeous transformation turns an old chair back into a charming chalkboard frame.
Whether you hang it in your kitchen for grocery lists, near the front door with a daily reminder, or in a café-style corner for quotes, this project brings old-world craftsmanship into everyday use.
Materials Needed:
- 1 vintage chair back (preferably with carved top and two spindles)
- 1 piece of thin MDF (approx. 12″ x 18″)
- Chalkboard paint
- Wood glue and small finishing nails
- Sandpaper, primer, and paint
Step-by-Step Guide:
Step 1: Sand the chair back thoroughly, then apply a coat of primer followed by your choice of paint. A distressed finish using dry-brush technique works beautifully here.
Step 2: Paint your MDF panel with 2-3 coats of chalkboard paint, allowing it to dry completely between coats.
Step 3: Fit the chalkboard panel into the opening at the back of the chair. Then, you want to use wood glue along the edges and secure with finishing nails.
#20. Repurposed Chair Back Jewelry Organizer
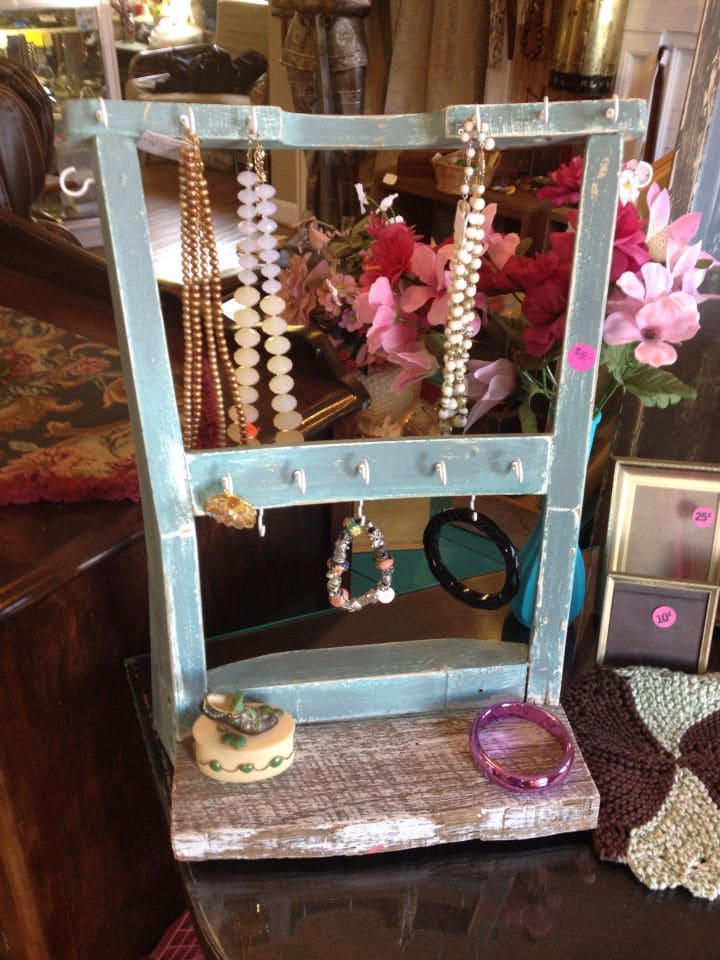
Wow, instead traditional organizers, you can give your favorite necklaces, bracelets, and rings a place of honor with this charming jewelry holder made from an old chair back.
In addition, this mini gallery of treasures help your bedroom become more rustic with vintage style.
Materials Needed:
- 1 old wooden chair bac
- 8-12 small screw-in cup hooks
- 1 sturdy base board (~12” wide)
- Paint or chalk paint
- Sandpaper and wood sealant (optional)
- Screws and drill
Step-by-Step Guide:
Step 1: Lightly sand the chair back to remove grime. Paint or touch it up if you prefer a fresh or distressed finish.
Step 2: Drill evenly spaced holes along the middle slat(s), and screw in cup hooks to hang necklaces and bracelets. You can also screw hooks along the side edges for rings or lightweight earrings.
Step 3: Attach the chair back securely to your wooden base with screws to ensure it stands upright and stable. You can also add rubber feet to prevent slipping.
Step 4: Decorate the base with a trinket dish or jewelry box for rings and pins.
#21. Chair Back Photo Display Frame
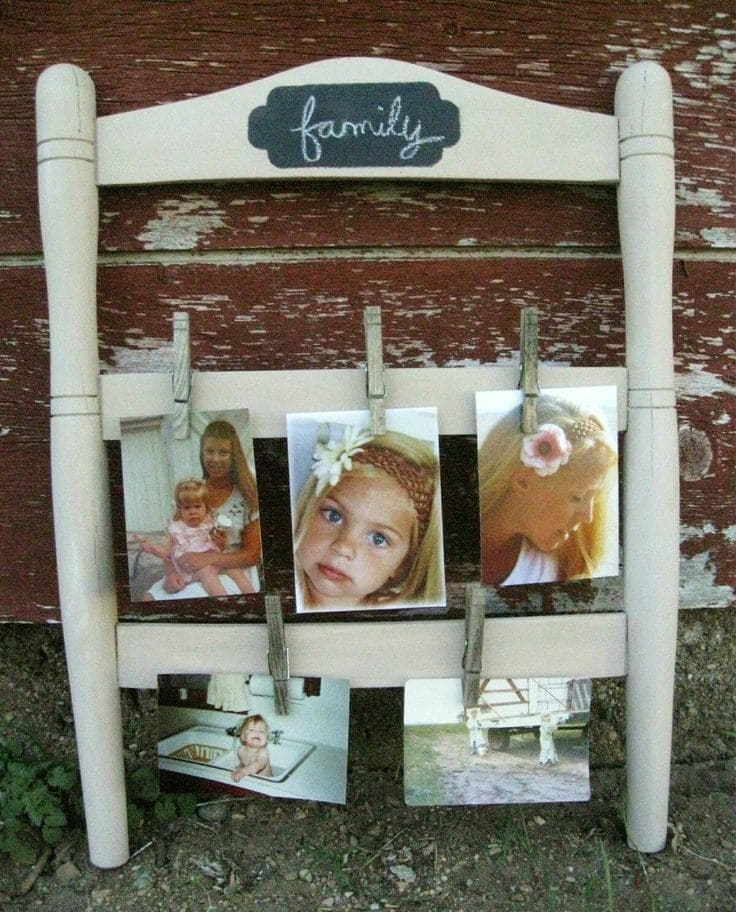
Have you ever turned an old, forgotten chair into a heartfelt piece of home decor with this simple and rustic photo display?
This project invites memories to take center stage. With just a little creativity and a few clothespins, you can create a charming display for snapshots that mean the most to you.
Materials Needed:
- 1 old wooden chair back
- 2-3 flat wooden slats
- 5 wooden clothespins
- Wood glue
- Optional: chalkboard label and white chalk marker
Step-by-Step Guide:
Step 1: Clean and lightly sand the chair back. If desired, paint or distress it to match your decor.
Step 2: Attach two or three slats horizontally across the open space using wood glue or small nails. Let them dry fully.
Step 3: Clip your favorite printed photos onto the slats using clothespins, you can mix sizes and angles for a more organic look.
