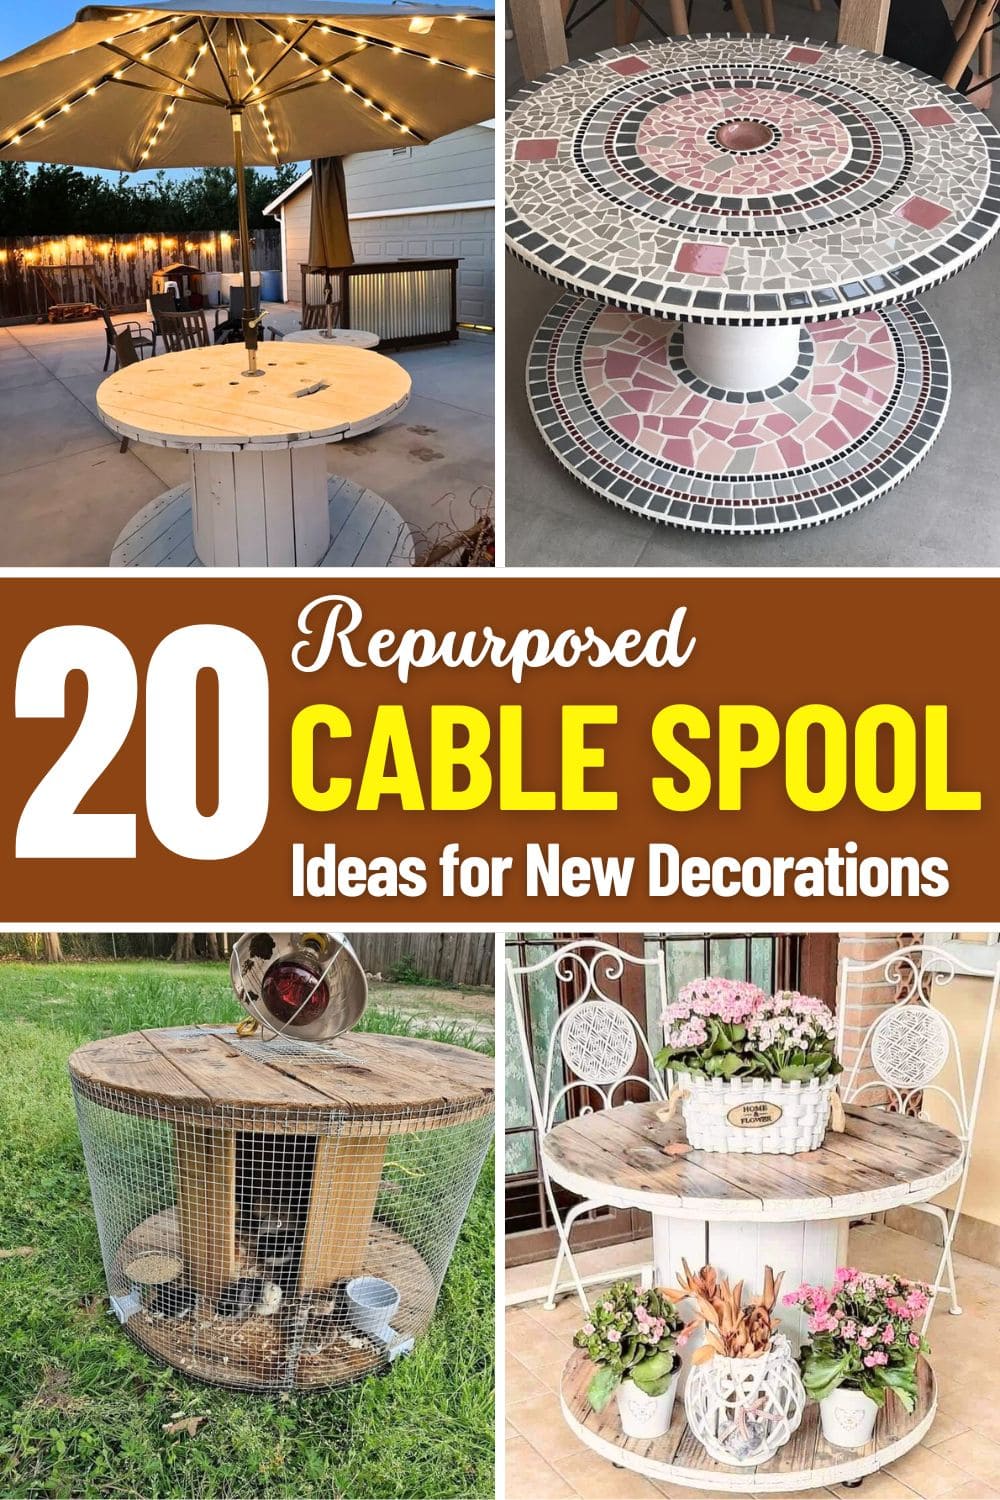
Old cable spools often end up gathering dust in basements or warehouses, their potential hidden behind layers of rust and wear. We’ve all seen them as large, bulky wooden spools that seem to serve no purpose except to take up space.
But what if I told you these seemingly useless objects could be transformed into something beautiful and functional? Many people struggle with finding creative ways to repurpose everyday items, but cable spools are a hidden gem.
Whether it’s a coffee table, garden bench, or unique decor piece, recycled cable spools offer endless possibilities. In this article, we’ll explore 20 creative projects that breathe new life into these forgotten spools, turning them into stunning additions to your home or garden.
#1. Cable Spool Fairy Garden Table
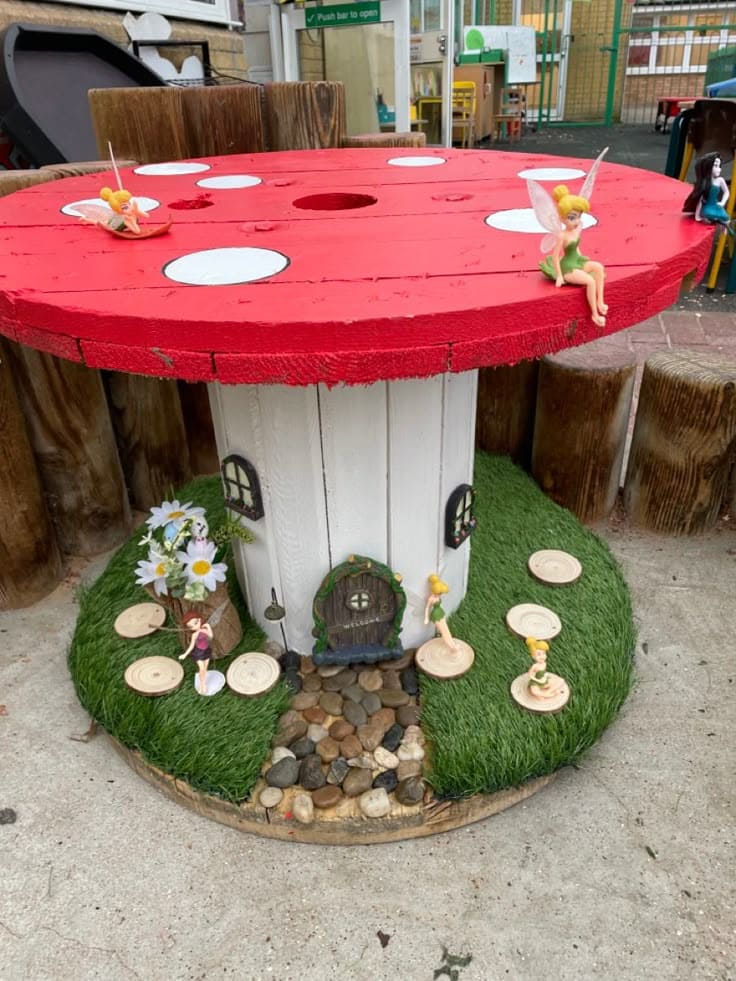
Nothing better than step into a whimsical world with this cable spool fairy garden table, a magical spot where tiny fairies come to life under a red mushroom cap.
You’ll feel a childlike delight as you craft a miniature garden with flowers and figures, perfect for a playful backyard, something I adored setting up for my niece last summer.
Materials Needed:
- Wooden cable spool (medium-sized, about 24-30 inches in diameter)
- Sandpaper (medium grit 120)
- Red exterior paint, white paint and paintbrush
- Artificial grass mat (24-inch diameter)
- 5-6 fairy figurines
- Artificial flowers
- Small pebbles (2 lbs)
- 4 wood screws (1.5-inch)
- Drill with screwdriver bit
Step-by-Step Guide:
Step 1: Sand the spool with 120-grit sandpaper to smooth its surface, wiping away dust as you picture a fairy haven taking shape.
Step 2: Paint the top red and the sides white with exterior paint, letting it dry for 4 hours to create a mushroom effect.
Step 3: Secure the artificial grass mat to the base with screws, adding a natural floor for your fairy world.
Step 4: Arrange pebbles, flowers, and fairy figurines on the mat, positioning them creatively, and watch your magical table come to life.
#2. Cable Spool Fire Pit Dining Table
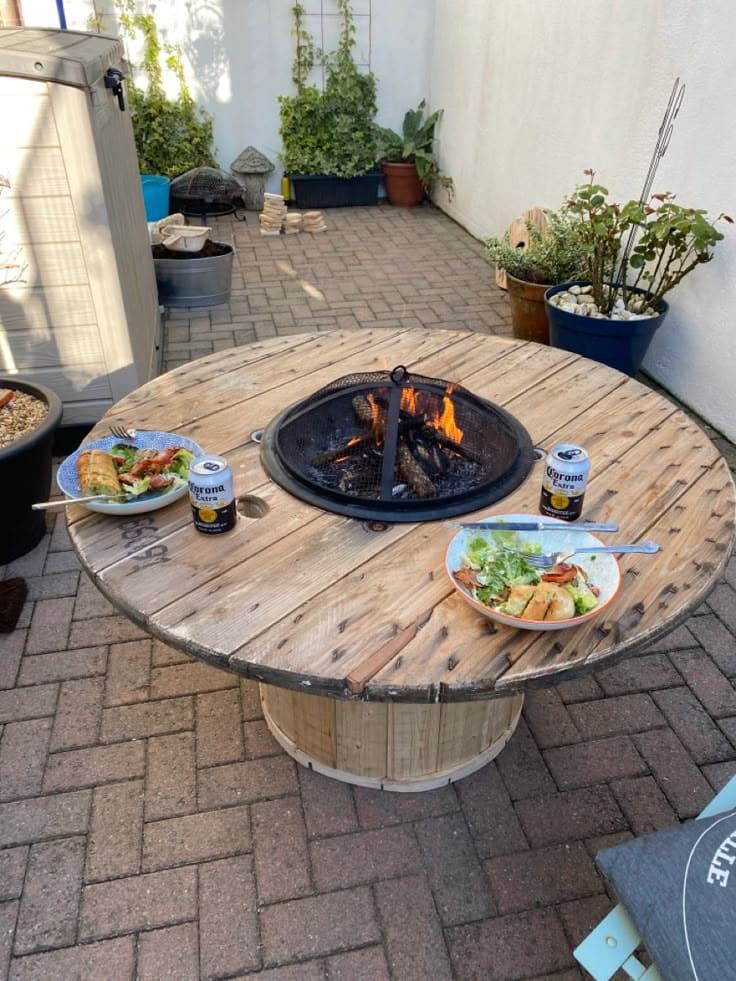
I believe you’ll savor the crackling flames as you enjoy a meal with friends, the wood’s rustic charm blending with the scent of burning logs.
Specially, this inventive project, costing around $50-60 with a reclaimed spool, turns your outdoor space into a haven of comfort.
Materials Needed:
- Wooden cable spool (medium-sized, about 30-36 inches in diameter)
- Sandpaper (medium grit 120)
- Exterior wood sealant and paintbrush (2-inch wide)
- Metal fire pit insert (20-24 inches diameter)
- 4 fireproof bricks (4x8x2 inches)
- 4 wood screws (1.5-inch)
- Drill with screwdriver bit
- Firewood
Step-by-Step Guide:
Step 1: Sand the spool with 120-grit sandpaper to smooth its surface, wiping away dust as you imagine a cozy firelit meal.
Step 2: Apply wood sealant with a paintbrush, letting it dry for 6 hours to protect it from heat and weather.
Step 3: Place fireproof bricks inside the spool to create a stable base, then secure the metal fire pit insert on top with screws.
Step 4: Finally, add firewood to the insert, light it up, and gather around with your food and drinks, soaking in the warm glow.
#3. Mosaic Cable Spool Side Table
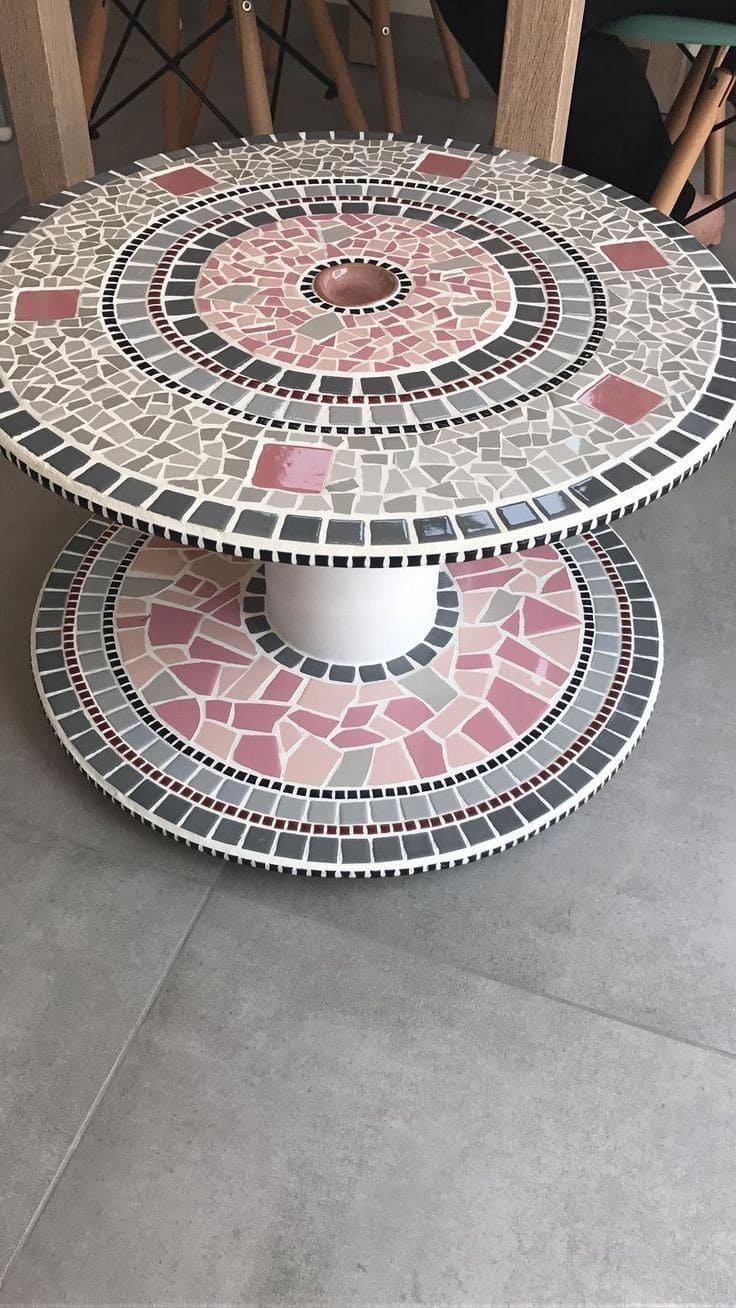
Let your creativity bloom with this mosaic cable spool side table, a dazzling centerpiece that turns a simple spool into a work of art.
I think you’ll feel a rush of pride as you piece together colorful tiles in swirling patterns, like painting with nature’s palette, creating a two-tiered gem for your living space.
Materials Needed:
- Wooden cable spool (medium-sized, about 20-24 inches in diameter)
- Sandpaper (medium grit 120)
- 200-250 ceramic tiles (1×1 inch)
- Tile adhesive
- Grout (5 lbs, gray)
- Grout float
- Sponge
- Bucket (2-gallon)
- Trowel (¼-inch notched) and sealant
Step-by-Step Guide:
Step 1: Sand the spool with 120-grit sandpaper to smooth it out, wiping away dust as you imagine the vibrant mosaic taking shape.
Step 2: Apply tile adhesive with a notched trowel to the top and bottom tiers, pressing ceramic tiles into place in a circular pattern, letting your creativity flow as it dries for 24 hours.
Step 3: Mix grout with water in a bucket, then spread it over the tiles with a grout float, pressing into the gaps, and wipe excess with a damp sponge after 15 minutes.
Step 4: Once dry (about 48 hours), apply a sealant coat to protect your masterpiece, then place it proudly in your room, admiring its unique glow.
#4. Cable Spool Garden Chair
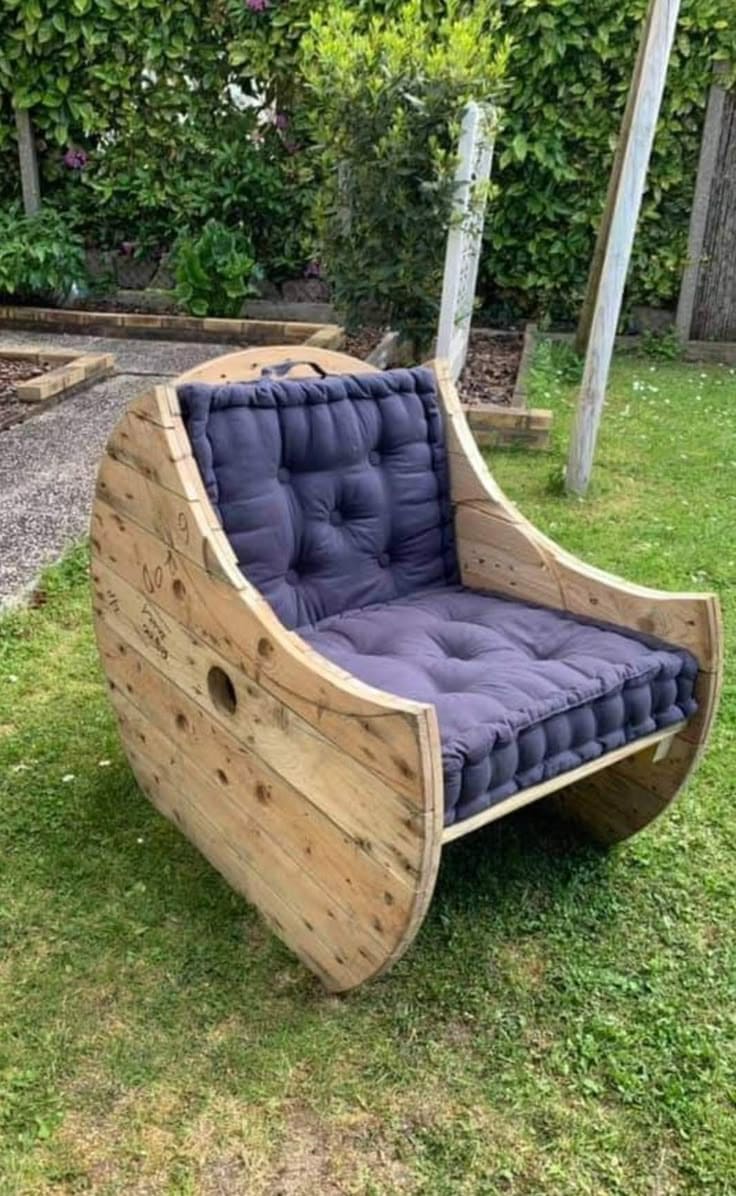
Feel the gentle breeze as you sink into this cable spool garden chair, a rustic throne that blends seamlessly with your outdoor sanctuary.
Moreover, this earthy creation invites you to relax and soak in nature’s peace.
Materials Needed:
- Wooden cable spool (medium-sized, about 24-30 inches in diameter)
- Sandpaper (medium grit 120)
- Exterior wood sealant and paintbrush (2-inch wide)
- Cushion (24×24 inches)
- 4 wood planks (1×6 inches, 20 inches long)
- 12 wood screws (1.5-inch)
- Drill with screwdriver bit
Step-by-Step Guide:
Step 1: Sand the spool with 120-grit sandpaper to smooth its surface, wiping away dust as you picture yourself lounging in the garden.
Step 2: Apply wood sealant with a paintbrush, coating evenly and letting it dry for 6 hours to protect it from the elements.
Step 3: Attach the wood planks to the spool’s side with screws and a drill to form a backrest, shaping it to cradle your back comfortably.
Step 4: Place the cushion on the seat, adjust it snugly, and settle in, letting the chair become your new favorite spot amidst the greenery.
#5. Cable Spool Wedding Display Table
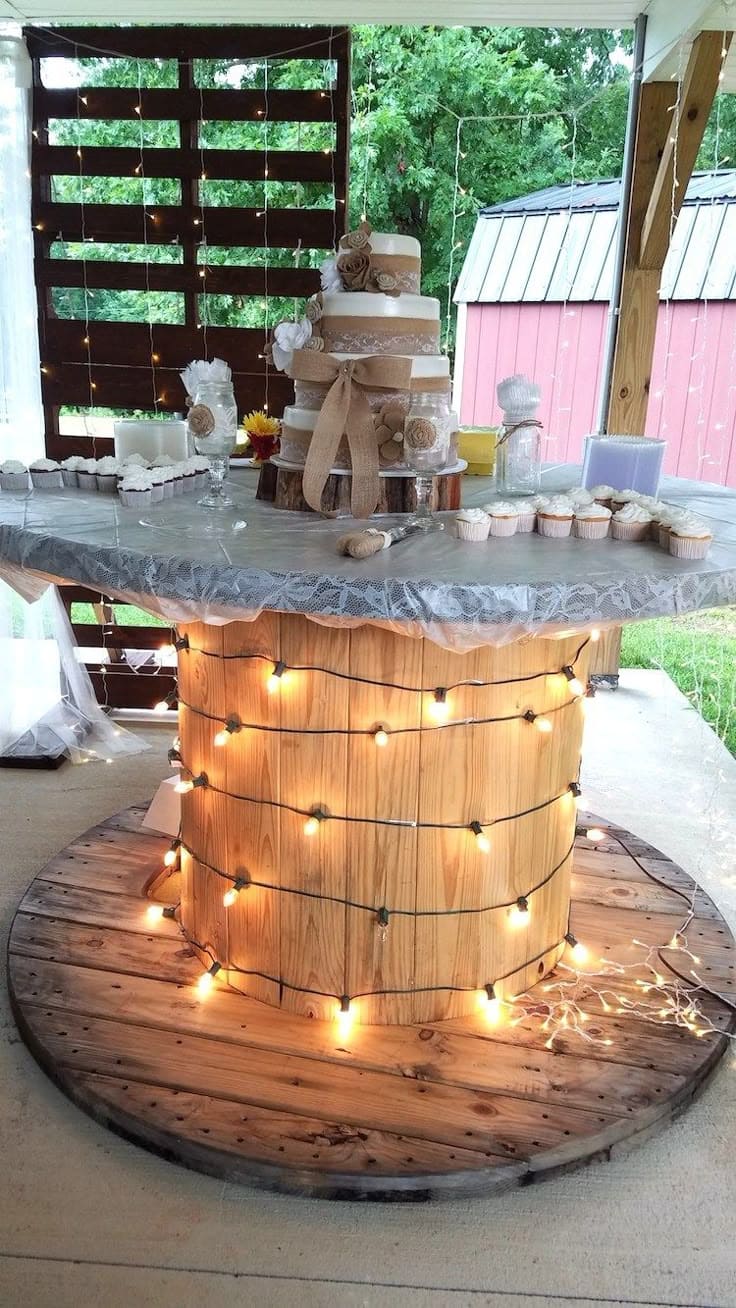
Imagine the soft glow of this cable spool wedding display table lighting up your special day, a rustic stage for your cake and cupcakes under a canopy of love.
Plus, this charming setup, costing around $40-50 with a salvaged spool, brings a touch of nature’s elegance to your celebration.
Materials Needed:
- Wooden cable spool (medium-sized, about 30-36 inches in diameter)
- Sandpaper (medium grit 120)
- String lights (20 feet, warm white)
- Lace tablecloth (48-inch round)
- Exterior wood sealant and paintbrush (2-inch wide)
- 4 wood screws (1.5-inch)
- Drill with screwdriver bit
Step-by-Step Guide:
Step 1: Sand the spool with 120-grit sandpaper to smooth its surface, wiping away dust as you picture the wedding glow taking shape.
Step 2: Apply wood sealant with a paintbrush, letting it dry for 6 hours to protect it from the outdoor air.
Step 3: Wrap the string lights around the spool’s sides, securing them with screws, and test the warm light as it dances in the evening.
Step 4: Drape the lace tablecloth over the top, arrange your cake and treats, and let it shine as the heart of your wedding celebration.
#6. Cable Spool Patio Table with Planter Shelves
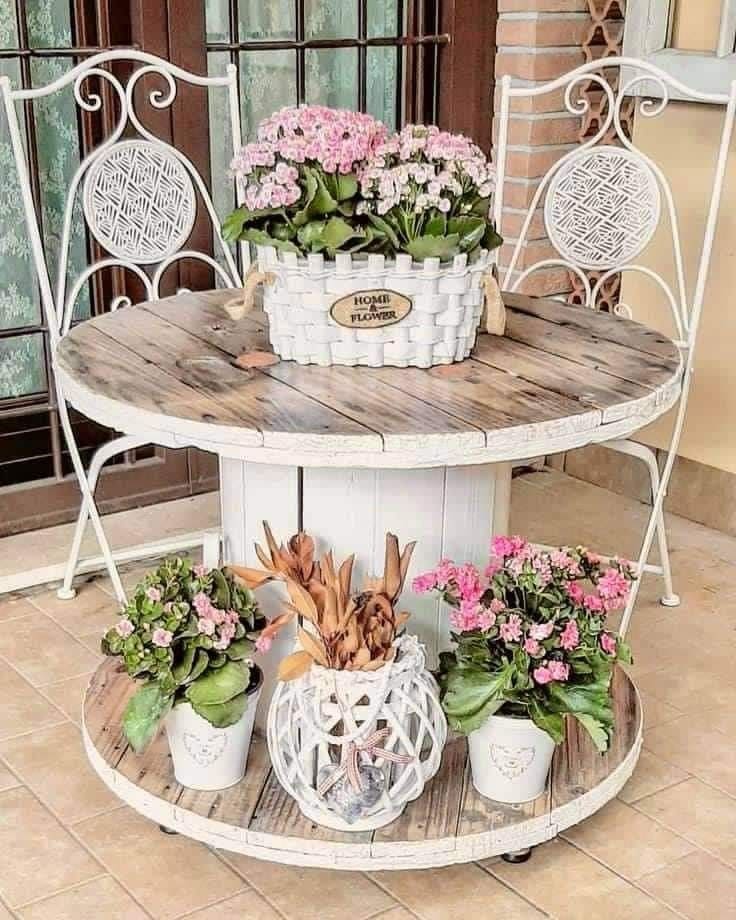
You’ll feel the joy of transforming a sturdy spool into a two-tiered masterpiece, topped with a weathered wooden surface perfect for morning tea, and adorned below with shelves brimming with pink flowers.
Materials Needed:
- Wooden cable spool (medium-sized, about 24-30 inches in diameter)
- Sandpaper (medium grit 120 and fine grit 220)
- Exterior white paint and paintbrush (2-inch wide)
- 4 wooden planks (1×6 inches, 24 inches long)
- 5 potted plants (6-inch diameter)
- 12 wood screws (1.5-inch)
- Drill with screwdriver bit
- 4 casters with brakes
- Clean cloth
Step-by-Step Guide:
Step 1: Sand the spool with 120-grit sandpaper to smooth its surface, then refine with 220-grit, wiping away dust with a cloth as you envision its new life outdoors.
Step 2: Paint the spool and wooden planks with exterior white paint, applying two coats with a 4-hour dry time between.
Step 3: Attach the wooden planks to the top of the spool with screws and a drill to create a sturdy table surface, then secure the casters to the base for easy movement.
Step 4: Place the potted plants on the lower shelf, arranging them with care, and roll your new table into place, letting the flowers greet the evening breeze.
#7. Cable Spool Wedding Reception Table
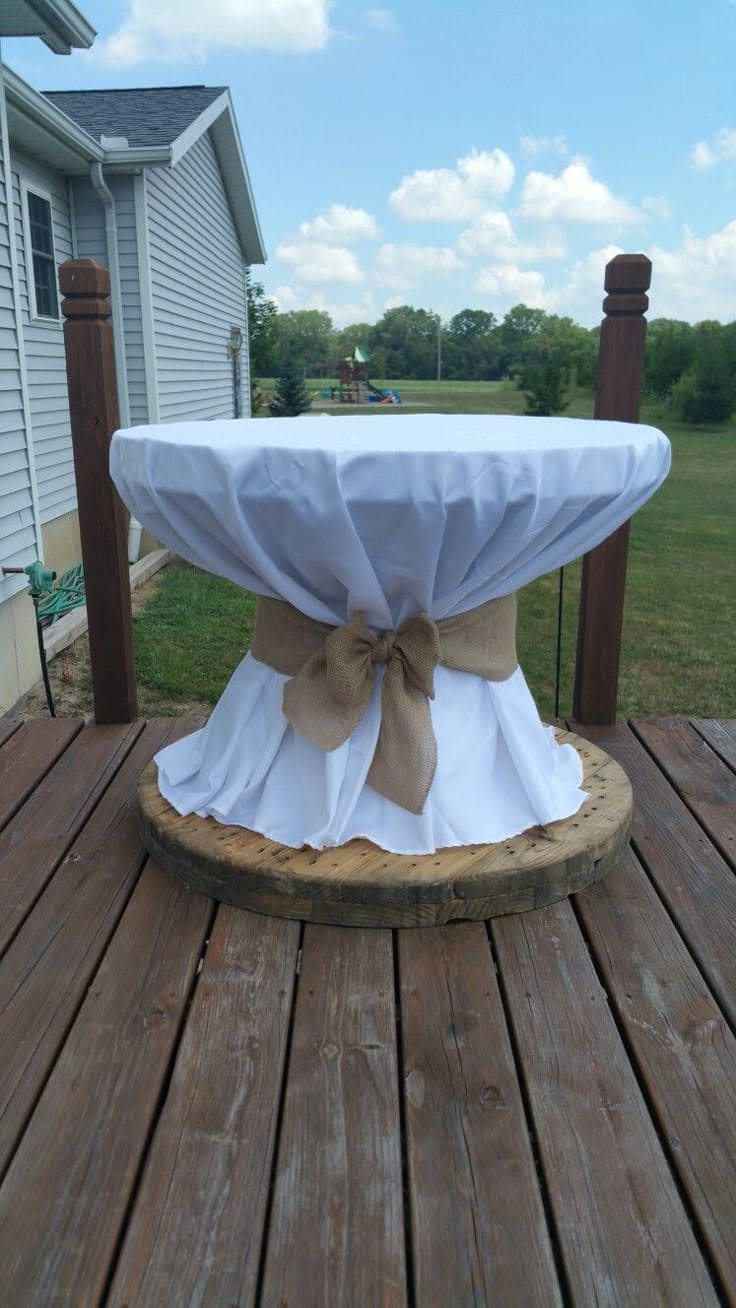
With the cable spool reception table as the star, you’ll feel a rush of joy as you dress it in elegant white fabric and a burlap bow, creating a rustic yet romantic focal point for your celebration.
Also, this charming setup adds a heartfelt touch to your special moment like wedding.
Materials Needed:
- Wooden cable spool (medium-sized, about 30-36 inches in diameter)
- Sandpaper (medium grit 120)
- Exterior wood sealant and paintbrush (2-inch wide)
- White tablecloth (48-inch round)
- Burlap ribbon
- Scissors
- 4 wood screws (1.5-inch)
- Drill with screwdriver bit
Step-by-Step Guide:
Step 1: Sand the spool with 120-grit sandpaper to smooth its surface, wiping away dust as you envision the wedding elegance.
Step 2: Apply wood sealant with a paintbrush, letting it dry for 6 hours to protect it from the outdoor air.
Step 3: Drape the white tablecloth over the spool and secure it with screws underneath, ensuring a neat fit.
Step 4: Finally, tie the burlap ribbon around the middle, fashioning a bow.
#8. Cable Spool Beverage Table
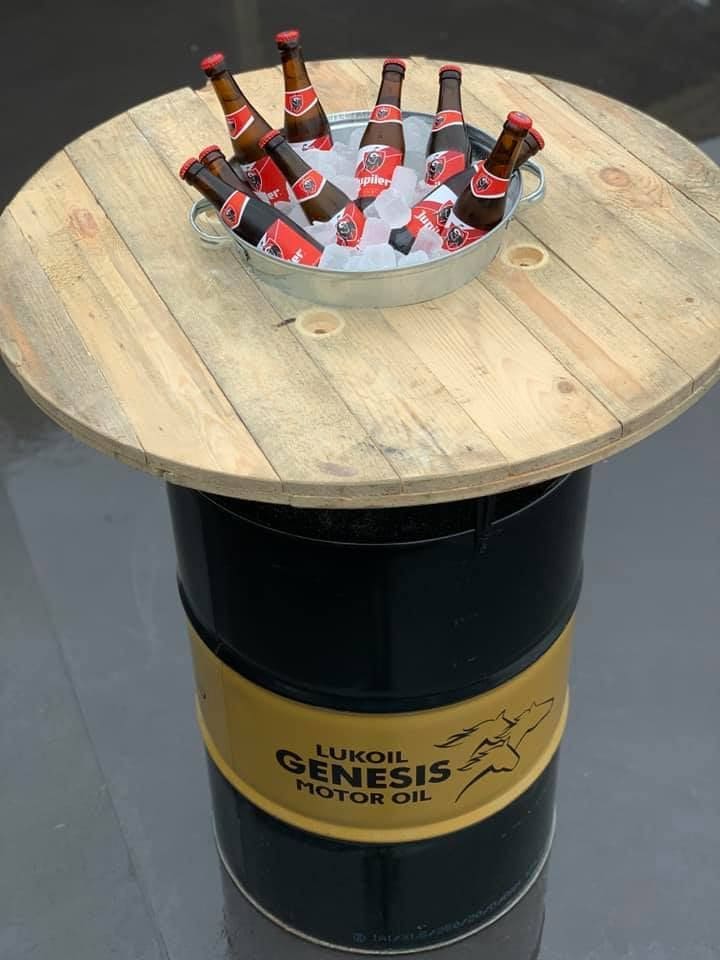
On a warm evening, you can host friends with this cable spool beverage table as your centerpiece, keeping drinks icy cold.
Additionally, you’ll feel the satisfaction of turning a rugged oil drum base into a stylish outdoor bar, topped with chilled beers in a metal bucket.
Materials Needed:
- Wooden cable spool top (medium-sized, about 24-30 inches in diameter)
- Metal oil drum (20-25 inches tall)
- Sandpaper (medium grit 120)
- Exterior wood sealant and paintbrush (2-inch wide)
- Metal bucket (12-inch diameter)
- Ice, 8 beer bottles
- 4 wood screws (1.5-inch)
- Drill with screwdriver bit
Step-by-Step Guide:
Step 1: Sand the spool top with 120-grit sandpaper to smooth its surface, wiping away dust as you envision a refreshing setup.
Step 2: Apply wood sealant with a paintbrush, letting it dry for 6 hours to protect it from outdoor elements.
Step 3: Secure the spool top to the oil drum with screws and a drill, ensuring a sturdy fit for your drinks.
Step 4: Place the metal bucket on top, fill it with ice and beverages, and enjoy a chilled drink as the evening unfolds.
#9. Cable Spool Illuminated Side Table
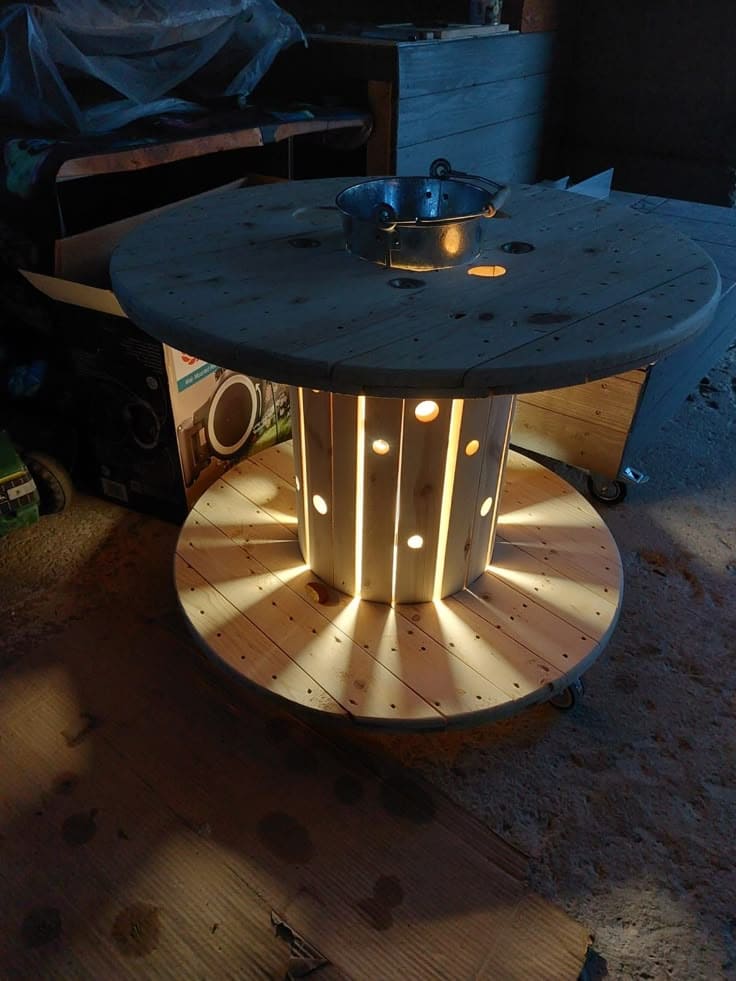
Wow, it’s great to unwind in the glow of this cable spool side table, where warm light spills from its core like a lantern in a quiet evening.
Also, you’ll immerse in a sense of wonder as you transform a rugged spool into a glowing masterpiece, perfect for a cozy corner, with the soft hum of LED lights adding magic.
Materials Needed:
- Wooden cable spool (medium-sized, about 24-30 inches in diameter)
- Sandpaper (medium grit 120)
- LED strip lights
- Power adapter
- 8 wood screws (1.5-inch)
- Drill with hole saw bit (2-inch diameter)
- Clear sealant and paintbrush (2-inch wide)
- Small metal bowl (8-inch diameter)
Step-by-Step Guide:
Step 1: Sand the spool with 120-grit sandpaper to smooth its surface, wiping away dust as you envision the warm glow it will cast.
Step 2: Drill several 2-inch holes around the spool’s sides, then apply clear sealant with a paintbrush to protect the wood, letting it dry for 6 hours.
Step 3: Secure the LED strip lights inside the spool with screws, connecting them to the power adapter, and test the glow as the light dances through the holes.
Step 4: Place the metal bowl on top as a decorative lid, position your table, and switch it on, basking in the cozy ambiance it creates.
#10. Cable Spool Chicken Coop Table
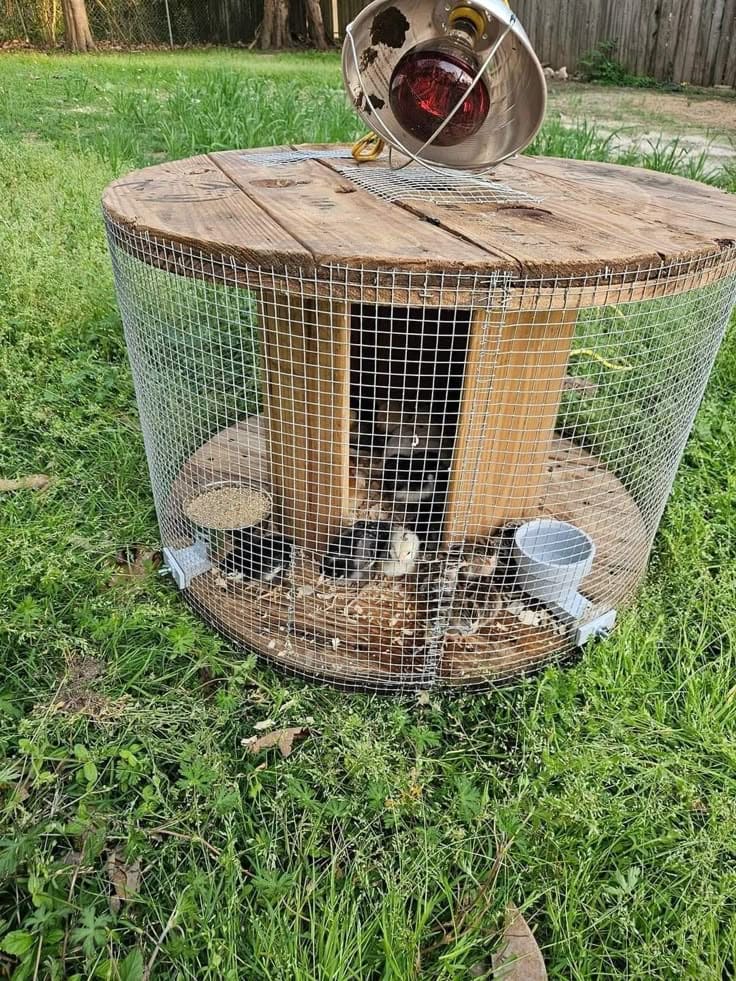
You can see the soft clucks of happy chicks under this cable spool chicken coop table, a charming addition to your backyard.
Materials Needed:
- Wooden cable spool (medium-sized, about 24-30 inches in diameter)
- Sandpaper (medium grit 120)
- Exterior wood sealant and paintbrush (2-inch wide)
- Chicken wire (1 roll, 36×10 feet)
- Wire cutters
- Heat lamp with bulb (250W)
- 50 staples and staple gun (¼-inch staples)
- Feeder and waterer
- Wood shavings (5 lbs)
Step-by-Step Guide:
Step 1: Sand the spool with 120-grit sandpaper to smooth its surface, wiping away dust as you picture a safe chick home.
Step 2: Apply wood sealant with a paintbrush, letting it dry for 6 hours to protect it from weather.
Step 3: Cut and staple chicken wire around the spool’s sides, leaving the top open, to create a secure enclosure.
Step 4: Add wood shavings inside, place the feeder, waterer, and heat lamp, then introduce your chicks to their new cozy space.
#11. Cable Spool Garden Planter
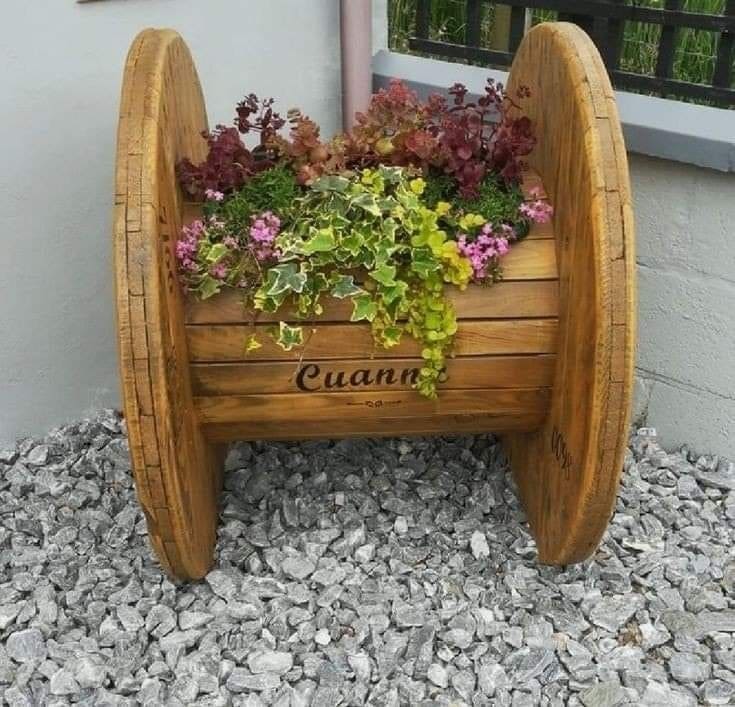
Step into your garden with this cable spool planter, a burst of color that feels like a heartfelt gift to nature itself.
You’ll delight in filling its wooden heart with vibrant flowers and ivy, their greens and purples dancing in the breeze, much like I enjoyed tending mine last summer.
Materials Needed:
- Wooden cable spool (medium-sized, about 24-30 inches in diameter)
- Sandpaper (medium grit 120)
- Exterior wood sealant and paintbrush (2-inch wide)
- Landscape fabric (3×5 feet)
- Potting soil (1.5 cubic feet)
- 6 assorted plants
- 20 staple gun with staples (¼-inch staples)
Step-by-Step Guide:
Step 1: Sand the spool with 120-grit sandpaper to smooth its surface, wiping away dust as you picture the plants thriving within.
Step 2: Apply wood sealant with a paintbrush, letting it dry for 6 hours to shield it from weather and enrich its natural look.
Step 3: Line the spool’s top with landscape fabric, securing it with a staple gun to hold soil while allowing drainage.
Step 4: Fill with potting soil and plant your flowers and ivy, arranging them with care, then water gently to welcome life into your creation.
#12. Cable Spool Outdoor Game Table
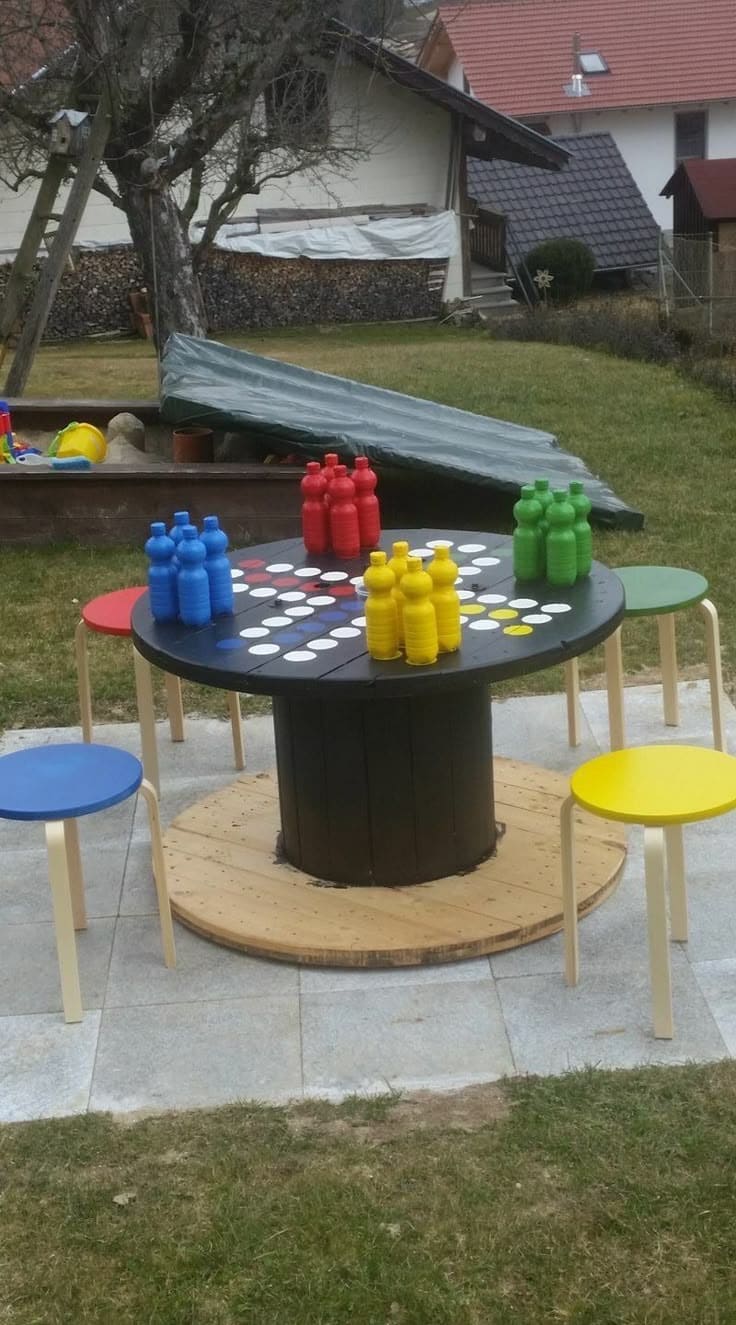
I remember building one myself last year, painting it black and adding colorful stools, turning it into a giant checkers board with recycled bottles as pieces.
Moreover, you’ll feel a thrill repurposing this sturdy spool into a family treasure, blending creativity with nature’s embrace, all for about $30 if you scavenge materials wisely.
Materials Needed:
- Wooden cable spool (medium-sized, about 24-30 inches in diameter)
- Sandpaper (medium grit 120)
- Black exterior paint and paintbrush (2-inch wide)
- 32 wooden discs (2-inch diameter)
- 12 plastic bottles
- Acrylic paint (red, blue, yellow, green, 4 small bottles, 2 oz each)
- 4 stools
- 8 wood screws (1.5-inch)
- Drill with screwdriver bit
Step-by-Step Guide:
Step 1: Sand the spool with 120-grit sandpaper to smooth its surface, wiping away dust as you picture lively games ahead, letting the wood’s grain peek through.
Step 2: Paint the spool black with exterior paint, applying two coats with a 4-hour dry time, imagining the bold contrast it’ll bring to your yard.
Step 3: Arrange and glue the wooden discs in a checkers pattern on top, then paint the plastic bottles in red, blue, yellow, and green to create game pieces, setting the stage for fun.
Step 4: Secure the stools around the table with screws, ensuring stability, and gather your family to play, feeling the grass underfoot as memories unfold.
#13. Cable Spool Mug Organizer
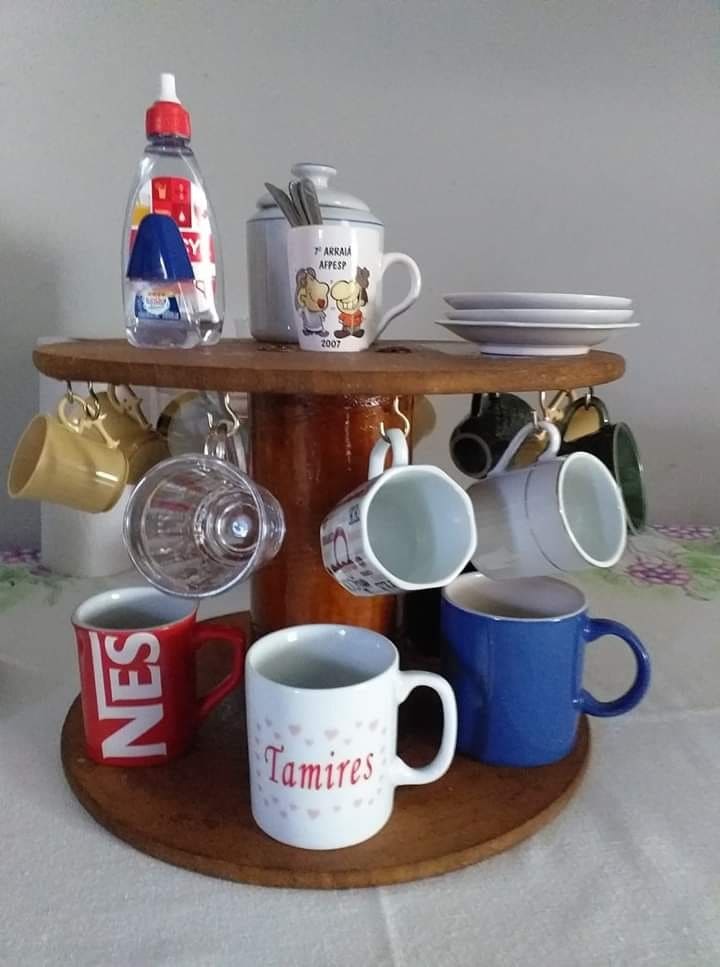
Now your kitchen coming to life with this cable spool mug organizer, a handy spot to showcase your favorite cups.
Bonus, this clever project, costing around $20–30 with a reclaimed spool, adds charm and practicality to your space.
Materials Needed:
- Wooden cable spool (small, about 18-24 inches in diameter)
- Sandpaper (medium grit 120)
- Exterior wood stain and paintbrush
- 6 wooden dowels (6 inches long, ½-inch diameter)
- 12 wood screws
- Drill with screwdriver bit
- Lazy Susan bearing (6-inch diameter)
Step-by-Step Guide:
Step 1: Sand the spool with 120-grit sandpaper to smooth its surface, wiping away dust as you imagine your mugs in place.
Step 2: Apply wood stain with a paintbrush, letting it dry for 6 hours to enhance its warm tone.
Step 3: Attach the lazy Susan bearing to the base with screws, then secure the dowels around the sides for mug hooks.
Step 4: Hang your mugs on the dowels, spin the organizer, and enjoy easy access to your collection.
#14. Cable Spool Wall Clock
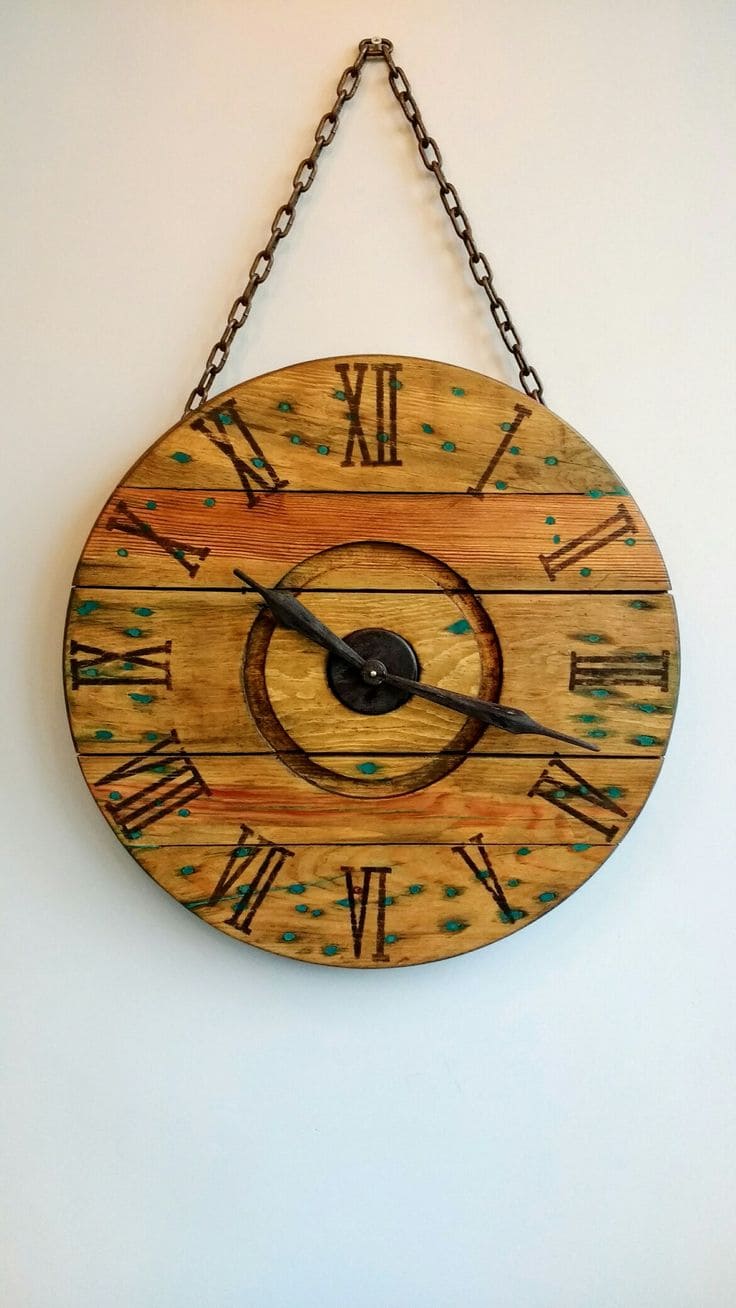
Your living room will be transformed by this cable spool wall clock, a rustic timekeeper that adds warmth to your space.
Materials Needed:
- Wooden cable spool (about 18-24 inches in diameter)
- Sandpaper (medium grit 120)
- Wood stain and paintbrush
- Clock mechanism with hands (½-inch shaft)
- Roman numeral stencils
- Acrylic paint
- 2 chains (12 inches each)
- Drill with ½-inch bit
- 2 wood screws (1-inch)
Step-by-Step Guide:
Step 1: Sand the spool with 120-grit sandpaper to smooth its surface, wiping away dust as you envision a stylish clock.
Step 2: Apply wood stain with a paintbrush, letting it dry for 6 hours to enhance its natural grain.
Step 3: Drill a central hole, install the clock mechanism, and use stencils to paint Roman numerals with teal paint, drying for 2 hours.
Step 4: Finally, attach chains with screws for hanging, mount it on the wall, and watch it keep time with rustic elegance.
#15. Cable Spool Patio Dining Table with Umbrella
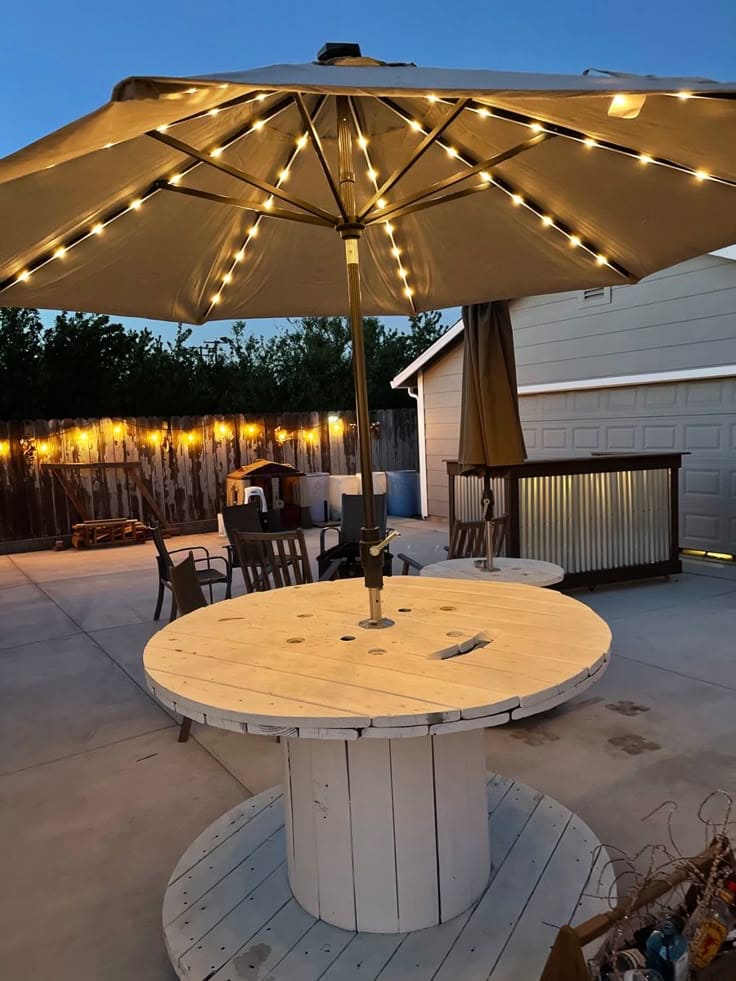
On a perfect summer evening, you can make this cable spool patio dining table with an umbrella. You’ll feel the warmth of the setting sun as the lights twinkle above, creating a cozy outdoor retreat.
Materials Needed:
- Wooden cable spool (medium-sized, about 30-36 inches in diameter)
- Sandpaper (medium grit 120)
- Exterior white paint and paintbrush (2-inch wide)
- Patio umbrella with lights (9-foot diameter)
- Umbrella base (50 lbs)
- 4 wood screws (1.5-inch)
- Drill with screwdriver bit
Step-by-Step Guide:
Step 1: Sand the spool with 120-grit sandpaper to smooth its surface, wiping away dust as you picture a lit-up patio night.
Step 2: Paint the spool white with exterior paint, applying two coats with a 4-hour dry time, imagining its bright charm.
Step 3: Drill a central hole in the spool top to fit the umbrella pole, securing it with screws, and place the base underneath.
Step 4: Set up the umbrella, turn on the lights, and arrange chairs around, ready to enjoy a delightful outdoor meal.
#16. Cable Spool Crescent Swing
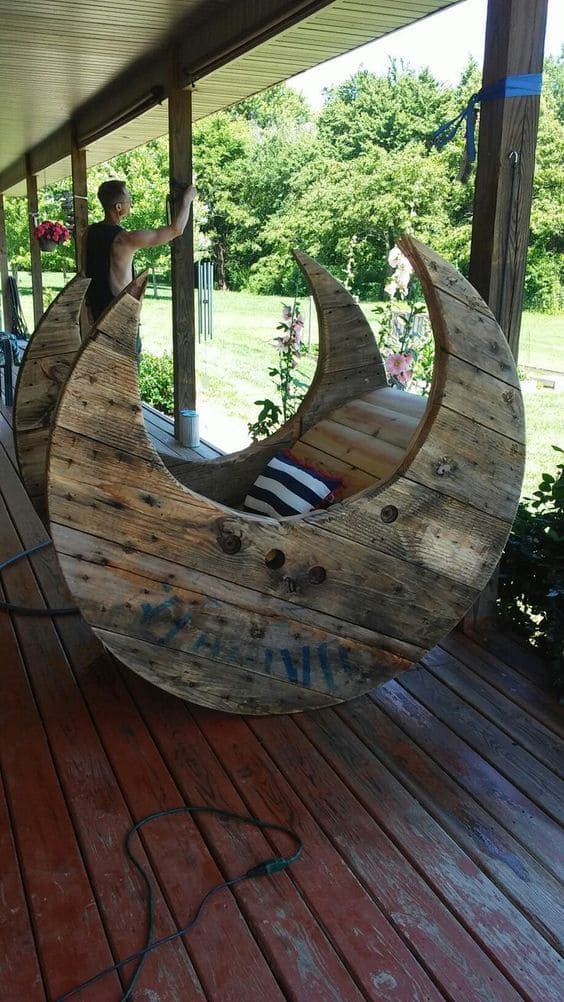
You’ll feel a peaceful joy as you craft this cozy seat with a curved back, perfect for relaxing. This charming project adds a unique touch to your outdoor retreat.
Materials Needed:
- Wooden cable spool (medium-sized, about 30-36 inches in diameter)
- Sandpaper (medium grit 120)
- Exterior wood sealant and paintbrush (2-inch wide)
- Cushion (24×24 inches)
- 2 heavy-duty chains (6 feet each, ¼-inch thick)
- 2 ceiling hooks (100 lbs capacity)
- Drill with screwdriver bit
- 8 wood screws (1.5-inch)
Step-by-Step Guide:
Step 1: Sand the spool with 120-grit sandpaper to smooth its surface, wiping away dust as you picture a relaxing swing.
Step 2: Apply wood sealant with a paintbrush, letting it dry for 6 hours to protect it from the elements.
Step 3: Cut and shape the spool into a crescent, securing the back with screws, then attach chains to each side.
Step 4: Install ceiling hooks on the porch, hang the swing with chains, add the cushion, and sway into your peaceful evening.
#17. Cable Spool Elevated Side Table
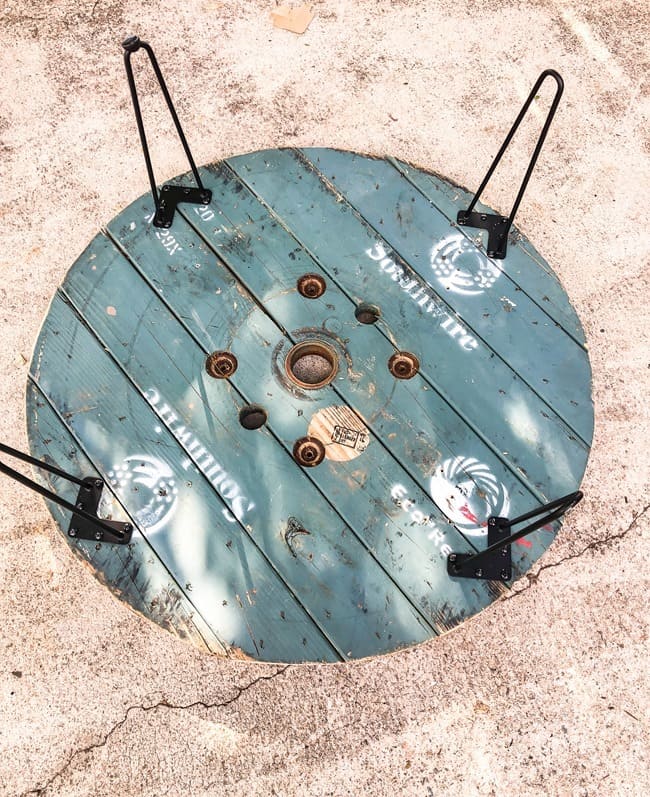
What about adding a touch of modern flair to your patio with this cable spool elevated side table?
You’ll feel a sense of accomplishment as you transform a rugged spool into a sleek surface with sturdy legs, perfect for a quiet drink, something I enjoyed last weekend at dusk.
Materials Needed:
- Wooden cable spool (medium-sized, about 24-30 inches in diameter)
- Sandpaper (medium grit 120)
- Teal exterior paint and paintbrush (2-inch wide)
- 4 metal table legs (12-16 inches tall)
- 16 wood screws (1.5-inch)
- Drill with screwdriver bit
Step-by-Step Guide:
Step 1: Sand the spool with 120-grit sandpaper to smooth its surface, wiping away dust as you envision its new look.
Step 2: Apply teal paint with a paintbrush, using two coats with a 4-hour dry time, letting the color pop in the sunlight.
Step 3: Attach the metal legs evenly around the base with screws and a drill, ensuring a stable lift for your table.
Step 4: Place it on your patio, add a drink or decor, and enjoy its elevated charm under the evening sky.
#18. Recycled Cable Spool Bookcase Table
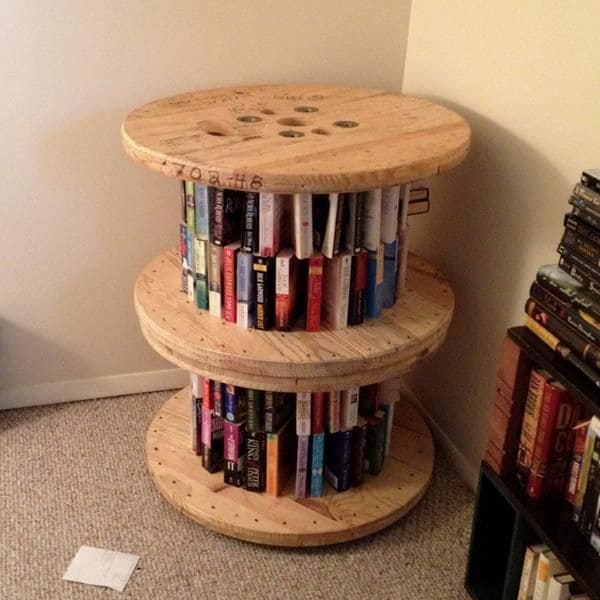
If you’re someone who’s constantly juggling stacks of books and never seems to have enough shelving, this clever upcycled cable spool bookcase might just be your dream project.
The best part is that it holds dozens of books without taking up too much floor space, and you don’t need fancy tools or carpentry skills to make it happen.
Materials Needed
- 2 wooden cable spools
- 1 long threaded rod
- Washers and nuts (if using threaded rod)
- Drill and bits
- Wood screws
- Sandpaper
- Wood stain or sealant (optional)
- Books
- Level and tape measure
Step-by-step Guide
Step 1: Sand down both spools thoroughly to smooth out any splinters. You can keep the raw industrial look or stain them for a polished finish.
Step 2: Decide the height between the spools, then you drill a hole through the center of both for the rod.
Step 3: Insert the bottom spool first and screw it into place. Now, you can stack books vertically around the perimeter.
Step 4: Add the second spool on top, repeat the vertical book stacking, then top it off with the final spool.
#19. Recycled Cable Spool Wall Shelf Garden
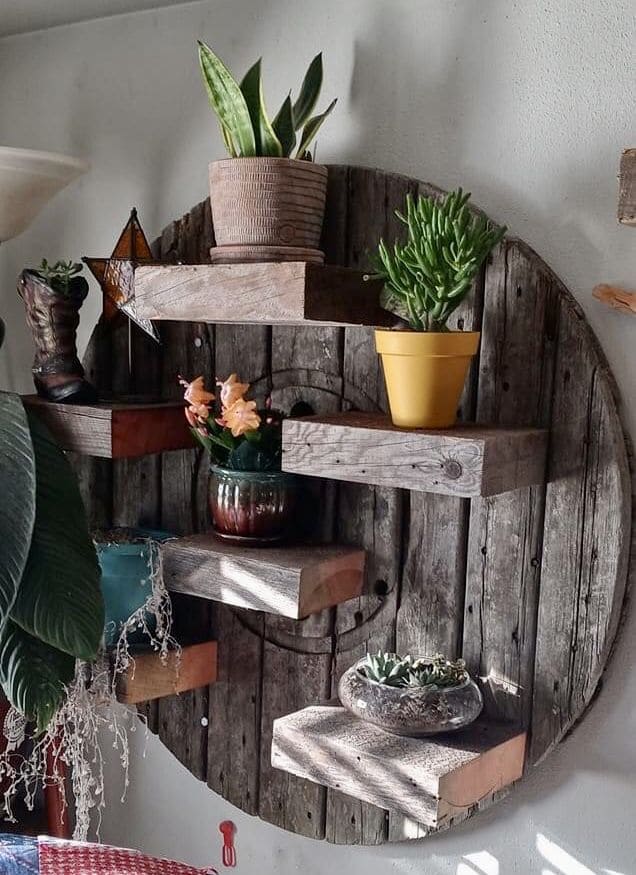
You can see this wall-mounted shelf, made from half a cable spool, is a rustic celebration of reclaimed charm and green living.
Perfect for showing off your favorite succulents or trailing houseplants, it turns a blank wall into a vertical garden with character.
Materials Needed
- 1 large wooden cable spool top
- 6 sturdy wood blocks
- Sandpaper (80 and 120 grit)
- Wood screws or nails
- Drill
- Wall mounting hardware
- Level and tape measure
- Wood stain or clear sealant (optional)
Step-by-step Guide
Step 1: Clean and sand the spool top. You can keep the weathered look or apply a wood stain or sealant to enhance it.
Step 2: Cut thick wood blocks to use as shelf pieces. Sand edges for safety, then arrange them on the spool face to create a balanced composition.
Step 3: Attach the blocks using wood screws drilled from the back, or use heavy-duty brackets for added strength.
Step 4: Secure the entire spool structure to the wall using proper anchors. Then decorate with lightweight potted plants, succulents, or small collectibles.
#20. Cozy Cable Spool Upholstered Stool
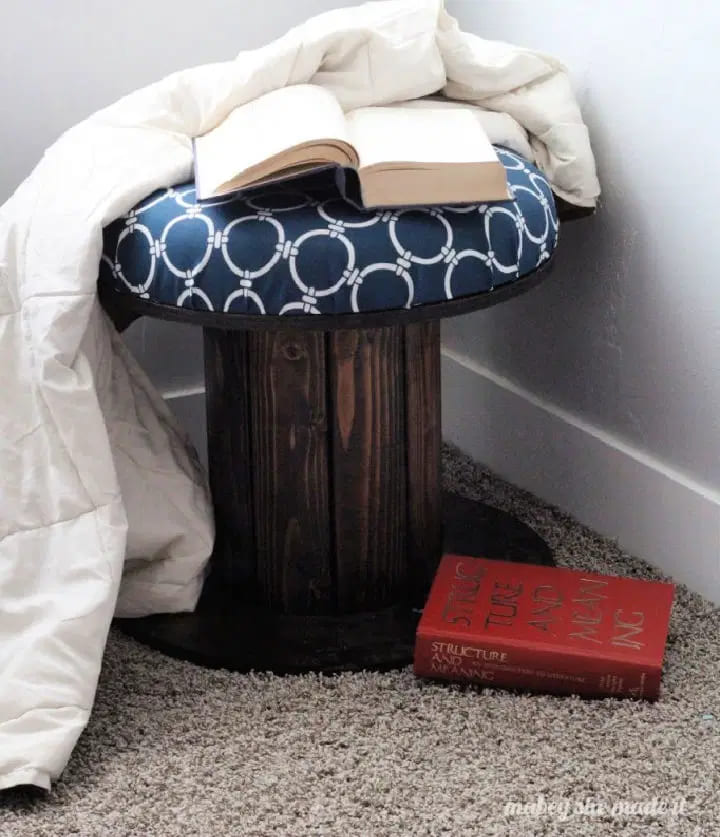
This upholstered cable spool stool is one of those pieces, a soft, round perch that feels right at home beside a bed, in a reading nook, or tucked in a cozy corner.
I made one during a rainy weekend, turning a discarded spool and an old foam cushion into a seat that practically begged for a book and a blanket.
Materials Needed
- 1 wooden cable spool (small to medium size)
- Sandpaper (80 and 120 grit)
- Wood stain and sealer
- Foam cushion
- Upholstery fabric (1/2 yard)
- Staple gun + staples
- Screws or construction adhesive (optional)
Step-by-step Guide
Step 1: Sand the entire spool thoroughly to remove any splinters or rough patches. Then start with coarse grit and finish with fine grit for smoothness.
Step 2: Apply your chosen wood stain or paint to the spool.
Step 3: Wrap the foam cushion with your fabric, pulling it tight around the edges. Next, use a staple gun to secure the fabric underneath the cushion.
Step 4: Finally, place the cushioned top onto the spool, then secure with construction adhesive or screws if you want it permanently fixed.

