Many people struggle with finding the perfect rug to elevate their indoor decor, especially when it comes to styles that don’t require sewing. It’s frustrating to search for a rug that matches your room’s aesthetic and fits your budget.
But what if you could craft your own stunning rug without the need for complicated sewing? DIY rug projects offer a creative, fun, and cost-effective way to customize your home with personalized, beautiful pieces.
Whether you’re looking for a cozy texture underfoot or a bold statement piece, these 16 impressive DIY rug ideas are easy to make and guaranteed to refresh any room in your home.
#1. DIY Hula Hoop T-Shirt Rug
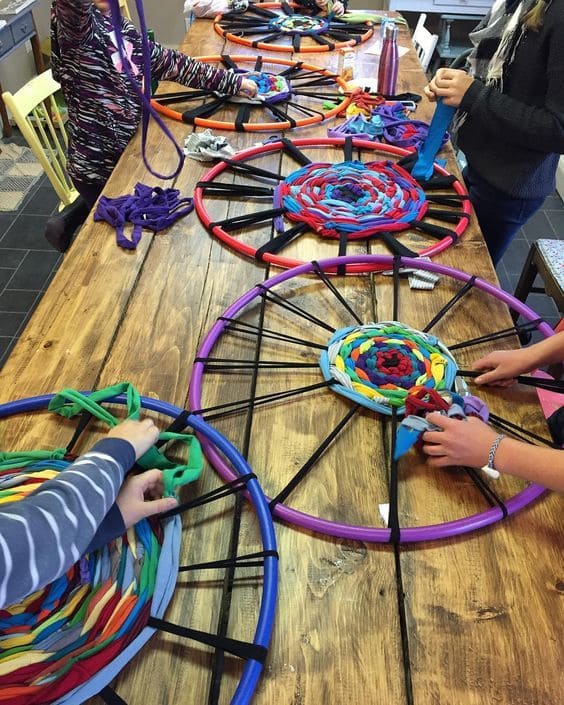
Are you ready for a burst of color and a dash of fun? Dive into this hula hoop T-shirt rug project, where you’ll weave a rainbow of fabric into a stunning, circular masterpiece.
The best part is that you can gather your friends or family for a collaborative craft session and watch your space bloom with vibrant energy.
Materials Needed
- 8–10 large old T-shirts
- 1 hula hoop (36-inch diameter)
- Scissors
- 8–10 elastic bands (each 12 inches long)
- Needle and thread or fabric glue
Step-by-Step Guide
Step 1: Grab your T-shirts and cut them into 1-inch wide strips, stretching each strip to curl into a cord. You’ll need about 50-60 strips for a full hoop rug.
Step 2: Tie the hula hoop to a stable surface with elastic bands, creating a secure frame. Start weaving the T-shirt strips over and under the hoop, working in a spiral from the center outward.
Step 3: Keep weaving tightly, adding new strips by knotting them to the ends as needed. Now you can use thread to secure loose ends.
Step 4: Once the hoop is covered, trim any excess fabric and secure the final edge with glue or stitches.
#2. Braided Fabric Rug DIY Project
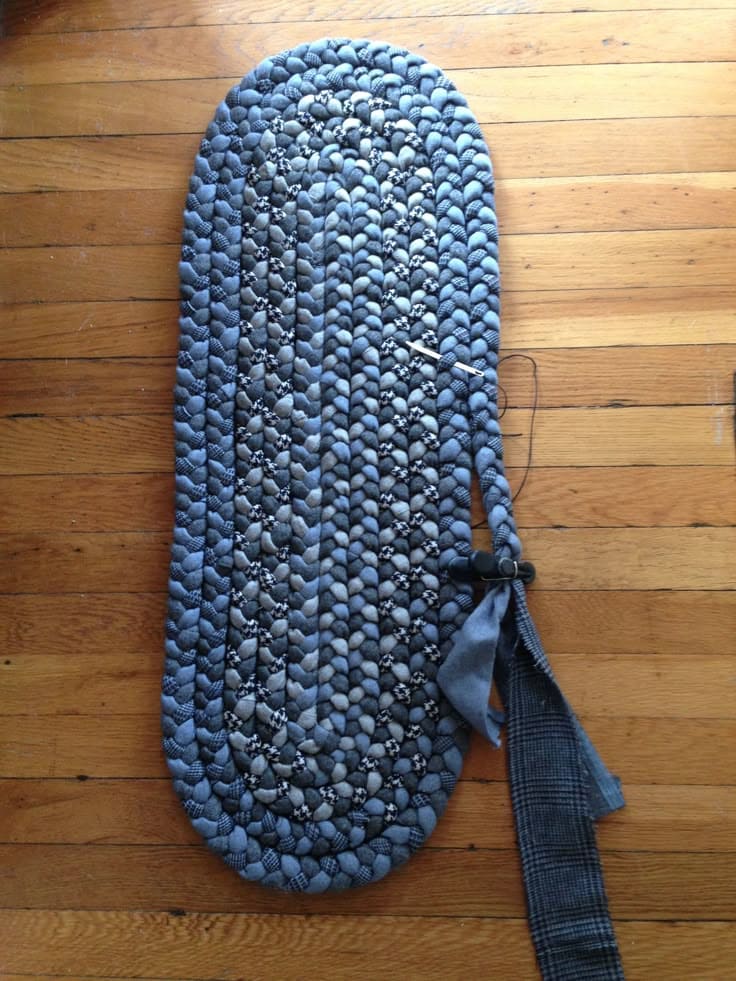
This simple yet charming rug is made by braiding fabric strips and stitching them into a circular or oval pattern, adding a unique touch to any space.
Whether you’re upcycling old clothes or choosing new fabric in your favorite patterns, this project offers a great way to express your style while crafting something functional for your home.
Materials Needed:
- 2-3 yards of fabric (mix of colors/patterns of your choice)
- 1 pair of fabric scissors
- 10-12 cloth clips
- 1 spool of thread or yarn
- 1 large-eye sewing needle
- Optional: Non-slip rug backing
Step-by-Step Guide:
Step 1: Cut your fabric into strips about 1-2 inches wide. You can use old t-shirts, denim, or any fabric you love to give your rug a unique look.
Step 2: Next, begin braiding them by grouping three strips at a time and tying them at one end. Continue braiding until you have several long braids.
Step 3: Lay the braids on the floor, arranging them in an oval shape, then use the cloth clips to secure the braids in place as you arrange them.
Step 4: Sew them together using a needle and thread. You can use a whip stitch to join the edges of the braids.
Step 5: Once all the braids are stitched together, trim any loose threads.
#3. DIY Denim Patchwork Rug
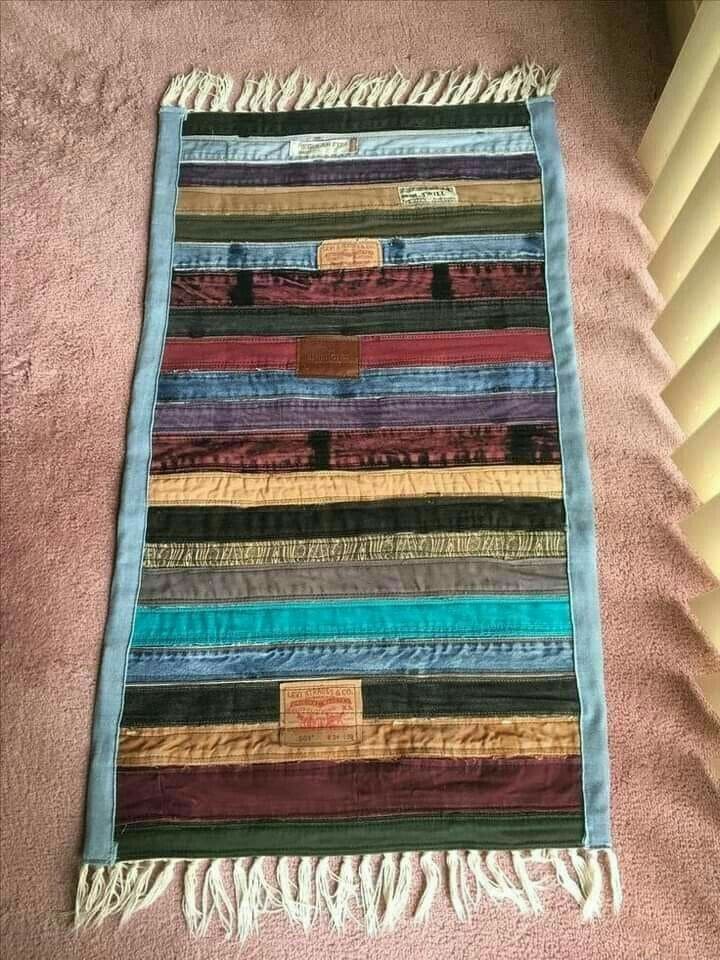
This denim patchwork rug is a treasure crafted from your favorite faded jeans.
Specially, each strip tells a story that those worn-in knees, that camping trip stain now stitched together into a vibrant, earthy tapestry for your floor.
Materials Needed
- 4–6 pairs of old jeans
- Scissors
- Sewing machine or needle and thread
- Yarn (about 20 yards)
- Ruler
Step-by-Step Guide
Step 1: Grab your old jeans and cut the legs into 2-inch wide strips, varying lengths from 10 to 15 inches to create a patchwork effect. You’ll need about 30-40 strips.
Step 2: Lay the strips side by side in a pattern you love, mixing colors and textures. Then sew them together along the long edges.
Step 3: Fold the edges of the panel under and sew a hem along the sides for a clean finish. Next, attach yarn to the short ends.
#4. DIY Pom-Pom Bliss Rug
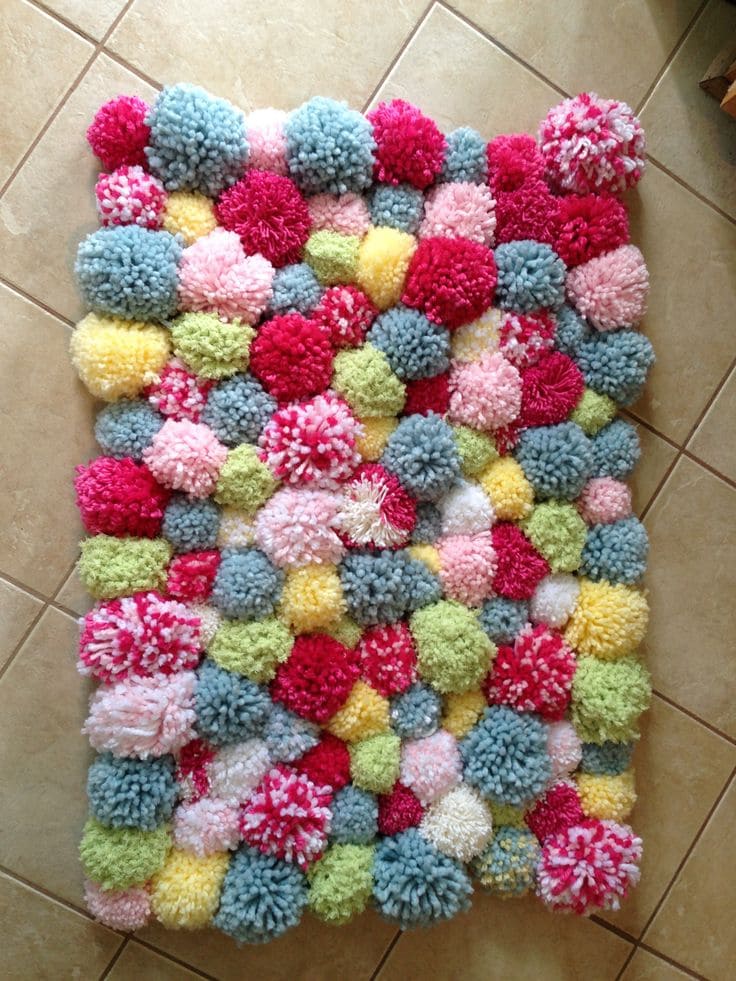
This project turns yarn into a soft, vibrant carpet that feels like stepping into a candy-coated garden.
In addition, it’s a cheerful, eco-friendly way to repurpose scraps, perfect for a kid’s room or a cozy reading nook on a lazy afternoon.
Materials Needed
- Yarn: 6–8 skeins (100g each) in assorted bright colors
- Pom-pom maker (2-inch diameter)
- Canvas base (24×36 inches)
- Scissors
- Hot glue gun and gloves
Step-by-Step Guide
Step 1: Grab your yarn and wrap it around the pom-pom maker about 80–100 times. Then tie the center tightly, cut the loops, and trim into a fluffy ball. You want to make 50–60 pom-poms for a 24×36-inch rug.
Step 2: Lay the canvas flat, then arrange the pom-poms in a random or patterned layout.
Step 3: Use the hot glue gun to attach each pom-pom to the base, pressing gently to keep them plump.
#5. DIY Knitted Patchwork Rug
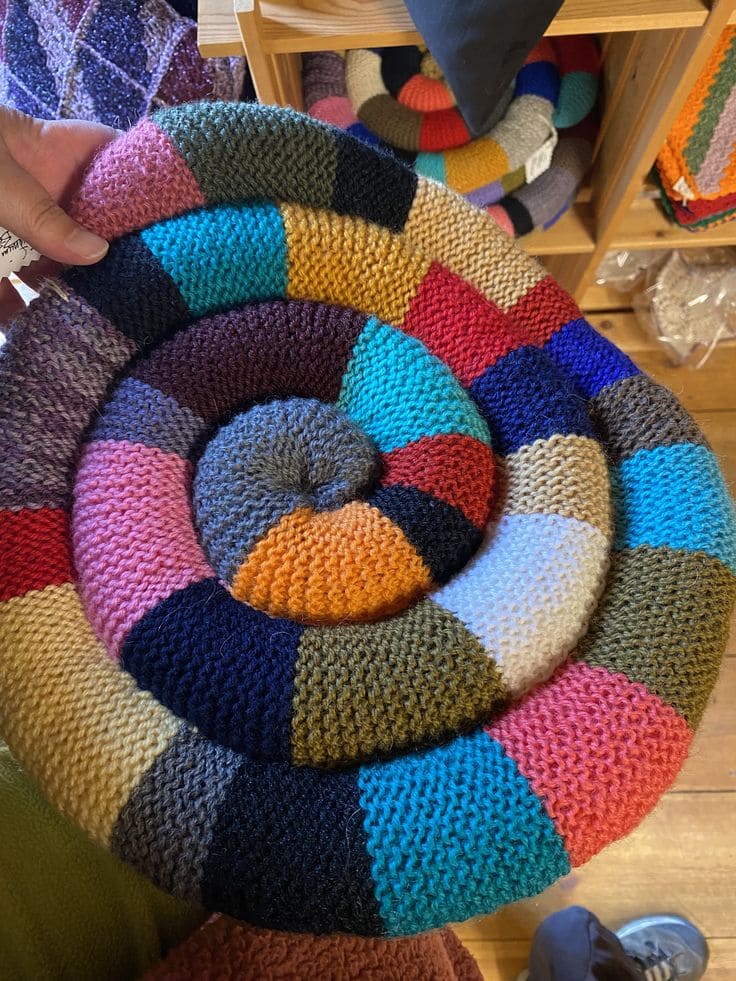
Oh, let’s embark on a cozy crafting journey with this knitted patchwork rug, a swirling kaleidoscope of colors that’ll warm your heart and floor!
This project is also a loving tribute to nature’s hues, turning leftover threads into a snug haven for your feet.
Materials Needed
- Yarn: 8–10 skeins (100g each) in assorted colors
- Knitting needles (size 8mm)
- Scissors
- Needle and thread or yarn needle
- Non-slip mat (optional)
Step-by-Step Guide
Step 1: Grab your yarn and knit small 4×4-inch squares using your needles, mixing colors as you go. You’ll need about 30-40 squares for a 24-inch rug.
Step 2: Sew the squares together side by side with a yarn needle, forming a long strip, then coil the strip into a spiral, stitching as you go to hold the shape.
Step 3: Continue coiling and sewing, keeping the spiral tight and even, until you reach your desired size.
Step 4: Secure the final edge with extra stitches. Add a non-slip mat underneath if you like.
#6. DIY Boho Fringe Rug
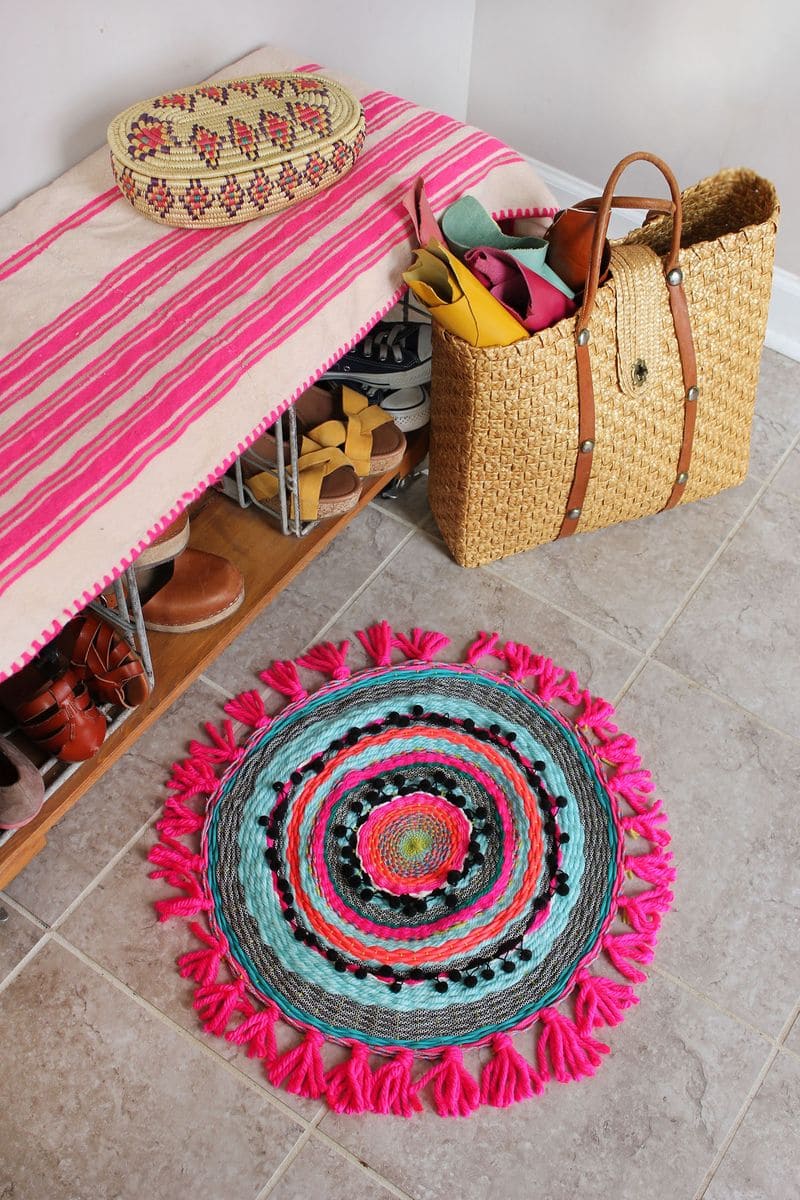
If you are looking for a budget-friendly rug to jazz up your entryway like a festival of joy, here is your solution.
This craft lets you weave together fabric scraps into a playful, textured masterpiece, complete with funky fringes that dance with every step.
Materials Needed
- 8-10 fabric scraps
- Scissors
- Needle and thread or hot glue gun
- Yarn (about 20 yards)
- Ruler
Step-by-Step Guide
Step 1: Grab your fabric scraps and cut them into 1-inch wide strips, then roll each into a tight cord. You’ll need about 30-40 cords for a 24-inch rug.
Step 2: Start coiling one cord into a tight spiral, stitching the edges together as you go. You can also add more cords, connecting them to build outward in a circular pattern.
Step 3: Once the base is complete, cut yarn into 6-inch pieces and tie them around the outer edge to create fringe, spacing them evenly.
Step 4: Trim the fringe for a uniform look and check all connections.
#7. DIY Coiled Fabric Rug
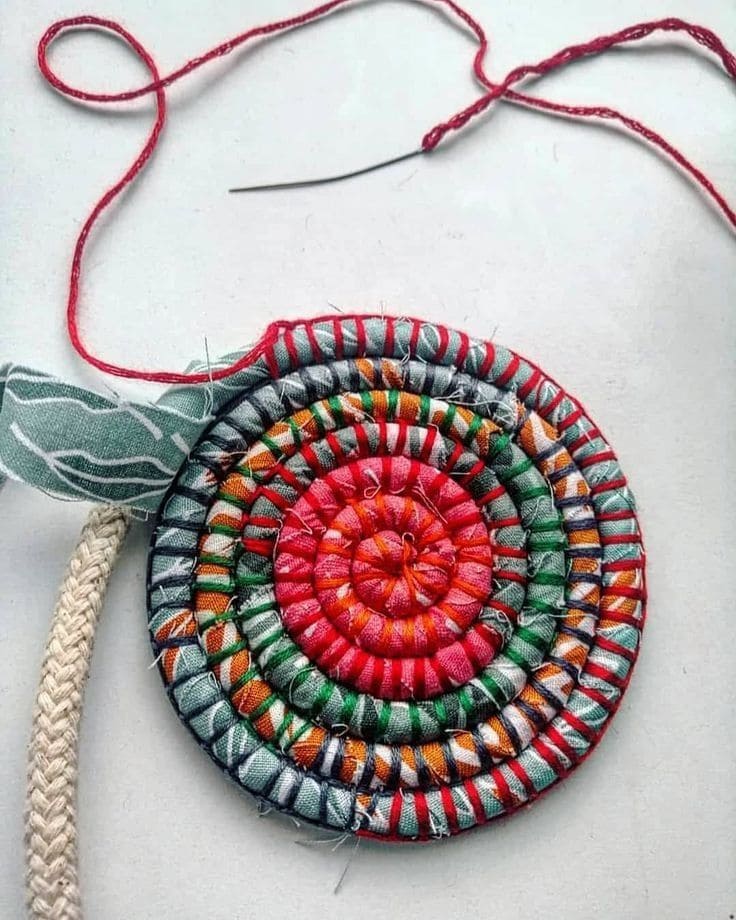
Let your creativity spiral into something beautiful with this coiled fabric rug, a vibrant explosion of color that feels like a garden blooming underfoot. This project invites you to stitch together scraps of fabric into a sturdy, eye-catching piece, perfect for a meditation corner or a kitchen nook. It’s a gentle nod to nature, reusing materials with love, and the rhythmic coiling process is as soothing as a walk in the woods. Get ready to craft a rug that’s as unique as your spirit!
Materials Needed
- 8-10 fabric scraps
- Strong red thread
- Needle
- Scissors
- Rope or cord (optional, 10 feet long)
Step-by-Step Guide
Step 1: Grab your fabric scraps and cut them into 1-inch wide strips, then roll each strip into a tight cord. You’ll need about 20-30 cords for a 12-inch rug.
Step 2: Take one cord and begin coiling it tightly into a circle, using the needle and thread to stitch the edges together as you go. You can add more cords by overlapping and sewing them to the end.
Step 3: Continue coiling and stitching, building outward in a spiral, keeping the tension even.
Step 4: Once you reach your desired size, secure the final edge with extra stitches.
#8. DIY Denim Scrap Rug
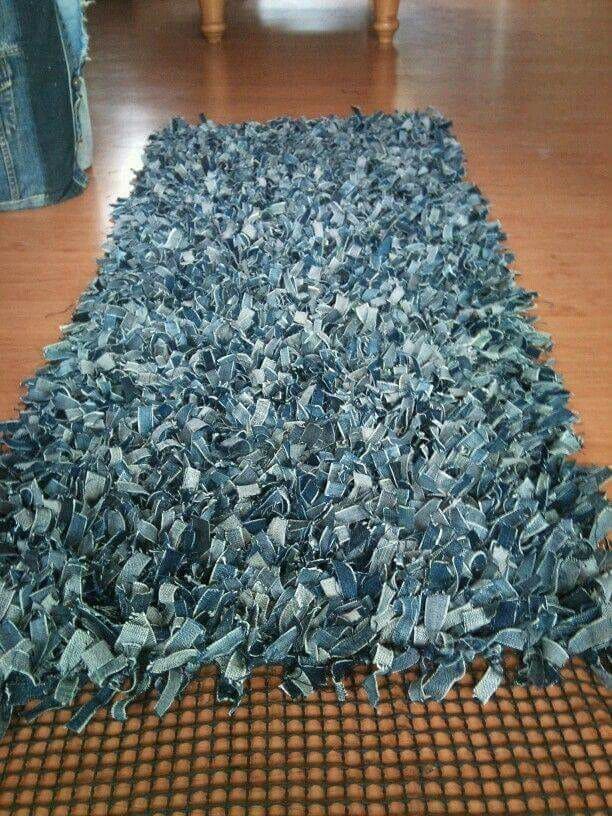
Instead of throwing away worn-out jeans, you can turn them into a rugged, stylish rug that’s pure personality.
Moreover, this project is like giving your favorite denim a second act, transforming faded fabrics into a textured masterpiece that anchors your space with earthy charm.
Materials Needed
- 4–6 pairs of old jeans
- Scissors
- Rubber mat (24×36 inches)
- Hot glue gun and glue sticks
- Needle and thread (optional)
Step-by-Step Guide
Step 1: Grab your old jeans and cut them into 2-inch wide strips, then snip those into 4-inch pieces to create small denim scraps. You’ll need about 200-300 pieces for a 24×36-inch rug.
Step 2: Lay the rubber mat backing flat. Start attaching the denim scraps by gluing them upright onto the surface, pressing each piece firmly to stand like a tiny forest.
Step 3: Next, let the glue set for 2–3 hours, then add a few stitches for extra strength if you like.
Step 4: Flip the rug over and trim any uneven edges for a neat finish.
#9. DIY Rope Circle Rug
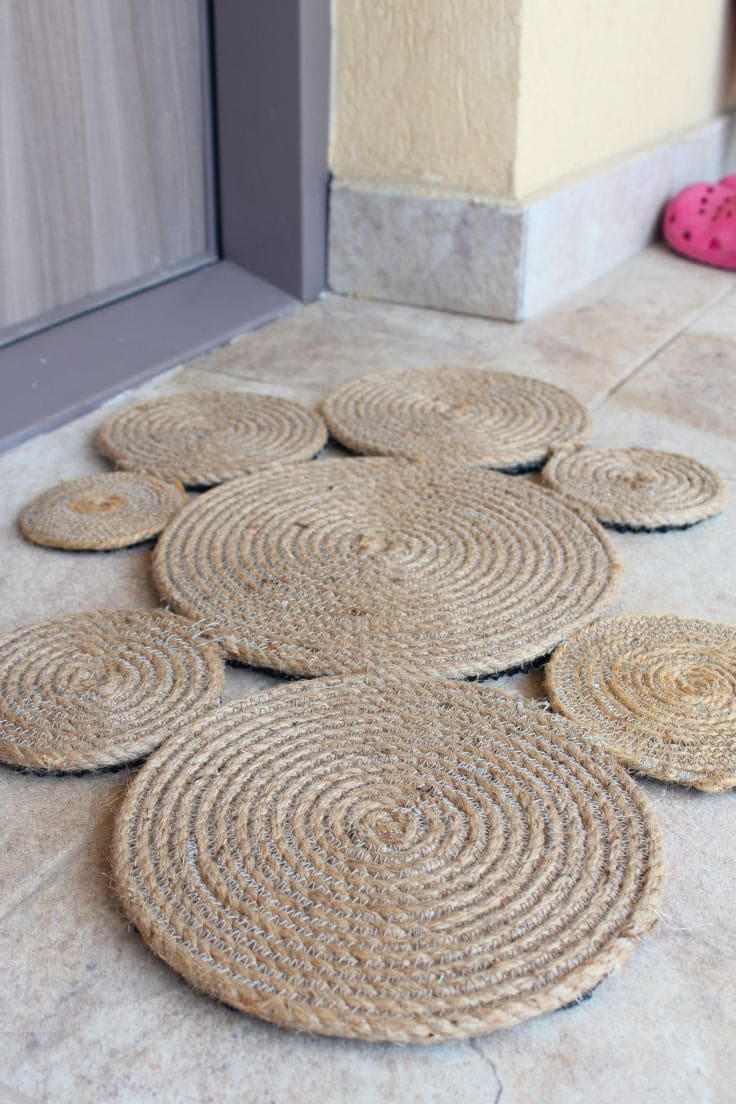
I believe any guests who visit your home will be surprised by this earthy rug made of coiled rope circles, and greeting them with rustic charm at doorstep.
Plus, this project is your chance to roll up some natural jute into a playful, paw-shaped masterpiece, perfect for a budget-friendly, nature-loving vibe.
Materials Needed
- Jute or sisal rope (50-60 feet, 1/2-inch thick)
- Hot glue gun and glue sticks
- Scissors
- Non-slip mat (optional, cut to 24×36 inches)
- Ruler
Step-by-Step Guide
Step 1: Grab your jute rope and start coiling it tightly into a small circle, about 6 inches in diameter, securing the layers with hot glue as you go. You can make 7-8 circles of varying sizes.
Step 2: Arrange the circles into a paw shape on the floor, gluing them together where they touch to form a cohesive rug.
Step 3: Add extra glue to the edges and let it set for 1–2 hours to ensure durability.
Step 4: Attach a non-slip mat underneath if desired, then place your rustic rug by the door to welcome you home!
#10. DIY Spiral Yarn Rug
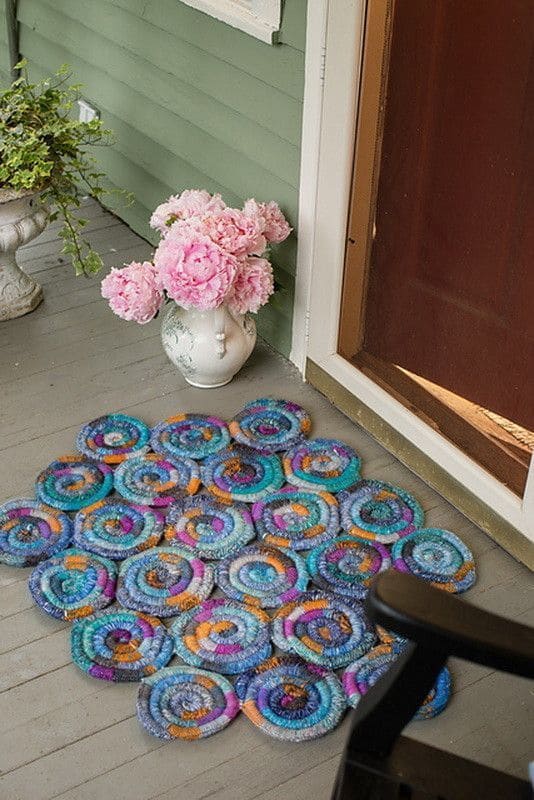
Nothing better than sipping tea on a quiet evening, surrounded by this handmade treasure that echoes the hues of a sunset.
Furthermore, you can imagine stepping onto a vibrant spiral rug that feels like a burst of wildflowers under your feet, welcoming you home with every twist of color.
Materials Needed
- Yarn: 8-10 skeins (100g each) in assorted colors
- Scissors
- Needle and thread or fabric glue
- Non-slip mat (optional, cut to 24-inch diameter)
Step-by-Step Guide
Step 1: Grab your yarn and cut it into 2-inch wide strips, then roll each strip into a tight coil. You’ll need about 30-40 coils for a 24-inch rug.
Step 2: Take one coil and stitch or glue it to another, forming a spiral pattern. Continue adding coils, sewing or gluing them together as you build outward.
Step 3: Keep the spiral tight and even, adjusting as needed to maintain a circular shape.
Step 4: Once complete, you can attach a non-slip mat underneath if desired.
#11. DIY Felted Pebble Rug
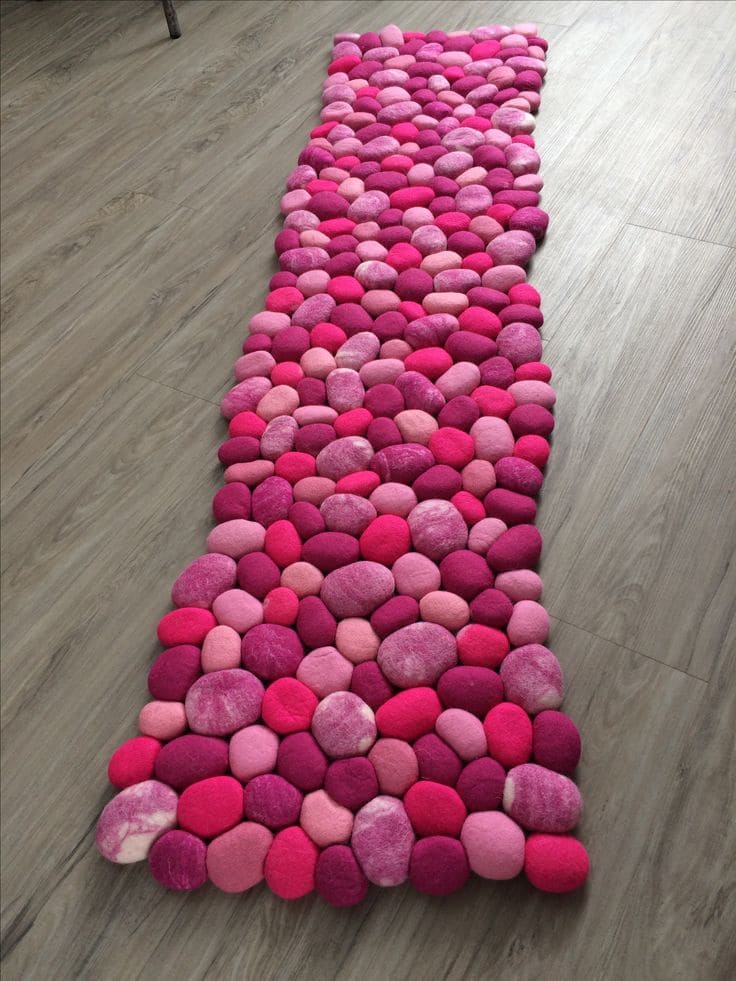
Oh, what a delight awaits with this felted pebble rug, a cascade of rosy stones that’ll tickle your toes with every step!
This eco-friendly project turns wool into a plush, vibrant runner, perfect for a hallway or entryway. Bonus, your kids will be amazed and play with!
Materials Needed
- Wool roving (2–3 lbs) in various pink shades
- Felting needles (size 36–38)
- Foam pad (large enough for a 24×60-inch workspace)
- Hot water and soap
- Scissors
Step-by-Step Guide
Step 1: Grab your wool roving and roll small pebble-shaped pieces, about 2–3 inches long, felting them with the needle on the foam pad until firm. You need to make 100-120 pebbles for a 24×60-inch rug.
Step 2: Arrange the pebbles in a single layer, side by side, forming a long runner pattern on the foam pad.
Step 3: Wet the wool with hot, soapy water, then gently press and rub the pebbles together to felt them into a cohesive mat.
Step 4: Let it dry completely, then trim any stray fibers.
#12. DIY Tie Quilt Rug
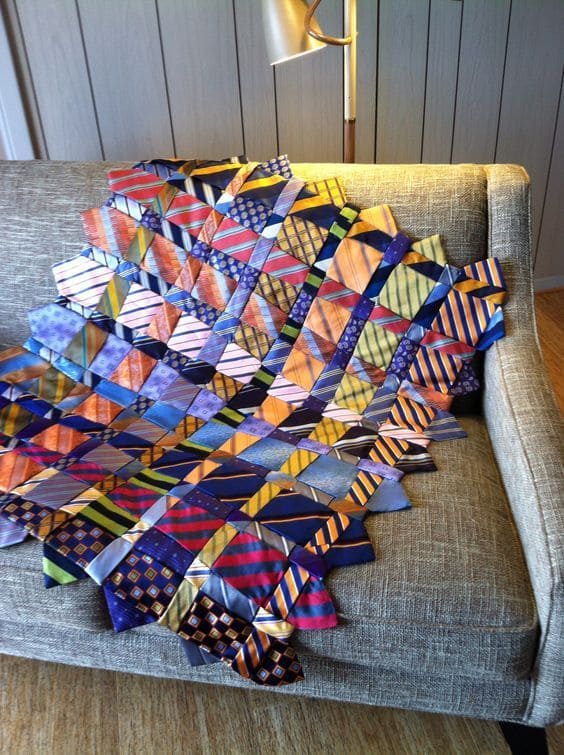
Last Father’s day, I had an idea of making keepsake gift to give my dad, then his neckties appeared as a way to remind me of our memories.
Of course, I completed one with vibrant colors and my dad was so proud of my present.
Materials Needed
- 30-40 assorted-color neckties
- Sewing machine or needle and thread
- Scissors
- Backing fabric (24×36 inches)
- Ruler
Step-by-Step Guide
Step 1: Grab your neckties and cut them into 2-inch wide sections, removing linings, to create about 100-120 pieces for a 24×36-inch rug.
Step 2: Lay the tie pieces side by side in a pattern you love, then sew them together along the edges, either by hand or with a machine to form a panel.
Step 3: Attach the panel to the backing fabric, stitching around the edges and adding extra seams for durability.
Step 4: Trim any uneven edges and press flat.
#13. DIY Patchwork Play Mat
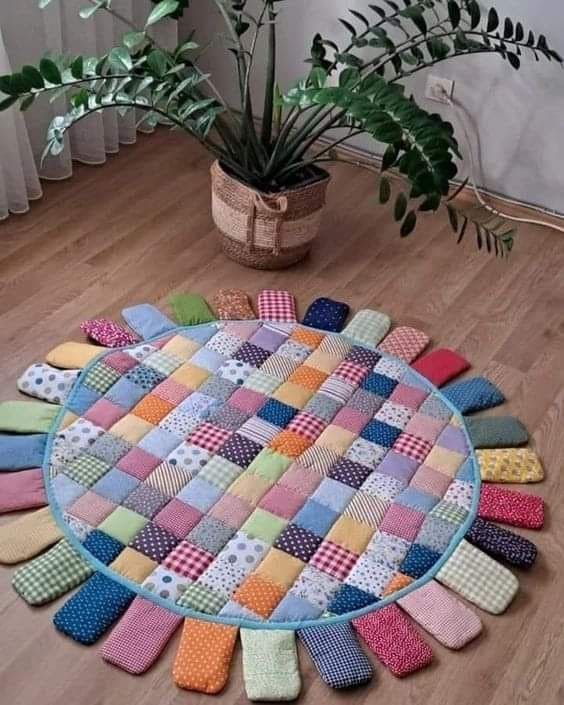
This nature-inspired project is perfect for a kid’s corner, blending thrifty fabric scraps into a cozy, eco-friendly haven. You can roll up your sleeves and let’s weave some joy into your space!
Materials Needed
- 8-10 fabric scraps
- Sewing machine or needle and thread
- Scissors
- Backing fabric (36-inch diameter)
- 1 bag of stuffing
Step-by-Step Guide
Step 1: Grab your fabric scraps and cut them into 4×4-inch squares, making about 100-120 pieces for a 36-inch mat, plus 20-25 strips for tabs.
Step 2: Sew the squares together in a grid pattern, then attach the backing fabric, leaving edges open for tabs.
Step 3: Cut the strips into 4×2-inch pieces, stuff lightly, and sew them into tubes. Attach the tabs around the edge, spacing evenly.
Step 4: Stitch the edges closed and press flat, then lay your vibrant mat down.
#14. DIY Yarn Flower Rug
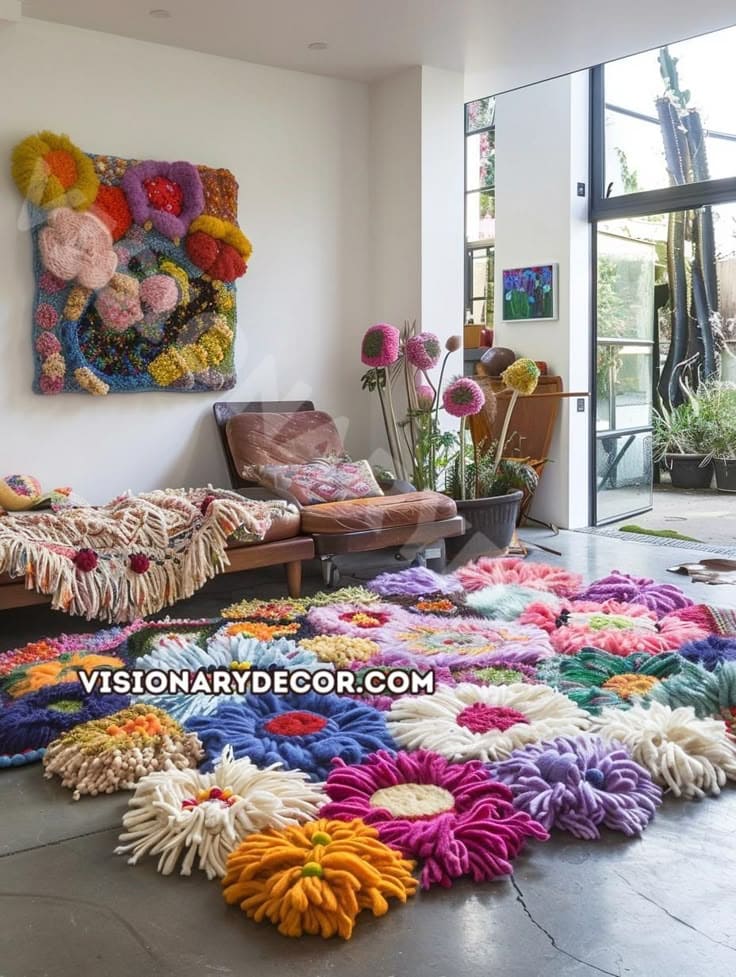
If you are looking for a new rug replacing the traditional ones, try this one as each fluffy petal, crafted with love from colorful yarn, invites you to step into a whimsical wonderland.
Moreover. this eco-friendly project is perfect for adding a splash of nature’s joy to your living room, blending thrift with creativity.
Materials Needed
- Yarn: 8–10 skeins (100g each) in assorted bright colors
- Felting needles (size 36–38)
- Foam pad (large enough for a 36×48-inch workspace)
- Scissors
- Backing fabric (optional, 36×48 inches)
Step-by-Step Guide
Step 1: Grab your yarn and shape it into flower forms on the foam pad, felting the strands with the needle to create 10–15 large petals and centers for a 36×48-inch rug.
Step 2: Arrange the flowers in a pattern on the floor, felting them together where they overlap to form a cohesive mat.
Step 3: Continue felting until the design is firm, adding more yarn as needed for fullness.
Step 4: Attach a backing fabric underneath if desired, then place your vibrant rug to brighten your room!
#15. DIY Felt Ball Rug
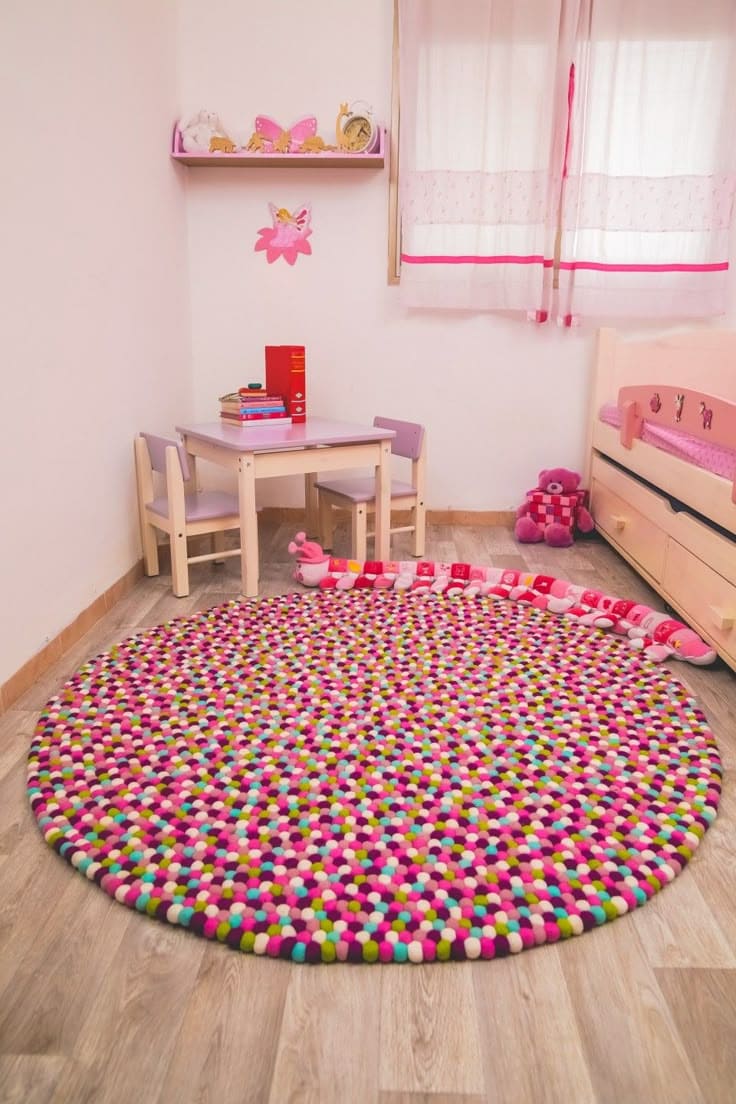
Pom-poms are always available in my children’s room and the first project when we do any project.
If your family are the same, let’s spin a fairy tale with this felt ball rug, a whimsical whirl of colorful pom-poms that’ll weave some magic for those little feet!
Materials Needed
- Wool roving (2–3 lbs) in assorted bright colors
- Felting needles (size 36–38)
- Foam pad (large enough for a 36-inch diameter workspace)
- Hot glue gun and glue sticks
- Backing fabric (optional, 36-inch diameter)
Step-by-Step Guide
Step 1: Grab your wool roving and roll small balls, about 1–2 inches, felting them with the needle on the foam pad until firm. You should make 300-400 balls for a 36-inch rug.
Step 2: Arrange the balls in a tight, circular pattern on the floor or backing fabric, ensuring full coverage.
Step 3: Use the hot glue gun to secure the balls in place, working in sections and letting the glue set as you go.
Step 4: Add a backing fabric underneath if desired, then place your vibrant rug where it can spark delight!
#16. DIY Pom-Pom Landscape Rug
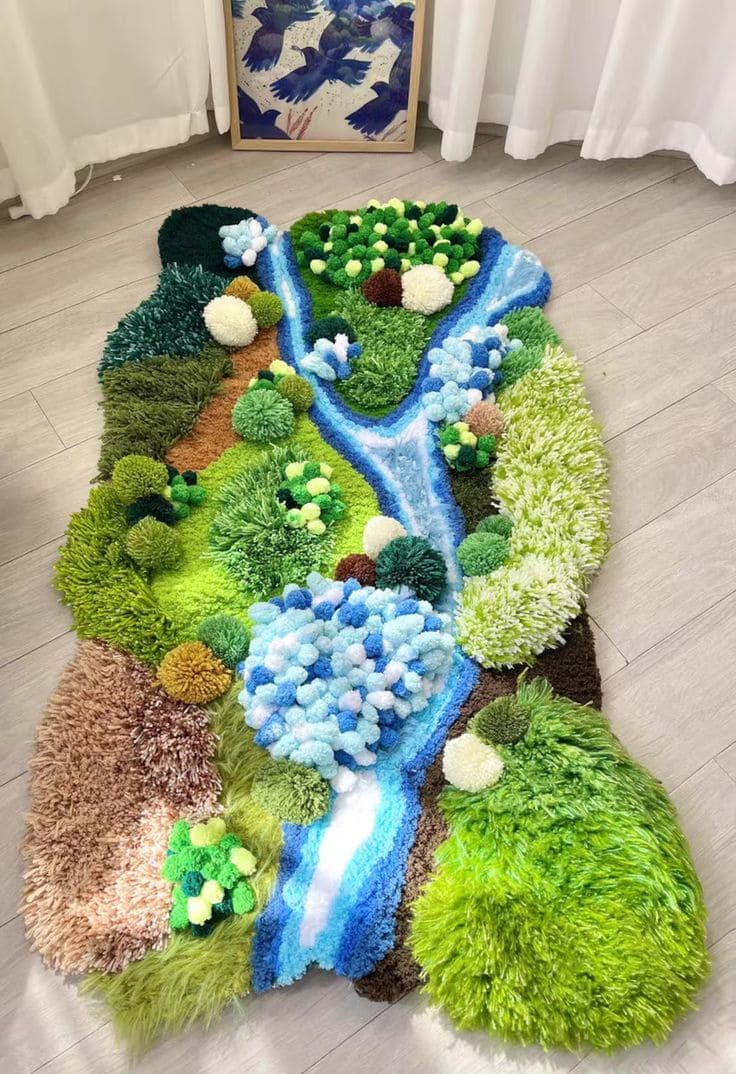
Wow, the first time I see this project, I feel like stepping into a dreamy world with pom-pom landscape rug, a vibrant meadow of yarn that brings a forest and stream to life underfoot.
Although it looks complicated, you just need a little patient and follow my following guide.
Materials Needed
- Yarn: 8–10 skeins (100g each) in green, blue, brown, and white
- Pom-pom maker (various sizes, 1–3 inches)
- Scissors
- Hot glue gun and glue sticks
- Backing fabric (optional, 24×48 inches)
Step-by-Step Guide
Step 1: Grab your yarn and wrap it around the pom-pom maker or cardboard to create pom-poms in different sizes, using greens for hills, blue for the river, and brown/white for details. Make 200–300 pom-poms.
Step 2: Arrange the pom-poms on the floor in a landscape pattern—hills, river, and accents—laying out the design first.
Step 3: Use the hot glue gun to attach the pom-poms to the backing fabric or directly to each other, working section by section.
Step 4: Let the glue set, then place your lush rug where it can bring a touch of nature indoors!
