Candles have a magical way of transforming any room, instantly warming it up with a soft glow and calming energy. But let’s be honest: a beautiful candle deserves an equally beautiful holder.
That’s where these 22 DIY candle holder ideas come in. Whether you love rustic charm, modern minimalism, or whimsical flair, you’ll find a project that speaks to your style.
Many of these ideas use items you probably already have at home, making them as budget-friendly as they are beautiful. From cozy table centerpieces to creative wall-mounted designs, these DIYs will light up your space and your creativity.
#1. Tentacle Grip Candle Holder
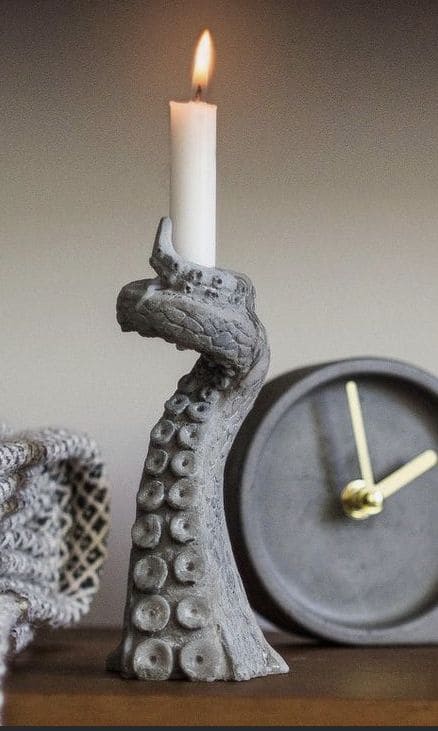
This quirky piece feels like something salvaged from the depths of an old sailor’s tale. It’s equal parts eerie and elegant, with a sculptural, modern edge.
Materials Needed
- Air-dry clay (~500g)
- Rolling pin and sculpting tools
- Candle (taper style, ~1 in diameter)
- Non-stick surface (e.g., silicone mat)
- Acrylic paint (dark grey, black, or metallic)
- Small round object
- Varnish
- Oven
Step-by-Step Guide
Step 1: Roll the clay into a log shape ~6–8 inches long. Flatten the base slightly to allow it to stand.
Step 2: Sculpt the tentacle’s curve, curling the top inward to form a grip that can support a candle. Ensure the “grip” fits snugly around the candle’s base.
Step 3: Press small circles along one side of the tentacle to mimic suction cups using a pen cap or similar object.
Step 4: Let the piece dry (air-dry clay) or bake according to package instructions (polymer clay).
Step 5: Once hardened, paint the entire holder with a dark base coat. Dry-brush lighter tones to highlight texture. Seal with varnish.
#2. Romantic Bottle Candle Holders with Dried Flowers
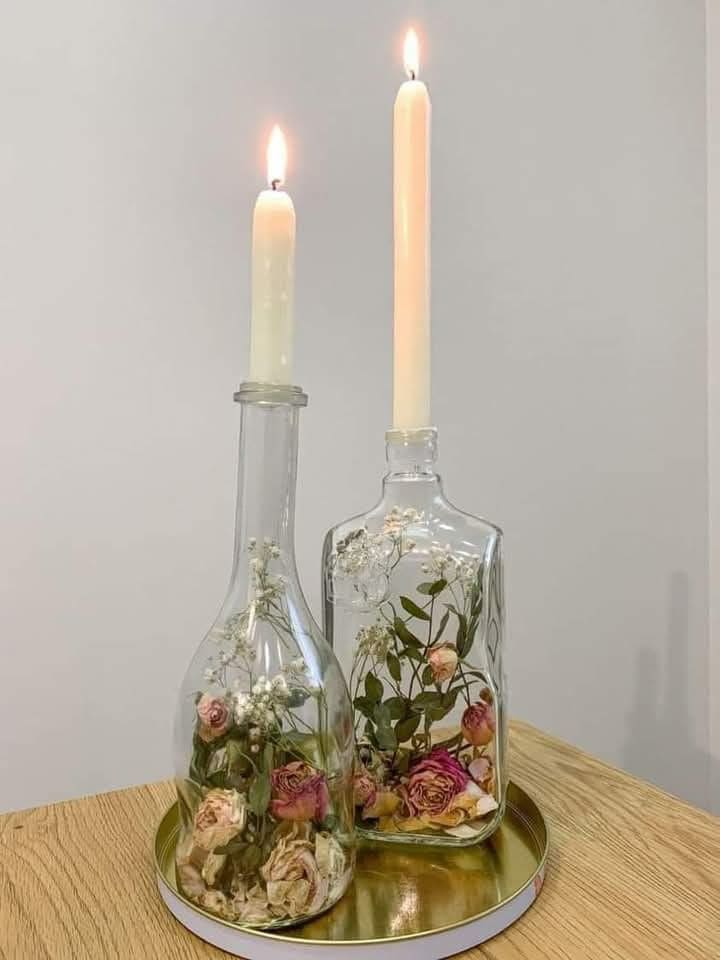
These elegant bottle candle holders feel like something out of a vintage love story. The soft taper candles on top give the setup a gentle, warm glow, perfect for dinner parties or just elevating your shelf decor.
Materials Needed
- 2 clear glass bottles (tall-necked wine or liquor bottles)
- 2 taper candles (¾-inch base width)
- Dried flowers (e.g. roses, baby’s breath, eucalyptus)
- Long tweezers or chopsticks
- Scissors
- Tray or coaster for display (optional)
Step-by-Step Guide
Step 1: Clean and remove any labels from your glass bottles. Let them dry completely.
Step 2: Trim your dried flowers so they fit loosely inside each bottle. Use tweezers to carefully arrange them.
Step 3: Gently insert the taper candles into the bottle openings. If they’re too loose, melt the base slightly to secure them.
#3. Woodland Toadstool Tealight Holder
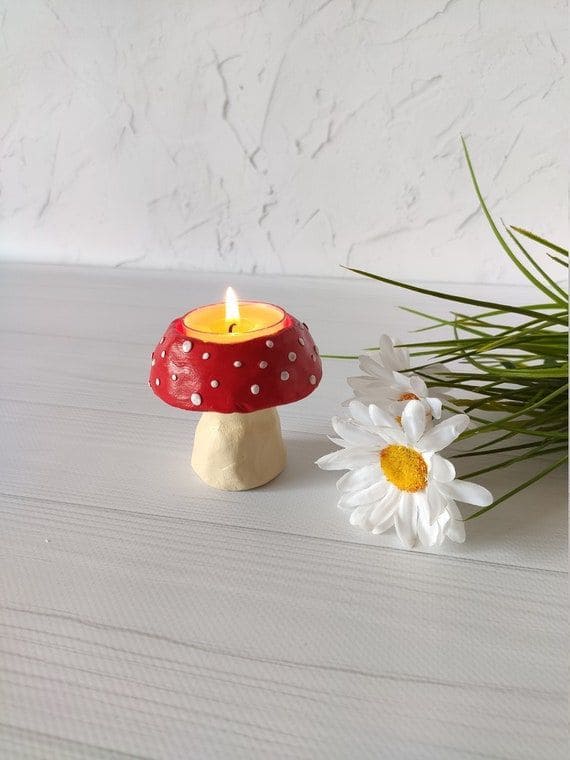
Inspired by enchanted forests and cottagecore aesthetics, it’s handmade using clay and a bit of playful creativity.
Materials Needed
- Air-dry clay (white and red – approx. 100g total)
- Acrylic paint (white, red, beige)
- Paintbrush (small, fine tip for dots)
- Craft knife
- Clear sealer (optional)
- 1 tealight candle (standard 1.5″ diameter)
Step-by-Step Guide
Step 1: Shape the mushroom cap by rolling a red ball of clay and flattening it slightly. Press a tealight into the center to form a snug cavity. Remove the candle before it dries.
Step 2: Sculpt the stem using beige or cream clay. Flatten the top slightly so the cap sits evenly.
Step 3: Once both pieces are dry (air-dry or baked per your clay instructions), glue the cap onto the stem.
Step 4: Paint small white dots over the red top and let it dry completely. Seal with a clear coat if desired.
#4. Middle Finger Statement Candles
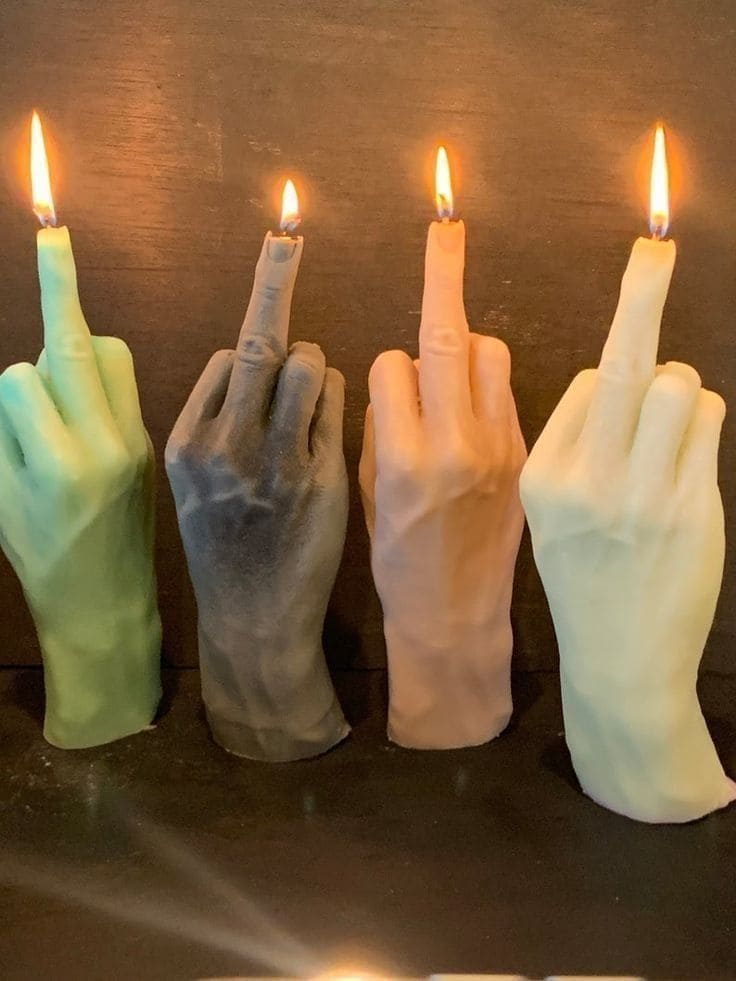
These candles aren’t just mood lightin, they’re the mood. Equal parts rebellious and hilarious, these hand gesture candles make the ultimate gift for that friend who’s always keeping it real.
Materials Needed
- Candle wax – approx. 1 lb per hand
- Candle dye (optional)
- Candle wicks – 6–7 inch cotton core wick
- Heat-safe silicone hand mold
- Wick sustainer tabs
- Hot glue
- Pouring pot
- Thermometer
- Fragrance oil (optional)
Step-by-Step Guide
Step 1: Melt your wax in a double boiler or pouring pot, heating it to around 170–180°F (77–82°C). Add candle dye and fragrance if using, and stir well.
Step 2: Prepare your mold. Attach the wick to the bottom using a glue tab or wick sticker. Thread it through the top of the mold and secure it with a wick holder or pencil.
Step 3: Slowly pour melted wax into the mold. Tap gently to release air bubbles. Let it cool completely—this could take 4–6 hours depending on the size.
Step 4: Once solid, carefully remove the candle from the mold. Trim the wick to about 1/4 inch.
#5. Upside-Down Wine Glass Candle Holders
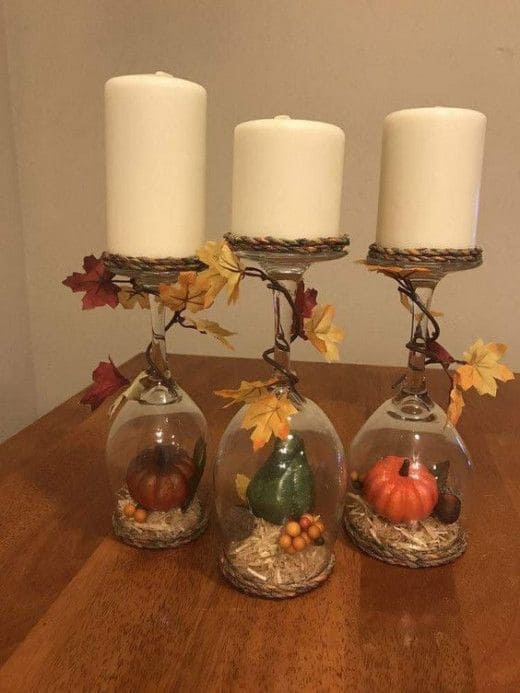
These DIY wine glass candle holders turn autumn decor into something magical. Each one creates a miniature scene inside the glass, perfect for Thanksgiving, Halloween, or cozy fall vibes.
Materials Needed
- 3 clear wine glasses (approx. 6–8 inches tall)
- 3 small faux pumpkins (about 1.5–2 inches each)
- A handful of decorative straw, moss, or raffia
- 3 flameless LED candles
- Fall leaves garland
- Twine (2–3 feet total)
- Hot glue gun and glue sticks
- Small round cardboard cutouts (optional)
Step-by-Step Guide
Step 1: Start by filling the bowl of each wine glass with a bit of straw or raffia to create a nest-like base. Then place one faux pumpkin or gourd inside each glass.
Step 2: If you want to keep the contents secure, hot glue a small cardboard disc over the rim of each glass to act as a base. Otherwise, just gently flip the glass upside down onto a flat surface.
Step 3: Wrap twine or fall leaf garland around the stem and base of each inverted wine glass to add a rustic touch. Secure with a dab of hot glue.
Step 4: Place a flameless or real candle on top of the flat wine glass base. If needed, hot glue it down for stability.
#6. Boho Beaded Candle Holders

These vibrant DIY beaded candle holders bring a wave of boho charm to any room. I loved making these because they combine simplicity with stunning results.
Materials Needed
- 3 small to medium glass jars (3–5 inches tall)
- Beaded trims (approx. 3 feet per jar)
- E6000
- Scissors
- Tea light candles
Step-by-Step Guide
Step 1: Clean your glass jars thoroughly and dry them completely.
Step 2: Plan the placement of your beads. You can use bead strands, ribbon trims, or individual beads in layered designs.
Step 3: Apply a small section of glue at a time and press the beads or trim gently onto the jar. Work in rows from bottom to top.
#7. Rustic Log Trio Candle Holder
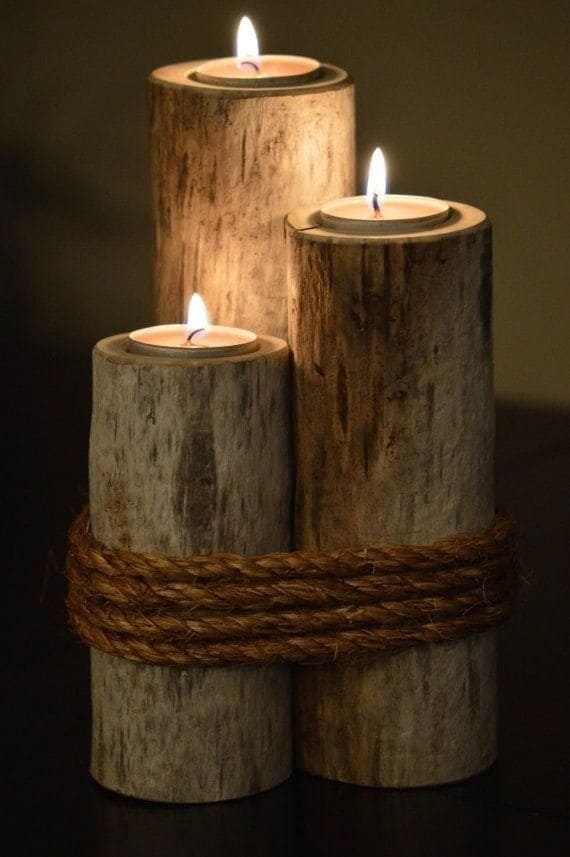
There’s something undeniably calming about the natural warmth of wood paired with soft candlelight. This rustic log trio candle holder is the kind of project that feels grounding.
Materials Needed
- 3 wood logs (diameters: ~3–4 inches; heights: 6 in, 8 in, 10 in)
- 3 tealight candles
- Forstner drill bit
- Electric drill
- Sandpaper (medium to fine grit)
- 3 ft thick jute rope
- Wood stain (optional)
- Hot glue gun (optional)
Step-by-Step Guide
Step 1: Sand the top surface of each log flat. If needed, level the bottoms so the logs sit upright without wobbling.
Step 2: Use the Forstner bit and drill to carve out a shallow hole in the center of each log, just deep enough to nestle a tealight (~0.5 in).
Step 3: (Optional) Apply wood stain or a clear matte sealant to protect and slightly darken the wood’s surface.
#8. Vintage Ladle Candle Wall Hangers
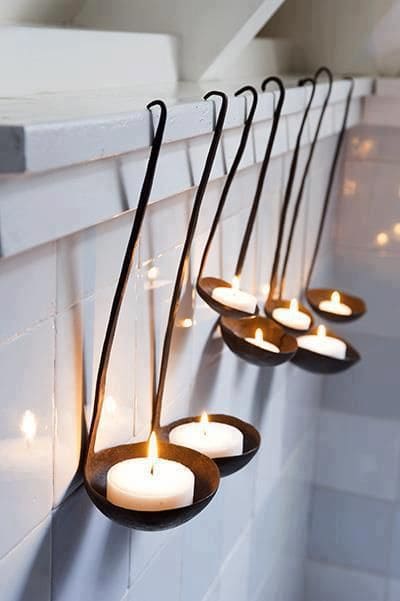
The way the candlelight pools inside each ladle feels both nostalgic and a little magical. It’s one of those projects that feels more expensive than it actually is.
Materials Needed
- 4–6 vintage metal ladles
- Tea light candles
- Strong adhesive
- Cleaning cloth and rubbing alcohol
Step-by-Step Guide
Step 1: Clean the ladles thoroughly using warm water and soap. Dry completely, then wipe the undersides with rubbing alcohol to remove any oils.
Step 2: Bend the top part of each handle slightly if needed, to create a hook shape that will stay in place securely when hung.
Step 3: Hang each ladle on the edge of a tile ledge, shelf, or mantel. Space them evenly for a cohesive look. You can use mounting tape for stability if you’re worried about slippage.
Step 4: Place one tea light into each ladle bowl. Light them when ready to enjoy a warm, flickering ambiance with a touch of vintage industrial soul.
#9. Rustic Pinecone Candle Holders
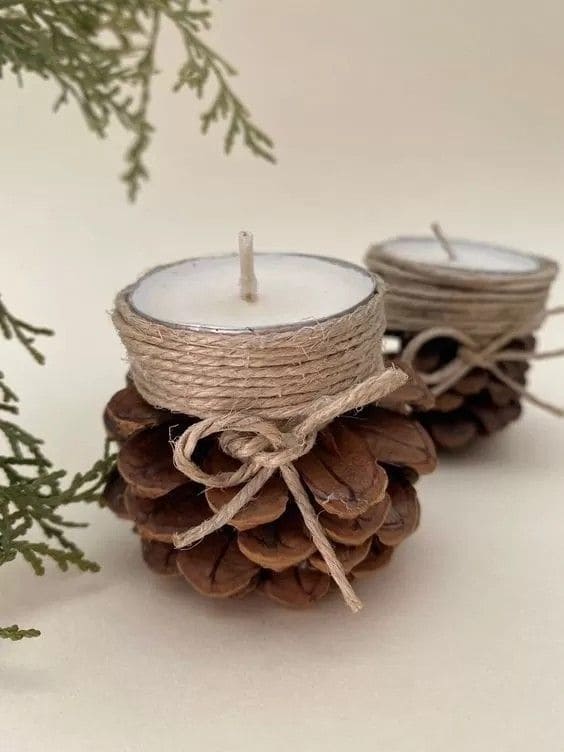
These pinecone candle holders bring a warm, woodland touch to any table or mantle. They’re perfect for autumn evenings or Christmas décor, and honestly.
Materials Needed
- 2 large, open pinecones (about 3–4 inches tall)
- 2 tealight candles (s1.5-inch diameter)
- Natural jute twine (about 40 inches total)
- Hot glue gun & glue sticks
- Scissors
Step-by-Step Guide
Step 1: Place the pinecones upside down so the flatter base is on top. Trim any uneven tips if needed to create a flat surface for the candle.
Step 2: Add hot glue to the bottom of each tealight and firmly press it onto the top of the pinecone.
Step 3: Wrap twine around the base of the candle several times for a rustic finish, then tie it into a bow.
#10. Eclectic Teacup and Vase Candle Holders
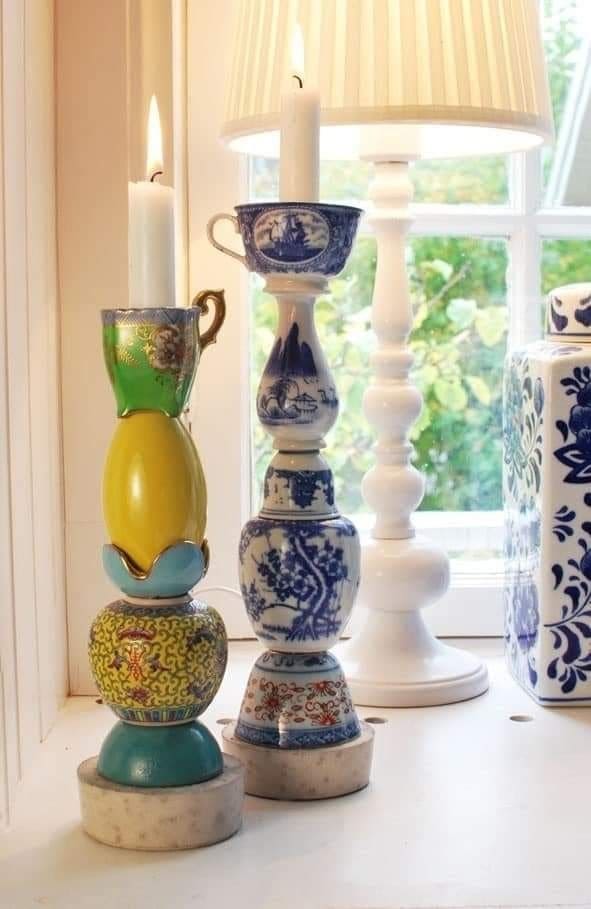
These whimsical candle holders are a joyful explosion of pattern, history, and imagination.
Materials Needed
- 2–3 teacups
- 2–3 small bowls
- 2–3 mini vases, creamers, or egg cups
- 2 flat bases (e.g. round wood slices, coasters, or marble discs, ~3.5–4 in diameter)
- Epoxy glue
- 2 taper candles
Step-by-Step Guide
Step 1: Gather your pieces and stack them into a layout that balances well visually and physically. Try alternating shapes and colors for contrast.
Step 2: Start gluing from the bottom up. Apply epoxy between each layer, pressing gently and letting it sit a few minutes before adding the next.
Step 3: Once you reach the top, use a sturdy teacup or shallow dish to hold the taper candle. Make sure the top surface is flat and centered.
Step 4: Let the structure cure completely (at least 24 hours). Then insert your taper candles, light them up, and enjoy the eclectic magic.
#11. Barbed Wire Candle Chandelier
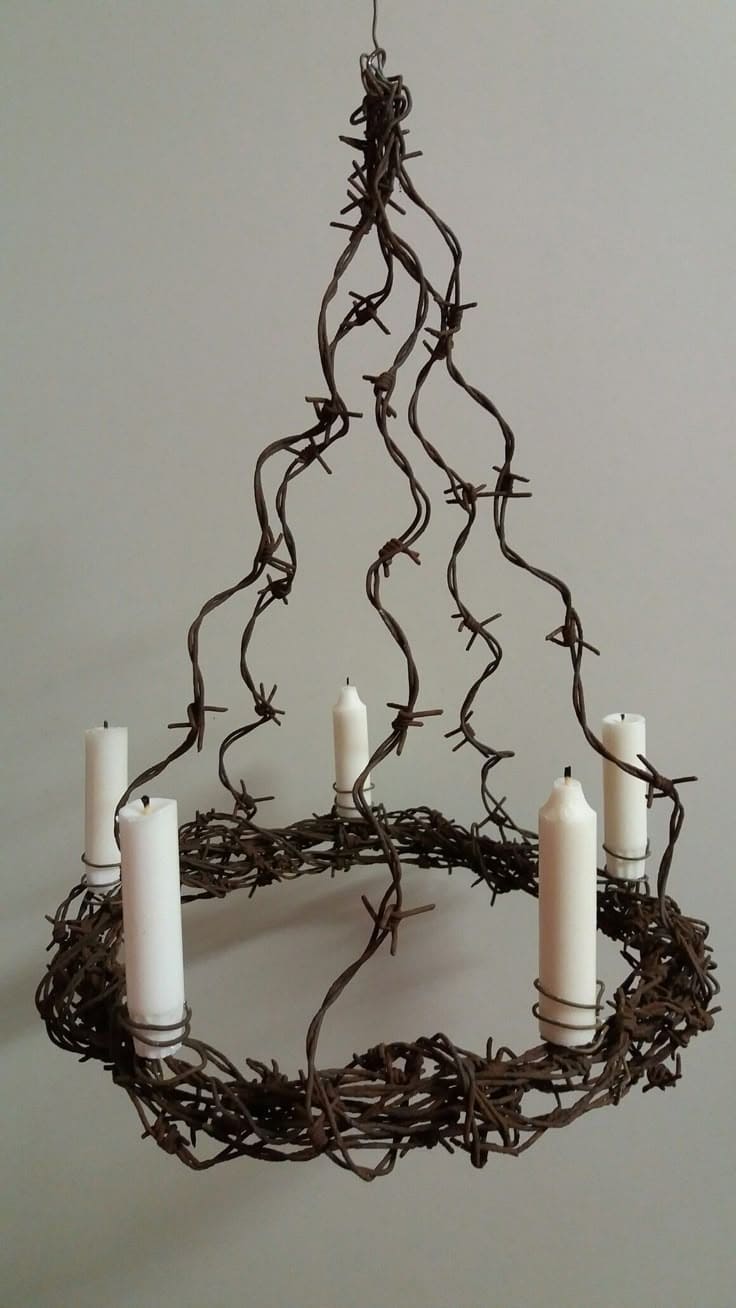
Whether you’re going for gothic farmhouse or post-apocalyptic cottagecore, this piece speaks volumes without saying a word.
Materials Needed
- Barbed wire (approximately 6–8 feet, pliable but sturdy)
- 4 white taper candles (standard 3/4-inch base, 6–8 inches tall)
- Heavy-duty gloves
- Pliers or wire cutters
- Heat-resistant wire
- Ceiling hook
Step-by-Step Guide
Step 1: Wearing gloves, carefully shape the wire into a circular base, about 12–14 inches in diameter. Wrap the wire several times to create a thick, stable ring.
Step 2: Create 4 vertical arms rising from the base and twist them together at the top to form a hanging point. Add spirals or curves for a sculptural touch.
Step 3: Use heat-resistant wire to secure one taper candle to each quadrant of the circle. Make sure each one is upright and firm, then hang the chandelier from a ceiling hook.
#12. Seashell Mosaic Candle Holders
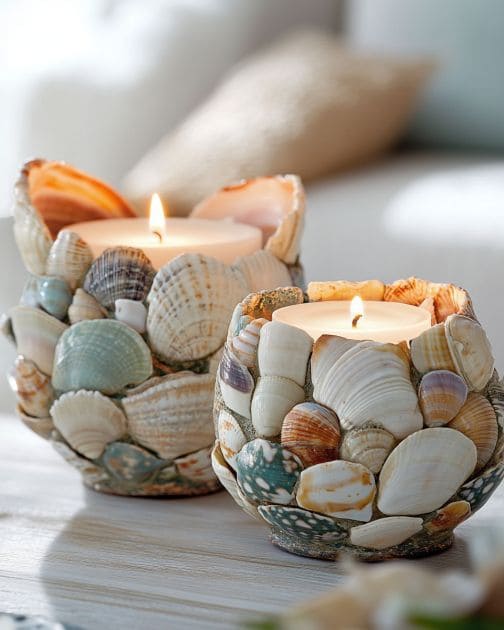
These candle holders are a dreamy reminder of sunny beach days. Covered in natural seashells, they add coastal charm and a gentle glow to any room.
Materials Needed
- 2 glass votive holders (3–4 inches tall, round or square)
- About 50–70 small to medium seashells per holder (1–2 inches wide)
- Strong clear-drying adhesive
- Optional: white paint
- Tea lights
Step-by-Step Guide
Step 1: Clean your glass holders and shells. If desired, lightly paint the glass surface for a base tone that complements your shells.
Step 2: Begin attaching the shells from the bottom edge up, overlapping slightly for a natural mosaic look. Alternate shapes and colors for visual interest.
Step 3: Let the adhesive fully dry (at least 4–6 hours if using E6000, quicker with hot glue), then place your candle inside.
#13. Rustic Funnel Candle Holders
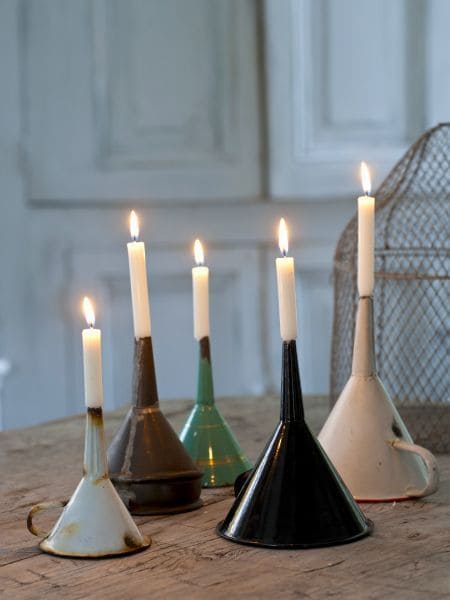
The chipped enamel and raw metal patina tell a story, making each piece feel like a treasure pulled from an old barn or workshop.
Materials Needed
- Vintage metal funnels (any size, about 4–6 inches in diameter)
- Taper candles (standard 3/4″ diameter)
- Candle adhesive
- Sandpaper
- Optional: Clear matte spray sealant
Step-by-Step Guide
Step 1: Clean each funnel to remove dust or rust. Use sandpaper lightly if you want to keep the aged look but smooth any sharp spots.
Step 2: Place a small amount of candle adhesive or a few drops of melted wax inside the funnel spout.
Step 3: Insert the taper candle and hold it upright until it sets in place, then spray with a matte sealant.
#14. Sand-Filled Bucket Candle Holder
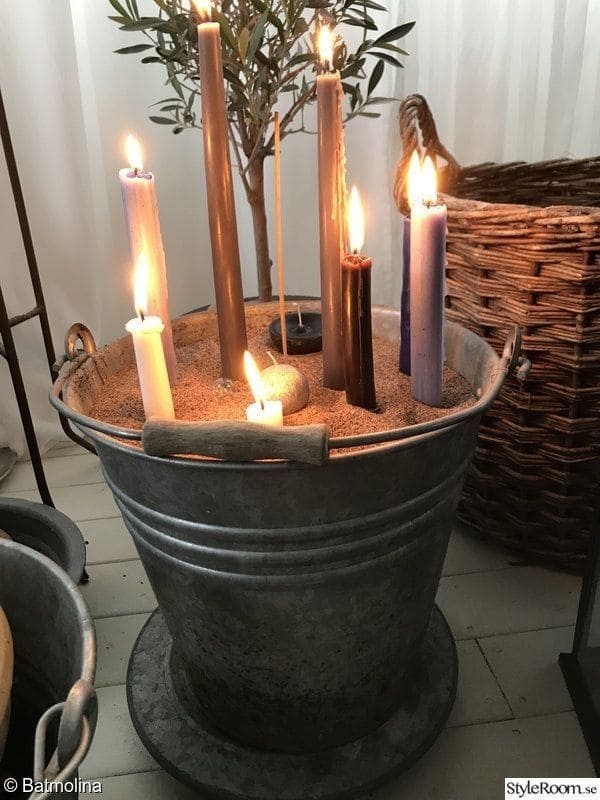
If you’re drawn to cozy Scandinavian aesthetics or love simple, grounded decor, this idea is pure magic.
Materials Needed
- 1 galvanized metal bucket (10–12 inches tall)
- Fine sand (5–8 lbs or enough to fill ¾ of the bucket)
- 8–10 taper candles
Step-by-Step Guide
Step 1: Fill the bucket about three-quarters full with clean, dry sand. Gently shake to level the surface.
Step 2: Press each taper candle straight into the sand, pushing firmly so they stand upright. Vary height and spacing for a natural, organic look.
#15. Whimsical Wire Candelabra
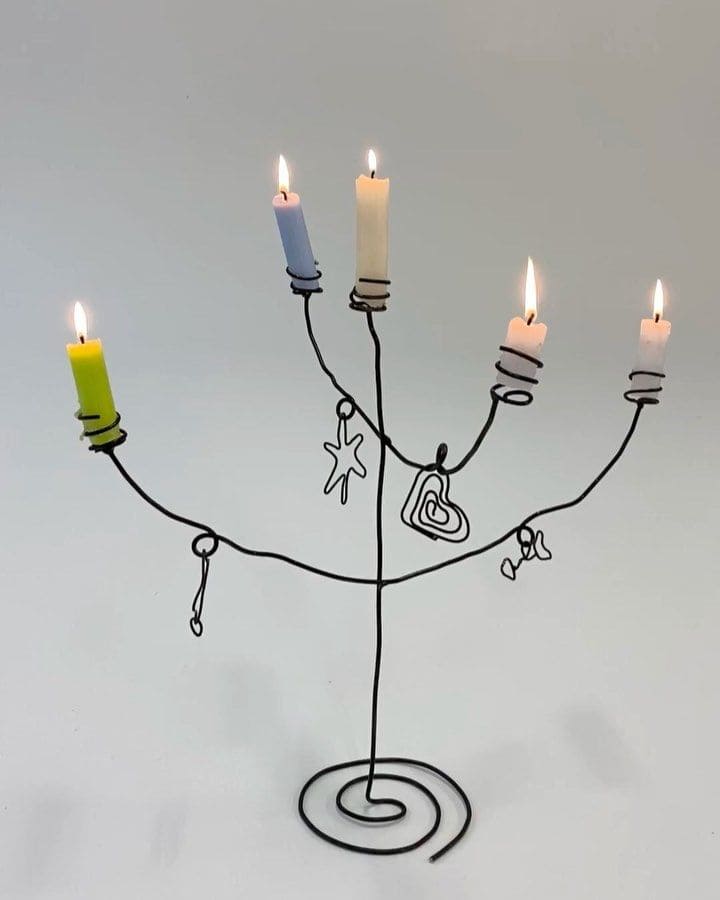
Minimalist meets quirky in this whimsical wire candle holder. It’s lightweight, surprisingly sturdy, and brings an artsy vibe to any space.
Materials Needed
- 12–15 feet of flexible black aluminum wire (2–3mm thick)
- Wire cutters
- Round-nose pliers
- 5 mini taper candles (approx. 0.5″ diameter)
- Optional: Small wire ornaments
Step-by-Step Guide
Step 1: Begin by forming the spiral base. Use round-nose pliers to twist a coil about 3–4″ wide for stability.
Step 2: Shape the center stem by extending the wire straight upward from the spiral base. Continue curving it into branching arms in a tree-like structure, spacing five arms evenly.
Step 3: At each arm’s tip, create tight wire spirals or rings wide enough to nest the base of a small candle securely.
Step 4: Add small wire-formed charms (hearts, stars, bows) to dangle from the branches for a playful touch.
#16. Pearl Accent Stick Candle Holders
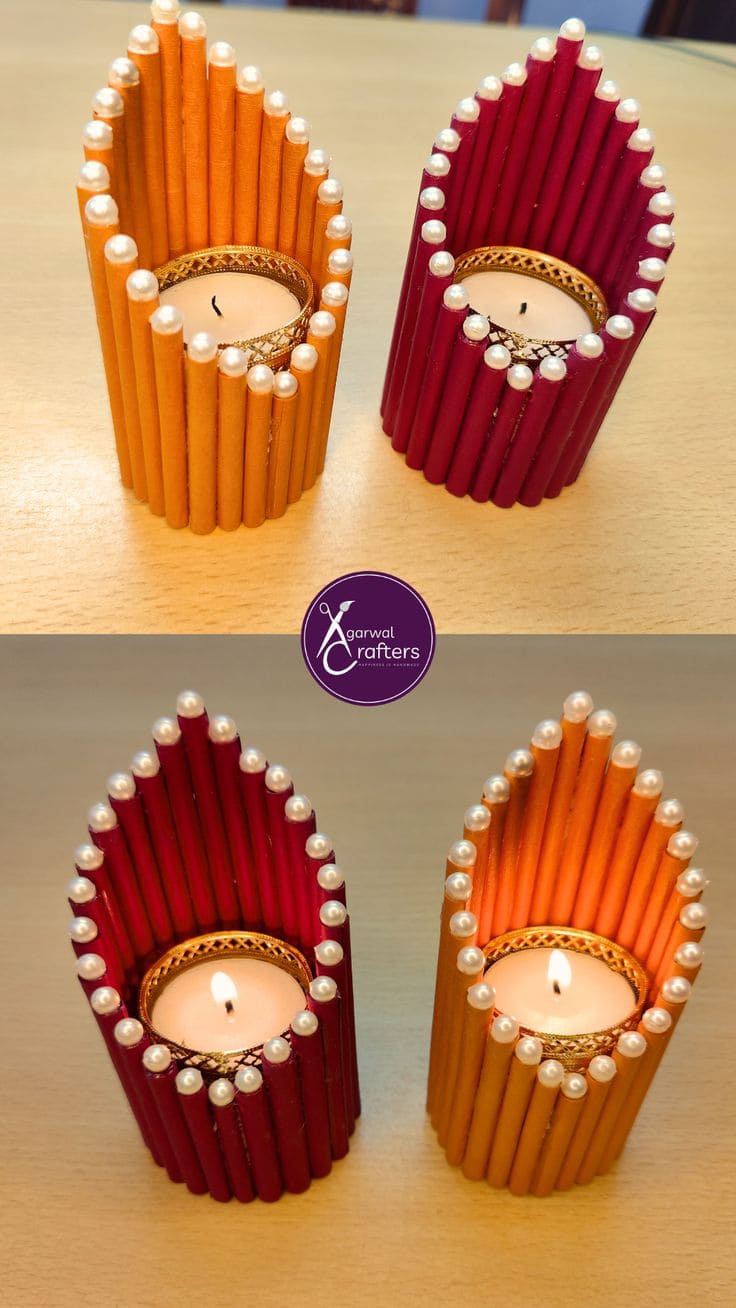
Made from simple colored sticks and faux pearls, they create an elegant, elevated look that’s perfect for Diwali, Christmas, or cozy dinner setups.
Materials Needed
- Colored craft sticks (around 20 per holder, 4–5″ long)
- Cardboard base (2.5” round diameter)
- Small round tea light candles
- Faux pearls (about 18–22 pieces per holder)
- Gold lace (6–8 inches per candle)
- Acrylic paint (optional)
- Hot glue gun & glue sticks
- Scissors
Step-by-Step Guide
Step 1: Cut out a sturdy round cardboard base to fit your tea light. Paint it if desired and let it dry.
Step 2: Wrap your gold lace around the edge of the candle and glue it in place. Secure the candle to the center of the cardboard base.
Step 3: Begin gluing colored craft sticks upright around the candle, spacing them closely for a tight fit. Leave a curved edge gap to shape a petal-like frame.
Step 4: Finish by gluing faux pearls to the tips of each stick for a polished, festive touch.
#17. Rustic Cinnamon Stick Candle Holders
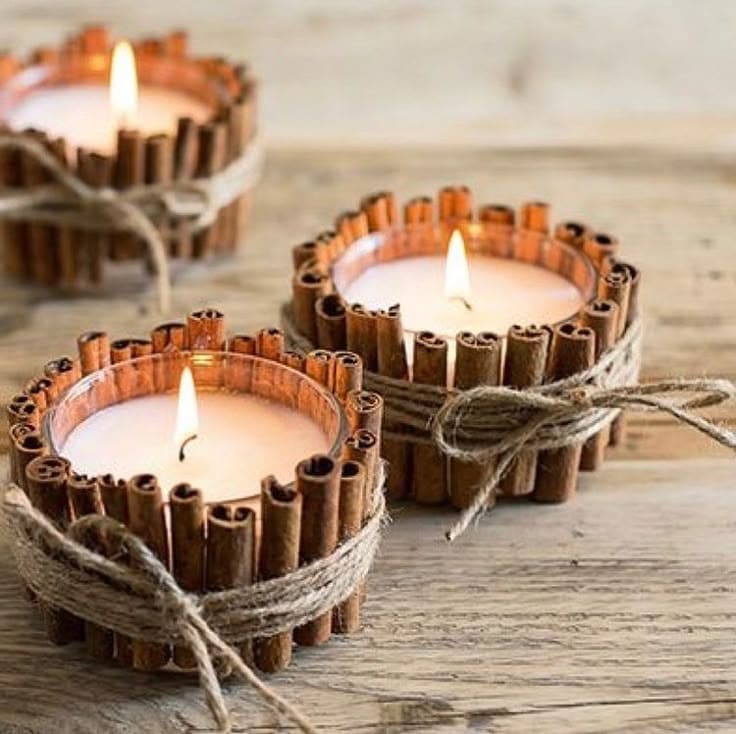
These cinnamon stick candle holders don’t just glow, they smell divine. They’re the perfect blend of rustic charm and subtle spice, making them a favorite in my fall décor lineup.
Materials Needed
- 1 glass tealight holder (2–3 inches in diameter)
- 20–30 cinnamon sticks (each 3–4 inches tall)
- Hot glue gun + glue sticks
- Natural twine (about 1 yard per holder)
- 1 tealight candle
Step-by-Step Guide
Step 1: Measure the height of your tealight holder and cut cinnamon sticks to match, if needed.
Step 2: Use the hot glue gun to attach each cinnamon stick vertically around the glass holder. Place them tightly side by side for a full look.
Step 3: Once dry, wrap twine around the cinnamon-covered holder two to three times and tie it into a bow for a charming finish.
Step 4: Drop a tealight or votive candle inside and enjoy the flicker of warm light paired with a soft cinnamon aroma.
#18. Cut Bottle Candle Holders
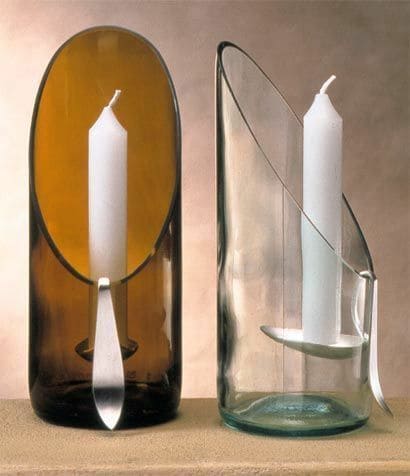
These designs not only look high-end, but they’re also a brilliant way to upcycle glassware into functional art.
Materials Needed
- 2 glass bottles (750ml wine bottles or similar)
- Glass cutter tool
- Sandpaper (fine grit, 320 or higher)
- Boiling and ice wate
- Taper candles (¾–1 inch diameter)
- Metal spoon, fork
- Safety gloves and goggles
Step-by-Step Guide
Step 1: Clean and dry the bottles thoroughly. Use a glass cutter to score a line around the bottle, roughly two-thirds up from the base.
Step 2: Carefully alternate pouring boiling and ice water over the score line to crack the bottle cleanly along the line.
Step 3: Sand all cut edges thoroughly until smooth to the touch, safety first!
Step 4: Optional: Secure a bent spoon or custom candle plate inside the bottle to hold the taper candle upright.
#19. Industrial Brick Candle Holder
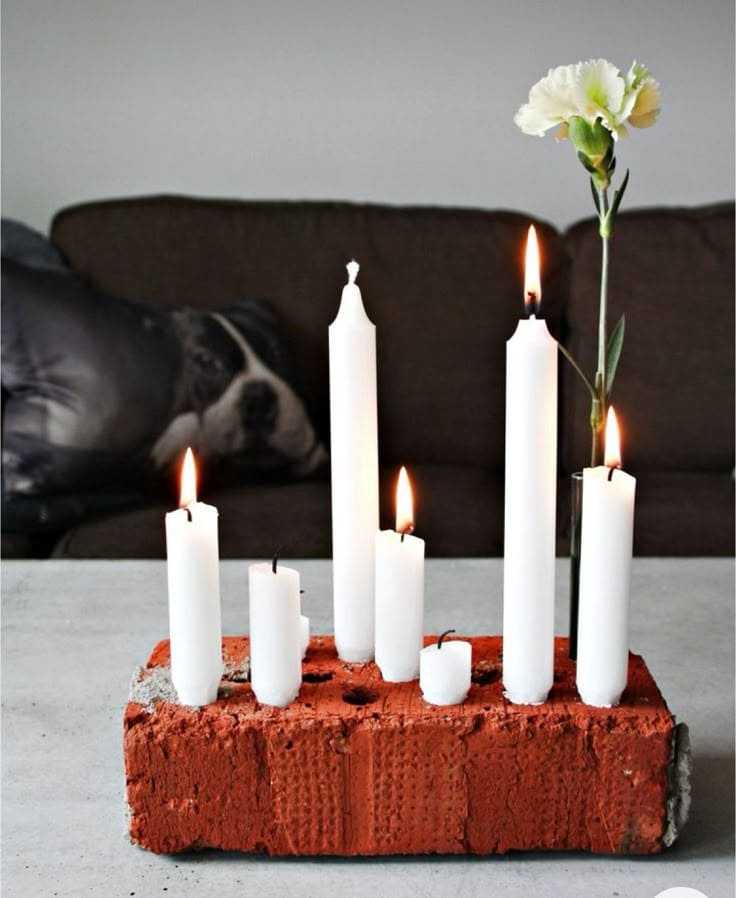
If you love raw, utilitarian style with just the right touch of warmth, this candle holder is it. A salvaged red brick becomes the stage for a lineup of tall white candles.
Materials Needed
- 1 old red brick (preferably with 6–10 holes, standard size ~8 x 4 x 2.25 in)
- 7–10 white taper candles (varying heights: 3″–9″)
- 1 small test tub
- Sandpaper
- Optional: hot glue
Step-by-Step Guide
Step 1: Clean your brick thoroughly with a damp cloth or sandpaper to remove debris and loose particles.
Step 2: Choose taper candles that fit snugly into the brick’s holes. If the fit is too loose, soften the candle base slightly over a flame and press it in, or drip melted wax into the hole before inserting.
Step 3: For variation, insert candles of different heights. If adding a flower like in the image, slip a test tube or slim bud vase into one of the holes and fill it with water and a single stem.
#20. Whisk Tea Light Candle Holders
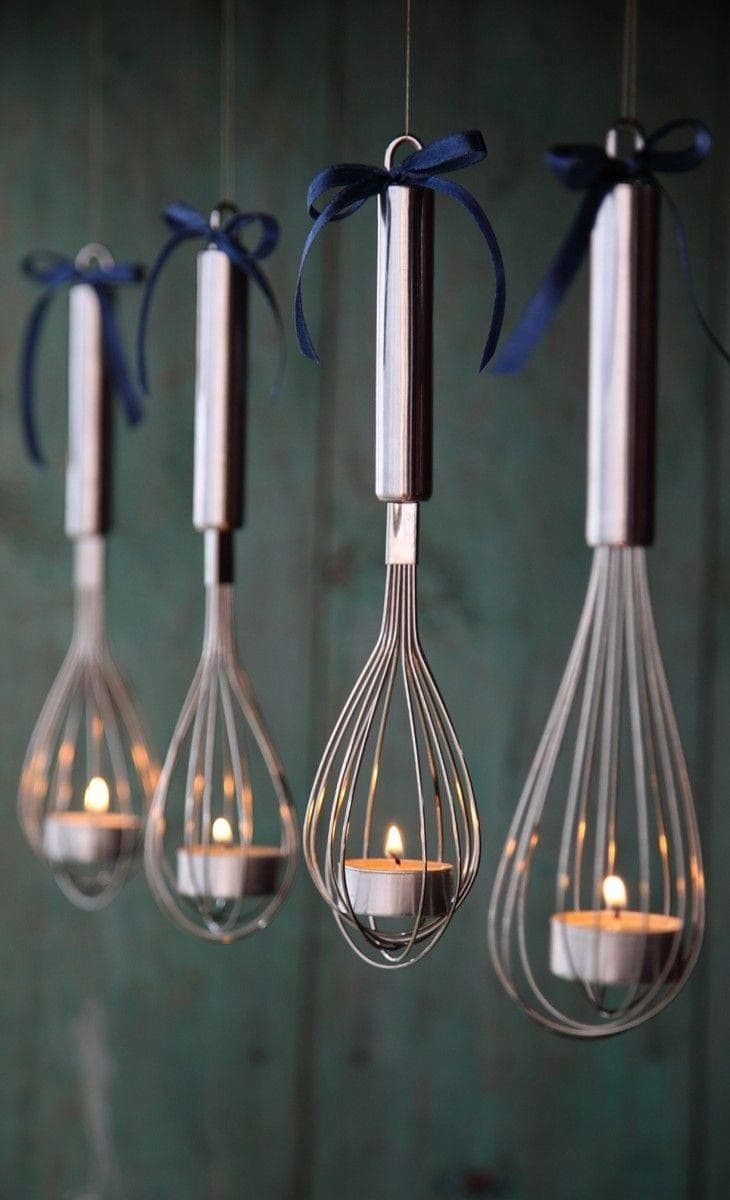
I made a set last fall and hung them by the kitchen window when the light flickers through the wire loops, it feels like a cozy little spell has been cast.
Materials Needed
- 4 metal balloon whisks (standard size, 8–10 inches long)
- 4 tea light candles
- Heat-resistant wire
- Pliers
- Optional: ribbon bows, hot glue gun
Step-by-Step Guide
Step 1: Carefully use pliers to spread apart the base of each whisk just enough to fit a tea light candle inside the wire cage. Don’t force—just enough room to rest securely.
Step 2: Insert one tea light into the center of each whisk. Adjust the wire if needed to keep the candle level.
Step 3: Tie wire or fishing line to the handle of each whisk, then suspend them from hooks, nails, or branches—wherever you want that warm glow.
Step 4: Add a ribbon bow around each handle for a touch of elegance, or leave them raw for a more minimalist industrial look.
#21. Mini Clay Pot Candle Garden
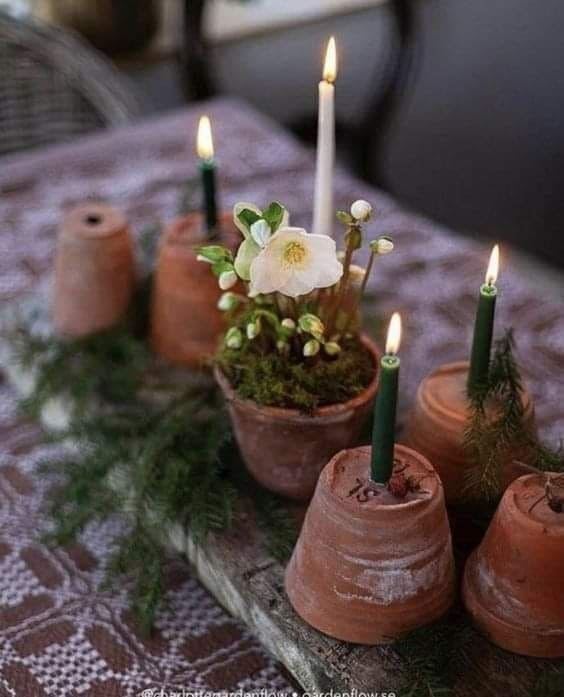
This charming candle holder combines rustic terracotta, soft greenery, and natural candlelight for a whimsical, woodland-inspired centerpiece.
Materials Needed
- 5–6 small terracotta pots (2–4 inches in height)
- Taper candles
- Floral foam
- One pot with real or faux moss and winter flowers (e.g. hellebore)
- Small sprigs of evergreen (pine, fir, cedar)
- Wooden tray
- Hot glue gun (optional)
Step-by-Step Guide
Step 1: Clean your terracotta pots and flip some upside down. Leave one or two upright to plant moss and flowers in the center.
Step 2: Insert a small piece of floral foam or clay inside the upside-down pots’ drainage hole. Push the taper candles firmly into the foam to hold them upright.
Step 3: In the upright pot, add moss and a small flower arrangement to bring life and texture.
Step 4: Arrange all the pots on a rustic plank or tray, spacing them naturally. Tuck evergreen sprigs between pots to finish the look.
#22. Rustic Clothespin Candle Holder
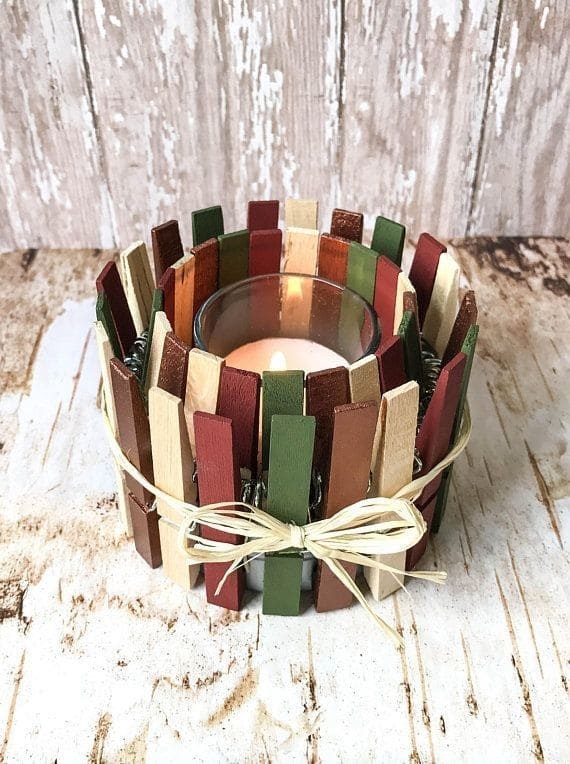
This charming little project brings such warmth and fall coziness to a space, it reminds me of harvest festivals and crisp evenings.
Materials Needed
- 1 small glass votive holder (approx. 2.5–3” diameter)
- 20–25 wooden clothespins (disassembled)
- Acrylic paint in fall colors (brown, red, orange, green, cream)
- Twine, raffia, or jute string (about 20 inches)
- Tea light candle
- Hot glue gun (optional)
Step-by-Step Guide
Step 1: Disassemble the clothespins and paint each wooden half in your chosen colors. Let them dry fully before assembling.
Step 2: Clip each painted half onto the edge of the votive holder, spacing them snugly to form a complete ring.
Step 3: Wrap the twine or raffia around the outside to secure the pins in place. Tie a bow in the front for a sweet rustic finish.
Step 4 (Optional): Use a hot glue dot at the bottom of each clothespin to ensure they stay fixed if you’re planning to move or gift it.


