The world of fairies has always felt like a place where imagination takes flight and dreams shimmer in the air.
With these enchanting fairy doll crafts, you can bring that touch of wonder right into your home.
Whether you’re crafting with kids, decorating a shelf, or adding a bit of whimsy to your day, these fairy dolls invite creativity, storytelling, and a sprinkle of handmade magic into your world.
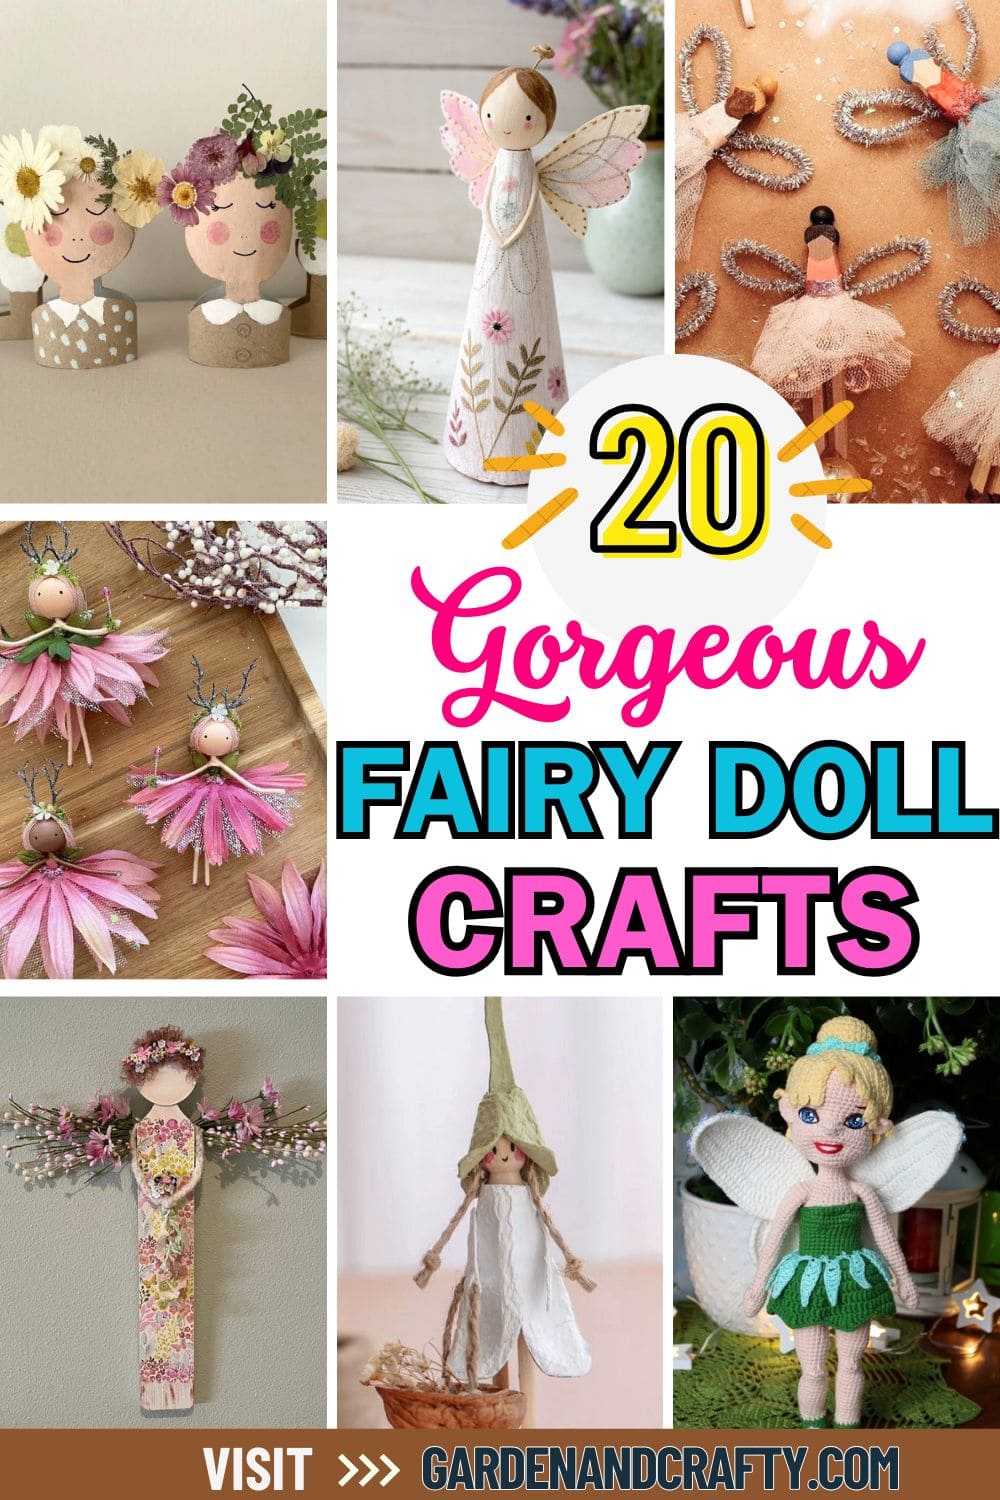
#1. Blossom Petal Fairy Dancers
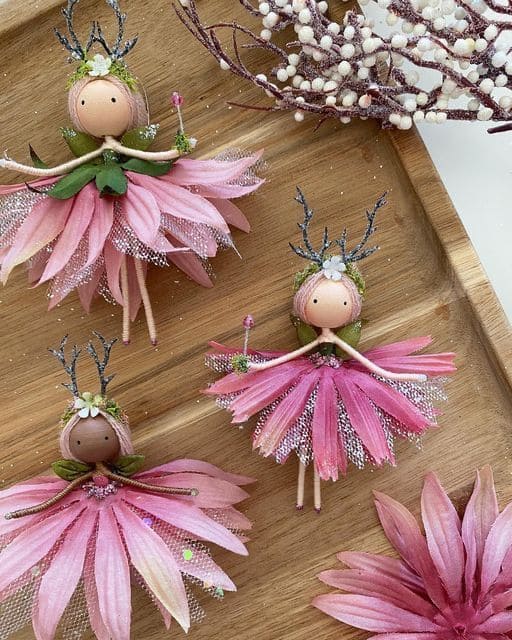
Graceful and full of woodland charm, these blossom petal fairy dancers look as if they’ve just leapt from a flower’s dream.
Their soft pink skirts made from real petals shimmer with glittery beads, while twig antlers and leafy accents give them a natural, enchanted look.
Each one feels alive with personality, making them perfect for decorating a children’s room, a spring wreath, or even a handmade gift box.
Materials
- 4–5 pink silk flower petals per fairy (approx. 6–8 cm each)
- 1 wooden stick or toothpick for the body (8 cm)
- 1 wooden bead (2 cm) for the head
- Brown floral wire or dried twigs for antlers (6–8 cm pieces)
- Glue gun or craft glue
- Fine glitter or bead trim
- Thin string or clear thread for hanging
- Small artificial leaves or moss for decoration
Instructions
- Start by attaching the wooden bead to the top of the stick using glue. Then paint or draw a tiny face using a fine marker, leaving it sweet and simple.
- Glue 4–5 petals around the top of the stick to create the fairy’s skirt. Layer them slightly for a natural, flowing look. You can also add a touch of glitter or bead trim to the edges for sparkle.
- Use small leaves or moss to make shoulder details or a leafy bodice. Secure them gently with glue.
- For the antlers, twist small lengths of floral wire or glue thin dried twigs to the top of the bead. Add a dab of glue and sprinkle glitter for a magical glow.
- Tie or glue a piece of string behind the head if you wish to hang your fairies. Let them dry fully before displaying.
#2. Rustic Wooden Garden Fairy Angel
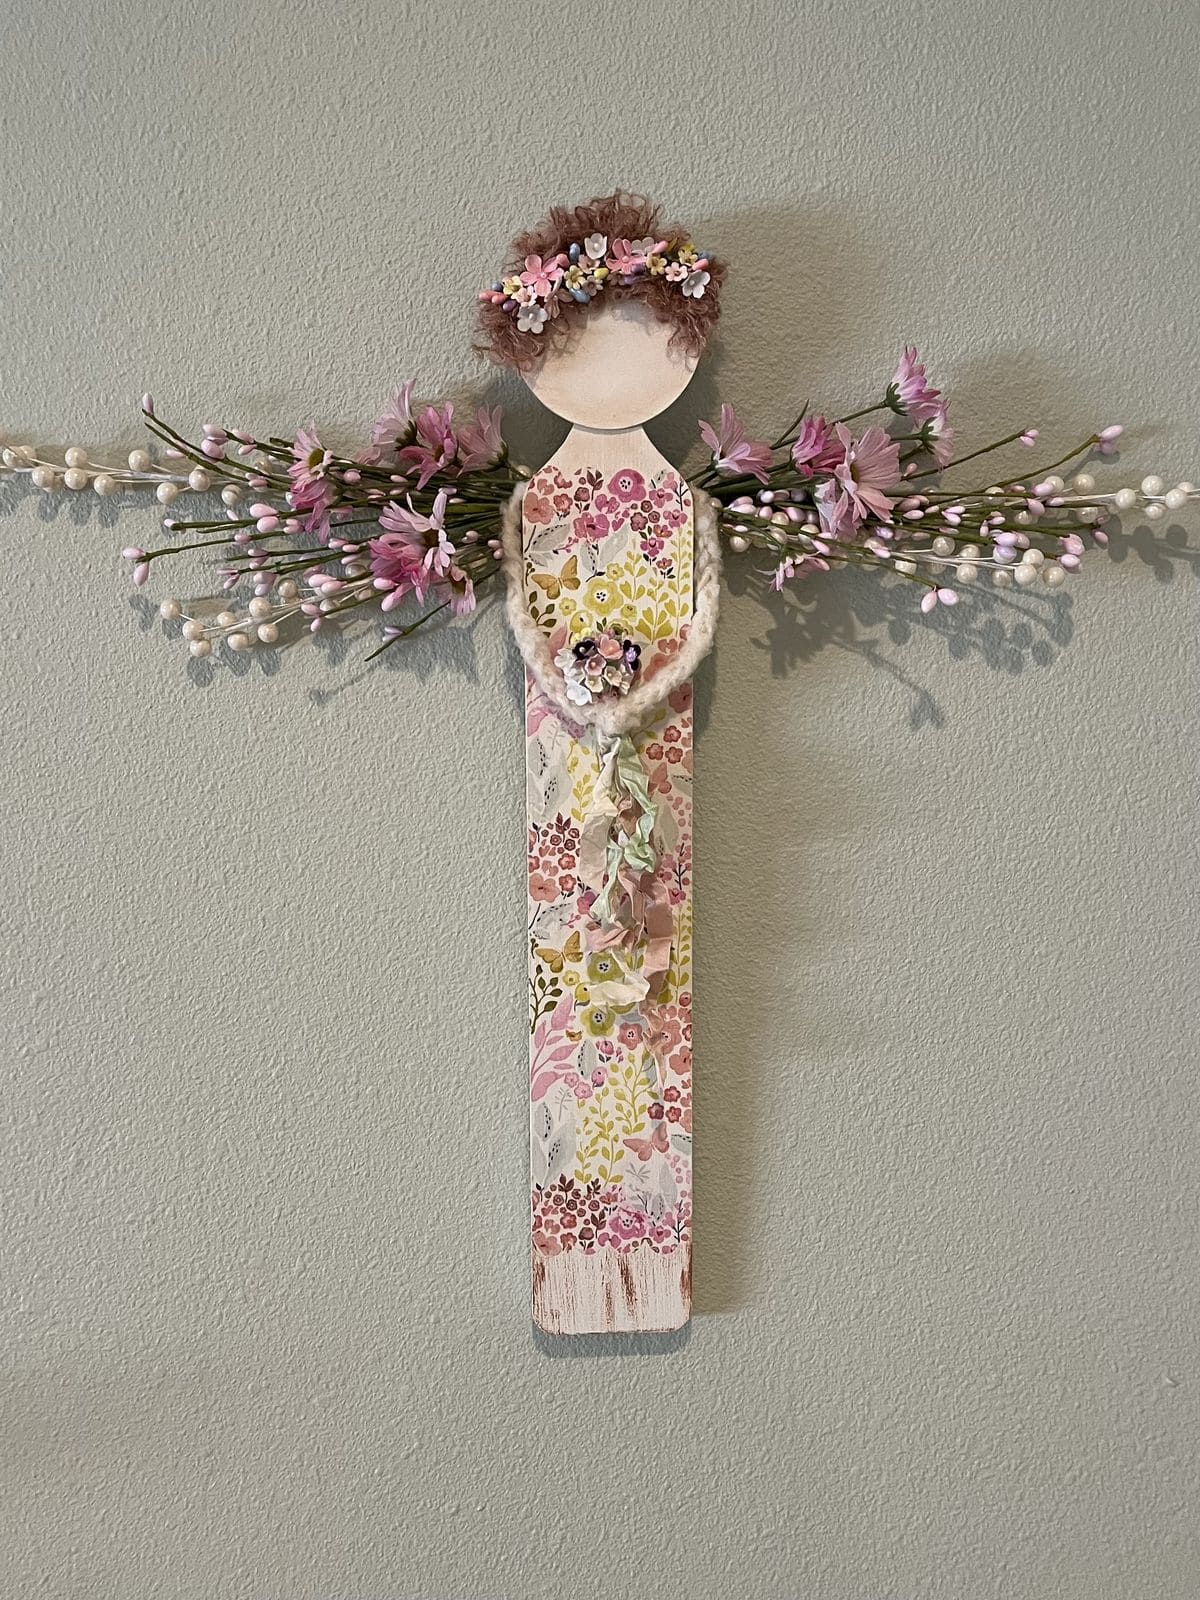
Made from a simple painted plank and wrapped in floral-patterned paper, it captures a serene, handmade beauty that brightens any wall.
The delicate floral crown, yarn arms, and wildflower wings bring a touch of spring’s tenderness indoors.
It’s an easy yet heartfelt craft that looks stunning in nurseries, cozy corners, or as a thoughtful handmade gift for someone who loves gentle, nature-inspired décor.
Materials
- Wooden plank (30–35 cm long, 5–6 cm wide)
- Acrylic paint (cream or pastel tones)
- Paintbrush and sponge brush
- Yarn or twine (25 cm) for arms
- Faux flowers or wildflowers for wings and crown
- Small bunch of dried flowers for hands
- Glue gun or craft glue
- Scissors
- Floral craft paper or napkin (1 sheet)
Instructions
- Paint the wooden plank lightly with acrylic paint. Once dry, decoupage a floral-patterned paper on the body area using glue or Mod Podge. Then smooth out air bubbles and let it dry.
- Cut a small round shape from paper or paint a circle at the top for the face. You should leave it simple or add tiny blush details.
- Glue small bunches of faux or dried flowers behind the plank to form wings. Use soft pink, white, or lavender tones for a dreamy look.
- Attach a piece of yarn as arms, crossing them at the front and securing a tiny bouquet in place.
- Finish with a floral crown made from small buds or dried blossoms, gluing them delicately around the head area.
#3. Pastel Garden Fairy Doll
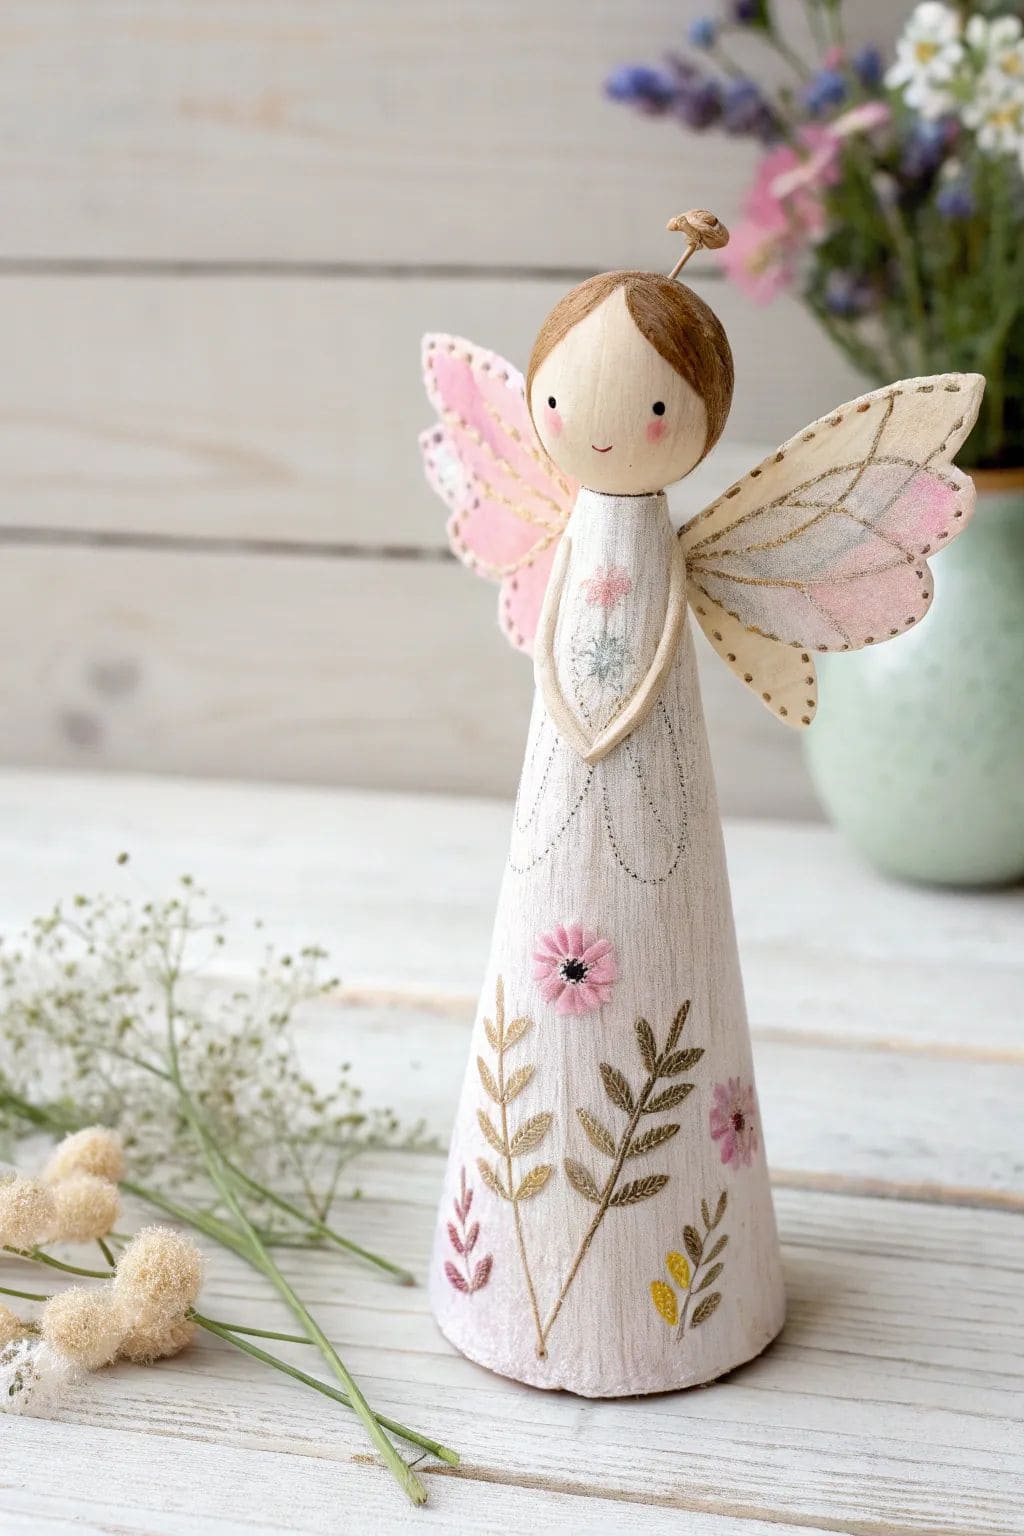
Soft, dreamy, and full of charm, this pastel garden fairy doll looks like she belongs in a storybook meadow.
Her delicate hand-painted flowers, gentle blush tones, and wings touched with gold create a sense of calm and innocence.
She’s an ideal craft for springtime or as a thoughtful handmade gift.
Materials
- Wooden cone base (12–15 cm tall)
- Wooden ball (3–4 cm diameter) for the head
- Light acrylic paints (cream, pink, green, gold, and brown)
- Fine-tipped paintbrushes
- Small piece of thin cardboard or felt for wings
- Craft glue or hot glue gun
- Pencil for sketching details
- Small flower embroidery patches or paint for decoration
- Thin wire (optional) for halo or hair detail
Instructions
- Begin by gluing the wooden ball onto the top of the cone to form the head and body. Once dry, lightly sketch the face including two tiny eyes, a smile, and rosy cheeks. Paint gently using fine brushes.
- Paint the body of the cone in a soft cream or ivory tone. Let it dry, then add delicate floral motifs using pinks, greens, and browns, or glue on tiny embroidered flower pieces for a textured look.
- For the wings, cut out two symmetrical shapes from cardboard or felt, then paint them in blush pink and outline with gold accents. Once dry, glue them to the back of the fairy.
- Add a small detail to the top of her head, a painted hair bun, a tiny floral crown, or a wire halo for a whimsical finish.
- Once the paint and glue are completely dry, display your pastel garden fairy on a shelf or give her as a keepsake.
#4. Delicate Winter Angel Ornament

Wow, this winter angel ornament is a lovely way to bring serenity and handmade charm to your holiday décor.
Her white tulle dress sparkles with golden flecks, while a tiny knit hat and angelic wings complete her look.
She’s light enough to hang on a Christmas tree but elegant enough to display all year.
Materials
- 1 wooden bead (2.5–3 cm diameter) for the head
- 10 × 10 cm piece of white felt for wings
- 20 cm of thin yarn or string for hair
- 1 small knit hat (or use a 10 cm knitted rectangle to make one)
- 15 cm white string or twine for hanging loop
- 2 white pipe cleaners for arms and legs (30 cm total)
- Small lace ribbon or bow (optional)
- Glue gun or craft glue
- 15 × 15 cm piece of white tulle with glitter
Instructions
- Begin by forming the body , you twist a pipe cleaner in half for the torso and leave small ends for the legs. Then attach the wooden bead to the top as the head.
- Cut a small tuft of yarn for the hair. Glue it around the top of the head, allowing it to hang naturally beneath the hat.
- Roll the tulle into a circle and pinch it in the center to create a skirt. Secure it around the doll’s waist using glue or thread.
- Fashion a tiny hat from a knitted scrap and slide it over the angel’s head. Then add a bit of glue to hold it in place.
- Cut out wings from felt and attach them firmly to the back, aligning with the shoulders.
- Add the finishing touches such as a bow on her chest, twisted ends on her legs for shoes, and a hanging loop attached to the top of her hat.
#5. Paper and Yarn Fairy Angels
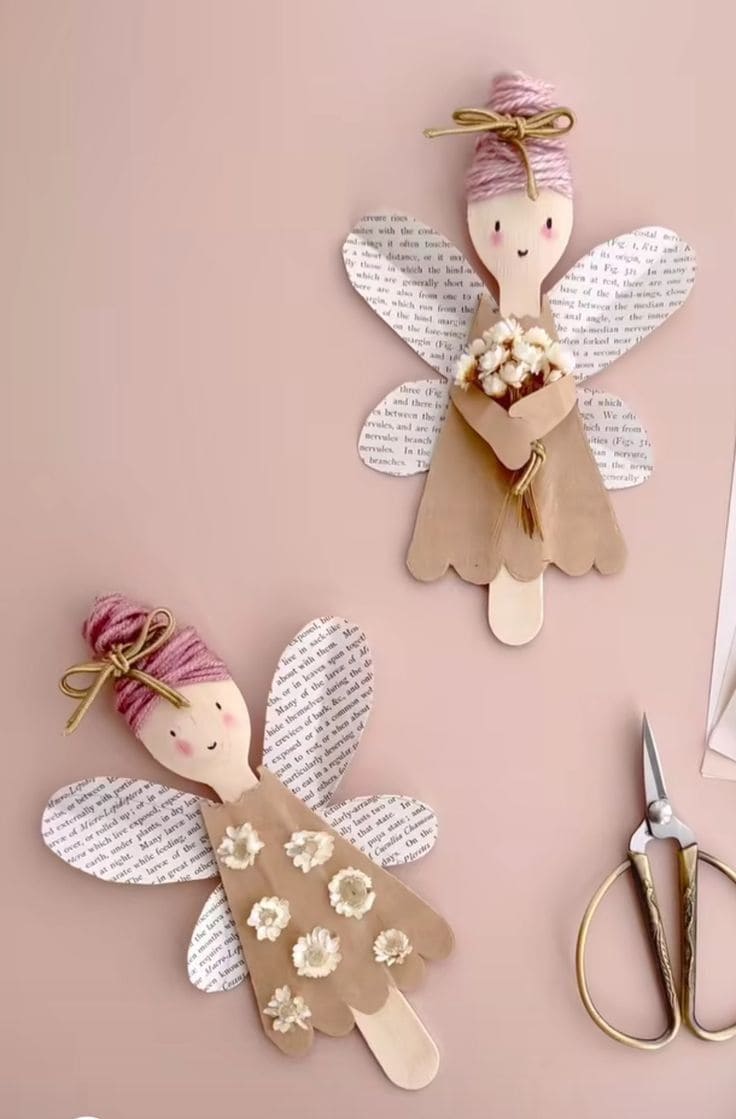
These paper and yarn fairy angels are the perfect blend of simplicity and charm.
Their soft pink yarn hair, gentle smiles, and delicate paper wings give them an ethereal, storybook quality.
Made from everyday craft supplies, these sweet fairies can be used as wall art, bookmarks, or festive ornaments.
Materials
- Wooden craft sticks (15 cm long)
- Beige and light pink craft paper
- Old book pages or printed paper for wings
- Yarn (pink or lavender, 50 cm per fairy)
- Small artificial flowers (6–8 pieces)
- Gold or jute string for bows (20 cm)
- Glue stick or hot glue gun
- Scissors
- Black pen or fine marker for the face
Instructions
- Cut out a small triangular paper dress with scalloped edges and glue it onto the wooden stick, leaving a portion uncovered for the neck and head.
- Cut two large and two small ovals from old book pages for wings, and glue them symmetrically behind the dress.
- Draw a gentle face using a fine marker, adding small rosy cheeks with pink paint or pastel.
- Wrap yarn around the head for hair and secure it with glue. Then tie a small bow from gold or jute string and place it on top.
- Decorate the dress with paper flowers or tiny dried blooms, then add a mini bouquet or extra embellishment if desired.
#6. Pastel Petal Fairy Necklaces
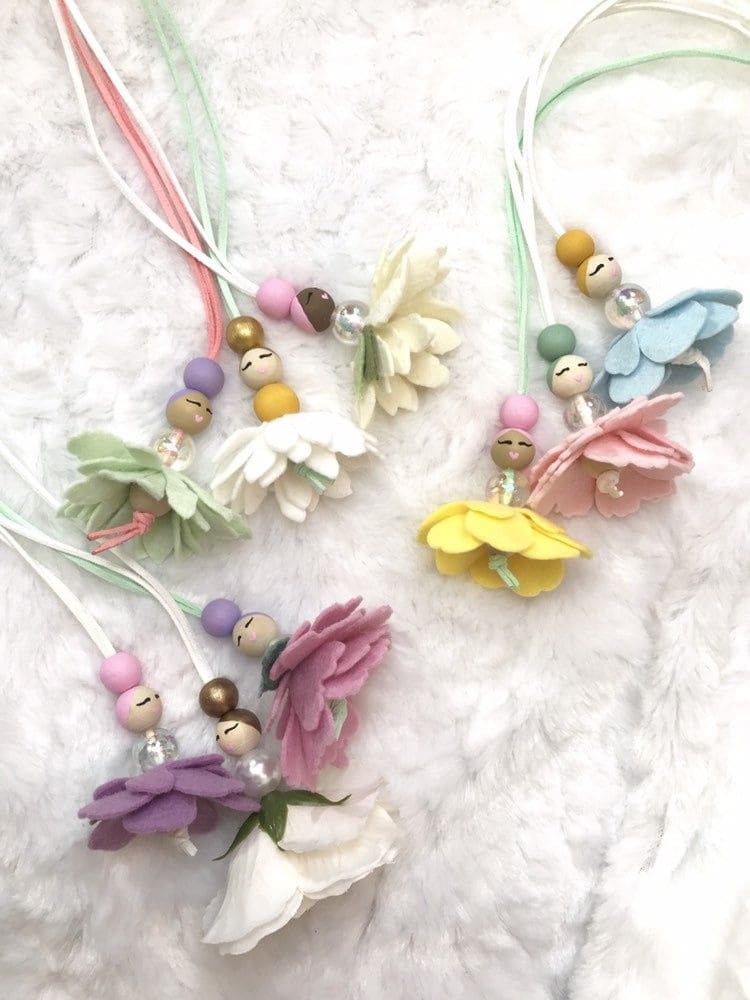
These pastel petal fairy necklaces are tiny bursts of color and imagination that feel straight out of a spring daydream.
Each one features a sweet little fairy made from felt petals and wooden beads, strung onto soft cord for a charming handmade accessory.
The delicate layers of fabric give the illusion of fluttering skirts, while the hand-painted faces bring each fairy to life.
Materials
- Felt flower petals (5–6 per fairy, assorted pastel colors)
- Wooden beads (2 sizes: 1 cm for the head, 0.5 cm for accents)
- Round pearl beads (1 cm for sparkle)
- Cotton cord or suede string (50–60 cm per necklace)
- Acrylic paint or fine markers (for fairy faces)
- Hot glue gun or craft glue
- Scissors and a large needle
Instructions
- Paint or draw small faces on the larger wooden beads and let them dry completely. Then add blush or tiny smiles for extra charm.
- Stack the felt petals around the string, alternating colors to form the fairy’s dress. Secure the petals with a dab of glue near the center.
- Thread the pearl bead under the petals, followed by the wooden head bead, and tie a knot to hold everything in place.
- Add a smaller bead on top for decoration and tie off both ends of the string to complete the necklace.
#7. Winter Fairy Doll Collection
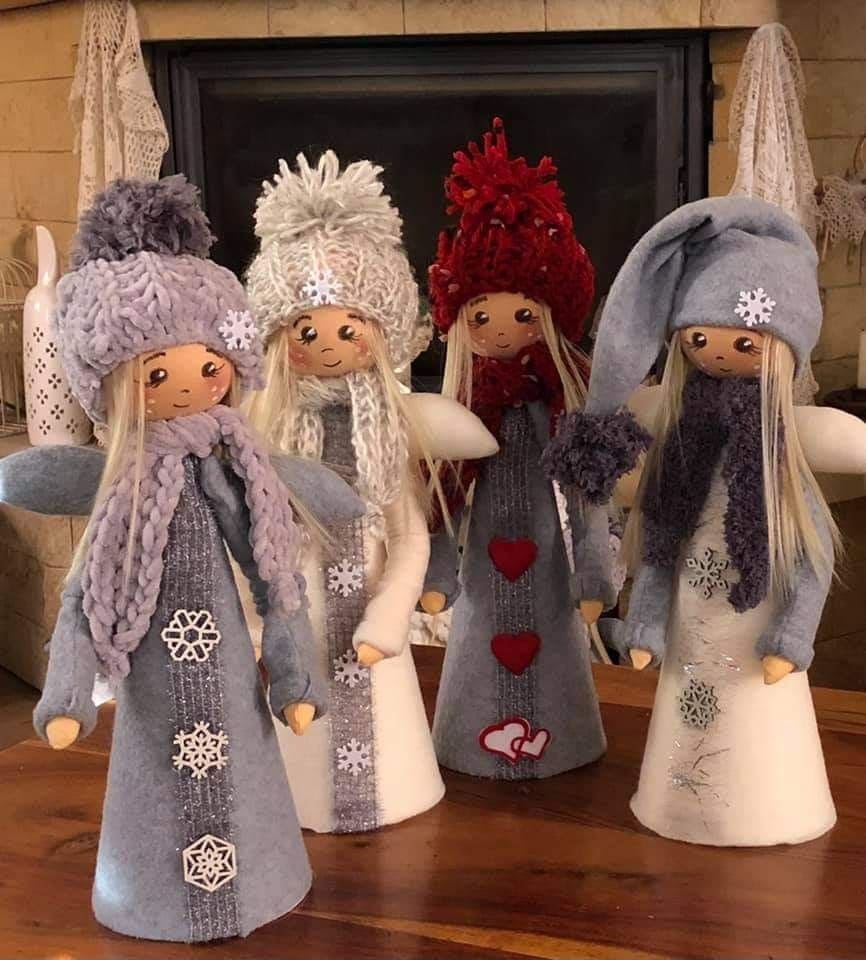
These cozy winter fairies bring a touch of magic and warmth to chilly days.
Dressed in soft felt gowns, fluffy scarves, and chunky knit hats, each fairy has her own personality.
Moreover, their delicate faces and long flowing hair make them perfect as holiday decorations or heartfelt handmade gifts.
Materials
- Felt sheets in gray, white, and red (20 × 30 cm each)
- Wooden beads (3 cm diameter for heads)
- Yarn in various colors for hats and scarves (50 g total)
- Hot glue gun or strong craft glue
- Cotton stuffing or soft filling (small amount)
- Decorative buttons, snowflakes, or felt hearts (2–3 pieces per doll)
- 20 cm of faux hair or yarn for hair per doll
- Scissors, needle, and thread
Instructions
- Start by rolling a piece of felt into a cone shape for the body (about 18 cm tall) and glue the edges securely. Then stuff lightly if you want a sturdier form.
- Cut out two small felt arms (8–10 cm each) and attach them near the top of the cone body. Use a little glue to secure.
- Attach the wooden bead head to the top of the cone with glue. Once set, glue strands of faux hair or yarn evenly around the bead.
- Crochet or twist yarn to create a cozy hat and scarf. Place the hat snugly on the head and wrap the scarf around the neck.
- Decorate the dress with felt snowflakes, stitched hearts, or buttons down the front. Add glitter or soft details for a festive sparkle.
- Finish by gently painting facial features with a fine brush or marker.
#8. Pressed Flower Fairy Faces
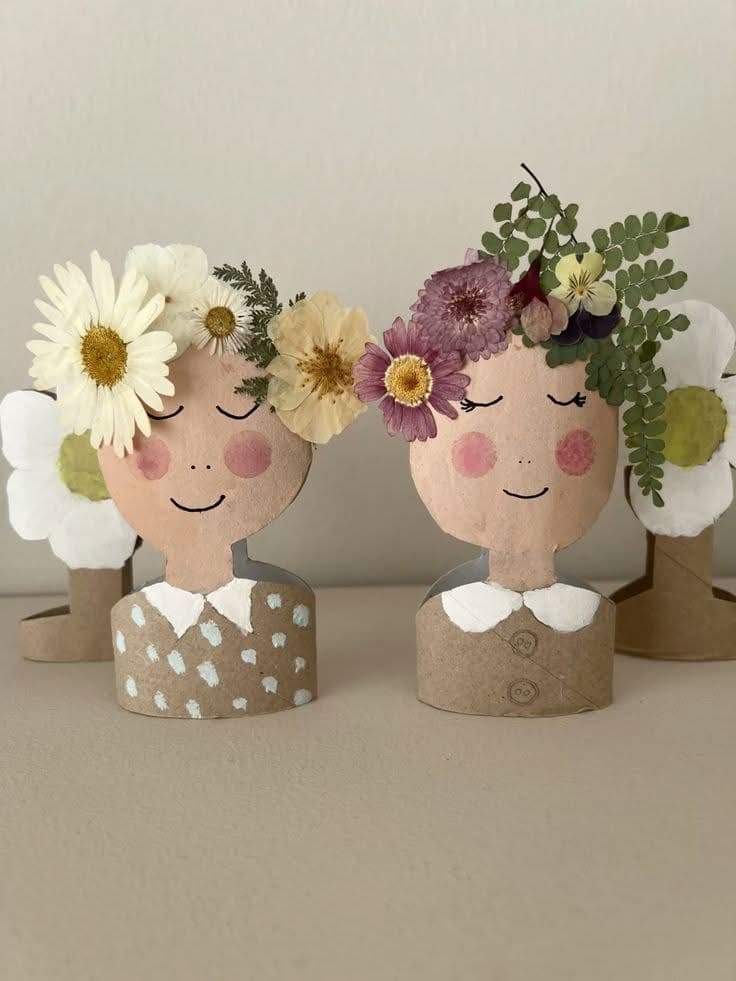
Sweet, serene, and filled with nature’s charm, these pressed flower fairy faces bring a breath of spring indoors.
Their calm smiles and rosy cheeks, paired with crowns of real dried blooms and tiny leaves, make them feel alive with gentle whimsy.
This is a relaxing craft for kids and adults alike, blending paper art with natural beauty.
Materials
- Kraft paper or cardboard (10×15 cm pieces)
- Light pink and beige acrylic paint (for face tones)
- Paintbrushes (small round size)
- Black marker or pen for facial features
- Dried flowers, leaves, or pressed petals (5–6 per head)
- Scissors
- Glue stick or craft glue
- White paper for collars or details
Instructions
- Cut out head and shoulder shapes from kraft paper. Then paint the face area using light pink or beige tones and let it dry.
- Using a black pen, draw closed eyes, a small smile, and blush dots on the cheeks. You can add a paper collar or patterned clothing with a touch of paint or cutouts.
- Arrange your pressed flowers and leaves on top of the head, forming a crown or floral hairstyle. Mix different shapes and sizes for a natural, organic look.
- Once you’re happy with the placement, glue them carefully, starting from the back layer forward.
- Allow the glue to dry completely before displaying your fairy faces upright or framing them.
#9. Woodland Flower Fairy Doll
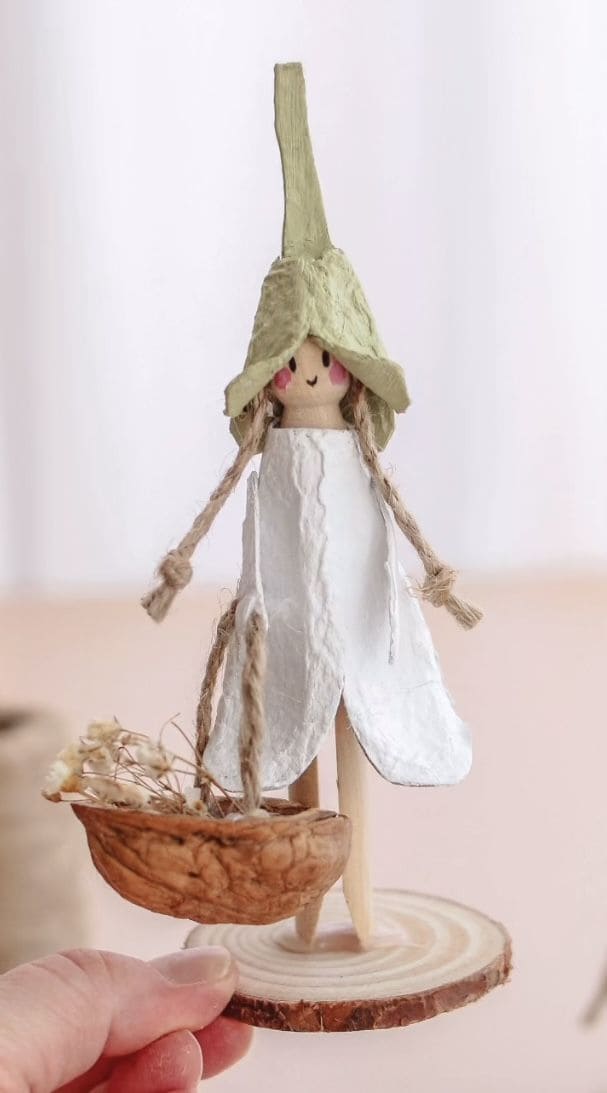
This enchanting woodland fairy doll looks like she just stepped out of a meadow.
Her soft, petal-like dress and acorn cap hat create a sweet, earthy charm, while her tiny walnut shell basket gives her a whimsical purpose.
This project is perfect for both kids and adults who enjoy transforming natural materials into something magical and full of character.
Materials
- 1 wooden peg doll (10–12 cm tall)
- 1 walnut shell (halved and cleaned)
- 1 wooden slice or round base (8–10 cm diameter)
- Egg carton (for hat and skirt pieces)
- Jute string or twine (50 cm total)
- White and green acrylic paint
- Fine-tipped black marker for the face
- Optional: dried flowers or tiny leaves for the basket
- Small paintbrush
- Hot glue gun or strong craft glue
Instructions
- Paint the wooden peg doll’s body a light beige and let it dry completely. Then add gentle blush marks with pink paint for a sweet expression.
- Cut two petal shapes from the egg carton and paint them white for the dress. Once dry, glue them around the doll’s lower body, overlapping slightly for a layered effect.
- For the hat, trim a section of the egg carton into a cone and paint it green. Let it dry, then glue it on top of the head like a flower bud cap.
- Twist pieces of jute string for arms and hair. Glue the arms to the sides and the hair under the hat, allowing loose strands to fall naturally.
- Attach the doll to the wooden base with glue. Secure a walnut shell in one hand using string as a handle to form a tiny basket.
- Finally, add small dried flowers or natural bits to the basket for a final woodland touch.
#10. Clothespin Ballerina Fairies
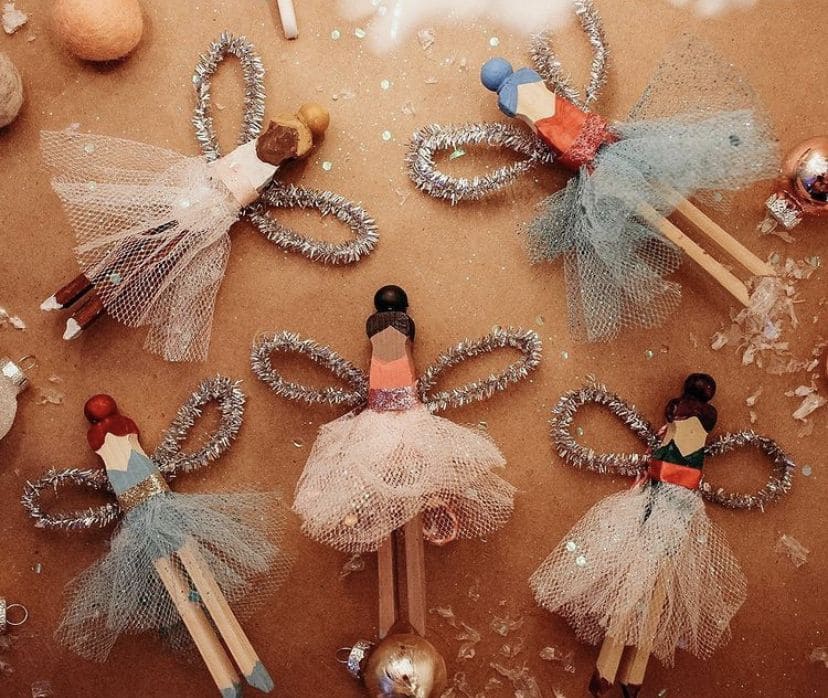
These clothespin ballerina fairies look like they’ve just pirouetted out of a winter wonderland.
With shimmering pipe cleaner wings, sparkling tulle skirts, and painted wooden bodies, they bring a mix of rustic charm and delicate fantasy.
Each fairy feels full of personality, perfect for Christmas tree ornaments, gift toppers, or even a handmade garland.
Materials
- Wooden clothespins (10–12 cm each)
- Wooden beads (1.5 cm for heads)
- Tulle fabric (15×15 cm per fairy)
- Acrylic paint (skin tone, hair color, and dress shades)
- Hot glue gun or craft glue
- Paintbrushes
- Scissors
- Glitter or sequins (optional for extra sparkle)
Instructions
- Paint the top half of each clothespin to resemble a bodice, leaving space for the head bead. You can add color details like leotards or belts for variety.
- Glue a wooden bead on top of the clothespin to form the fairy’s head, then paint on hair and simple facial features.
- Cut a strip of tulle, fold it into a short ruffle, and glue it around the clothespin to make a twirling skirt. Then add glitter if you want some sparkle.
- Shape a pipe cleaner into two loops for wings, twist in the middle, and glue to the back of the fairy.
- Once dry, gently bend the wings and fluff the skirt for a soft, airy effect.
#11. Autumn Leaf Woodland Fairies
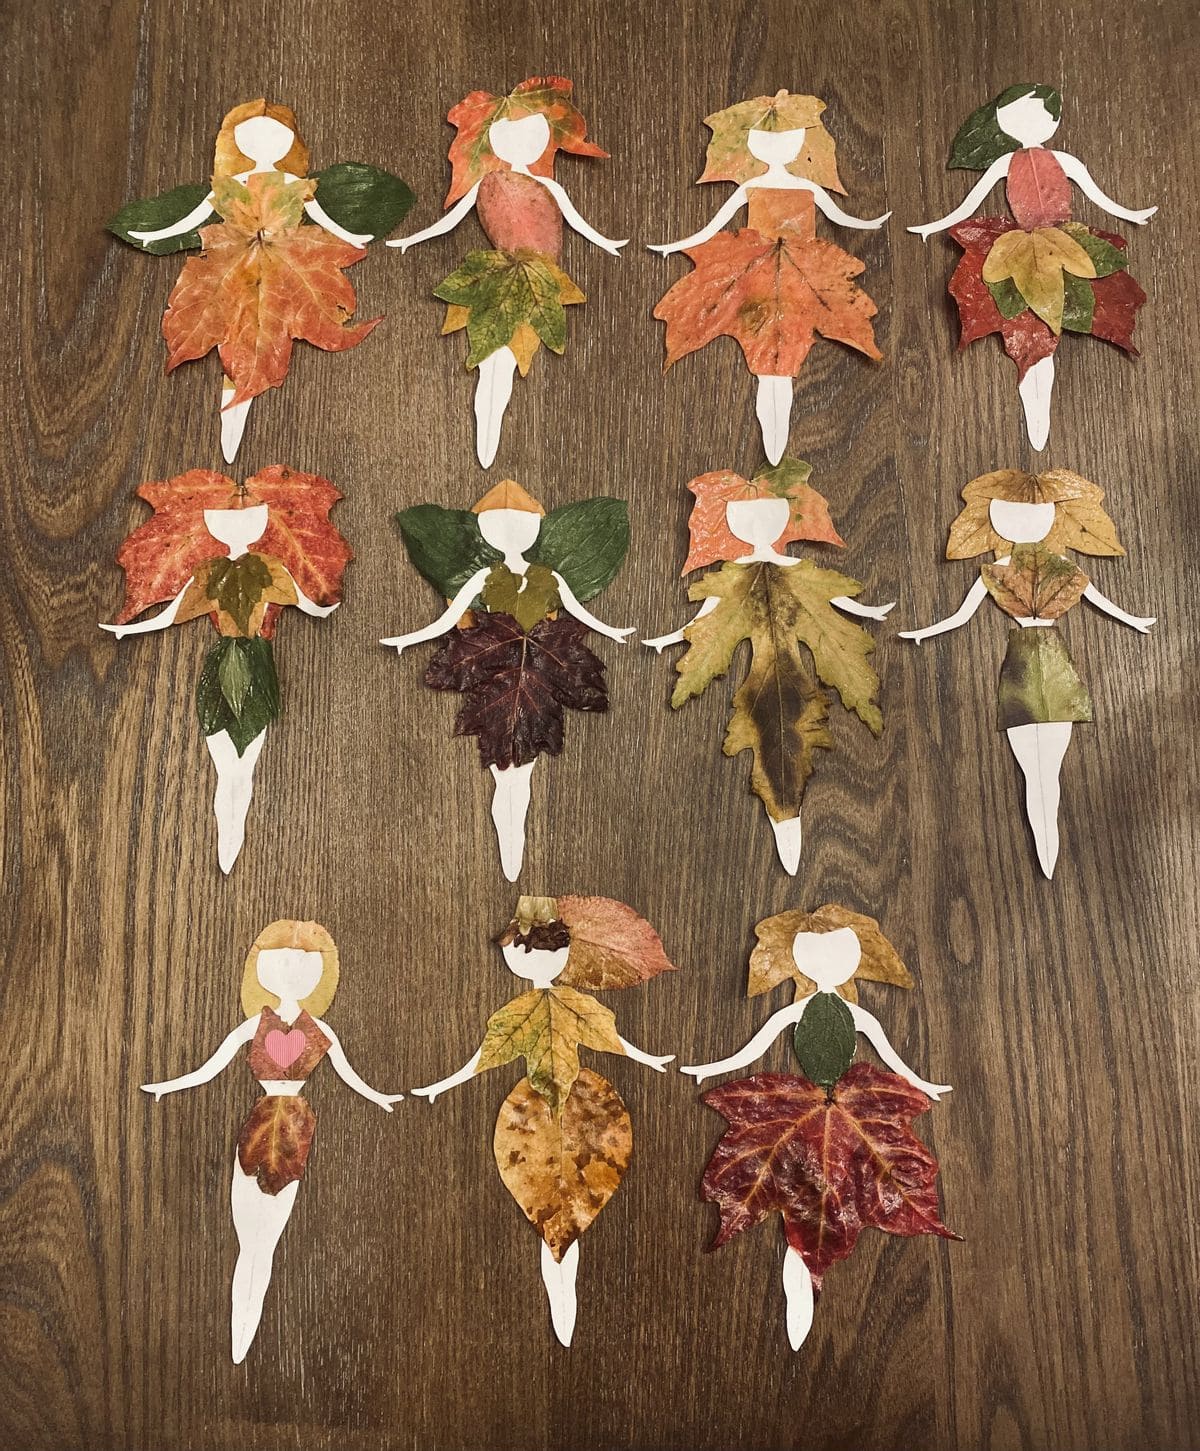
These autumn leaf woodland fairies look like they’ve fluttered straight out of a forest storybook.
Each one wears a dress made entirely from real fall leaves like maple, oak, and ivy blend together into skirts that swirl with gold, crimson, and green.
Specially, the contrast of delicate paper bodies and vibrant natural textures gives them a whimsical, earthy beauty.
Materials
- Dried autumn leaves (various shapes and sizes)
- White cardstock or thick paper (for bodies)
- Craft glue or glue stick
- Pencil and scissors
- Small paintbrush (for applying glue)
- Optional: glitter, markers, or tiny flowers for details
Instructions
- Sketch or print a simple fairy silhouette on white cardstock, about 10–12 cm tall works well. Cut out the figure carefully.
- Arrange your dried leaves by size and color, choosing smaller ones for tops and larger ones for skirts or wings.
- Gently glue the leaves onto the fairy’s body, overlapping them to create a flowing dress shape. You can also use two leaves on the back as wings.
- Press each leaf down with your fingers for a few seconds to help it stick. Let the glue dry completely.
- Add personal touches like leaf crowns, tiny flowers, or a touch of glitter for a magical finish.
#12. Acorn Cap Fairy Buddies
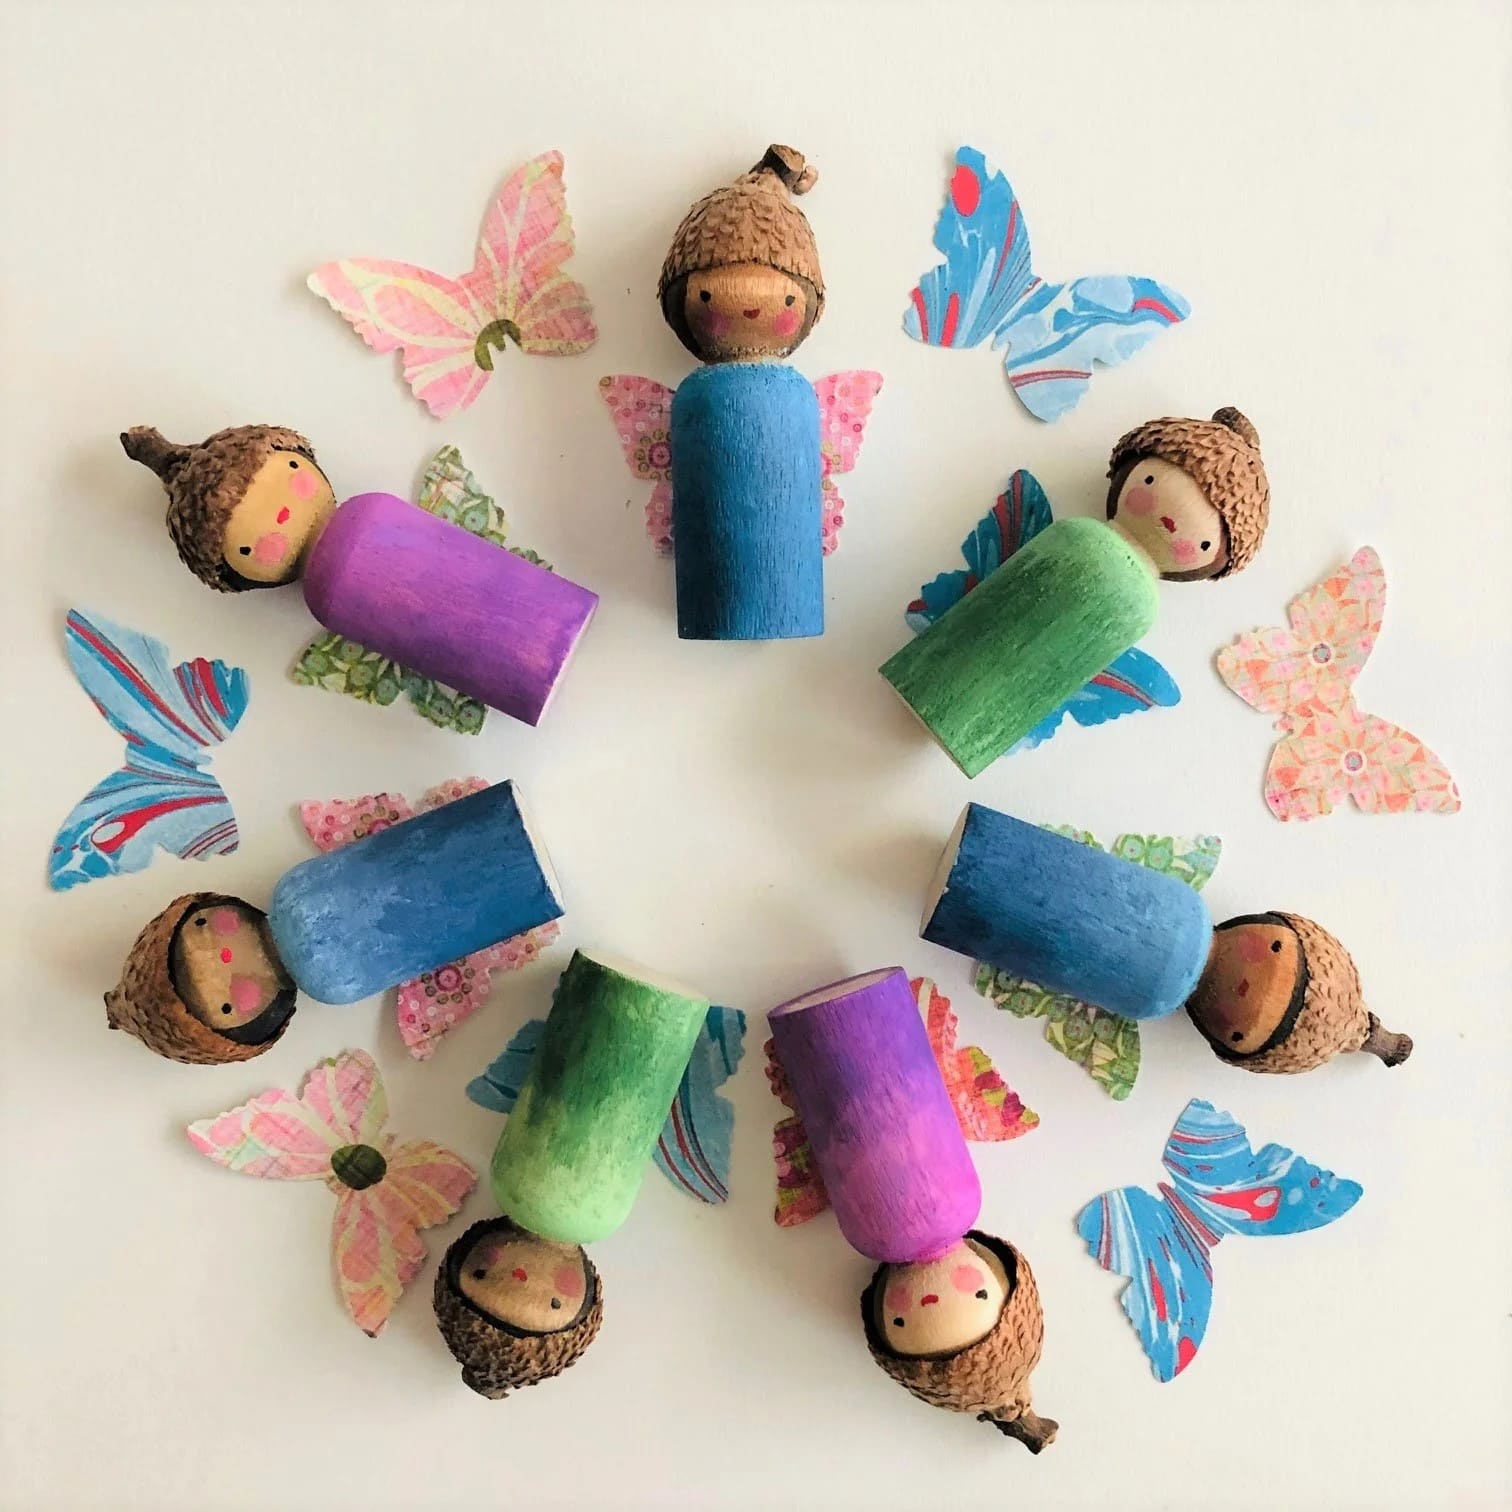
These adorable acorn cap fairy buddies look like they’ve stepped right out of a woodland story.
Made from simple wooden pegs, colorful paint, and nature’s own treasures, they bring warmth and charm to any craft day.
You can arrange them in a fairy circle, hang them as ornaments, or use them as delightful party favors for little nature lovers.
Materials
- Wooden peg dolls (5–7 cm tall)
- Acorn caps (1 per fairy)
- Acrylic paint (assorted colors for bodies and faces)
- Small paintbrushes
- Craft paper or scrapbook paper for wings (5×5 cm pieces)
- Scissors and glue gun
- Fine-tipped marker for facial details
Instructions
- Paint the peg dolls in bright, cheerful shades for their clothing. Let them dry completely.
- Add soft facial details with a fine marker like small eyes, pink cheeks, and a gentle smile give them a friendly look.
- Glue an acorn cap onto the top of each peg doll’s head to make a whimsical hat. Hold in place for a few seconds to secure.
- Cut out butterfly-shaped wings from patterned paper and glue them to the back of each doll.
- Once everything is dry, arrange the fairies in a circle or line them up as a playful woodland display.
#13. Lavender Blossom Fairy Twins
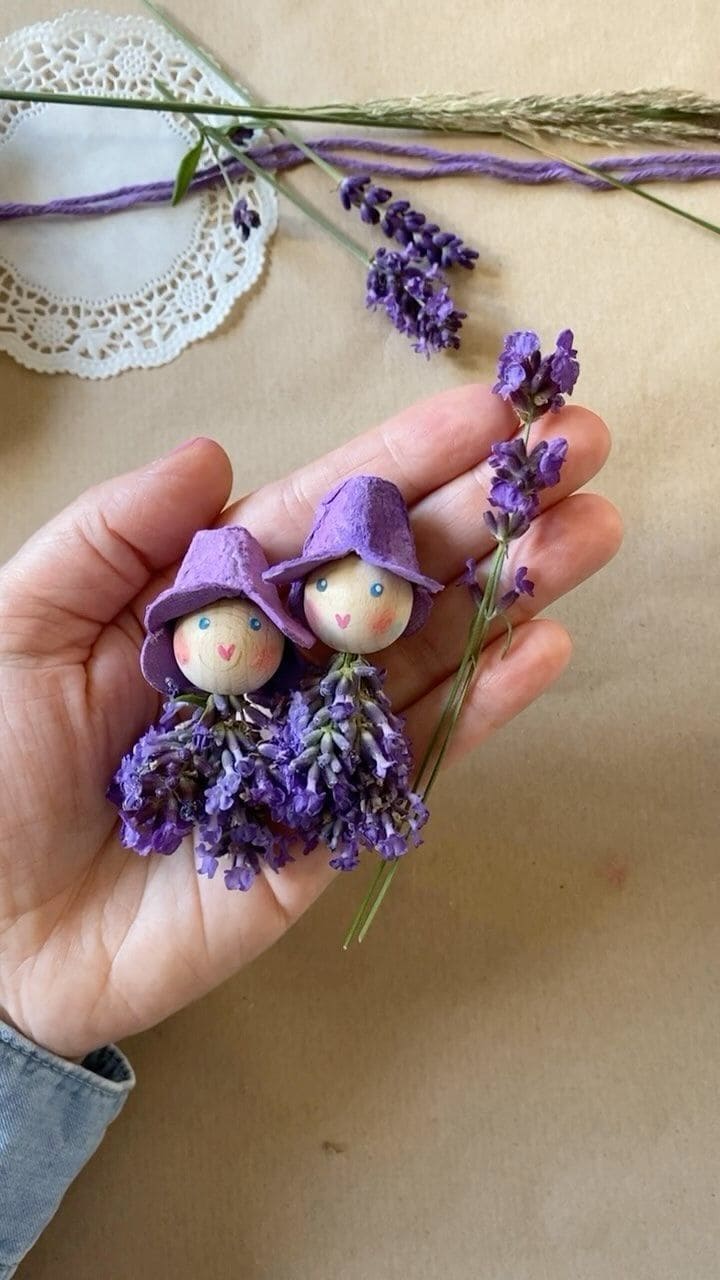
Look! These lavender blossom fairy twins are pure summer magic in miniature form.
With their delicate purple hats and fragrant lavender skirts, they capture the beauty and calm of a blooming field.
Each fairy looks like she just danced out of a garden breeze, bringing with her a whisper of floral fragrance and rustic charm.
Materials
- Fresh or dried lavender stems (2–3 per fairy)
- Wooden beads (2–2.5 cm diameter for heads)
- Purple egg carton pieces (for hats, 2×2 cm each)
- Paint and brush (pink for cheeks, black for eyes, red for lips)
- Hot glue gun or craft glue
- Twine or thin floral wire (10–15 cm)
- Scissors
Instructions
- Cut out small cone shapes from a purple egg carton and trim them into hat forms. You now paint the edges lightly for added color if desired.
- Draw simple, cheerful faces on each wooden bead. Then add a touch of pink to the cheeks for a soft, lively look.
- Arrange 2–3 lavender stems together, aligning the top blooms to form a skirt. Tie them with twine near the base of the flowers.
- Glue the wooden bead head onto the tied area and gently press the egg carton hat on top. Hold for a few seconds until set.
- Once dry, adjust the lavender so it fans out naturally like a fairy dress.
#14. Elegant Pink Fairy Doll Craft
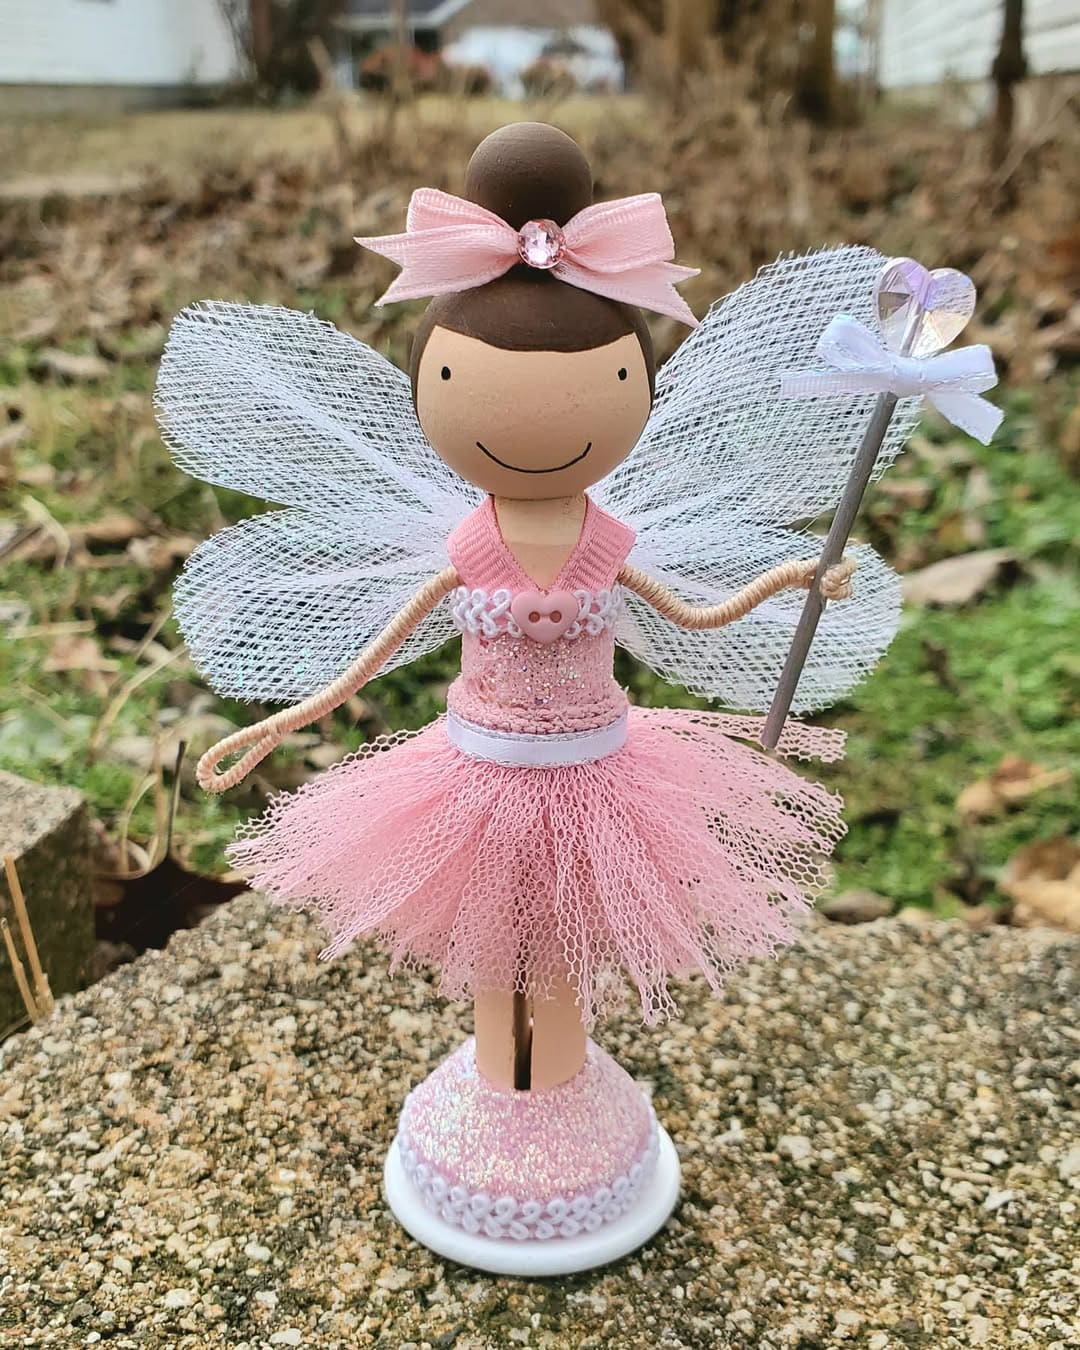
This fairy doll is every little crafter’s dream come true. She sparkles with charm from her twinkling wings to her delicate tutu.
The mix of soft textures, dainty ribbons, and a hand-painted wooden face gives her a timeless, storybook appeal.
It’s a wonderful project to make together with kids, teaching patience and creativity while ending with a keepsake that seems to hold a sprinkle of real fairy dust.
Materials
- 1 wooden peg doll (10–12 cm tall) or bead and stick combo
- 30 cm of pink ribbon (0.5–1 cm wide)
- 10 × 10 cm piece of white mesh or lace for wings
- 20 × 15 cm piece of pink tulle fabric
- 1 small bow or ribbon flower
- Small piece of glitter paper or bead for wand tip
- Hot glue gun or craft glue
- Fine marker or paint for the face
- 1 toothpick or 10 cm skewer for the wand
Instructions
- Begin by painting or drawing the doll’s face with gentle features including two eyes, a small smile, and blush if desired. Then allow it to dry fully.
- Cut a strip of pink tulle long enough to wrap twice around the doll’s lower half. Then gather it at the top and glue it in place to form a fluffy skirt.
- Use the pink ribbon to create a waistband. Wrap and glue it around where the skirt meets the upper body, tying a neat bow at the back.
- Cut two identical wing shapes from mesh or lace. Then attach them carefully to the back with a drop of glue, adjusting until they sit evenly.
- Decorate the wand by gluing a bead, bow, or glitter paper star on the end of the toothpick. Place it gently in one of the fairy’s hands.
- Add a ribbon bow to her hair or the top of her head for a final magical touch.
#15. Woodland Fantasy Fairy Trio
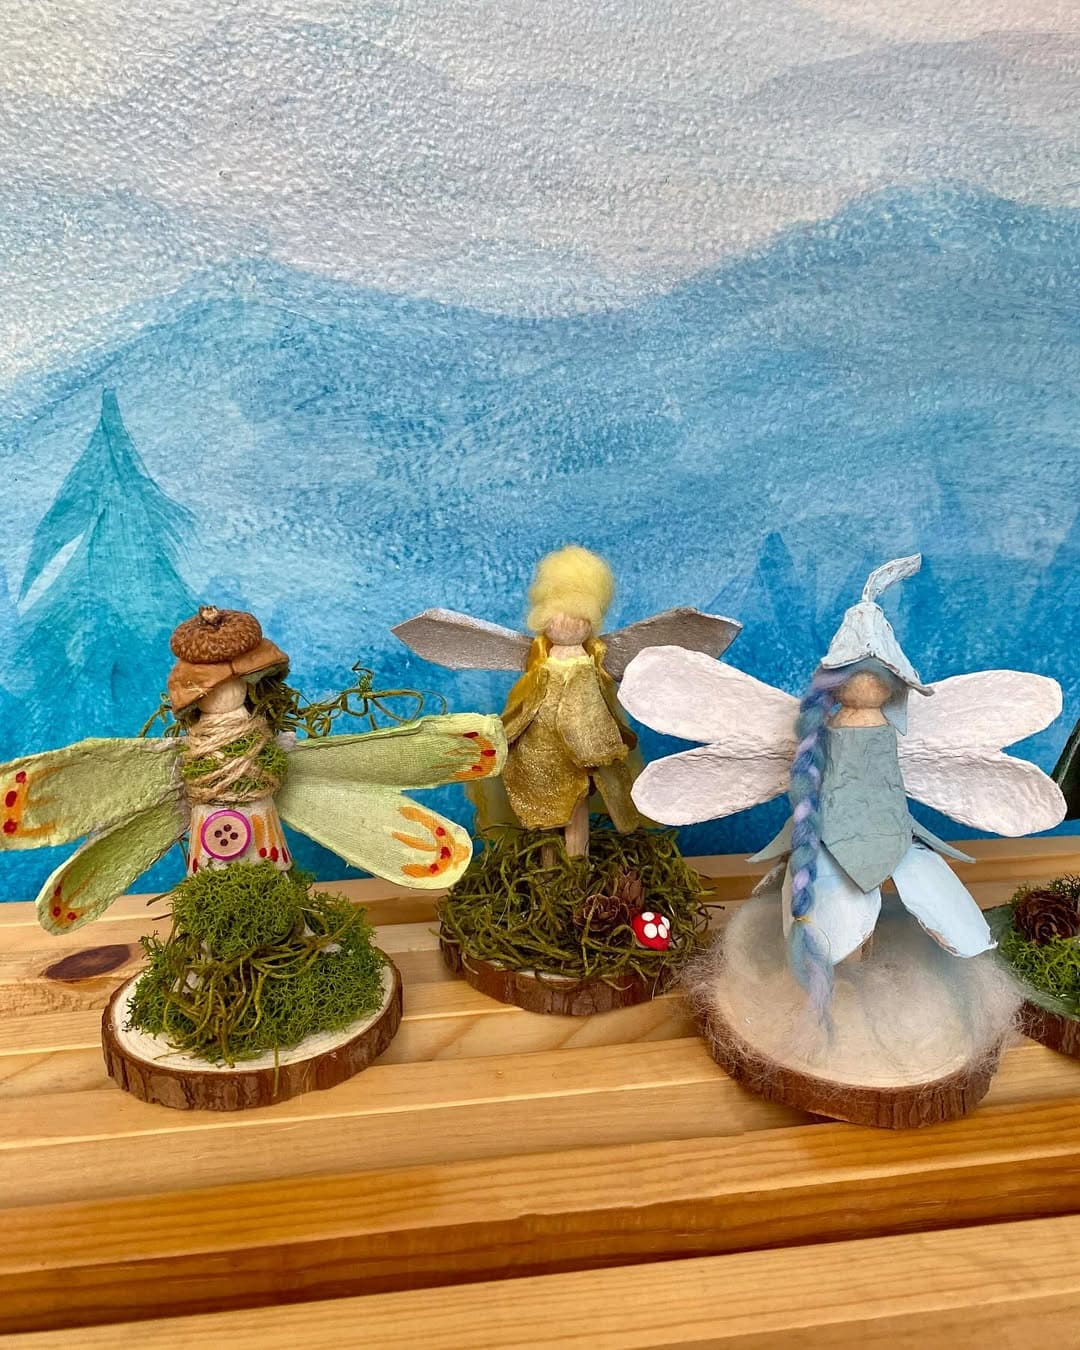
These enchanting woodland fairies look like they’ve stepped right out of a storybook.
Crafted from natural elements like moss, twine, and wooden bases, they radiate a handmade warmth that fits beautifully in nature-themed displays or fairy gardens.
Also, their delicate wings, tiny hats, and gentle colors make them feel alive, as if they might flutter off the moment you glance away.
Materials
- Wooden peg dolls (10–12 cm tall)
- Dried moss (small handful per fairy)
- Felt sheets or fabric scraps (light blue, gold, and green)
- Acorn caps or mini hats (3 pcs)
- Egg carton or paper petals for wings (cut into 6–8 cm shapes)
- Twine or embroidery thread
- Small round wood slices (7–8 cm diameter for bases)
- Acrylic paint (for faces and body details)
- Hot glue gun
Instructions
- Begin by painting each wooden peg doll with soft, earthy tones to create the fairy’s outfit. Let them dry completely before moving on.
- Cut out wing shapes from egg cartons or thick paper, then lightly paint them with watercolor or glitter for a magical shimmer.
- Glue moss onto each wooden slice to create a lush fairy base. Then press gently to ensure it adheres well.
- Attach the wings to the back of each peg doll, securing them with glue. Then wrap twine around the body or waist to add texture and a rustic look.
- Add accessories like acorn caps, felt cloaks, or tiny buttons to personalize each fairy.
- Finally, glue each fairy to its moss-covered base and let everything set for at least 15 minutes.
#16. Glitter Wing Christmas Fairy Ornaments
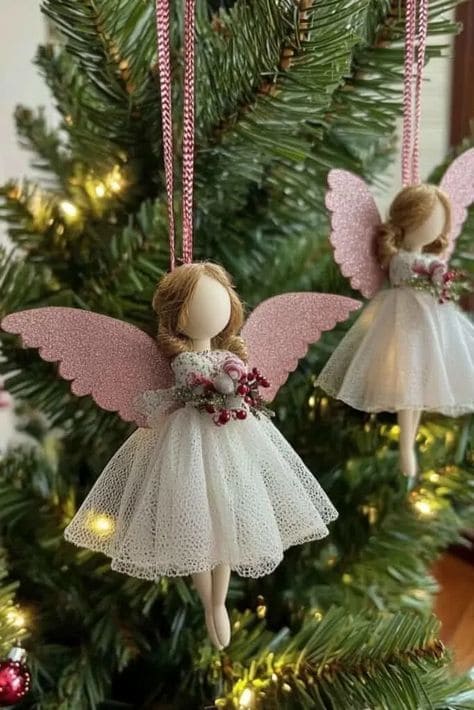
Soft, sparkly, and utterly enchanting, these glitter-wing Christmas fairy ornaments turn your tree into a magical woodland scene.
Each tiny fairy wears a fluffy tulle dress and carries a miniature berry bouquet, while her delicate pink wings shimmer under the twinkle lights.
This project is an absolute joy to make and a wonderful keepsake to gift during the holiday season.
Materials
- Wooden bead heads (2–3 cm diameter)
- White or cream tulle fabric (20×20 cm per fairy)
- Pink glitter foam sheet (for wings, 10×8 cm per pair)
- Brown yarn or embroidery thread (for hair, 40 cm per fairy)
- Small faux berries or tiny flowers (for bouquet)
- Hot glue gun
- Scissors
- Pink ribbon or string (for hanging, 20 cm)
- Wooden peg bodies (10–12 cm)
Instructions
- Glue a wooden bead to the top of the peg to form the head. Then wrap small sections of yarn to create hair and twist into soft curls before attaching.
- Cut a 20×20 cm piece of tulle, gather it around the waist of the peg, and secure it with glue or thread to make a puffy skirt.
- Draw or cut a wing shape from pink glitter foam and glue it to the fairy’s back, pressing gently until secure.
- Add a small berry cluster or flower bundle between her hands, gluing them in place as a delicate bouquet.
- Attach a pink ribbon to the top of her head for hanging, ensuring it’s balanced when suspended.
#17. Crocheted Forest Fairy Doll
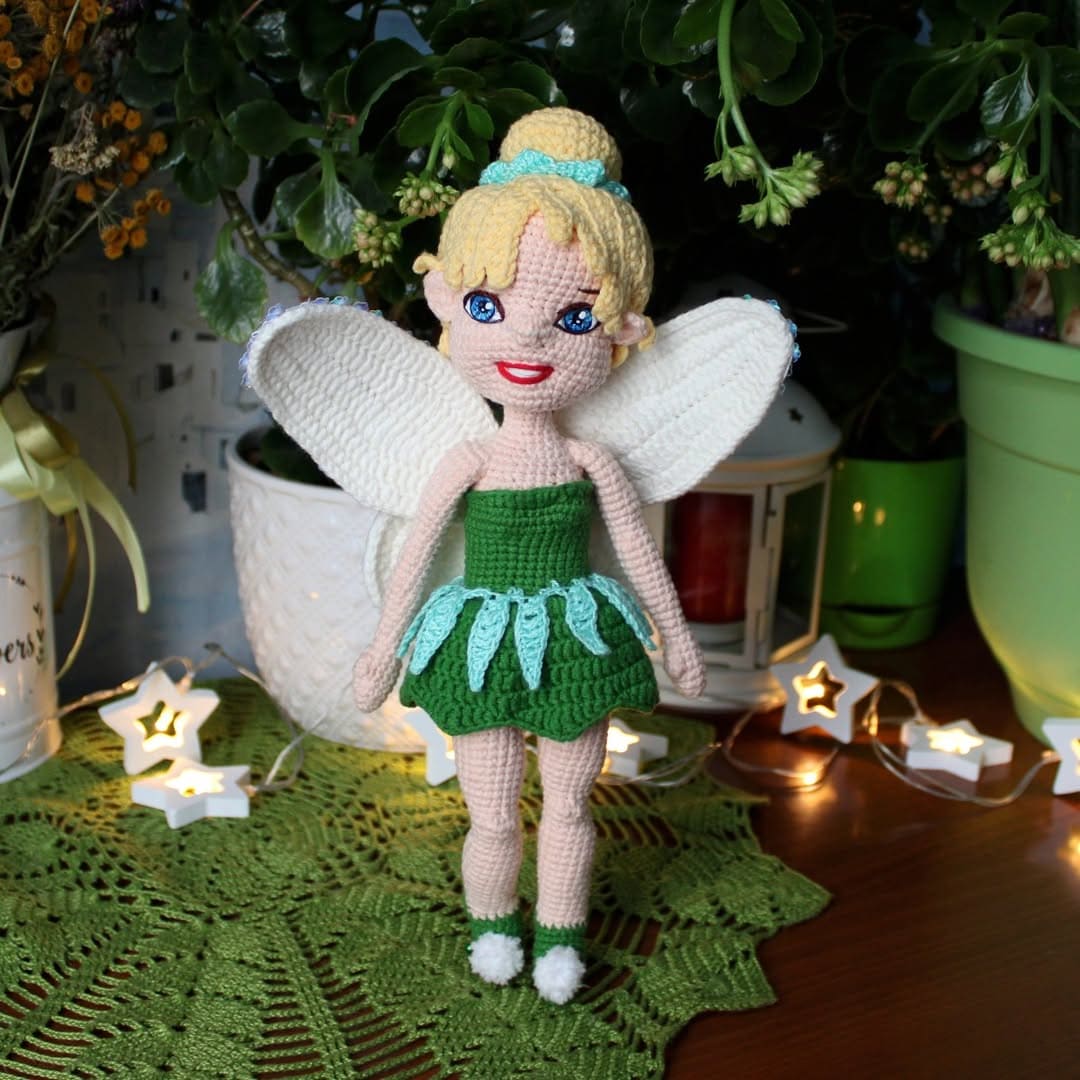
This delightful crocheted forest fairy looks like she’s just stepped out of a secret woodland garden.
With her bright green dress, blonde bun, and delicate wings, she’s full of personality and charm.
Whether perched on a shelf or gifted to a child who believes in fairies, she’ll spread a little magic wherever she goes.
Materials
- Light skin-tone yarn (50 g, cotton or acrylic)
- Crochet hook (2.5–3 mm)
- Polyester stuffing (about 50 g)
- Embroidery thread for eyes and mouth
- Needle for sewing details
- Small white pom-poms for shoes
- Optional: wire for poseable arms and legs (30 cm total)
- White yarn (20 g for wings)
- Green yarn (50 g for dress and shoes)
- Yellow yarn (30 g for hair)
Instructions
- Start by crocheting the head and body using the skin-tone yarn. Stuff as you go to maintain shape. Then use small, tight stitches for a smooth texture.
- Once the body is complete, crochet a fitted green dress separately and slide it on, sewing it securely at the waist. You can add a layered leaf skirt using lighter green yarn.
- For the hair, create a crocheted cap in yellow yarn, then add strands or stitches to form the bun. Secure the bun at the top and tie a small yarn ribbon around it.
- Crochet the wings using white yarn and a lacy stitch pattern. Attach them firmly to the back of the doll.
- Add the finishing touches such as embroidered facial features, pom-poms on the shoes, and any small accessories. Bendable wire can be inserted inside the arms and legs if you want her to be poseable.
- Once finished, fluff her wings gently and let her fly onto a display shelf, where she’ll brighten any room with her handmade magic.
#18. Personalized Hanging Angel Fairy Dolls
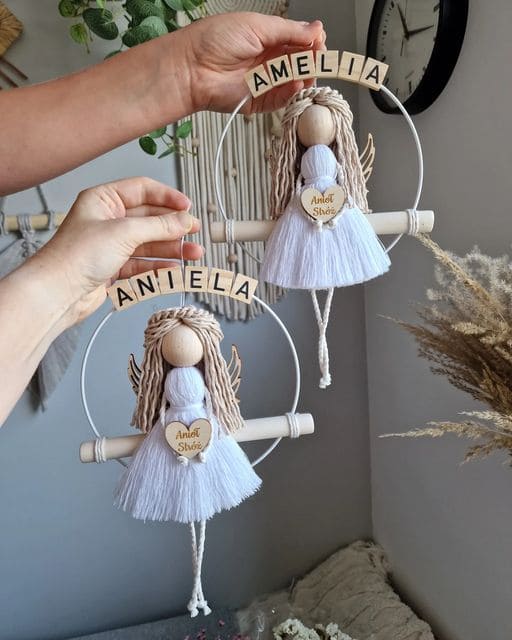
These personalized hanging angel fairy dolls are the perfect mix of elegance and heart.
Each one carries a calm, heavenly charm, dressed in a soft white tassel dress and framed by a delicate wooden hoop.
The personalized name blocks make them extra special—ideal for nurseries, baby showers, or as keepsake gifts for loved ones.
Materials
- 1 wooden bead (3–4 cm) for the head
- 1 wooden hoop (15–20 cm diameter)
- 1 small wooden dowel (15–18 cm)
- Thin jute or raffia for hair (20 cm)
- Small wooden heart or tag for inscription
- Wooden letter beads for names
- Small wooden wings (2 pieces)
- Glue gun
- Scissors
- 6–8 pieces of cotton string or macramé cord (25–30 cm each) for the dress
Instructions
- Start by gluing the wooden bead onto the center of the dowel, it will form the angel’s head. Then, attach the dowel horizontally to the inner bottom part of the wooden hoop with glue or twine.
- Create the dress by tying cotton strings around the dowel beneath the bead, layering until it looks full and tassel-like.
- Cut small strands of jute or raffia for hair and glue them onto the bead. Style by twisting or braiding if desired.
- Attach the wooden wings to the back of the bead, then glue a wooden heart or small engraved tag to the front.
- Add wooden letter beads across the top of the hoop to spell the name. Now, you can thread a small loop of string on top for hanging.
#19. Mini Witch Broom Fairy Dolls
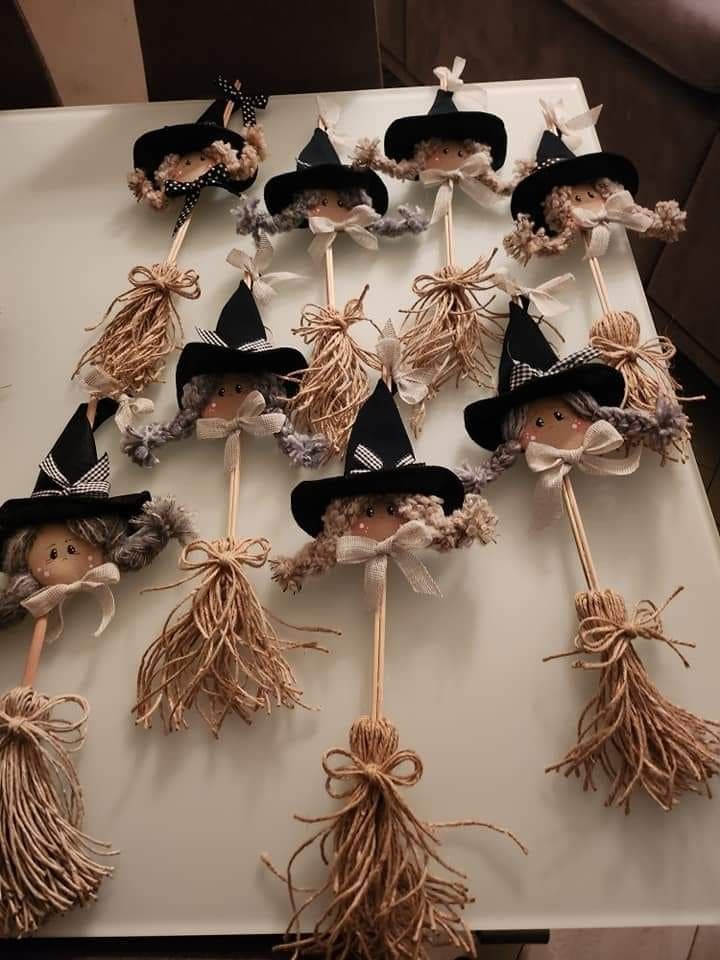
These mini witch broom fairy dolls are an irresistible blend of whimsy and rustic charm.
Each little figure looks like she’s just swooped in from a magical autumn night, her twine broom fluttering and her felt hat tipped playfully to the side.
Made with simple materials like yarn, felt, and wooden sticks, they’re a fun craft for Halloween or fall decorating.
Materials
- Wooden sticks or dowels (25 cm long)
- Wooden beads (2.5–3 cm diameter for heads)
- Black felt (for hats, 10×10 cm per doll)
- Jute twine or thick yarn (for broom and hair, 1 m per doll)
- Small ribbons or fabric scraps (for bows and decorations)
- Glue gun and glue sticks
- Scissors
- Fine-tip marker or paint for facial details
Instructions
- Begin by making the broom. Cut 40 cm of twine, gather strands together, and tie them around one end of the stick. Then trim and fluff the ends for a full, broom-like shape.
- Glue a wooden bead onto the top of the stick to form the doll’s head. You can draw small eyes, a smile, and rosy cheeks with paint or marker.
- Cut yarn into short lengths (10 cm each) for the hair and glue it around the bead. Let the curls or waves fall naturally to give each doll personality.
- Create a small cone hat from black felt, secure it with glue, and decorate it with a ribbon or mini bow.
- Finish by tying a bow at the broom’s handle or under the chin for extra charm.
#20. Paper Fairy and Mushroom Friend

This cheerful paper fairy and her mushroom companion are full of color and imagination!
Perfect for little hands, this craft encourages storytelling and creativity while introducing simple cutting and decorating skills.
The fairy’s pastel wings, floral crown, and sparkly wand make her look straight out of a storybook.
Materials
- Colored cardstock or construction paper (various shades for fairy and mushroom)
- Scissors
- Glue stick
- Colored pencils or markers
- Glitter pens or stickers for decoration
- Optional: wooden stick or straw (to turn it into a puppet)
Instructions
- Draw and cut out the fairy’s body, wings, and dress from different colored papers. You layer them together to form the fairy’s outfit.
- Create the fairy’s face and hair with markers, then add a floral crown or bow for detail.
- Assemble all parts with glue, pressing gently to avoid wrinkles. Then draw or glue on a wand for a magical touch.
- Cut a small mushroom shape from pink and white paper, adding dots and details.
- Once both pieces are ready, attach them to sticks if you’d like to make them into puppets for play.
