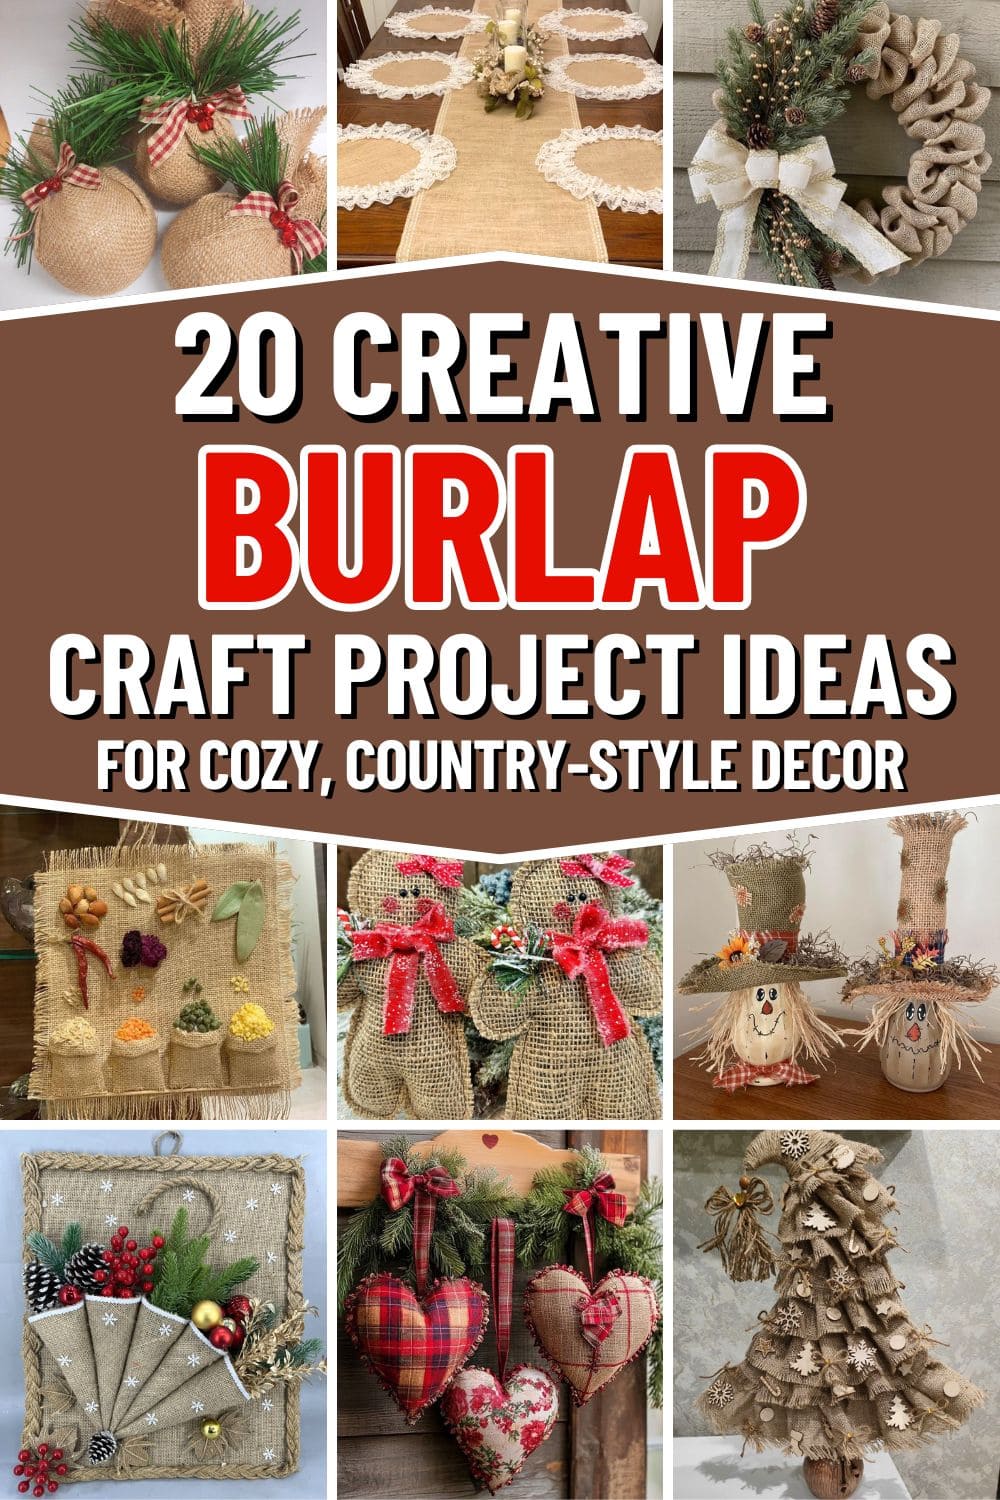
Burlap has a special way of turning simple materials into something warm and timeless.
You can use it to create everything from wall hangings and wreaths to charming table runners and seasonal crafts.
If you love farmhouse aesthetics or just enjoy crafting with earthy materials, these creative burlap ideas will inspire you to bring that rustic charm into your home, one piece at a time.
#1. Rustic Burlap and Lace Table Set
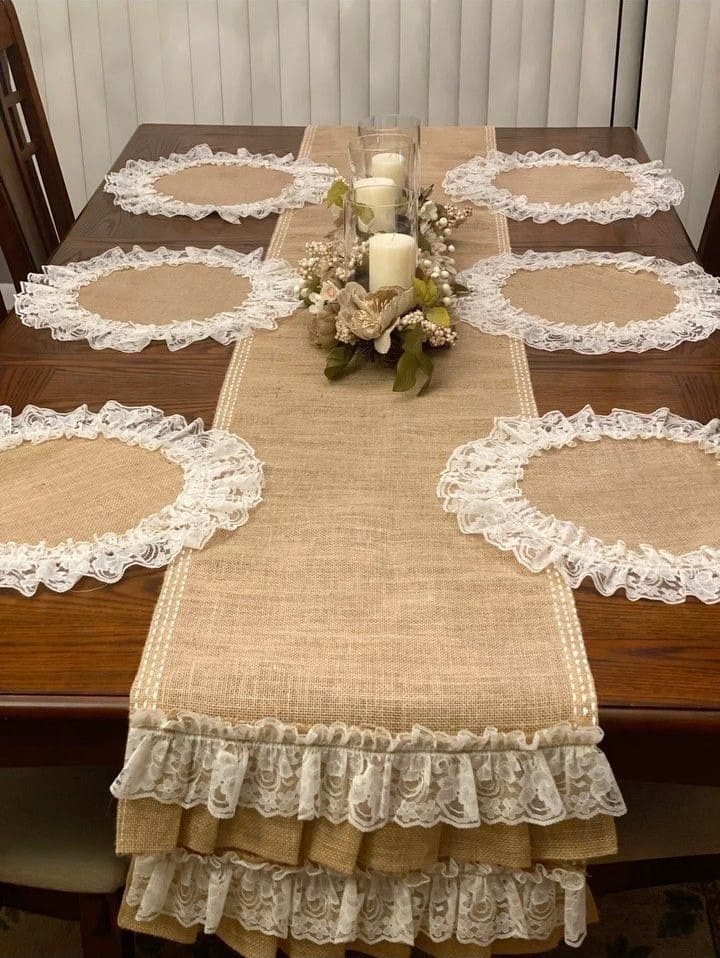
Elegant and timeless, this burlap and lace table set brings country charm and vintage grace to your dining room.
The soft lace edging lightens the coarse texture of burlap, creating a beautiful balance that feels cozy yet refined. Perfect for weddings, family gatherings, or everyday decor, this handmade set transforms your table into a warm,
welcoming centerpiece.

- Burlap fabric ((for runner: 14×72 inches; for placemats: 12×18 inches each))
- Lace trim ( (2-inch width, 4 yards total))
- Fabric glue or sewing machine
- Scissors and ruler
- Pins or clips
- Optional: decorative stitching thread (white or cream)
-
Cut your burlap to the desired size for the table runner and placemats. To prevent fraying, apply a thin line of glue or stitch around all edges.
-
Lay out your lace trim along the perimeter of each placemat and along both long edges of the runner. Then adjust to ensure the lace lies flat and even.
-
Secure the lace with pins, then sew or glue it in place. If sewing, use a straight stitch about ¼ inch from the burlap edge.
-
For a layered look on the runner, add extra lace or ruffled burlap at both ends, folding slightly to create soft gathers.
-
Press lightly with a warm iron (with a cloth over the lace) to smooth everything.
#2. Colorful Burlap Embroidery Wall Art
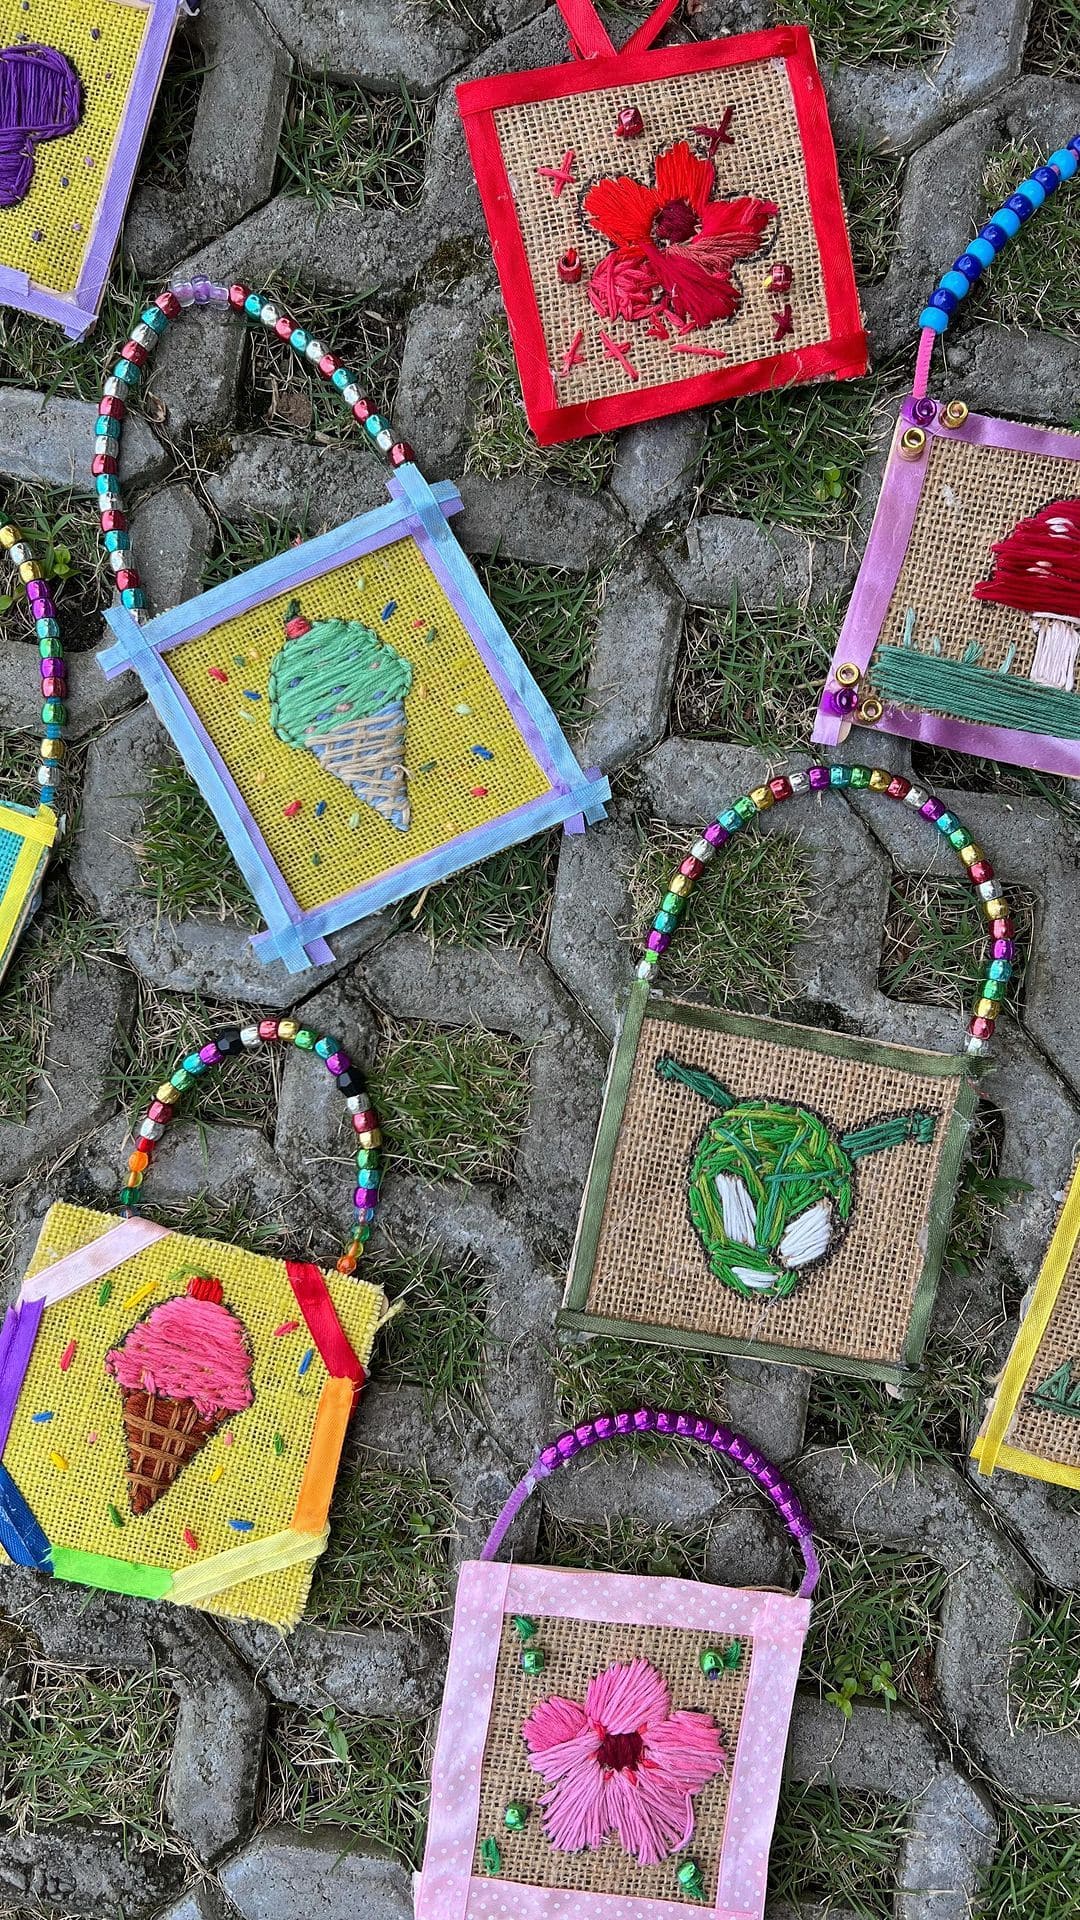
Bright, textured, and full of personality, these mini burlap embroidery artworks are a fun way to play with color and creativity.
Each small square becomes a little masterpiece like ice cream cones, flowers, or abstract shapes stitched in vibrant threads.
Specially, the playful mix of yarn, beads, and ribbons gives it a cheerful handmade feel that brings warmth to any wall, classroom, or kids’ craft corner.

- Burlap squares ((6×6 inches, 5-6 pieces))
- Embroidery threads or yarn ((assorted colors, about 10 meters each))
- Embroidery needle ((medium size))
- Colored felt or paper (for backing (6×6 inches))
- Ribbon ((½ inch wide, 3 feet per frame))
- 20-330 Wooden beads ((per hanging handle))
- Craft glue or hot glue gun
- Scissors and pencil
- Optional: fabric paint, sequins, or buttons (for decoration)
-
Cut your burlap into neat 6×6-inch squares. If you’d like extra sturdiness, glue each square onto a piece of felt or cardstock. Let it dry before stitching.
-
Use a pencil to lightly sketch your design, it could be an ice cream cone, a flower, or a simple geometric pattern. Keep the shapes bold and easy to fill with thread.
-
Thread your needle with yarn or embroidery floss. Start by stitching along the outline using a simple backstitch or running stitch. Once the border is set, fill the design using horizontal stitches, layering colors for texture.
-
After finishing the main design, add small details like sprinkles, petals, or accents with a contrasting thread color.
-
Frame each square by gluing colored ribbons along the edges. Then press firmly and trim any excess.
-
For the handle, string colorful beads onto a short piece of wire or thick thread (about 8 inches long). Next, glue or stitch each end of the handle onto the top corners of your artwork.
-
Decorate the frame further, you can add sequins, buttons, or even tiny fabric bows.
#3. Burlap Scarecrow Jar Decor
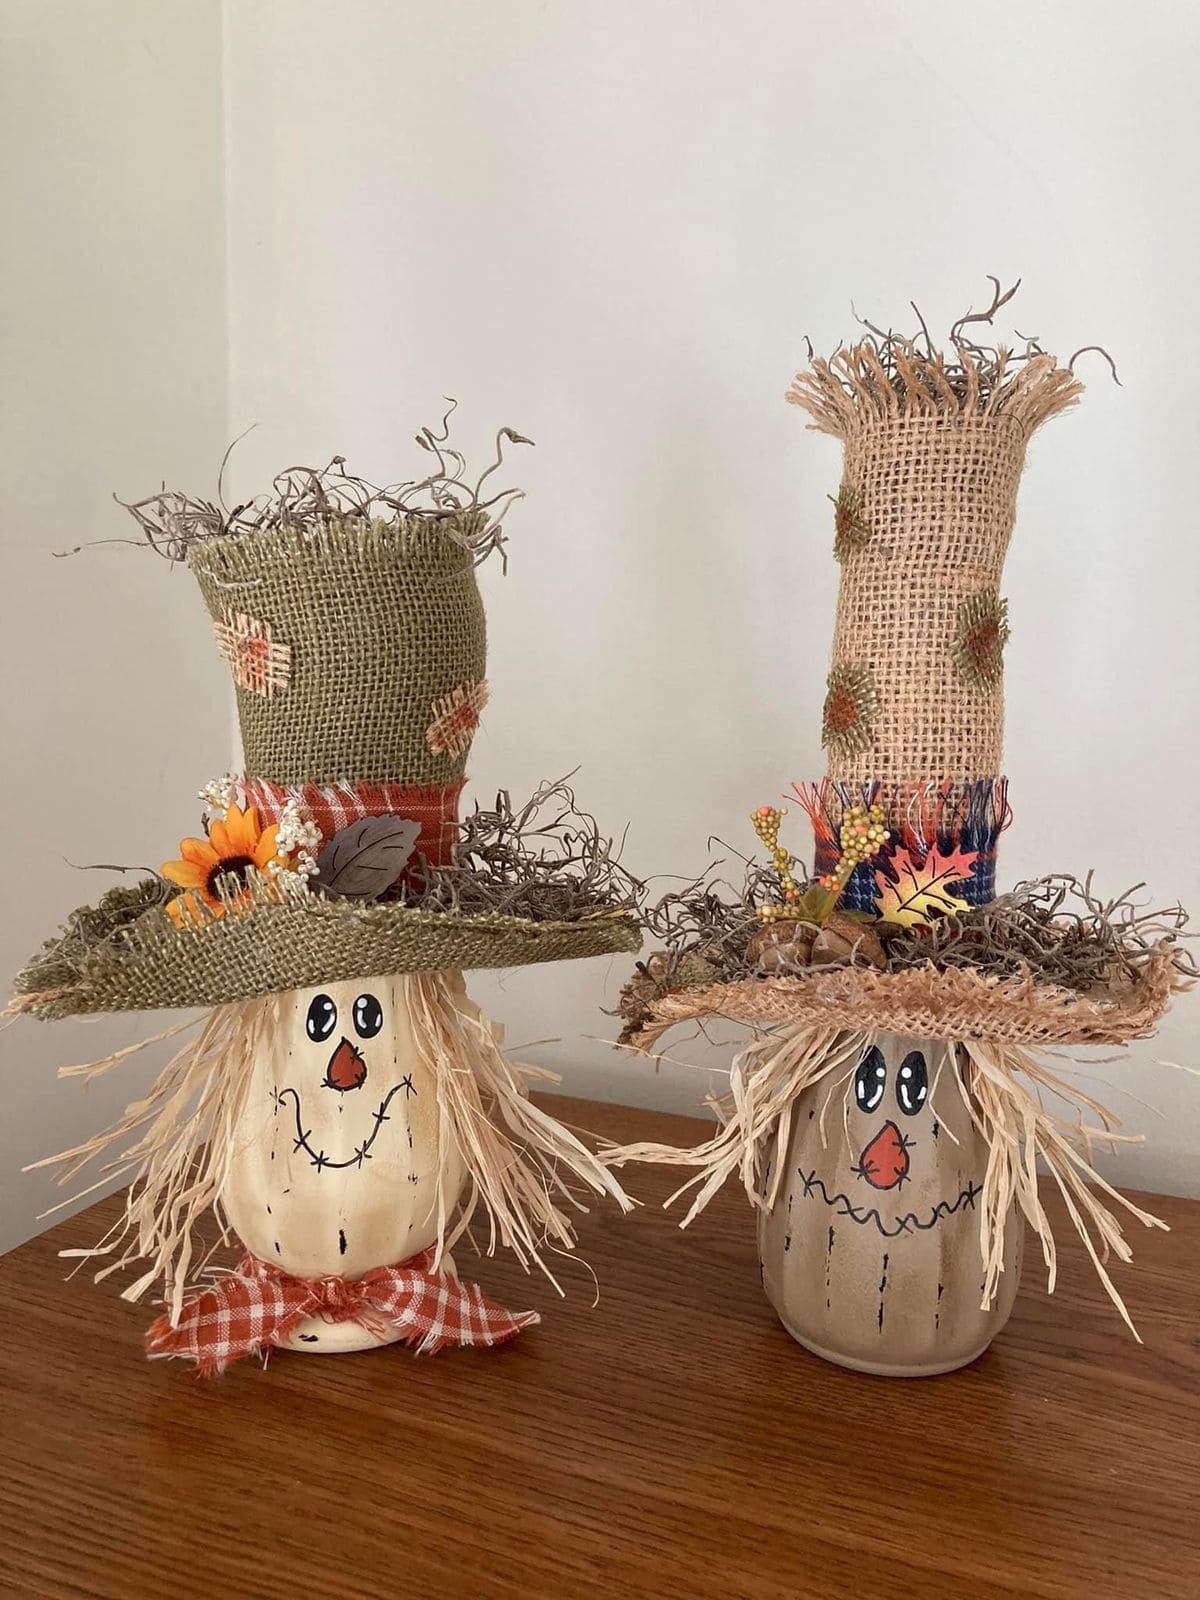
Why not bring a touch of country cheer to your fall setup with these burlap scarecrow jars?
Their friendly faces, messy straw hair, and patchy hats give them that perfect rustic farmhouse personality.
You can place them on a mantel, dining table, or entryway shelf, they instantly make any space feel cozy and playful.

- Mason jars or small glass jars ((2-4 jars, 4-5 inches tall))
- Burlap fabric ((8×8 inches for hats))
- Raffia or straw ((1 small bundle))
- Acrylic paint ((tan, black, white, orange, and red))
- Paintbrushes and fine marker or paint pen
- Hot glue gun and glue sticks
- Small faux flowers, ribbon, and fabric scraps (for hat accents)
- Scissors
-
Paint the jars a light tan or cream color as the base. Once dry, use a fine brush or paint pen to draw cheerful scarecrow faces like round eyes, stitched smiles, and cute orange noses.
-
Cut small bunches of raffia for hair and glue them along the jar’s rim, letting them stick out on the sides like straw hair.
-
For the hat, cut a rectangle of burlap and roll it into a loose cylinder. Glue the edge and attach a circle of burlap to form a brim. You can fray the edges slightly for a worn look.
-
Decorate the hat with faux flowers, patches, or fabric ribbons. Then glue it onto the jar top, slightly tilted for charm.
-
Finally, tie a small piece of ribbon or fabric around the jar’s neck to serve as a scarf.
#4. Rustic Burlap Kitchen Spice Art
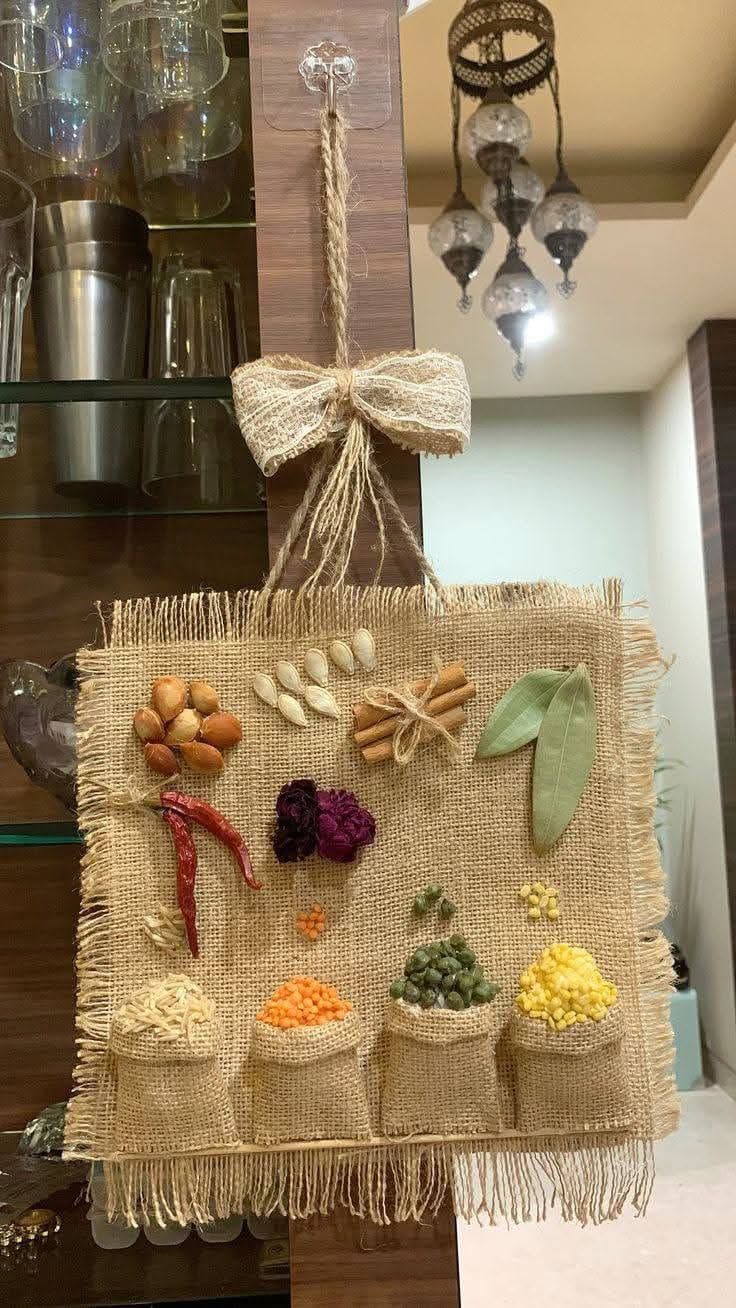
If you love crafts that celebrate nature and simplicity, this burlap kitchen wall art will steal your heart.
It turns everyday spices into rustic beauty, a little piece of your pantry turned into décor.
Each tiny pocket looks like a miniature burlap sack overflowing with grains, beans, and herbs, reminding you of slow cooking and homegrown goodness.

- Burlap fabric ((12×12 inches))
- 4-5 Small burlap strips ((2×3 inches each for pockets))
- Hot glue gun and glue sticks
- Twine or jute rope ((about 20 inches for hanging and bow))
- Assorted dried items (lentils, rice, beans, cinnamon sticks, bay leaves, dried chili, nuts, or flowers (a handful of each))
- Cardboard backing ((cut to match burlap size))
- Scissors
-
Cut a square of burlap and a matching piece of cardboard for sturdiness. Then glue the burlap neatly over the cardboard, folding the edges behind and securing with glue.
-
Make small sacks by gluing burlap strips into tiny pouches and attaching them along the bottom edge of your burlap square. Keep the top part open so the grains or beans can peek through.
-
Fill each pocket with a small handful of dried ingredients like red lentils, green peas, rice, or corn kernels. A mix of colors makes the artwork pop beautifully.
-
Arrange the larger spices like cinnamon sticks, bay leaves, and chilies above the sacks in a scattered, organic way. Next, glue each piece firmly in place.
-
Cut a piece of jute rope and glue it at the top corners for hanging. Then add a rustic bow at the center for a finished look.
You can lightly spray the piece with clear sealant to prevent spices from crumbling over time, it’ll keep your kitchen wall art fresh and neat for seasons to come.
#5. Burlap and Clothespin Angel Ornament
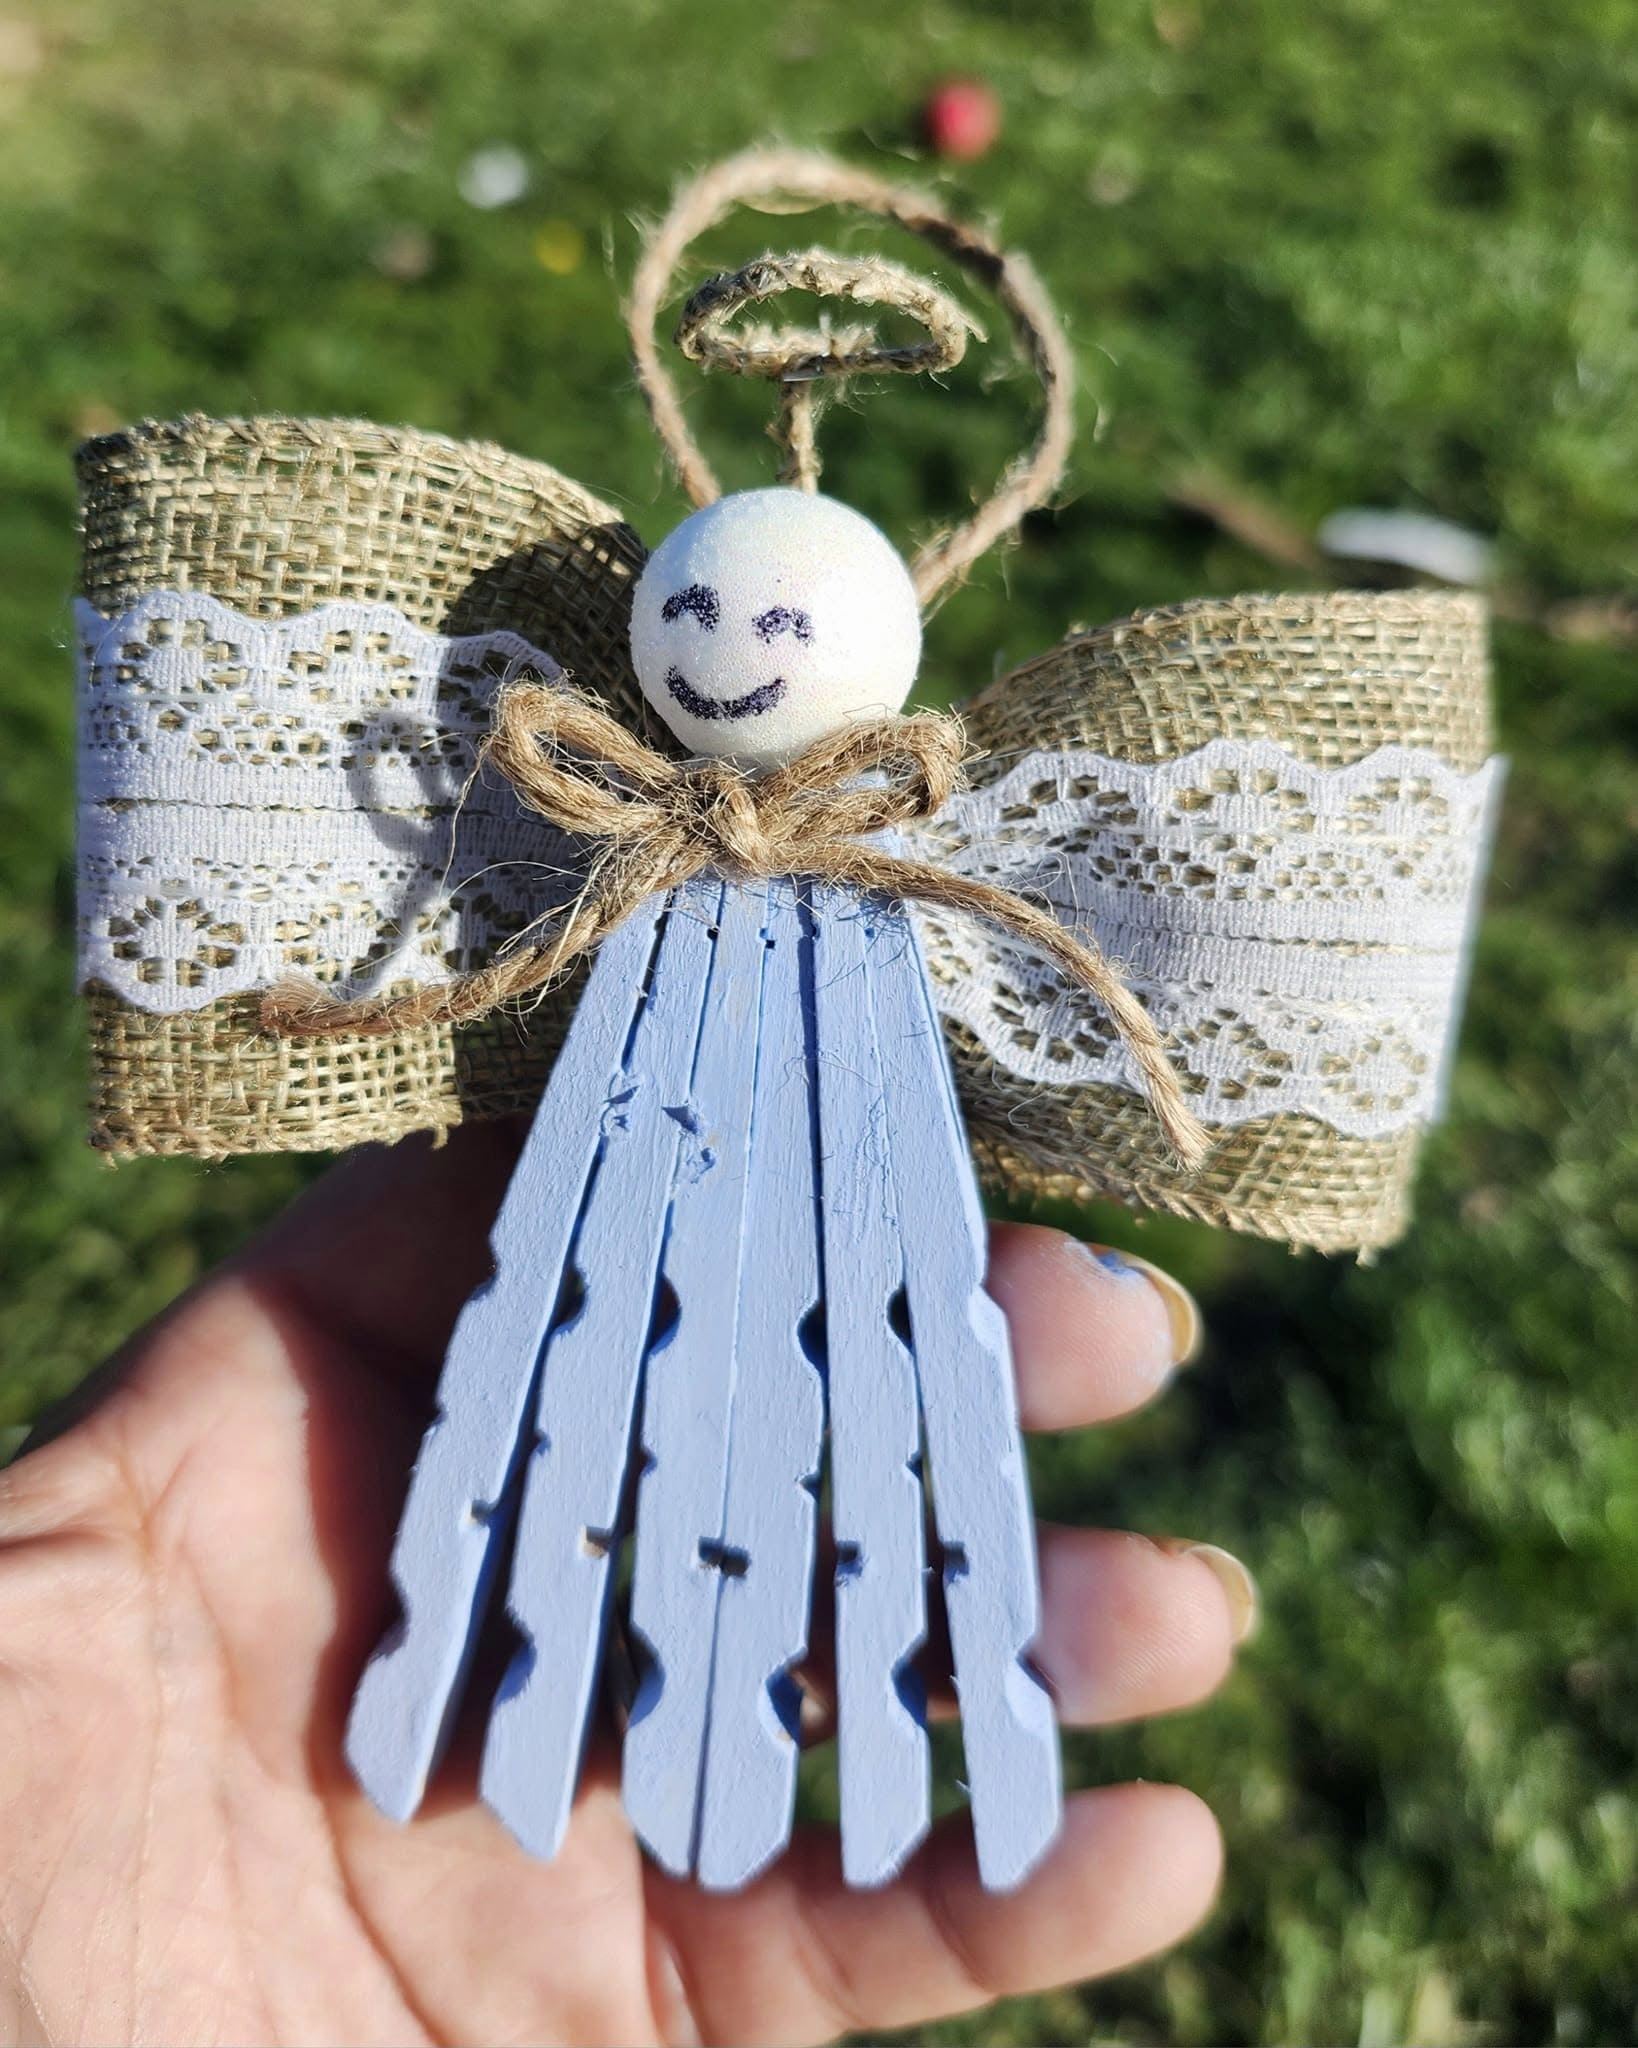
The mix of rustic burlap, soft lace, and simple wooden clothespins gives it an old-fashioned charm that fits beautifully into any farmhouse-style Christmas tree or gift wrap.
With its twine halo and smiling face, it feels personal like a decoration passed down through generations.
You’ll love how easy and relaxing it is to make, and how each angel ends up with its own little personality.

- 4 wooden clothespins ((3 inches each, painted pale blue or white))
- Burlap ribbon ((2 inches wide, 10 inches long))
- White lace ribbon ((1 inch wide, 10 inches long))
- Wooden bead ((¾ inch for the head))
- Jute twine ((about 2 feet total))
- Black fine-tip marker ((for the face))
- Hot glue gun and 4-5 glue sticks
- Scissors
-
Start by taking apart your clothespins. Discard the metal springs and glue the flat sides of four pieces together, fanning them slightly so they form a gown-like shape. Let it dry completely before moving on.
-
Once the glue is dry, paint the gown in your chosen color. Soft pastels or whites work best for a delicate, angelic look. Let the paint dry for at least 20 minutes.
-
While waiting, make the wings. Lay the burlap ribbon flat, then layer the lace ribbon on top. Fold both together into a bow shape and pinch the center tightly. Tie it off with a small piece of twine, forming neat wings.
-
Glue the bow onto the back of the clothespin body, positioning it just behind the upper edge so it looks like wings spreading outward.
-
For the head, glue the wooden bead on top of the body. Then draw a simple smiling face using a fine-tip marker once it’s secure.
-
Create a tiny halo by twisting a small loop of jute twine (about 1½ inches in diameter) and gluing it to the back of the bead. You can also add a short piece of twine behind the halo to serve as a hanger.
-
Finally, tie a little bow around the neck area with the remaining twine.
#6. Coastal Burlap Seashell Wall Decor
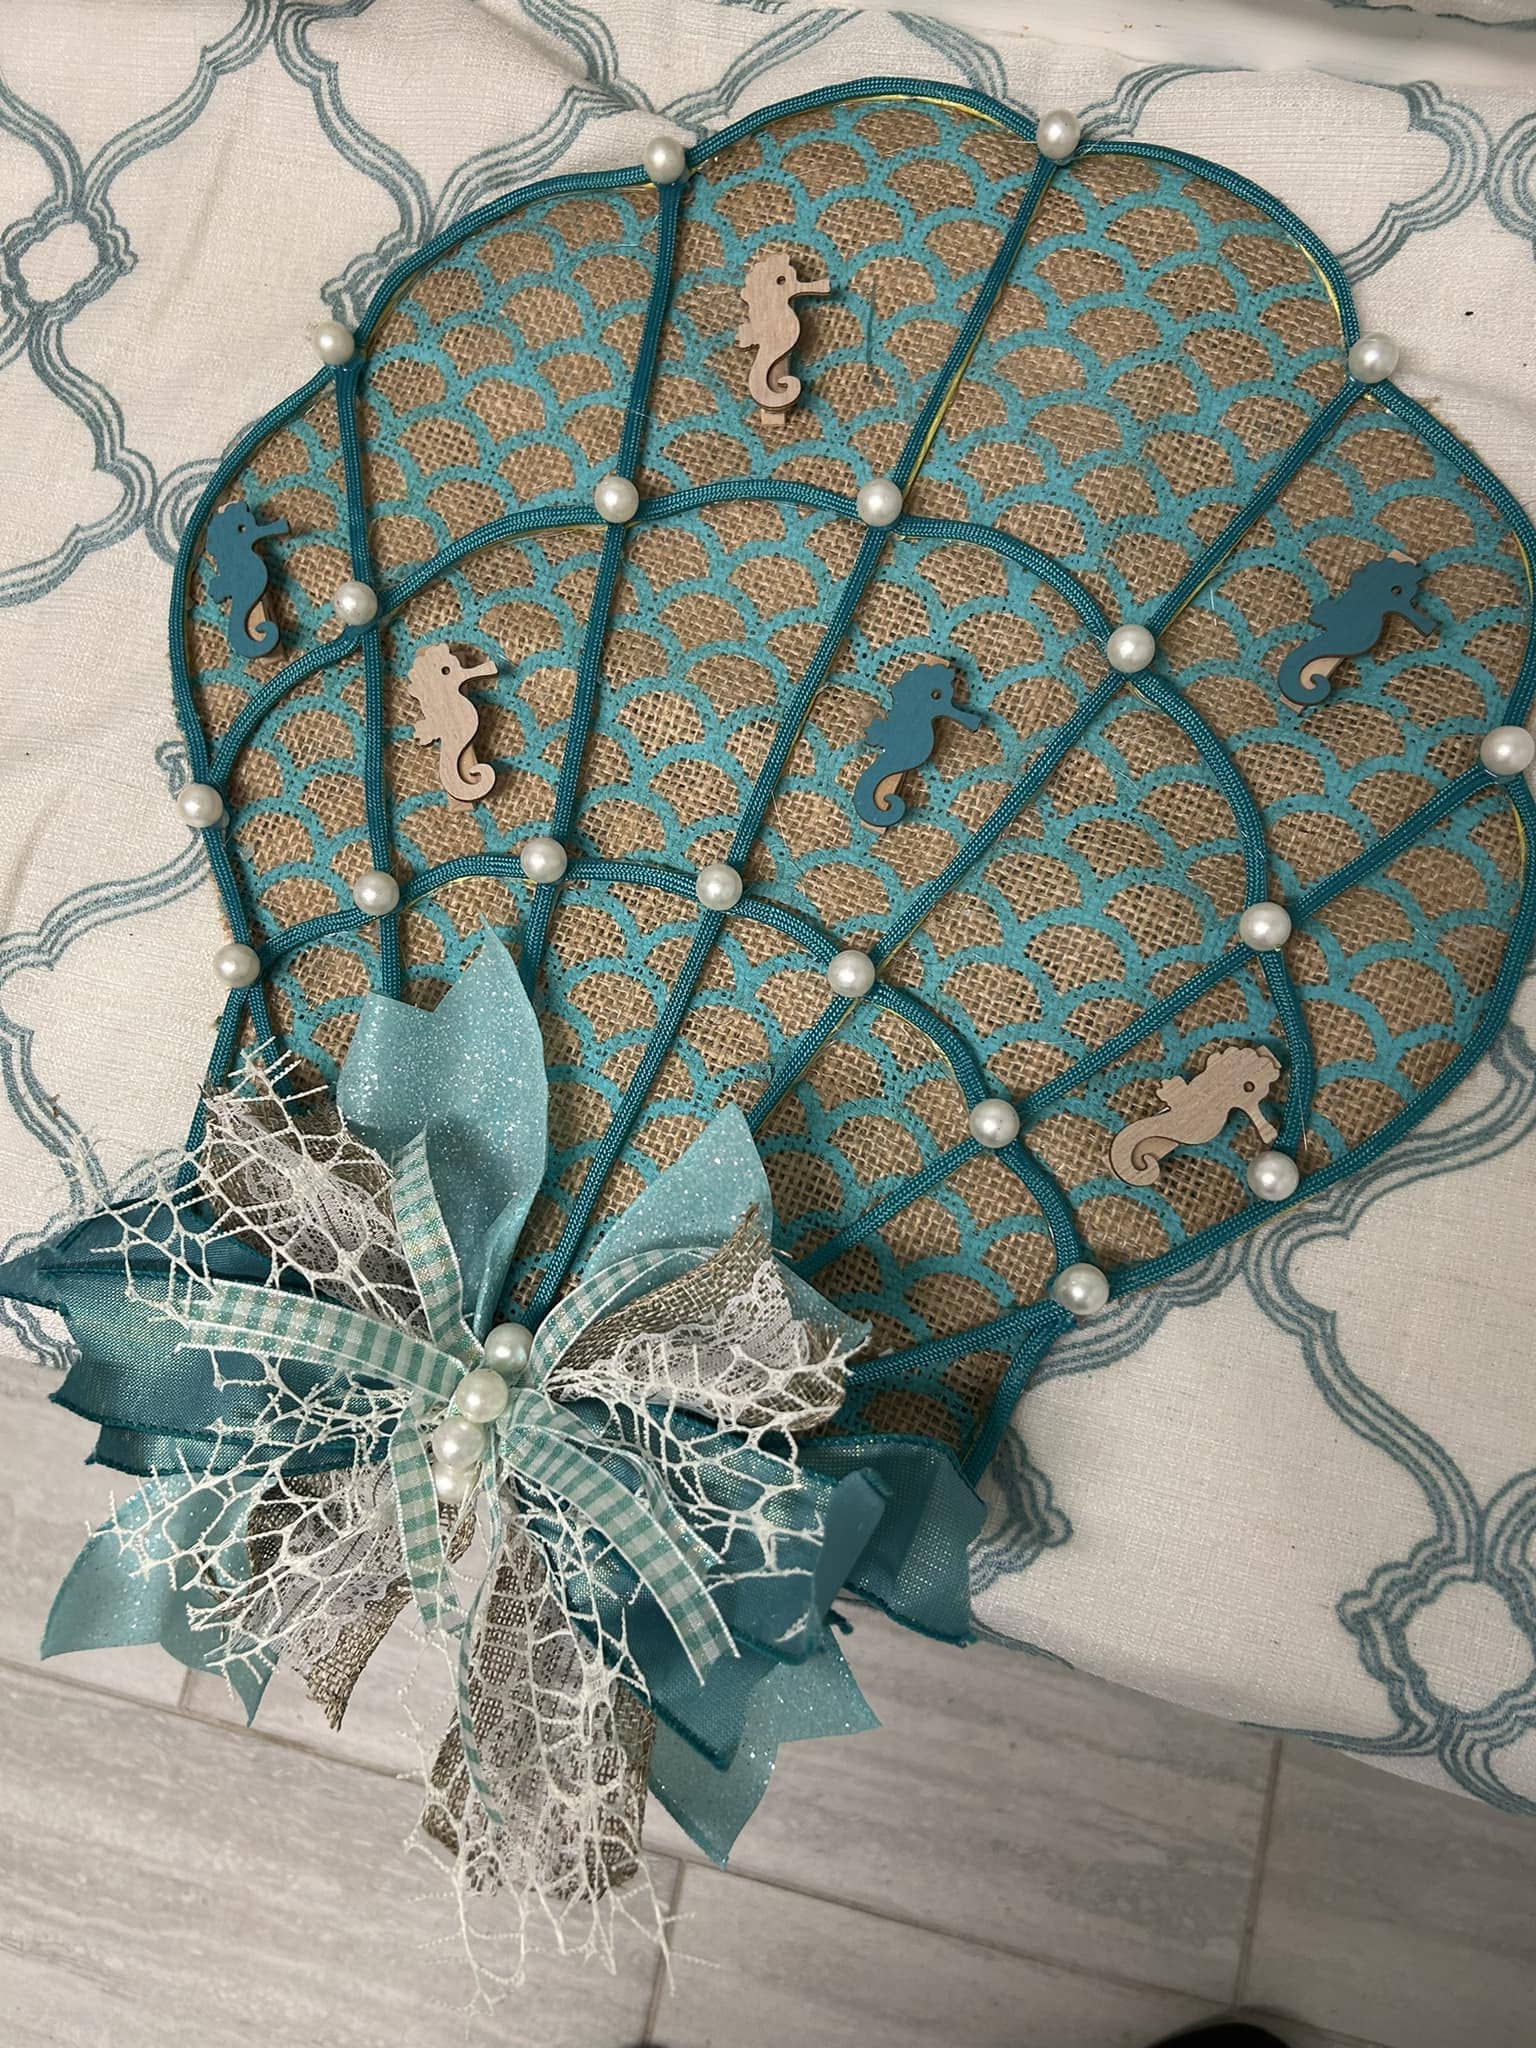
Ocean-inspired decor never goes out of style, and this burlap seashell craft brings a gentle touch of seaside serenity to any room.
The turquoise frame, textured burlap, and pearl accents combine to create a beautiful contrast between rustic and coastal elegance.
Small wooden seahorses add playful charm, while the layered bow at the base ties everything together.

- Seashell-shaped wire frame ((about 14×14 inches))
- 1 Burlap fabric ((15×15 inches))
- Turquoise ribbon or paint ((6-8 feet))
- 10-12 Flat pearls ((½ inch diameter))
- 6-8 Mini wooden seahorses ((1-2 inches tall))
- Hot glue gun and 6-8 glue sticks
- Decorative ribbon (for bow (mix of lace, gingham, and glittered fabric, 2-3 yards total))
- Scissors
-
Lay the burlap flat and place your wire shell frame on top. Cut the burlap slightly larger than the frame, then glue or weave it to the back so the texture shows through the open pattern. Trim any excess fabric for clean edges.
-
Outline the frame with turquoise ribbon or paint each section for a more defined seashell shape. Allow paint to dry if used.
-
Decorate each panel by gluing flat pearls where the lines of the frame intersect ,this adds subtle shimmer and dimension.
-
Attach wooden seahorses randomly across the shell for a charming coastal feel. You should vary their placement for a more natural look.
-
Create a full layered bow using a mix of wide glitter ribbon, lace, and checked fabric. Then secure it with hot glue at the shell’s base and embellish the center with a few extra pearls
-
Now add a loop or hanger on the back if you plan to mount it on a wall.
#7. Burlap Umbrella Christmas Wall Decor
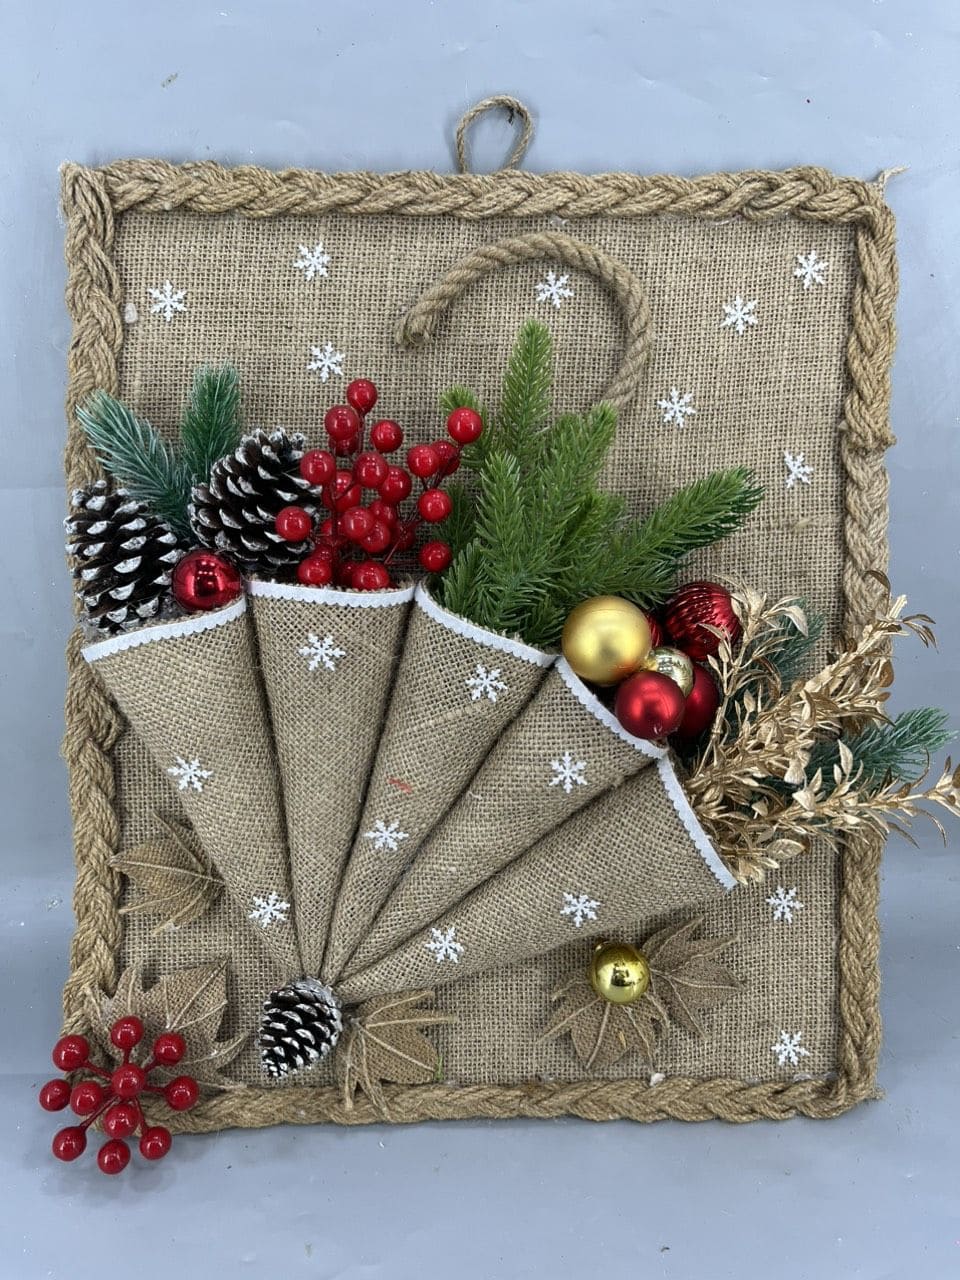
Look at this charming burlap umbrella wall hanging! It brings a touch of rustic elegance to your holiday decor.
The folded burlap, arranged like an umbrella bursting with pine, berries, and ornaments, captures the cozy, natural beauty of winter.
What makes this craft special is how it blends textures, the rough burlap, glossy ornaments, and soft pine sprigs, all working together to create a warm, handmade Christmas accent that radiates festive spirit.

- Burlap fabric ((14×18 inches))
- Cardboard base ((10×14 inches))
- Jute rope ((2 yards))
- 5-6 Mini pinecones
- 3-4 Faux pine branches
- 6-8 Red and gold ornaments ((1-2 inches diameter))
- Faux berries and gold leaves
- White paint or snowflake stickers
- Hot glue gun and glue sticks
- Scissors
-
Cut a rectangular piece of cardboard for the backing and wrap it neatly with burlap fabric. Secure the edges on the back with hot glue.
-
Twist or braid the jute rope and glue it around the border to frame your piece. You need to leave a small loop at the top for hanging.
-
Cut a piece of burlap (about 10×12 inches), fold it accordion-style, and shape it into a fan to resemble an umbrella. Then glue the bottom point to the burlap base.
-
Add a curved piece of rope above the fan to form the umbrella handle.
-
Arrange and glue pine branches, pinecones, berries, and ornaments inside the top folds of the umbrella to give it fullness.
-
Paint or stick small snowflakes around for a wintery touch, then let everything dry before hanging it proudly on your wall.
#8. Burlap Christmas Bell Wall Hanging
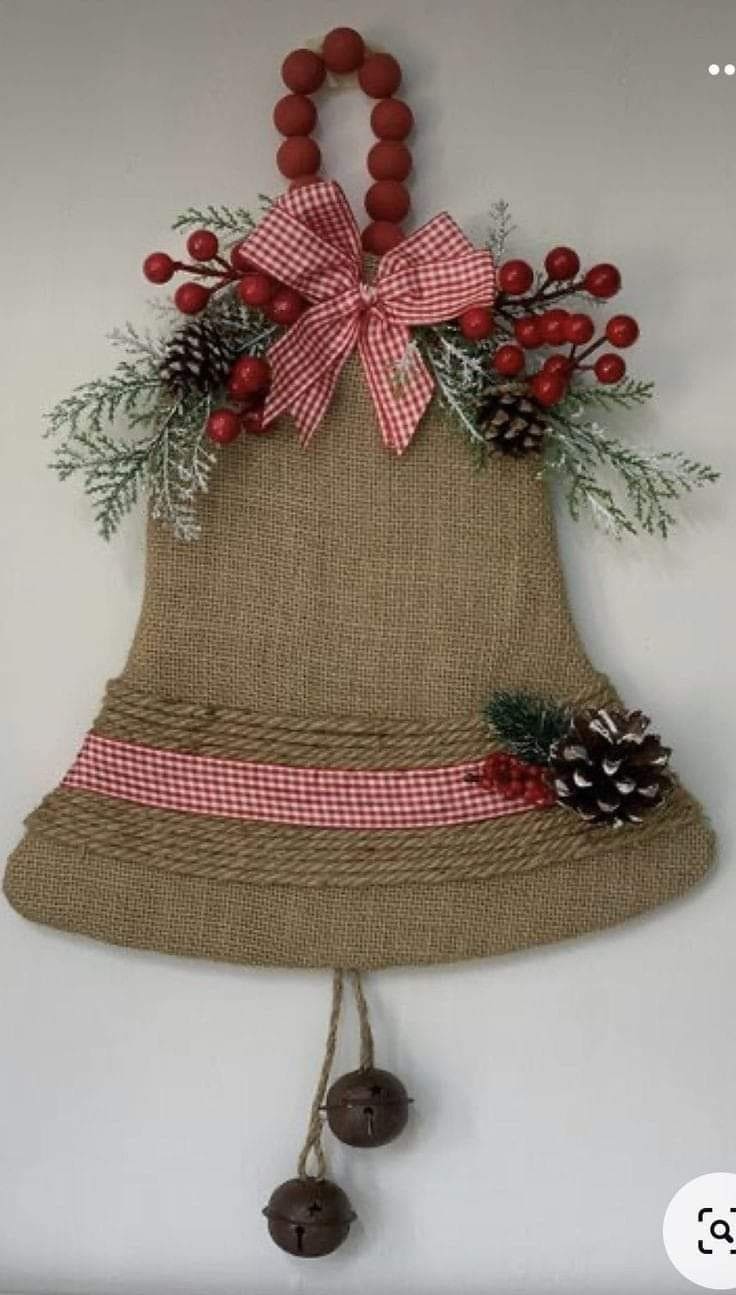
A cozy mix of rustic and festive, this burlap bell decoration brings holiday cheer with a touch of farmhouse charm.
The combination of red berries, plaid ribbon, and frosted pine gives it a warm, traditional Christmas feel, perfect for hanging on your front door, mantel, or hallway wall.
Also, the gentle jingle of the hanging bells adds just the right festive touch.

- Burlap fabric ((12×16 inches))
- Cardboard or foam sheet ((bell shape template))
- Jute rope ((2 yards))
- Red gingham ribbon ((1 yard, 1 inch wide))
- 2-3 Faux pine sprigs and red berry stems
- 22 Small pinecones
- Two rustic jingle bells ((1 inch each))
- 10-112 Wooden beads
- Hot glue gun and glue sticks
- Scissors and pencil
-
Draw and cut a bell shape from cardboard, about 12 inches tall. This will be your base.
-
Cut a piece of burlap large enough to wrap around the shape, leaving about ½ inch extra on all sides. Then glue the edges tightly to the back of the cardboard.
-
Wrap the jute rope around the lower curves of the bell and glue it in place to add depth and texture.
-
Glue a strip of red gingham ribbon just above the rope for a festive accent. You next add a small pinecone cluster to one side.
-
Arrange faux pine branches and berries at the top of the bell. Secure them with hot glue and tie a red plaid bow in the center.
-
String wooden beads onto a piece of twine to form the hanging loop. Then attach it to the back of the bell.
-
For the finishing touch, tie two smaller jingle bells on a short piece of twine and glue them to dangle from the bottom.
#9. Burlap-Wrapped Tin Can Decor
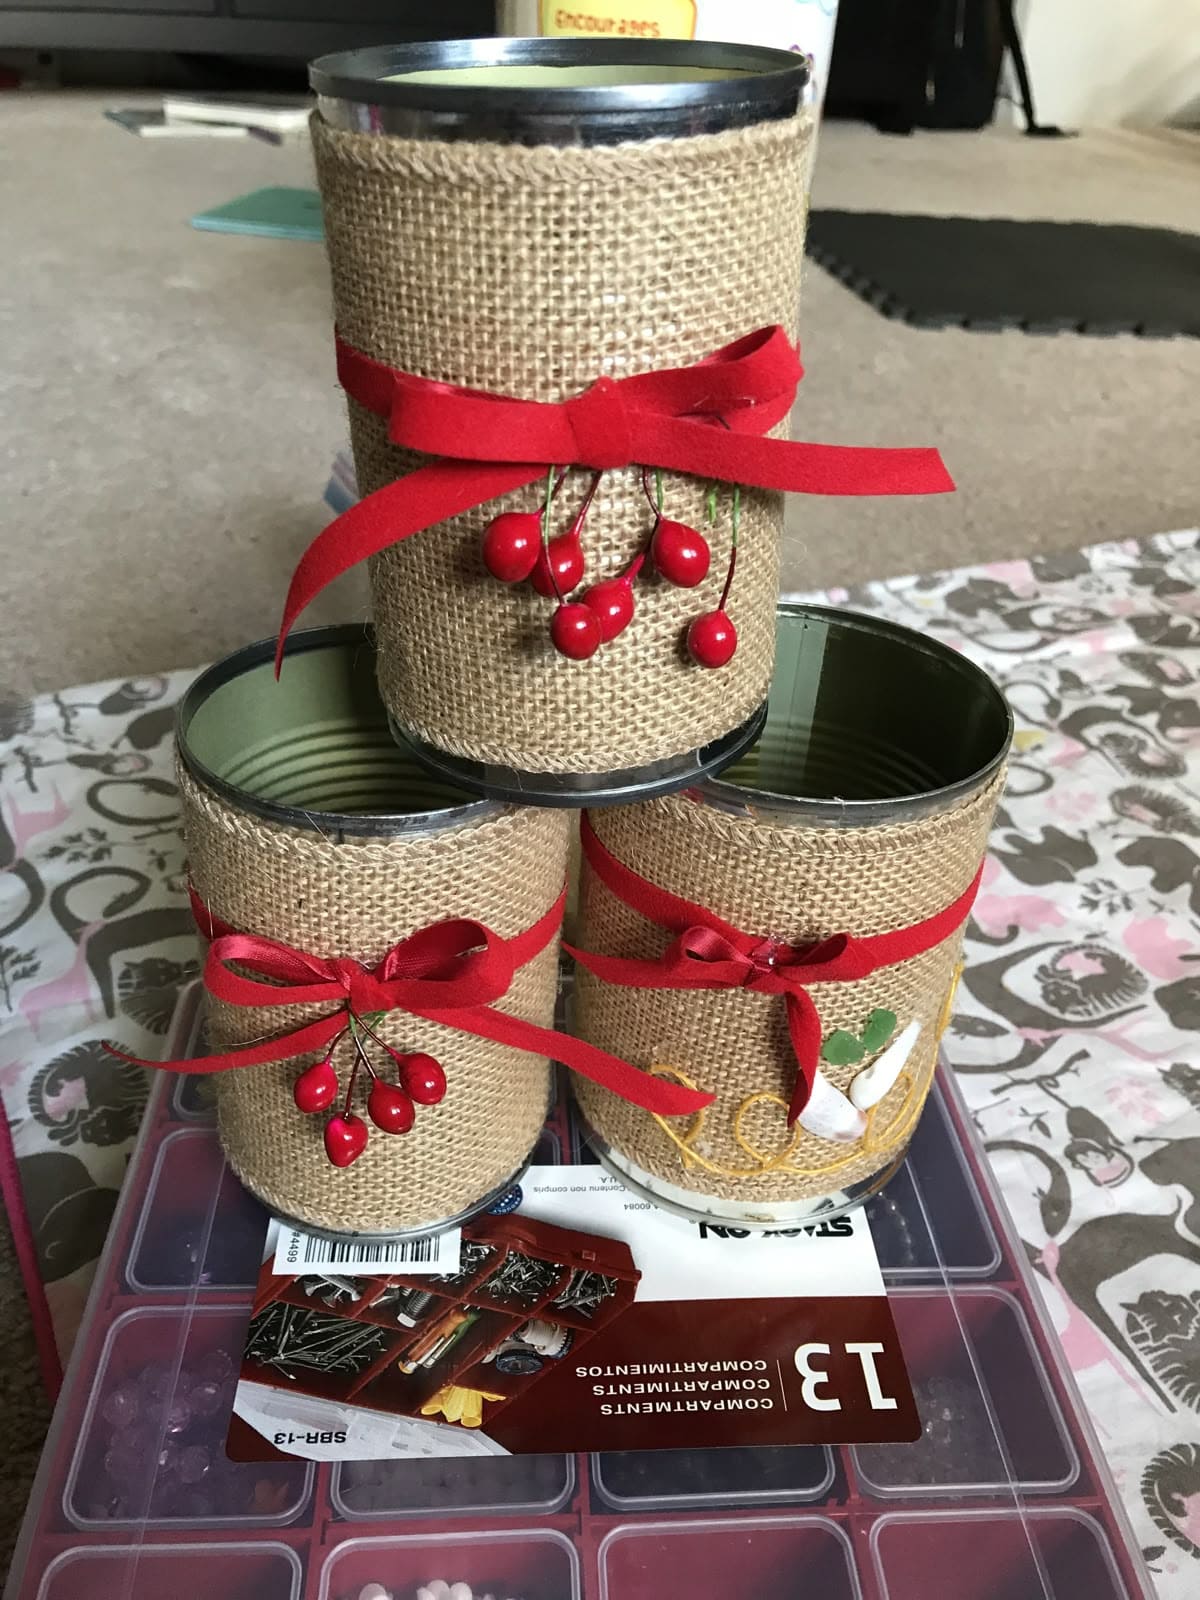
Amazingly, these rustic burlap-wrapped tin cans are a charming way to upcycle ordinary cans into festive decorations.
Their natural texture paired with red ribbon and berry accents makes them perfect for Christmas, but you can easily adapt the design for any season.
They work beautifully as small vases, utensil holders, or candle sleeves to bring a cozy farmhouse vibe to your space.

- 33 Empty tin cans ((cleaned and dried, various sizes))
- Burlap fabric ((enough to wrap around each can))
- Red ribbon ((½ inch wide, about 12 inches per can))
- 3-5 Faux red berries or small ornaments
- Hot glue gun and glue sticks
- Scissors
- Optional: lace trim, paint, or twine
-
Remove any labels and clean the cans thoroughly. Make sure there are no sharp edges on the rim.
-
Measure and cut a piece of burlap long enough to wrap around the can with a slight overlap. The height should cover most of the can’s surface.
-
Apply a line of hot glue vertically along the can and attach one edge of the burlap. Then wrap it tightly and glue the other end to secure it in place. Smooth out any wrinkles as you go.
-
Tie a red ribbon around the middle of each can, finishing it with a small bow. You use a dab of hot glue under the knot to keep it steady.
-
Attach faux berries, tiny pinecones, or ornaments just beneath the bow for a festive accent. Hold each piece in place for a few seconds until the glue sets.
-
Let everything cool before using your new containers. You can fill them with flowers, pens, or tealight candles for a warm, rustic glow.
#10. Burlap Fall Gnome Door Hanger
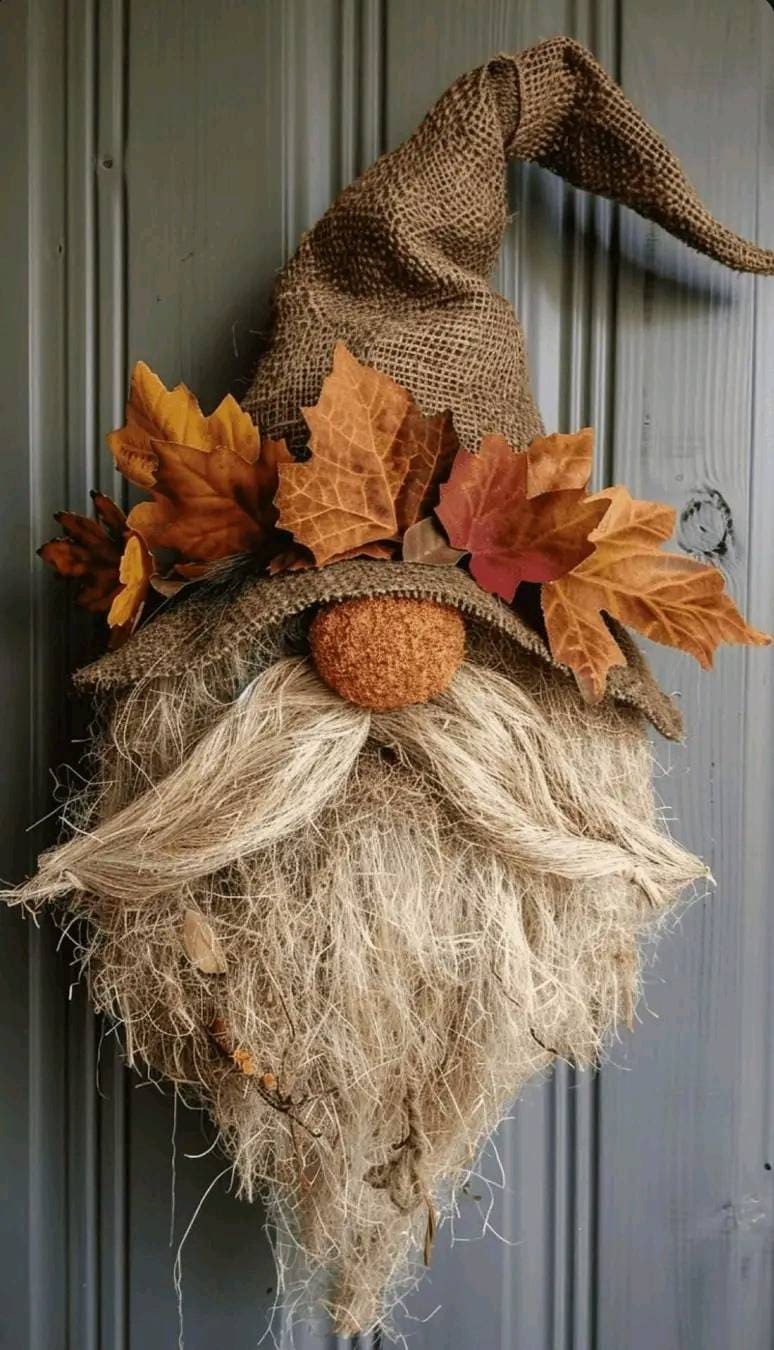
This burlap fall gnome is the perfect mix of rustic charm and cozy autumn spirit.
With his scruffy beard, soft burlap hat, and crown of colorful leaves, he’ll look right at home on your porch or front door.
Making him feels like crafting a little forest guardian, simple, calming, and delightfully messy in all the right ways.

- 11 Burlap fabric ((12×18 inches))
- 11 Foam ball ((2-inch diameter) for nose)
- Spanish moss or jute twine (about 1 handful)
- 6-8 Faux autumn leaves (assorted sizes (2-4 inches each))
- Hot glue gun and 4-5 glue sticks
- Twine or jute string ( 10 inches long for hanging loop)
- Scissors and a ruler
-
Start by cutting your burlap into a large triangle shape (about 12 inches tall and 10 inches wide at the base). Then roll it into a cone to form the gnome’s hat, and glue along the edge. Hold it in place until the glue sets firmly.
-
Take a handful of Spanish moss or cut several strands of jute twine (each around 6-7 inches long). You glue these to the inside bottom of the hat, letting them fall freely like a beard. Trim uneven ends but leave some wispy texture for character.
-
Glue the foam ball just below the hat’s edge to create the nose, slightly tuck it under the brim so it looks nestled in.
-
Arrange your faux leaves around the hat’s brim, layering different shades of brown, red, and orange for depth. You glue them securely and let them overlap a bit for a full look.
-
Attach a loop of twine or jute string to the back of the hat for hanging. Once it’s dry, fluff the beard, adjust the hat’s bend, and admire your rustic new gnome friend.
#11. Burlap Gingerbread Couple Decor
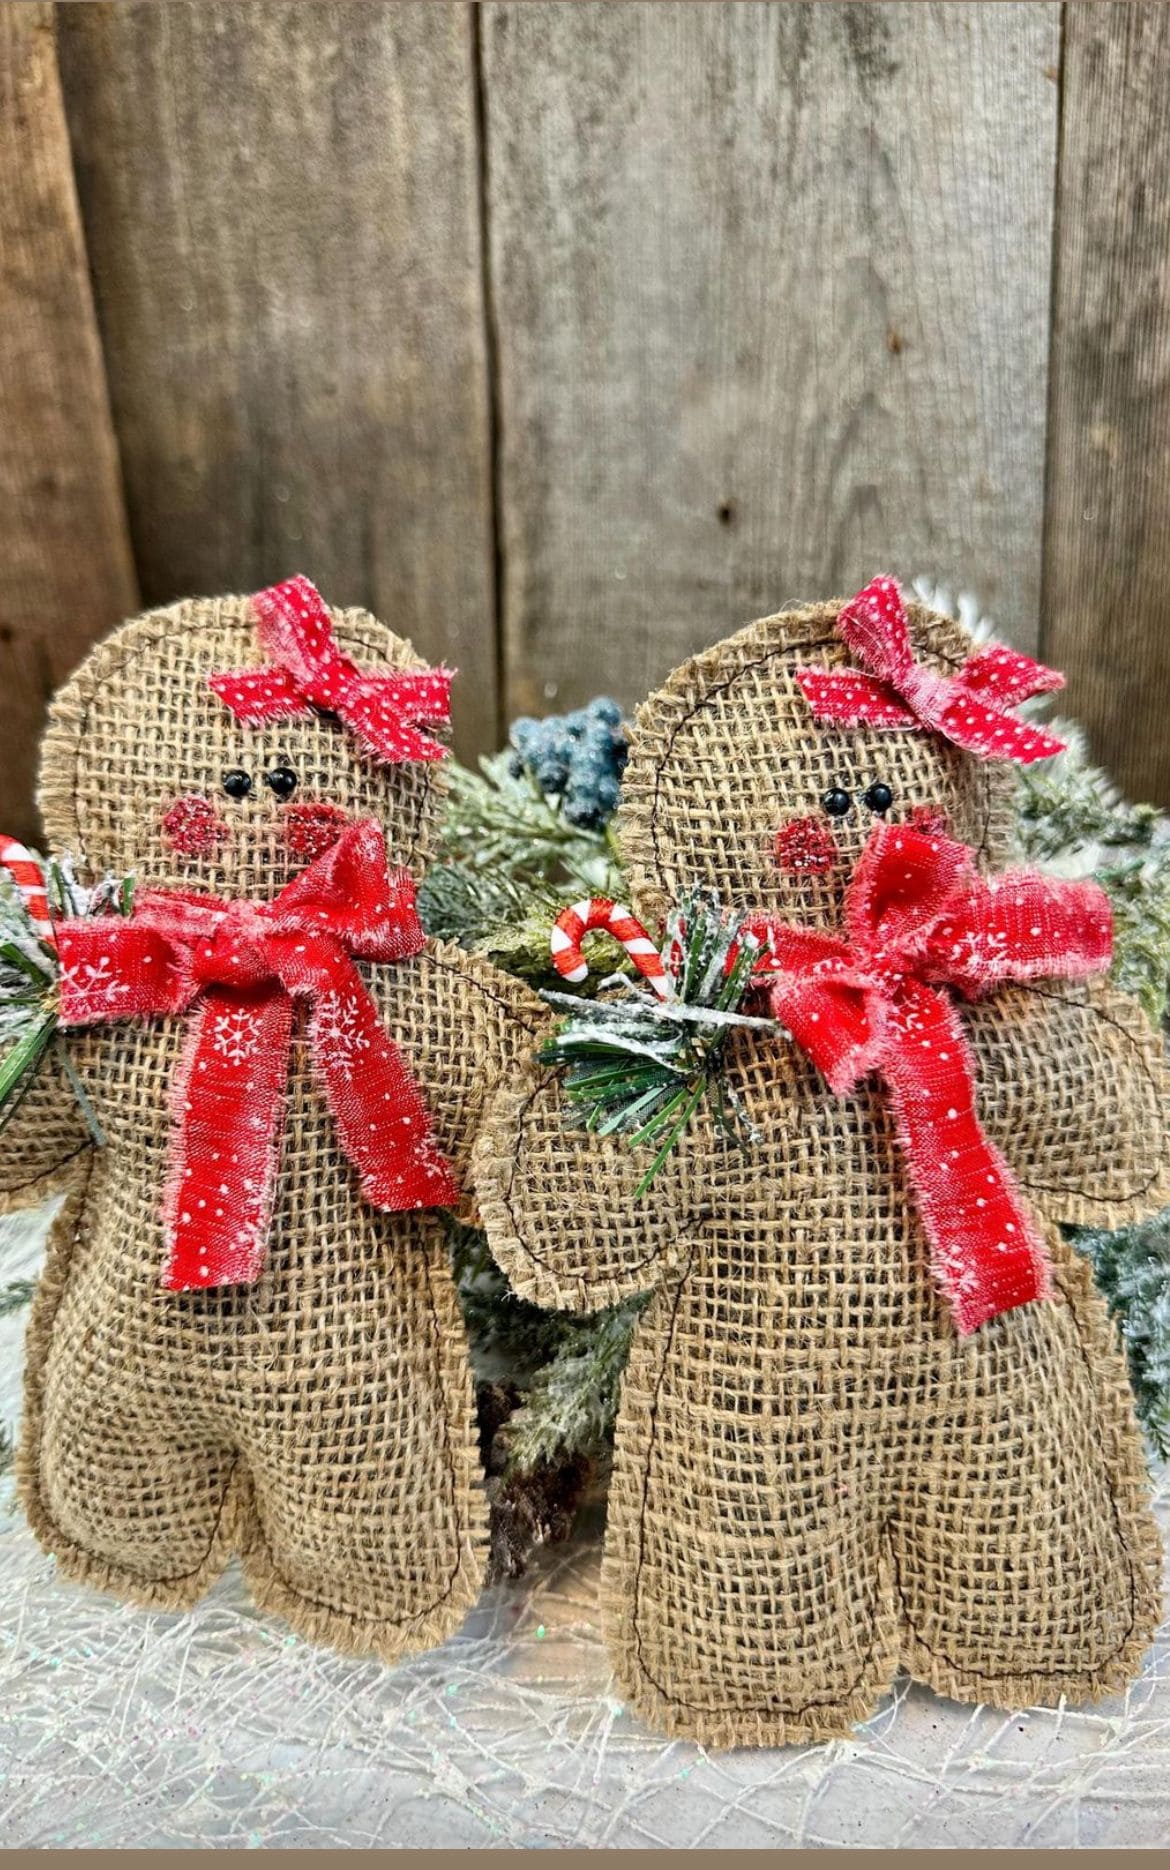
These adorable burlap gingerbread figures will melt your heart before the season even begins.
Their rustic charm, paired with cheerful red bows and tiny candy accents, makes them perfect for cozy Christmas displays.
Whether you place them on a mantel, hang them on your tree, or tuck them into a holiday centerpiece, they add warmth and a handmade touch.

- Burlap fabric ((about 12×18 inches))
- Gingerbread man template ((6-8 inches tall))
- Hot glue gun and glue sticks
- Polyester stuffing ((a handful per figure))
- Red fabric ribbon ((½ inch wide, 12 inches long))
- 2-3 Mini candy cane ornaments or faux greenery
- 6 Small black beads or buttons
- Red paint or blush
- Scissors and marker
-
Trace and cut two gingerbread shapes from the burlap using your template. Make sure the edges are neat but slightly frayed for a natural rustic look.
-
Place the two pieces together and glue around the edges, leaving a small opening at the bottom. Lightly stuff with polyester filling to give it shape, then seal the opening with hot glue.
-
Glue on the small black beads for the eyes and buttons. Use a bit of red paint or blush to dab on rosy cheeks for that sweet gingerbread glow.
-
Tie a bright red fabric ribbon around the neck of each gingerbread figure to create a festive bow. You can also add a small bow on the head for a cute touch.
-
Glue mini candy canes or a few sprigs of faux greenery into their hands for added holiday detail.
-
Once everything is set, you can sprinkle a little faux snow or dab white paint along the edges for a frosty finish.
#12. Mini Burlap Scarecrow Ornaments
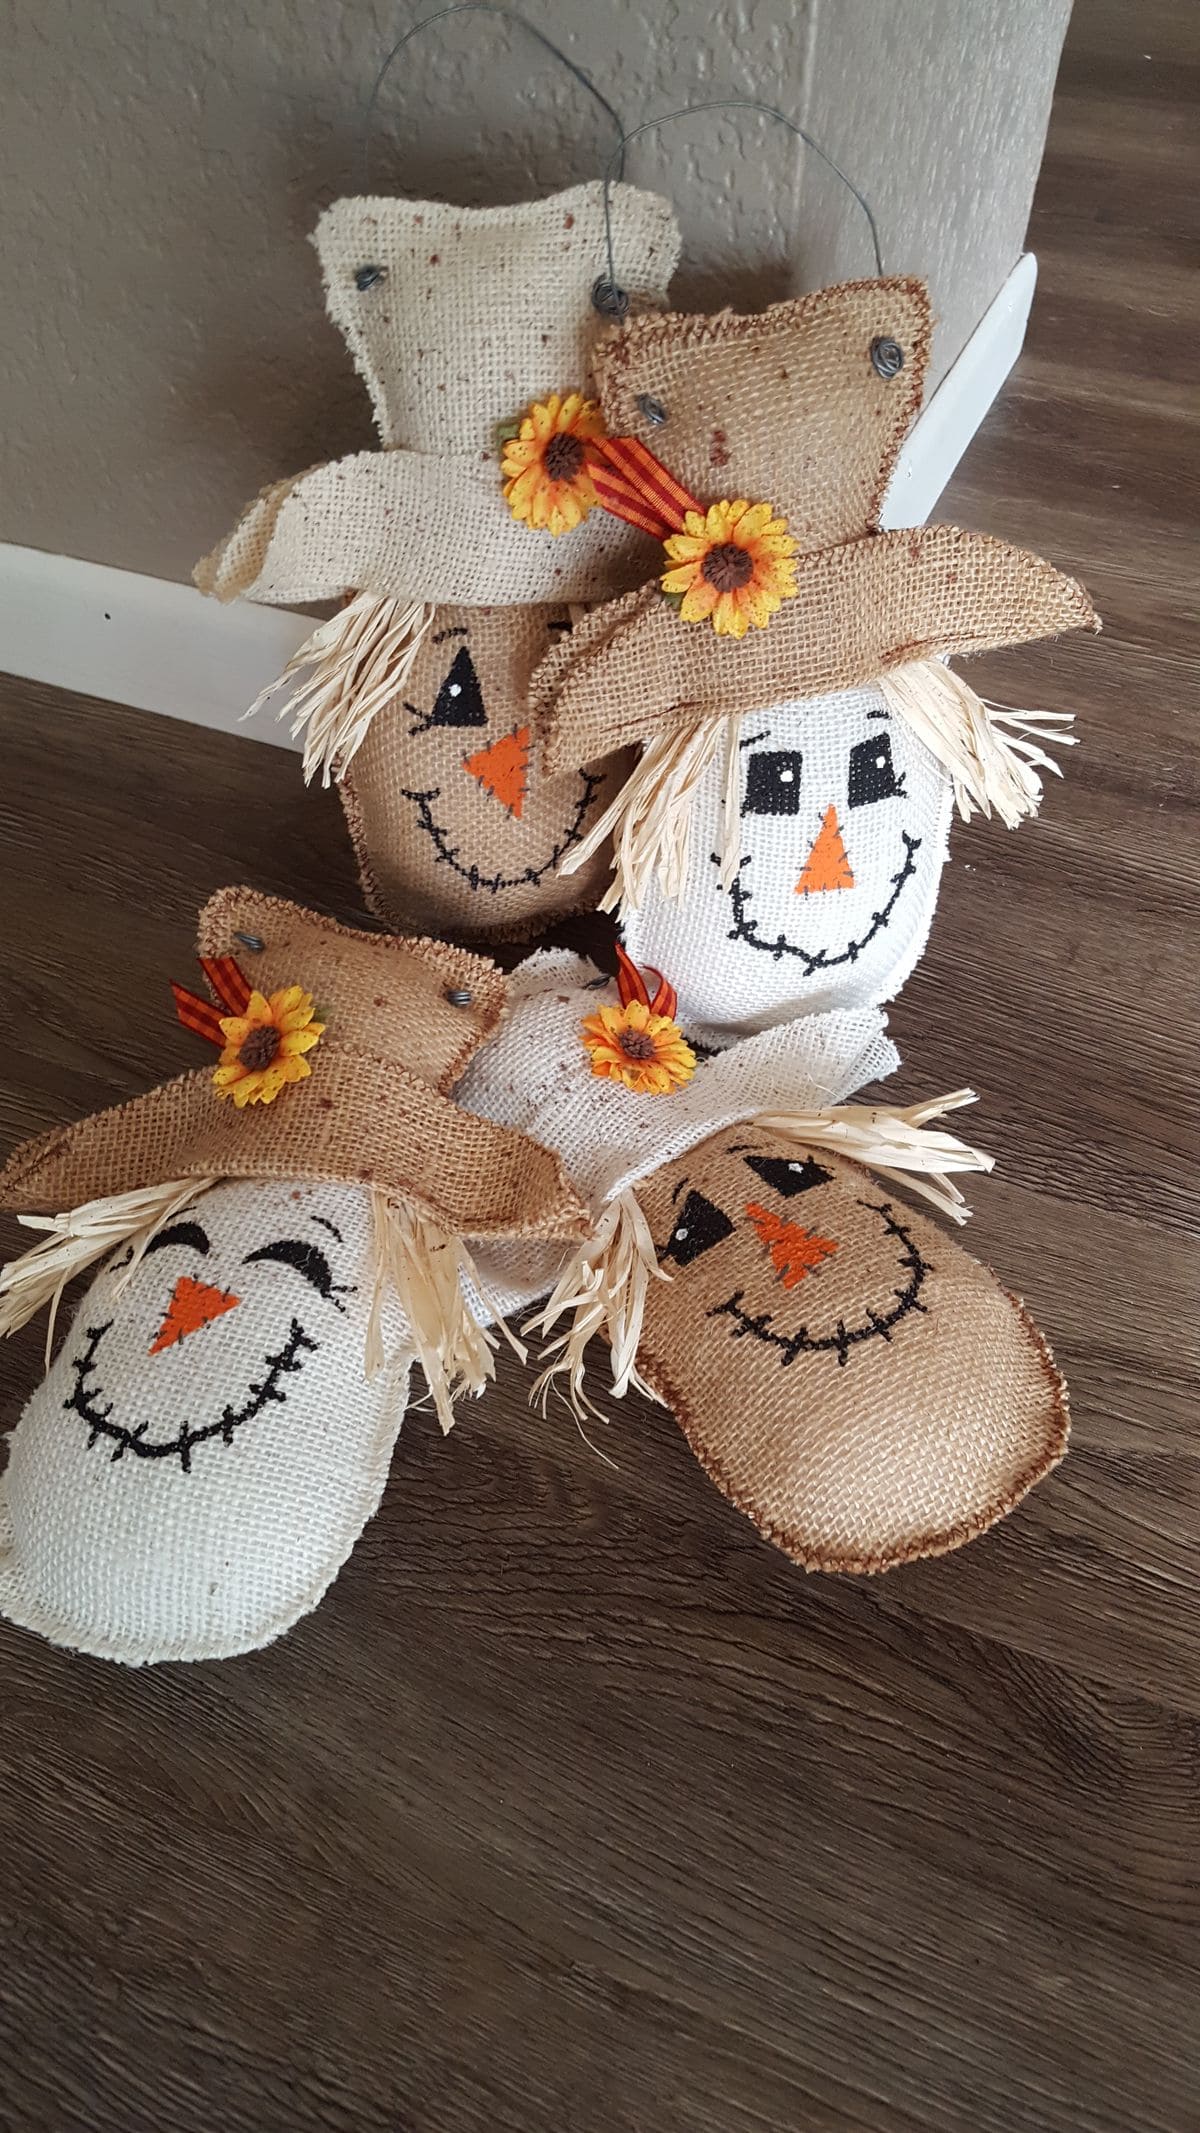
Cheerful and full of personality, these mini burlap scarecrow ornaments bring a homespun touch to your fall décor.
Each one has a sweet stitched smile, a straw fringe, and a hat topped with a sunflower, little details that make them irresistibly cute.
You can hang them on a seasonal tree, use them as gift toppers, or scatter them along a shelf for a rustic harvest vibe.

- Burlap fabric ((two 6×6-inch squares per scarecrow))
- Raffia or straw ((1 handful))
- Orange, black, and white acrylic paint
- Small fabric scraps or burlap (for hats (4×4 inches))
- 1-2 Faux sunflowers
- Ribbon scraps ((4 inches each))
- Hot glue gun and glue sticks
- Needle and thread or sewing machine
- Wire or twine ((6 inches per ornament))
- Scissors and paintbrushes
-
Cut two matching ovals from burlap for the scarecrow’s face. Stitch or glue around the edges, leaving a small opening. Then fill lightly with raffia or cotton stuffing, then close the gap.
-
Paint the scarecrow’s face witwith big black eyes, a stitched smile, and a carrot-orange triangle for the nose. Let it dry completely.
-
Cut small bunches of raffia for hair and glue them around the top edge. Then attach a burlap or fabric hat above it, folding the brim slightly for charm.
-
Add a faux sunflower and a ribbon accent to the hat for a cheerful touch.
-
Finally, glue or twist a small loop of wire or twine on the back so it can hang easily.
#13. Rustic Burlap and Fabric Heart Ornaments
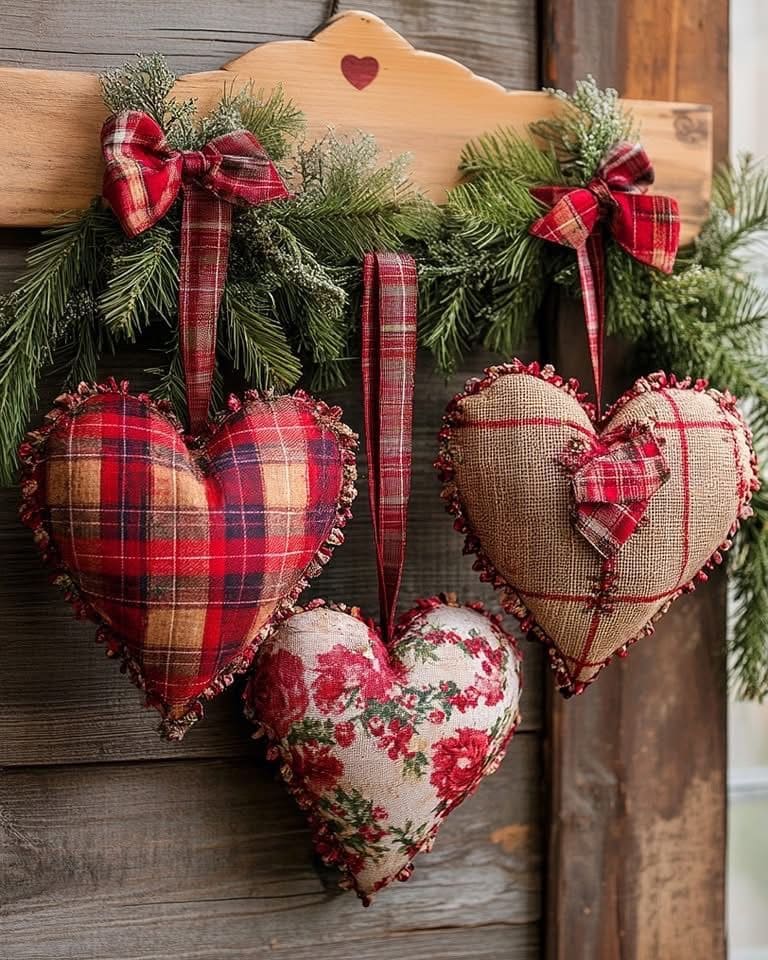
These cozy heart ornaments capture the warmth of country charm and the softness of handmade love.
Made with burlap, plaid, and floral fabrics, they add a heartfelt touch to your home during Christmas, Valentine’s, or any season that calls for a bit of sweetness.
You can hang them on a wreath, mantel, or doorknob to instantly make your space feel welcoming.

- Burlap and patterned cotton fabric ((each 8×8 inches per heart))
- 33 Ribbon (for hanging (each 10-12 inches long))
- Stuffing fiber or cotton ((about ½ cup per heart))
- (about ½ cup per heart)
- Matching thread and sewing needle ((or sewing machine))
- Scissors and fabric chalk
- Hot glue gun and glue sticks
- Small bows or buttons
-
Fold your fabric in half and draw a heart shape about 6 inches wide. Cut out two identical heart pieces for each ornament. Mix fabrics, try pairing burlap with plaid or floral cotton for contrast.
-
Place the two heart pieces together (right sides facing each other if using patterned fabric) and sew along the edges, leaving a small opening at the bottom.
-
Turn the heart inside out so the seams are hidden, then gently stuff it with fiberfill until plump but soft. Then stitch the opening closed with small, neat stitches.
-
Glue or sew a ribbon loop to the top center of each heart for hanging. If you want extra flair, add bows, lace trim, or small buttons at the front.
-
To finish, lightly fray the edges of the burlap or pull a few threads for a rustic look. Hang your hearts on garlands, doors, or even Christmas trees for a homespun touch of love.
#14. Rustic Burlap Snowman Frame
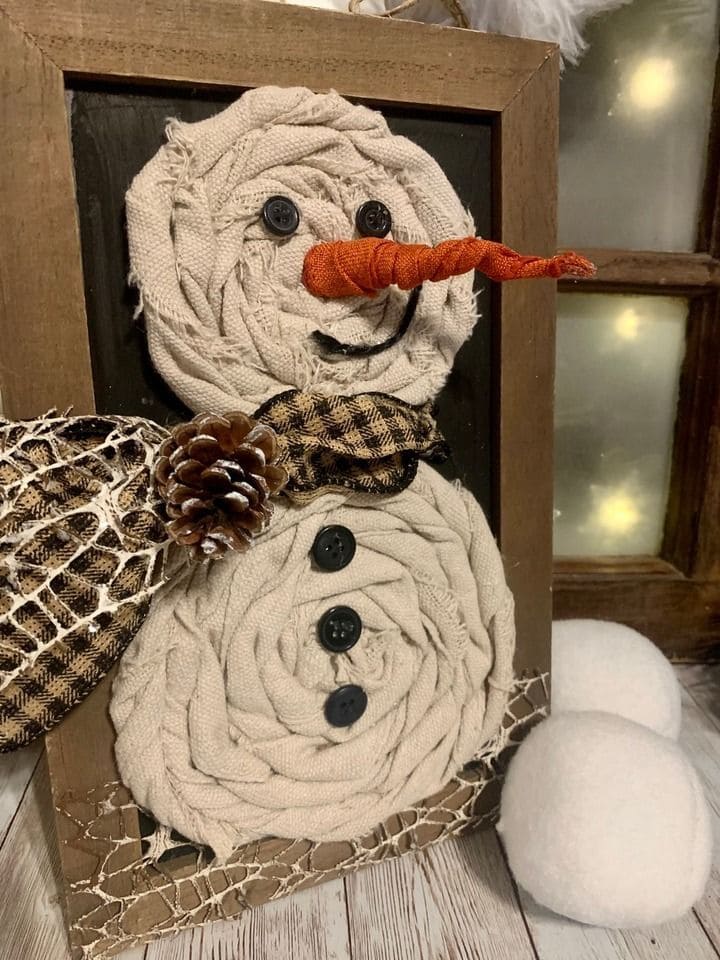
Bringing winter charm indoors is easy with this adorable rustic snowman made from soft fabric rosettes and cozy country textures.
The layered fabric gives it a handmade warmth, while the wooden frame adds that farmhouse flair.
Bonus, the pinecone and scarf details make it feel like something you’d find in a storybook cabin.

- Wooden frame or shadow box ((10×14 inches))
- Burlap or drop cloth fabric strips ((about 3 yards total, 2 inches wide))
- Hot glue gun and glue sticks
- 5-6 black buttons ((¾ inch))
- Orange fabric scrap ((for nose, 4×4 inches))
- Small pinecone and plaid ribbon ((about 12 inches))
- Black marker or paint (for the mouth)
- Decorative mesh or lace fabric ((optional for scarf accent))
-
Cut your fabric into long strips. Twist and roll each strip into a spiral, gluing as you go to form two round rosettes including one for the snowman’s head and one for his body. The head should be about 5 inches wide, and the body about 7 inches.
-
Glue the two fabric rosettes vertically onto the wooden frame to create the snowman’s shape.
-
Attach two black buttons for the eyes and three more for the body. Then use black paint or a marker to draw a small curved smile beneath the eyes.
-
Twist the orange fabric into a cone shape to form the carrot nose. Glue it securely to the snowman’s face.
-
Tie a short piece of plaid ribbon around the neck area for a scarf. You can add the pinecone and decorative mesh at one side for a cozy touch.
-
Finish by brushing a little white paint or fake snow on the pinecone for a frosty look, then place your framed snowman on display.
#15. Elegant Burlap and Pinecone Wreath
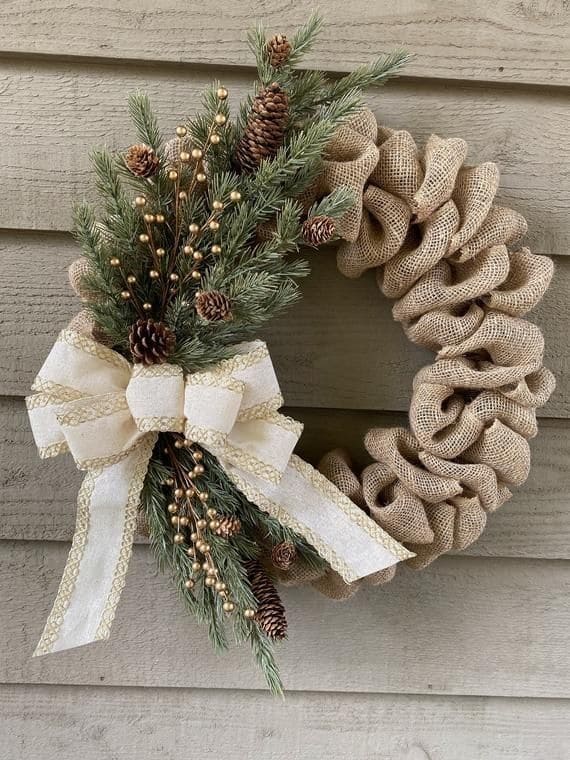
You can see a timeless combination of natural burlap, evergreen sprigs, and pinecones brings rustic elegance to your door.
This wreath feels cozy and classic, perfect for winter or even all-year farmhouse décor.
Moreover, the soft folds of burlap create a full, textured base, while the pinecones and golden berries add a forest-inspired charm.

- 1 wire wreath frame ((14-16 inches))
- 1 roll burlap ribbon ((2 rolls, each 10 yards long, 5-6 inches wide))
- Floral wire ((1 pack))
- Hot glue gun and glue sticks
- Faux pine branches ((3-4 stems))
- Mini pinecones ((8-10 pieces))
- Gold berries or small ornaments
- Large decorative ribbon ((2 yards, 2.5 inches wide))
- Scissors and wire cutters
-
Attach one end of the burlap ribbon to the wreath frame using floral wire. Begin weaving the ribbon through each section of the wire frame, pulling out loops to create volume. You continue looping until the frame is fully covered. Secure the end with wire at the back.
-
Trim your pine branches and arrange them on one side of the wreath. Then glue or wire them securely so they fan out naturally.
-
Tuck pinecones and small decorative pieces like gold berries into the greenery, gluing them in clusters for balance.
-
Tie a large bow using the decorative ribbon and attach it at the base of the greenery cluster with hot glue or floral wire. Let the ribbon tails drape slightly for a soft, elegant touch.
-
Fluff the burlap loops and adjust the greenery for fullness. Now, hang your wreath using a sturdy hook or ribbon loop.
#16. Burlap Embroidery Hoop Flower Art
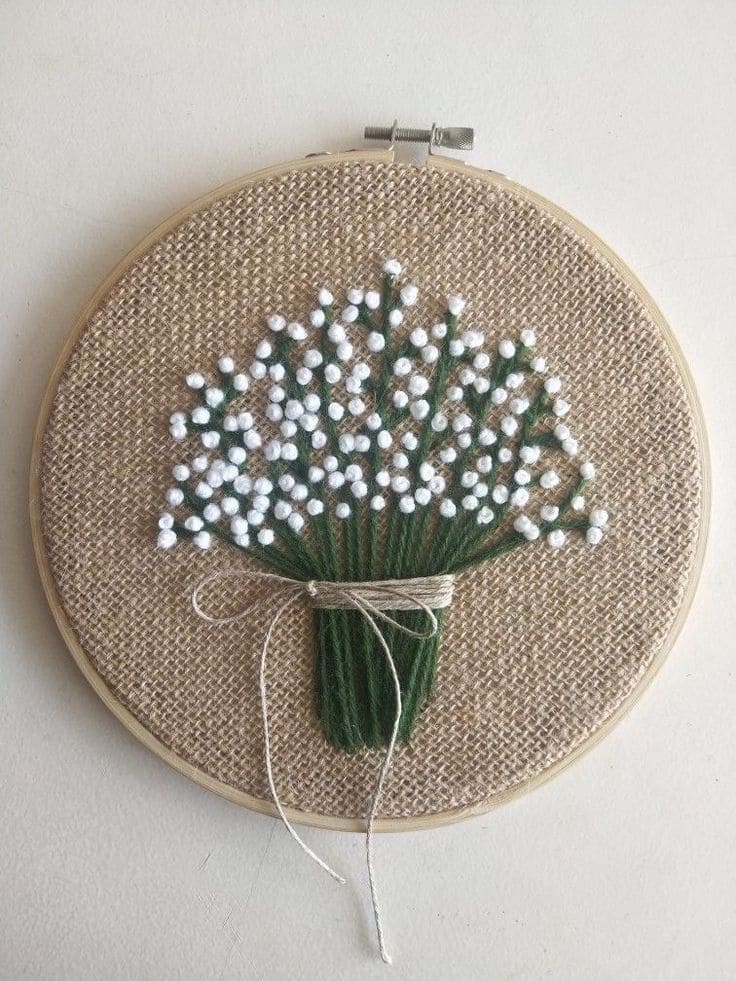
Soft, simple, and full of charm, this burlap embroidery hoop features a delicate bunch of flowers made from yarn and beads.
The combination of rough burlap texture and gentle floral detail gives it a natural, rustic beauty that feels handmade and heartfelt.
Plus, it’s perfect for hanging in cozy corners, gifting to a friend, or adding to your craft gallery wall.

- Burlap fabric ((10×10 inches))
- Embroidery hoop ((8-inch diameter))
- Green yarn ((about 3 yards))
- Small white beads ((40-50 pieces))
- Embroidery needle with large eye
- Hot glue gun or craft glue
- Twine or jute string ((12 inches))
- Scissors
-
Place the burlap fabric inside the embroidery hoop, pulling it tight and even. Then trim any excess fabric from the edges.
-
Thread your needle with green yarn and start stitching vertical lines from the bottom center to form the flower stems. You should vary the lengths slightly for a natural look.
-
Once your stems are done, glue small white beads at the tips of the green lines to create the flowers. You can use different sizes of beads for added dimension.
-
Cut an extra piece of green yarn and glue it horizontally across the base of the stems to create the bouquet tie. Then wrap it around a few times, then tie it neatly with a piece of twine for a rustic finish.
-
Check that all beads and yarn ends are secure. Tighten the hoop screw if needed to keep the burlap flat.
#17. Beaded Burlap Pumpkin Wall Art
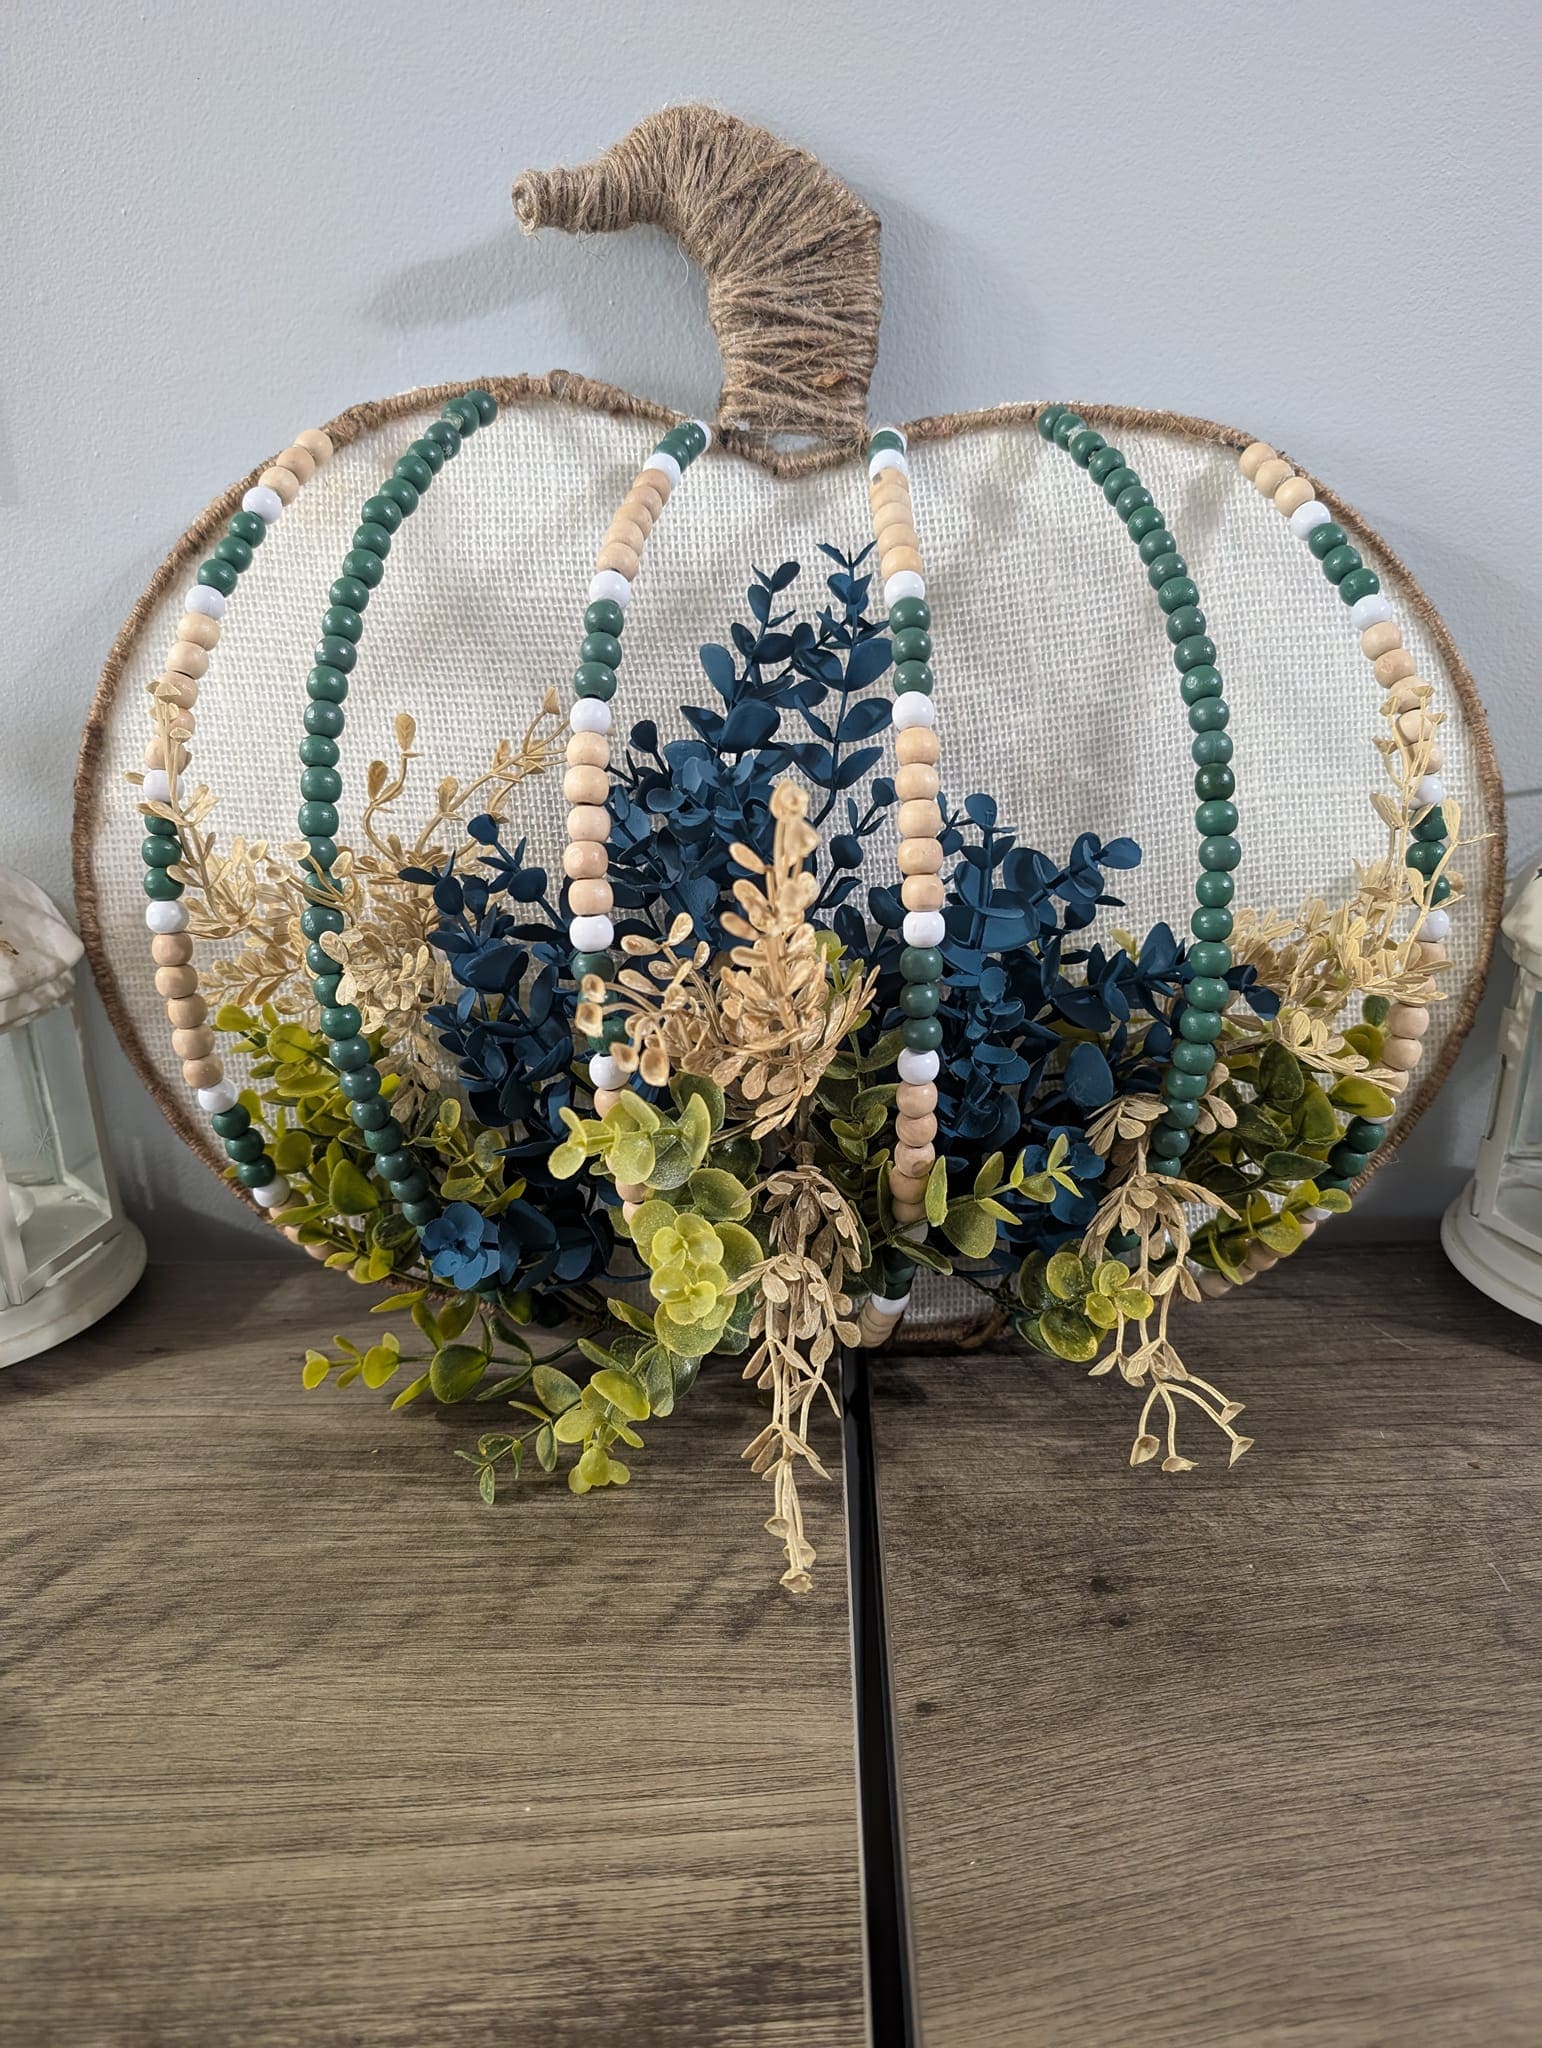
Wow, this beaded burlap pumpkin captures the cozy essence of fall in the most elegant way.
The combination of twine, wooden beads, and faux greenery gives it a natural yet sophisticated look, ideal for adding warmth to your living room or entryway.
Once finished, it becomes a stunning handmade accent that welcomes the season with quiet grace.

- Round wire frame or pumpkin-shaped base ((about 14-16 inches wide))
- 1 Burlap or linen fabric ((16×18 inches))
- Jute twine ((2 yards))
- Wooden beads ((approximately 120-150 beads, 8-10 mm each))
- Faux greenery and dried florals ((about 5-6 stems total))
- Floral wire or hot glue gun
- Scissors and wire cutters
-
Begin by wrapping the outer edge of your frame with jute twine, securing the ends with hot glue for a clean, rustic border. Then twist extra twine around the top to create a whimsical pumpkin stem.
-
Cut and attach a piece of burlap or linen to the back of the frame, gluing or tying it taut so it becomes the pumpkin’s background.
-
String wooden beads onto wire or sturdy twine, alternating natural and colored beads for variation. You’ll need about five bead strands to create the pumpkin’s curved lines. Next, attach each strand to the frame using hot glue or floral wire.
-
Once your pumpkin’s body is complete, tuck faux greenery, dried leaves, or small branches into the lower part. Then arrange them to spill out slightly for a natural, abundant look.
-
Add any finishing touches such as tiny pumpkins, raffia, or eucalyptus sprigs to make it feel lush and full of life. Finally, hang it proudly or lean it on a shelf to enjoy its earthy autumn vibe.
#18. Rustic Burlap Christmas Orbs
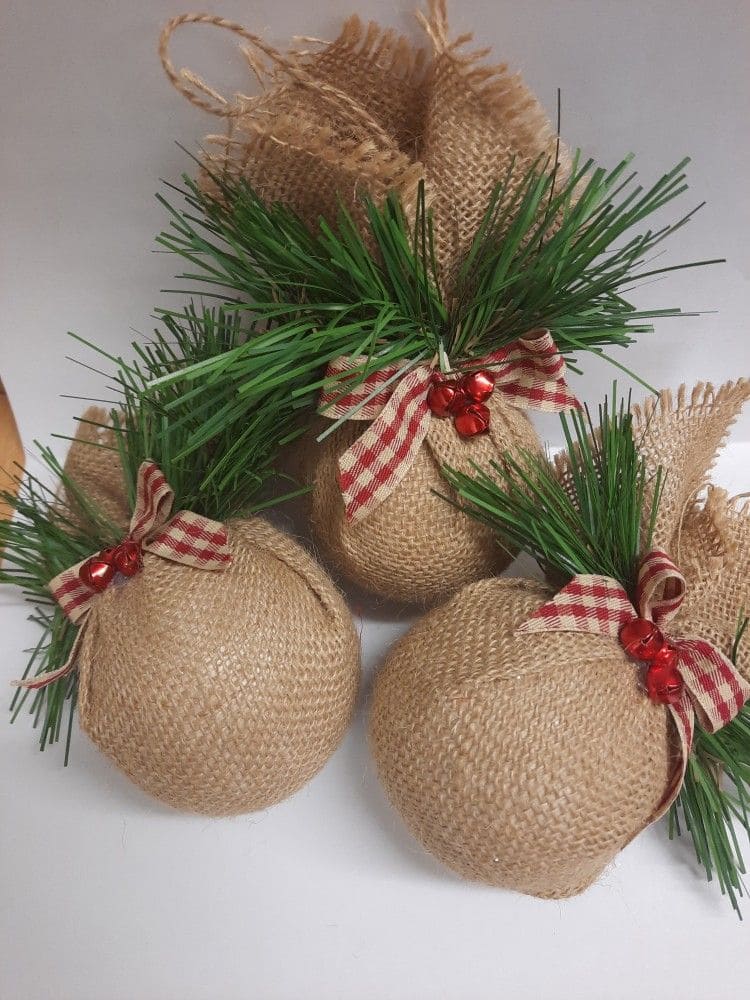
These charming burlap orbs bring a cozy farmhouse feel to your holiday décor.
The texture of natural jute paired with pine sprigs, red bells, and checked ribbon makes them perfect for a country Christmas display.
You can tuck them into a centerpiece bowl, hang them on your tree, or use them to decorate wrapped gifts for a handmade touch.

- Burlap fabric ((10×10 inches per orb))
- Foam balls ((3-4 inches in diameter))
- Twine or jute string ((12 inches per orb))
- Faux pine greenery ((3-4 sprigs per orb))
- Red gingham or plaid ribbon ((½ inch wide, 10 inches long))
- Small red bells ((2-3 per orb))
- Hot glue gun and glue sticks
- Scissors
-
Cut the burlap into 10×10-inch squares. Then place a foam ball in the center and gently wrap the fabric up and around it, gathering the edges neatly at the top.
-
Tie the gathered top tightly with a piece of jute string, leaving enough length for a small hanging loop if desired. You trim the excess burlap ends for a clean look or leave them slightly frayed for rustic charm.
-
Glue a small cluster of faux pine greenery at the tied section, arranging it so the leaves fan out naturally.
-
Add a ribbon bow over the greenery, securing it with hot glue. Attach two or three red bells in the center of the bow for a pop of color and festive sound.
-
Once the glue dries, fluff the greenery and adjust the bow for balance.
#19. Rustic Burlap Christmas Tree
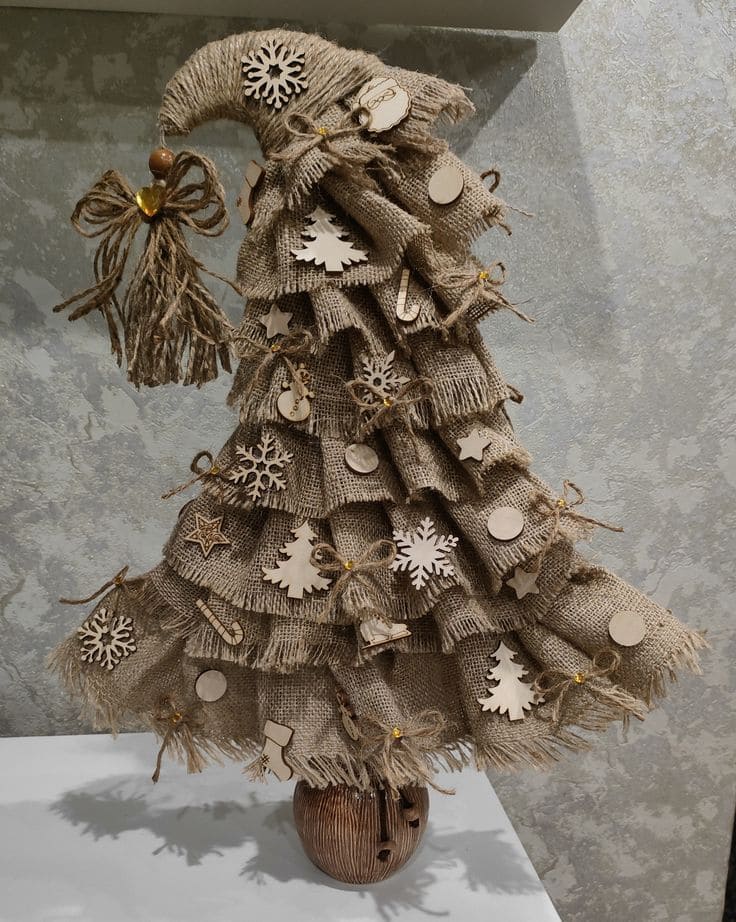
A handcrafted burlap Christmas tree like this one brings the heart of the holidays right into your home.
There’s something timeless about the soft, frayed edges of burlap mixed with simple wooden ornament.
Also, each folded layer gives the tree texture and movement, while the little twine bows and wooden snowflakes add that perfect touch of country whimsy.

- Burlap fabric ((1 yard, cut into 3-4 inch wide strips))
- Foam or cardboard cone base ((about 18 inches tall))
- Hot glue gun and glue sticks
- 15 Small wooden ornaments or cutouts ((stars, trees, snowflakes))
- Jute twine ((2 yards))
- Decorative bead or charm ( for tree topper)
- Wooden or round base ((3-4 inches wide))
-
Start by cutting the burlap into long strips. Then pull a few threads from each edge to create a soft, frayed look.
-
Beginning at the bottom of your cone, glue the first burlap strip in a loose, ruffled fold around the base. You continue layering upward, slightly overlapping each row to form a tiered, textured effect.
-
Once the cone is fully covered, gather the top of the burlap and twist it slightly to form a whimsical, floppy tip. Secure it with twine and a dab of glue.
-
Decorate your tree with small wooden shapes, gluing them evenly across the layers. You can also tie tiny twine bows and add them between ornaments for extra charm.
-
Attach your tree to a wooden base using hot glue. Top it off with a small bead, ribbon bow, or rustic bell.
For a cozier winter feel, you can also lightly brush the edges with white paint or sprinkle a bit of faux snow on the burlap.
#20. Burlap Ghost Door Hanger
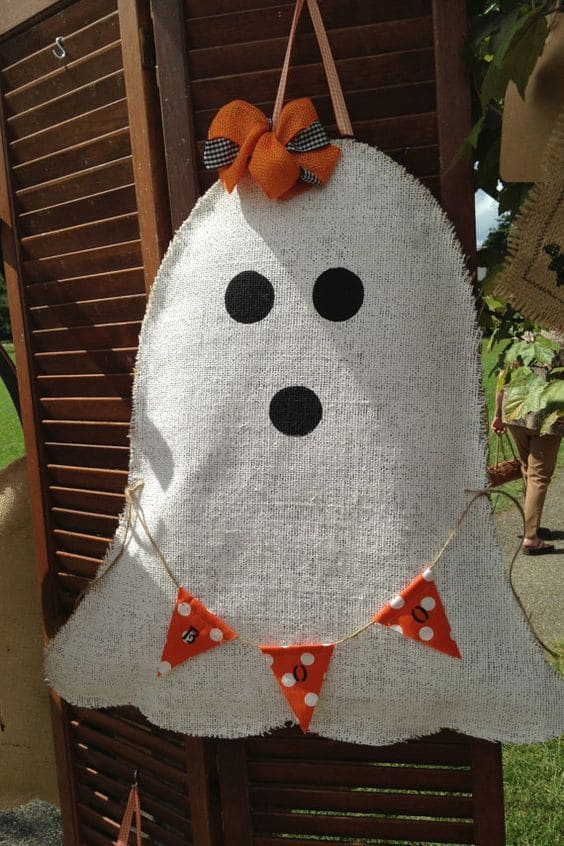
Here’s a playful way to bring Halloween spirit to your porch, a friendly ghost made of burlap!
Its simple design, bright orange bunting, and cute bow give it a charming farmhouse twist.
You’ll love how quick it is to put together, and it looks equally adorable hanging on a front door, wall, or even beside a hay bale display.

- White burlap fabric ((18×24 inches))
- Black felt ((for eyes and mouth))
- Orange and black ribbon ((12 inches each for the bow))
- Twine ((2 feet))
- 3-4 Small fabric triangles ((3×3 inches each, in orange))
- Fabric paint or markers ((optional for letters or dots))
- Hot glue gun and glue sticks
- Scissors
- Cardboard or foam board ((for backing, optional))
-
Cut the burlap into a ghost shape, round at the top with wavy edges at the bottom. You can double-layer it for sturdiness or glue it onto a piece of cardboard backing.
-
Cut out two oval eyes and one round mouth from black felt. You glue them onto the upper center of the ghost.
-
Tie or glue an orange and black ribbon bow at the top of the ghost’s head for a festive accent.
-
Create a small pennant banner by gluing the orange fabric triangles onto a length of twine. Then add painted letters like “BOO” or white dots for detail.
-
Stretch the banner across the ghost’s lower section and glue or tie the ends to the sides.
-
Finally, add a twine loop at the top for hanging.
