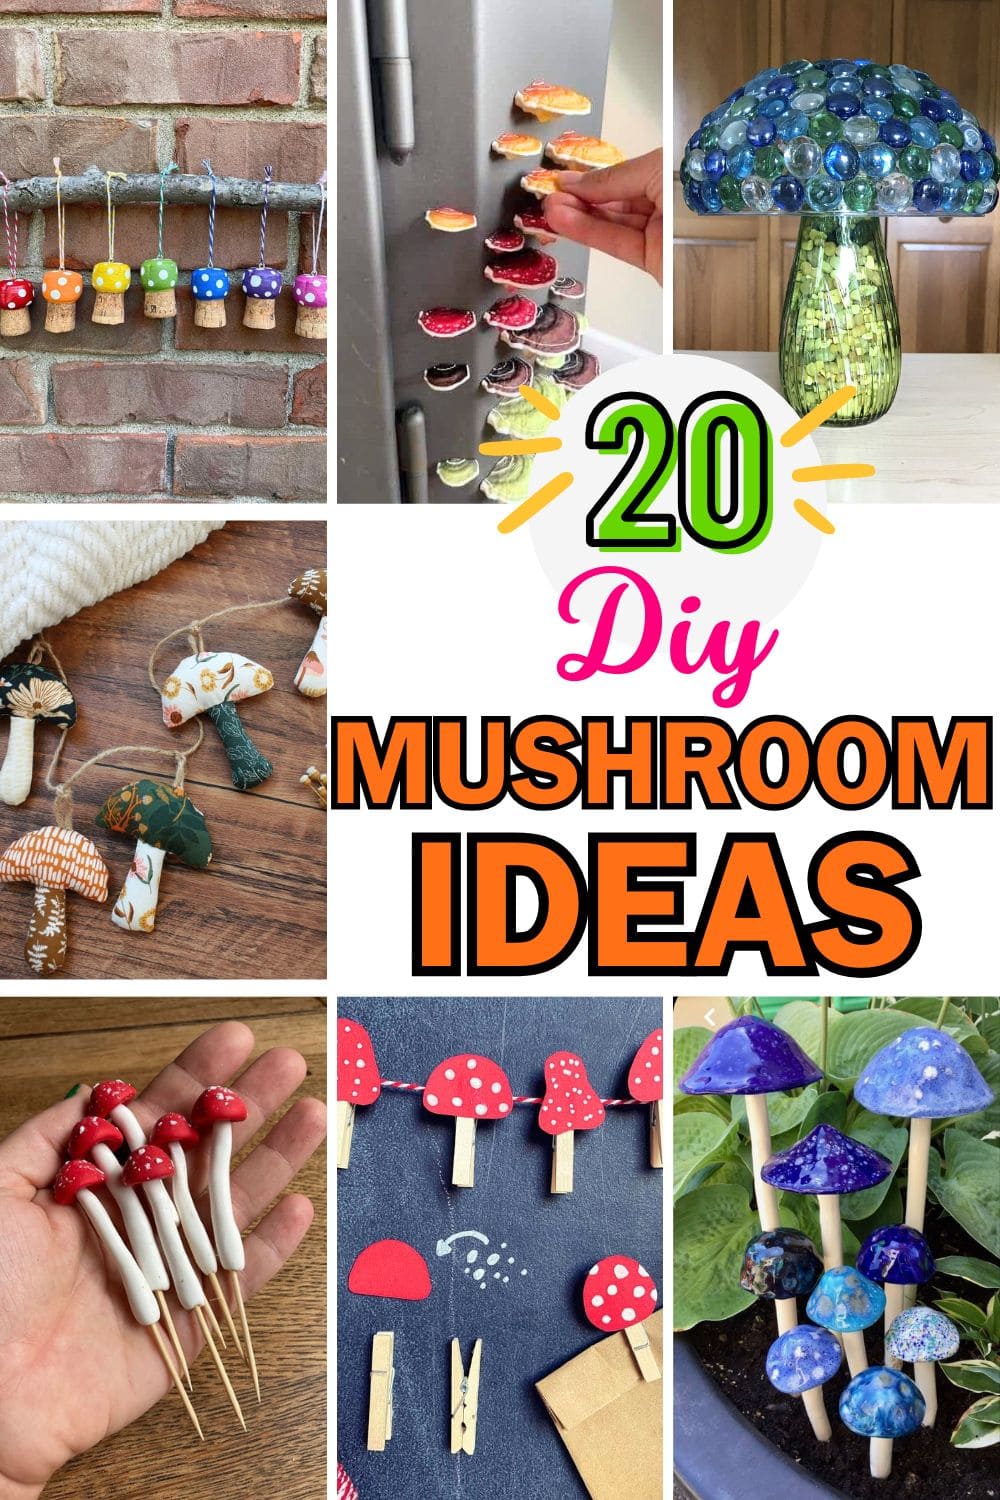
Tiny mushrooms have a way of turning an ordinary space into something straight out of a storybook. Their playful shapes, bright colors, and enchanting details can instantly spark joy.
These DIY mushroom ideas are perfect for adding that magical, woodland touch to your home and garden.
Each project is fun to make, surprisingly easy, and a great way to use up craft materials you already have. Get ready to transform your space with charming creations that feel plucked from a whimsical forest path.
#1. Glass Gem Mushroom Garden Decor
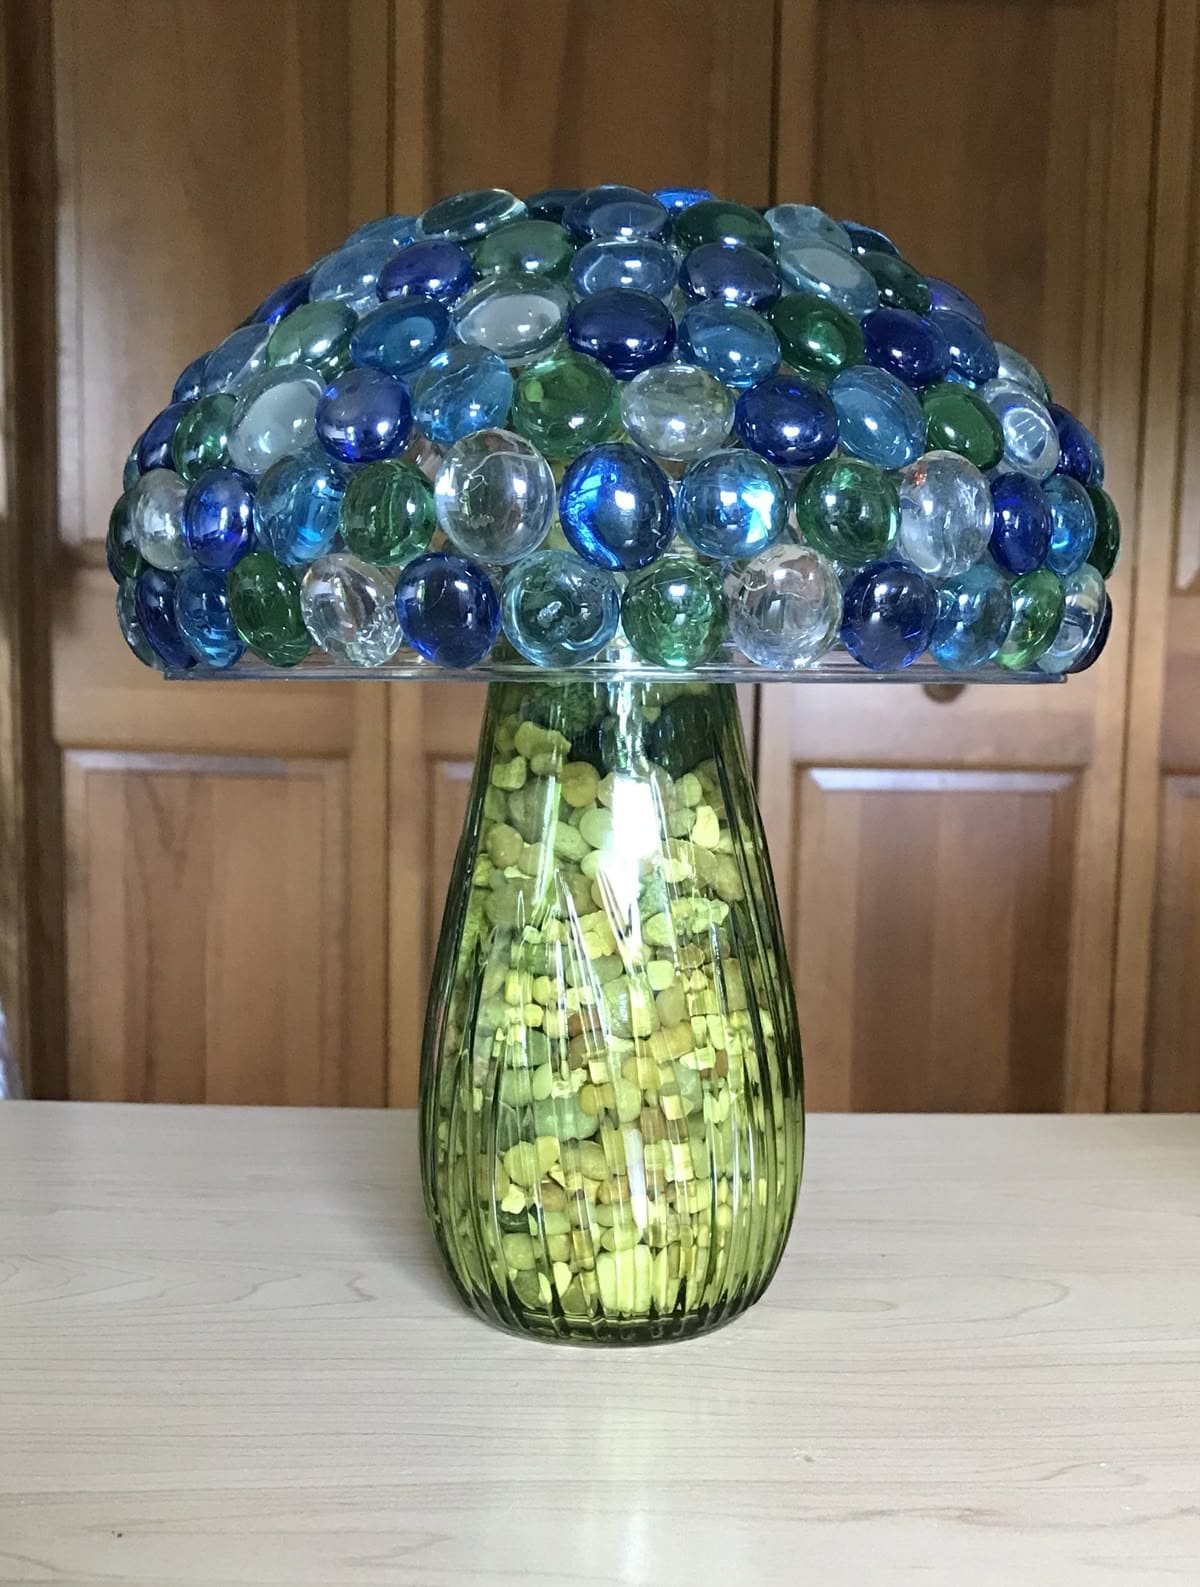
This charming mushroom is a vibrant mix of blues, greens, and clear glass gems that catch the light beautifully.
The sturdy green vase creates a whimsical stem, while the cap is a shallow glass bowl transformed into a dazzling mosaic. It’s a simple, eye-catching project that works perfectly as a garden ornament or a playful indoor accent.
I bet you’ll love how quickly it comes together and how magical it looks in your space.
Materials Needed
- 1 green glass vase (approx. 8-10″ tall)
- 1 shallow glass bowl (10-12″ diameter)
- Glass gems in mixed colors (about 120-150 pieces, 0.75-1″ each)
- Yellow decorative stones (about 2 cups)
- Strong clear adhesive (E6000 or similar)
Step-by-step Guide
Step 1: Clean and dry both the vase and the bowl thoroughly to ensure glue adhesion.
Step 2: Apply strong clear adhesive to the back of each glass gem and arrange them closely on the outer surface of the bowl. Let dry according to glue instructions.
Step 3: Fill the vase with yellow decorative stones until it’s almost full, leaving about 1″ at the top.
Step 4: Flip the decorated bowl upside down to form the mushroom cap, and glue it securely to the top of the vase. Then allow it to cure fully before moving.
#2. Upcycled Bowl and Log Garden Mushrooms
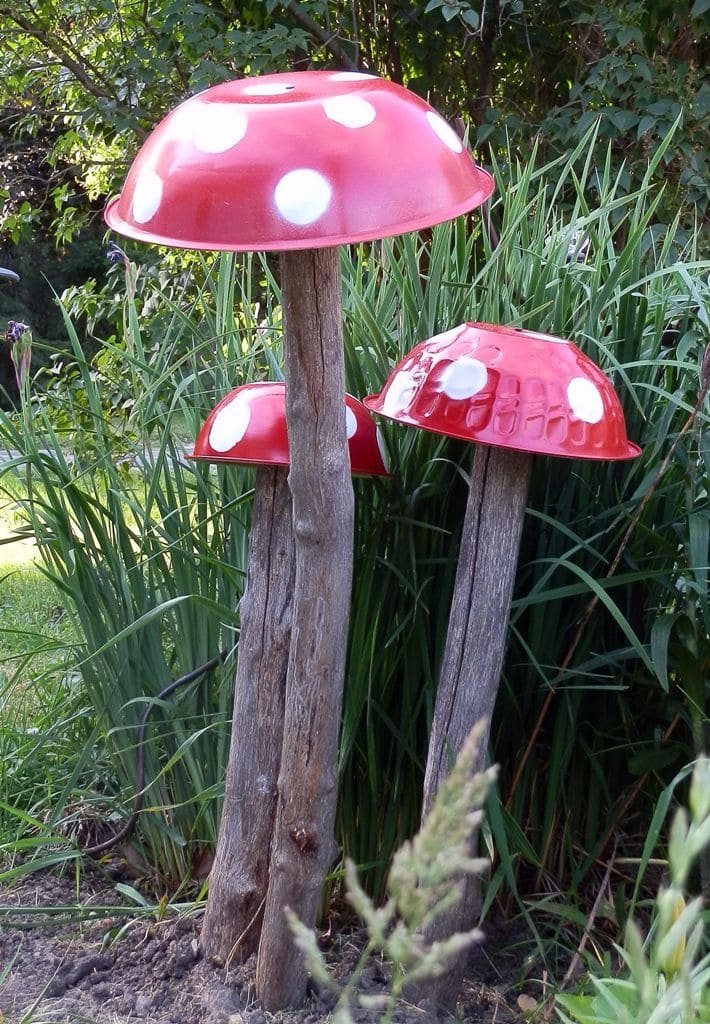
These playful garden mushrooms are made from upcycled metal or plastic bowls and sturdy wooden logs, creating an eye-catching and weather-friendly outdoor feature.
The glossy red caps with bold white spots give them a classic toadstool look, while the natural wood stems blend beautifully with garden greenery.
Plus, they’re simple to make, highly durable, and perfect for adding a touch of whimsy to flower beds, pathways, or fairy garden areas.
Materials Needed
- 3 wooden logs (24″ to 36″ height, 3″ to 5″ diameter)
- 3 large bowls (10″ to 14″ diameter)
- Red outdoor spray paint (1 can)
- White outdoor spray paint (1 can)
- Strong outdoor adhesive or screws with drill
- Drop cloth or newspaper
Step-by-step Guide
Step 1: Clean the bowls thoroughly, then place them upside down on a drop cloth. Then spray them red and let them dry completely.
Step 2: Use a stencil or freehand technique to paint large white spots across each cap, spacing them randomly for a natural look.
Step 3: Prepare your logs by cutting the base flat so they stand securely.
Step 4: Attach each painted bowl to the top of a log using outdoor adhesive or screws.
Step 5: Now position your mushrooms in the garden, partially burying the log bases for stability.
#3. Cozy Yarn-Wrapped Mushroom Decor
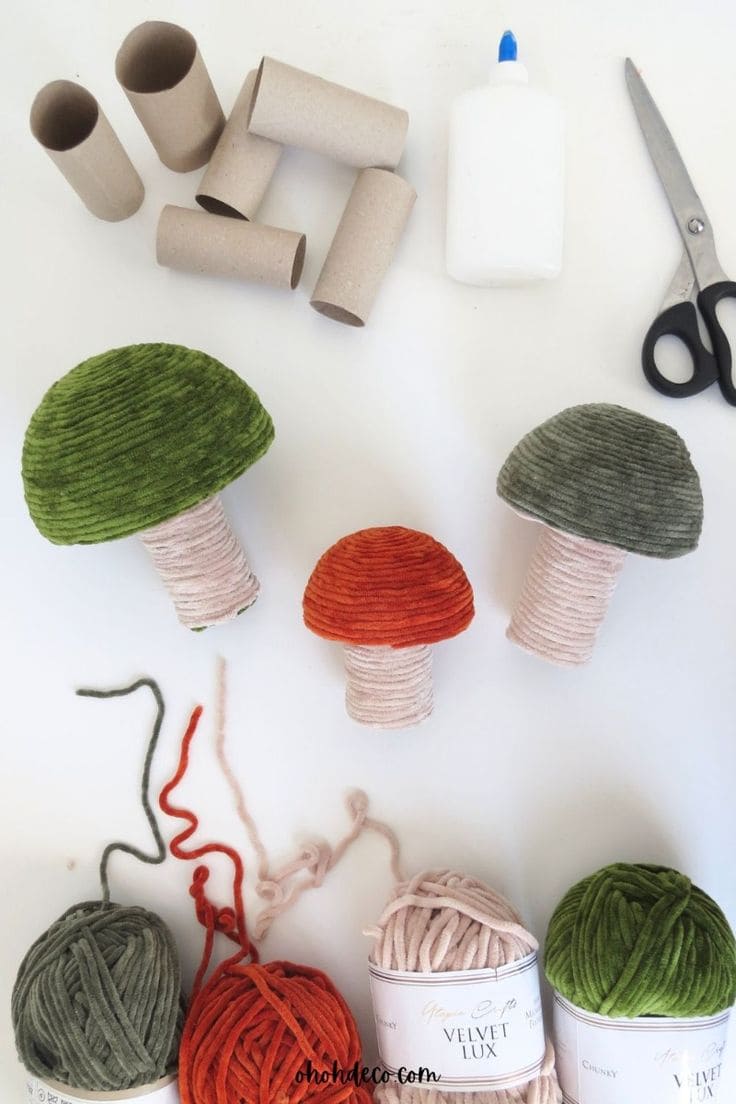
Soft, colorful, and irresistibly touchable, these yarn-wrapped mushrooms bring a gentle charm to your home.
Using cardboard tubes and plush velvet yarn, you can create a set of mushrooms that feel just as comforting as they look. The thick, textured yarn gives the caps a rich, velvety finish, while the stems have a simple, clean look.
Also, they’re lightweight, easy to make, and endlessly customizable, you can choose earthy tones for a woodland vibe or bright colors for a playful twist.
Materials Needed
- 3 cardboard tubes (4″ to 6″ length)
- 3 styrofoam half-spheres (3″ to 5″ diameter)
- 20-25 yd chunky velvet yarn in assorted colors
- 1 bottle craft glue
- Scissors
Step-by-step Guide
Step 1: Glue one end of the yarn to the bottom of a styrofoam cap, then wrap tightly until the entire surface is covered.
Step 2: Wrap each cardboard tube with lighter-colored yarn to create the stem.
Step 3: Glue the wrapped stem to the underside of the wrapped cap.
Step 4: Let dry completely, then arrange your mushrooms together for a cozy display.
See also: Here’re 25 Colorful Craft Ideas You Can Make With Yarns
#4. Rainbow Cork Mushroom Ornaments
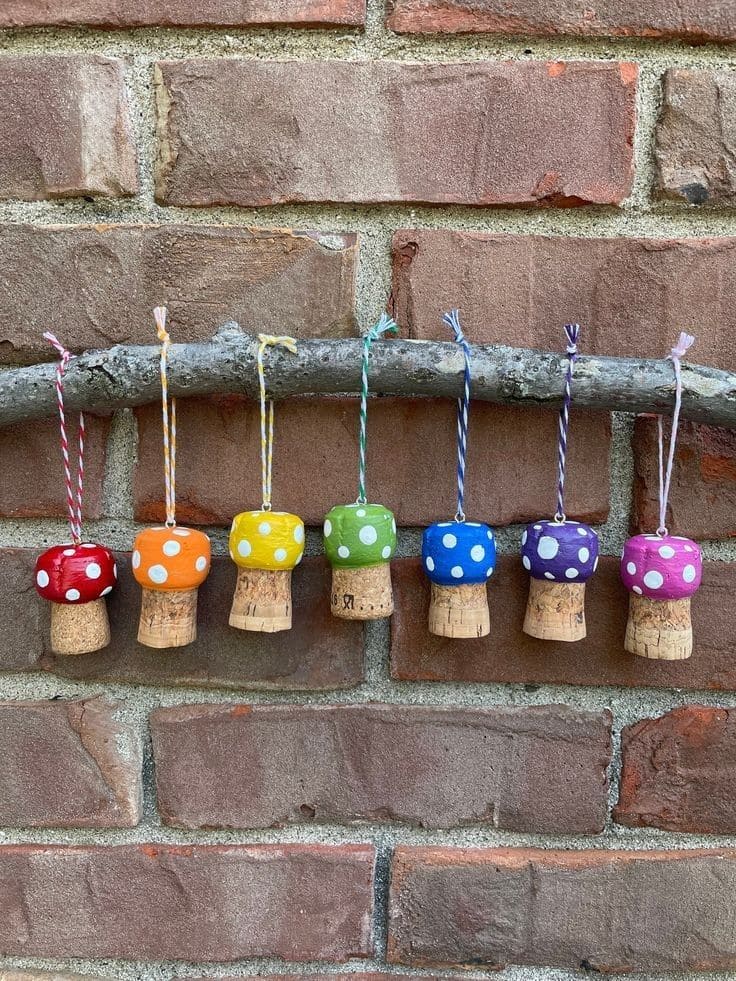
Look at these cheerful little mushrooms! They are like tiny bursts of happiness you can hang anywhere.
Made from recycled corks and bright, glossy paint, they’re an easy way to add a pop of color to your home, garden, or holiday décor. Each one is hand-painted in a different rainbow shade, dotted with playful white spots that make them feel straight out of a whimsical forest.
They’re sweet standalone ornaments. Plus, they’re a great way to reuse corks from past celebrations.
Materials Needed
- 8 champagne corks
- 8 assorted acrylic paints inlcuding red, orange, yellow, green, blue, purple, pink
- White acrylic paint (1 oz)
- 8 pieces baker’s twine (6″ each)
- 1 small paintbrush
- Hot glue gun with 2 glue sticks
Step-by-step Guide
Step 1: Paint the top of each cork in a different rainbow color, letting the texture of the cork peek through.
Step 2: Once dry, use the tip of your brush to dot on white spots for that classic toadstool look.
Step 3: Cut a small slit into the top and insert a loop of baker’s twine, securing with hot glue.
Step 4: Hang them on a branch, tree, or wall hook for a playful pop of color.
#5. Eco-Friendly Egg Carton Mushroom
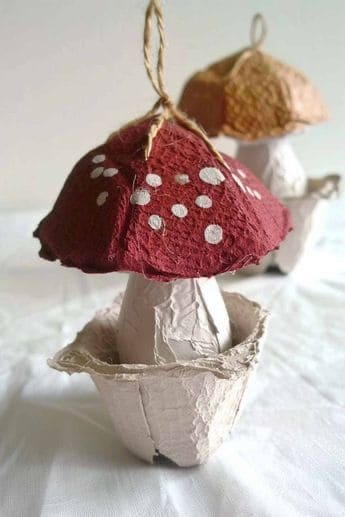
These egg carton mushrooms have a rustic, woodland charm that feels right at home in a cozy craft nook or hanging in a child’s play space.
The textured cap, painted a deep red with playful white spots, sits snugly atop a sturdy stem, all fashioned from the same carton.
You can also add a loop of twine and they become sweet little ornaments, perfect for seasonal décor or eco-conscious gifting.
Materials Needed
- 1 cardboard egg carton (12-egg size)
- 1 small pot of red acrylic paint (2 oz)
- White acrylic paint (1 oz)
- 1 small paintbrush
- 6″ length jute twine
- Hot glue gun with 2 glue sticks
- Scissors
Step-by-step Guide
Step 1: Cut out one cup section for the stem and one dome-shaped section for the cap.
Step 2: Paint the cap red, letting the natural texture show through. Once dry, add white spots with the tip of your brush for a toadstool look.
Step 3: Glue the cap to the stem, making sure it sits firmly.
Step 4: Poke a small hole in the cap, thread the twine through, and tie a loop for hanging.
Read more: 26 Creative & Fun Egg Carton Craft Projects for Kids and Parents
#6. Fabric Mushroom Garland
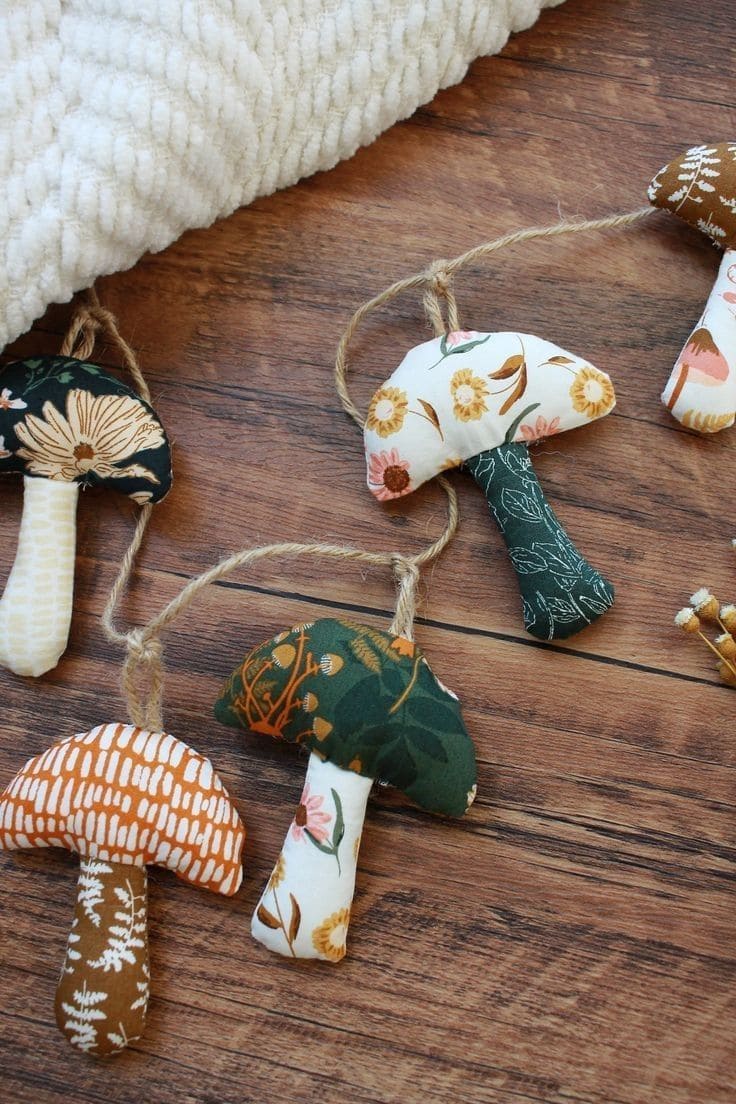
Soft, cozy, and full of character, this fabric mushroom garland brings a handmade touch to your home. Each mushroom is sewn from patterned fabric, giving it a unique personality.
Stuffed lightly for a plush look, they hang together on a simple jute string, creating a warm, cottagecore vibe.
You can drape them across a mantel, over a bed frame, or along a party table for woodland-themed décor. It’s the kind of project that feels personal and homey.
Materials Needed
- 5-6 fabric scraps – 6″×6″ each, assorted prints
- Polyester stuffing (1 cup)
- 24″ length jute twine
- Needle and thread or sewing machine
- Fabric scissors
- Hot glue gun (optional)
Step-by-step Guide
Step 1: Cut mushroom cap and stem shapes from your fabric scraps, making pairs for front and back.
Step 2: Sew the edges together, leaving a small gap. Then turn the pieces inside out.
Step 3: Stuff each mushroom lightly, then stitch the gap closed.
Step 4: Attach the mushrooms to the jute twine using small stitches or a dab of hot glue.
Step 5: Finally, hang your garland where it can add a whimsical, soft accent to your space.
#7. Rustic Faux Wood Mushroom Display
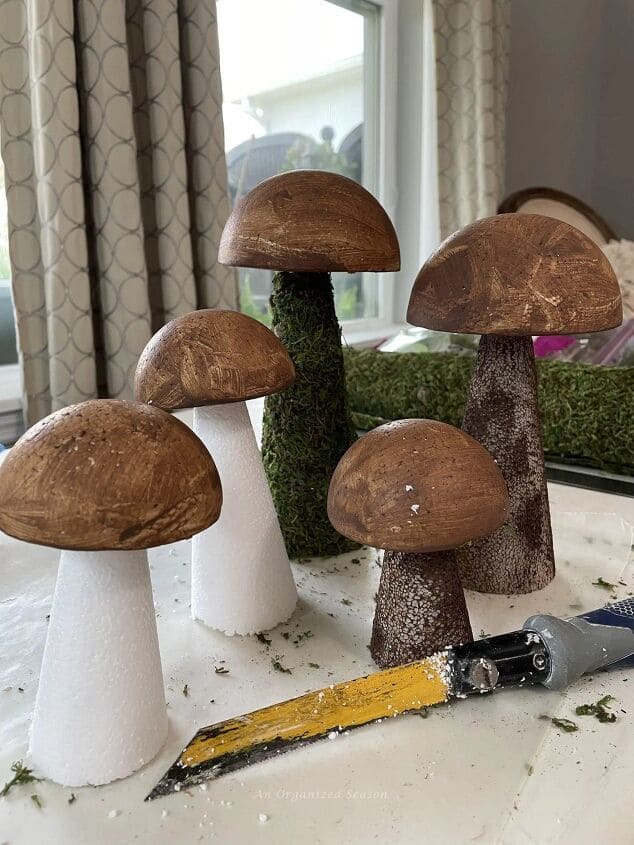
Wow, these rustic mushrooms bring the charm of a woodland walk right into your home. Made from lightweight foam cones and half-spheres, they’re painted to mimic the warm, textured look of real wood.
The tall, slender shapes give the arrangement a sculptural feel, while the varied heights create a natural forest-like grouping.
Also, they’re perfect for seasonal decorating, fairy garden scenes, or as year-round rustic décor.
Materials Needed
- 5 foam cones (4″ to 8″ height)
- 5 foam half-spheres – 3″ to 5″ diameter
- Brown acrylic paint – 4 oz
- Dark brown or black paint – 1 oz
- Paintbrushes (medium and fine tip)
- Hot glue gun with 3 glue sticks
- Optional: preserved moss
Step-by-step Guide
Step 1: Paint the foam cones in earthy tones for the stems; add texture by dabbing with a sponge.
Step 2: Paint the foam half-spheres a warm brown, then brush on darker streaks for a woodgrain effect.
Step 3: Glue each cap onto its matching stem, ensuring they’re centered and secure.
Step 4: Arrange them in clusters, varying the heights for a natural forest look.
Step 5: (Optional) You can add moss around the base for an extra woodland feel.
#8. Galaxy-Inspired Ceramic Garden Mushrooms
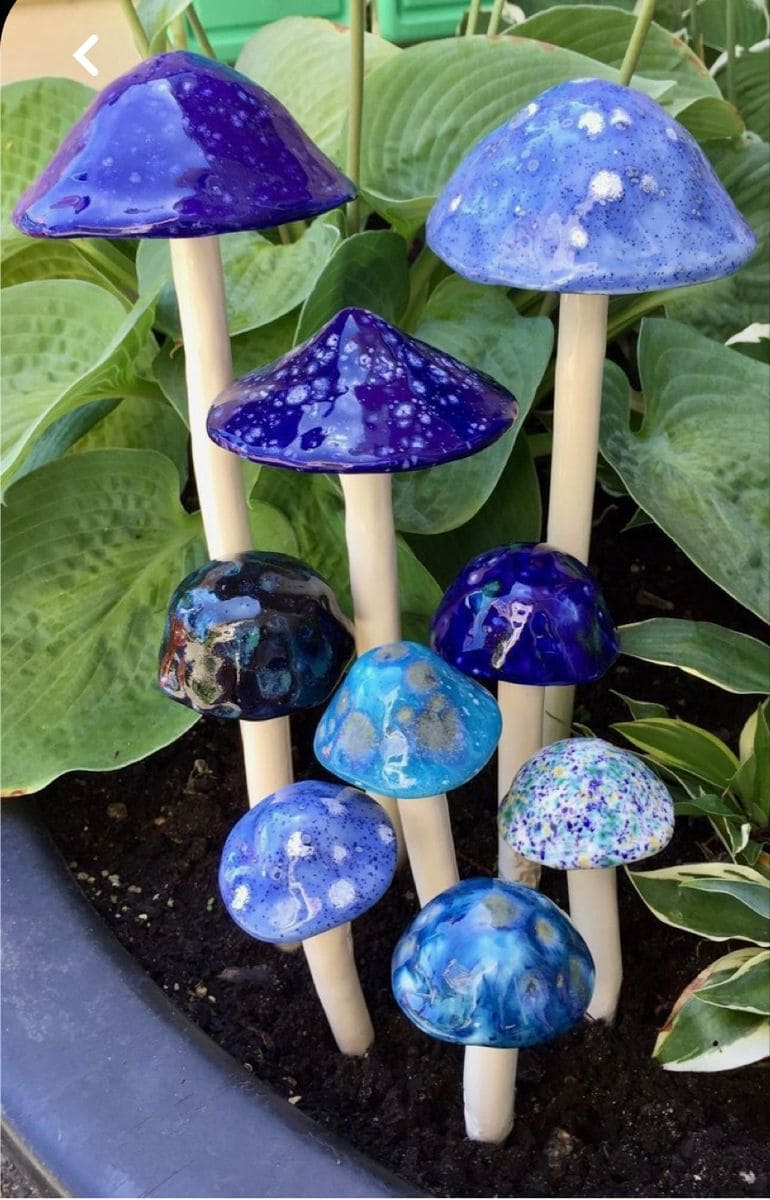
These mushrooms look as though they’ve been plucked from a dream and dipped into the night sky.
Their glossy caps swirl with deep blues, purples, and speckled starbursts, making them a true focal point in any garden or planter. Each one is a tiny work of art, reflecting light beautifully in the sun.
Specially, the tall, slender stems add elegance, while the variety of cap shapes keeps the arrangement playful.
They’re weather-resistant, easy to move, and bring a celestial touch that feels both modern and whimsical, perfect for garden lovers who want something truly unique.
Materials Needed
- 8 pre-made ceramic mushroom caps ( 2″ to 4″ diameter)
- 8 ceramic or wooden stems (6″ to 12″ height)
- Assorted blue, purple, and white ceramic glazes (1 oz each)
- Paintbrushes (fine and medium tip)
- Clear outdoor sealant (1 can)
Step-by-step Guide
Step 1: Paint each mushroom cap with deep blue or purple glaze as your base, then layer lighter shades to create a swirling galaxy effect.
Step 2: Use a splatter technique with white glaze to mimic stars, letting some specks blur for a dreamy look. Once dry, attach each cap securely to its stem.
Step 3: Apply a coat of clear sealant for extra shine and weather protection.
Step 4: Arrange in your garden, clustering tall and short mushrooms together for a natural grouping.
#9. Rustic Paper Plate Mushroom Craft
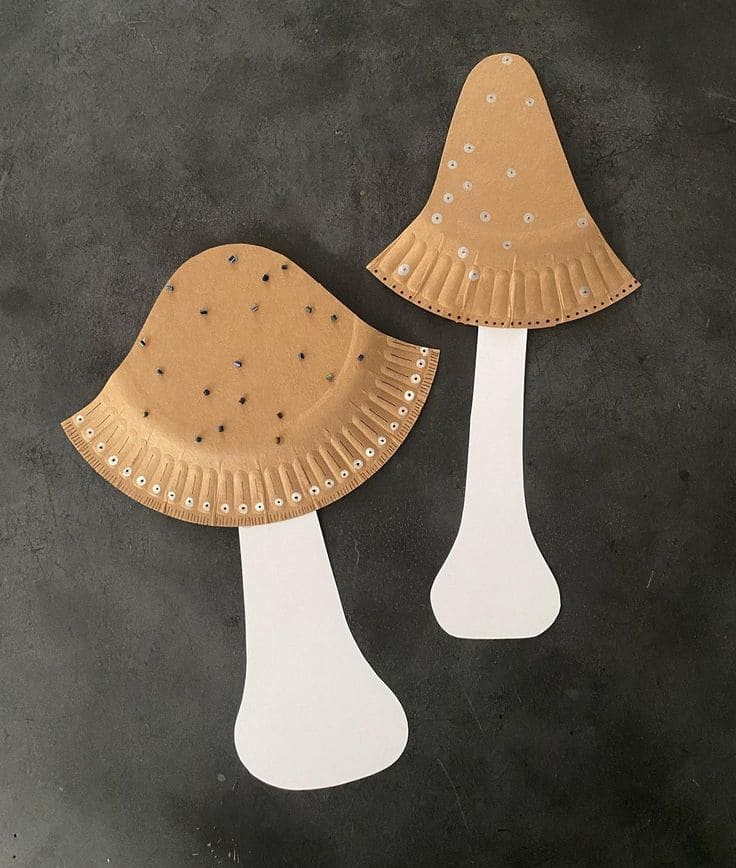
There’s something wonderfully satisfying about turning everyday things into charming decorations.
These paper plate mushrooms carry a warm, woodland vibe, with their earthy brown caps and tiny sequins that twinkle like morning dew. They’re quick to make, light as air, and just rustic enough to look like they belong in a storybook forest.
Whether you hang them on a wall, tuck them into a seasonal display, or use them for a kids’ nature craft day, they’re bound to spark smiles.
Materials Needed
- 2 brown paper plates (9″ diameter)
- 2 sheets white cardstock (8″×11″)
- 30-40 silver sequins
- 20-30 black seed beads
- 1 bottle craft glue
- 1 pair scissors
Step-by-step Guide
Step 1: Take a paper plate and cut it in half, there’s your mushroom cap. Give the edges a little trim if you want a softer, more natural curve.
Step 2: From the white cardstock, cut out tall, rounded stems. You can play with shapes until they feel right under your cap.
Step 3: Glue each cap to its stem, pressing gently so they stay put.
Step 4: Add your silver sequins and black beads like forest freckles, no need for perfection here, random is charming.
Step 5: Let them dry, then display your new mushrooms where they’ll catch the light.
#10. Crocheted Toadstool Plushies
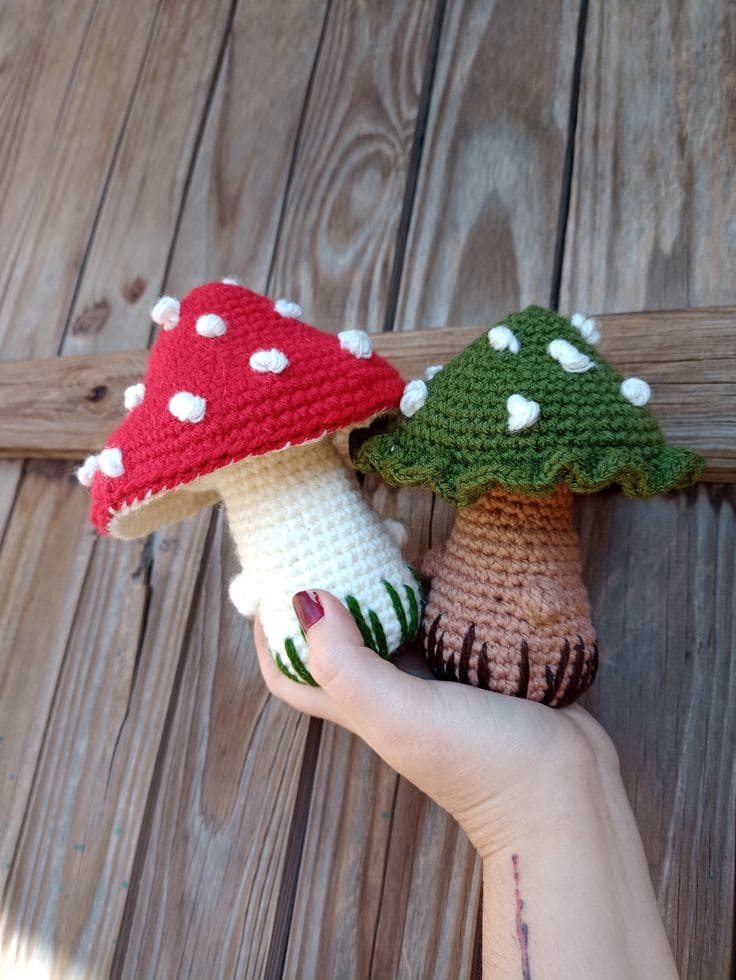
Interestingly, these crocheted toadstools are the perfect mix of cozy craft and whimsical charm.
With their plump caps including one in classic red, the other in forest green dotted with soft white bumps, they look like they’ve hopped out of a fairy garden and into your hands.
Moreover, the textured stitches give them a warm, handmade feel, while the sturdy shape makes them ideal for display on a shelf, desk, or windowsill.
Materials Needed
- Red, green, brown and white worsted weight yarn (50 g each)
- Size G (4 mm) crochet hook
- 1 cup polyester fiberfill
- Yarn needle
- Scissors
Step-by-step Guide
Step 1: For the cap, crochet in your chosen color, increasing each round until it reaches about 3.5″ in diameter.
Step 2: Switch to white (for red cap) or brown (for green cap) and crochet the stem, working in rounds until it’s about 3″ tall and 1.25″ wide.
Step 3: Stuff both the cap and stem firmly with polyester fiberfill so they hold their shape.
Step 4: Sew the stem to the center underside of the cap using a yarn needle.
Step 5: Crochet small white bumps (about 0.5″ each) and sew them evenly across the cap.
Tip: You can make a mix of 3″ and 4″ tall mushrooms to create a playful, varied display.
#11. Colorful Mushroom Cap Fridge Magnets
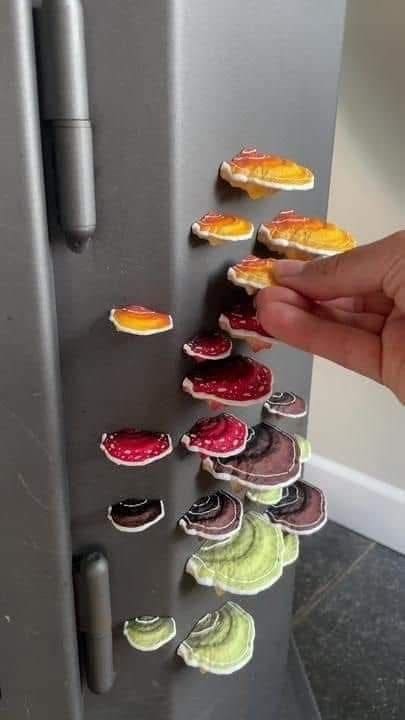
Why not bring a dash of forest magic to your kitchen with these vibrant mushroom cap magnets?
Inspired by the natural patterns of bracket fungi, each piece bursts with rich colors from fiery oranges and reds to earthy browns and fresh greens.
They’re perfect for holding up grocery lists, photos, or little notes while making your fridge a piece of living art.
Materials Needed
- 12-15 wood slices or sturdy craft foam shapes (1.5″ to 2.5″ diameter)
- Assorted acrylic paints (orange, red, green, brown, white)
- Fine-tip paintbrushes
- 12-15 small round magnets
- Strong craft glue
Step-by-step Guide
Step 1: Paint each wood slice or foam shape to resemble a mushroom cap, layering colors for a natural, textured look.
Step 2: Add thin white edging around the caps to mimic real fungi. Once dry, glue a magnet to the back of each cap.
Step 3: Arrange them on your fridge, door, or any magnetic surface in clusters for a realistic “growing” effect.
#12. Paper Baking Cup Mushrooms
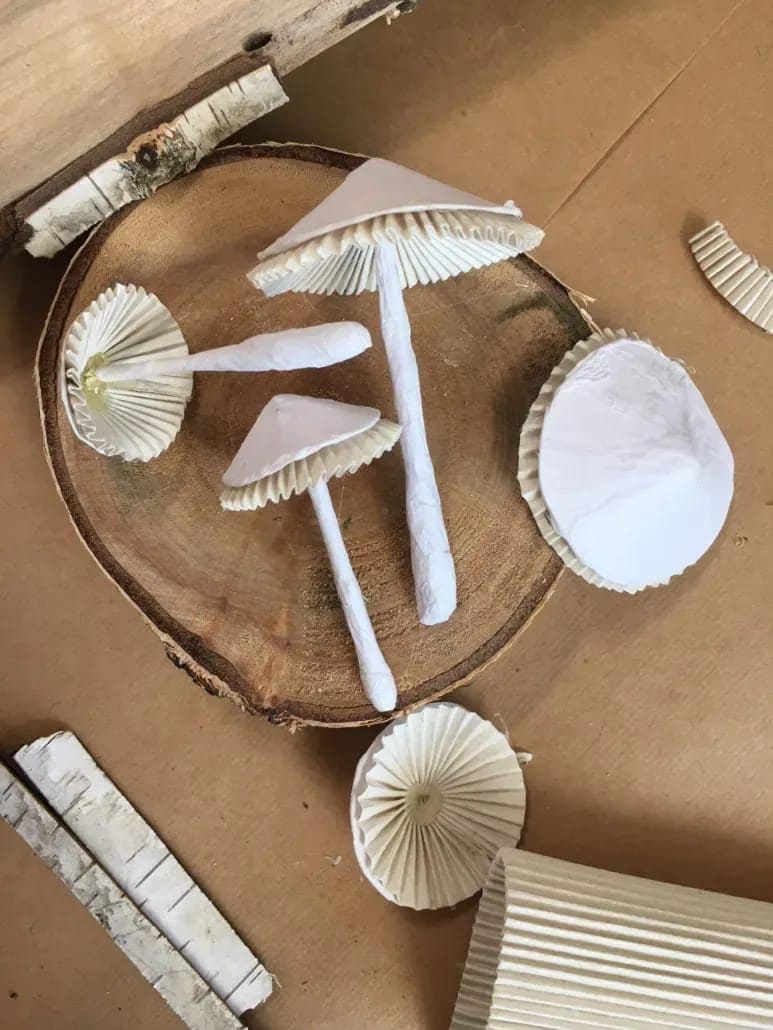
Delicate and earthy, these paper baking cup mushrooms capture the look of wild fungi in a lightweight, handmade form.
Perfect for table centerpieces, fairy garden scenes, or seasonal displays, they’re made entirely from simple materials you may already have in your kitchen.
Plus, the pleated texture of the baking cups naturally mimics mushroom gills, while rolled paper stems add a touch of rustic charm.
Materials Needed
- 6-8 white paper baking cups – 2″ to 3″ diameter
- 6-8 strips of white paper – 1″×6″ each
- Glue stick or hot glue gun with 2 glue sticks
- Scissors
- Optional: small wood slice bases (2″ to 4″ diameter)
Step-by-step Guide
Step 1: Take one baking cup and flatten it gently to form the mushroom cap. For a more pointed cap, fold the cup slightly inward at the top.
Step 2: Roll a strip of white paper into a tight tube about 0.25″ thick for the stem, then twist slightly to give it a natural shape.
Step 3: Glue the stem to the center underside of the cap, pressing firmly until secure.
Step 4: If desired, glue the base of the stem to a wood slice for stability.
Step 5: Repeat the process in different sizes to create a varied cluster.
#13. Woodland Mushroom Slice Ornaments
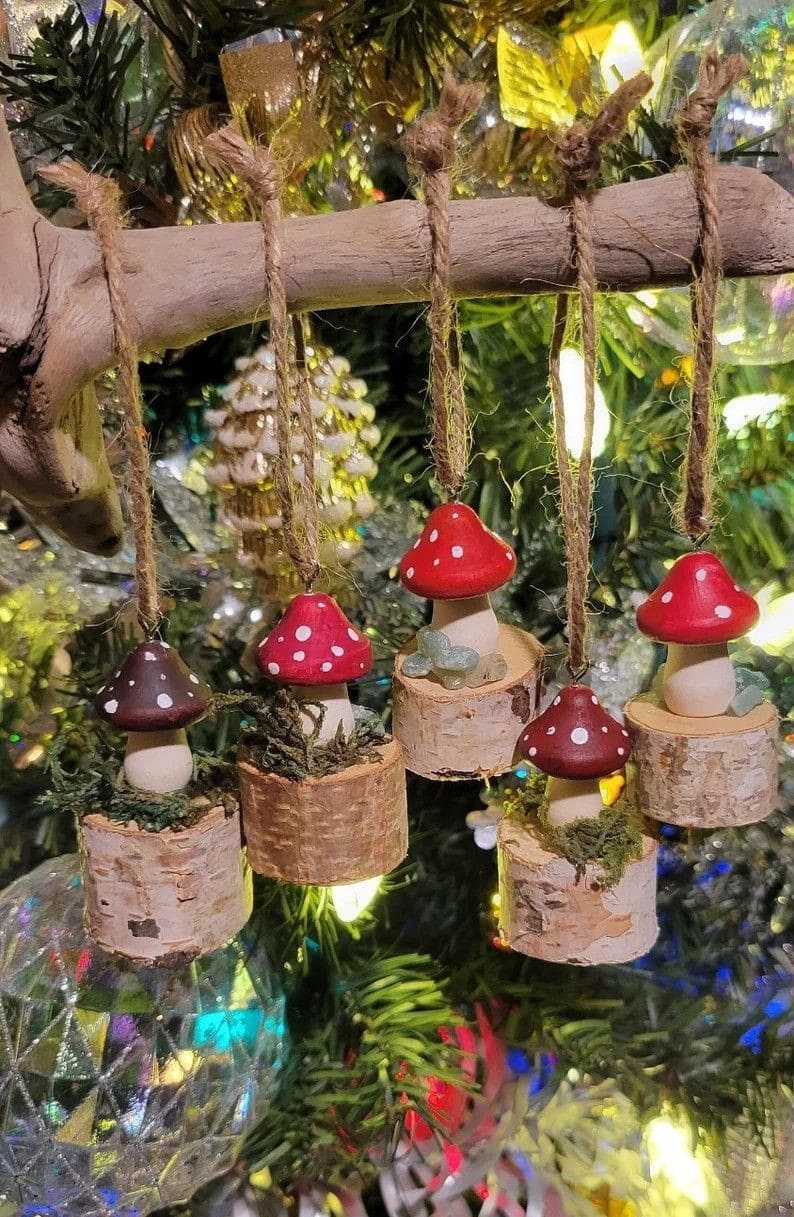
These sweet little mushroom ornaments look like they’ve been gathered from a fairy village deep in the forest. Each one is perched on a slice of real birch wood, complete with natural bark and moss accents.
The tiny toadstools, with their bright red or rich brown caps dotted in white, add a dash of woodland magic to your holiday tree or rustic décor.
Materials Needed
- 5 birch wood slices (1.5″ to 2″ diameter)
- 5 miniature mushroom figurines (1″ to 1.5″ height)
- Small tufts of faux moss (1-2 oz)
- 10″ length jute twine per ornament
- Hot glue gun with 2 glue sticks
Step-by-step Guide
Step 1: Glue a miniature mushroom to the center of each birch slice.
Step 2: Add small patches of moss around the base for a forest-floor look.
Step 3: Cut and loop jute twine, then glue or staple it to the back for hanging.
Step 4: Finally, hang them on your tree, along a garland, or from a rustic branch display.
#14. DIY Painted Acorn Cap Mushrooms
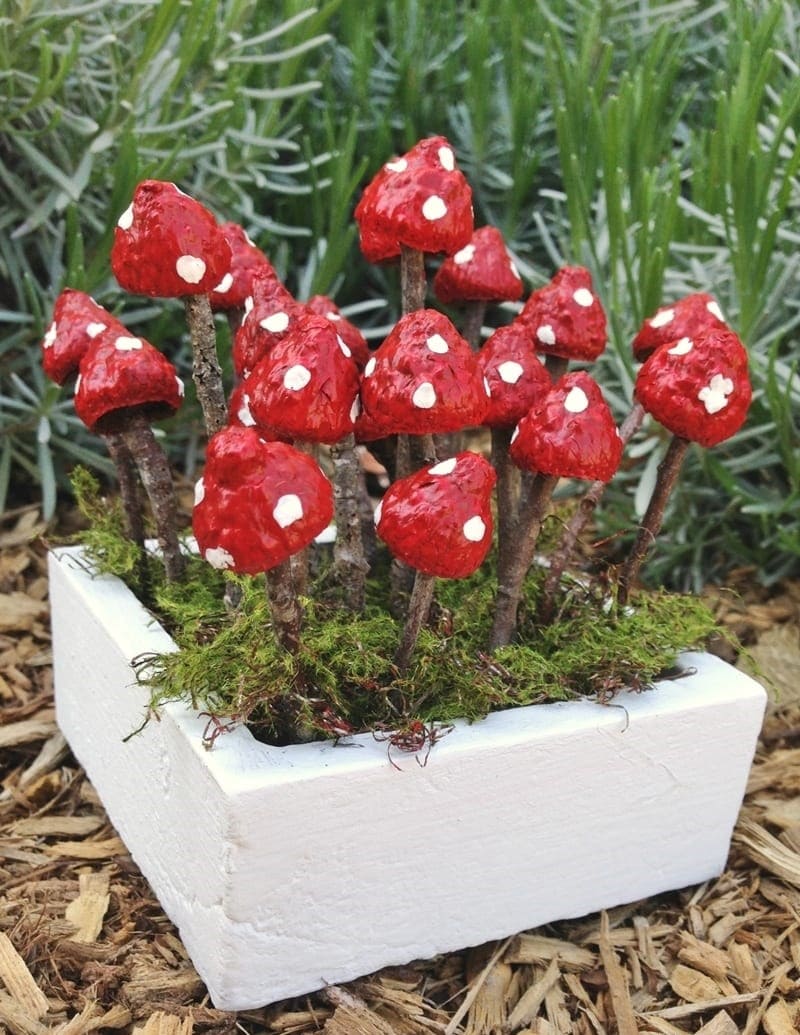
These whimsical acorn cap mushrooms bring instant fairy garden magic to your yard or planter. The caps are hand-painted in bright red with charming white dots, mimicking the iconic toadstool look.
Mounted on twig stems and set in a moss-covered base, they create a delightful miniature forest scene.
This project is small enough for a windowsill but striking enough to stand out in a garden bed.
Materials Needed
- 20-25 large acorn caps (about 1-1.5″ diameter each)
- 20-25 twigs (4-6″ long)
- Red acrylic paint (2 oz)
- White acrylic paint (1 oz)
- Paintbrushes – 1 fine tip, 1 medium
- Small wooden planter box (6″ × 6″ × 3″)
- Preserved moss (2 cups)
- Hot glue gun with glue sticks
Step-by-step Guide
Step 1: Paint each acorn cap red, let dry, then add small white spots using a fine brush. Then allow to dry fully.
Step 2: Hot glue each cap onto one end of a twig, holding in place until secure.
Step 3: Fill the wooden box with preserved moss, pressing it down for stability.
Step 4: Next, insert the twig mushrooms into the moss, arranging at varying heights for a natural cluster look.
Step 5: Adjust spacing, and your fairy garden mushrooms are ready to display indoors or outdoors.
#15. Glowing Toadstool Mushroom Lamps
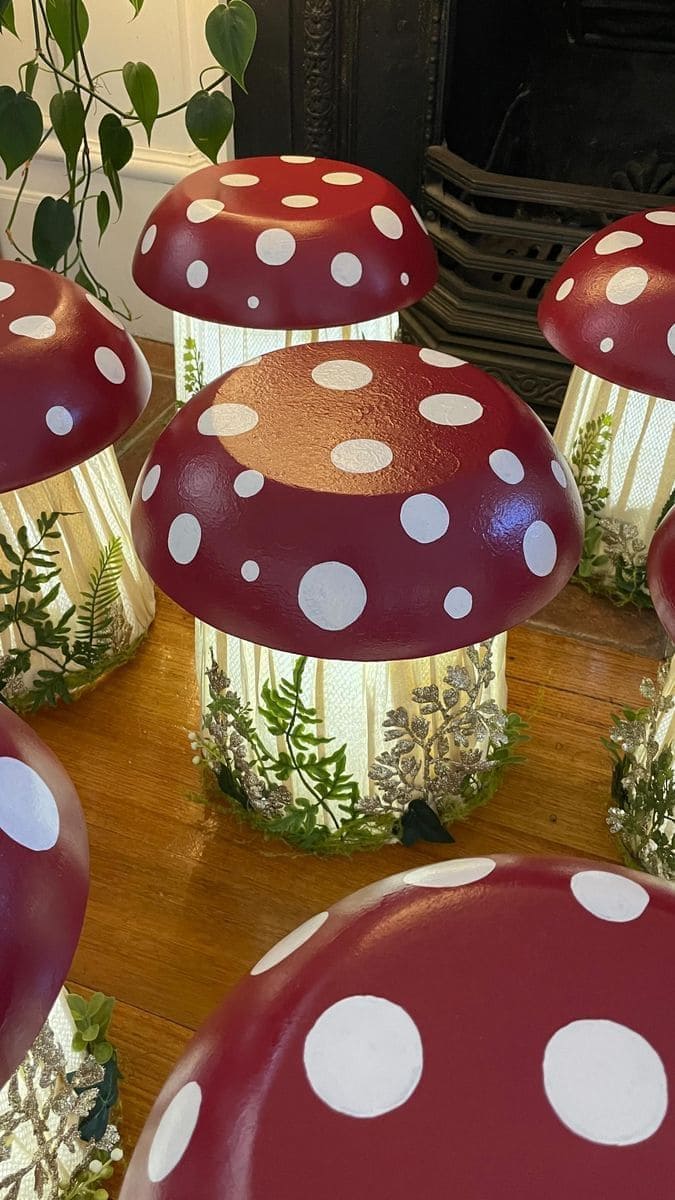
These magical mushroom lamps look like they’ve been lifted straight from an enchanted forest and given a cozy indoor home.
Their bold red caps with crisp white spots bring a playful fairy-tale charm, while the soft glow from within creates a warm, inviting atmosphere.
Bonus, ferns and leafy details at the base make them feel rooted in nature, even though they’re perfect for a bedroom, reading nook, or whimsical party setup.
Materials Needed
- 1 large plastic bowl – 12″ diameter
- Red acrylic paint (4 oz)
- White acrylic paint (2 oz)
- 1 cylindrical lamp base (10″ to 12″ height)
- Artificial ferns and leaves
- Hot glue gun with 2-3 glue sticks
- Small paintbrush
Step-by-step Guide
Step 1: Paint the outside of the bowl red, letting it dry completely before adding large white spots for the classic toadstool look.
Step 2: Secure the bowl upside-down on top of the lamp base, ensuring the light can shine through beneath.
Step 3: Decorate the base with faux ferns and leafy accents for a woodland touch.
Step 4: Now you can switch on the lamp and enjoy the soft, enchanting glow.
#16. Dried Orange Peel Woodland Mushroom
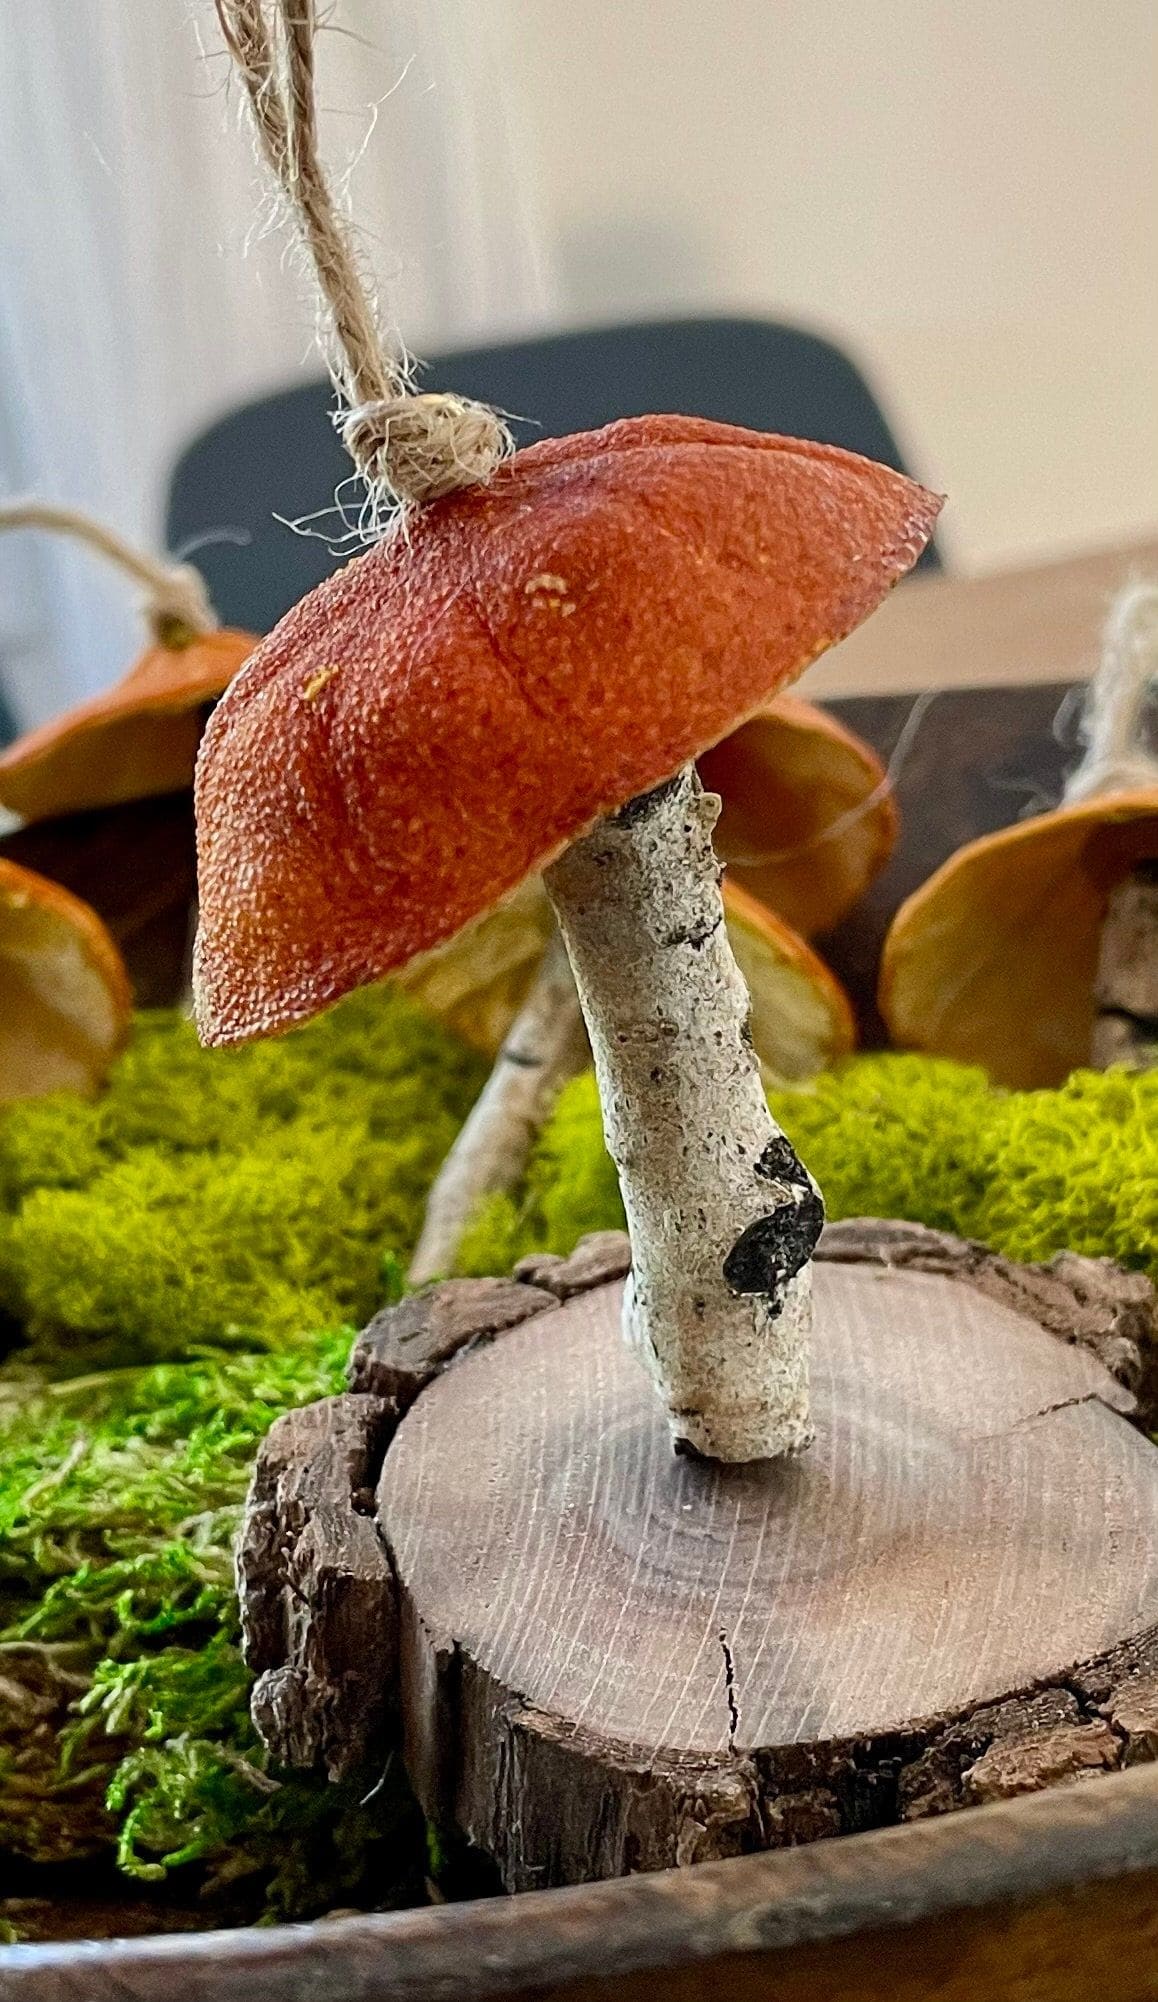
This little mushroom carries the scent of the forest and a whisper of citrus in its creation. The cap is made from a dried orange peel, its warm, rustic hue giving it an autumn glow.
Also, a small twig forms the stem, bringing natural texture and character to the piece, while a slice of wood acts as a sturdy base.
You can add a loop of jute twine, and it transforms into a charming ornament, perfect for hanging in a kitchen, on a rustic wreath, or as part of a woodland centerpiece.
Materials Needed
- 1 dried orange peel cap – approx. 2.5″ diameter
- 1 twig stem (4″ length)
- 1 small wood slice – 3″ diameter
- 6″ length jute twine
- Hot glue gun with 1-2 glue sticks
Step-by-step Guide
Step 1: Choose a curved piece of dried orange peel that naturally mimics a mushroom cap.
Step 2: Glue the twig to the center underside of the peel.
Step 3: Secure the base of the twig to the wood slice so it stands upright.
Step 4: Tie the jute twine into a loop and glue it to the top for hanging, or leave it off for a tabletop decoration.
#17. Large Outdoor Coco Fiber Mushrooms
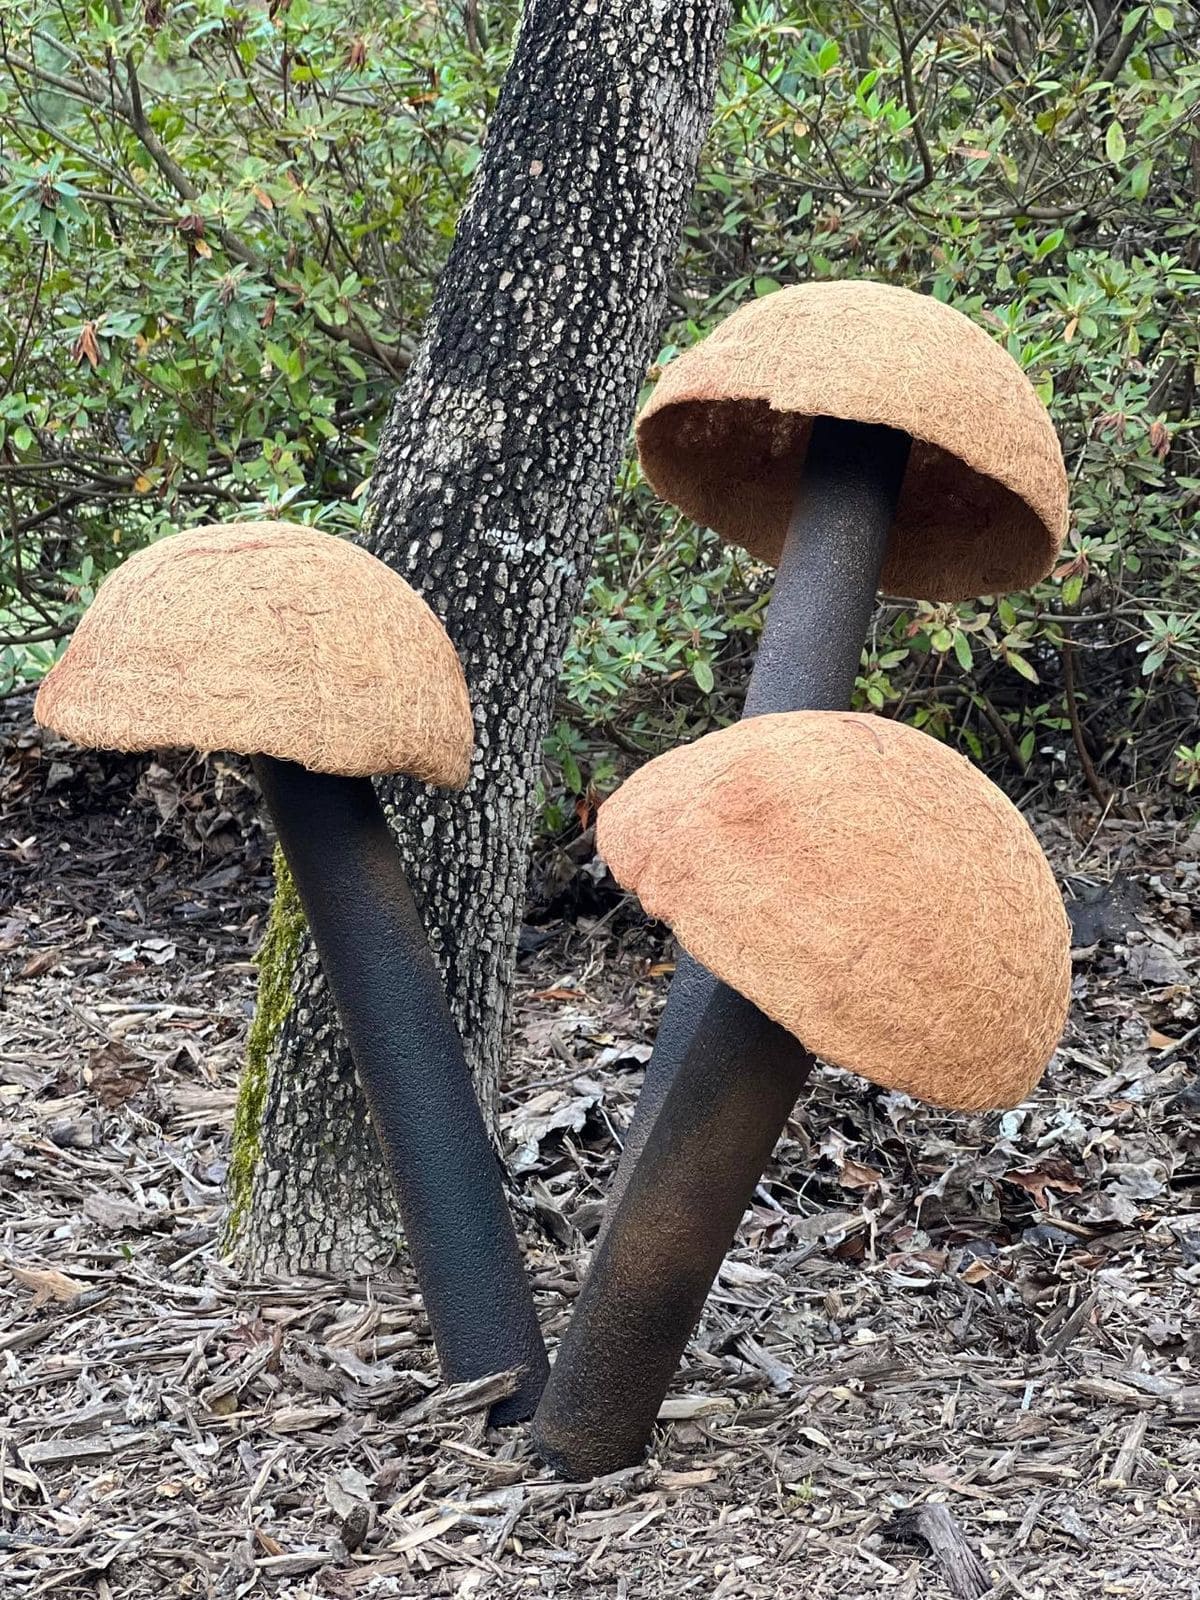
These oversized mushrooms make a bold statement in any garden or woodland path. With tall, angled stems and large domed caps covered in natural coco fiber, they blend seamlessly into outdoor landscapes while still catching the eye.
Their earthy texture and weather-resistant build make them perfect for year-round display. Plus, placed in clusters, they give the illusion of giant fungi sprouting naturally from the ground
Materials Needed
- 3 large PVC or metal pipes (24″ to 36″ length, 3″ diameter)
- 3 half-sphere coco fiber liners (12″ to 14″ diameter)
- Black outdoor spray paint (1 can)
- Outdoor adhesive
- Shovel
Step-by-step Guide
Step 1: Paint the pipes with outdoor spray paint, giving them a matte, natural look. Let dry completely.
Step 2: Attach each coco fiber liner to the top of a painted pipe using heavy-duty outdoor adhesive.
Step 3: Dig holes in the desired garden spot, deep enough to hold each pipe securely at an angle.
Step 4: Insert the stems into the holes, packing soil firmly around the base.
Step 5: Finally, arrange the mushrooms in a small group for a natural, clustered effect.
#18. Woodland Mushroom Clothespin Clips
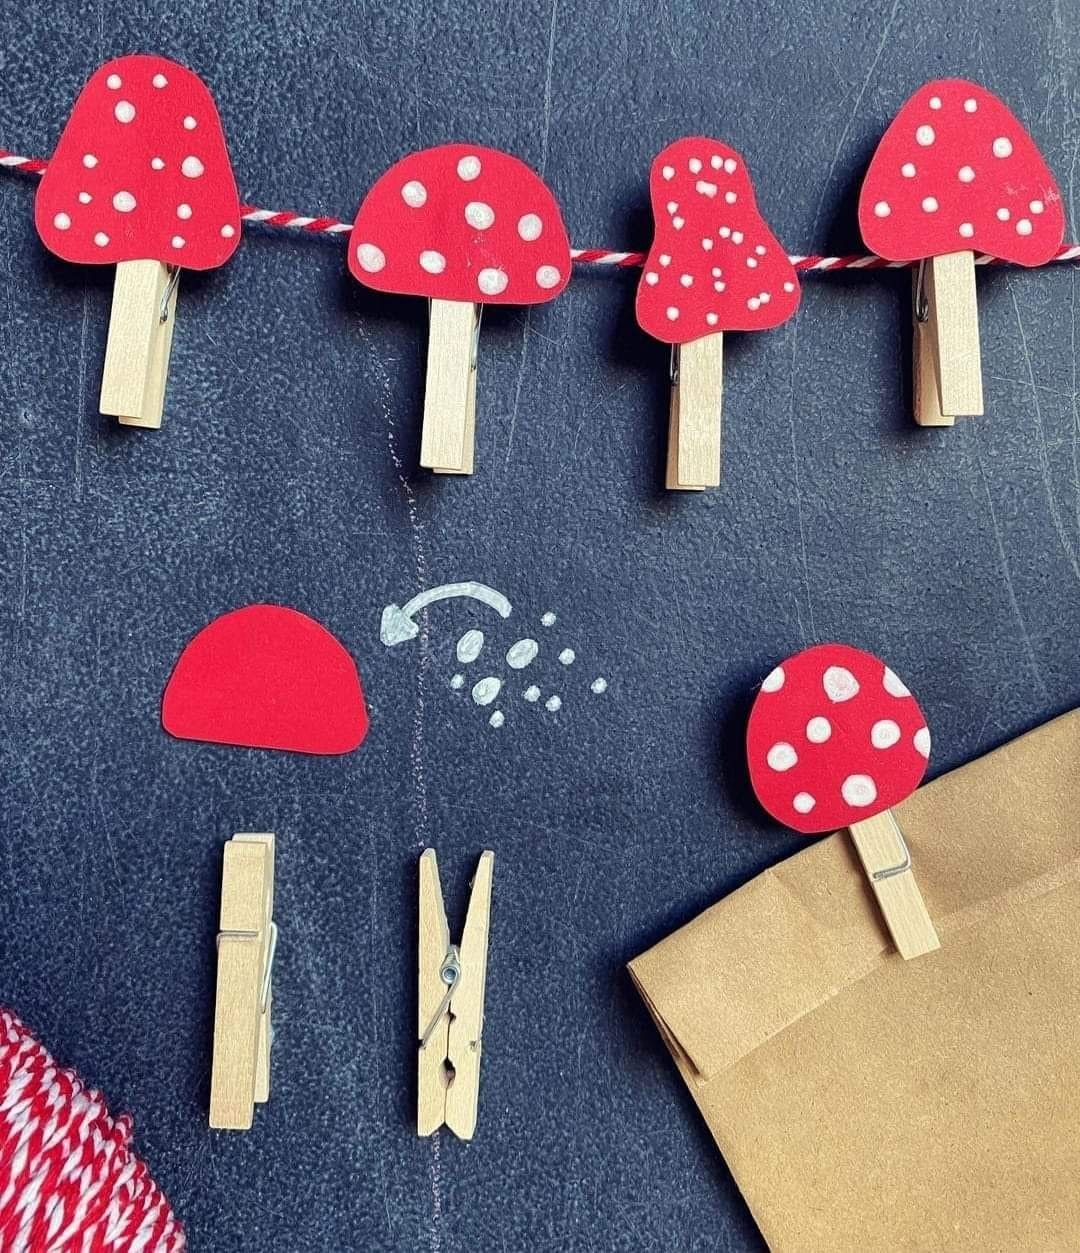
These little mushroom clothespin clips are the kind of craft that instantly makes you smile. Bright red caps dotted with whimsical white spots feel like they’ve hopped right out of a fairy tale.
They’re perfect for hanging gift bags, stringing photos, or even decorating a festive garland.
Bonus, the beauty is in their simplicity, a few snips, a dab of paint, and suddenly your everyday clothespins are transformed into tiny forest treasures.
Materials Needed
- 6 wooden clothespins (3″ length)
- 6 red cardstock mushroom caps (about 2″ wide)
- 1 small paintbrush
- White acrylic paint (1 oz)
- 1 bottle craft glue
Step-by-step Guide
Step 1: Cut out mushroom cap shapes from red cardstock, you can play with curves so each has its own personality.
Step 2: Using the tip of your paintbrush, dab on white spots. Imperfect circles give them a natural, storybook look.
Step 3: Once the paint dries, glue the cap to the top half of a clothespin.
Step 4: Clip them onto a twine garland, gift bag, or photo string and watch the magic happen.
#19. Mini Clay Mushroom Skewers
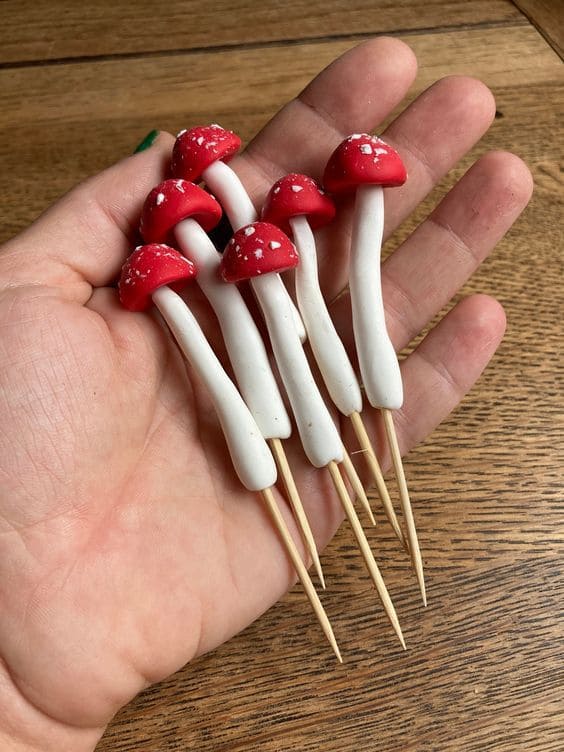
Wow, these slender little mushrooms look like they could have been plucked straight from a magical forest, only they’re made by hand and built to last.
Their elongated white stems and bright red caps, speckled with tiny white flecks, bring an enchanting touch to planters, fairy gardens, or even food displays.
Once you’ve made a batch, you’ll find they’re perfect for tucking into arrangements or gifting as whimsical garden picks.
Materials Needed
- 100 g white polymer clay
- 50 g red polymer clay
- 6 bamboo skewers (6″ length)
- White acrylic paint
- 1 fine-tip paintbrush
Step-by-step Guide
Step 1: Roll the white clay into thin, tapered stems, let them have a natural curve so they feel lifelike.
Step 2: Shape small domes from red clay for caps and gently press them onto the stem tops.
Step 3: Insert a skewer into the base of each stem, twisting slightly so it holds securely.
Step 4: Bake the clay according to package directions, then let cool.
Step 5: Flick tiny white paint speckles onto the caps for a wild-foraged look.
#20. Pastel Fabric and Wood Mushrooms
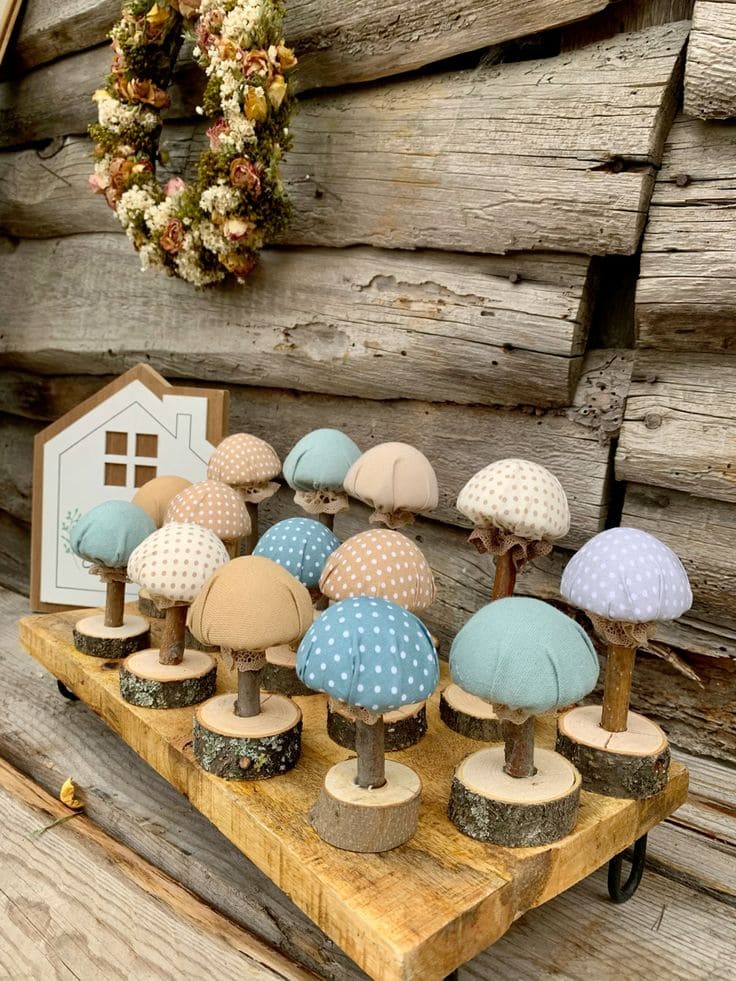
With soft, fabric-covered caps in shades of blue, cream, and beige, some sprinkled with dainty polka dots, these charming pastel mushrooms feel both rustic and refined.
The stems are made from natural twigs, giving each piece its own unique character, and the bases are crafted from wood slices for a sturdy, earthy foundation.
Displayed together, they create a sweet little forest scene that’s perfect for a mantel, tabletop centerpiece, or seasonal shelf styling.
Materials Needed
- 10-12 small fabric scraps (5″×5″, pastel and patterned)
- 10-12 twig stems (3″ to 4″ length)
- 10-12 wood slices (2″ to 2.5″ diameter)
- Polyester stuffing (1 cup)
- Hot glue gun with 3 glue sticks
- Scissors
Step-by-step Guide
Step 1: Cut a circle from each fabric scrap, about 4″ in diameter.
Step 2: Sew a loose running stitch around the edge, pull slightly to create a pouch, and stuff lightly.
Step 3: Insert a twig stem into the center opening, then tighten the stitch and glue to secure.
Step 4: Glue the bottom of the twig stem to the wood slice base.
Step 5: Finally, arrange your mushrooms together for a clustered woodland effect.
See more: 20 Fabric Scrap Projects You Must Try Before Trashing Them
