Gardeners know the joy of digging into soil but not the frustration of digging through a messy pile of tools.
If you’ve ever wasted precious planting time hunting for your missing trowel or tangled hose, you’re not alone.
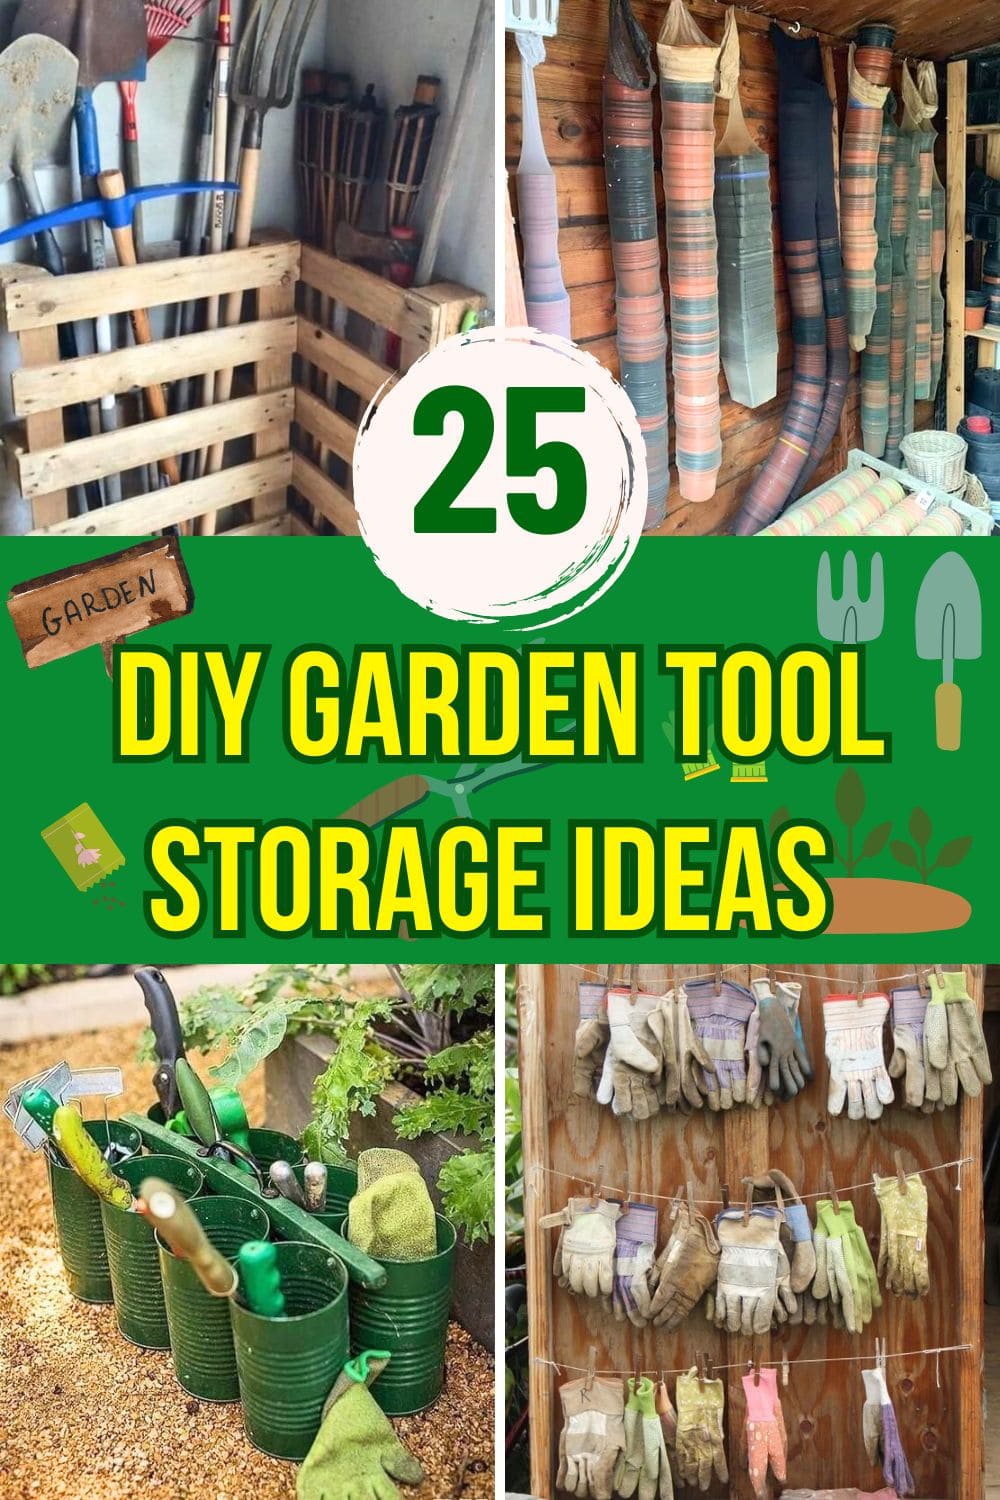
Shovels lean against fences, gloves vanish, and pruners seem to migrate everywhere except where you need them.
This collection of 25 clever DIY garden tool storage ideas will help you reclaim your space, stay organized, and keep your gardening rhythm smooth.
#1. Rustic Pallet Garden Tool Cabinet
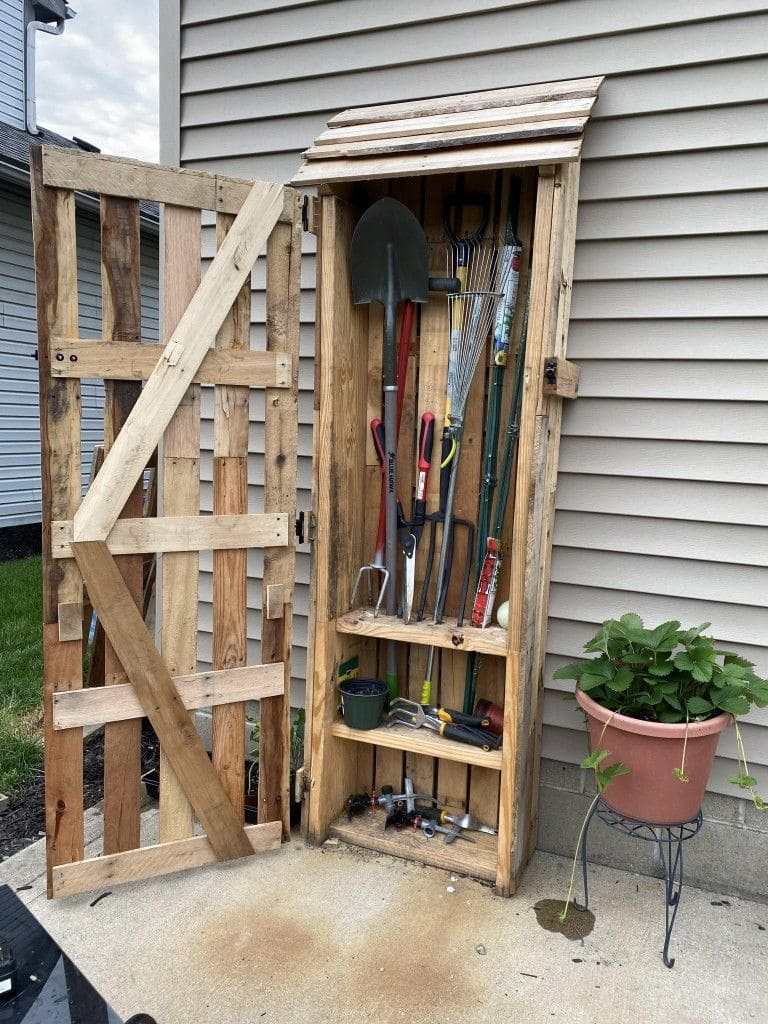
For anyone who loves the charm of upcycled wood, this pallet garden cabinet is a practical gem.
It keeps long-handled tools like rakes and spades upright and orderly, while the built-in shelves provide space for shears, gloves, seeds, and small planters.
Also, the pitched roof and rustic slatted door not only protect the contents but give it a countryside look that fits beautifully alongside any shed or wall.
Materials Needed
- Wood pallets or reclaimed boards
- Nails or wood screws
- Hinges and a latch
- Optional: wood sealer or outdoor paint
Step-by-step Guide
Step 1: Cut pallets to create the cabinet frame and back panel. Then assemble and secure upright.
Step 2: Add interior hooks or small nails to hang tools and build simple shelves using extra planks.
Step 3: Attach a slatted door and a small overhang roof to shield tools from rain.
#2. Corner Pallet Tool Corral
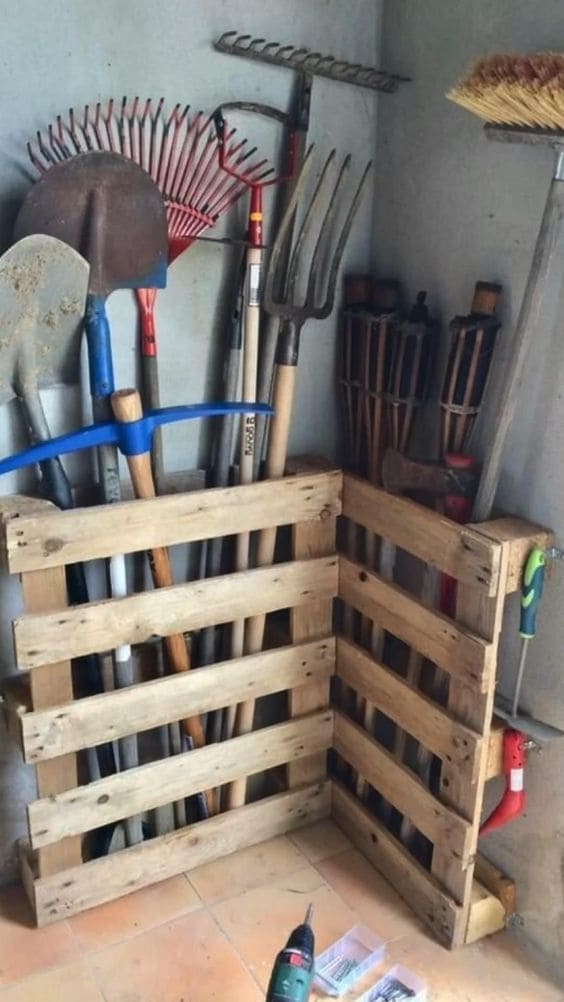
When you’ve got a pile of long-handled tools toppling every time you grab a rake, it’s time to reclaim that forgotten corner.
This clever corner pallet setup corrals chaos using just two reclaimed wood pallets, giving your brooms, hoes, and shovels a tidy standing home.
Of course, this project is rugged, functional, and fits seamlessly into even the smallest garden sheds.
Materials Needed
- 2 wooden pallets
- Screws or nails
- Drill or hammer
- Optional: L-brackets for added stability
Step-by-step Guide
Step 1: Place two pallets upright in an L-shape, snug in a corner where tools are easily accessible.
Step 2: Screw or nail the pallets together where they meet, reinforcing with L-brackets if desired.
Step 3: Slide in your long-handled tools so they stand upright between the slats for quick grab-and-go use.
Tip: You can add a small block of wood at the base as a stopper if you’re placing the pallets on a slippery surface.
#3. Wall-Mounted Folding Potting Station
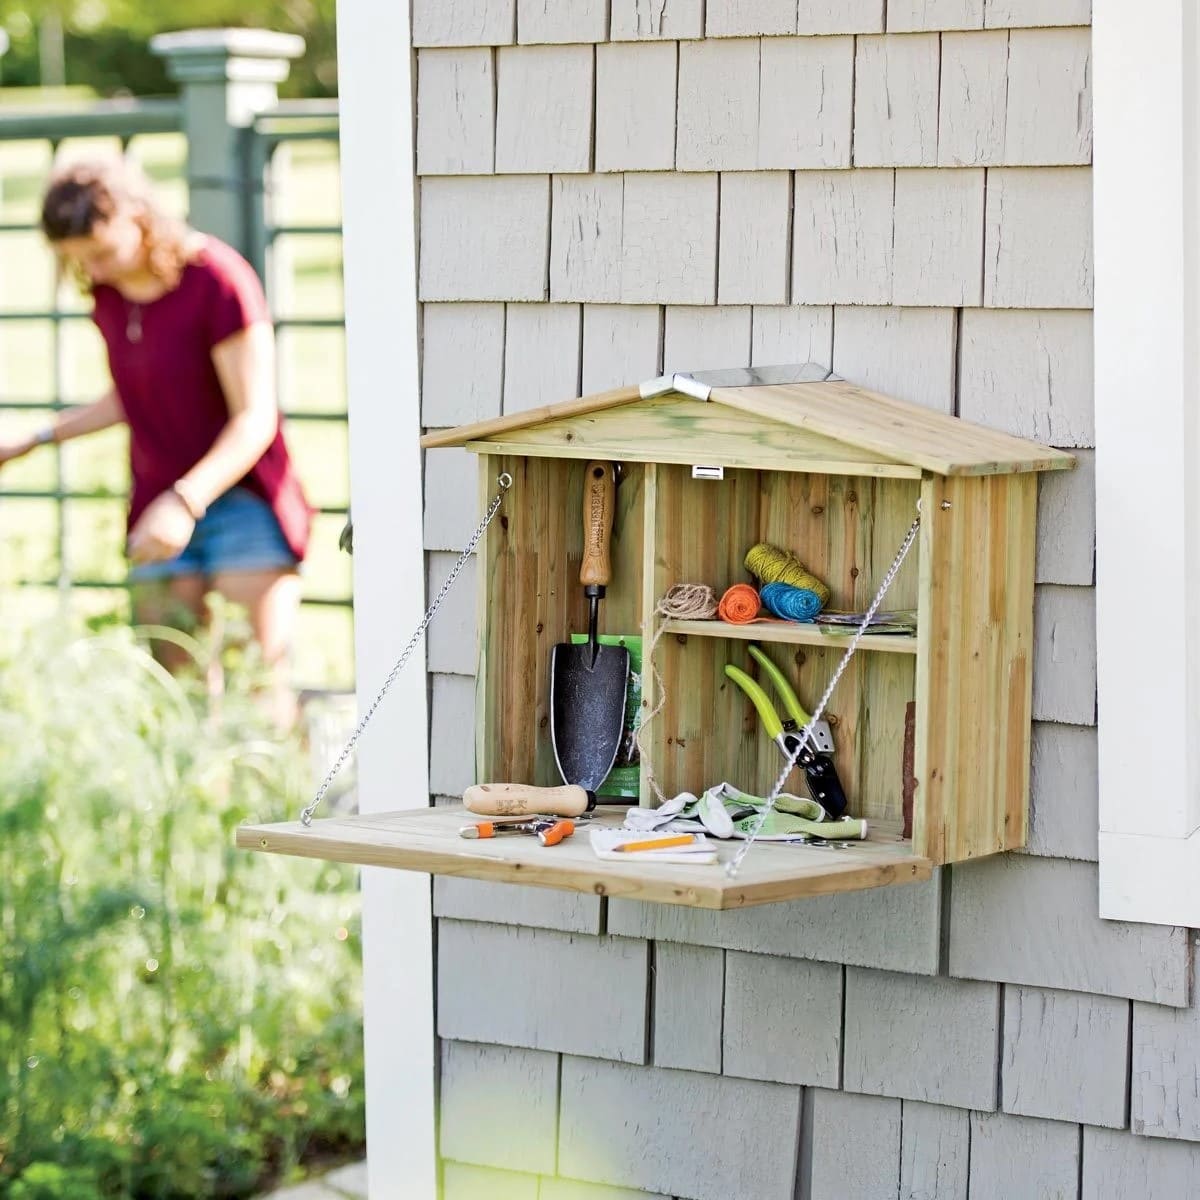
If you’re short on garden space but love a good project nook, this wall-mounted folding station is a must-have.
Compact when closed, yet fully functional when opened, it doubles as a prep table and tool shelf in one neat design.
Inside, there’s just enough room for twine, gloves, hand tools, and seed packets.
When you’re done potting or trimming, simply fold the door back up and secure it.
Materials Needed
- Wood boards or pre-cut lumber
- Chains and hinges
- Screws and drill
- Optional: outdoor wood sealer
Step-by-step Guide
Step 1: Build a small open box with dividers for shelves and mount it securely to a wall.
Step 2: Attach a wooden panel with hinges for the fold-down tabletop.
Step 3: Finally, use chains on each side to support the door when open, turning it into a stable work surface.
#4. Vintage Wall Hook Garden Display
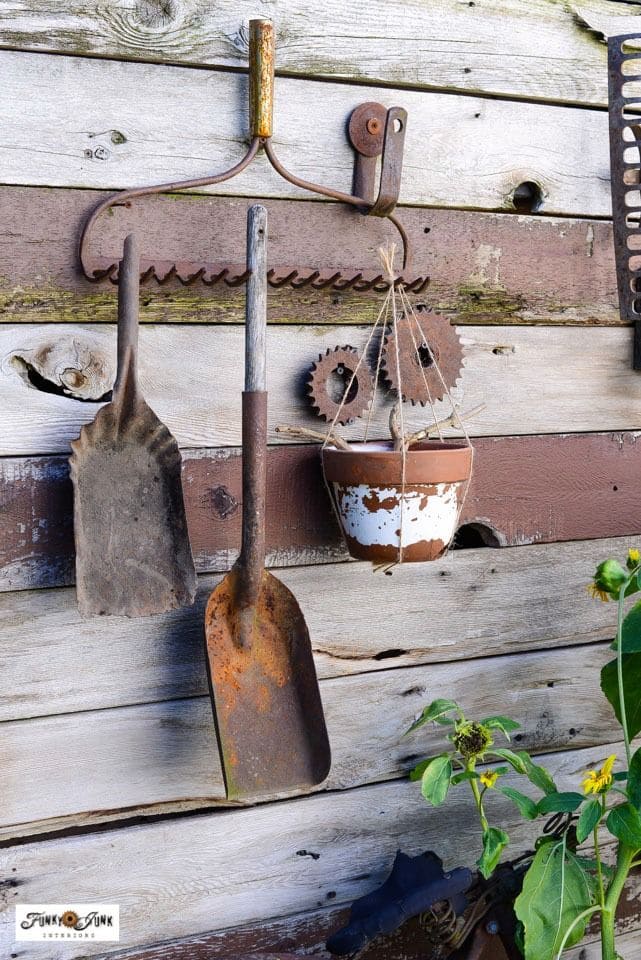
Old tools, industrial scraps, and weathered wood come together in this rustic garden wall that feels both purposeful and poetic.
Using vintage rakes, sprockets, and metal hardware, this wall becomes more than storage, it’s a reclaimed art installation.
The hanging terracotta pot adds charm and softens the metal-heavy display, while the rusty patina on each piece tells its own history.
Materials Needed
- Reclaimed wooden boards (varied lengths)
- Old metal tools (shovels, rakes, gears, handles)
- Sturdy nails or hooks
- Optional: Hanging terracotta planter and rope
Step-by-step Guide
Step 1: Choose a section of your shed wall or fence with aged or reclaimed wood as the base.
Step 2: Arrange tools and parts in a pleasing, balanced layout before securing them with hooks or heavy-duty nails.
Step 3: Add visual flair with a small hanging planter, using rustic rope or twine to complete the old-world feel.
#5. Rustic Toy and Boot Crate Organizer
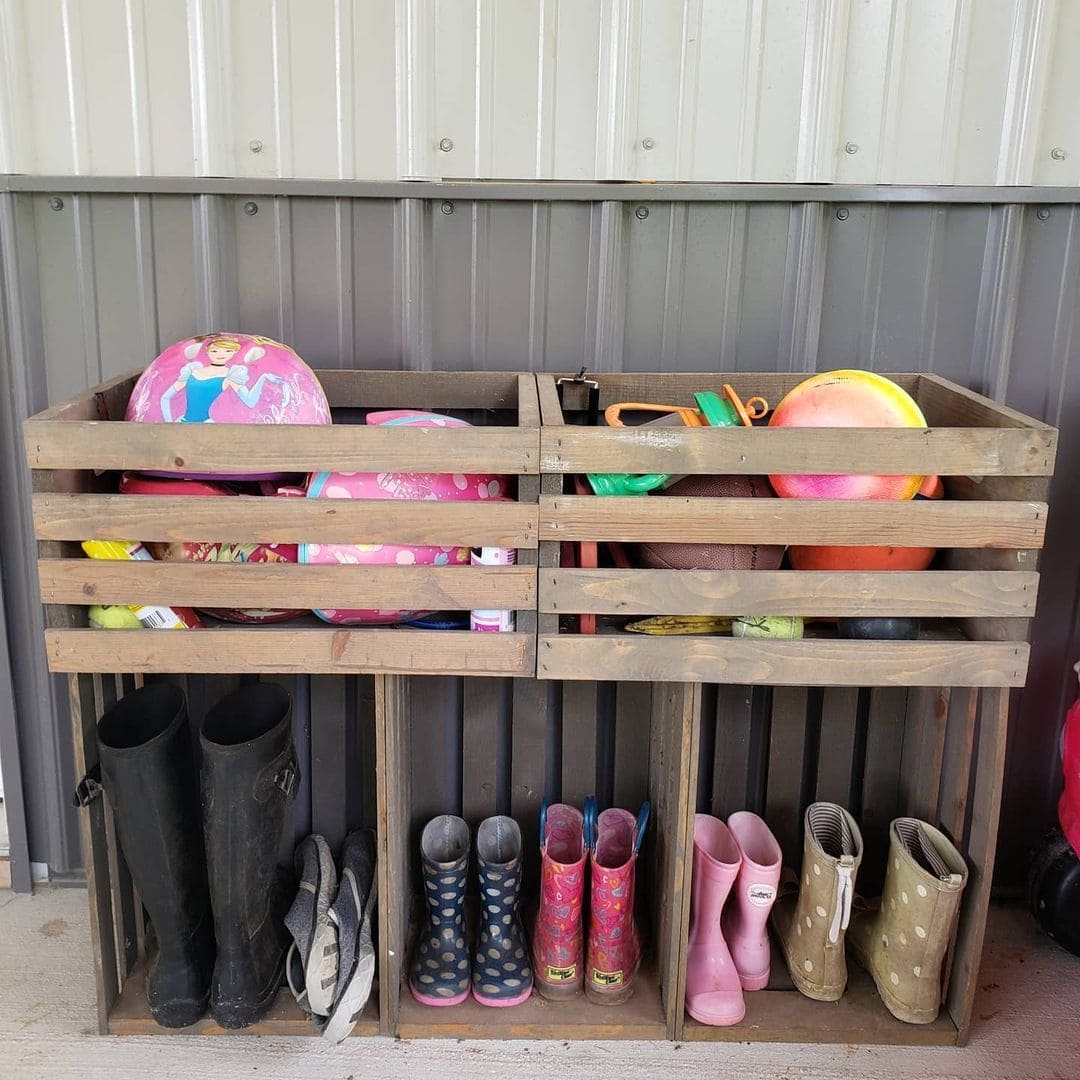
Wow, this setup nails both function and charm for families with kids and outdoor gear.
Using simple wooden crates stacked into a shelving unit, it keeps muddy boots off the porch and rogue balls and toys from taking over the yard.
Plus, the open slats allow airflow, perfect for damp shoes while the deep upper bins can catch everything from jump ropes to soccer balls.
It’s a great solution for front porches, mudrooms, or garage walls where clutter tends to collect.
Materials Needed
- Wooden crates (same size for balance)
- Drill and wood screws
- Wood stain or sealer (optional)
- Sandpaper (if using reclaimed wood)
Step-by-step Guide
Step 1: Sand down any rough crate edges and stain if desired for a polished finish.
Step 2: Stack crates vertically and horizontally to form cubbies—two on top for toys, three on bottom for boots.
Step 3: Secure crates together with screws or metal brackets for added stability.
#6. Repurposed Mailbox Garden Tool Holder
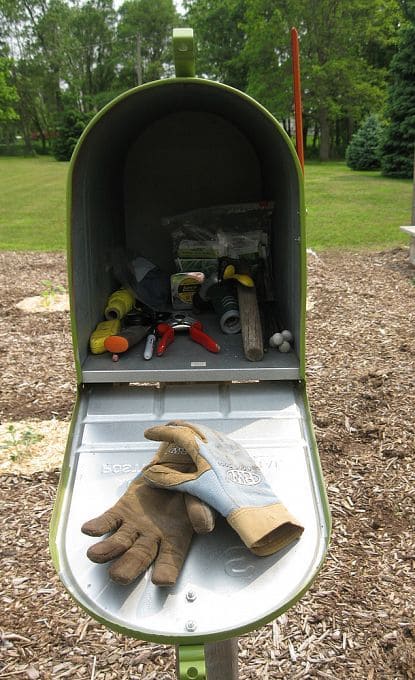
This clever project transforms an old mailbox into a practical storage station for your gardening essentials.
By keeping it close to your garden beds, you’ll save countless trips back and forth to the shed.
Gloves, pruners, seed packets, and small hand tools fit neatly inside, while the door can even act as a temporary shelf while you work.
Materials Needed
- 1 old or unused mailbox (standard or large size)
- Post or stand for mounting
- Screws or mounting hardware
- Gardening tools and gloves
- Optional: weatherproof paint
Step-by-step Guide
Step 1: Choose a sturdy mailbox that opens easily and has enough space to hold your basic garden tools.
Step 2: Mount the mailbox on a post or stand near your garden, making sure it’s at a comfortable height for reaching inside.
Step 3: Secure it with screws or mounting brackets so it won’t wobble or tilt.
Step 4: (Optional) Paint or seal the mailbox with weatherproof paint to help it last longer outdoors.
Step 5: Stock the mailbox with your most-used garden essentials such as gloves, pruners, twine, seed packets, and small hand tools.
#7. Over-the-Door Pocket Organizer for Garden Tools
Sometimes the simplest solutions are hiding in your closet.
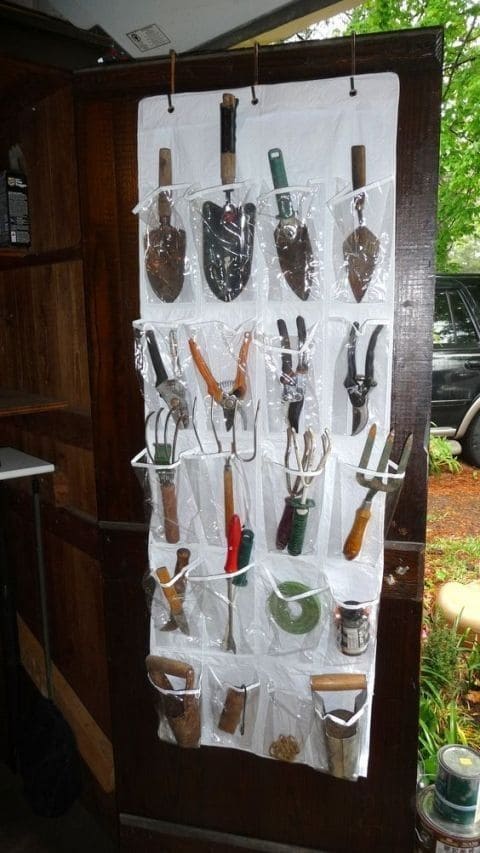
You can see a clear plastic shoe organizer, hung over a shed or garage door, transforms into the ultimate vertical storage hack for your garden tools.
Each pocket keeps items separate, visible, and within easy reach, no more rummaging around in boxes or losing pruners under a pile of gloves.
This setup makes use of vertical space in a way that feels smart and satisfying, especially if you’re tight on storage room.
Materials Needed
- Over-the-door clear shoe organizer (plastic or canvas)
- Sturdy door or wood panel
- Hooks or nails
- Small to medium garden tools
Step-by-step Guide
Step 1: Choose a spot like the inside of your shed door or a nearby wall. Then hang the shoe organizer using over-the-door hooks or screws.
Step 2: Slide one tool into each pocket. Keep sharp ends down or tucked safely away to avoid snags or injuries.
Step 3: Group tools by type like trowels together, pruners with pruners to make it even easier when grabbing on the go.
Tip: You can label the pockets or use a small dry-erase marker on the plastic for seasonal tool swaps!
#8. Genius Plant Pot Storage Using Stockings
Never underestimate the power of stretchy nylon and a clever mind.
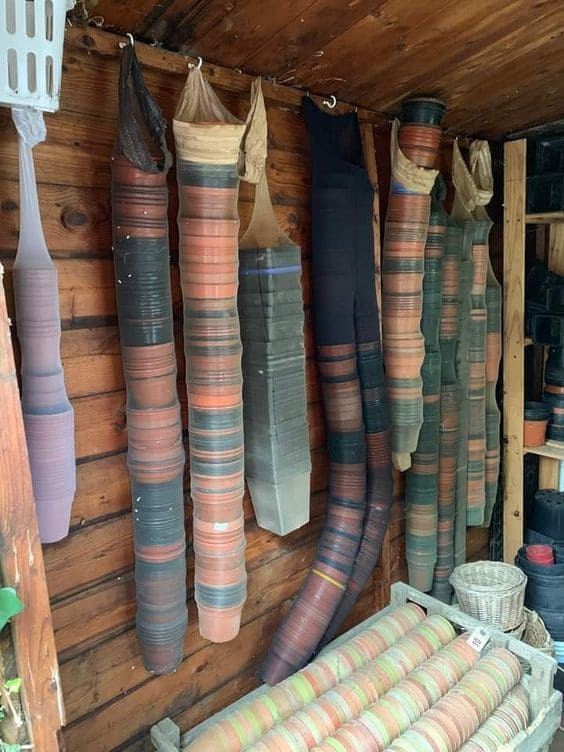
This unconventional garden hack transforms old pantyhose into vertical storage tubes for plastic pots, saving serious shelf space while keeping things neat and visible.
The elasticity holds the pots snugly, and the sheer fabric allows you to see how many you’ve got left without digging
I find this solution oddly satisfying like turning clutter into garden spaghetti.
Materials Needed
- Old nylon stockings or pantyhose
- Plastic plant pots (stackable)
- Hooks or nails
- Wood screws (if needed for hook support)
Step-by-step Guide
Step 1: Choose stockings without runs and stretch them gently to make space for the pots.
Step 2: Insert the pots one by one from the open end, stacking them vertically inside.
Step 3: Knot the top of the stocking securely and hang it from a wall hook or beam inside your shed.
Tip:
Use darker or patterned nylons to hide scuffs and create a more uniform appearance if you’re displaying them in open view.
#9. Recycled Tin Can Tool Caddy
What about giving your old tin cans a second life by turning them into a compact, earthy tool caddy?
This upcycled project keeps your garden essentials organized and close at hand, all while blending naturally into your outdoor space.
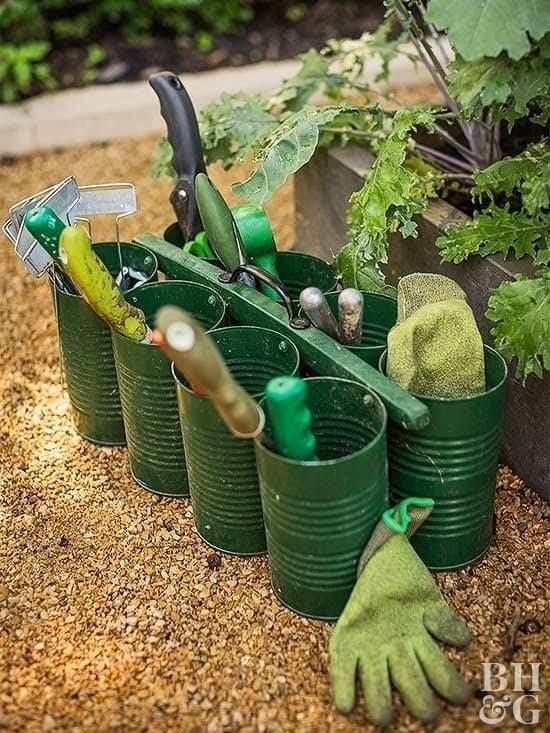
Painted in a deep green, these cans are fastened together with a sturdy strip and carry handle, forming a tidy little organizer with rustic charm.
It’s lightweight, surprisingly durable, and can be tucked right beside your garden bed so you’re never far from your gloves or trowel.
Materials Needed
- 6-8 clean tin cans (same size)
- Green spray paint (outdoor-safe)
- Strong adhesive or screws
- Metal or wood strip
- Drill (if attaching with screws)
Step-by-step Guide
Step 1: Wash and dry all cans thoroughly. Also, you need to remove any labels or sharp edges.
Step 2: Spray paint the cans and allow them to dry completely before handling.
Step 3: Arrange the cans in a row or cluster and secure them together using strong adhesive or drill and screws through the sides.
Step 4: Attach a handle across the top for easy carrying, making sure it’s well-balanced.
#10. Clothespin Glove Drying Station
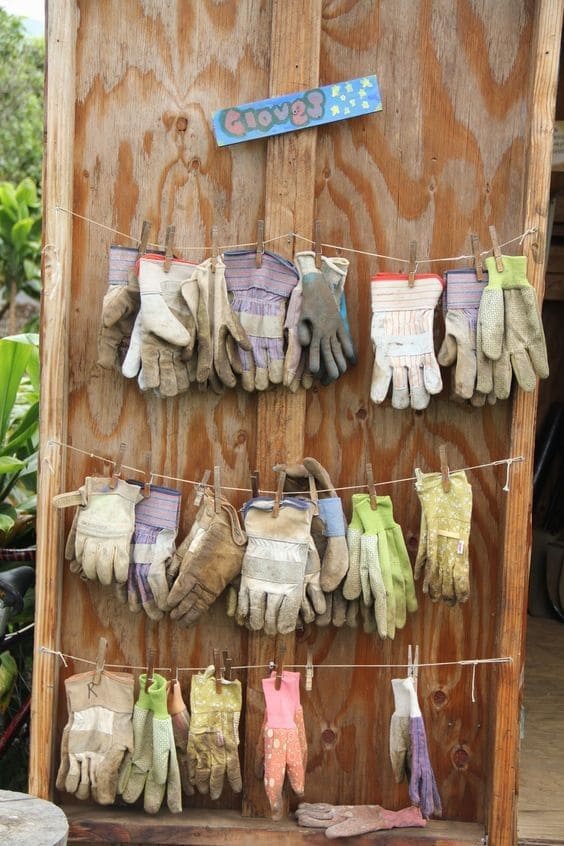
There’s something charmingly old-school about this glove storage idea, and it works as well as it looks.
By stringing up a few sturdy lines and using clothespins, this drying station gives every pair of gloves their own place to air out and dry.
It’s simple, efficient, and surprisingly delightful, especially when you see all the gloves lined up like garden soldiers ready for action.
Plus, the handmade “Gloves” sign adds a touch of playful personality.
Materials Needed
- Wooden board or shed wall
- Strong twine or clothesline cord
- Clothespins (wooden or plastic)
- Hooks or nails
- Optional: Decorative sign or label
Step-by-step Guide
Step 1: Choose a flat vertical surface like a wooden wall or panel near your garden shed or entrance.
Step 2: Attach hooks or nails in horizontal rows, then stretch and secure the twine across.
Step 3: Use clothespins to clip gloves along the line, pairing them together for easy grabbing.
#11. Hanging Watering Can Rack
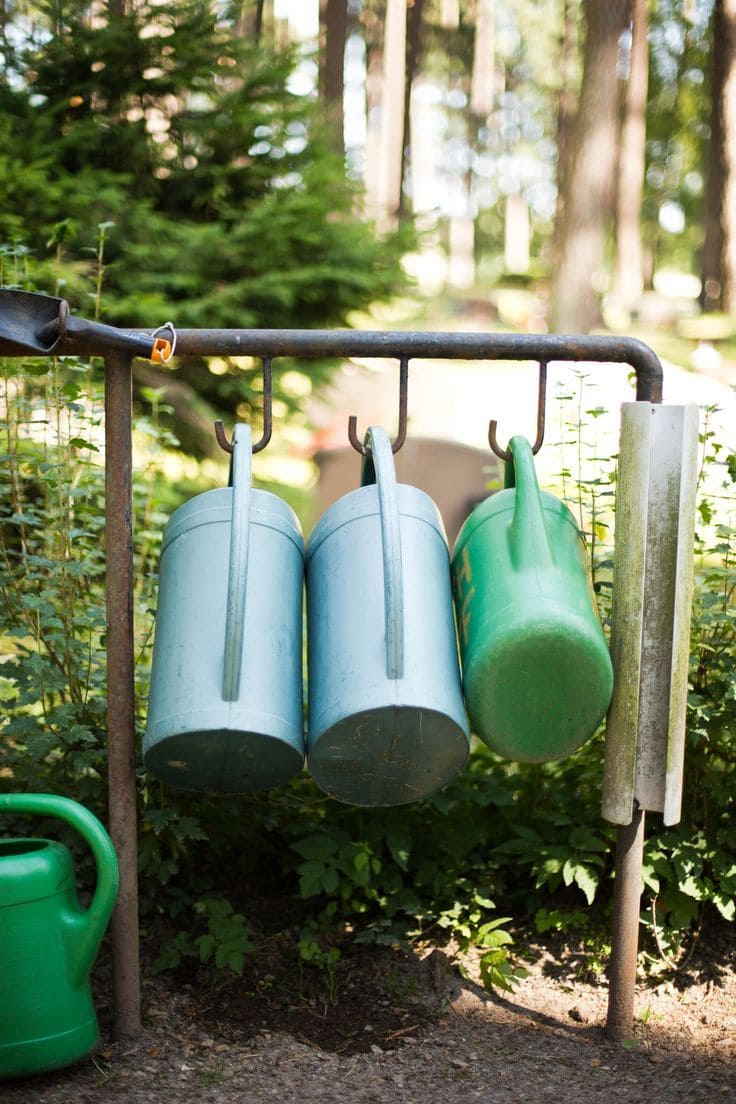
Look at this clever hanging rack! It not only keeps them off the ground and neatly stored, but it also helps them dry quickly and stay clean.
Mounted to a sturdy frame or fence post, the rack uses simple metal hooks to suspend each can by its handle.
Also, it brings both charm and function to your outdoor setup, blending rustic simplicity with smart storage.
Materials Needed
- Metal or wooden frame
- Heavy-duty metal hooks
- Screws or nails
- Watering cans with sturdy handles
Step-by-step Guide
Step 1: Install a horizontal metal or wooden bar between two vertical supports in your garden or shed area.
Step 2: Space out the metal hooks evenly and attach them securely to the bar using screws.
Step 3: Hang each watering can by its handle and make sure it sits balanced and stable.
Tip: Position the rack in a sunny or breezy spot to allow any leftover water to dry out faster between uses.
#12. Galvanized Hose Holder with Built-In Storage
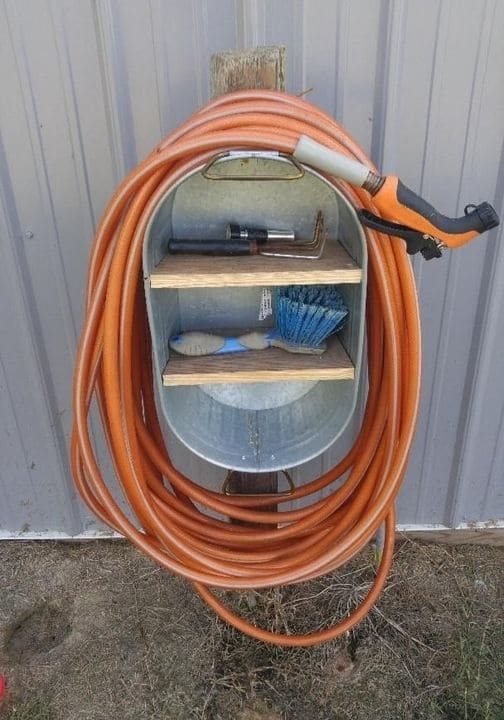
You can also give your garden hose a proper home with this clever upcycled bucket idea.
A galvanized tub mounted vertically doubles as a hose reel and a mini storage unit, making outdoor cleanups easier and more efficient.
With just two wooden planks added inside, it neatly cradles hose attachments, brushes, or gloves.
Plus, the rounded form naturally keeps the hose coiled without kinks or tangles.
Materials Needed
- Galvanized metal bucket or tub
- Two wooden planks (cut to fit width)
- Screws and drill
- Wall/post mounting hardware
- Garden hose and attachments
Step-by-step Guide
Step 1: Cut your wood planks to fit snugly across the inner width of the bucket. Then screw them in securely to form shelves.
Step 2: Use heavy-duty screws or brackets to attach the bucket to a fence post, shed wall, or garden panel.
Step 3: Wind your hose around the outside. Place nozzles, scrub brushes, and extra tools inside the shelves for easy reach.
Tip: Add drainage holes to the bottom if you store it in a rainy spot or want to prevent moisture buildup inside.
#13. Rustic Garden Tool Art Display
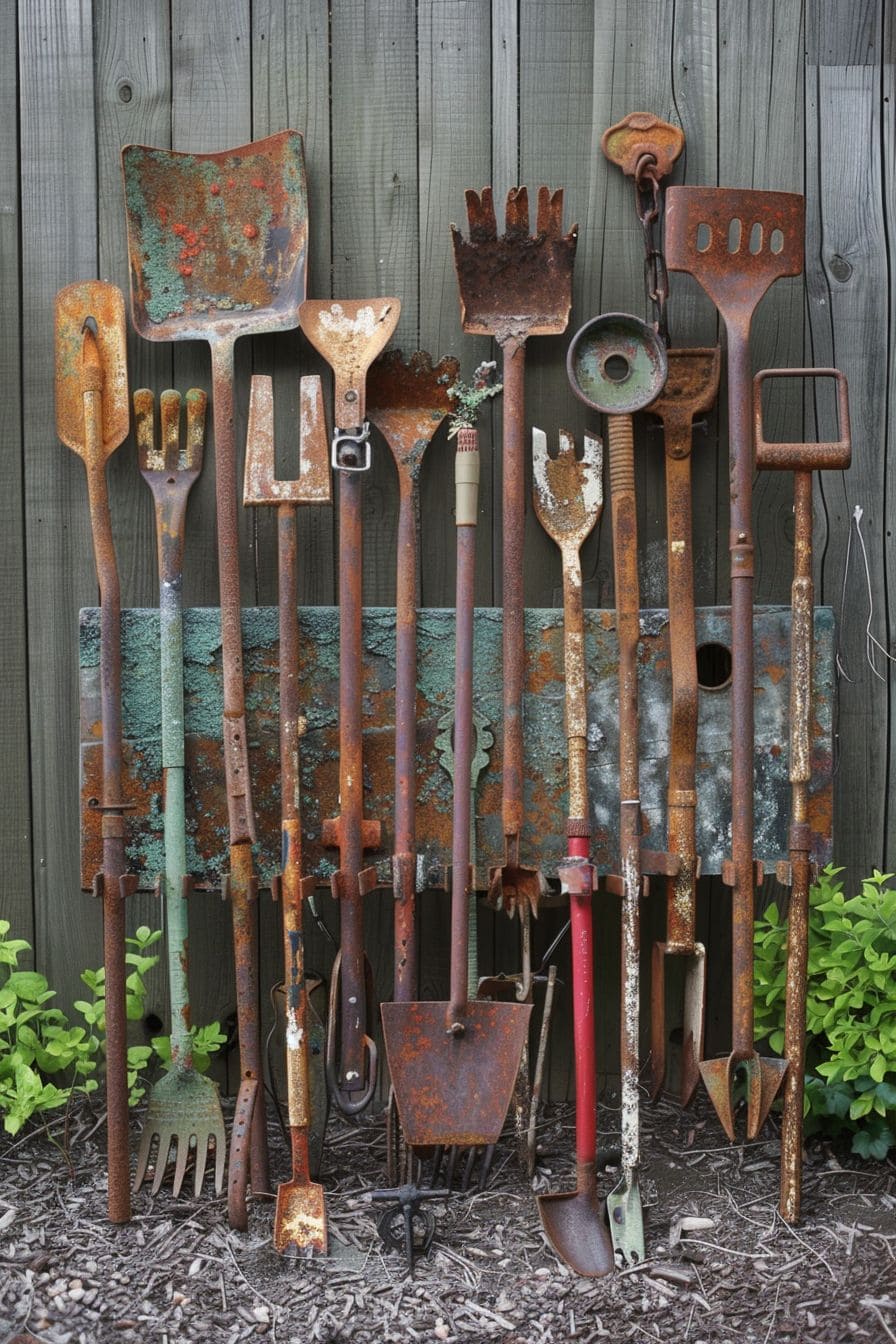
This creative setup blurs the line between functionality and outdoor art.
Old, rusted garden tools find new life as a vertical display, evoking nostalgia and personality while keeping your space organized.
Bonus, the patina show some worn smooth from use, others striking with flaked paint and moss.
Mounted against a weathered wooden fence, this storage becomes a focal point that’s rugged, soulful, and practical.
Materials Needed
- 1 weathered wooden plank or metal plate (approx. 36” x 12”)
- 10-15 old metal garden tools (rakes, shovels, hoes)
- Strong screws or welding equipment
- Optional: Rust sealer or matte clear coat
Step-by-step Guide
Step 1: Select your tools, opt for ones with character: rust, shape, or patina adds appeal.
Step 2: Attach your tools vertically to the backing plank using clamps, brackets, or welded hooks.
Step 3: Mount the entire display to your fence or shed wall, spacing it above mulch or soil for a tidy look.
#14. Garden Cubby

This delightful little cubby box tucked among the greenery invites both young hearts and curious gardeners to pause and share a moment of joy.
With its cheerful yellow message, this setup turns a simple wooden shelf into a community gem.
Also, you can make this a magical feature for visiting grandkids or a sweet neighborhood tradition.
Materials Needed
- Old wooden cubby shelf or wine crate
- Bright outdoor paint
- Paintbrush
- Small items to start your treasure collection
- Clear waterproof sealant (optional)
Step-by-step Guide
Step 1: Clean the cubby and sand down any rough spots. Then paint a kind, welcoming message across the top in vibrant color.
Step 2: Place your cubby in a dry, visible corner of the garden or trail area, using bricks or scrap wood to level it if needed.
Step 3: Add a few treasures of your own to start. You can also encourage others to leave or take something small, sparking ongoing magic.
#15. DIY Sand Bucket Tool Cleaner and Holder
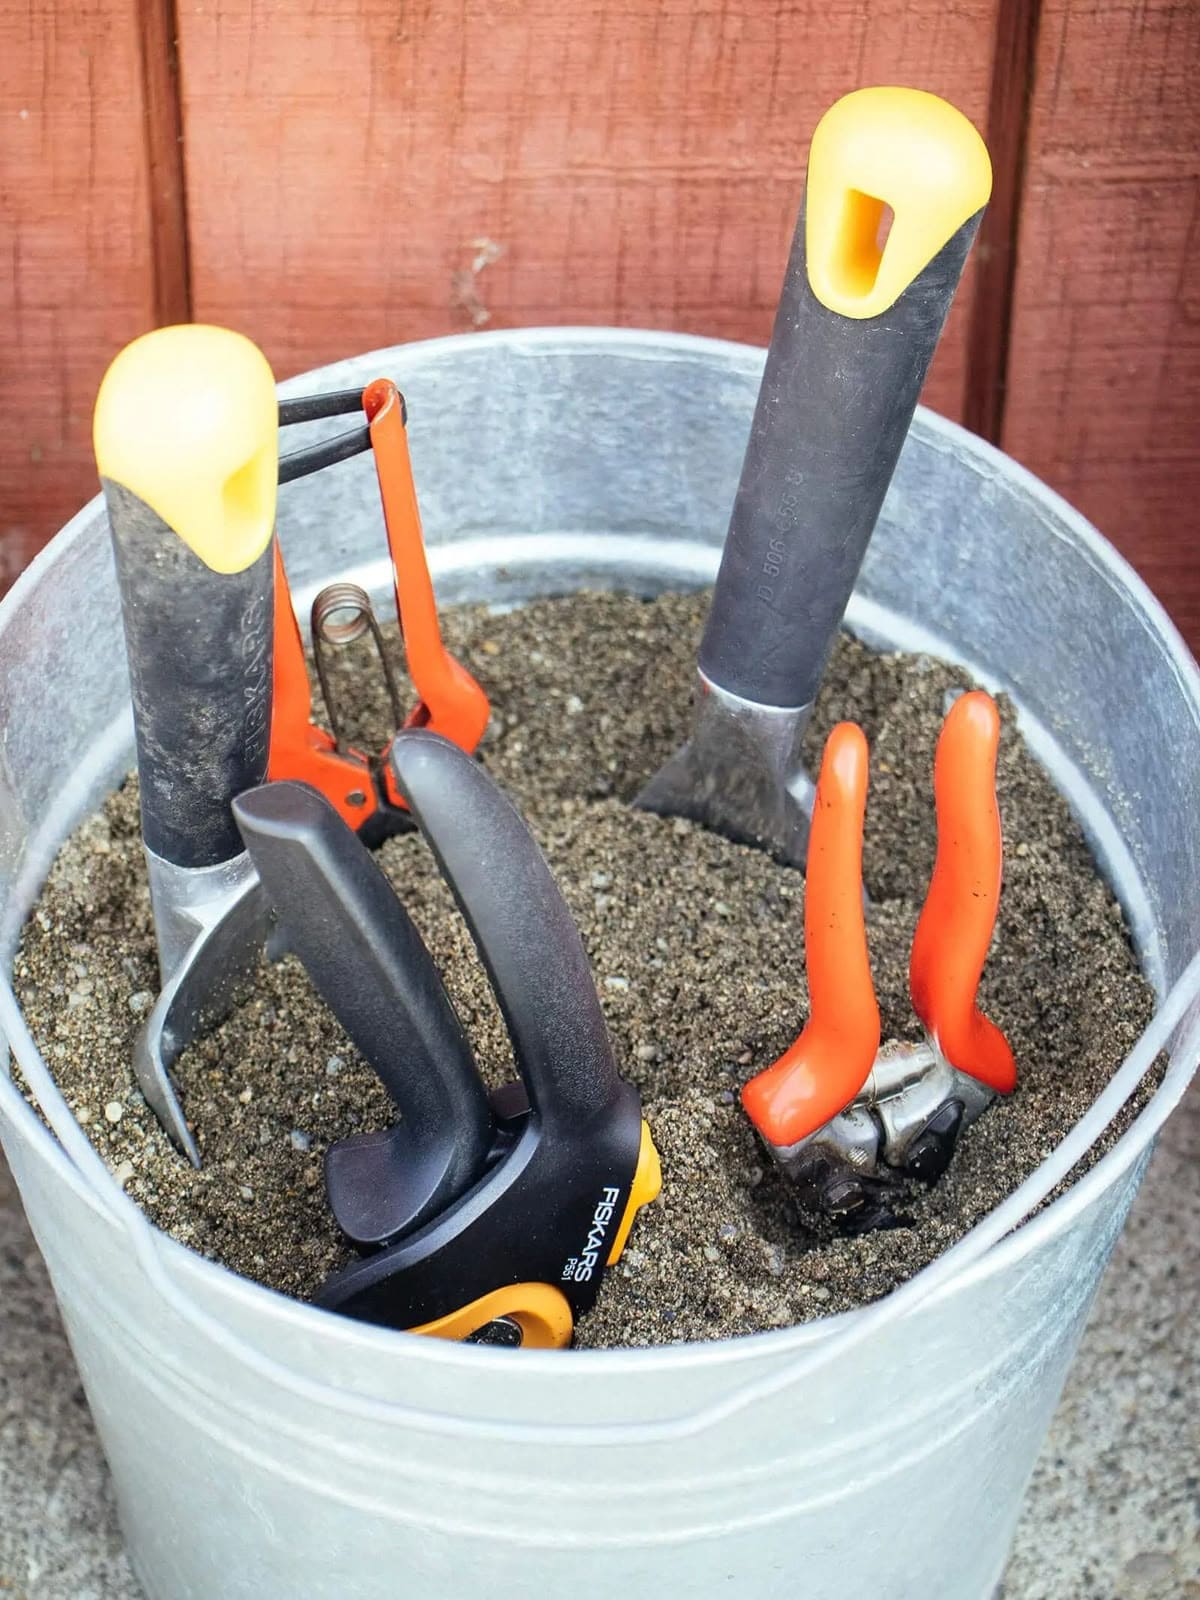
This clever setup does double duty, organizing and maintaining your garden tools all in one place.
By simply filling a galvanized bucket with sand and a bit of mineral oil, you create a self-cleaning and rust-preventing station.
Just plunge your tools into the gritty mix after use, and it keeps them clean, sharp, and ready for the next round.
I use this trick often, especially for hand tools I need quick access to.
Materials Needed
- Galvanized bucket or large container
- Clean sand (play sand or builder’s sand)
- Mineral oil (optional)
- Hand tools (trowels, pruners, weeders, etc.)
Step-by-step Guide
Step 1: Fill your bucket with clean sand, leaving a few inches of space at the top.
Step 2: Mix in a small amount of mineral oil if you want to condition and protect the metal blades.
Step 3: Insert garden tools blade-side down after each use, and give them a quick wipe as you pull them out next time.
Tip: You should place the bucket near your garden shed door or potting bench for easy reach and to encourage regular tool care.
#16. Wall-Mounted Power Tool Board
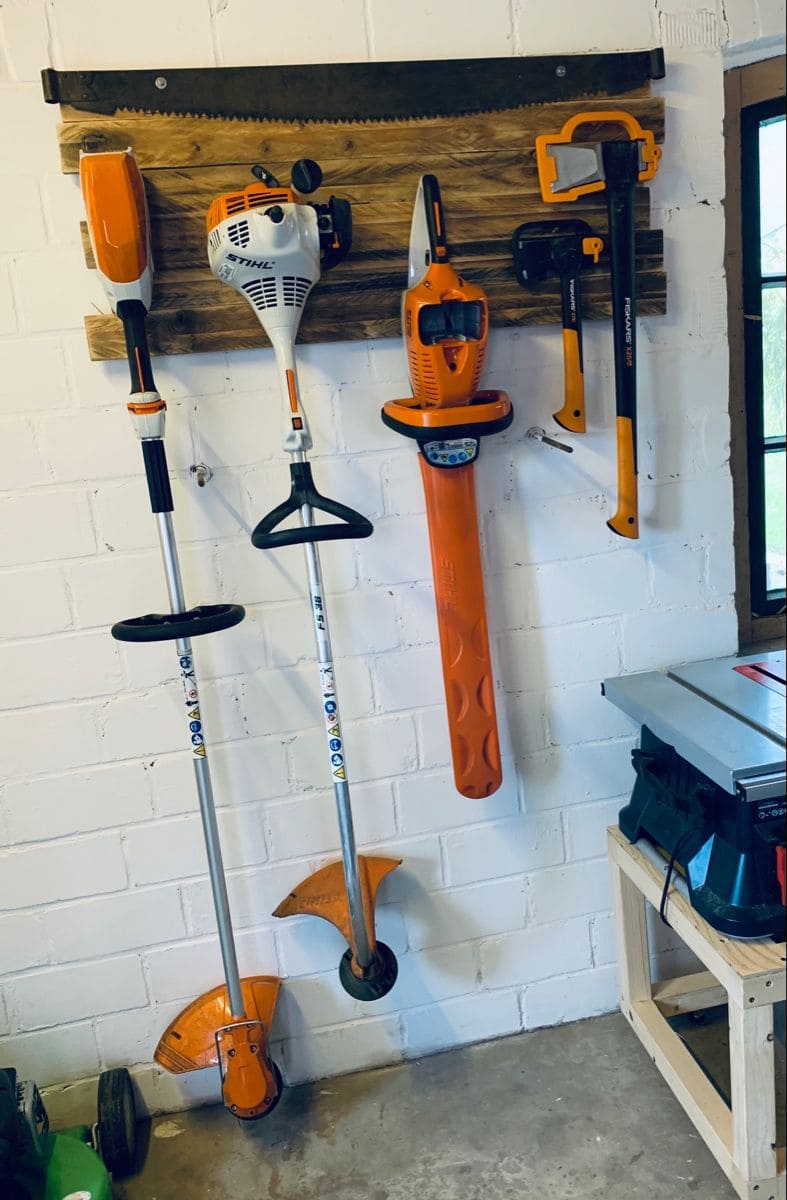
If you’ve got a collection of power tools and garden gear with no clear home, this DIY hanging board transforms chaos into clean lines.
Mounted on a plain brick wall, a sturdy slab of wood serves as the anchor for hooks that hold trimmers, axes, and chainsaws with precision.
The visual organization makes each tool feel like it belongs in a pro’s shed, easy to grab and satisfying to hang back up.
Materials Needed
- Wooden board (reclaimed or treated)
- Heavy-duty tool hooks or wall-mounted hangers
- Screws, wall anchors, and a power drill
- Level (optional, but helps align the hooks)
Step-by-step Guide
Step 1: Choose a solid backing board, sand if needed, and stain or seal for protection.
Step 2: Mount it securely to the wall using appropriate screws and anchors for your wall type.
Step 3: Install hooks spaced to match the size and weight of your tools, staggered for visual balance and easy access.
#17. Bucket Garden Tool Organizer
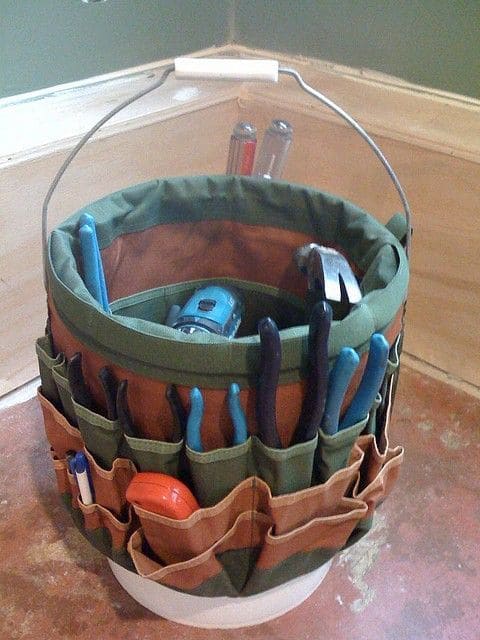
If you’re tired of juggling tools around the garden, this bucket tool organizer will be a lifesaver.
With a sturdy canvas caddy wrapped snugly around a 5-gallon bucket, this DIY storage solution offers a place for every trowel, pruner, and screwdriver you own.
The deep interior space holds larger tools or seed packets, while the outer pockets keep essentials like gloves, twine, or scissors right within arm’s reach.
Materials Needed
- 5-gallon plastic bucket
- Canvas bucket tool organizer
- Gardening tools (pruners, spade, trowel, etc.)
- Optional: labels or tags
Step-by-step Guide
Step 1: Choose a durable bucket and slip the canvas caddy over the rim until it fits snugly.
Step 2: Fill the outer pockets with your most-used tools. Group them by purpose for quicker access.
Step 3: Place larger or bulkier items like gloves, twine, or seed packs inside the bucket’s interior.
Step 4: Add optional labels to pockets if you want a quick visual guide for organizing your tools.
Tip: Consider storing a small water bottle or sunscreen in one of the pockets to keep yourself prepped during long gardening sessions.
#18. Rustic Tin Can Wall Organizer
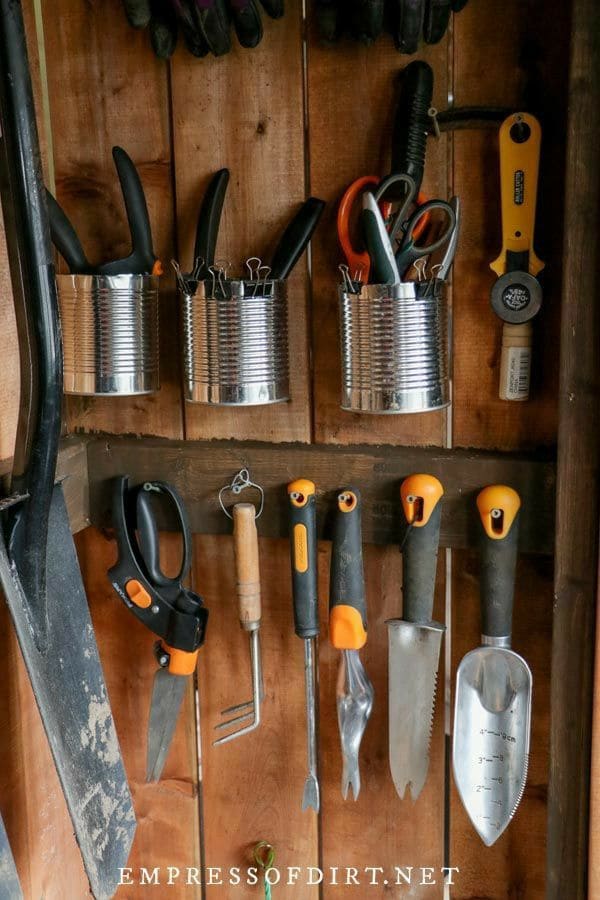
There’s something satisfying about turning what would be trash into a tidy, purposeful display.
This rustic wall organizer uses clean, empty tin cans fastened to a wooden shed wall to create compartments for hand tools like pruners, trowels, and scissors.
Below, hooks hold larger tools in a neat row, transforming your shed into a cozy, well-ordered workshop.
Bonus, the industrial silver sheen of the cans contrasts beautifully with the wood, giving it both charm and practicality.
Materials Needed
- 3-6 empty tin cans (label-free)
- Screws and drill
- Wooden board or shed wall
- Wall hooks or pegs
- Optional: Paint or labels
Step-by-step Guide
Step 1: Clean and dry all tin cans thoroughly, ensuring no sharp edges remain.
Step 2: Screw each can securely into the wooden surface, keeping spacing even for aesthetics and function.
Step 3: Install hooks or pegs beneath the cans to hang trowels, garden forks, or pruning shears.
Step 4: Place tools handle-up in each can for easy grab-and-go convenience.
#19. Rustic Farmhouse Garden Tool Tote
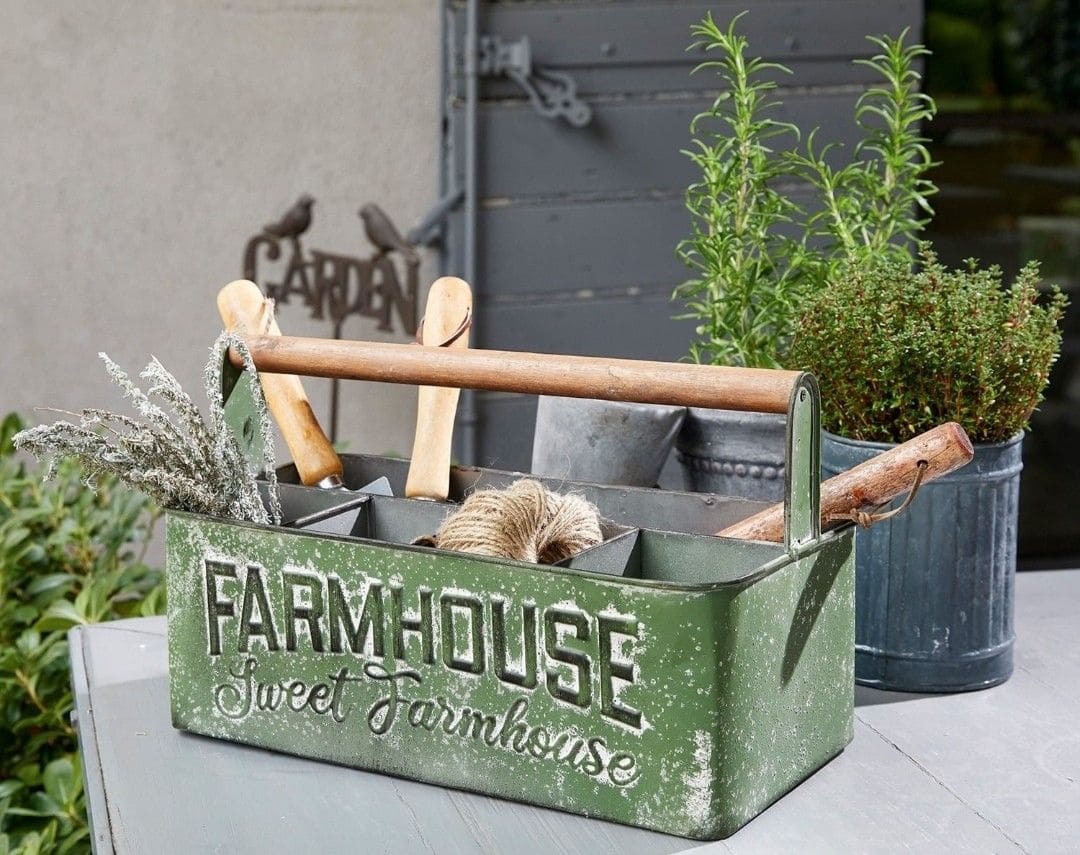
Simple, nostalgic, and packed with personality, this farmhouse-style tool tote keeps all your gardening essentials in one easy-to-carry place.
With divided compartments, it’s perfect for stashing hand tools, twine, pruners, and dried florals.
The distressed green paint and “Sweet Farmhouse” lettering bring out that cozy, lived-in charm.
In addition, the sturdy wooden handle adds functionality and makes it easy to move from shed to soil without missing a beat.
Materials Needed
- Metal or wooden toolbox or divided crate
- Acrylic or chalk paint (optional for distressed look)
- Wooden dowel or handle bar
- Sandpaper, twine, and stencils (optional)
Step-by-step Guide
Step 1: Choose a durable caddy with compartments and a solid handle.
Step 2: Paint the exterior in your favorite rustic tone, then distress the surface with sandpaper for an aged effect.
Step 3: Add hand-lettered or stenciled wording to personalize your tote.
#20. Wall-Mounted Rod Organizer
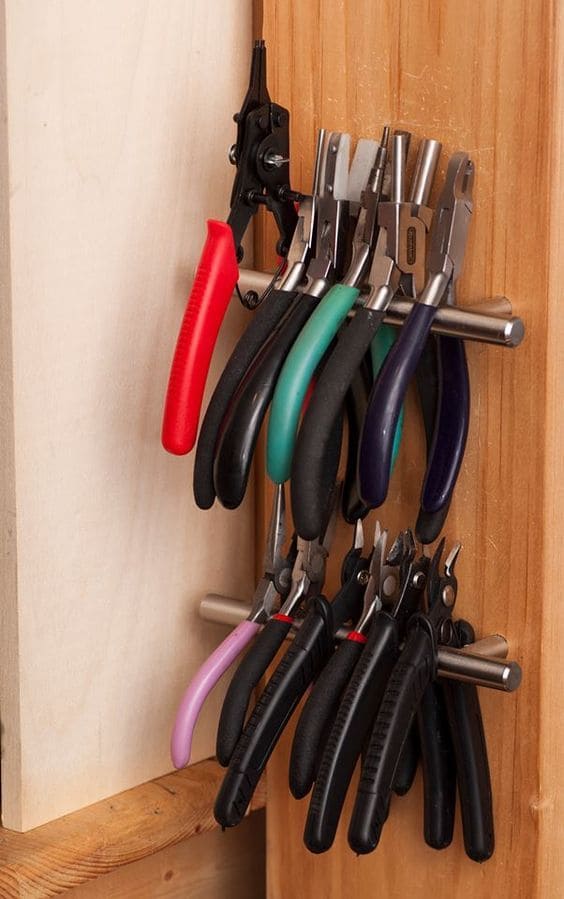
If you’ve got a jumble of hand tools cluttering your workspace, this sleek rod system might be your new best friend.
It’s surprisingly simple, just mount a pair of horizontal rods inside a cabinet or on a wooden panel, and let your pliers or small garden shears hang freely.
This setup keeps tools visible, accessible, and off your surfaces. No more digging through a drawer for that one pair of pruners.
Materials Needed
- 2 metal rods or towel bars (12″-18″)
- Wall anchors and screws
- Drill and level
- Wooden board or cabinet door (optional)
Step-by-step Guide
Step 1: Choose a spot with enough clearance for tools to hang freely. Mark where you want to mount the rods.
Step 2: Use a level to ensure the rods will be straight, then drill pilot holes and secure them with screws.
Step 3: Hang tools by their handles or grip holes so they’re easy to grab and return after each use.
Tip: For heavier tools, you can use thicker rods or install into a stud to prevent sagging over time.
#21. Wall-Mounted Hook Strip for Garden Tools
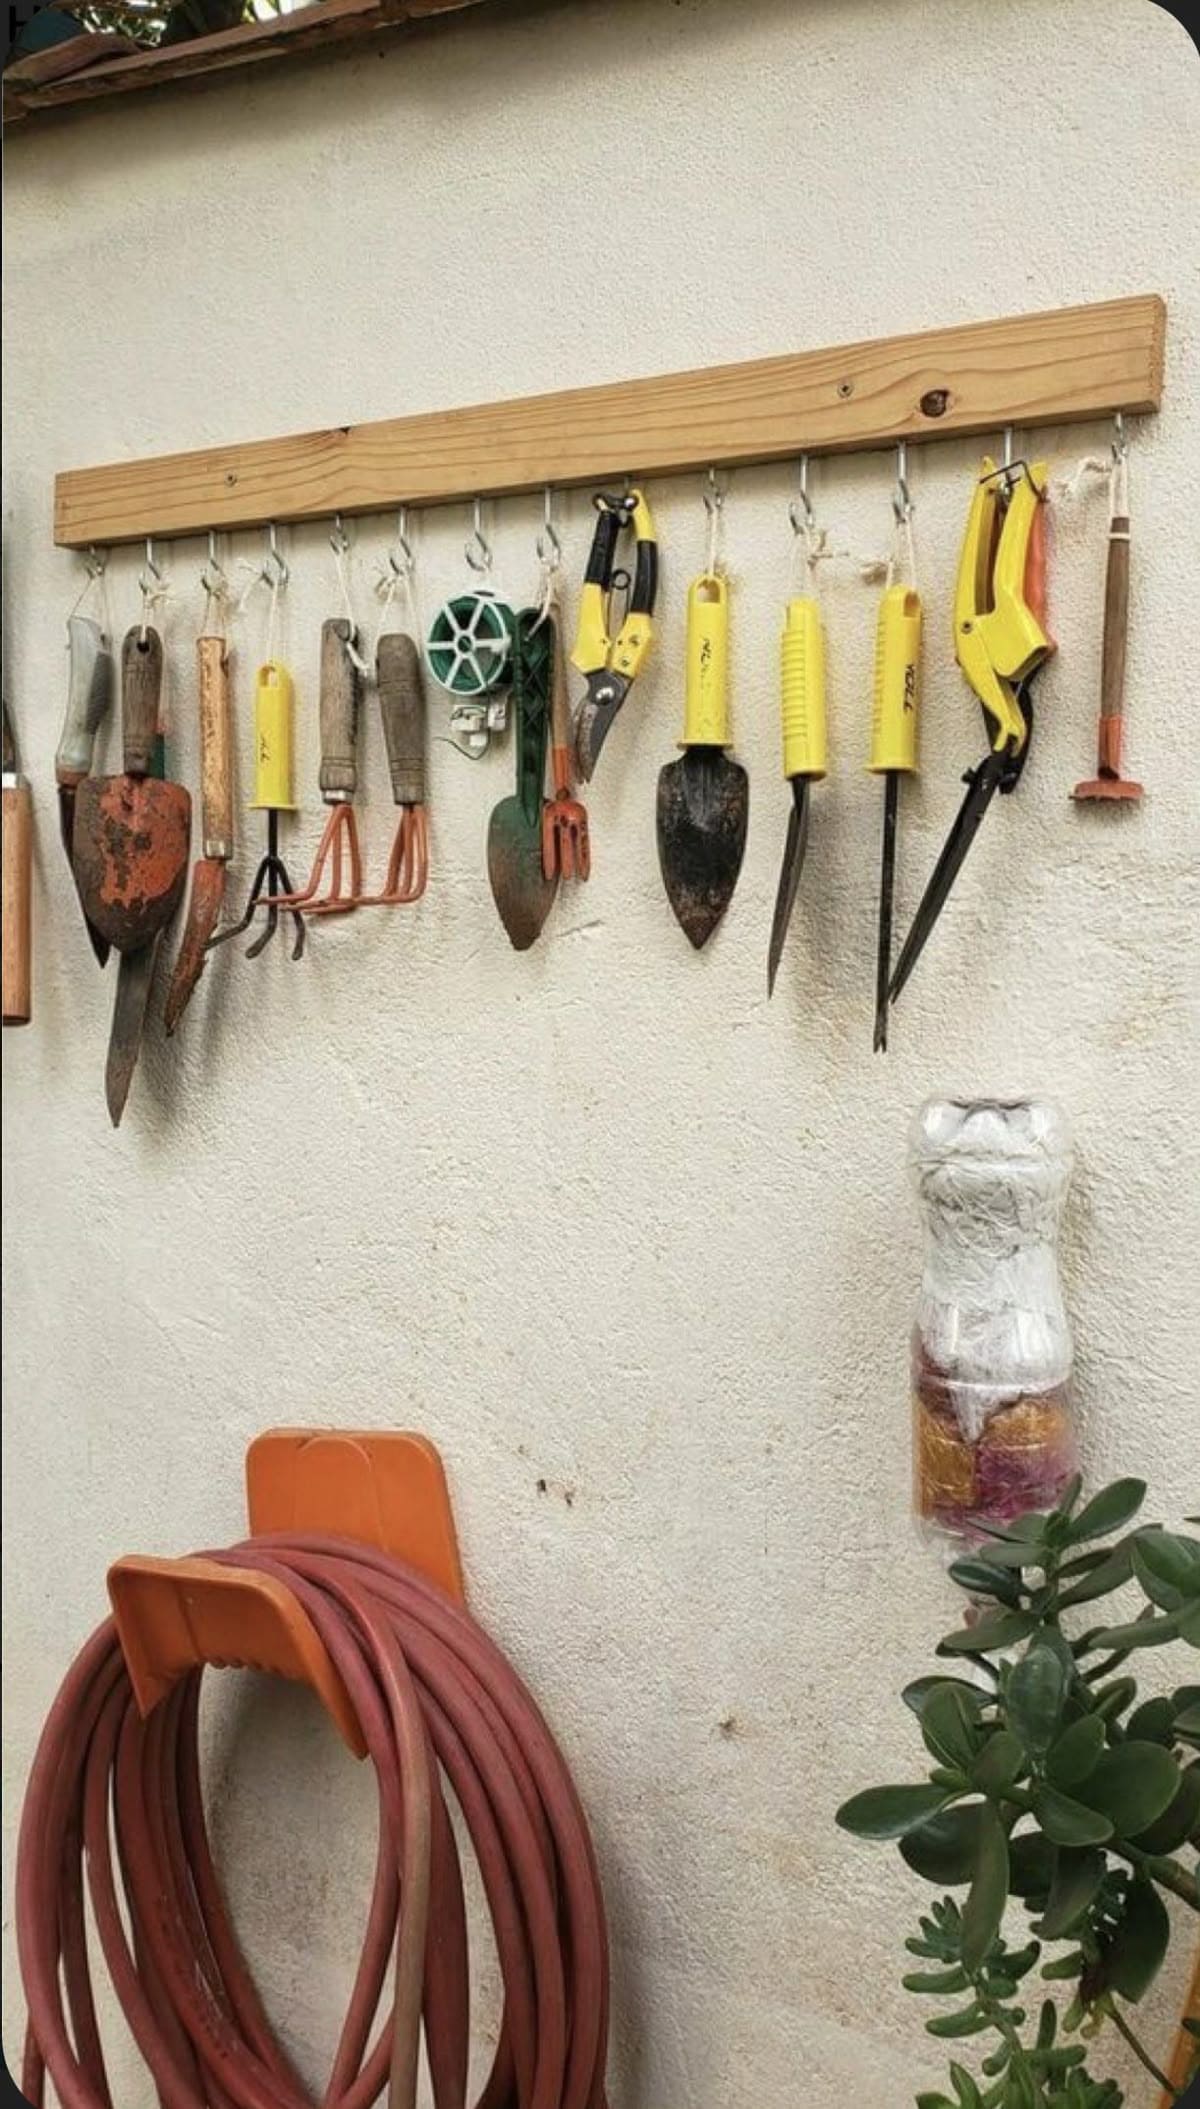
If you’re tired of tripping over trowels and misplacing pruners, this smart wall-mounted hook system makes everything visible and within reach.
A simple wooden plank fitted with evenly spaced hooks turns a bare wall into a neat, vertical tool display.
You’ll instantly create a clean visual layout for your tools, great for fast grabs during a busy gardening session.
I love how this method encourages putting things back in their place, making post-planting cleanup effortless.
Materials Needed
- Wooden plank (about 3-4 feet long)
- Screw-in hooks or cup hooks
- Wall mounting hardware
- Basic garden tools (hand spades, clippers, trowels, etc.)
Step-by-step Guide
Step 1: Cut and sand your wooden board, then mark evenly spaced points for the hooks.
Step 2: Screw in the hooks and attach the plank to your wall using strong anchors or screws.
Step 3: Hang your tools, organizing by size or use for maximum efficiency.
#22. Wire Mesh Shelf Organizer
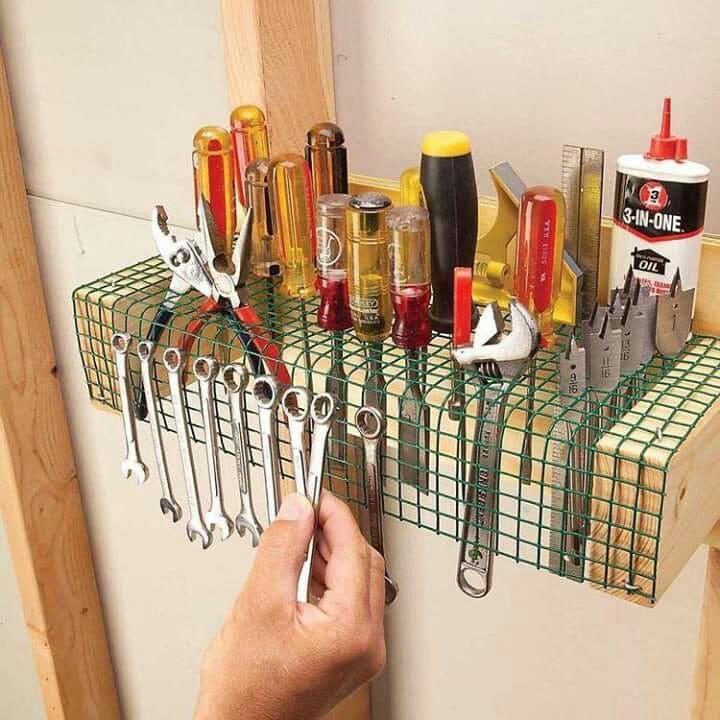
By attaching a simple piece of wire mesh to the edge of a wooden shelf, you instantly gain a place to hang wrenches, pliers, or hand trowels.
It turns your tools into a tidy, visible lineup, almost like they’re waiting to be picked for duty.
On top, the shelf offers space for oil cans, screwdrivers, or other gardening essentials.
It’s functional, frugal, and doesn’t take up much room, which makes it perfect for tight garden sheds or garage walls.
Materials Needed
- Sturdy wooden shelf (or scrap wood)
- Wire mesh panel (1/2″ or 1″ grid)
- Staple gun or nails
- Hooks (optional)
- Screws and wall anchors for shelf
Step-by-step Guide
Step 1: Attach your shelf securely to the wall using screws and anchors, ensuring it can support your tools’ weight.
Step 2: Cut a section of wire mesh to fit the front of the shelf and staple or tack it tightly in place.
Step 3: Hang tools through the mesh grid using the tool handles or small S-hooks if needed. Store smaller items on top.
Tip: Spray-paint the mesh for a cleaner look or color-code your tools to add style and function in one go.
#23. Labeled PVC Tool Rack
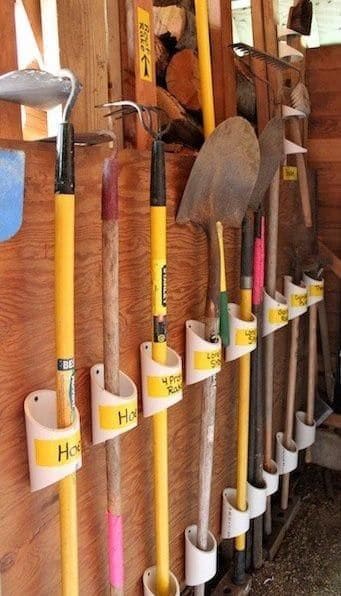
This smart, no-fuss wall-mounted rack brings order to chaos using labeled PVC pipe sections as holders.
Each tool has its own spot like hoes, shovels, and rakes stand neatly upright, ready when you need them.
Bonus, labels make grabbing the right tool a no-brainer, especially when you’re mid-project and can’t afford to guess.
Materials Needed
- 3-4 inch PVC pipe (cut into 5-6 inch lengths)
- Screws and wall anchors
- Drill
- Permanent marker or label maker
Step-by-step Guide
Step 1: Cut PVC pipe into equal sections, each large enough to cradle a tool handle securely.
Step 2: Drill holes in each piece and screw them onto a wooden shed wall or fence at a consistent height.
Step 3: Add clear labels above each holder to designate specific tools for each slot.
#24. Reclaimed Pallet Tool Wall
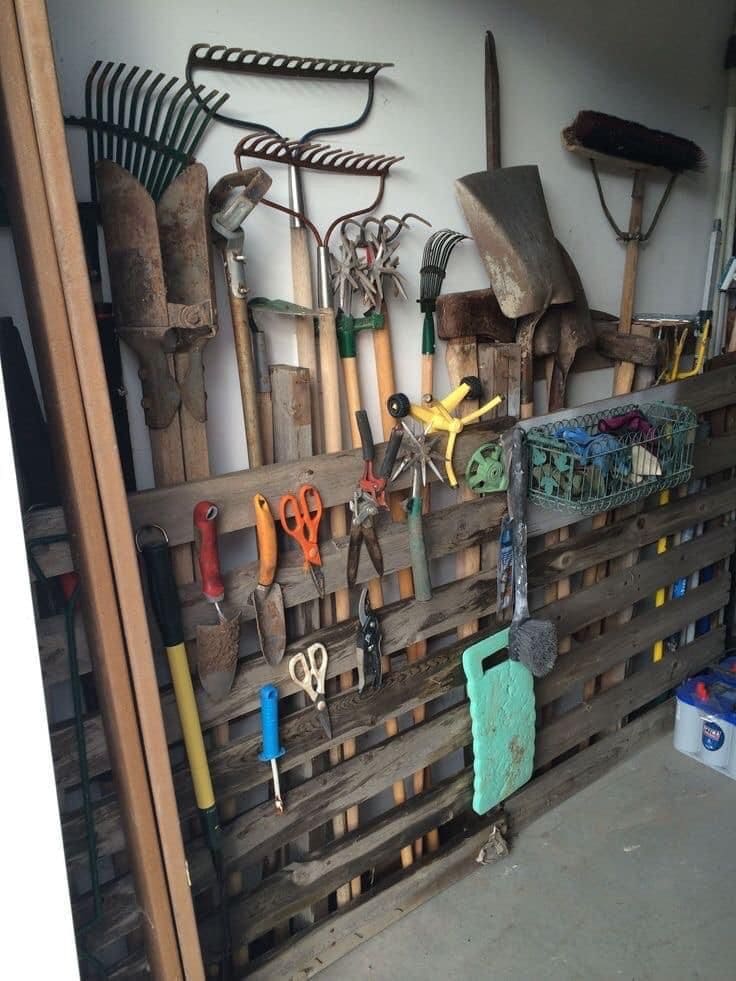
If your tools are scattered and leaning in every corner, a wooden pallet might be the easiest fix you never thought of.
This smart upcycling solution turns an old pallet into vertical storage for everything from shovels and rakes to gloves and garden scissors.
Just lean it against the wall or bolt it down for extra security.
Its natural slots make ideal holders for long-handled tools, while hooks and wire baskets can be added for smaller essentials.
Materials Needed
- 1-2 reclaimed wooden pallets
- Screws or nails
- Wall anchors (optional)
- Hooks or screw-in hangers
- Optional: metal basket or bin
Step-by-step Guide
Step 1: Clean your pallet and inspect for loose boards or nails. Sand rough edges if needed.
Step 2: Secure the pallet vertically against the wall using screws or anchors for stability.
Step 3: Slip long tools between the slats or wedge them securely behind crossbars.
Step 4: Add screw hooks or a hanging basket to store gloves, tape, or twine for quick access.
Tip: Treat the pallet with outdoor wood sealant to extend its life, especially if your storage is in a damp shed or garage.
#25. Vertical Pegboard Tool Station
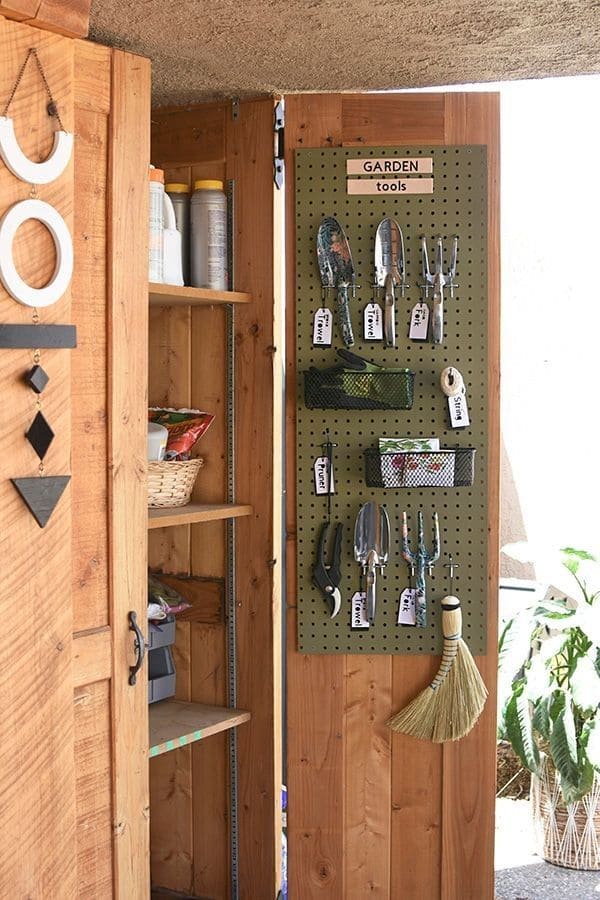
This tidy pegboard setup brings function and charm to any garden shed or closet door.
Every trowel, pruner, and dibber has a labeled spot, making it effortless to find what you need without rummaging.
With mesh bins for small supplies and hooks for tools, this layout keeps things up and off shelves, giving you more room to breathe.
Materials Needed
- Pegboard panel (cut to fit door or wall)
- Hooks, clips, and mesh containers
- Label tags or adhesive nameplates
- Screws and drill
Step-by-step Guide
Step 1: Mount your pegboard securely to a flat surface, like a door or shed wall.
Step 2: Arrange hooks and bins based on your tool collection’s size and frequency of use.
Step 3: Finally, label each spot for easy organization and quick returns after gardening sessions.
