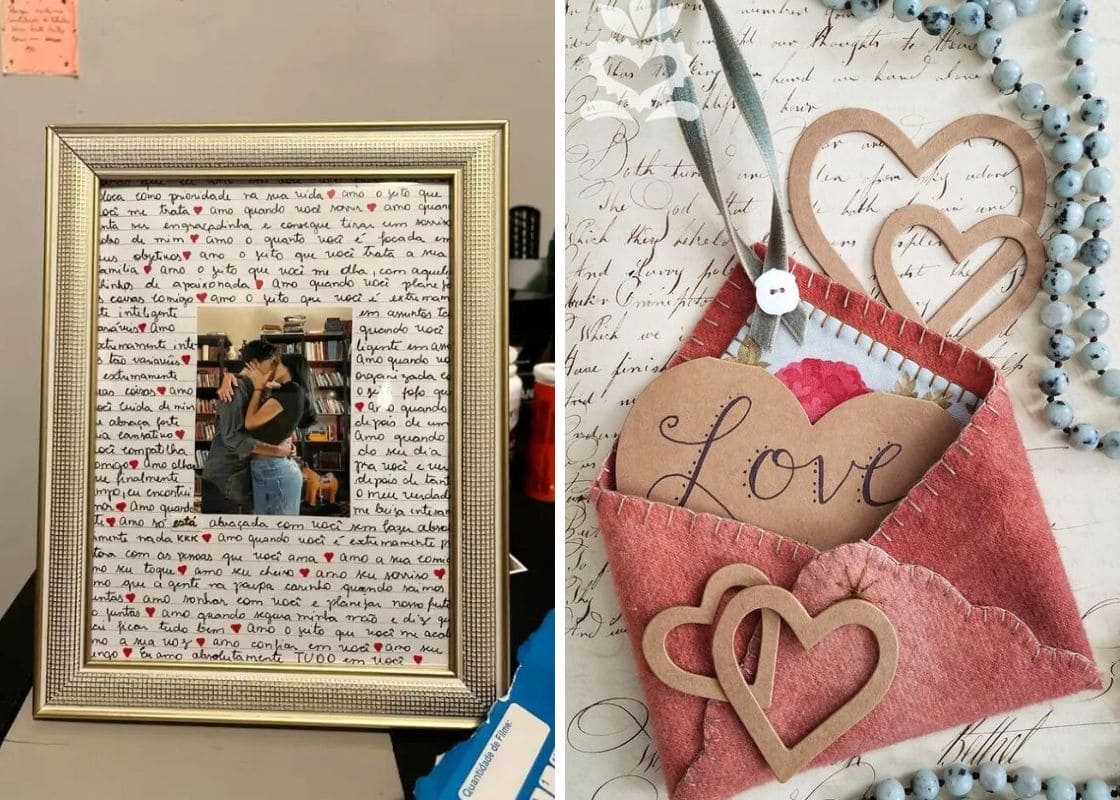
Ever look at your old tote bag, faded pillow, or tired chair cushion and think, this could be something beautiful again? I have.
One afternoon, while sorting through a box of fabric scraps too sentimental to toss, I stitched together a little patch. That one square sparked a whole journey into patchwork.
Patchwork has a way of turning the everyday into something personal. It’s not just sewing; it’s storytelling through texture, pattern, and memory.
No matter how you’re refreshing a well-worn hoodie, giving a chair a cozy update, or crafting something totally new, these 23 patchwork ideas will inspire you to cut, stitch, and revive what you already own.
#1. Scrappy Cat Patchwork Jean Art
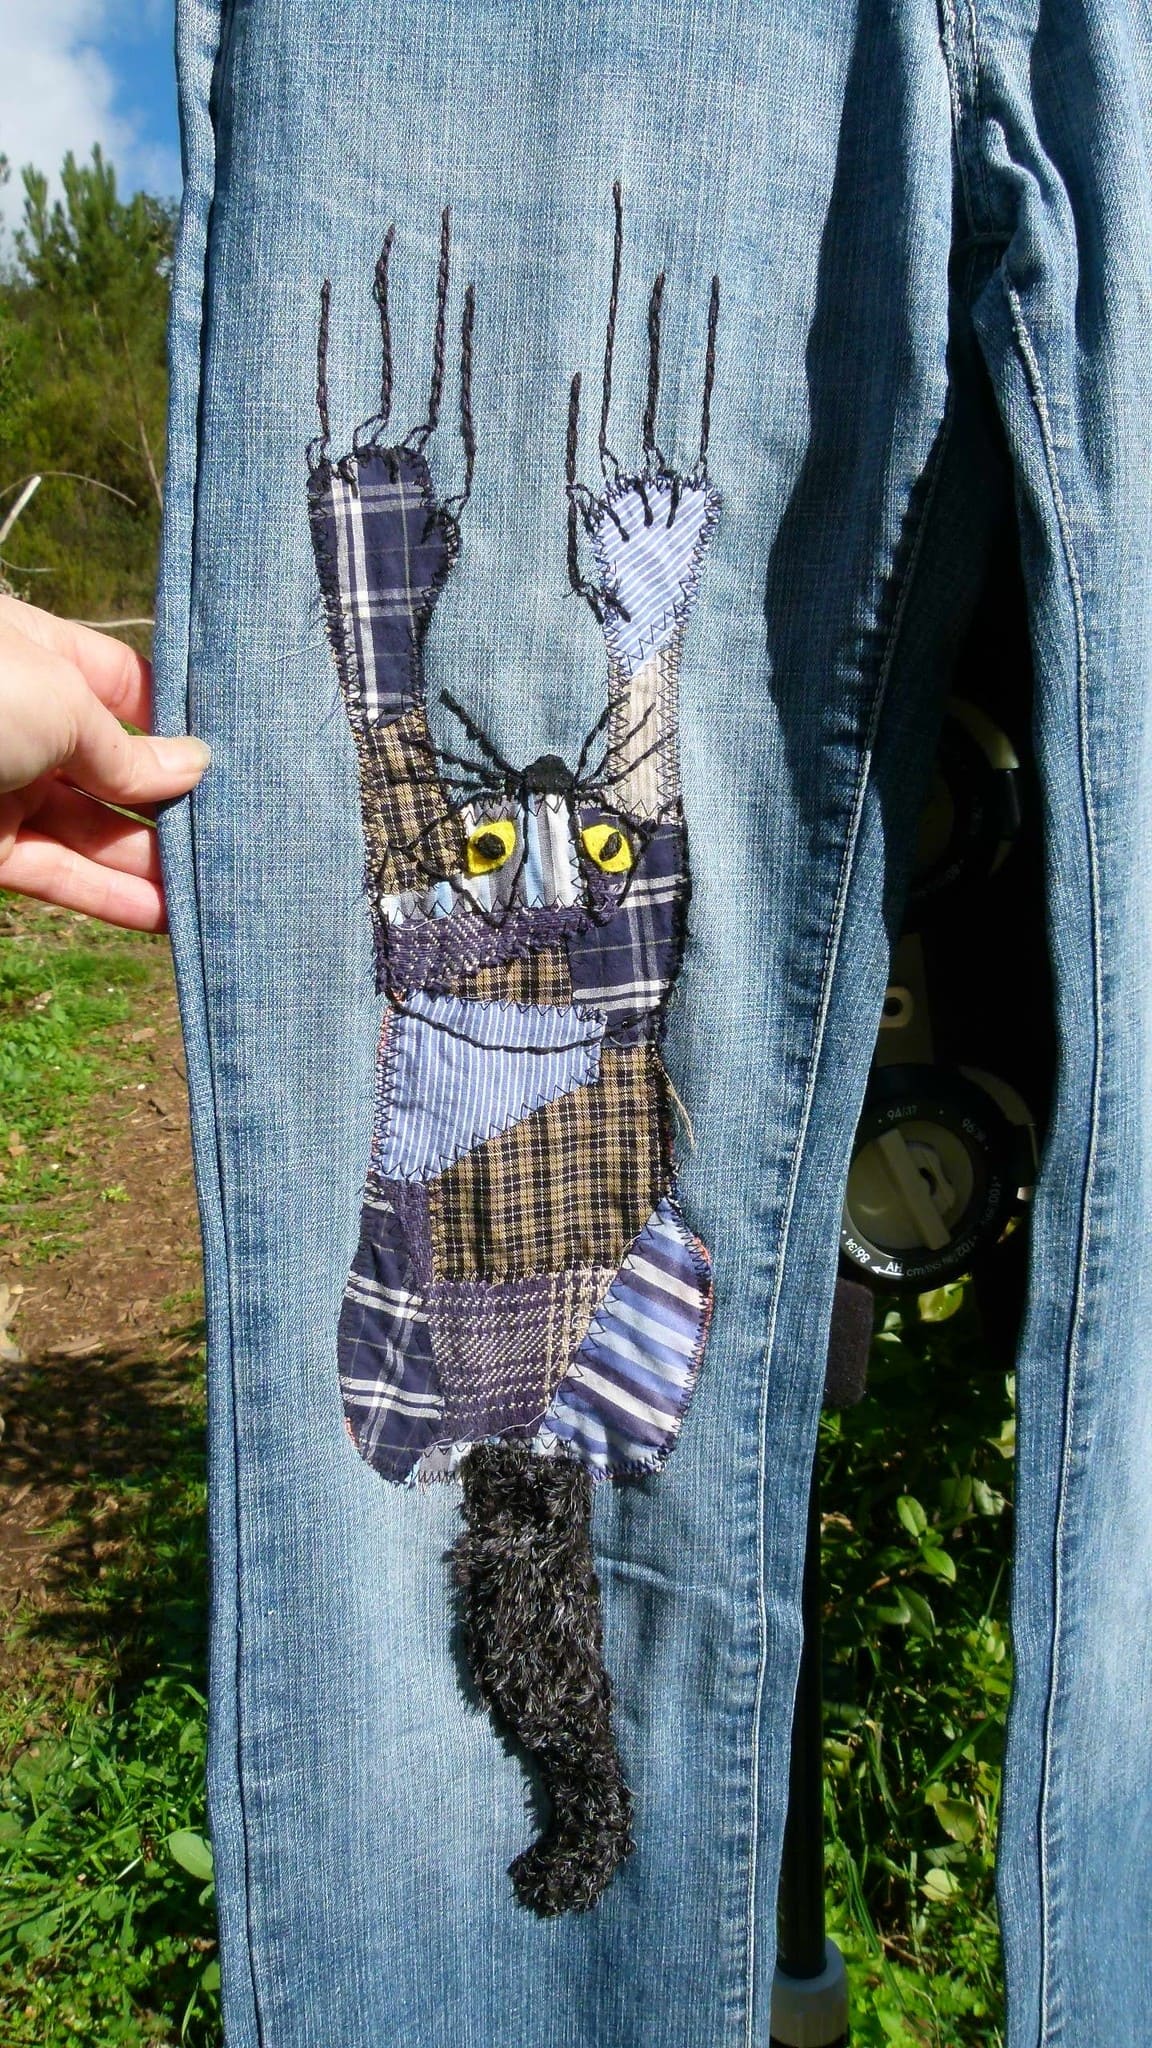
This adorable climbing kitty is a funny little patchwork cat that looks like it’s clawing its way up your leg with scrappy plaid fabric, bright yellow button eyes, and the cutest fuzzy tail made of faux fur.
Honestly, every time I see one like this, it makes me smile. Whether you’re a cat lover or just enjoy quirky, artsy fashion, this one’s a total charmer.
Materials Needed
- 1 pair of jeans
- 4-6 small fabric scraps (approx. 4×4 inches each) in plaid, checkered, or striped patterns
- 1 piece of faux fur (approx. 3×6 inches)
- 2 small yellow buttons
- Black embroidery thread (about 1 yard)
- Basic sewing needle
- Fabric glue
- Paper and pencil
- Scissors
Step-by-step Guide
Step 1: Draw a simple cat shape on paper, you need to include a rounded head, long body, two reaching paws, and a tail.
Step 2: Cut your fabric scraps to match each section of the cat. You should mix patterns to keep the look patchy and playful.
Step 3: Lay out the pieces on the jeans to test your arrangement, then pin them in place or use fabric glue sparingly to keep them steady.
Step 4: Stitch around each piece using a zigzag stitch or tight straight stitch. You start from the body and layer the paws and head over it.
Step 5: Attach the eyes and embroider the whiskers and scratch marks above the paws. Finally, sew on the tail with a few loose stitches so it hangs a bit for extra texture.
Bonus tip:
If you’re gifting this or just want a neater finish, add a bit of fabric stabilizer behind the patch before you sew. It’ll last longer and won’t pucker as easily.
#2. Vintage-Inspired Patchwork Quilt
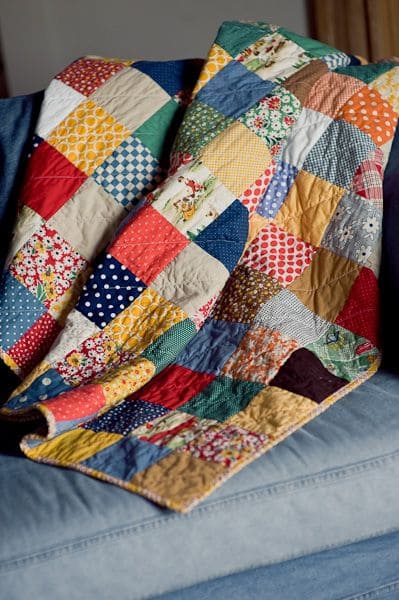
Wow, with squares of playful polka dots, florals, and solids, this quilt feels like a cozy embrace from a bygone era. It’s also perfect for draping over a sofa or gifting to someone special.
Materials Needed
- Fabric scraps (approx. 90-100 squares, each 5″x5″)
- 1 piece of cotton batting, around 45″x60″
- Backing fabric, same size as batting
- Quilting thread in a neutral tone
- Binding fabric (½ yard)
- Rotary cutter, quilting ruler, pins, sewing machine
Step-by-step Guide
Step 1: Choose an assortment of fabrics that range from bright to muted tones. Then cut all pieces into uniform 5″x5″ squares.
Step 2: Arrange the squares in rows, alternating patterns and tones to create balance and flow. Now, you sew the squares together row by row.
Step 3: Stitch all rows together to form the quilt top, then press the seams flat on the backside.
Step 4: Create a quilt sandwich: lay the backing fabric face down, place the batting on top, then add the patchwork top face up.
Step 5: Quilt through all three layers using straight lines along seams or diagonal stitches.
Step 6: Trim edges and bind with coordinating fabric. Now you can fold and hand-stitch the binding on the back for a clean finish.
#3. Plaid Patchwork Maxi Skirt
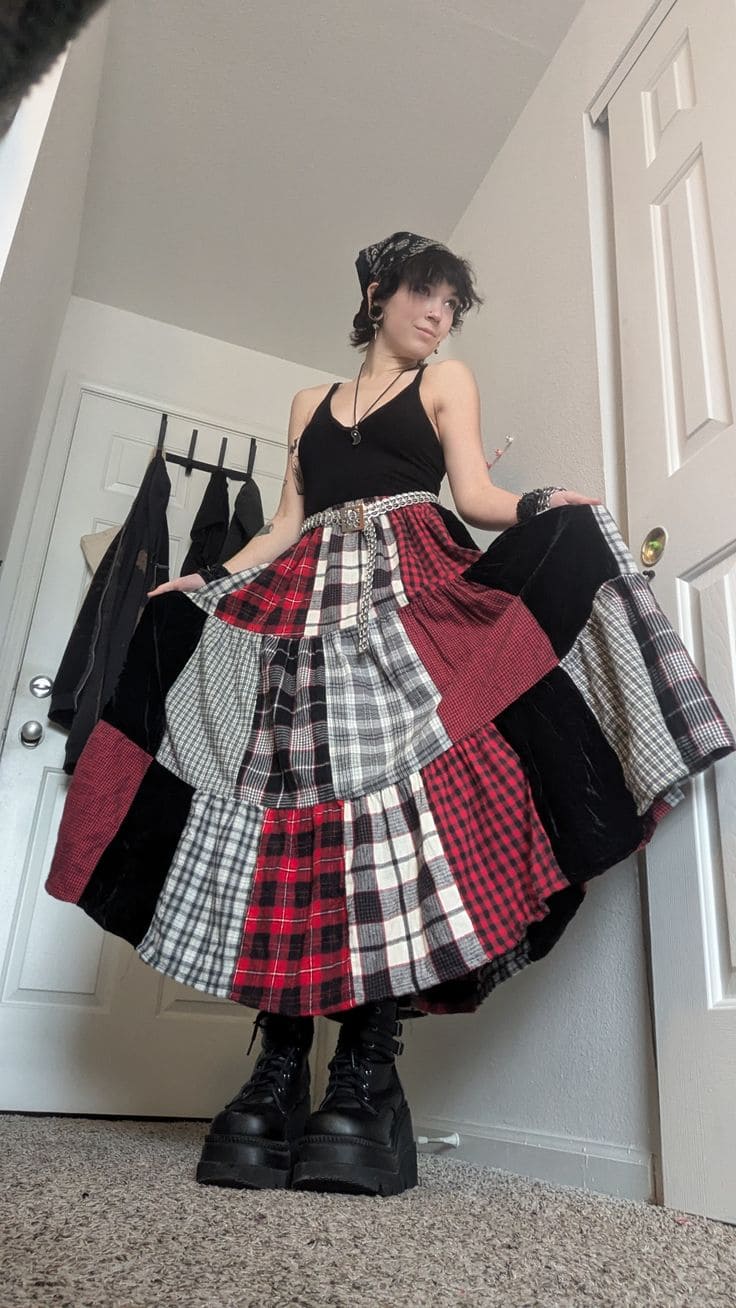
Look at this bold and flowy maxi skirt. Each plaid panel tells its own story with an old work shirt, a thrifted treasure, or a hand-me-down flannel that’s too soft to let go.
Specially, I love how this piece swishes dramatically with every step, it’s not just a skirt, it’s a statement.
Materials Needed
- 8-10 old flannel shirts (minimum 18″ x 18″ each)
- 1 wide elastic waistband (1.5″-2″ thick and sized to your waist)
- Fabric scissors
- Measuring tape
- Sewing machine or hand needle
- Pins or clips
- Optional: lining fabric (1-1.5 yards)
Step-by-step Guide
Step 1: Cut out uniform square or rectangular panels from each fabric piece (around 10″ x 10″ works well). Then lay them out on the floor to plan your pattern.
Step 2: Sew panels together into horizontal rows, pressing seams flat as you go. Then, stitch the rows together vertically to form a large patchwork rectangle.
Step 3: Once the body is finished, gather the top edge slightly so it fits your waistband. You can attach the elastic band by stretching it slightly while stitching.
#4. Patchwork Statement Bow
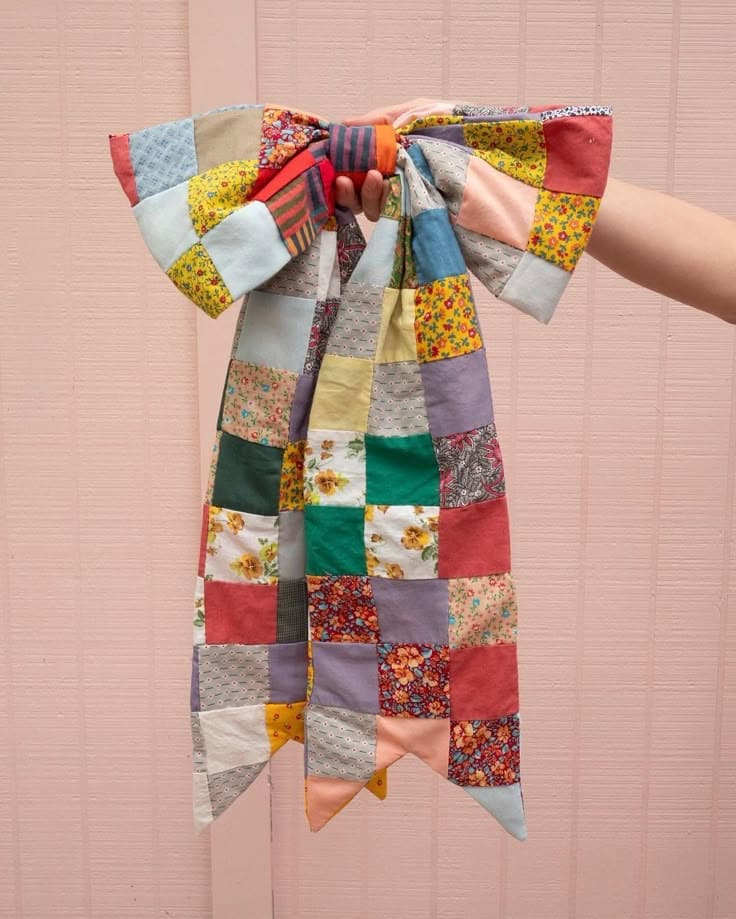
Whether you tie it to your bag, wear it in your hair, or hang it as a cheerful wall accent, this bow adds instant charm with a vintage twist.
Moreover, each tiny fabric square carries a nostalgic vibe, from florals to stripes to ditsy prints. It’s playful, soft, and totally joyful.
Materials Needed
- 40-50 small fabric squares (each 2.5″ x 2.5″) in mixed patterns and colors
- Lightweight interfacing (½ yard)
- Matching thread and sewing needle or sewing machine
- Iron and ironing board
- Fabric scissors
- Optional: safety pin
Step-by-step Guide
Step 1: Arrange your fabric squares in rows, mixing prints and colors for a fun patchwork layout. You’ll need enough to form a long strip (approx. 6 squares wide by 10-12 tall).
Step 2: Stitch squares together row by row, pressing seams flat as you go. Then sew the rows together into one large rectangle.
Step 3: Iron lightweight interfacing to the back of the patchwork for added firmness.
Step 4: Fold the rectangle like an accordion and cinch the center with a strip of fabric or ribbon.
Step 5: Add tails if you’d like, or attach a clip to the back so it can be worn or displayed easily.
#5. Cozy Patchwork Chair Cushion
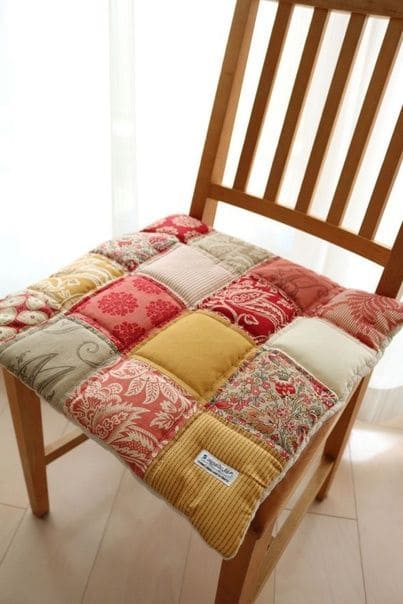
This handmade chair cushion transforms any hard seat into a cozy perch with charm and softness. It’s packed with visual interest thanks to its rich patchwork design.
Ideal for kitchen chairs, dining sets, or a reading nook, this project adds instant warmth with minimal sewing skills required.
Materials Needed
- 16 fabric squares (each 5″ x 5″) in warm, coordinating prints
- Backing fabric (18″ x 18″)
- Batting or soft stuffing
- Thread, sewing machine or hand needle, pins
- Optional: ties or velcro strips
Step-by-step Guide
Step 1: Lay out your fabric squares in a 4×4 grid. You can mix textures and shades like corduroy, damask, florals, even ticking stripes for added depth.
Step 2: Sew the squares into four rows, then connect the rows into one large square, then press the seams flat.
Step 3: Place the patchwork top and backing right sides together. Next, you insert batting or stuffing in the center if using a pre-cut pad. If using loose fill, you can stuff after turning right side out.
Step 4: Sew around the edges, leaving a gap to turn the piece right side out. Then turn and stuff if needed. You sew the opening closed by hand or machine.
Step 5: Topstitch along the seams to create tufted sections, or hand-tack at the intersections to keep the padding in place.
Optional: You can add ribbon or fabric ties to the back corners so the cushion stays snugly tied to your chair.
#6. Giant Patchwork Foot Rugs
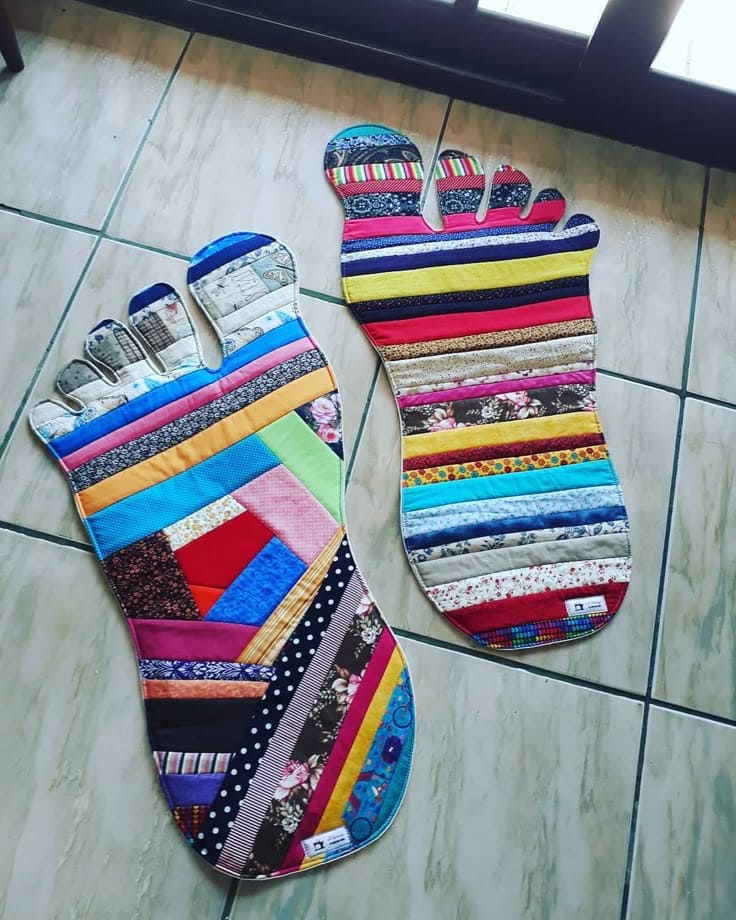
Interestingly, these oversized patchwork foot-shaped rugs are quirky, playful, and unexpectedly adorable. Perfect for a kids’ room, sewing studio, or creative entryway, they bring a splash of fun with every step.
Materials Needed
- 30-40 fabric strips (2″ to 3″ wide, 12″-20″ long) in various patterns and textures
- Foot-shaped paper template (around 30″ tall)
- 1 yard of thick fleece
- 1 yard of non-slip rug backing
- Bias tape
- Matching thread and scissors
- Sewing pins and sewing machine
Step-by-step Guide
Step 1: Draw or print a large foot shape on paper and don’t forget the toes!
Step 2: Arrange your fabric strips in horizontal or angled patterns on a base fabric slightly larger than the template. Then sew strips together, pressing flat as you go.
Step 3: Place the patchwork front, batting, and backing in a sandwich. You continue to pin together and quilt as desired, straight lines work well for strips.
Step 4: Lay the foot template over your quilted sandwich and cut out the foot shape through all layers.
Step 5: Use bias tape or a long strip of fabric to bind the edge for a clean, finished look. Then add grippy fabric dots underneath to keep it from sliding.
#7. Patchwork Memory Butterflies
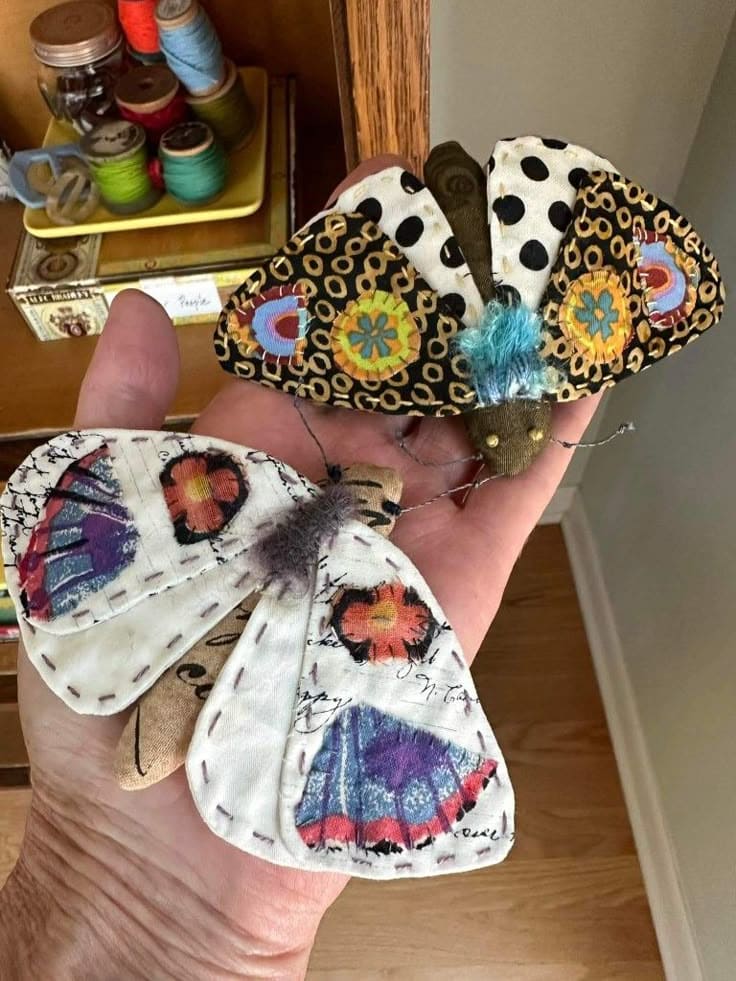
These adorable fabric butterflies flutter with charm and sentiment. They’re soft, slightly stuffed, and stitched with love, with delicate wire antennae and embroidered wing patterns.
In addition, you can display them in shadow boxes, hang them from a window, or gift them as symbolic tokens of transformation and remembrance.
Materials Needed
- 2-3 small fabric scraps in coordinating colors (around 6″ x 6″ each)
- 1 piece of felt (4″ x 4″)
- Polyfill stuffing
- Embroidery thread
- 2 wire (about 4″ each)
- Fabric glue
- Needle, scissors, and optional beads or trims
Step-by-step Guide
Step 1: Cut two identical butterfly wing shapes from your fabric. If layering patterns, sew or glue smaller fabric details onto the main wings before assembly.
Step 2: Cut a body shape from felt and lightly stuff it with polyfill. Then stitch or glue the sides closed, leaving the top and bottom flat.
Step 3: Attach the wings to the body using hand stitches or strong glue. Now you can fan them out slightly for a 3D effect.
Step 4: Twist your wire into two small antennae and insert into the top of the felt body. Next, add decorative stitching, trim, or tiny beads if you like.
#8. Chunky Stitched Patchwork Bucket Hat
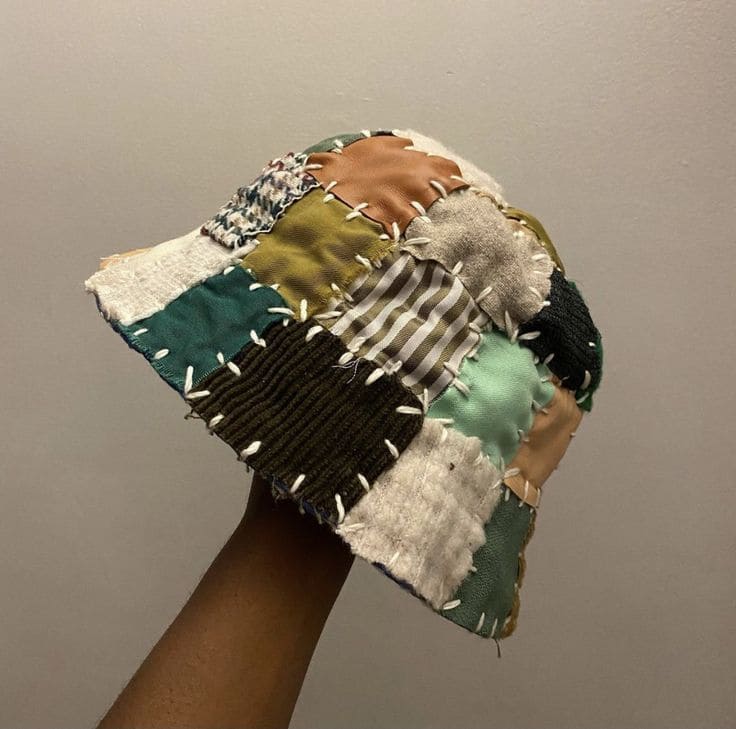
You can see the chunky hand-stitches give it that handmade, homespun charm, while the mix of silky, ribbed, and matte textures makes each panel pop. It’s like wearing a fabric sampler with attitude.
The best part is that every piece tells its own story, stitched into something totally wearable. I’d wear it to the farmer’s market and feel like the coolest grandma-meets-artist hybrid in town.
Materials Needed
- 15-20 fabric scraps (approx. 4″ x 4″, various textures like corduroy, satin, linen, cotton)
- 1 basic bucket hat pattern
- Thick embroidery thread
- Needle with a large eye
- Fabric scissors and pins
- Optional: fusible interfacing
- Lining fabric (approx. ¼ yard)
Step-by-step Guide
Step 1: Cut your patchwork pieces and lay them out to form the basic panels of the hat (top circle, side band, brim).
Step 2: Stitch pieces together by hand using large, bold stitches. And don’t worry about perfection as he rougher, the better for charm.
Step 3: Once each section is fully patched, assemble the hat using your pattern. Next, you pin and sew pieces together carefully, working inside out.
Step 4: Add interfacing to reinforce if needed, and sew in the lining to keep it soft inside.
#9. Patchwork Carhartt-Inspired Sweatshirt with Florals
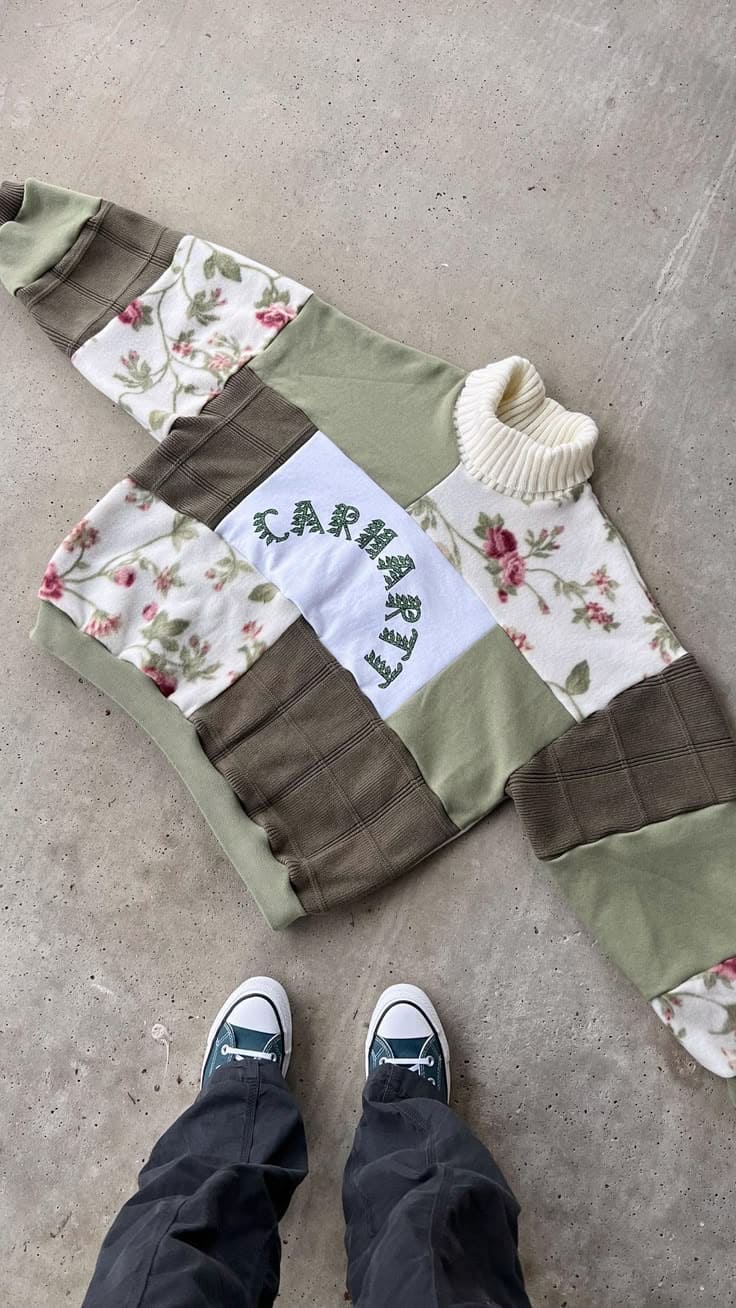
With its muted earthy tones, soft floral fleece panels, and the iconic Carhartt lettering front and center, this piece brings together rugged durability and delicate charm.
Bonus, it’s also an ideal way to repurpose old sweatshirts, sweaters, or fleece blankets you’ve been hanging on to just in case.
Materials Needed
- 1-2 thrifted sweatshirts or hoodies
- 1 piece of floral fleece (about ½ yard)
- 1 ribbed knit scrap (about 6″ x 12″)
- Fabric with letters/logo or iron-on Carhartt patch
- Rotary cutter
Step-by-step Guide
Step 1: Cut the original sweatshirt into large panels (front, back, sleeves). You need to do the same with your floral fleece and other sweatshirts for color blocking.
Step 2: Lay out the patches like a puzzle, balancing colors and textures. Don’t forget to add a white center panel for the graphic if needed.
Step 3: Use a zigzag stitch or straight seam to connect all pieces panel by panel, then press seams open for a clean finish.
Step 4: Reassemble the sweatshirt by sewing the panels together. You continue to add the neck insert using a ribbed knit, stretching slightly for a snug fit.
Step 5: Finally, attach the Carhartt patch or appliqué letters to the center.
#10. Tomato Patch Corduroy Jeans
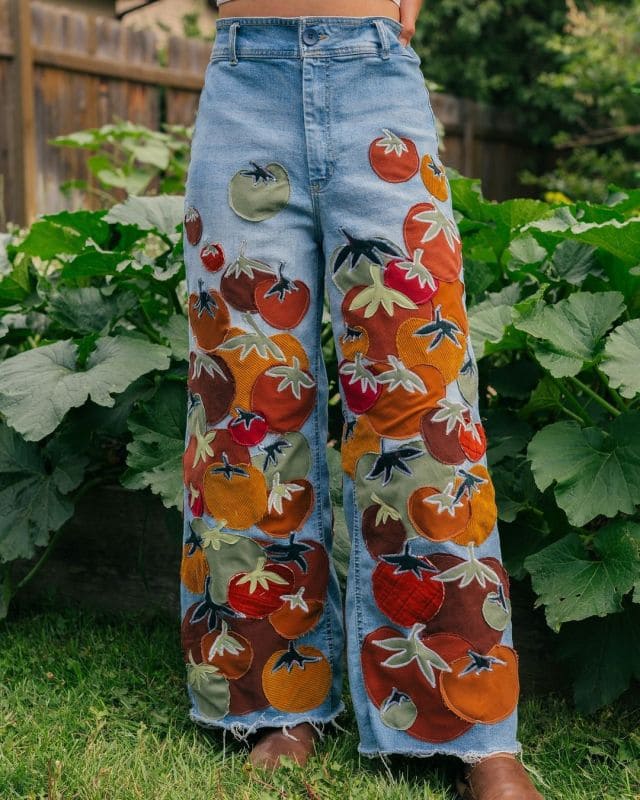
Talk about garden-to-garment fashion! These jeans are a fresh, fun, and fabulously quirky tribute to everyone’s favorite garden staple like tomato.
Furthermore, the details, like stitched stems and layering, give the pants depth and whimsy. They feel like something you’d wear while harvesting veggies or spinning around at a fall festival.
Materials Needed
- 1 pair of wide-leg denim jeans
- 10-12 scraps of corduroy (each 6″ x 6″)
- Dark greens (about 1/4 yard total)
- Heat-erasable fabric pen
- Sharp fabric scissors
- Sewing machine or strong hand-stitching needle
- Contrasting threads
- Optional: fusible web
Step-by-step Guide
Step 1: Sketch and cut out your tomato shapes in various sizes. You can also add personality with imperfect circles and slightly tilted stems.
Step 2: Arrange your patches over the legs of the jeans, starting from the hem and layering upward for a cascading effect.
Step 3: Lightly glue or pin each tomato in place. Then, stitch around the edges using a straight stitch or zigzag for durability. Leave raw edges if you want them to fray charmingly with wear.
Step 4: Add the stem patches and stitch those on too!
Step 5: Finish with a press of the iron to smooth everything out. Then throw them on and let your tomato patch pants steal the spotlight wherever you go.
#11. Framed Patchwork Fabric Art for Wall Display
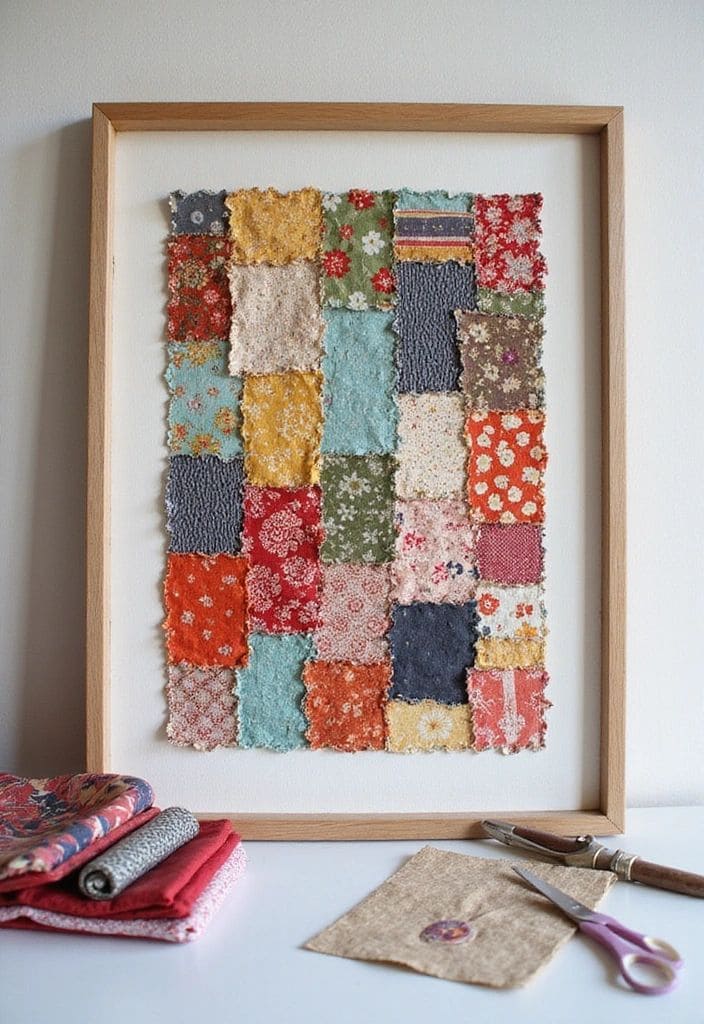
Displaying fabric collages in a wooden frame turns your patchwork into a piece of textile art, perfect for brightening up a studio, hallway, or cozy nook.
Plus, it’s a super beginner-friendly project, but still deeply meaningful. Ideal for honoring vintage fabrics, family heirlooms, or just celebrating your personal aesthetic.
Materials Needed
- 28-36 fabric squares (each about 2.5″ x 2.5″)
- Piece of white or neutral-colored cardstock (11″ x 14″)
- 11″ x 14″ frame with glass removed
- Fabric glue
- Scissors
Step-by-step Guide
Step 1: Cut your chosen fabric scraps into equal squares. Then you use pinking shears for a sweet, frayed look that resists unraveling.
Step 2: Arrange the fabric squares on the cardstock in a layout you love.
Step 3: One by one, secure each patch in place using a light amount of fabric glue or fusible web, then press gently to smooth.
Step 4: Let the adhesive dry completely. If desired, add a top layer of thin Mod Podge or fabric sealant to preserve the colors.
#12. Boho Patchwork Curtain
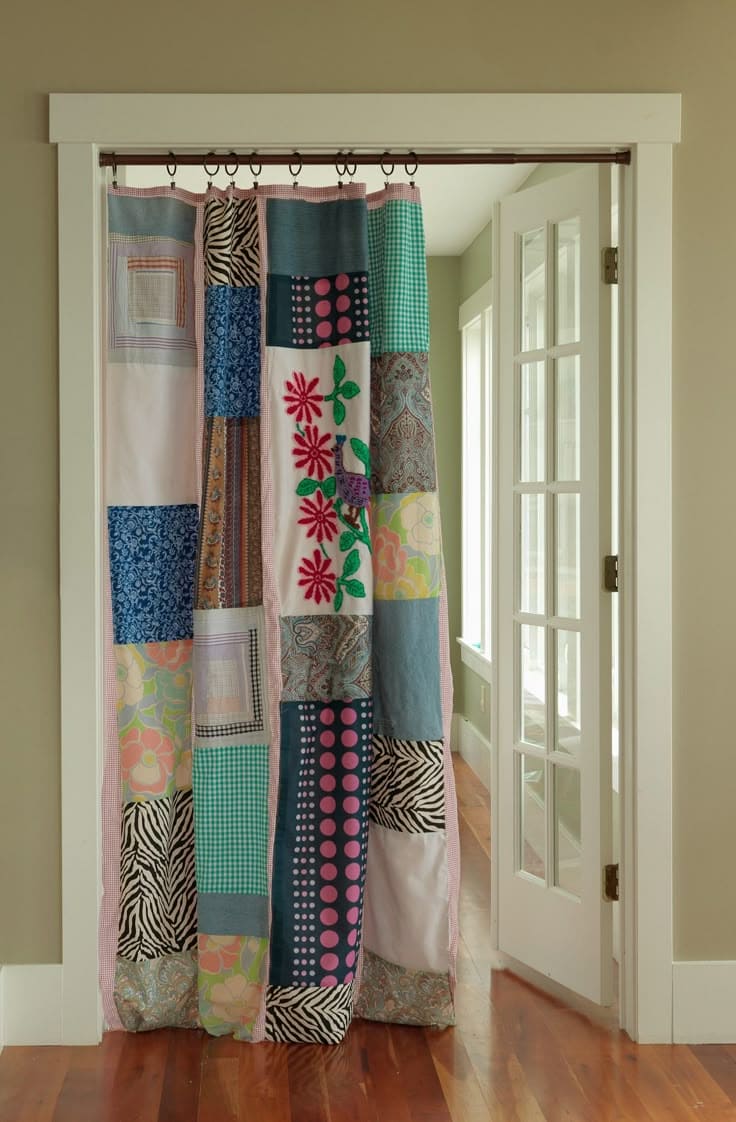
Instead of a plain door or divider, you get a cascade of cheerful, personality-filled fabric squares, each one different, each one delightful.
There’s something inviting about the mix of florals, stripes, animal prints, embroidery, and gingham that makes the space feel playful yet cozy. It’s one of those happy accident pieces that feels like it’s always belonged.
Materials Needed
- 18-25 fabric rectangles (approx. 10″ x 16″)
- 2 yards of backing fabric
- Bias tape (2.5 yards)
- Iron-on interfacing (optional)
- Sewing machine and coordinating thread
- Measuring tape, pins, scissors, and iron
- Curtain clips
Step-by-step Guide
Step 1: Sort your fabric rectangles into vertical strips, group colors or patterns if you want a loose theme, or go totally wild with contrast.
Step 2: Sew the rectangles together lengthwise to form long strips, then press all seams flat with an iron.
Step 3: Join all strips side-by-side until you have a full curtain width, you continue to press the horizontal seams neatly.
Step 4: Lay your patchwork onto the backing fabric (right sides facing), sew around the edges, and turn right side out
Step 5: Finally, add clips or sew grommets to the top, then hang it.
#13. Vintage-Inspired Patchwork Scarf
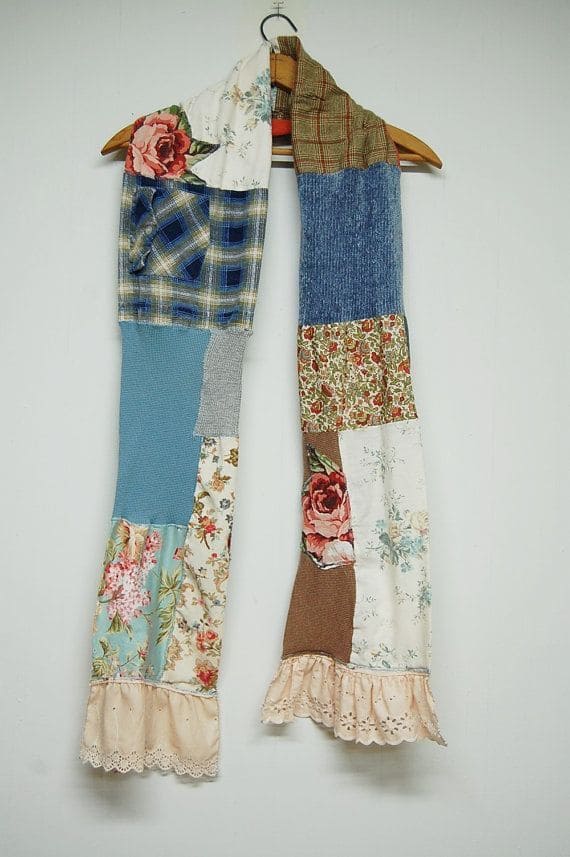
This scarf feels like a warm hug from grandma’s sewing box. It’s made from a thoughtful blend of floral cottons, soft knits, flannel, and lace, each piece whispering stories of seasons past.
Bonus, the frilled edges add a delicate, feminine touch, and the mix of textures gives it both warmth and whimsy. I love how it turns even the simplest outfit into something nostalgic and heartfelt.
Materials Needed
- 10-12 fabric scraps (sizes about 6″ x 8″) in different textures and prints
- 2 strips of lace trim (approx. 3″ wide and 20″ long)
- 1 piece of lightweight backing fabric (optional, 10″ x 60″)
- Sewing machine or needle and thread
- Fabric scissors, pins, and iron
Step-by-step Guide
Step 1: Choose your fabric scraps and lay them out in a pleasing order. You should alternate colors and textures to keep it visually balanced.
Step 2: Stitch the pieces together end to end, right sides facing. Then press the seams open as you go to keep everything flat.
Step 3: If using a backing, lay it right side together with your patchwork piece and sew around the edges, leaving a small gap. Turn right side out and stitch the gap closed.
Step 4: Attach the lace trim to both ends. You can gather it slightly for a soft ruffle or leave it straight for a cleaner look.
#14. Boho Patchwork Keychain Discs
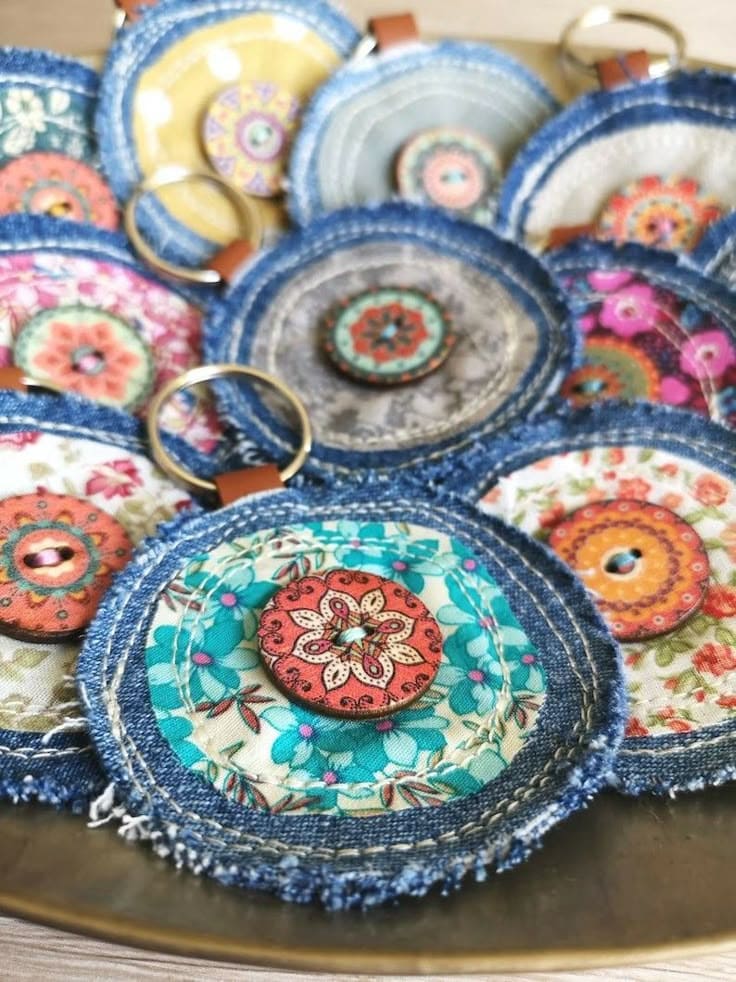
These handmade patchwork keychains blend denim, floral prints, and bold wooden buttons into playful little charms. Each disc is layered with circles of fabric, stitched concentrically for texture and dimension.
I love how the frayed denim edges give them that carefree boho energy, while the colors keep it cheerful. You can clip one to your keys, purse, or backpack, it’s like carrying a tiny piece of personality with you everywhere.
Materials Needed
- 6 denim fabric scraps (approx. 3″-4″ squares)
- 6 assorted cotton print scraps (2.5″-3″ circles)
- 6 decorative wooden buttons (1″ diameter)
- Embroidery floss or strong thread
- 6 keyrings with leather loops
- Scissors, needle, and fabric glue (optional)
- Circle template
Step-by-step Guide
Step 1: Cut out denim circles as the base layer, then smaller circles from your cotton prints.
Step 2: Stitch around each circle with a straight or zigzag stitch to secure all layers together, then leave the denim edges raw for texture.
Step 3: Sew a large wooden button in the middle as a focal point.
Step 4: Attach a keyring through a sewn-in leather loop or eyelet near the top of the disc. Finally, trim any uneven threads or excess edges.
#15. Classic Patchwork Throw Pillow
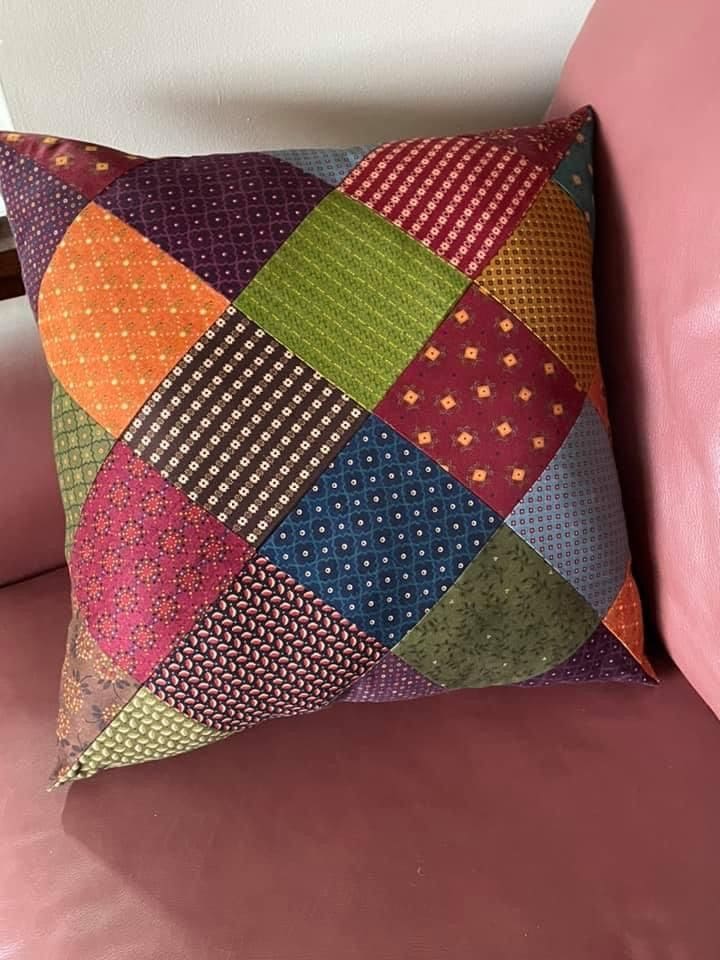
Wow, this vibrant throw pillow brings together a nostalgic mix of vintage prints and bold colors, perfect for adding a splash of character to any sofa or armchair.
Plus, it’s a lovely project for beginners who want to practice piecing and quilting, and it’s ideal for using up smaller scraps that are too special to toss. Each square becomes a tiny memory, stitched together into a functional piece of homey art.
Materials Needed
- 16 squares of cotton quilting fabric (each 5” x 5”)
- 1 piece of cotton backing fabric (18” x 18”)
- 1 invisible zipper (12” x 18” each)
- Thread, pins, sewing machine or hand needle
- Pillow insert (16” x 16”)
Step-by-step Guide
Step 1: Arrange your 5-inch fabric squares in a layout you like, 4 across by 4 down. You should mix colors and patterns for a bold contrast or keep it in a similar palette for a calmer vibe.
Step 2: Sew the squares into rows using a ¼” seam allowance. Then press seams flat, then join rows together, and press again for a smooth finish.
Step 3: Layer the patchwork top with the backing fabric, right sides together. You now insert zipper.
Step 4: Sew all around the edges. Continue to trim corners and turn right side out.
Step 5: Finally, insert your pillow form and fluff it up. Done!
#16. Rag Quilt Patchwork Tote Bag
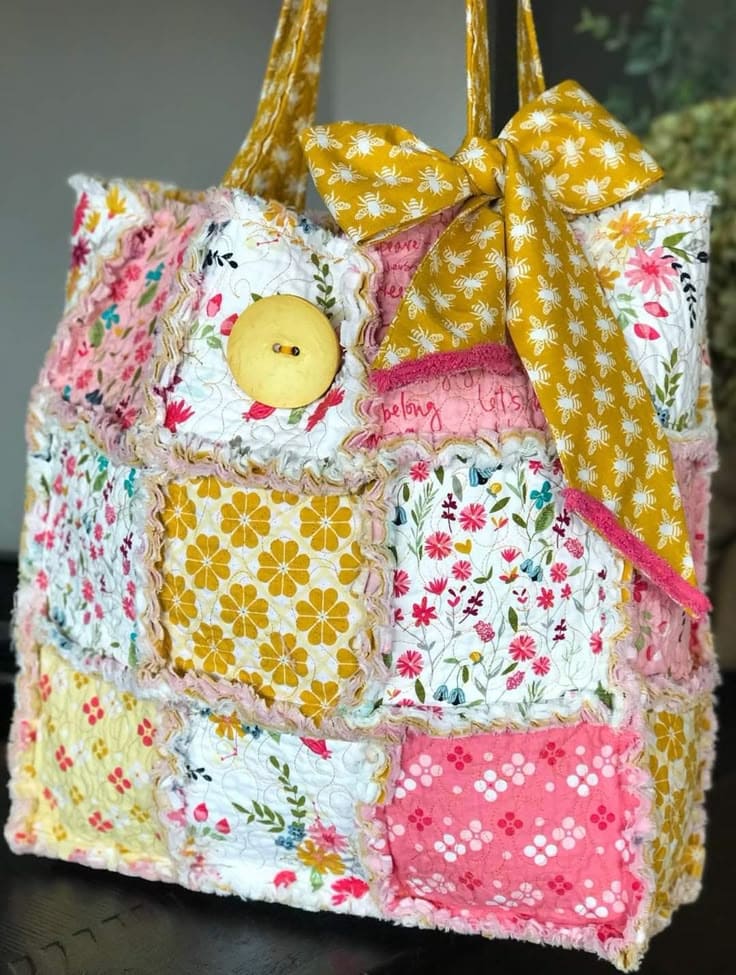
Designed with raw-edge seams that fluff over time, the bag is equal parts rustic charm and handmade luxury. Also, the oversized wooden button and playful yellow bow give it an irresistibly cute personality.
Materials Needed
- 18-20 fabric squares (5″x5″) in coordinating florals and solids
- Matching number of 5″x5″ cotton batting pieces
- Lining fabric
- 1 large button (wood or plastic)
- 1 yard matching cotton fabric
- Thread, scissors, sewing pins
- Sewing machine with walking foot (recommended)
Step-by-step Guide
Step 1: Make a fabric sandwich for each square including top layer, batting, and lining, then quilt each one with a simple “X” or swirl stitch.
Step 2: Join the squares together with seams facing outward. Once assembled, the exposed seams will become the fluffy fringe.
Step 3: Create two long straps using folded strips of matching fabric. Then stitch securely to the top inside edges of the bag.
Step 4: Add a fabric bow and sew a large button to the front for an accent. You can close the bag with a magnetic snap or button loop if desired.
Step 5: Clip the raw edges of each seam to encourage fraying, then toss the bag in the washer and dryer to achieve the signature raggy look.
#17. Patchwork Fabric Gift Tags
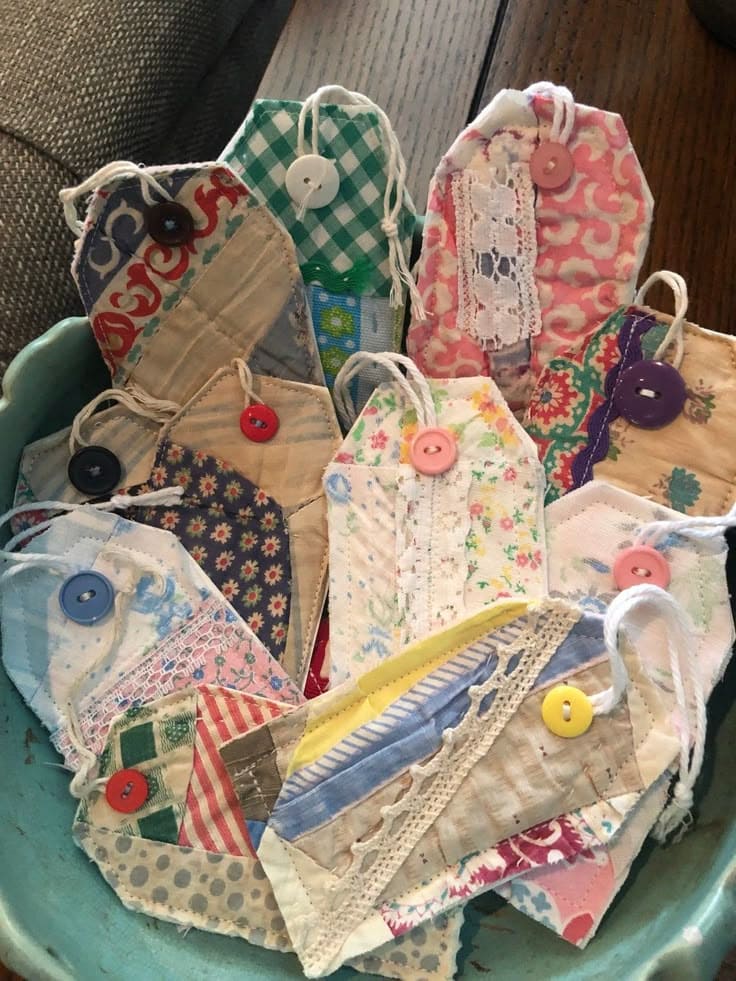
These patchwork gift tags are tiny, charming, and a whole lot more meaningful than store-bought ones. They’re perfect for adding a personal touch to presents, scrapbooks, or even as bookmarks.
I love how each tag feels like a miniature quilt square. Some have buttons, others lace or hand-stitching, making each one delightfully unique.
Materials Needed
- 12-15 small fabric scraps (approx. 2″ x 4″) in assorted prints and textures
- Lightweight fusible interfacing (¼ yard)
- 10 cardstock pieces (cut into 2″x4″ rectangles)
- 10-12 decorative buttons
- Lace (optional, ½ yard)
- Sewing machine or hand needle and thread
- Hole punch and string
Step-by-step Guide
Step 1: Cut your base pieces from cardstock or felt. These will give the tags structure and make them sturdy.
Step 2: Arrange and sew fabric scraps across each base in diagonal or patchy strips. Don’t worry about perfection as it’s the variety that makes them sing.
Step 3: Iron a piece of interfacing to the back to smooth things out and hold the layers together.
Step 4: Trim edges and round or angle the top corners like traditional tags. Then punch a hole at the top center.
Step 5: Finally, add a decorative button or lace detail, then loop through string or ribbon.
#18. Photo Patch Memory Dress
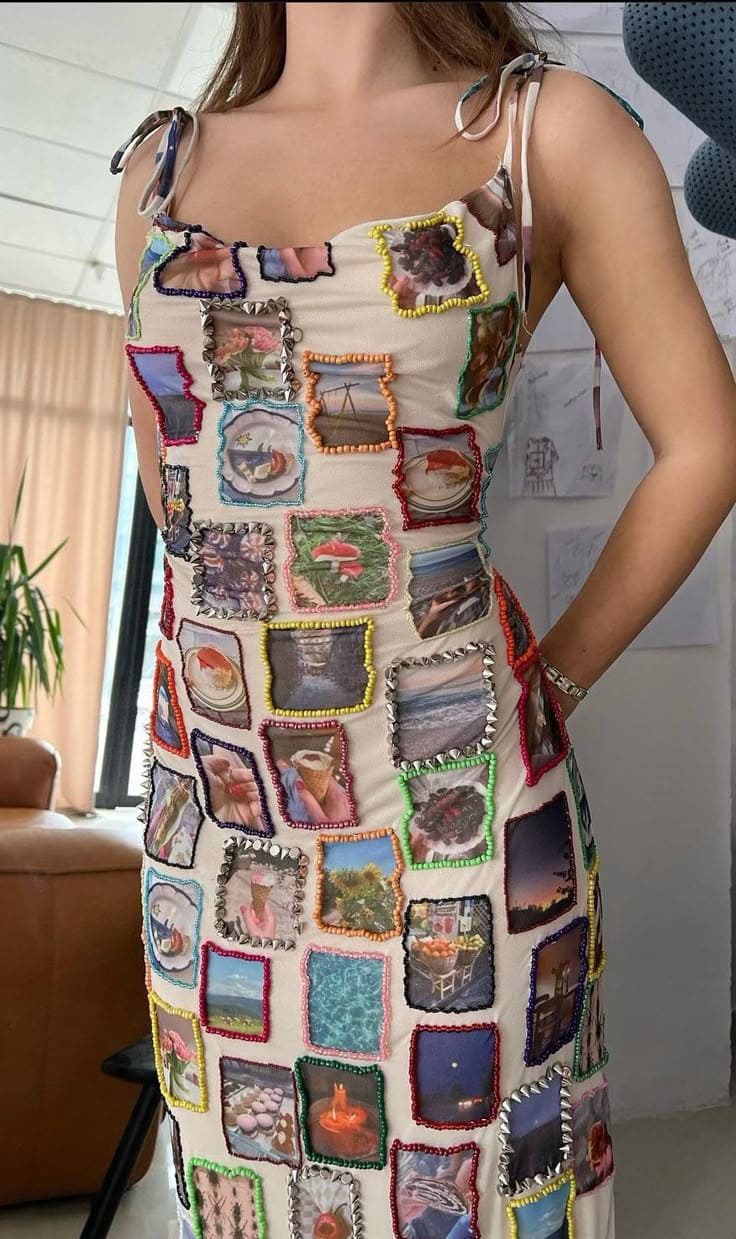
This one’s a total conversation starter. A fitted slip-style dress becomes a gallery of stitched memories, with mini photo patches arranged like personal postcards all over the fabric.
Moreover, each image feels like a snapshot of summer like picnics, ice cream cones, sunsets, beach days and every square is bordered with vibrant thread, beads, or funky stitches that give it a scrapbook feel.
Materials Needed
- 1 plain linen slip dress (neutral tone works best)
- 30-40 small photo-printed fabric patches (about 2.5″ x 2.5″ each)
- Embroidery thread in 6-8 colors
- Optional: seed beads
- Embroidery needle and thimble
- Fabric glue
- Iron and pressing cloth
Step-by-step Guide
Step 1: Print your favorite photos onto iron-on transfer paper and apply them to white cotton fabric. Then trim them into small squares with pinking shears or straight edges.
Step 2: Lay out your photo patches on the dress to get a balanced, scattered arrangement.
Step 3: Use a tiny dab of fabric glue to hold each patch in place. Then, stitch around each one using colorful embroidery floss or decorative beads. You should mix up your stitches like blanket, chain, zigzag or a whimsical patchwork effect.
Step 4: Once everything is stitched, give the dress a gentle press to smooth it out.
#19. Patchwork Leather Clutch
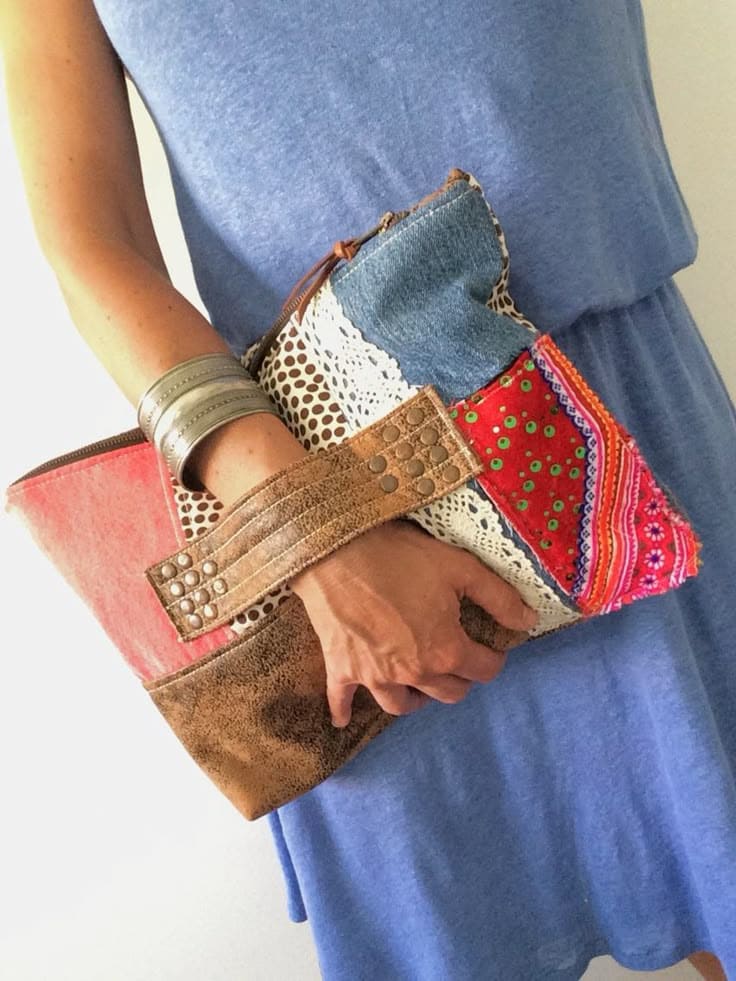
Amazingly, the mix of worn denim, faux leather, vibrant embroidery, and vintage lace gives it texture and soul. Whether you carry it to brunch, a festival, or just out for errands, it adds instant flair to even the simplest outfit.
Also, that built-in leather wrist strap is super handy and surprisingly comfy. It’s the perfect project if you want to turn fabric scraps into something practical and chic.
Materials Needed
- 7-10 assorted fabric scraps (approx. 6″ x 8″ each: denim, faux leather, lace, embroidery)
- 1 piece of fusible interfacing (10″ x 14″)
- 10″ zipper
- Lining fabric (10″ x 14″)
- Optional leather strap (10″ x 2″) + rivets or snap fasteners
- Sewing machine, leather needle
- Scissors, pins, and fabric glue
Step-by-step Guide
Step 1: Arrange your fabric pieces into a pleasing layout on top of the interfacing. Then you trim any uneven edges, and stitch them together to create one flat panel.
Step 2: Fuse the patchwork panel onto interfacing with an iron to strengthen it.
Step 3: Attach the zipper along the top edge, sewing it between the outer patchwork and lining fabric. You want to repeat for the other side of the zipper.
Step 4: Sew around the edges of the clutch, leaving a gap in the lining to turn it right side out.
Step 5: Finally, attach your leather strap with rivets or topstitch in place.
#20. Rustic Patchwork Sundress
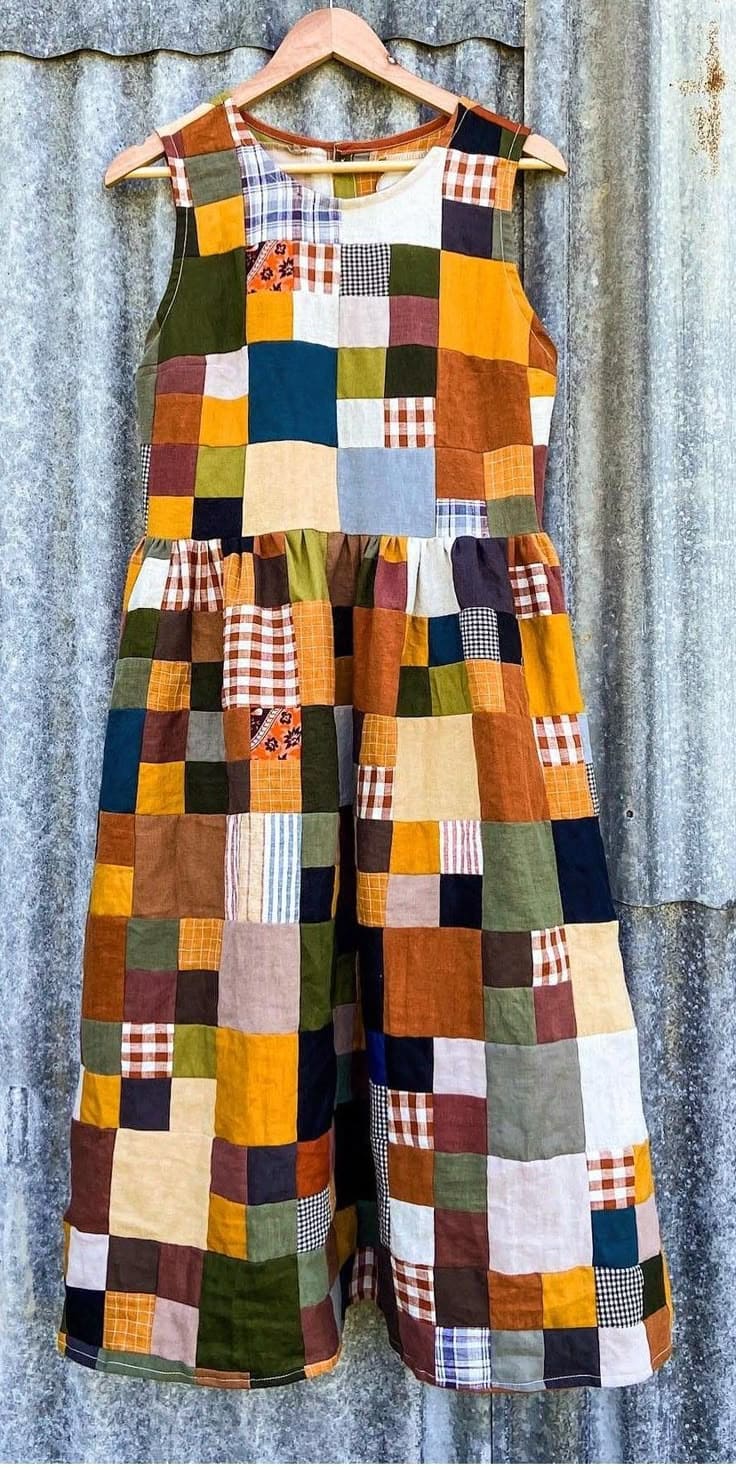
This charming sundress is the definition of slow fashion done right. Every patch tells its own story including gingham, florals, checks, solids, all stitched into a cheerful cascade of autumn hues.
Specially, the shape is simple and breezy, making it the perfect everyday dress for warmer days or layering with a cardigan when it cools off. I imagine wearing this to the farmers’ market or picking wildflowers in the garden.
Materials Needed
- 30-40 cotton fabric squares (each about 5″ x 5″) in various patterns and colors
- 1 yard of cotton lining fabric (optional)
- Bias tape
- Sewing machine and matching thread
- Scissors, pins, measuring tape, and iron
- Dress pattern (basic sleeveless bodice and gathered skirt)
Step-by-step Guide
Step 1: Choose your fabric squares and lay them out to create the bodice and skirt pieces. You’d better mix colors and patterns freely for that signature patchwork vibe.
Step 2: Sew the squares together, pressing seams flat as you go. Then create enough patchwork fabric to match the pieces of your dress pattern.
Step 3: Cut out the dress pieces from your patchwork sections, following your pattern. Next, assemble the bodice first, then attach the gathered skirt.
Step 4: Finish the neckline and armholes with bias tape or a turned hem. Add a lining if you want extra softness inside.
#21. Cozy Patchwork Crochet Runner for the Kitchen
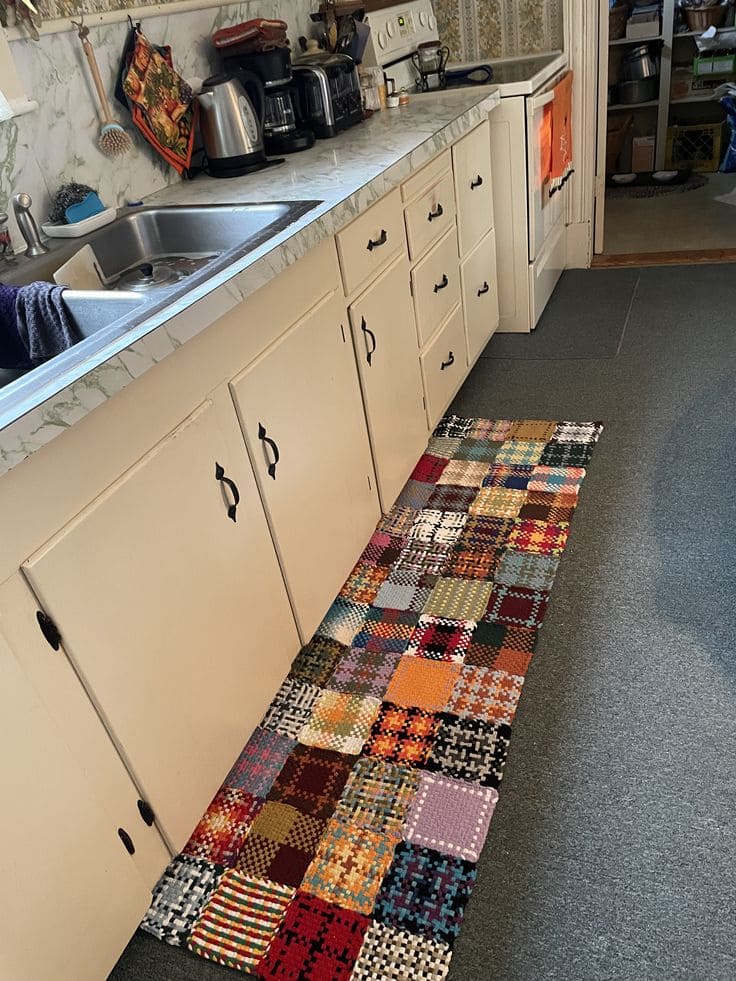
What a delightful way to warm up your kitchen floor! This handcrafted crochet runner is made entirely from small, colorful granny squares, each boasting a unique pattern and palette.
I believe you will love love how it brings instant charm and texture into the space as it’s both practical and beautiful. Perfect for anyone who wants to infuse a bit of nostalgia into a modern kitchen!
Materials Needed
- Worsted weight yarn in at least 15 different colors (50g per color)
- Size H/5.0mm crochet hook
- Scissors and yarn needle
- Anti-slip rug pad or fabric backing (optional)
Step-by-step Guide
Step 1: Crochet 6×12 individual granny squares using your chosen colors. Each square should measure about 4” x 4”. You can mix up patterns to create visual interest.
Step 2: Weave in all loose ends on each square and lightly block them if necessary to ensure even edges.
Step 3: Arrange the squares in a layout that flows well, then seam the squares using either slip stitch join.
Step 4: Optionally, add a backing for extra durability or lay a non-slip mat underneath to prevent shifting.
#22. Bandana Patchwork Tablecloth
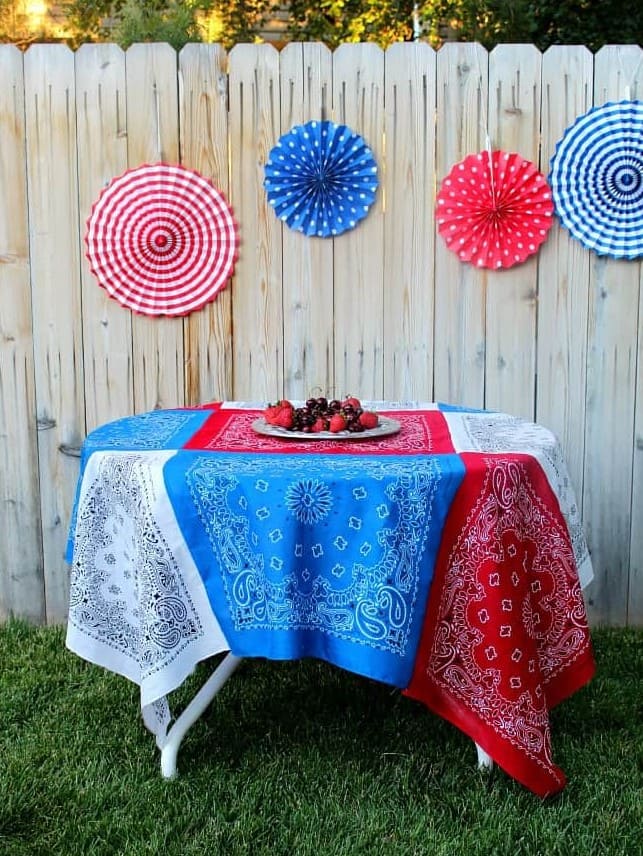
This bandana tablecloth is a cheerful and easy way to dress up your outdoor table, especially for summer cookouts or patriotic gatherings.
Bright, bold, and no sewing machine required if you’re feeling crafty with fabric glue or iron-on tape. It’s practical, washable, and looks like a burst of Americana charm.
Materials Needed
- 4-9 standard cotton bandanas (22″ x 22″), mix of red, white, blue, or your favorite theme
- Matching thread (if sewing)
- Fabric glue (if no sewing)
- Iron, pins, and scissors
Step-by-step Guide
Step 1: Lay out your bandanas in a square or rectangular grid depending on your table size, 3×3 works well for a square card table, while 2×4 is perfect for a longer surface.
Step 2: Overlap edges slightly (about ½”) or line them edge-to-edge. Then pin them in place for sewing, or use fusible web between the layers if you’re skipping stitching.
Step 3: Sew the bandanas together along the edges with a simple straight stitch, or press with a hot iron if using fabric adhesive.
Step 4: For a finished look, hem the outer edges or add bias tape, though the raw edges of bandanas usually hold up well for casual use.
Tip: You can even line it with a waterproof layer underneath if you’re using it outdoors often!
#23. Colorful Patchwork Kitchen Apron
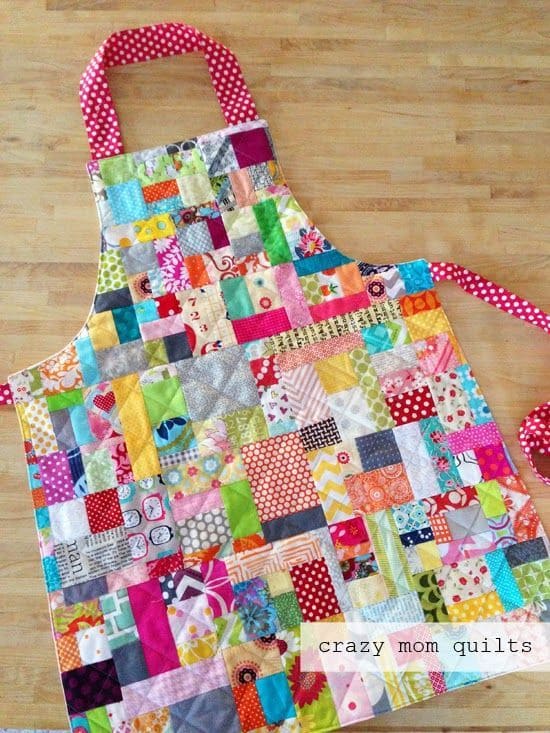
This delightful patchwork apron turns scraps into a functional fashion statement. With a sea of vibrant fabric squares stitched together, it’s a joyful blend of creativity and practicality.
Materials Needed
- 60-80 fabric scraps in various colors (each about 2.5″x2.5″ to 3″x5″)
- 1 piece of backing fabric, approx. 24″x28″
- Lightweight fusible interfacing (same size as backing)
- Thread in a neutral color
- ½ yard of fabric
- Bias tape (optional)
- Sewing machine, scissors, pins
Step-by-step Guide
Step 1: Lay out your patchwork pieces in a rectangle roughly 24″x28″. You should mix colors and patterns freely, or go for a rainbow gradient if you’re feeling fancy.
Step 2: Sew the scraps into rows first, then stitch the rows together to complete the front panel. Then press seams flat as you go for a tidy finish.
Step 3: Iron on fusible interfacing to give the apron some structure, then pin and stitch to your backing fabric.
Step 4: Cut out an apron shape using a template or an apron you already own as a guide. Now, round the corners or add angles to your preference.
Step 5: Sew on the neck loop and waist ties using sturdy cotton fabric or thick ribbon.
Pro tip: If you’re gifting this apron, stitch a pocket on the front using a contrasting square due to both cute and useful.


