Ever wished your home felt a little more like a dance floor? Disco-inspired decor is all about bringing that glittery, carefree energy into your everyday space.
With a touch of mirrorball magic and a love for all things bold and shiny, you can transform even the dullest corner into something that shimmers.
These 22 DIY projects are perfect for anyone craving a little sparkle whether it’s a funky wall piece, a dazzling light fixture, or a sparkly plant pot.
You don’t need a full renovation or a disco ball budget, just some creativity, a few sequins or mirrors, and the spirit of Saturday night.
#1. DIY Disco Ball Wall Art
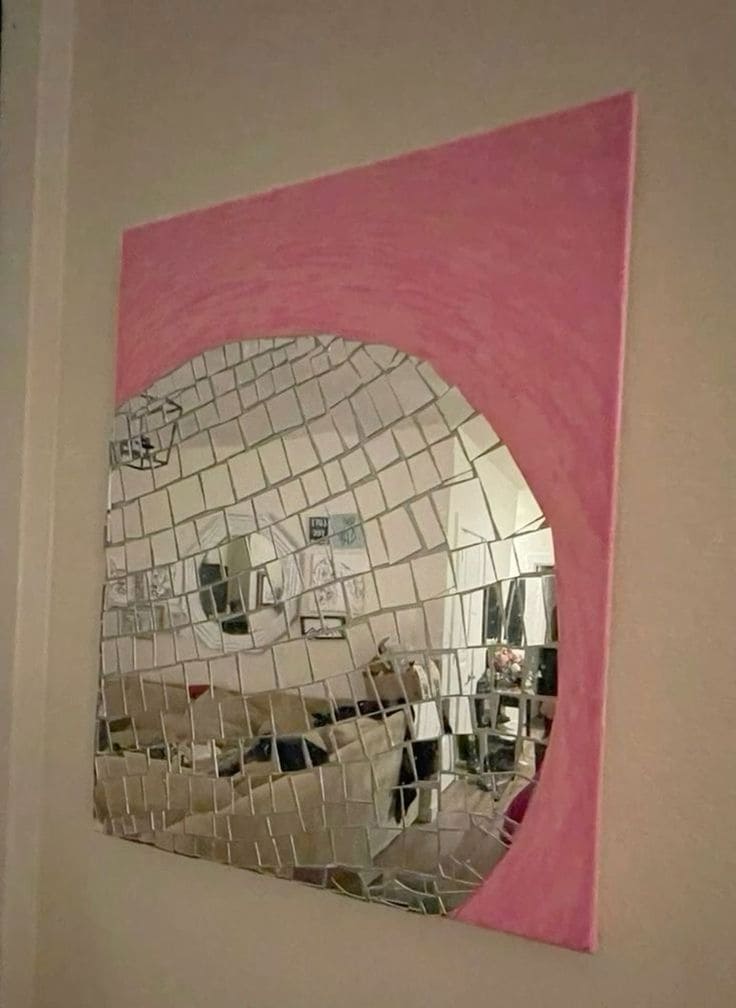
How incredibly cool and unexpected is this piece of art? It takes the iconic sparkle of a disco ball and transforms it into a bold, modern wall statement!
Imagine this hanging in your living room, a teen’s bedroom, or even a home bar, bringing a unique blend of art and dazzling light to your space.
Plus, the pink background here offers a playful contrast, but you could choose any color to make it truly your own.
Materials Needed
- 1 stretched canvas (e.g., 20×24 inches or larger)
- Acrylic paint (in your chosen background color, e.g., bright pink)
- Paintbrush
- 100-200 flat mirror tiles (approximately 1×1 inch or 0.5×0.5 inch)
- Strong craft glue
- Pencil or chalk
- Ruler or flexible measuring tape
Step-by-step Guide
Step 1: Paint your canvas your desired background color and let it dry. Then lightly sketch a large, curved shape onto the canvas with a pencil or chalk; this is where your mirror tiles will go.
Step 2: Begin applying mirror tiles within your sketched curve. If self-adhesive, peel and stick. If not, apply a small dot of strong craft glue to each tile and press firmly onto the canvas.
Next, place tiles closely together, starting along an edge and working inward.
Step 3: Continue adding tiles, following your sketched curve to fill the entire section.
Step 4: Once all tiles are in place, let the glue cure completely (check your glue’s instructions, typically 24 hours).
#2. DIY Sparkling Snowman
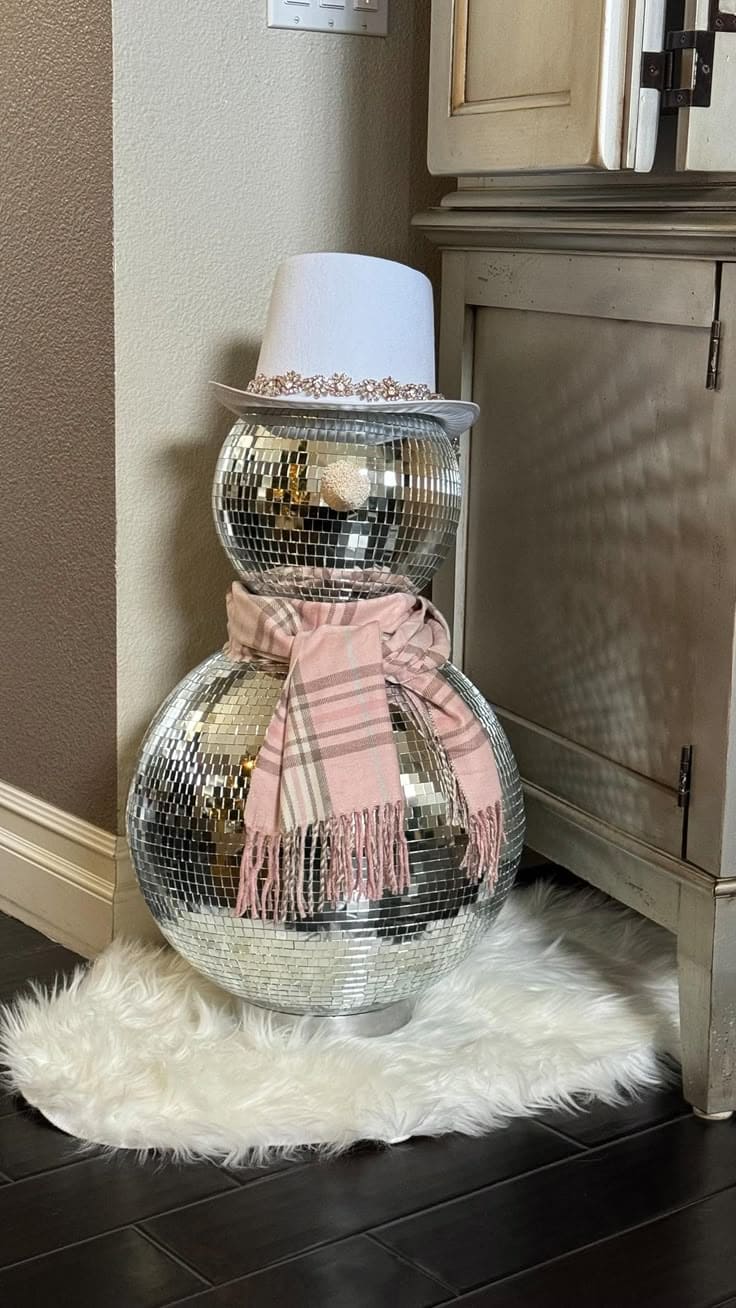
Ready to bring some unexpected sparkle and festive cheer into your home, even beyond the holidays?
This DIY sparkling snowman is an absolute delight, transforming simple spheres into a dazzling, light-reflecting winter friend!
You’ll love seeing this friendly figure come to life with all its radiant shine, making every day feel a little more festive!
Materials Needed
- 2 large Styrofoam or lightweight plastic spheres
- Small mirror mosaic tiles
- Strong craft glue
- White top hat
- Small scarf (fabric, ribbon, or knit)
- Craft knife
- Optional: Hot glue gun
Step-by-step Guide
Step 1: Prepare your sphere shapes. If desired, you can paint them white for a clean base, especially if they are not already white, and let them dry completely.
Step 2: Begin applying your mirror tiles to the surface of both spheres. Work carefully, covering the entire larger sphere (the body) first, then the slightly smaller sphere (the head).
Step 3: As you cover the curved surfaces, you’ll need to cut your mirror tiles into smaller pieces to fit snugly and ensure full coverage.
Step 4: Once all the tiles are applied and the adhesive has completely dried, it’s time to assemble your snowman.
Then, adorn your snowman with its top hat and wrap a charming scarf around its neck.
#3. DIY Giant Disco Cherries
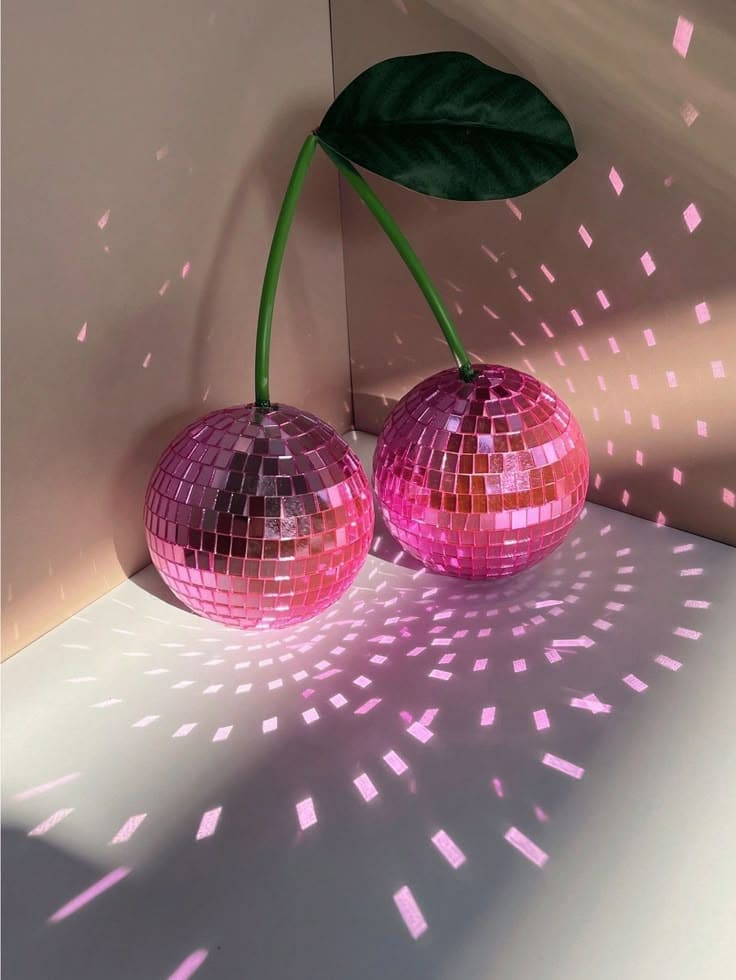
Amazingly, these DIY giant disco cherries are an absolute treat for the eyes, transforming simple spheres into a playful, oversized fruit sculpture that radiates pure joy.
Plus, these shimmering beauties catch the sunlight in a corner, adding a vibrant and quirky touch to a party, or even gracing a mantelpiece with their unique charm.
Materials Needed
- 2 large Styrofoam or lightweight plastic spheres
- Pink or red mirror mosaic tiles
- Strong craft glue or adhesive
- 2 sturdy green craft wires
- Large artificial green leaf
- Green floral tape
- Craft knife or strong scissors
Step-by-step Guide
Step 1: If using Styrofoam, you might want to gently sand any rough spots. If using craft wire for stems, wrap them neatly with green floral tape.
Step 2: Begin applying your pink or red mirror tiles to the surface of each sphere. Start from one point and work your way around.
If your tiles are self-adhesive, simply peel and press firmly. If not, apply a tiny dab of strong glue to the back of each tile before placing it.
Step 3: As you cover each sphere, you’ll need to cut your mirror tiles into smaller pieces to fit the curves snugly and ensure full coverage.
Step 4: Once all the tiles are applied and the adhesive has completely dried, carefully insert one green stem into the top of each cherry.
Then, attach the large green leaf to the top of one of the stems, arranging them to look like a pair of cherries.
#4. DIY Disco Shoes
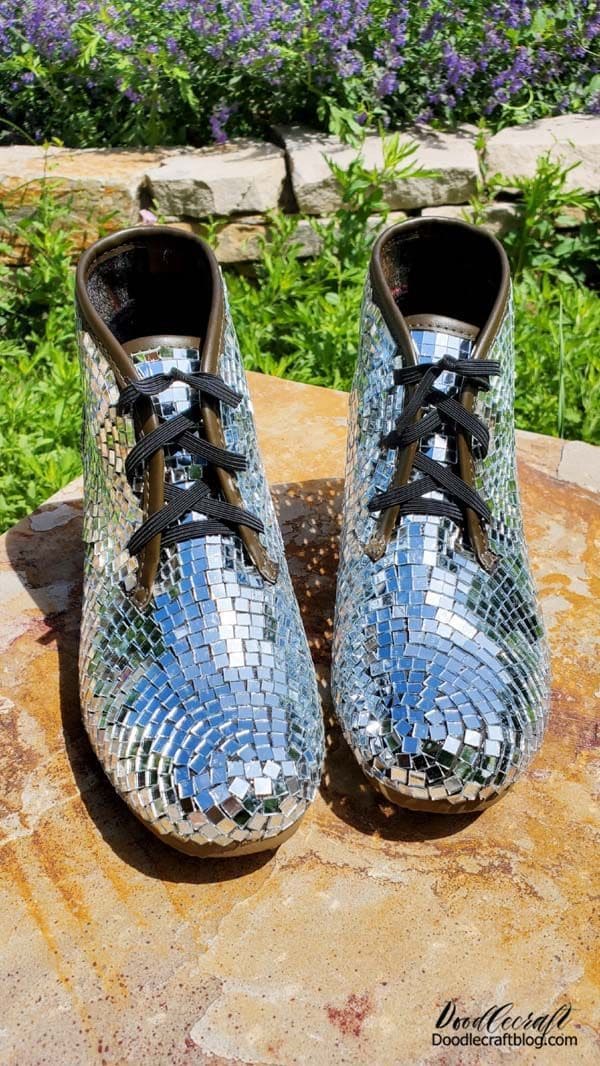
These DIY disco shoes are an absolute game-changer, transforming ordinary footwear into dazzling works of art that are ready for the dance floor or just a fabulous day out.
This project is for anyone who loves to express their unique style and isn’t afraid to shine.
Moreover, it’s a surprisingly accessible way to create a truly bespoke accessory that will turn heads and bring pure joy with every glittering stride.
Materials Needed
- A pair of shoes
- Small mirror mosaic tiles
- Strong craft glue
- Tweezers
- Craft knife or strong scissors
- Rubbing alcohol and cotton pads
Step-by-step Guide
Step 1: Prepare your shoes by cleaning them thoroughly with rubbing alcohol. Let them dry completely before you start.
Step 2: Begin applying your mirror tiles to the surface of the shoes. Start with larger, flat areas and work your way around.
Step 3: As you reach curved areas, corners, and edges, you’ll need to cut your mirror tiles into smaller pieces or custom shapes to fit.
Step 4: Continue until the entire shoe is covered in shimmering tiles. Then allow plenty of time for all the adhesive to dry completely, following the glue manufacturer’s instructions.
#5. DIY Disco Shell Chandelier
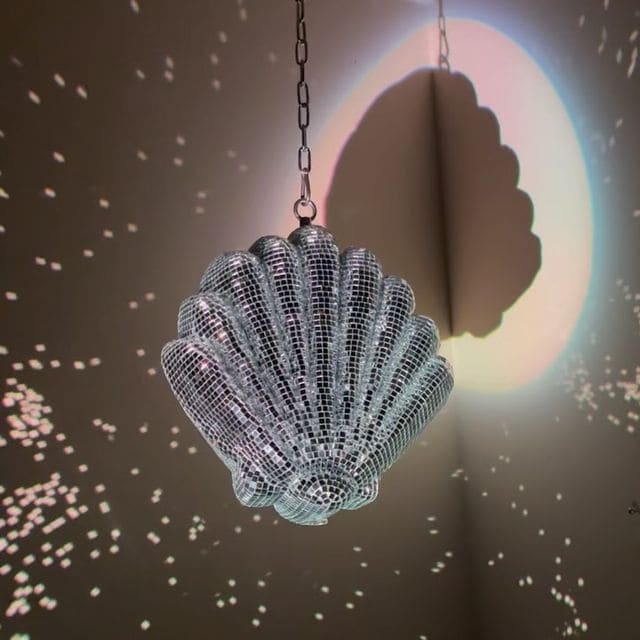
Wow, this DIY disco shell chandelier is an absolutely mesmerizing piece, transforming a simple shape into a dazzling, light-casting work of art that’s pure enchantment.
I believe this sparkling shell hangs gracefully, sending dancing light patterns across your walls and ceiling, creating an ethereal and dreamy ambiance.
Materials Needed
- Large shell shape
- Small mirror mosaic tiles
- Strong craft glue
- Craft knife
- Eye hooks and chain
- Optional: Tweezers
Step-by-step Guide
Step 1: Prepare your shell shape by ensuring it’s clean and smooth. Any dust or residue should be removed to ensure proper adhesion for your mirror tiles.
Step 2: Begin applying your mirror tiles to the outer, curved surface of the shell.
Step 3: As you navigate the ridges and curves of the shell, you’ll likely need to cut your mirror tiles into smaller pieces or strips to fit snugly.
Step 4: Continue until the entire shell shape is covered in shimmering tiles. Now, hang your magnificent disco shell chandelier and watch it cast its magical, dancing light patterns.
#6. DIY Mirror Mosaic Cactus
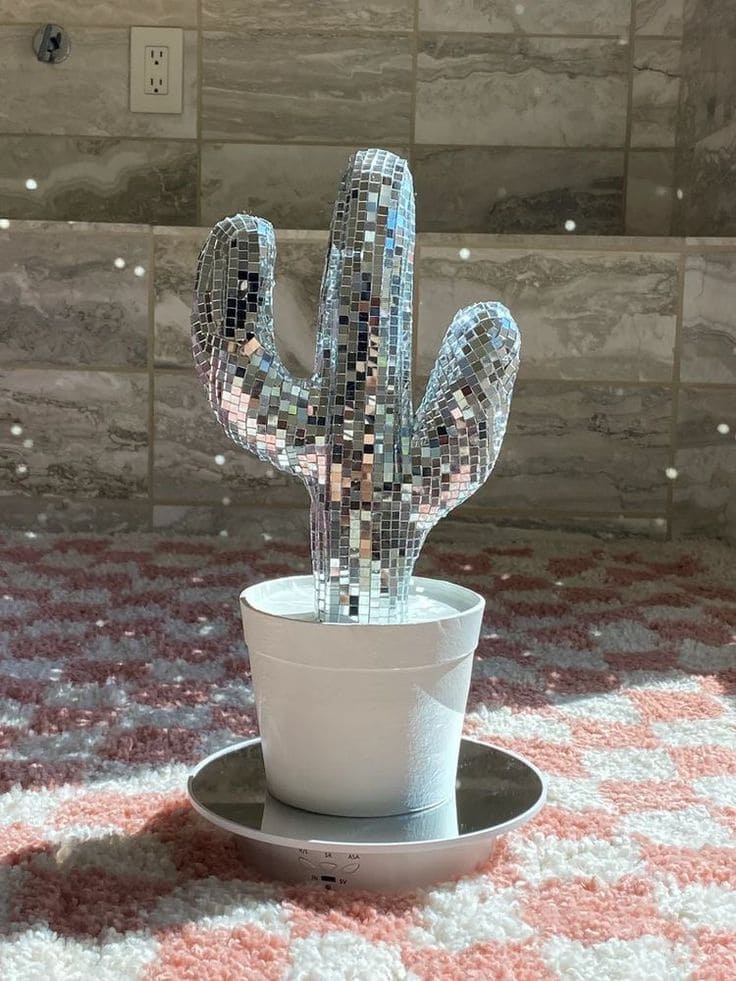
This DIY mirror mosaic cactus is an absolute delight, transforming a simple plant shape into a dazzling, light-reflecting sculpture!
It’s a wonderfully creative project that combines natural inspiration with a fun, retro vibe, making it a conversation starter in any space.
Materials Needed
- Cactus shape made from Styrofoam, cardboard, or wood
- Small mirror mosaic tiles
- Strong craft glue
- Craft knife
- A small pot and saucer
- White paint
- Optional: Small pebbles or decorative filler
Step-by-step Guide
Step 1: If you’re using a plain pot, you might want to paint it white or a color of your choice now and let it dry completely.
Step 2: Begin applying your mirror tiles to the cactus shape. Start from the base and work your way up each arm.
Step 3: As you navigate the curves and arms of the cactus, you’ll need to cut your mirror tiles into smaller pieces to fit snugly.
Step 4: Continue until the entire cactus is covered in shimmering tiles. You can add small pebbles around the base for a realistic touch.
#7. DIY Disco Mannequin
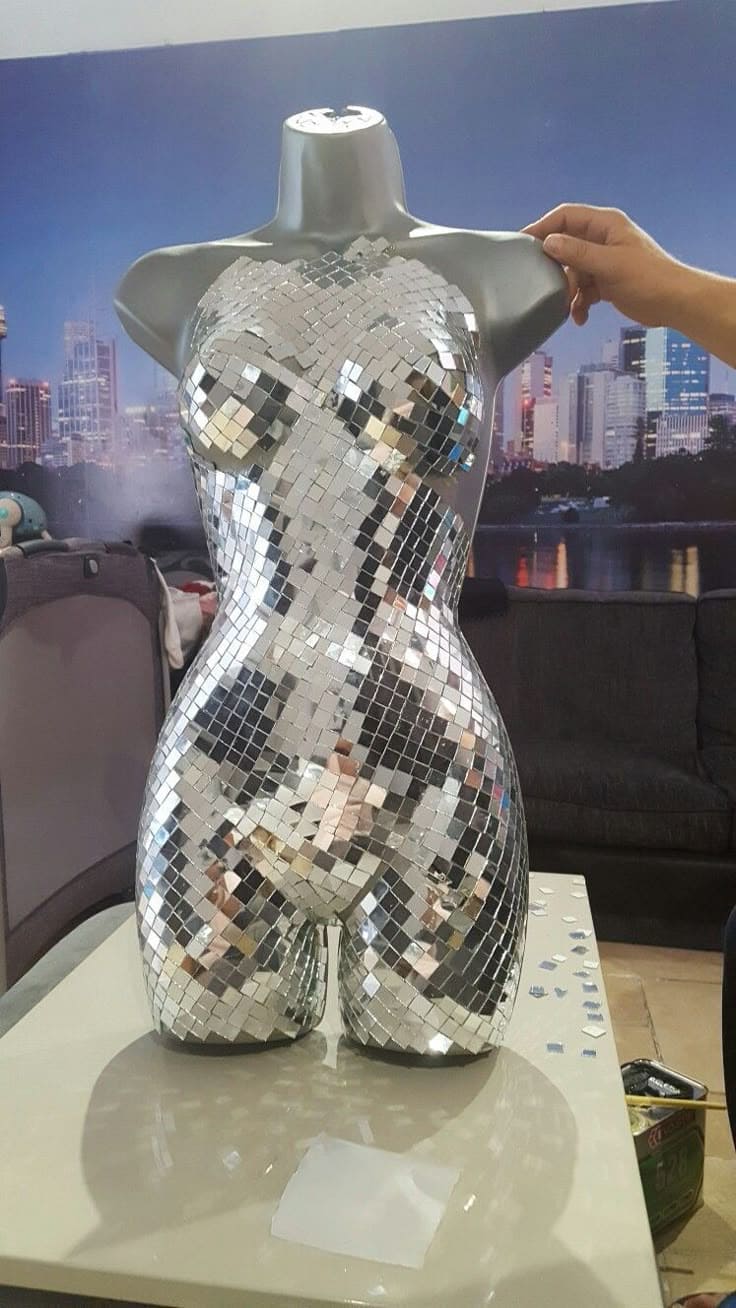
This DIY disco mannequin project is an absolute showstopper, turning an ordinary form into a dazzling focal point that catches every glimmer of light.
It’s a fantastic way to infuse a dose of playful glamour and transform a simple item into a work of art.
Plus, it’s a project that’s surprisingly therapeutic as you meticulously place each little mirror, watching the piece come to life!
Materials Needed
- Mannequin torso or full body form
- Small mirror tiles
- Strong adhesive
- Grout (optional)
- Grout spreader
- Sponge and water
- Protective gloves
- Towel or drop cloth
Step-by-step Guide
Step 1: First things first, make sure your mannequin is clean and dry. Give it a good wipe down to ensure any dust or grime won’t interfere with your adhesive.
Step 2: Starting from the top, or a prominent area like the chest, begin applying your mirror tiles. If they’re self-adhesive, simply peel and stick.
Step 3: As you work your way around the curves and contours of the mannequin, you might need to cut some mirror tiles to fit awkward spots or edges. You can use strong scissors or tile nippers for this.
Step 4: If you want a more cohesive and finished look, you can apply grout in between the mirror tiles once all the adhesive has dried.
Next, mix your grout according to the package directions, then use a grout spreader or an old credit card to push it into the gaps between the tiles.
Step 5: Once all the grout has dried and been cleaned, your disco mannequin is ready to steal the show!
#8. DIY Disco Star Ornament
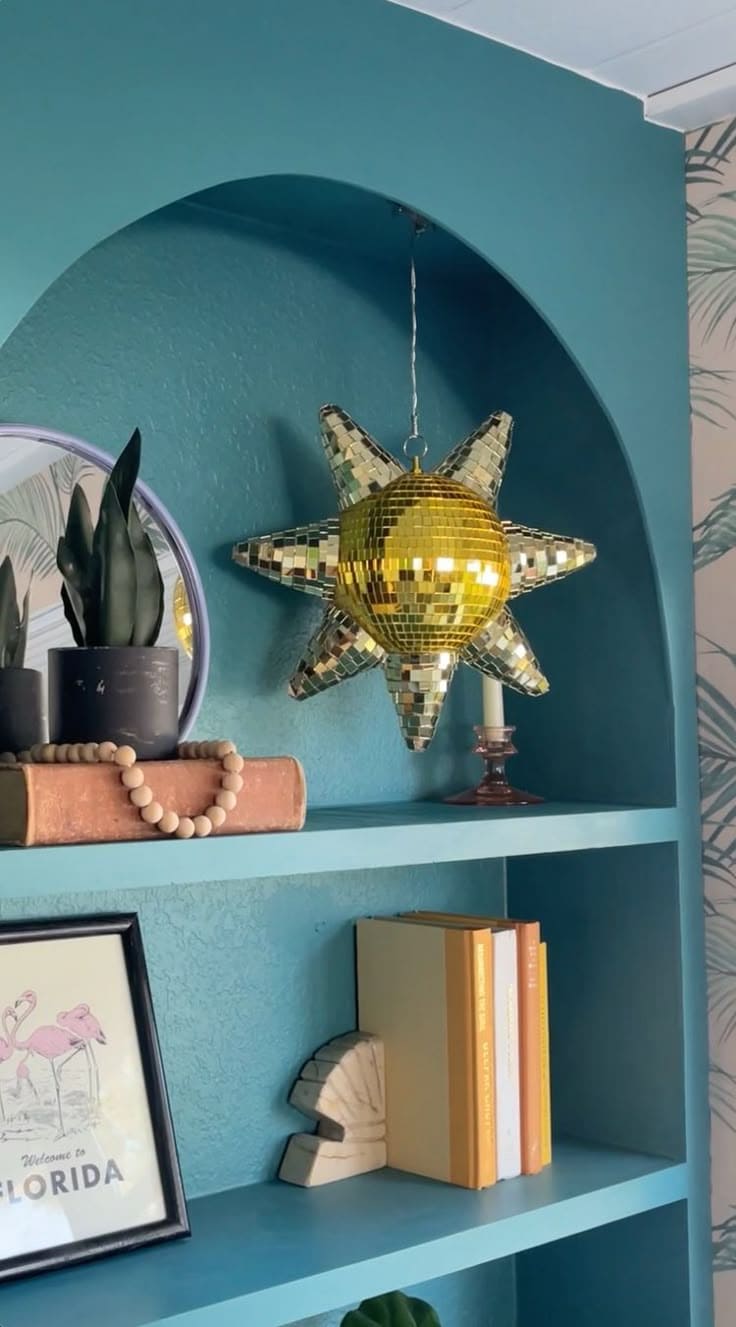
This DIY disco star ornament is an absolute showstopper, transforming a simple shape into a dazzling beacon of light and joy!
Imagine this shimmering star hanging gracefully in a cozy nook, adorning a party, or becoming a unique, festive highlight in your decor.
I think it’s a wonderful project that combines cosmic charm with classic disco glam, casting beautiful reflections all around.
Materials Needed
- Star-shaped form
- Small mirror mosaic tiles (gold or silver, self-adhesive are fantastic!)
- Strong craft glue or adhesive (if tiles aren’t self-adhesive)
- Craft knife or strong scissors (for cutting tiles)
- String, fishing line, or chain
- Optional: Eye hook
Step-by-step Guide
Step 1: Prepare your star shape by ensuring it’s clean and smooth. Any dust or residue should be removed to ensure proper adhesion for your mirror tiles.
Step 2: Begin applying your mirror tiles to the surface of the star. Start from the center and work your way outwards, meticulously covering each point and surface.
Step 3: As you navigate the points and angles of the star, you’ll need to cut your mirror tiles into smaller pieces or strips to fit snugly.
Step 4: Continue until the entire star shape is covered in shimmering tiles. Once dry, attach a string, fishing line, or chain for hanging.
#9. DIY Disco Glasses
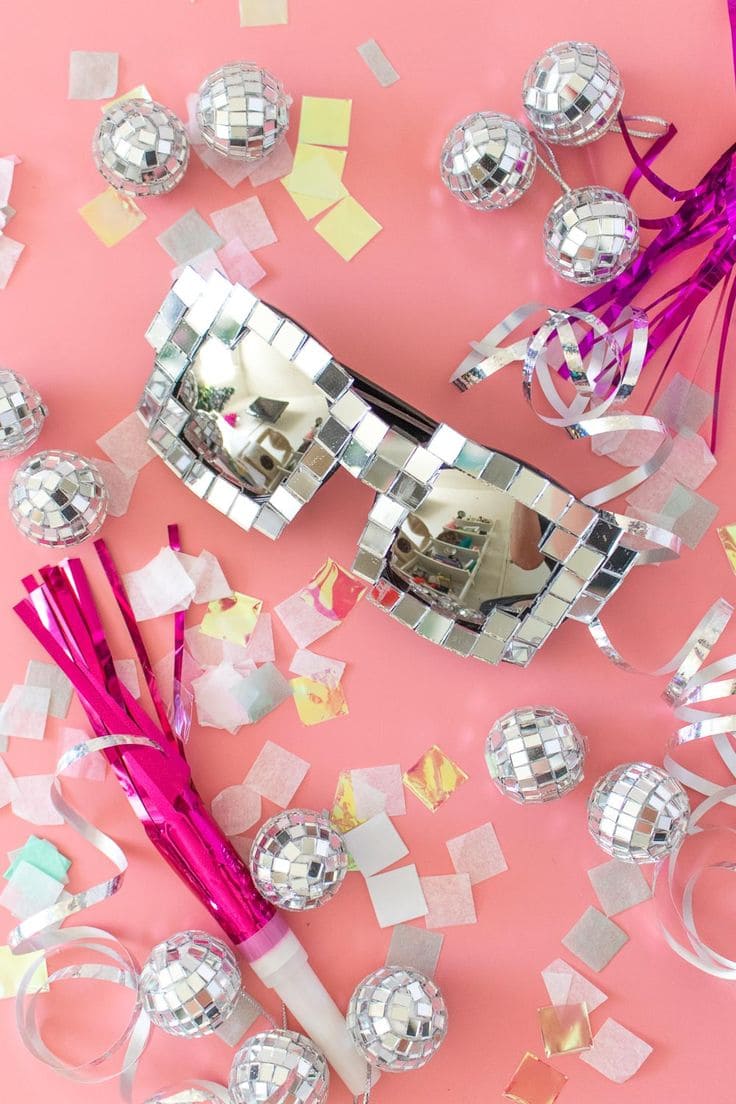
These DIY disco glasses are the ultimate accessory for parties, festivals, or just bringing a dose of playful glam to your everyday!
This is an incredibly fun and straightforward project that lets you transform ordinary sunglasses into a shimmering statement piece that’s bursting with personality.
Materials Needed
- Pair of oversized or novelty sunglasses
- Small mirror mosaic tiles
- Strong craft glue
- Craft knife
- Rubbing alcohol and cotton pads
Step-by-step Guide
Step 1: Thoroughly clean the frames of your sunglasses with rubbing alcohol to remove any oils or dirt. This ensures that your mirror tiles will adhere properly.
Step 2: Begin applying your mirror tiles to the front of the sunglass frames. If your tiles are self-adhesive, simply peel and press firmly onto the frame.
Step 3: Work methodically across the frame, trying to keep the spacing between tiles as consistent as possible.
As you reach the edges and curves of the frames, you’ll need to cut your mirror tiles into smaller pieces or strips to fit precisely.
Step 4: Continue until the entire front surface of the sunglass frames is covered in shimmering tiles. You can also cover the arms of the glasses for extra sparkle.
#10. DIY Disco Mushroom
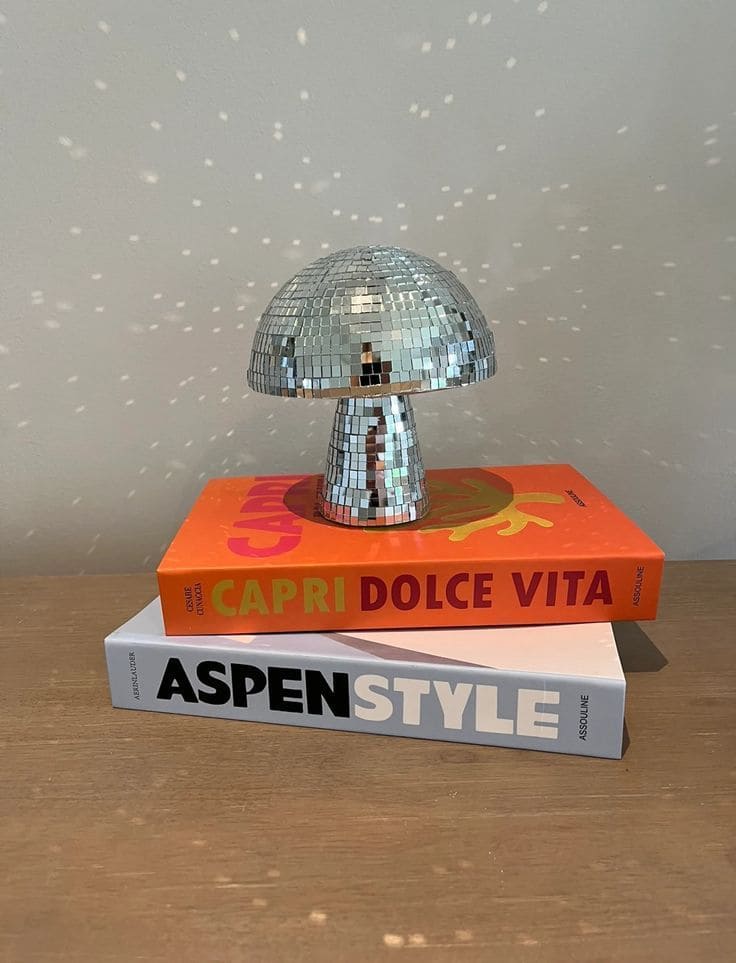
This DIY disco mushroom is an absolutely enchanting creation, transforming a simple shape into a shimmering accent piece that’s bursting with personality.
You can brighten a bedside table, or add a playful, unexpected element to your decor through this project. You’ll love seeing this little mushroom come to life with all its radiant shine!
Materials Needed
- 2 Styrofoam or lightweight plastic spheres
- Small mirror mosaic tiles
- Strong craft glue
- Craft knife
- Strong dowel or skewer
- Optional: White paint
Step-by-step Guide
Step 1: Prepare your sphere shapes. Choose one larger for the mushroom cap and a smaller one for the stem.
Step 2: Begin applying your mirror tiles to the surface of both spheres. Start by covering the larger sphere (the cap) entirely. Then, cover the smaller sphere (the stem).
Step 3: As you cover the curved surfaces, you’ll need to cut your mirror tiles into smaller pieces to fit snugly and ensure full coverage.
Step 4: Once all the tiles are applied and the adhesive has completely dried, it’s time to assemble your mushroom.
Then, insert a strong dowel or skewer into the center of the smaller sphere (stem), leaving enough exposed to insert into the larger sphere (cap).
#11. DIY Disco Ice Cream Cones
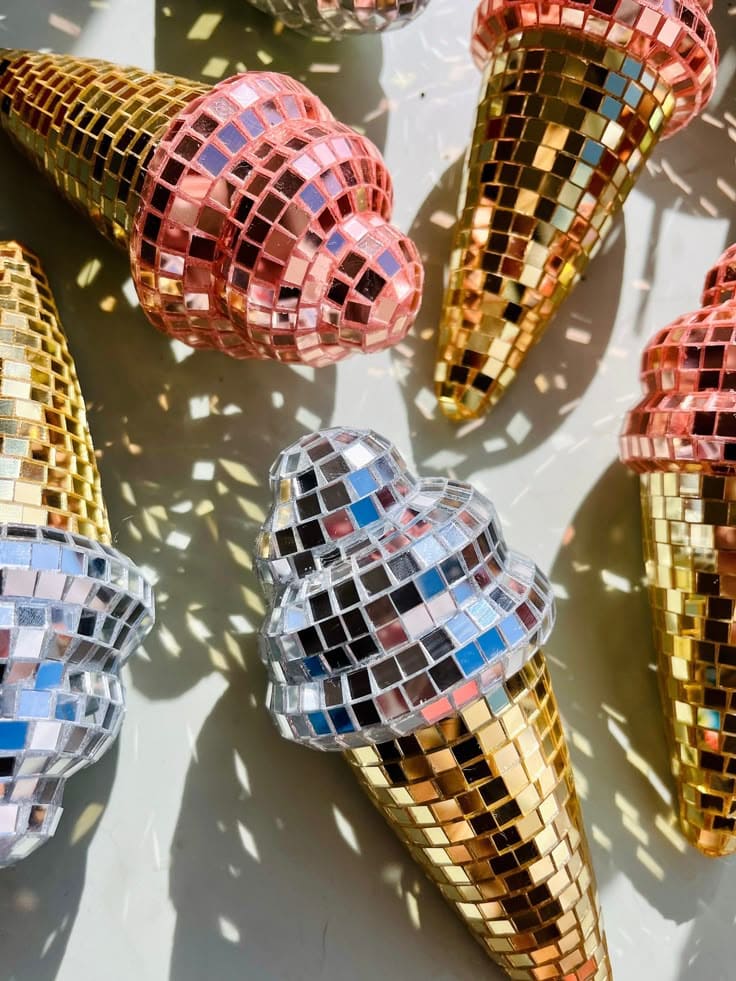
These DIY disco ice cream cones are an absolute feast for the eyes, transforming simple shapes into shimmering, whimsical sculptures that are bursting with playful charm.
Moreover, these glittering cones are as a unique centerpiece for a party, adding a sweet touch to a child’s room, or simply brightening up any corner with their unexpected sparkle.
Materials Needed
- Ice cream cone shapes
- Sphere or rounded foam shapes
- Small mirror mosaic tiles (gold, silver, pink, etc.,)
- Strong craft glue
- Craft knife or strong scissors
- Optional: White paint
Step-by-step Guide
Step 1: Prepare your cone and scoop shapes. If desired, you can paint them a base color (like white) and let them dry completely before tiling.
Step 2: Begin applying your mirror tiles to the cone portion. If your tiles are self-adhesive, simply peel and press firmly.
Step 3: Next, tile the scoop sphere. Work around the curved surface, carefully applying tiles. You’ll likely need to cut many small pieces to cover the sphere completely and smoothly.
Step 4: Once dry, carefully attach the tiled scoop to the top of the tiled cone using strong adhesive. You can use a wooden dowel or skewer inserted into both pieces for extra stability if needed.
#12. Craft Your Own Glittering Disco Ball
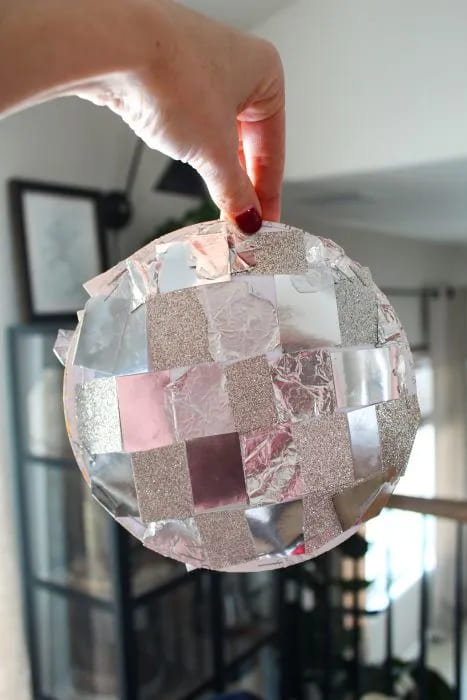
Get ready to infuse some serious sparkle into your next celebration or everyday decor with your very own handcrafted disco ball!
This project is all about transforming simple materials into a dazzling focal point that catches the light and casts a magical glow.
Plus, there’s something truly satisfying about piecing together each shimmering square and watching your very own sphere of joy come to life!
Materials Needed
- Styrofoam ball
- Assorted shiny materials: aluminum foil, glitter paper, old CDs (cut into squares), metallic cardstock
- Scissors or craft knife
- Craft glue
- String
Step-by-step Guide
Step 1: Cut your chosen shiny materials into small, manageable squares or irregular mosaic pieces. A mix of textures, like smooth foil and sparkly glitter paper, adds fantastic dimension.
Step 2: Apply a small amount of glue to the back of each square and begin adhering them to your sphere.
Step 3: Continue placing squares until your entire ball is covered in shimmering goodness. Don’t worry if it’s not perfectly even as the handmade charm is part of its beauty!
Step 4: Once the glue is dry, carefully insert a loop of string or fishing line into the top of your disco ball.
#13. DIY Disco Skeleton
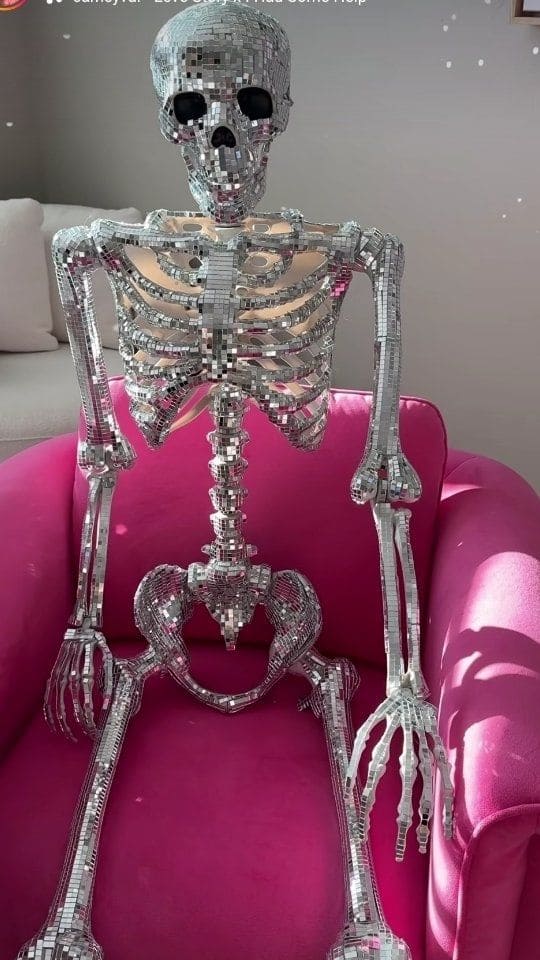
Ready to give your Halloween decor a major glow-up, or just embrace a quirky, year-round vibe that’s unlike anything else?
This DIY disco skeleton is an absolute showstopper, transforming a classic spooky prop into a dazzling, light-reflecting marvel!
Materials Needed
- Full-size plastic skeleton prop
- Small mirror mosaic tiles
- Strong craft glue
- Craft knife or strong scissors
- Rubbing alcohol and cotton pads
- Optional: Tweezers
Step-by-step Guide
Step 1: Prepare your plastic skeleton. Clean its entire surface thoroughly with rubbing alcohol to remove any dust or residue.
Step 2: Begin applying your mirror tiles to the skeleton’s surface. Start with larger, flatter areas like the skull or rib cage, and work your way outwards.
Step 3: As you navigate the intricate bones, curves, and joints, you’ll need to cut your mirror tiles into much smaller pieces or thin strips to fit precisely.
Step 4: Continue this meticulous process until the entire skeleton is covered in shimmering tiles. This is a patience-testing step, but the result is truly rewarding!
#14. DIY Disco Centerpiece with Vinyl
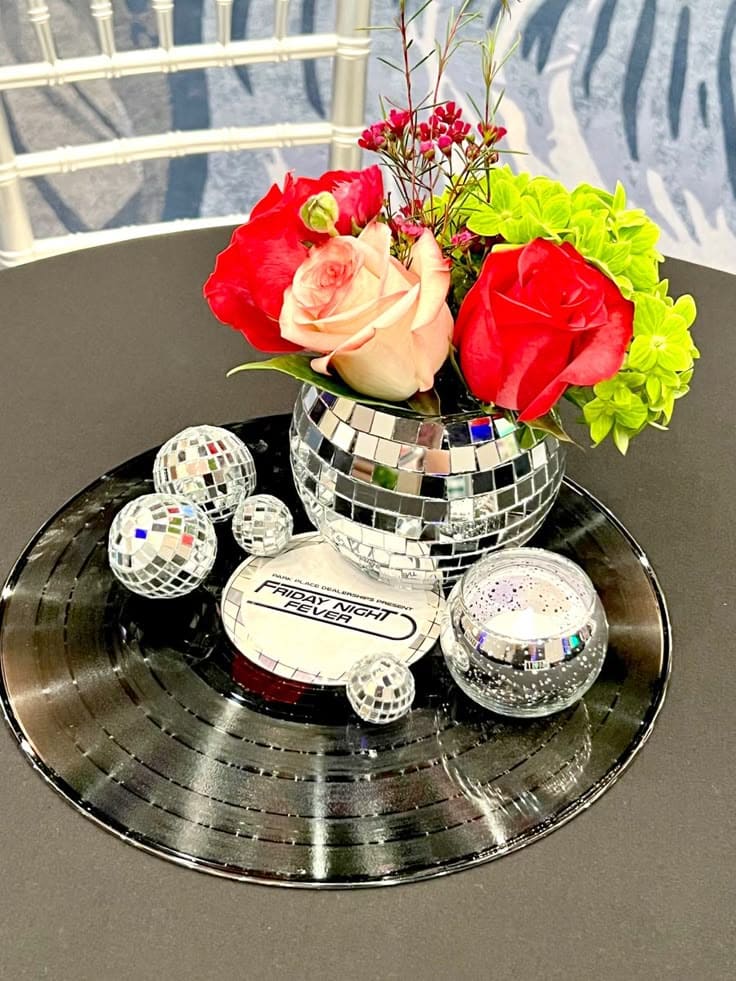
This DIY disco centerpiece is a brilliant way to combine music nostalgia with dazzling sparkle. It’s a wonderfully creative and customizable project that lets you reuse old vinyl records and simple disco elements to create a truly unique focal point.
Materials Needed
- Old vinyl record
- Small mirror mosaic vase
- Small disco ball ornaments
- Small votive holder or candle and mirror tiles
- Fresh or artificial flowers and greenery
- Optional: Hot glue gun
Step-by-step Guide
Step 1: Start with your vinyl record as the base. Ensure it’s clean and stable on your chosen surface.
Step 2: Place your disco-tiled vase in the center of the record. If you’re tiling a plain vase yourself, follow the steps from the disco martini glass project to cover it with small mirror mosaic tiles.
Step 3: Arrange your flowers and greenery in the vase, creating a vibrant and eye-catching floral display.
Step 4: Strategically place your small disco ball ornaments around the base of the vase on the record. Add your disco-tiled votive holder with a candle, or tile a plain one if you wish.
#15. DIY Disco Lips Wall Art
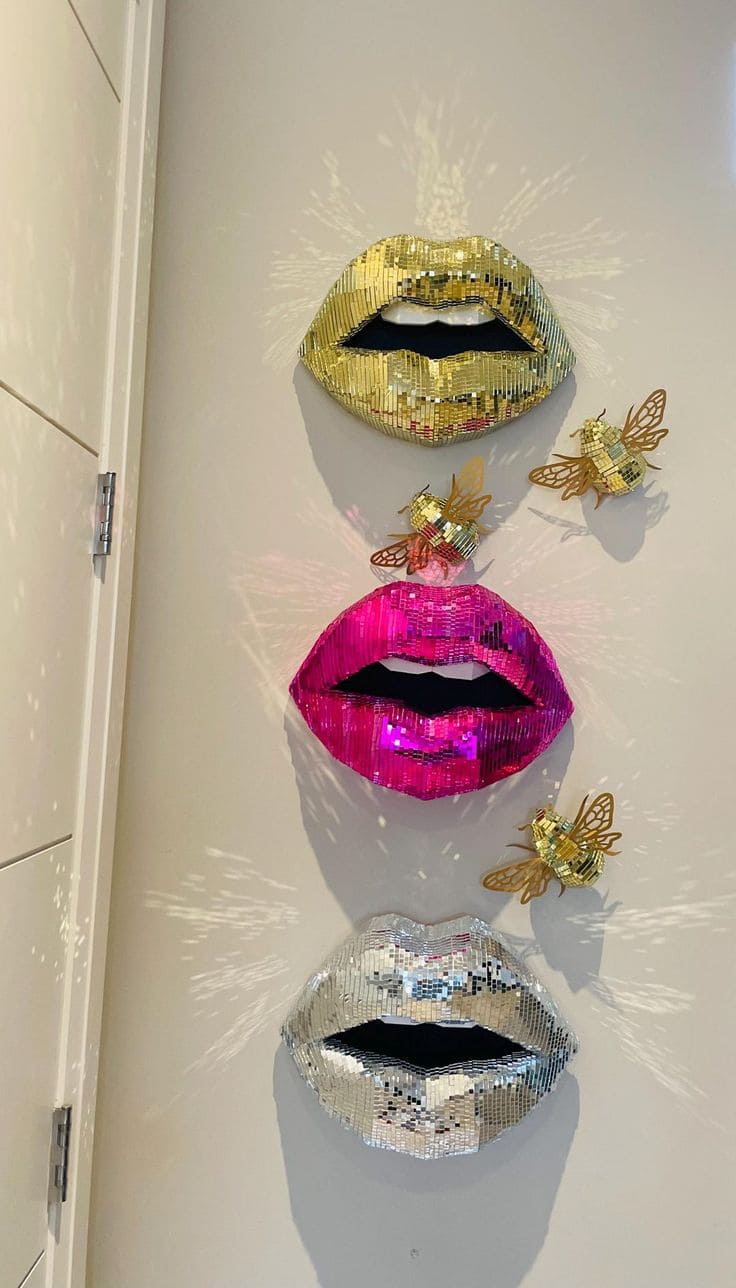
These DIY disco lips wall art pieces are an absolute showstopper, transforming simple shapes into dazzling, light-reflecting sculptures!
I bet these shimmering lips adorning your entryway, a gallery wall, or even adding a playful touch to a vanity, casting whimsical light patterns all around.
Materials Needed
- Lip-shaped forms (cardboard, MDF, or lightweight plastic)
- Small mirror mosaic tiles (various colors like silver, gold, pink)
- Strong craft glue
- Craft knife or strong scissors
- Black paint
- Paintbrush
- Wall mounting hardware
Step-by-step Guide
Step 1: If lip shapes are cardboard, ensure they are sturdy. Clean the surface thoroughly, then paint the inner mouth area black and let it dry completely.
Step 2: Begin applying your mirror tiles to the outer surface of the lips. If your tiles are self-adhesive, simply peel and press firmly.
Step 3: As you navigate the curves and contours of the lips, you’ll need to cut your mirror tiles into smaller pieces or strips to fit snugly.
Step 4: Continue until the entire lip shape is covered in shimmering tiles. Once dry, attach your preferred wall mounting hardware to the back.
#16. DIY Disco Brunch Decor
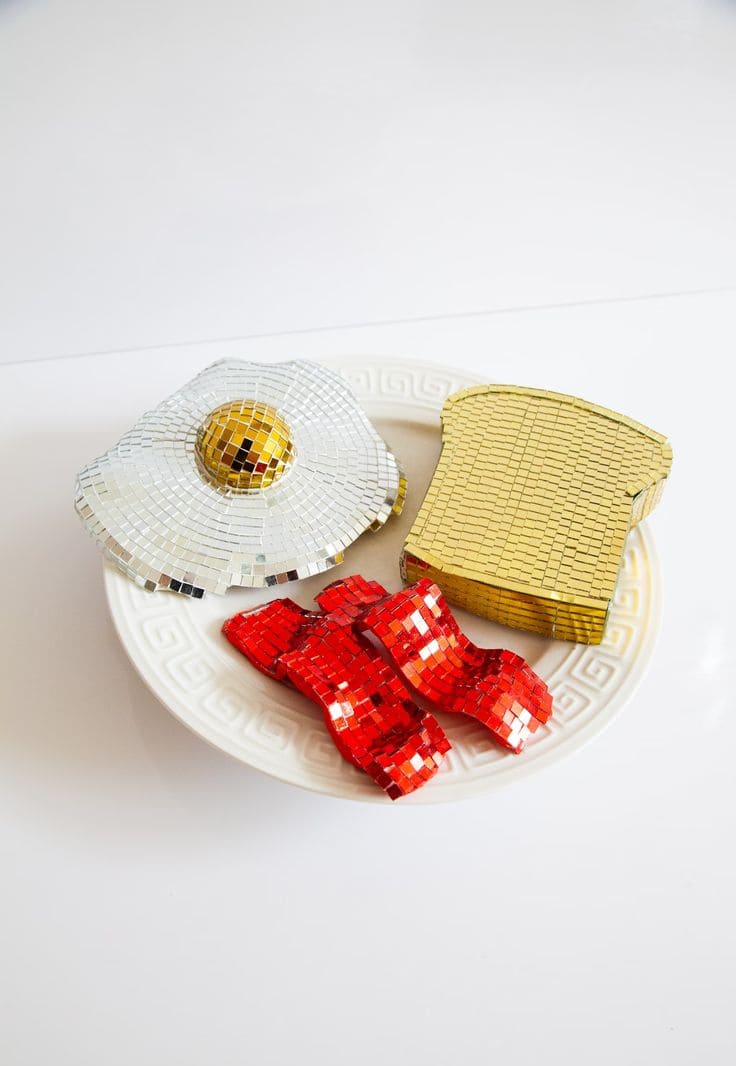
These DIY disco breakfast pieces are an absolutely whimsical delight, transforming everyday food shapes into dazzling, light-reflecting works of art!
You can see a glittering fried egg, shimmering bacon, and golden toast gracing your kitchen counter, a playful brunch setup, or even adding a unique, quirky touch to a gallery wall.
Materials Needed
- Flat shapes of a fried egg, bacon strips, and toast
- Small mirror mosaic tiles (silver, gold, red/pink)
- Strong craft glue or adhesive
- Craft knife
- Optional: White paint
Step-by-step Guide
Step 1: Cut breakfast shapes cleanly from your chosen material. For the fried egg, you might want to paint the outer egg white area white and let it dry before tiling.
Step 2: Begin applying your mirror tiles to each shape. For the egg white, use silver tiles. For the yolk, use gold. For the toast, use gold tiles. For the bacon, use red or pink tiles.
Step 3: As you cover the shapes, you’ll need to cut your mirror tiles into smaller pieces or strips to fit the contours and edges precisely.
Step 4: Continue until all your breakfast pieces are completely covered in shimmering tiles. Allow plenty of time for all the adhesive to dry completely, following the glue manufacturer’s instructions.
#17. DIY Mirror Mosaic Wine Bottles
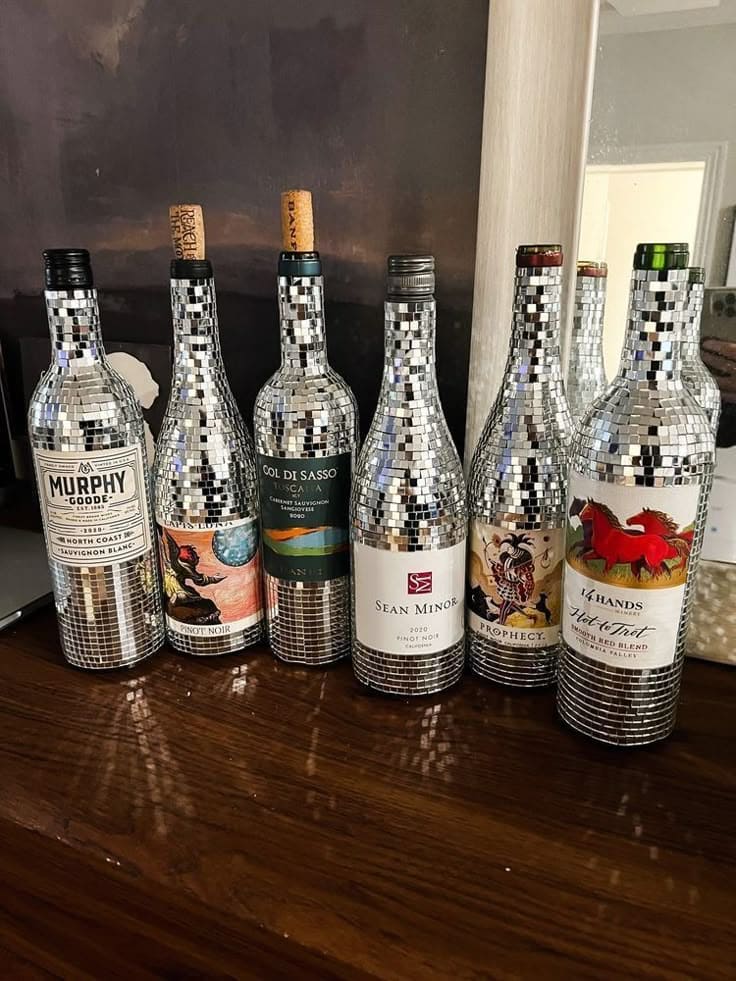
How about elevating your entertaining game or create truly unforgettable gifts with these dazzling DIY mirror mosaic wine bottles?
Imagine these sparkling beauties gracing your dinner table, catching the candlelight, or becoming the ultimate hostess gift that truly stands out.
Materials Needed
- Empty wine or spirit bottles
- Small mirror mosaic tiles
- Strong craft glue or adhesive
- Rubbing alcohol and cotton pads
- Optional: Tweezers
Step-by-step Guide
Step 1: First, thoroughly clean your wine bottles with rubbing alcohol to remove any labels, glue residue, and oils.
Step 2: Begin applying your mirror tiles to the bottle, starting from the base and working your way up.
Step 3: As you work your way up the bottle, especially around the neck and shoulders, you may need to cut some mirror tiles into smaller pieces or strips to fit the tapering curves.
Step 4: Continue until the desired portion of the bottle is fully covered in shimmering tiles. You can stop below the label for an exposed look or cover the entire body.
#18. DIY Disco Ball Cooler
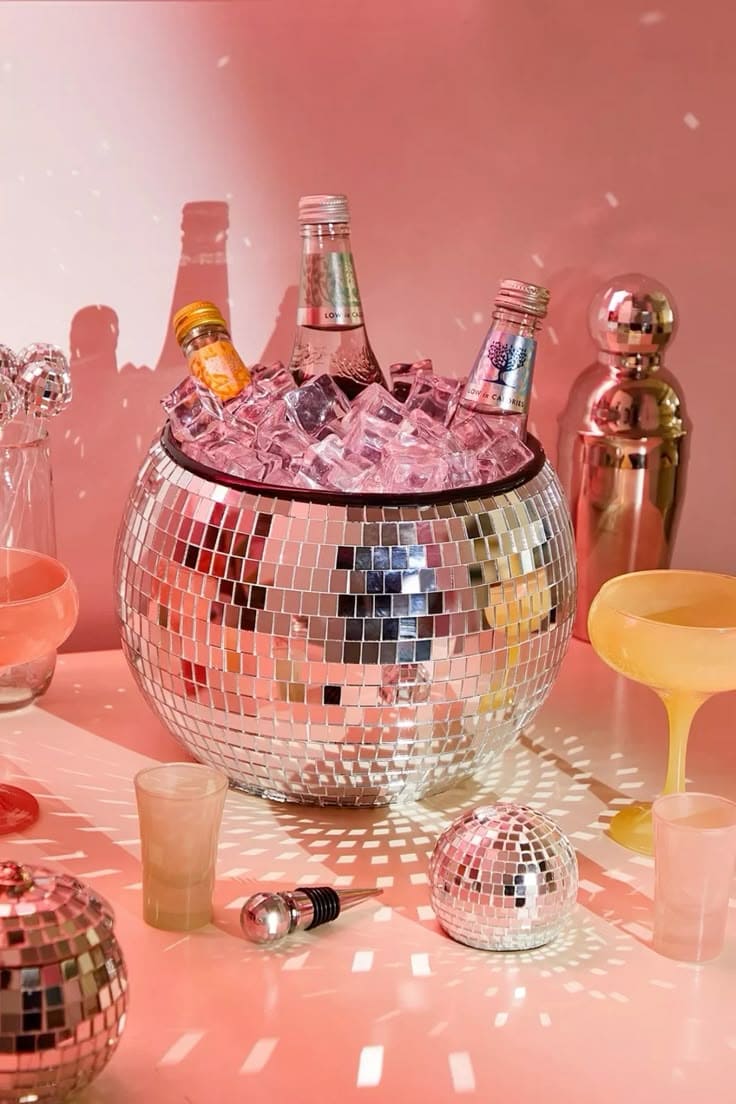
Ready to turn up the glam at your next gathering? This DIY disco ball cooler is an absolute showstopper, promising to keep your drinks perfectly chilled while casting dazzling reflections all around.
It’s the ultimate party accessory, bringing a fantastic retro vibe and a serious sparkle factor to any celebration, from backyard BBQs to elegant cocktail parties.
Materials Needed
- Large plastic or metal bowl
- Small mirror mosaic tiles
- Strong craft glue
- Black electrical tape
- Rubbing alcohol and cloth
- Ice and your favorite beverages
Step-by-step Guide
Step 1: Thoroughly clean your chosen bowl with rubbing alcohol to remove any grease or dirt. This ensures your mirror tiles will stick perfectly. Let it dry completely.
Step 2: Begin applying your mirror tiles to the outside of the bowl, starting from the bottom and working your way up.
Step 3: Continue covering the entire exterior surface of the bowl with mirror tiles. Try to maintain consistent spacing between the tiles.
Step 4: Once the bowl is fully tiled and the adhesive has dried, you can add a strip of black electrical tape or another trim around the top rim for a clean, finished look.
#19. DIY Disco Martini Glass
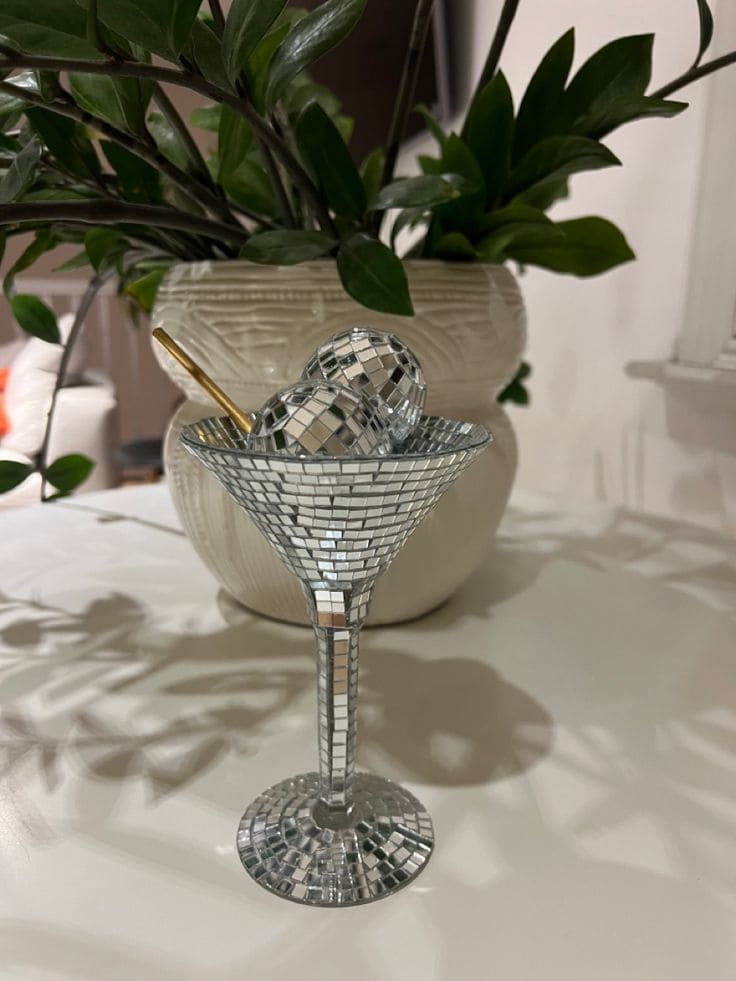
Wow, this DIY disco martini glass is a fabulous way to bring retro chic to any surface. It’s an incredibly fun and satisfying project that lets you transform an ordinary glass into a miniature work of art.
You’ll love how the tiny mirror tiles catch and dance with the light, turning any corner into a little disco haven!
Materials Needed
- Martini glass
- Small mirror mosaic tiles
- Craft glue or strong adhesive
- Rubbing alcohol and cotton pads
- Optional: Small disco ball ornaments
Step-by-step Guide
Step 1: Start by thoroughly cleaning your martini glass with rubbing alcohol to ensure a clean, grease-free surface for the tiles to adhere to.
Step 2: Begin applying your mirror tiles from the rim of the glass, working your way down. If your tiles are self-adhesive, simply peel and stick. If not, apply a small dot of glue to each tile.
Step 3: Continue tiling the bowl and stem of the glass. You may need to cut some tiles into smaller pieces to fit the narrower parts.
Step 4: Once all your tiles are applied and the glue has dried completely, your dazzling disco martini glass is ready!
#20. DIY Disco Ball Evil Eye Decor
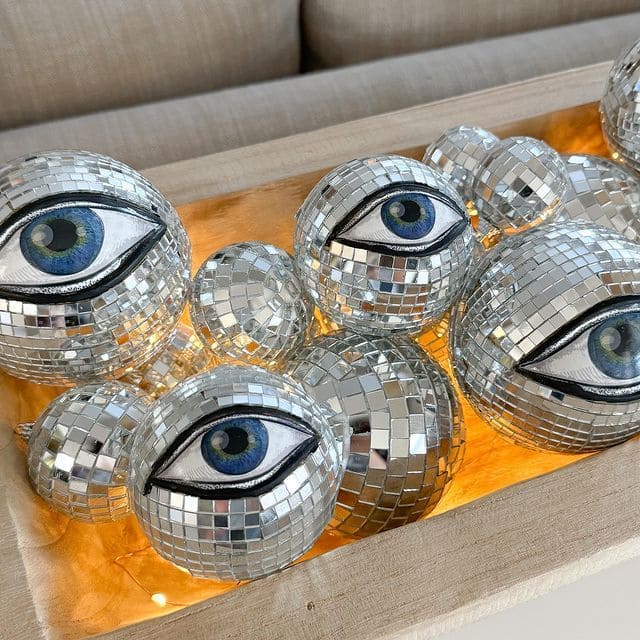
These DIY disco ball evil eyes are absolutely captivating, transforming simple ornaments into watchful, glittering guardians!
You can also see these shimmering orbs nestled in a bowl, adorning a shelf, or adding a whimsical touch to your next gathering, casting protective and joyful reflections all around.
Materials Needed
- Assorted sizes of mini disco balls
- Acrylic paints (white, black, blue, and a lighter blue/green)
- Small paintbrushes
- Clear sealant spray (optional)
- Optional: Fairy lights
Step-by-step Guide
Step 1: Choose the side of your disco ball where you want the eye to be. You’ll be painting directly onto the mirror tiles, so a smooth surface is best.
Step 2: Start by painting a white oval shape for the eyeball onto the chosen area of the disco ball. You might need a couple of coats to get good, opaque coverage over the mirrors.
Step 3: Once the white is dry, paint the iris. Start with a darker blue or green circle, then add a lighter shade of the same color inside or around it for depth.
Step 4: Paint a black pupil in the center of the iris. Then, carefully paint a bold black outline around the entire white eyeball shape and add an upper and lower eyelid line.
Step 5: Finally, spray the painted area with a clear sealant for added protection and durability.
#21. DIY Disco Banana Art
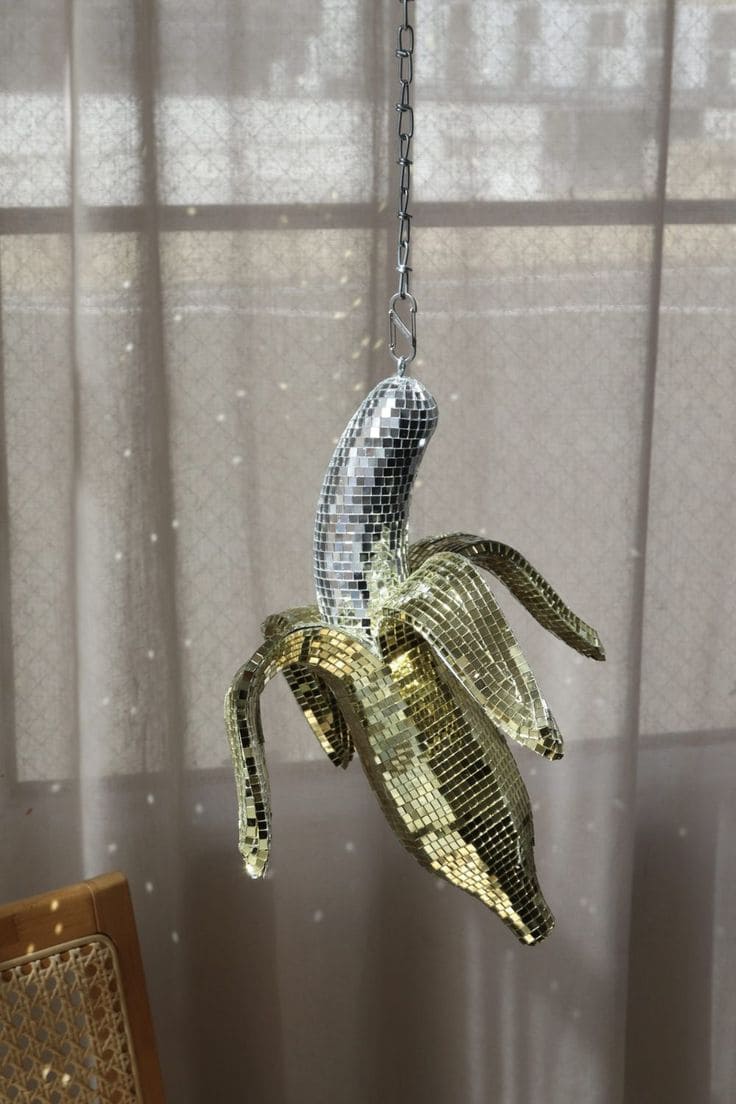
Haha, this DIY disco banana is an absolute showstopper, transforming an everyday fruit into a dazzling, light-reflecting piece of pop art!
You can see this shimmering banana hanging whimsically in a kitchen, a creative studio, or adding an unexpected, humorous touch to a party backdrop.
Materials Needed
- Banana shape
- Small mirror mosaic tiles (silver and gold)
- Strong craft glue
- Craft knife
- String or chain
- Optional: Eye hook
Step-by-step Guide
Step 1: Prepare your banana shape. Ensure it’s clean and smooth. If you’re creating a peeled effect, ensure the peel sections are distinct from the banana body.
Step 2: Begin applying your silver mirror tiles to the main banana fruit portion. Work carefully, following the curve.
Step 3: Next, apply gold mirror tiles to the peel sections of the banana. As you cover the curved and intricate shapes, you’ll need to cut your mirror tiles into smaller pieces or strips to fit snugly.
Step 4: Continue until the entire banana, and now, you can hang your magnificent disco banana and let it bring a peel-ful of sparkle and fun to your space.
#22. DIY Disco Letter Art
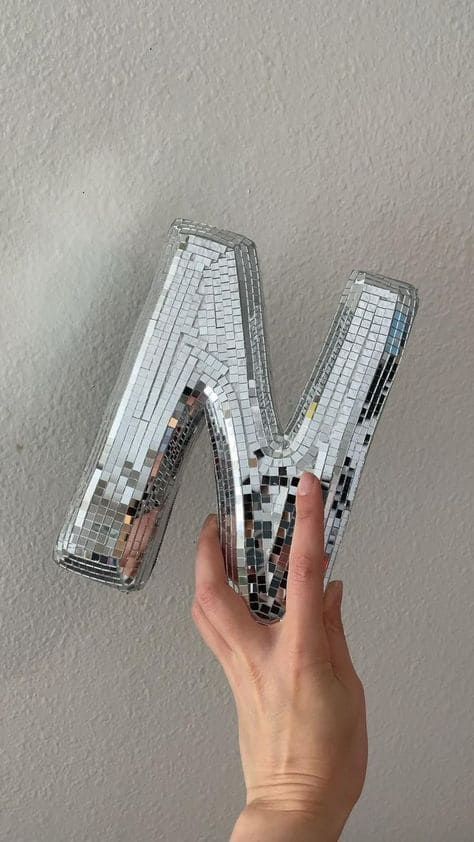
Want to add a truly unique and sparkling touch to your space? This DIY disco letter project is a brilliant way to personalize your decor with shimmering style.
This is a wonderful project that combines a personal touch with undeniable glam, catching every bit of light and spreading joy.
Materials Needed
- Cardboard or MDF letter
- Small mirror mosaic tiles
- Strong craft glue
- Craft knife or strong scissors
- Optional: Sandpaper
- Optional: Hanging hardware
Step-by-step Guide
Step 1: Prepare your letter. If it’s cardboard, ensure it’s sturdy. If MDF, you might want to lightly sand the edges for a smoother finish.
Step 2: Begin applying your mirror tiles to the front surface of the letter. You can use self-adhesive tiles or regular tiles.
Step 3: As you work around the curves and angles of your letter, you’ll need to cut your mirror tiles into smaller pieces or strips to fit precisely.
Step 4: Continue until the entire front and visible edges of the letter are covered in shimmering tiles. Once dry, you can find the perfect spot to display your personalized, sparkling creation!
#23. DIY Disco Ball Mirror Frame
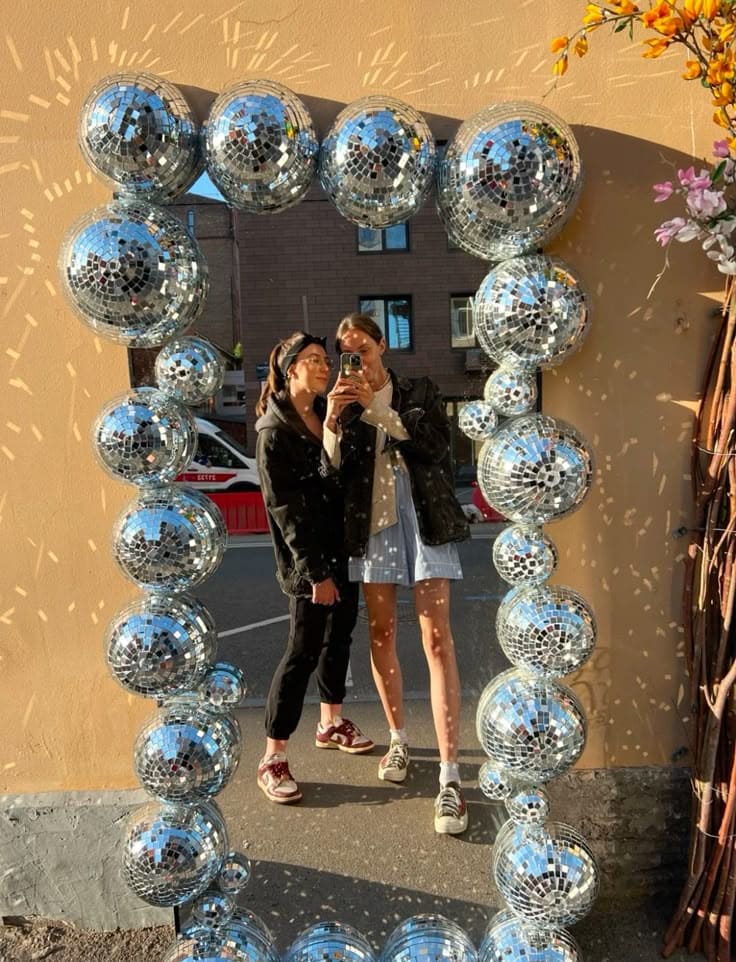
Wow, this DIY disco ball mirror frame is an absolute showstopper, bringing instant party vibes and playful glamour to any room.
This is a fantastic project for anyone who loves bold decor and wants to infuse their space with a unique, retro-chic statement.
Materials Needed
- Mirror
- Assorted sizes of mini disco balls
- Strong adhesive
- Hot glue gun (optional)
- Rubbing alcohol and cloth
Step-by-step Guide
Step 1: Begin by thoroughly cleaning the mirror surface and any existing frame with rubbing alcohol.
Step 2: Plan your disco ball arrangement. You can go for a uniform look with balls of the same size, or mix and match different sizes for a more dynamic effect.
Step 3: Start attaching the disco balls to the mirror frame or directly onto the mirror edge if it’s frameless. You now apply a generous amount of strong adhesive to each disco ball where it will contact the mirror.
Step 4: Continue gluing the disco balls around the entire perimeter of the mirror, pressing each one firmly into place.
Notes: You can fill in any gaps with smaller disco balls if necessary to create a full, continuous frame.
#24. DIY Disco Hearts
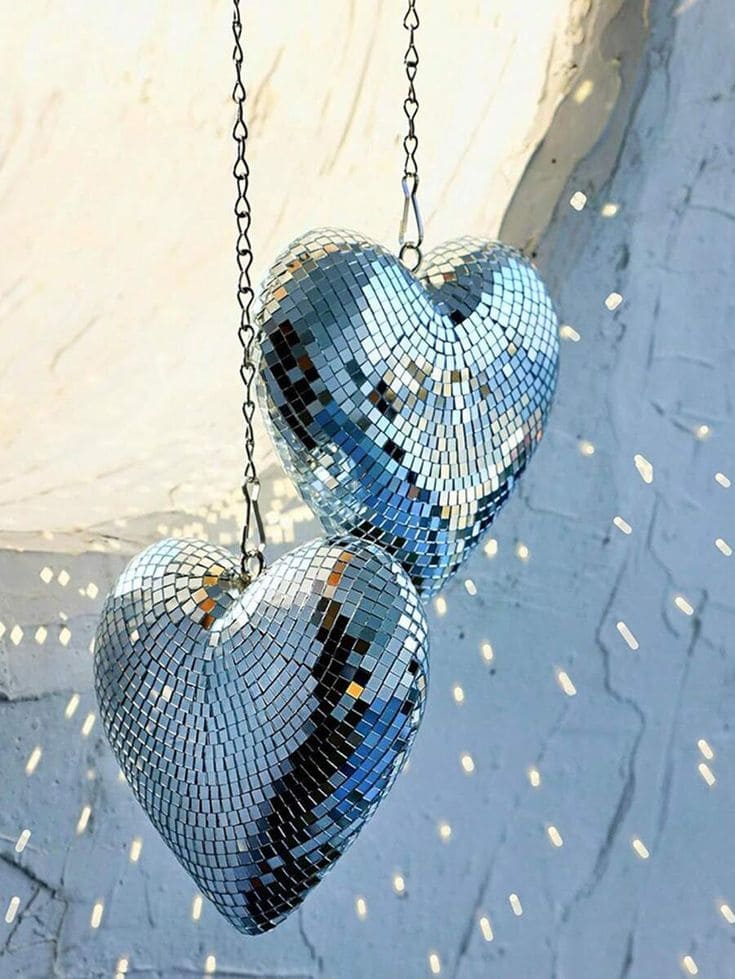
You can see these DIY disco heart ornaments are absolutely charming, transforming simple shapes into shimmering beacons of joy.
Imagine them catching the sun’s rays in a window, twinkling above a party, or even adding a unique touch to your Valentine’s Day decor year-round.
You’ll adore how these little hearts spread light and happiness wherever they hang!
Materials Needed
- Styrofoam or plastic heart shapes
- Small mirror mosaic tiles
- Strong craft glue
- Craft knife
- Eye hooks and chain
- Optional: Tweezers
Step-by-step Guide
Step 1: Prepare your heart shapes by ensuring they are clean and smooth. If using Styrofoam, you might want to gently sand any rough edges.
Step 2: Begin applying your mirror tiles to the surface of the heart. If your tiles are self-adhesive, simply peel and press firmly.
Step 3: As you navigate the curves and pointed tip of the heart, you’ll need to cut your mirror tiles into smaller pieces to fit snugly.
Step 4: Finally, insert an eye hook (or two, for balance) into the top of the heart and attach a chain or strong string for hanging.
#25. DIY Disco Ball Bucket Hat
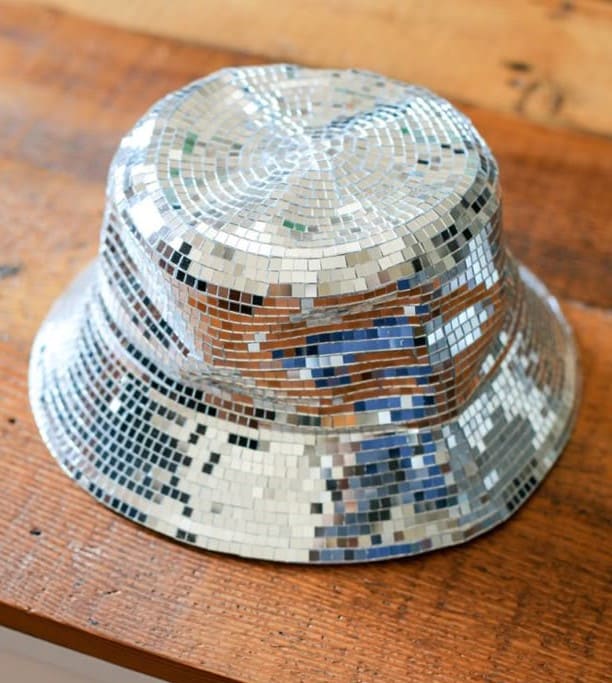
This DIY disco ball bucket hat is the ultimate accessory for festivals, parties, or just adding a serious dose of unexpected glam to your everyday.
Bonus, it’s an incredibly fun and stylish project that lets you transform an ordinary hat into a shimmering crown of fun that’s bursting with personality.
You’ll love how this hat instantly makes you the life of the party and spreads good vibes wherever you go!
Materials Needed
- Plain bucket hat
- Small mirror mosaic tiles
- Strong craft glue
- Craft knife
- Rubbing alcohol and cloth
Step-by-step Guide
Step 1: Prepare your bucket hat by ensuring it’s clean and dry. A clean surface helps the mirror tiles adhere properly.
Step 2: Begin applying your mirror tiles to the surface of the hat. Start with the top flat part of the crown, then move to the sides, and finally the brim.
Step 3: Work methodically, trying to keep the spacing between tiles as consistent as possible. As you reach the curved areas of the crown and the brim, you’ll need to cut your mirror tiles into smaller pieces or strips to fit precisely.
Step 4: Now you continue until the entire outer surface of the bucket hat is covered in shimmering tiles.


