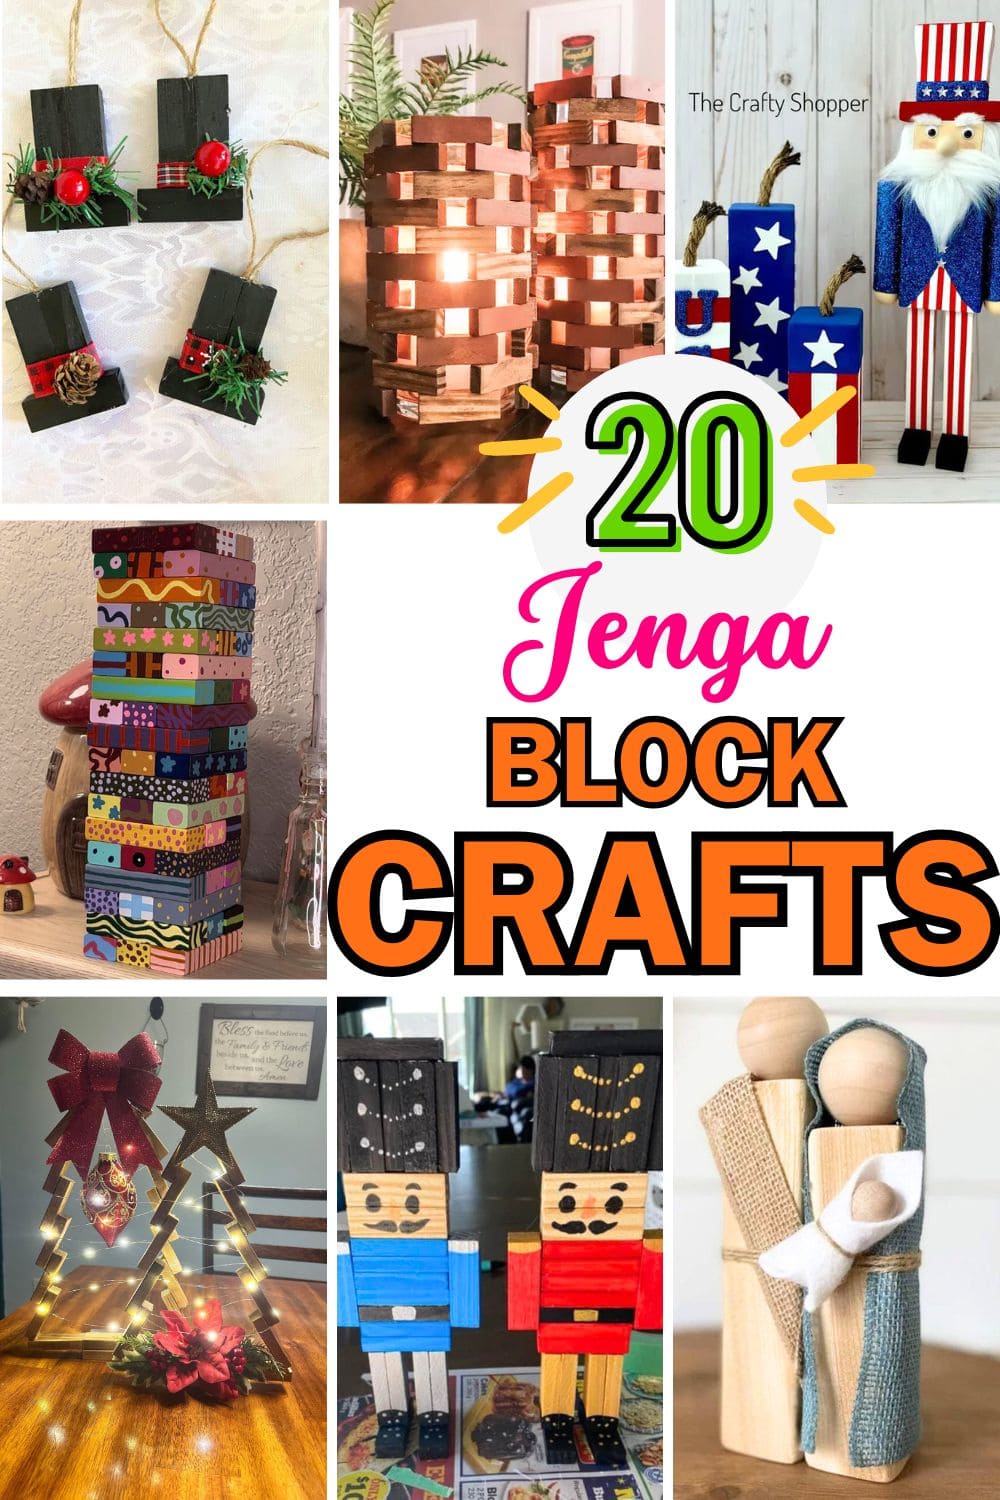
Ever looked at a pile of leftover Jenga blocks and thought “What can I actually do with these?” You’re not alone and the answer might just surprise you.
These humble little wooden rectangles are a secret weapon for DIY lovers, crafters, and even holiday decorators. With just a bit of paint, glue, and creativity, they transform into charming seasonal pieces, rustic home accents, and gift-worthy treasures.
I bet these 20 genius Jenga block projects are simple, adorable, and way more versatile than you’d expect. From snowmen and pumpkins to planters and patriotic décor, you’ll find ideas here that are just too cute to resist.
#1. Hand-Painted Jenga Block Art Stack
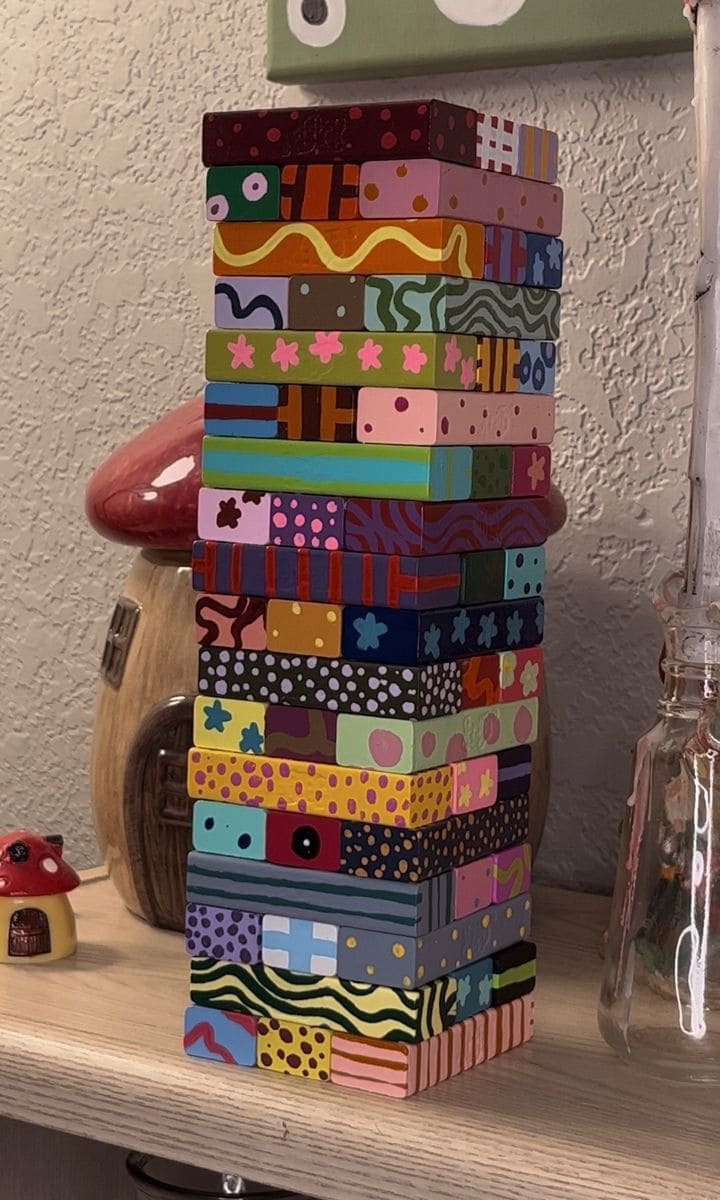
This colorful tower started as a rainy-day distraction and turned into something that makes me smile every time I pass by.
You can see each block is its own little canvas, painted with random doodles, color experiments, and cheerful patterns. Kids love it and of course, adults can’t resist touching it.
Materials Needed
- 54 standard Jenga blocks (2.95″ x 0.75″ x 0.59″)
- Acrylic paints in assorted colors and fine paintbrushes (size 0-2 and size 4-6)
- Painter’s tape (optional)
- Paint palette
- Clear acrylic sealer spray
- Paper towels and water cup
Step-by-step Guide
Step 1: If your Jenga blocks are unfinished wood, you can lightly sand them to smooth things out, but it’s not necessary.
Step 2: Next, try stripes, polka dots, tiny flowers, animal prints or whatever pops into your head. You can even let each family member decorate a few for that extra personal touch.
Step 3: If you want crisp lines or geometric shapes, painter’s tape helps a lot.
Step 4: Once all the blocks are dry, spray with a clear acrylic sealer or brush on Mod Podge to keep the colors from chipping during play or stacking.
#2. Rustic Jenga Block Crosses
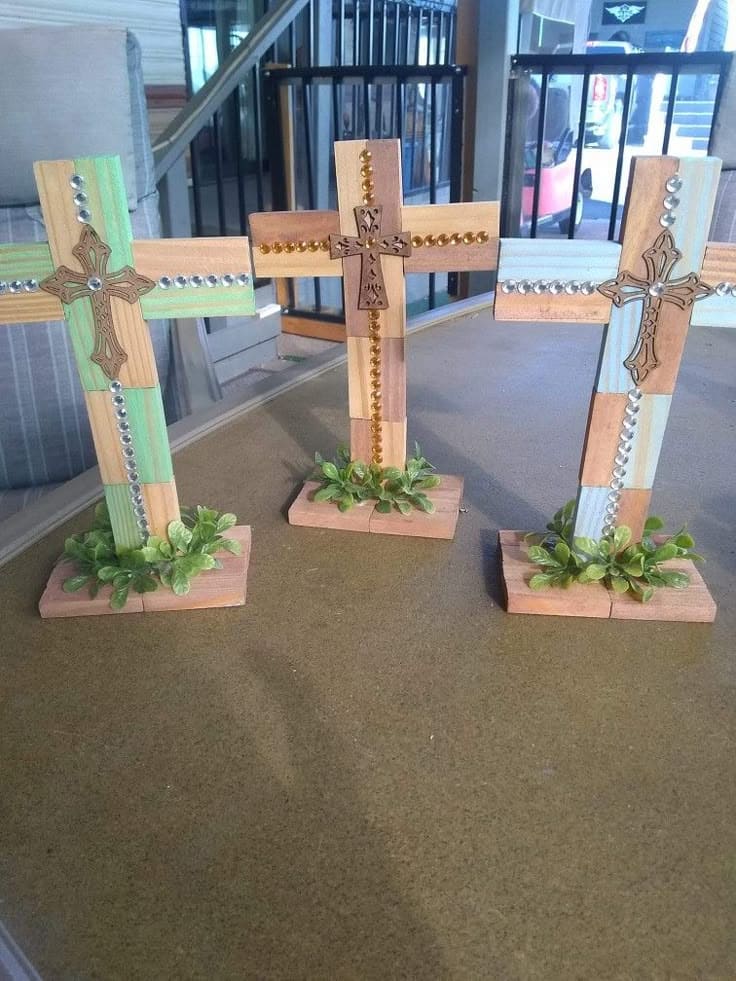
These standing crosses made from Jenga blocks blend humble materials with heartfelt meaning.
Additionally, a small base of faux greenery adds a grounding, natural touch turning these into thoughtful centerpieces for a table, shelf, or spiritual corner.
Materials Needed
- 22 Jenga blocks per cross
- Wood glue
- Small faux greenery
- Wooden or metal mini cross
- Decorative gems, trim, or ribbon
- Paint (optional)
- Small square wood pieces
Step-by-step Guide
Step 1: Start by forming the vertical post of the cross with 8 Jenga blocks glued end-to-end. Once secure, glue 4 blocks across the middle to form the cross arms.
Step 2: Create a sturdy base using 6 more blocks side by side. Then attach the base to the bottom of the vertical section to ensure the piece stands securely.
Step 3: Add detail with strips of paint, metallic adhesive beads, or patterned ribbon down the center of each arm. Also, glue the decorative cross at the center where the arms meet.
Step 4: Wrap or glue faux leaves, moss, or tiny floral bits around the base to soften the look and tie it to nature.
#3. Twinkling Jenga Block Christmas Trees
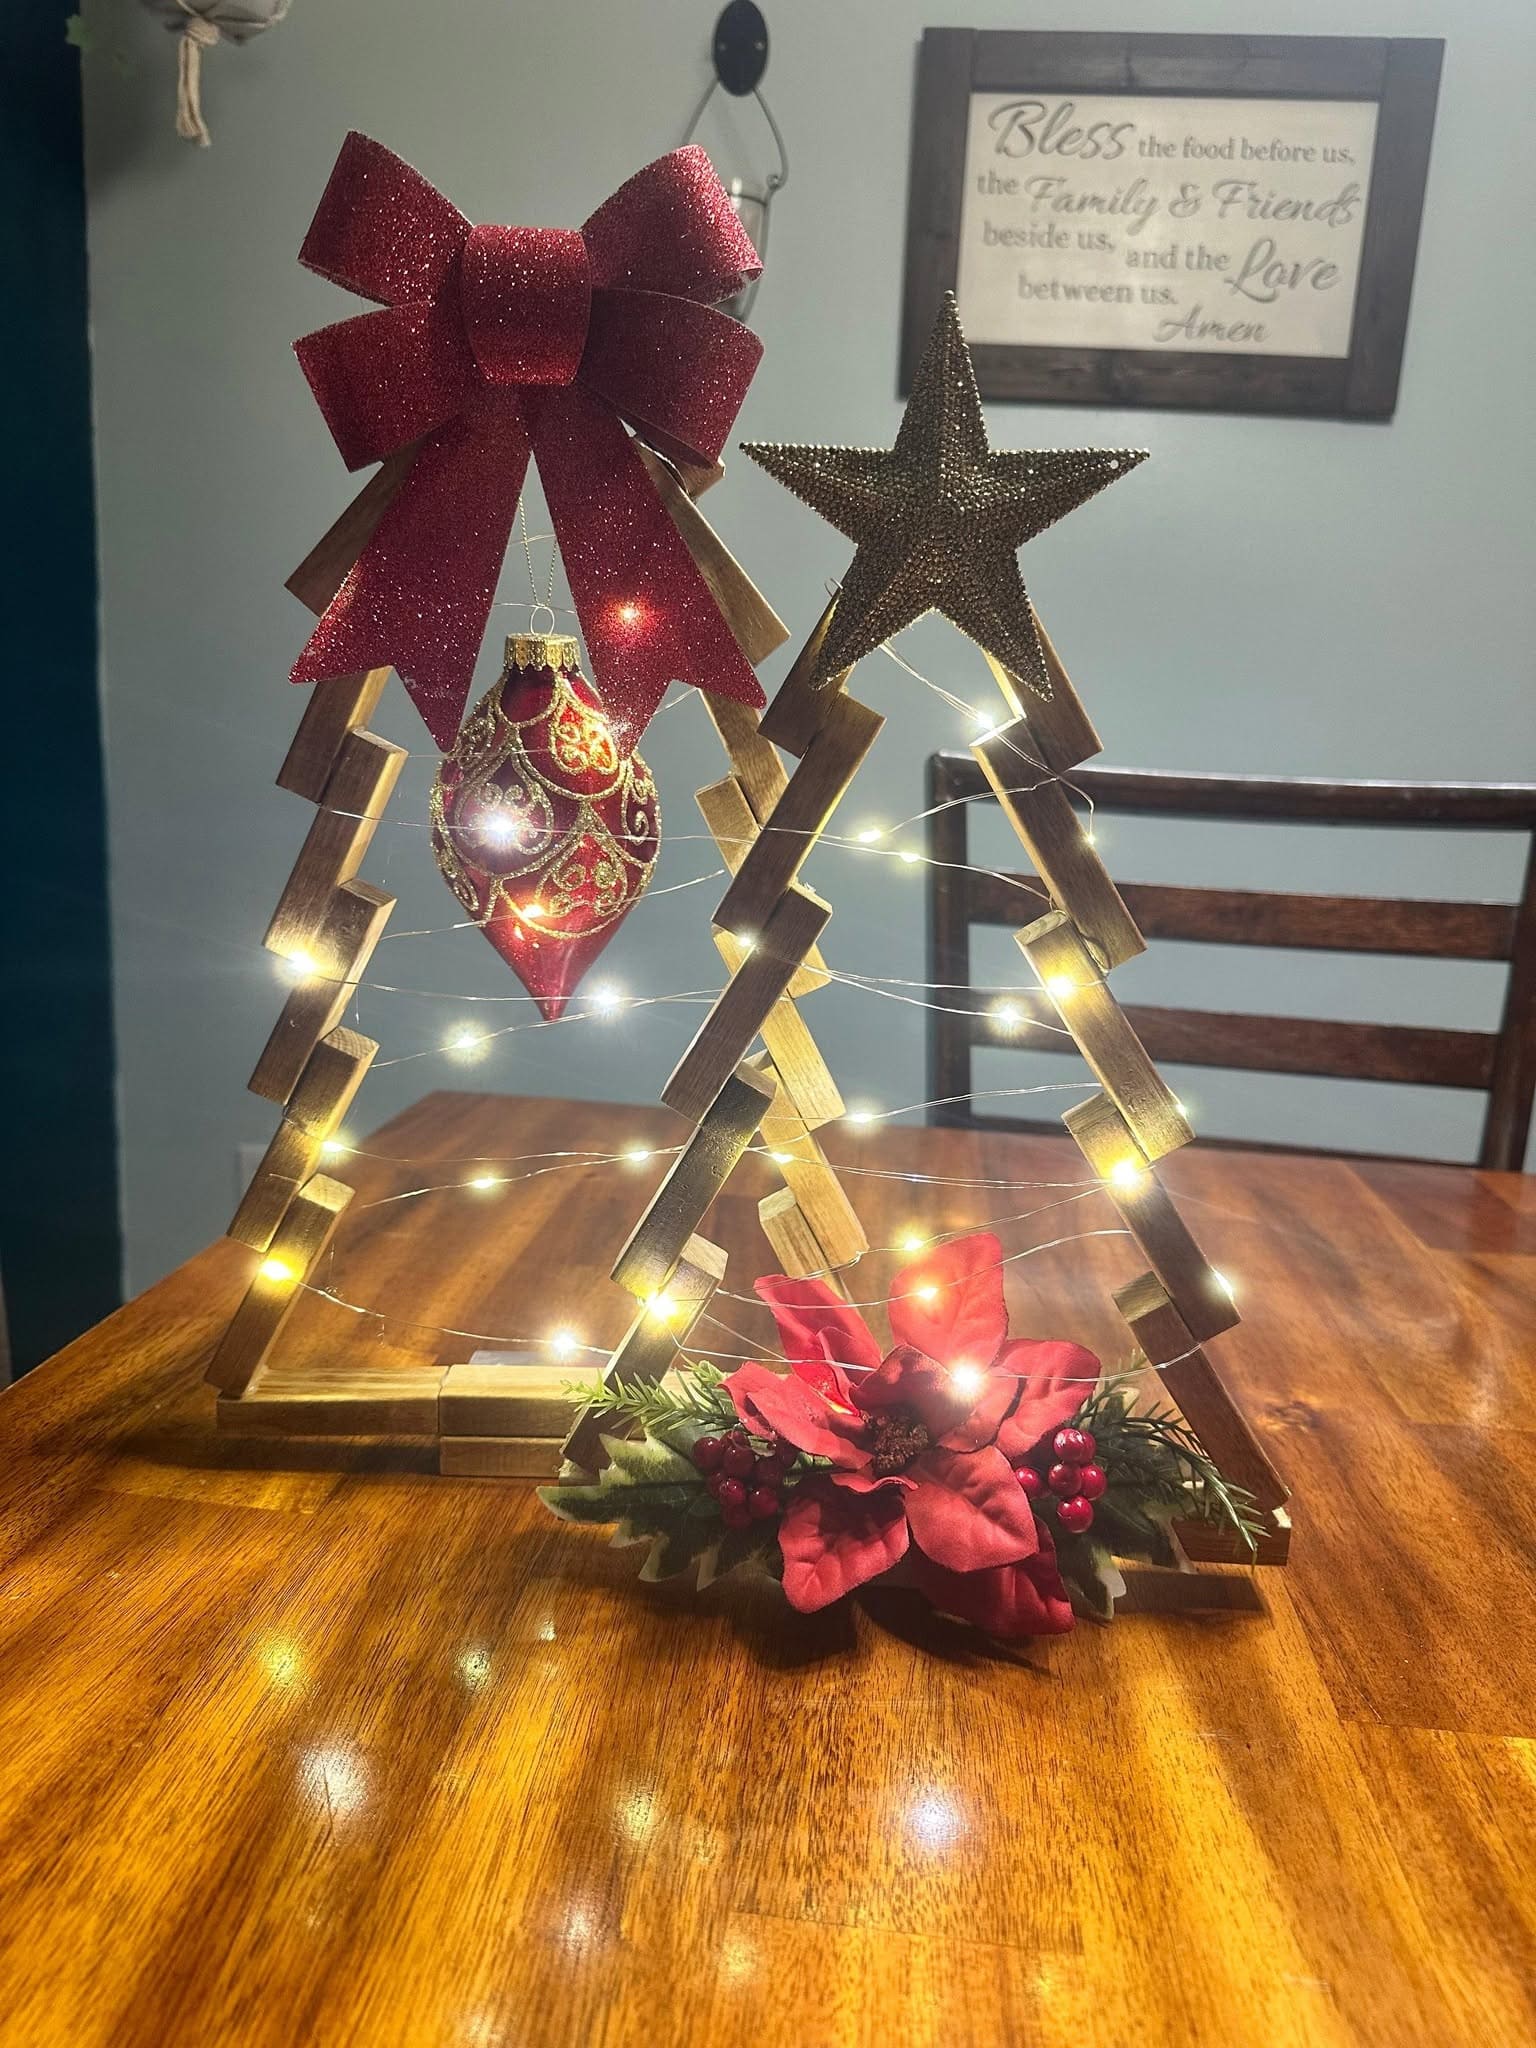
When the holiday spirit whispers at your fingertips, these DIY Jenga block Christmas trees become a heartfelt way to welcome it in.
I made mine on a cozy afternoon with a cup of cocoa nearby, and I wished I did this sooner. The twinkle lights tucked around the frame bring such a gentle glow.
Materials Needed
- 36 Jenga blocks (18 per tree; standard size: 2.95″ x 0.75″ x 0.59″)
- Wood glue
- Mini LED string lights
- 1 decorative bows, stars, or tree toppers
- 1 holiday ornament
- Faux poinsettia
- Wood stain (optional)
Step-by-step Guide
Step 1: Lay out the shape of your tree using 9 Jenga blocks per triangle. Then glue the blocks together to form the angled sides and base, with small gaps for a stylized zig-zag effect.
Step 2: Once the glue is dry, you can stain or paint the wood. I went for a warm walnut stain, but white or gold paint would look stunning too.
Step 3: Wrap your LED string lights around the trees gently. Then secure the battery pack behind the base with tape or a dab of glue.
Step 4: Finally, add a bow or star on top, a holiday ornament hanging in the center, and some florals or greenery at the base.
#4. Framed Christmas Wreath
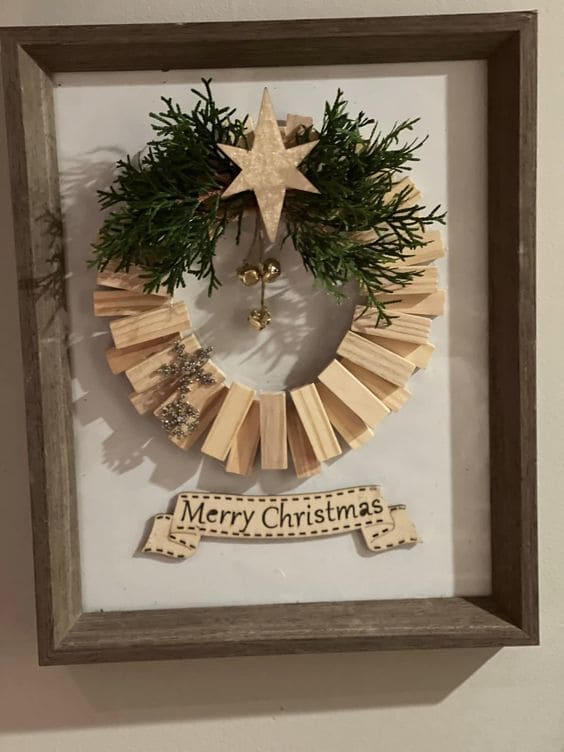
You can see each little wooden piece, originally meant for a tumbling game, now stands in harmony, forming a circle of warmth and festive charm.
At the top of the wreath, a wooden star gleams with rustic pride, nestled in faux evergreen branches and golden bells that softly jingle with movement. Everything about it feels personal, thoughtful, and quietly magical.
Materials Needed
- ~25-30 Jenga blocks
- Faux greenery sprigs and mini gold bells
- 1 wooden star
- Hot glue
- Shadow box frame (approx. 10×10 in or larger)
- Optional: mini bow, metallic embellishments, “Merry Christmas” cutout
Step-by-step Guide
Step 1: Lay the Jenga blocks out in a rough circle shape. You overlap the edges slightly, tilting and spacing them to give the wreath a dynamic, fanned look, then glue each block carefully to the base forming a ring.
Step 2: Once the ring is secure and dry, embellish the top with faux greenery and attach the wooden star above the wreath. You can also add small bells or ornaments for an extra festive touch.
Step 3: Mount the wreath onto a white backing and center it within your frame, then glue everything in place.
Step 4: For a finishing touch, glue a “Merry Christmas” wooden label or printed message underneath the wreath on the backing.
#5. Bee-Themed Jenga Block Stack
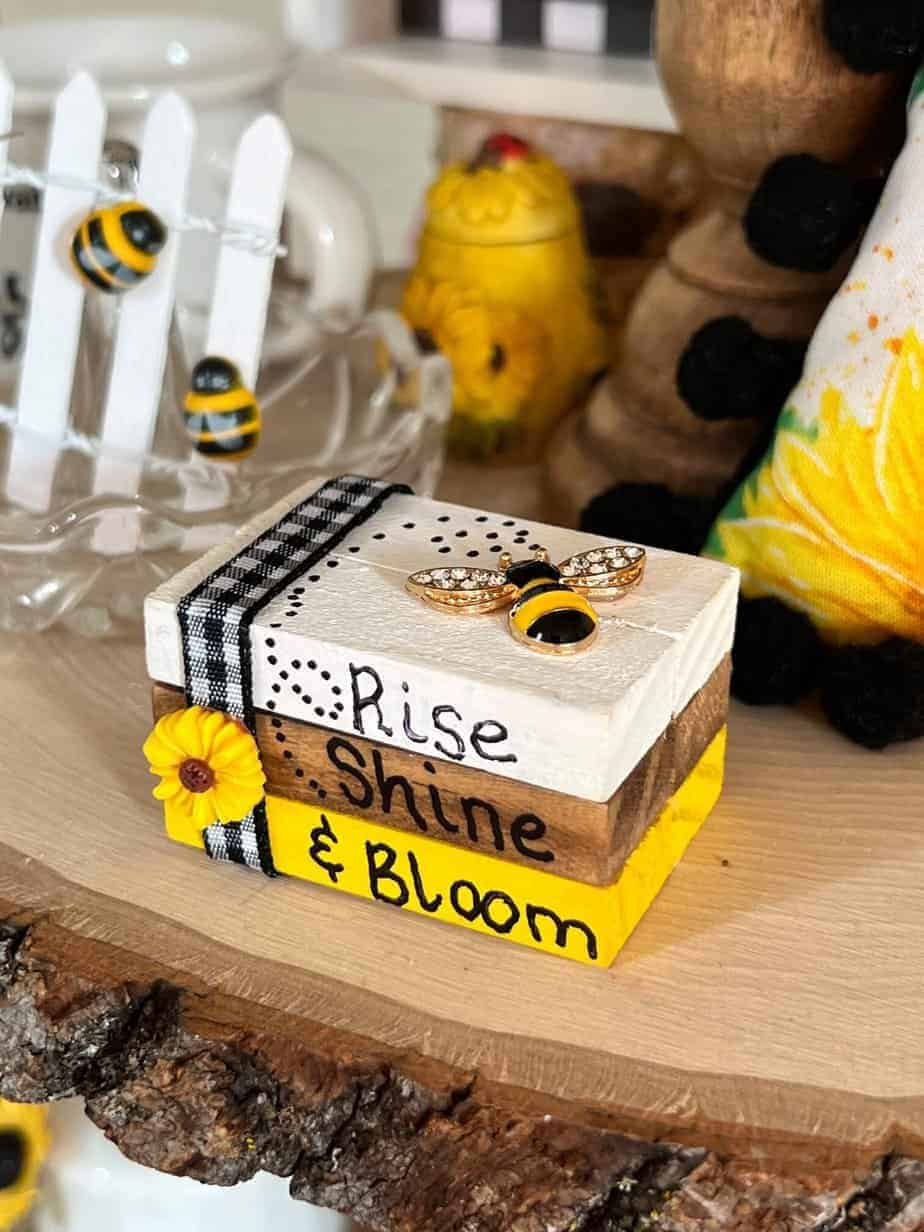
I made this little piece one lazy Sunday with just a few Jenga blocks, a stripe of ribbon, and a touch of joy. It’s the kind of décor that feels like a warm hug for your shelf or windowsill.
Moreover, the phrase reminds you to start each day with hope, just like flowers do for the bees.
Materials Needed
- 6 small wooden blocks (approx. 2.5-3 inches long each)
- White, brown/natural wood stain, and yellow acrylic paint
- Small paintbrushes
- Black permanent marker
- Gingham ribbon
- Small bee embellishment
- Small sunflower embellishment
- Hot glue gun and glue sticks
- Sandpaper (optional)
Step-by-step Guide
Step 1: Paint two blocks white, two natural/stained brown, and two yellow.
Step 2: Write text: “Rise” on the white block, “Shine” on the brown, “& Bloom” on the yellow.
Step 3: Stack the blocks with white on top, brown in middle, yellow on bottom. Then hot glue the blocks together to secure the stack.
Step 5: Finally, wrap gingham ribbon around the top block and hot glue the bee embellishment to the top block and the sunflower to the side of the bottom block.
#6. Stacked Jenga Block Organizer
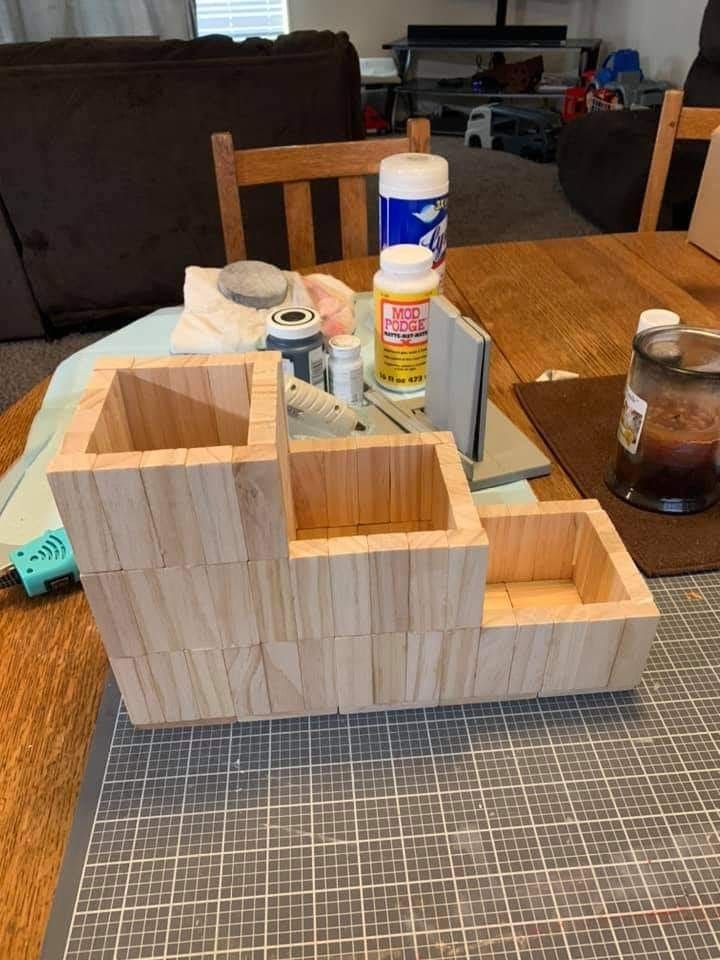
If you’ve ever looked at your cluttered desk and wished for something functional and charming, this stepped Jenga block organizer might be your new favorite solution.
Moreover, the natural wood tones give it a rustic, handmade appeal, while the three tiers offer plenty of flexibility, ideal for craft supplies, small plants, or even coffee station goodies.
Materials Needed
- 81 Jenga blocks total (27 per tier box)
- Wood glue
- Sandpaper (medium grit)
- Optional: wood stain, clear sealant, or paint
- Ruler and pencil
Step-by-step Guide
Step 1: Begin with the largest box. You want to lay out 9 blocks in a square shape (3×3) and glue them side by side. Then stack two more identical layers on top, gluing each layer securely.
You repeat this three-layer structure two more times for the medium and small boxes, just reduce the footprint to 2×3 blocks and 2×2 blocks accordingly.
Step 2: Once your three boxes are complete and dried, position them in a stepped pattern with large on the left, smallest on the right, medium in the middle.
Step 3: Sand down any uneven edges and clean off glue residue. If you want a rustic look, leave the wood raw or apply a light stain.
Step 4 (Optional): Finish with a coat of clear sealant if you plan to use it in high-traffic or humid areas.
#7. Mini Jenga Snowmen
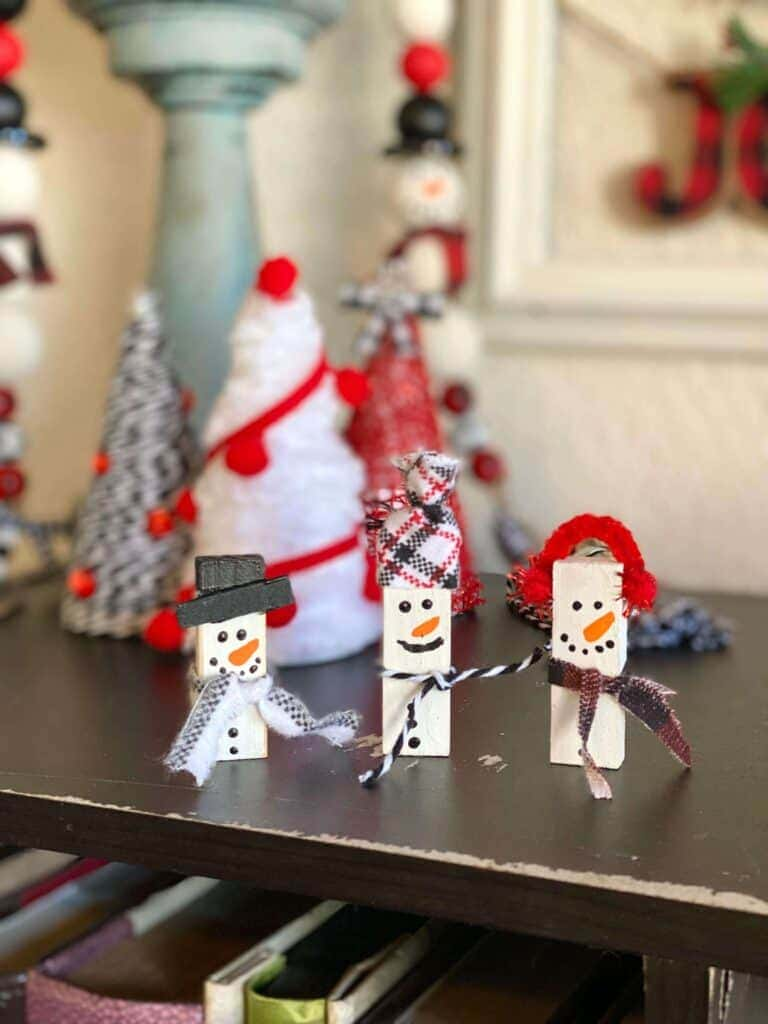
You don’t need snow to build a snowman, just a few Jenga blocks and a spark of holiday spirit. These little wooden snowmen are the kind of project that makes your hands happy and your heart even happier.
Bonus, they’re easy enough for kids to help with, and they make perfect little gifts!
Materials Needed
- 3 Jenga blocks (per snowman)
- White acrylic paint
- Black and orange paint
- Scrap fabric
- Mini pom-poms
- Hot glue gun and glue sticks
- Small paintbrush
Step-by-step Guide
Step 1: Paint each Jenga block white and allow them to dry completely. If you want a more rustic look, sand lightly afterward.
Step 2: Using black paint or marker, add eyes, buttons, and a smile. Then, paint a little orange triangle for the carrot nose.
Step 3: Cut small strips of fabric or ribbon and glue them around each “neck” as a scarf. You can twist pipe cleaners or add fabric for earmuffs or hats.
#8. Nutcracker Soldiers from Jenga Blocks
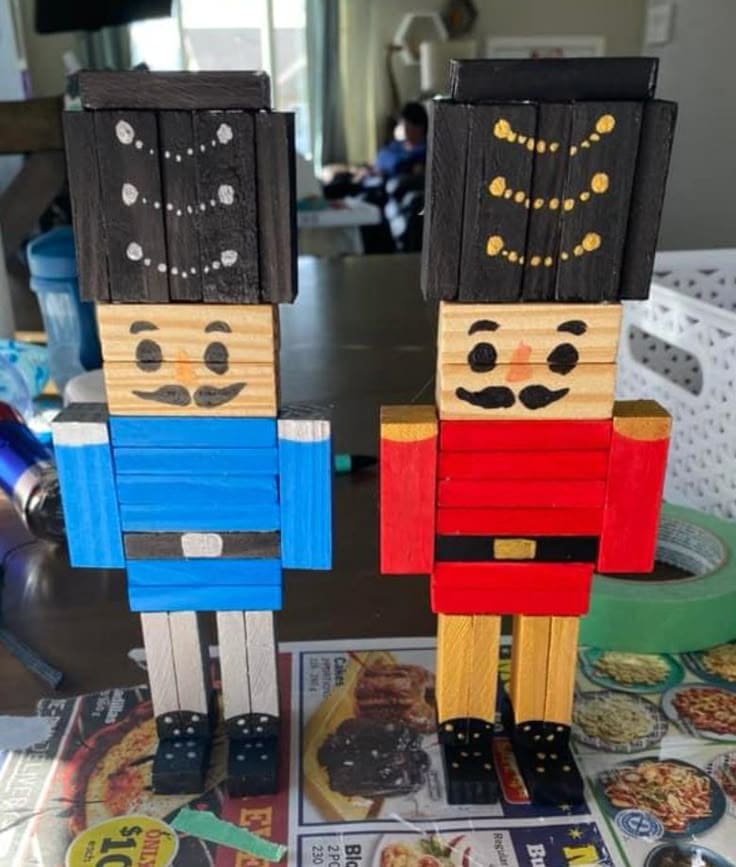
It all started with a bit of Christmas music and a box of mismatched Jenga pieces. I wanted something festive, playful, and full of character, so these little nutcracker soldiers came to life.
Specially, you get to decide every detail with the mustache style, the uniform colors, even the sparkle on their boots.
Materials Needed
- 23-25 Jenga blocks per nutcracker (2.95″ x 0.75″ x 0.59″)
- Acrylic paint (red, blue, black, white, gold, peach, and detail colors)
- Craft glue or hot glue gun
- Fine-tipped paintbrush
- Black marker or paint pen for faces
- Optional: tiny gems, glitter, or ribbon for embellishment
Step-by-step Guide
Step 1: Arrange your blocks into the basic soldier shape with 2 blocks for the head, 9 for the body, 2 for each arm and leg, and 6 stacked for the hat. Then glue them together securely.
Step 2: Paint the blocks in sections like uniform, skin tone, boots, and hat.
Step 3: Use a fine brush or marker to add facial features, buttons, and tiny decorative touches like gold trim or belt buckles.
Step 4: Once everything is dry, feel free to add extra details like glitter accents, tiny pom-poms, or even a toothpick sword.
#9. Mini Monster Book Trio
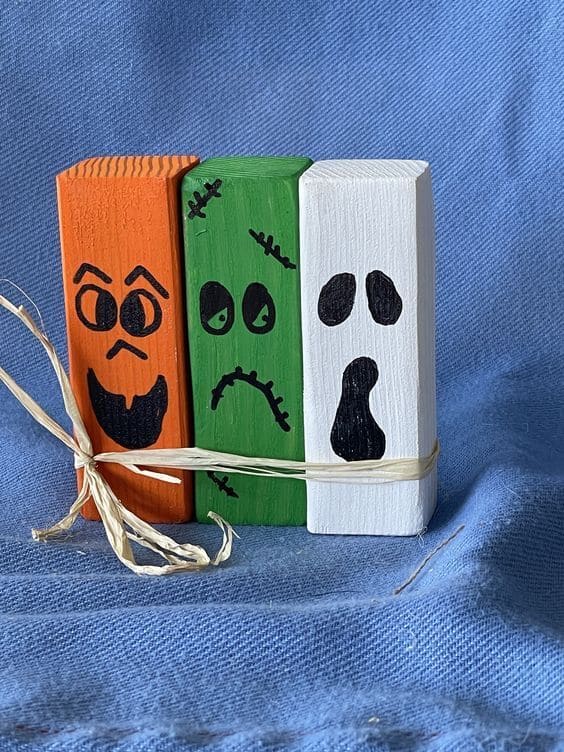
These little guys bring all the spooky vibes without any of the mess. Made from three Jenga blocks painted as a jack-o’-lantern, Frankenstein, and a ghost, this project is as fun to make as it is to display.
Whether you’re crafting with kids or just embracing your own Halloween spirit, they come together in just under an hour.
Materials Needed
- 3 Jenga blocks
- Acrylic paints: orange, green, white, and black
- Small paintbrush
- Raffia
- Clear sealer (optional)
Step-by-step Guide
Step 1: Paint each Jenga block a base color: one orange for the pumpkin, one green for Frankenstein, and one white for the ghost.
Step 2: Using black paint, draw simple spooky faces. Then, a wide-eyed jack-o’-lantern, a stitched-up monster, and a surprised ghost work great.
Step 3: Once everything is dry, arrange them in a row and tie them together with a bit of raffia.
Step 4: (Optional) Finish with a quick spray of matte sealer to protect the paint.
#10. Rustic Jenga Block Pumpkin
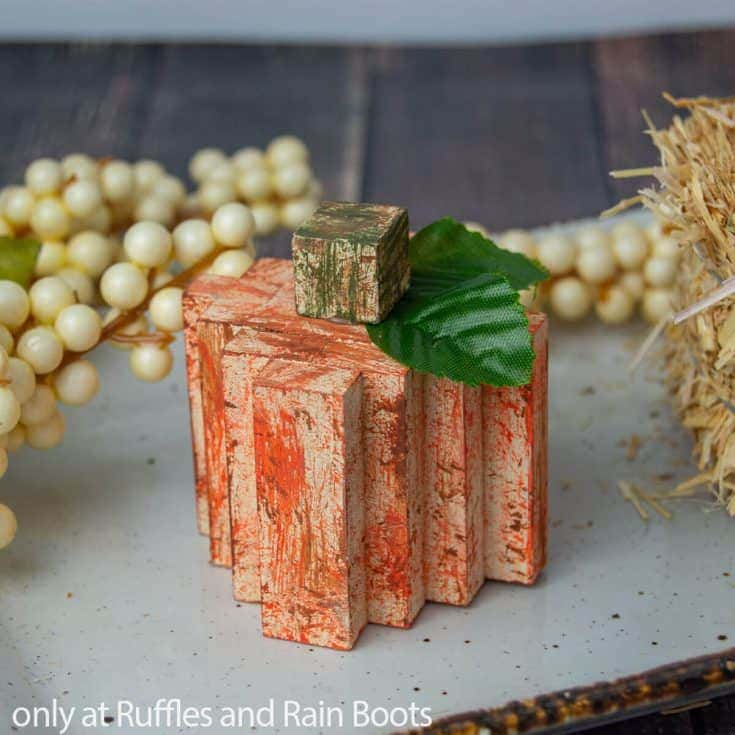
There’s something magical about autumn, the crisp breeze, the crunch of leaves, and the sudden urge to make everything a little cozier. That’s exactly what inspired this miniature pumpkin made from humble Jenga blocks.
It’s simple, charming, and perfect for using up leftover blocks in your stash. No two turn out the same, and that’s the beauty of it.
Materials Needed
- 16 Jenga blocks (standard size, 3″ long)
- 1 small wood cube (approx. 1″ square)
- Orange and brown acrylic paint
- Green faux leaf
- Hot glue gun and glue sticks
- Paintbrush and sponge
- Sandpaper (optional)
Step-by-step Guide
Step 1: Arrange your 16 blocks standing upright side by side in a rectangle, then glue them together using hot glue to form a thick pumpkin shape.
Step 2: Lightly paint the outside using orange paint, dabbing with a sponge or dry brush to give it that rustic texture.
Step 3: Glue the wooden cube on top as the stem and paint it with a worn green or brown tone. You continue to attach a faux leaf to one side of the stem.
#11. Jenga Block Candle Holders
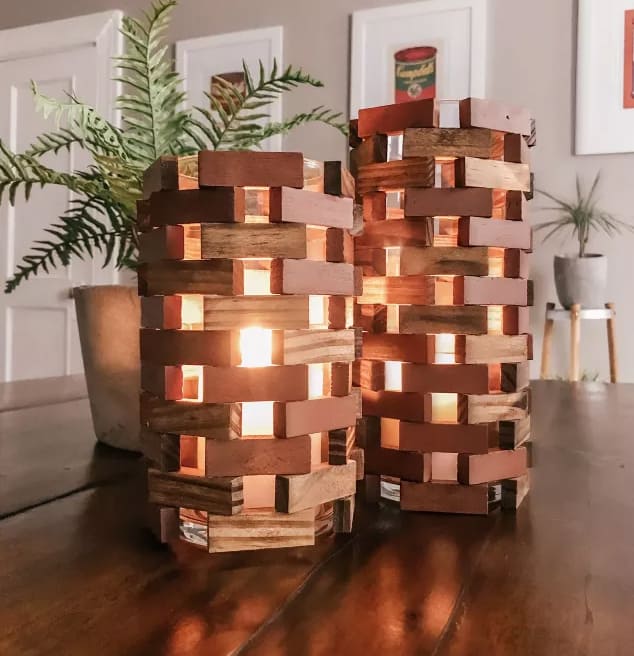
These Jenga block lanterns instantly became my favorite table centerpiece, modern yet earthy, minimalist but rich with texture.
And the best part is that they’re surprisingly easy to make. You don’t even need glue, just stack, balance, and nestle a glass candleholder in the center.
Materials Needed
- 48 wooden Jenga blocks per lantern (standard size: 2.95″ x 0.75″ x 0.59″)
- 1 clear glass candleholder (height ~4″, diameter ~2.5″)
- 1 LED tealight
- Optional: Wood stain
- Clean cloth
Step-by-step Guide
Step 1: First, place the glass candleholder in the center and begin your first layer by arranging blocks around it in a square.
Step 2: Stack the next layer by turning the blocks 90 degrees so they crisscross the previous row. You should keep building upward, leaving small gaps between blocks for the light to shine through.
Step 3: Alternate wood tones beforehand for a stylish mixed-wood look. You can build as high as you like, mine felt perfect at about 16-18 rows tall.
Step 4: Once done, drop your LED tealight into the glass holder.
#12. Jenga Block Nativity
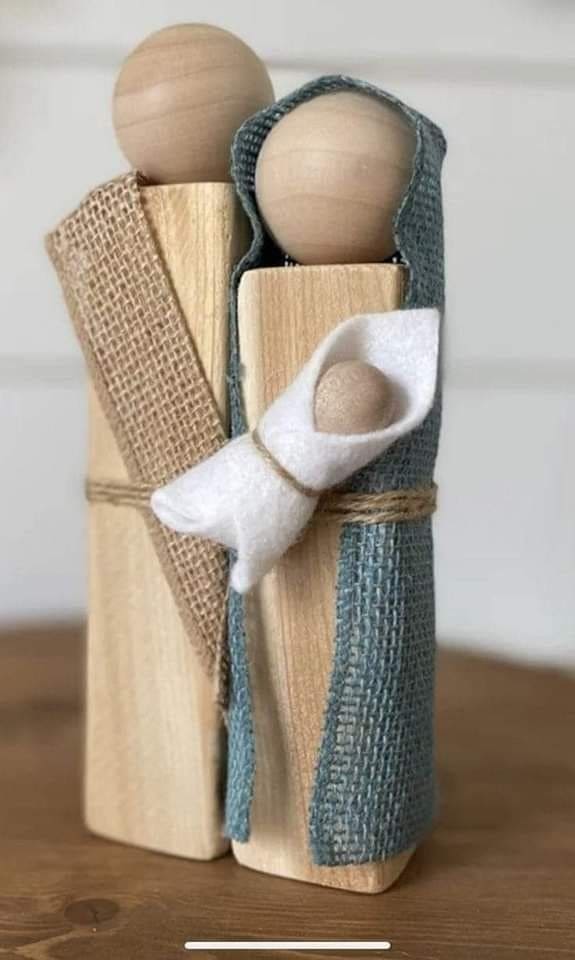
This nativity scene made from Jenga blocks and simple fabrics speaks volumes with its quiet beauty. And of course, you can easily craft Mary, Joseph, and baby Jesus using just a few wooden blocks and soft textures.
Materials Needed
- 2 Jenga blocks
- 1 small wooden bead (approx. ¾”) and 2 larger wooden balls (1½”)
- A strip of burlap (about 1.5″ wide × 6″)
- A strip of light blue
- A small piece of white felt
- Jute twine (about 12″)
- Hot glue gun
Step-by-step Guide
Step 1: Glue a large wooden ball onto the top of each Jenga block to form Mary and Joseph.
Step 2: Wrap burlap diagonally around one figure like a shawl and hot glue it in place. Do the same with the blue fabric for the other figure. Then secure with a small piece of twine around the waist for a rustic touch.
Step 3: Wrap the small wooden bead in white felt like a swaddle, secure with a thin strand of twine, and glue it gently to the front of Mary’s block.
Step 4: (Optional) Lightly distress the fabric edges or leave them raw for a handmade look.
#13. Rustic Jenga Block Wishing Well
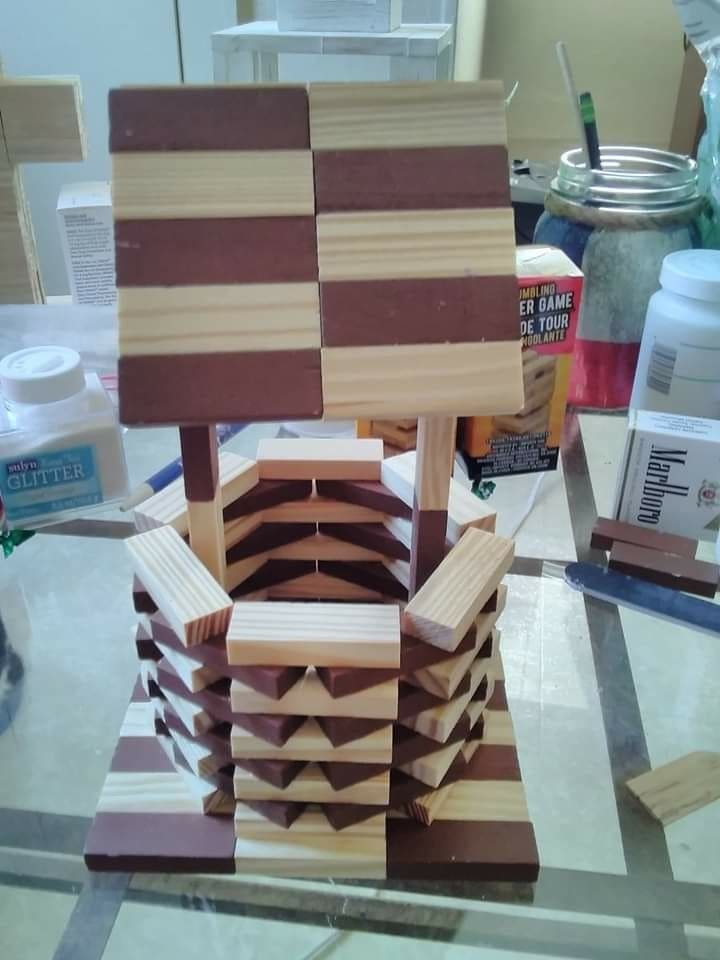
I built one as a centerpiece for my spring table, and honestly, it sparked so many conversations. The two-tone blocks give it that warm, weathered look without needing real aging.
Materials Needed
- 80-90 Jenga blocks (2.95″ x 0.75″ x 0.59″)
- Wood glue
- Brown and natural wood stain
- 1 small foam brush
- 2 square wooden bases
- Optional: miniature bucket
Step-by-step Guide
Step 1: Separate blocks into two groups and paint or stain one set brown and leave the other natural.
Step 2: Start stacking the well base in a staggered octagon pattern using alternating colored blocks. You repeat this until it reaches your desired height (around 7-8 layers).
Step 3: For the roof, glue two sets of horizontal blocks to create two rectangular panels. Then attach them at an angle to form a peak.
Tips: You can also use 2 upright blocks as the roof supports and glue them to the base.
Step 4: Attach the finished roof to the supports. You can add a small string or mini bucket inside for extra detail.
#14. Rustic Knife Block from Jenga Pieces
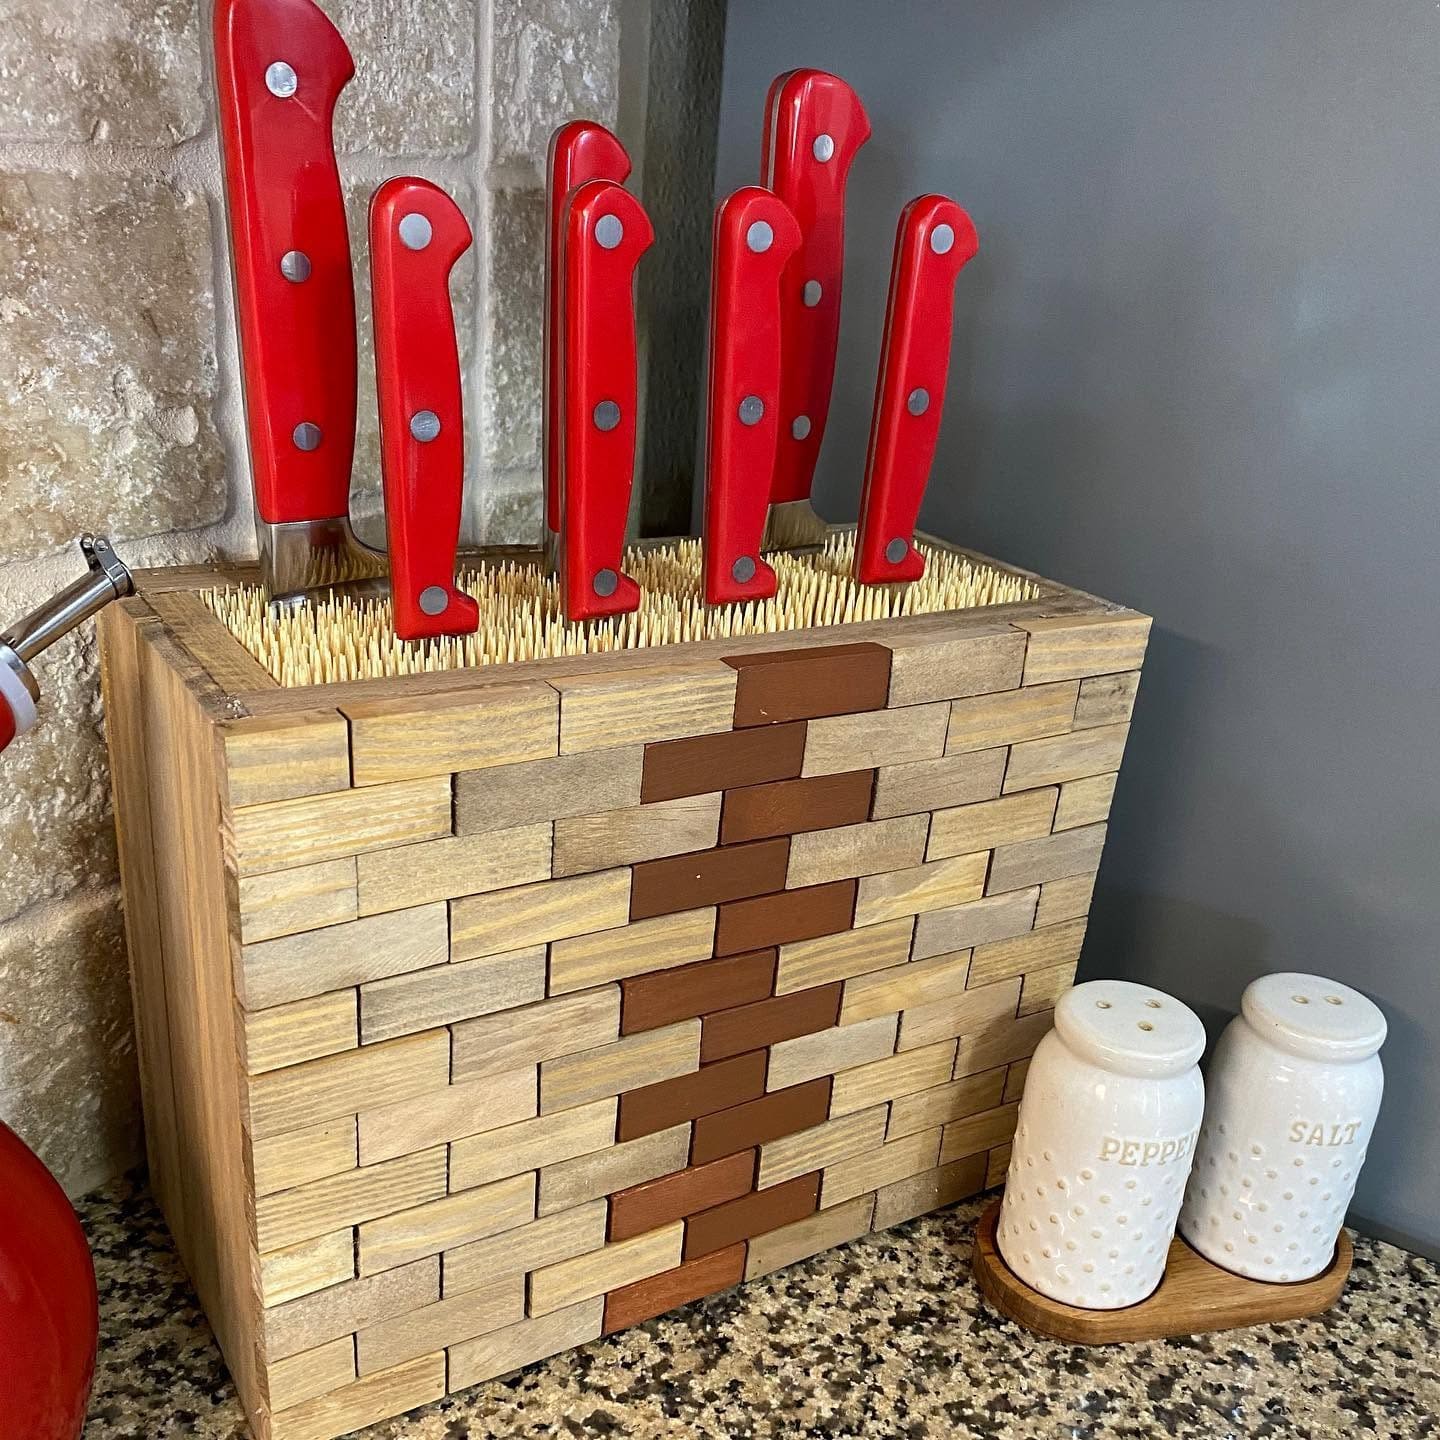
This one feels like something you’d find in a well-worn farmhouse kitchen as it’s sturdy, handsome, and made with love.
Materials Needed
- Around 150 Jenga blocks (standard size: 2.95″ x 0.75″ x 0.59″)
- Wood glue
- Wood stain (optional)
- 1 wooden box frame
- About 1500-2000 bamboo skewers
- Sandpaper
- Clamps (optional)
Step-by-step Guide
Step 1: Begin by gluing Jenga blocks in a staggered pattern to each side of your box frame, alternating block directions like brickwork.
Step 2: Once each side is covered and dried, lightly sand any rough edges. Then, apply your choice of wood stain to deepen the tones or give it a two-tone effect like mine.
Step 3: Cut your bamboo skewers (if needed) to fit the height of the box. Now, you fill the box with them upright until it’s packed tightly enough to hold knives securely.
Step 4: Let everything settle and dry fully. Then slide in your knives and admire the handmade centerpiece you didn’t know your kitchen needed.
#15. Uncle Sam and Firecracker Blocks
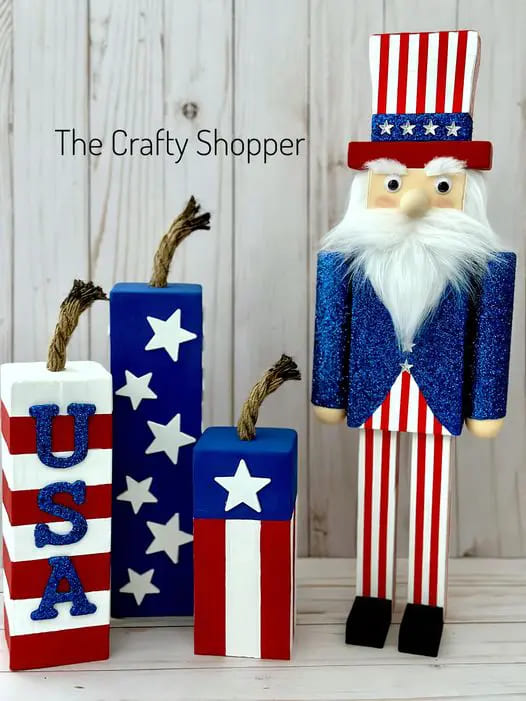
Whether you’re decorating for the Fourth of July or simply love Americana vibes, this bold Uncle Sam and his trio of firecrackers are bursting with spirit!
Furthermore, it feels like something straight out of a vintage parade float. You can create this with just a few Jenga blocks and a little paint, yet the results are wonderfully festive.
Materials Needed
- 1 tall wooden doll body
- 1 wooden ball (1½-2”)
- 1 small wooden rectangle
- 3 Jenga blocks
- Red, white, blue acrylic paint
- Small piece of rope (about 3 inches each)
- Faux fur
- Blue glitter
- Letter stickers or stencils (U, S, A)
- Paintbrushes, hot glue gun, scissors
Step-by-step Guide
Step 1: Start with Uncle Sam, you paint his body with red and white stripes, then paint the top portion blue for the jacket. Next, attach the wooden ball to the top for his head and the mini block as his hat.
Step 2: Paint the top hat with red and white vertical stripes. Then, add a blue band around the brim and decorate with star shapes or stickers.
Step 3: For the firecrackers, paint each Jenga block differently, one with red and white stripes, another with blue and white stars, and a third with a vertical flag-style pattern.
Step 4: Finish Uncle Sam’s face with a tiny felt or faux fur beard, googly eyes or hand-painted features, and glue the arms in place if using doll parts.
#16. Rustic Bathroom Organizer Basket
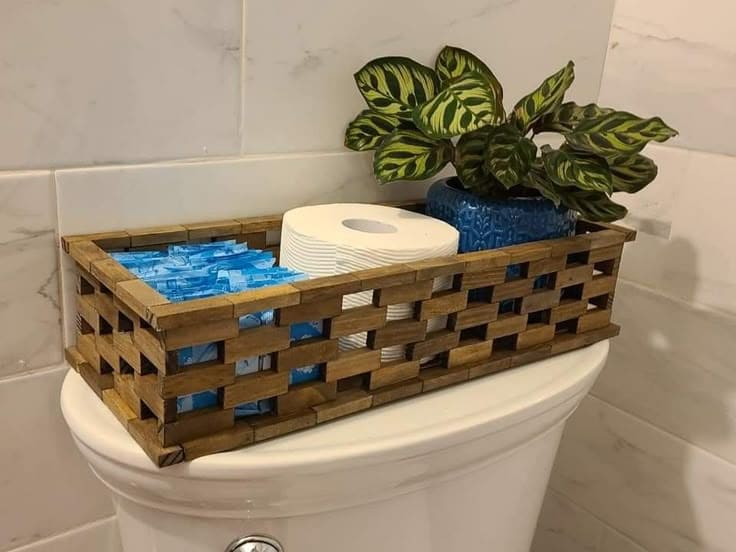
Wow, the basket isn’t just pretty, it’s practical. It cradles toilet paper rolls, stacked wipes, and even makes room for a vibrant plant that brings the space to life.
Also, its interlocking pattern gives a warm, handmade texture, and the neutral tones complement any bathroom decor, from minimalist to farmhouse.
Materials Needed
- ~100 Jenga blocks
- Wood stain (optional)
- Hot glue
- Sandpaper
Step-by-step Guide
Step 1: Begin with the base. You line up blocks side by side to form the floor of your basket, about 6 blocks long by 3 blocks wide, then glue them together securely.
Step 2: For the sides, create the woven look by alternating horizontal and vertical placements, leaving small gaps between. You should glue each layer in place and let it dry before adding the next.
Step 3: Continue building layer by layer, adjusting the basket’s height to your needs (about 5-6 layers high is ideal).
Step 4: Once the frame is complete, stain the basket if desired, then seal it with a clear finish to protect against bathroom moisture.
#17. Mini Snowman Hat Ornaments
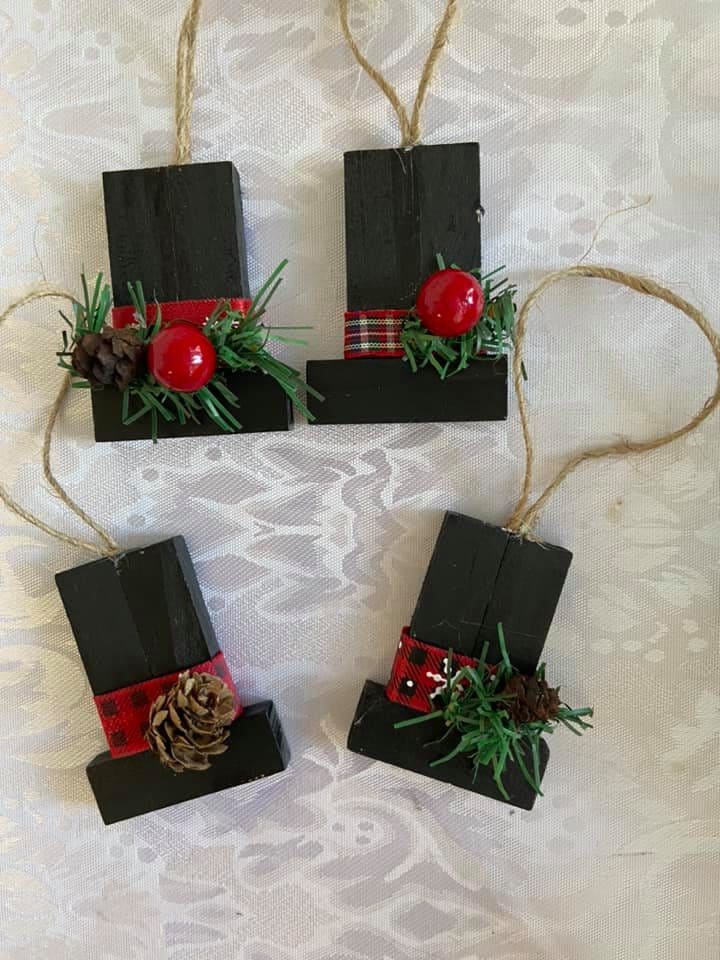
There’s something quietly nostalgic about handmade ornaments, especially ones that look like they came straight out of a storybook winter. These mini snowman hats are just that.
Plus, they’re perfect for gifting or adding a homespun feel to your tree. I made a whole batch during a snowy weekend, and let’s just say they were the unexpected stars of my holiday decor.
Materials Needed
- 3 Jenga blocks per ornament (standard size: 2.95″ x 0.75″ x 0.59″)
- Black acrylic paint
- Hot glue gun and glue sticks
- 6″ twine per ornament
- 2″ strip of holiday ribbon (plaid, checkered, or festive patterns)
- Mini pinecones, faux holly berries, and artificial greenery (small sprigs)
- Small red bells (optional)
Step-by-step Guide
Step 1: Glue three Jenga blocks together in a T-shape, two standing vertically, one laid horizontally at the base to form the hat brim.
Step 2: Once the glue sets, paint the entire piece black. Then let it dry fully before adding decorations.
Step 3: Wrap and glue a piece of festive ribbon where the two blocks meet. Then, hot glue on your greenery, berries, pinecones, or bells for a cheerful, woodland touch.
Step 4: Attach a loop of twine to the back with hot glue for hanging.
#18. Patriotic Stacked Book Blocks
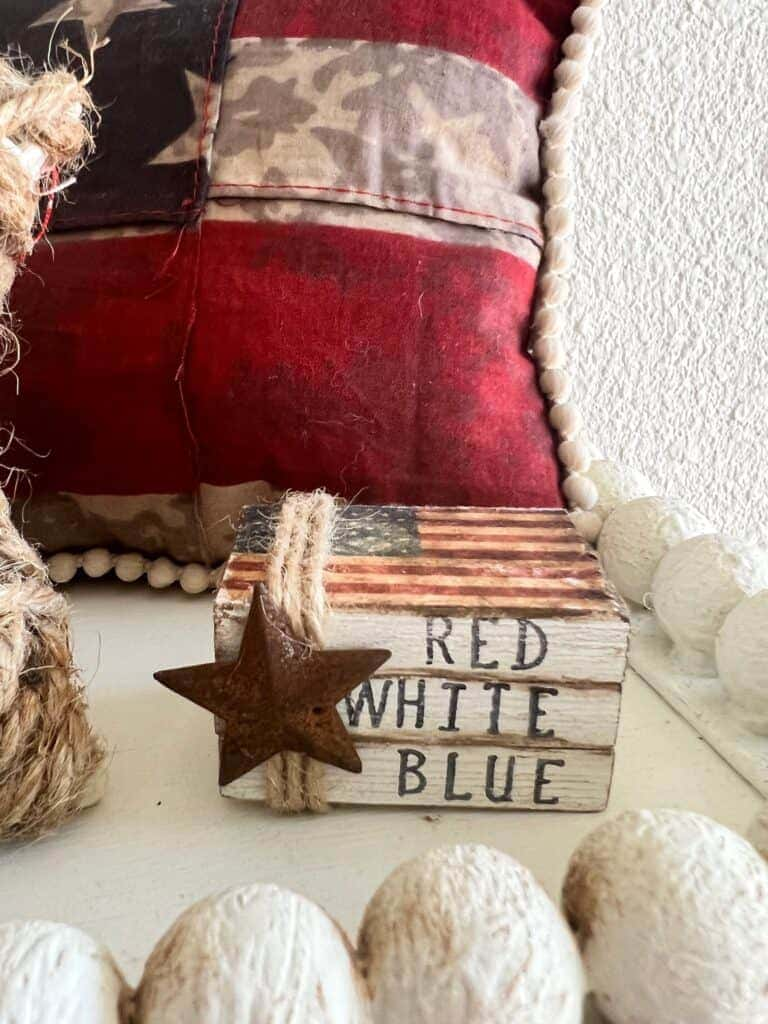
Here’s a sweet little tribute to the red, white, and blue. This faux-book stack made from Jenga blocks carries the spirit of summer, barbecues, and small-town parades.
Specially, it’s the kind of DIY you’ll want to display proudly on your entryway table or mantel. And best of all is that you can make this in under an hour with scraps and paint you probably already have.
Materials Needed
- 6 Jenga blocks (each approx. 3″ long)
- White acrylic paint
- Red and navy blue paint
- Thin paintbrush
- Twine (12″-14″)
- Optional: mini metal star embellishment (1–2″)
- Sandpaper (medium grit)
- Hot glue gun
Step-by-step Guide
Step 1: Start by painting all three Jenga blocks with white paint. Let them dry, then lightly sand the edges if you want that rustic, worn look.
Step 2: On the top block, freehand or stencil a small American flag in the top right corner using red and blue paint.
Step 3: Use a marker or fine brush to write “RED,” “WHITE,” and “BLUE” on the sides of each block. Then you space the words vertically so each one stands alone.
Step 4: Stack the blocks neatly and wrap them with twine a few times for that cozy book-bundle effect. Finish by hot gluing a small rustic star to the front.
#19. Rustic Jenga Block Ornaments with Beads and Keys
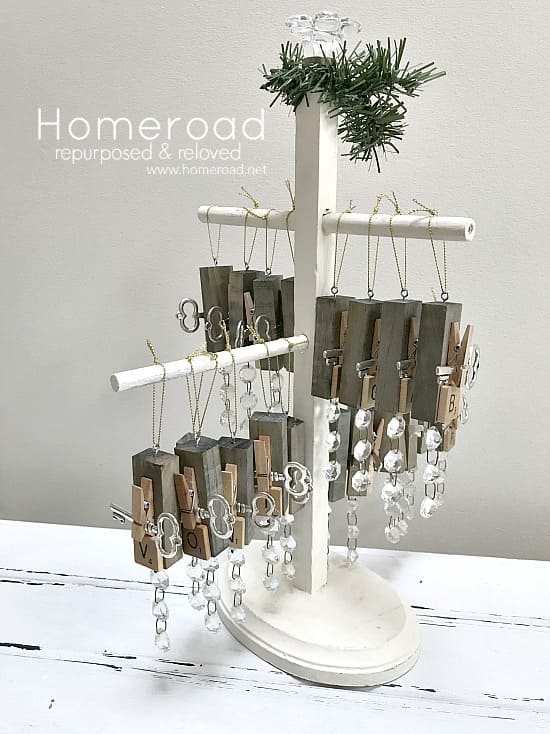
These Jenga block ornaments blend the warmth of aged wood, the sparkle of clear beads, and the whimsy of old-fashioned keys.
Of course, they feel like something you’d find in a cozy country shop or your grandmother’s attic. Whether you use initials, numbers, or special words, these are endlessly personal and full of soul.
Materials Needed
- 1 Jenga block per ornament
- Gray wood stain
- Vintage-style keys
- Wooden Scrabble tile (1 per ornament)
- Clear faceted beads (about 6-8 per ornament)
- Jewelry wire (6-8″ per ornament)
- Mini eye hooks (1 per ornament)
- Gold
- Hot glue gun
Step-by-step Guide
Step 1: Lightly stain each Jenga block with gray wash or diluted acrylic paint. Then let them dry completely before handling further.
Step 2: Screw a mini eye hook into the top of each block. On the front, glue a Scrabble tile or letter block for a personalized touch.
Step 3: Using jewelry wire, string clear beads together in a dangling chain. You can make a few strands per ornament for a waterfall effect. Then attach them to the bottom of the block using hot glue.
Step 4: Add a vintage key to the side for that rustic finish. Next, you tie a string through the top hook to hang it proudly.
#20. Hourglass Jenga Planter
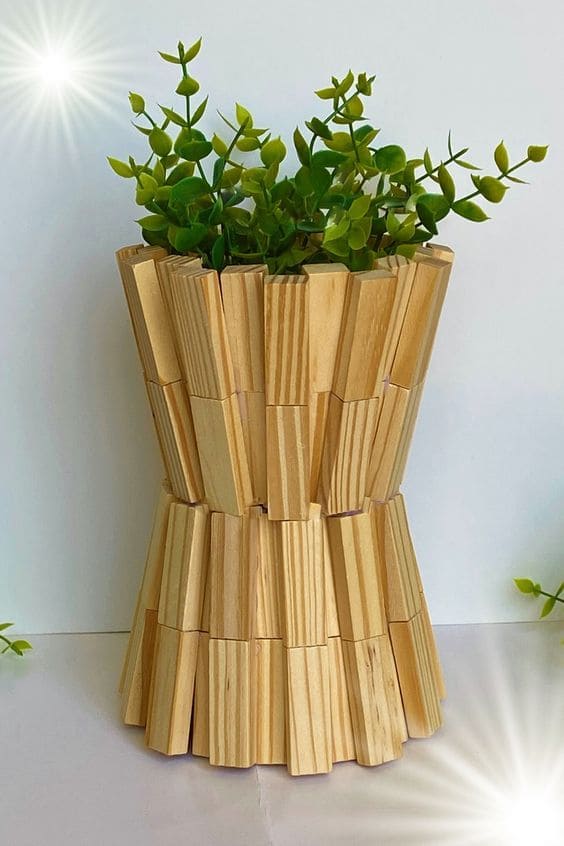
Wow, this showstopper of a planter frames it like art. Built entirely from Jenga blocks, its striking hourglass silhouette catches light and shadow in all the right places.
Plus, you can get a sculptural centerpiece that looks like something you’d find in a boutique gallery, not your weekend craft table.
Materials Needed
- Approx. 80-100 Jenga blocks
- Strong wood glue
- A round pot or plastic container
- Sandpaper
- Optional: wood stain
Step-by-step Guide
Step 1: Start with a round base, either a small plastic pot or a sturdy cardboard form. You can use this as the core around which you’ll glue the Jenga blocks.
Step 2: For the lower half, tilt the blocks slightly outward as you glue each one around the base. Now, use painter’s tape to temporarily hold them in place until the glue sets.
Step 3: At the middle section, begin angling the blocks slightly inward.
Step 4: For the top half, reverse the tilt and glue the blocks outward again, matching the curve from the bottom.
Step 5: Once dry, lightly sand any glue spots and finish with a natural sealer or leave raw for a more organic look.
