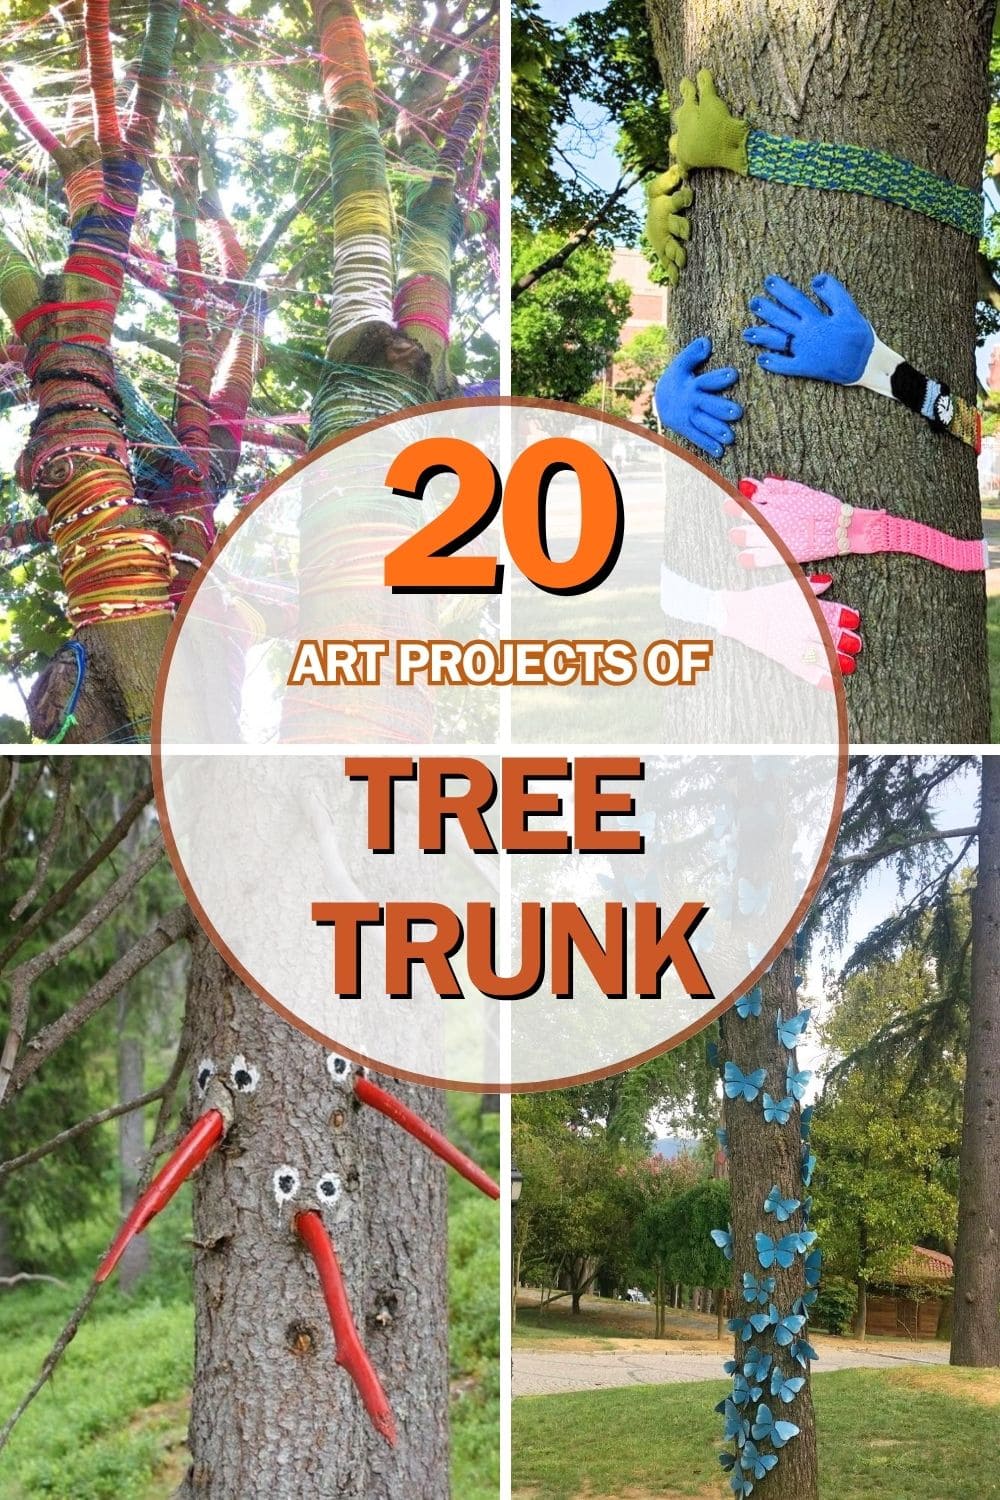
If you have an old tree trunk hanging out in your yard, don’t chop it down, turn it into something magical instead.
With a splash of creativity, that forgotten stump can become a fun little showstopper in your garden.
These 20 whimsical projects are simple enough for beginners and guaranteed to make your outdoor space feel a little more playful.
#1. Crochet Beehive Tree Wrap
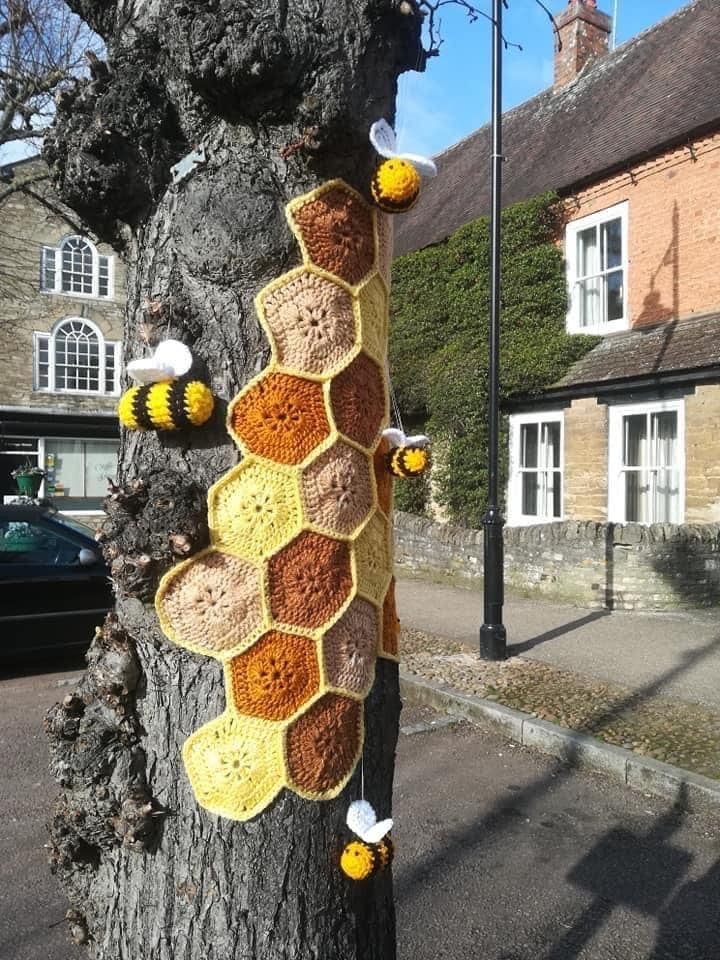
This sweet little project is proof that yarn bombing can be adorable and educational.
With a mix of golden honeycomb hexagons and plump little crocheted bees, this tree wrap adds warmth and whimsy to any sidewalk or town square.
If you’ve ever wanted to mix art, nature, and crochet into one playful display, this buzzing beehive wrap is the perfect weekend project.
Materials Needed
- Worsted weight yarn in yellow, orange, beige, and brown tones (approx. 200g total)
- Black, yellow, and white yarn for bees (approx. 50g each)
- Crochet hook (4.0 mm or size H)
- Darning needle for sewing hexagons and bee parts
- Scissors
- Velcro strips or yarn ties for attaching wrap to tree
- Stuffing for bee bodies (cotton or polyfill)
Step-by-Step Guide
Step 1: Crochet multiple hexagons using your yarn colors to create the honeycomb pattern. Aim for around 12-15 hexagons, each 4-5 inches wide.
Step 2: Stitch the hexagons together in a loose, organic shape that mimics real honeycomb. Alternate colors for a natural look.
Step 3: Make 4-5 small crocheted bees. You can use black and yellow stripes for the body, white loops for wings, and lightly stuff each bee to keep them plump.
Step 4: Secure bees onto the honeycomb using yarn or invisible thread so they appear to be buzzing or hanging.
Step 5: Attach your completed honeycomb wrap to the tree trunk with yarn ties or Velcro straps.
#2. DIY Tree Hugs with Colorful Glove Arms
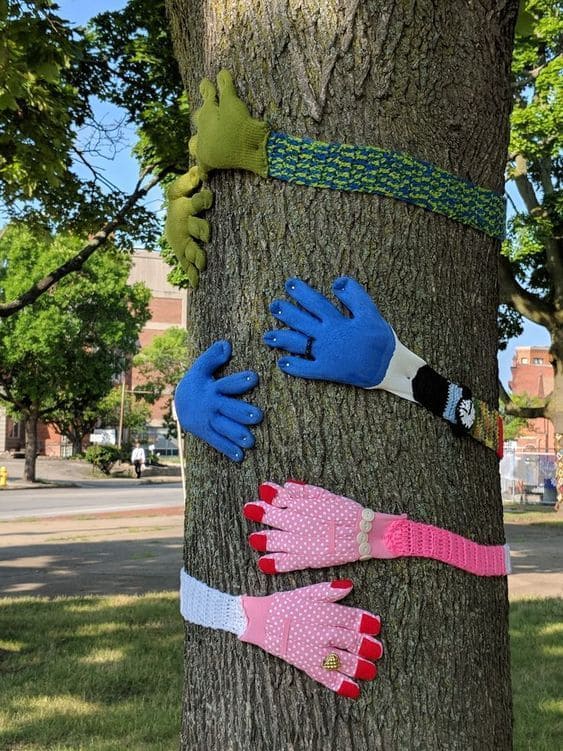
There’s something undeniably sweet about seeing a tree wrapped in a soft, quirky hug.
This cheerful project turns old gloves and scraps of fabric into joyful little arms that give your favorite tree a big ol’ embrace.
Whether you’re spreading a message of love, whimsy, or just trying to make your neighborhood a little brighter, this is a low-cost, high-heart-impact craft anyone can do.
Materials Needed:
- 3 pairs of old gloves (any color or pattern)
- Fabric strips or old sleeves (approx. 20-25 inches per “arm”)
- Needle and thread or fabric glue
- Buttons, trim, or small embellishments
- Safety pins or yarn to tie around the tree
Step-by-Step Guide:
Step 1: Choose your glove, mixing colors adds character! Attach them to fabric strips to create arms long enough to wrap around the tree.
You can use old sleeves, scarves, or sewn-together fabric scraps.
Step 2: Sew or glue the gloves to each end of your fabric strip. Then add buttons, lace, or decorative touches to make each arm feel like it has its own little personality.
Step 3: Wrap the finished arms around your tree and secure them using yarn, velcro, or safety pins. Overlap slightly for that snuggly, layered hug effect.
Step 4 (Optional): Finally, add a handwritten tag or sign.
#3. Whimsical Tree Critters
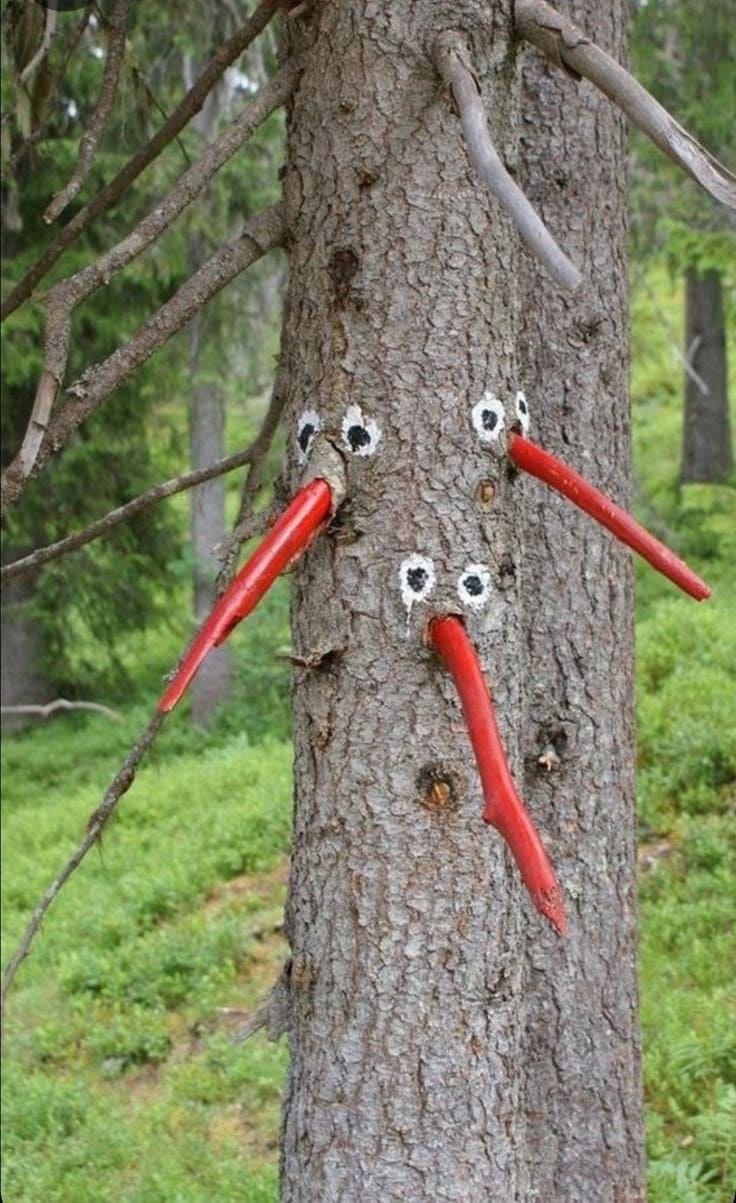
If you’ve ever wandered through the woods and thought the trees might be watching you, well, this hilarious project proves you’re not wrong.
With just a splash of paint and a few twisty branches, this tree suddenly becomes a trio of curious creatures, each one sticking out a long red nose as if caught mid-gossip.
It’s weird, wonderful, and a bit absurd in the best way possible. You don’t need perfection. You just need playfulness.
Materials Needed:
- 3 curved or angled branches (each about 1-2 ft long)
- Outdoor red paint
- White and black outdoor paint for the eyes
- Sandpaper (optional, to smooth sticks)
- Drill or hammer (for small pilot holes)
- Wood glue or screws
Step-by-Step Guide:
Step 1: Find three eye-catching sticks with natural curves or bends, ones that look like they’re pointing or could pass as noses.
Step 2: Paint them bright red and let them dry completely. You could also try neon orange or even glow-in-the-dark for a nighttime giggle.
Step 3: Paint goofy eyes directly onto the tree using white and black. Don’t worry about being perfect.
Step 4: Carefully drill or screw in each stick below a set of eyes to look like it’s popping out of a face. Then use wood glue if the bark is too tough to hold hardware.
#4. DIY Butterfly Tree
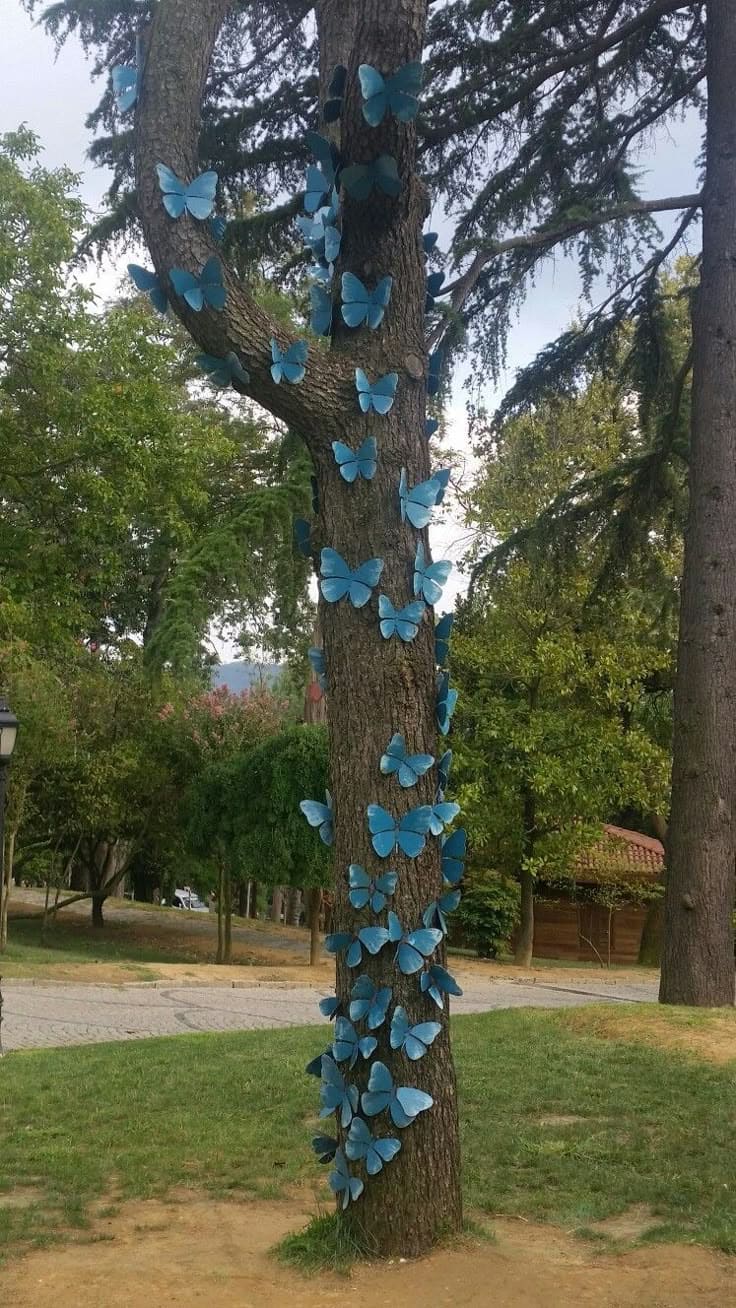
There’s something dreamlike about watching butterflies flutter around a garden. But what if the butterflies stayed, just for a little longer?
This beautiful tree, completely wrapped in a swirling dance of blue butterflies, feels like a frozen moment from a storybook.
It stops you in your tracks, makes you smile, and reminds you of childhood daydreams.
Materials Needed:
- 40-60 butterfly cutouts (cardboard, metal, or weatherproof plastic)
- Outdoor-safe paint (shades of blue, teal, or any you love)
- Hot glue or exterior adhesive putty
- Optional: clear fishing line or garden wire for a floating effect
Step-by-Step Guide:
Step 1: Cut butterfly shapes from a sturdy, weatherproof material. You can find stencils online or make your own. Vary the sizes for a natural effect.
Step 2: Paint each butterfly with a coat of bright, cheerful color. Blue gives a calming, surreal feel but you can go wild with a rainbow palette if you prefer.
Step 3: Once dry, gently bend the wings to give a 3D, mid-flight illusion. This part brings the magic to life.
Step 4: Start attaching the butterflies around the tree trunk, letting them spiral upward like they’re climbing toward the sky.
Next, use outdoor adhesive so they stay in place through sun and storm.
Step 5 (Optional): Hang a few butterflies from branches above using fishing line to create movement and surprise from every angle.
#5. DIY Fairy Tree House with Windows
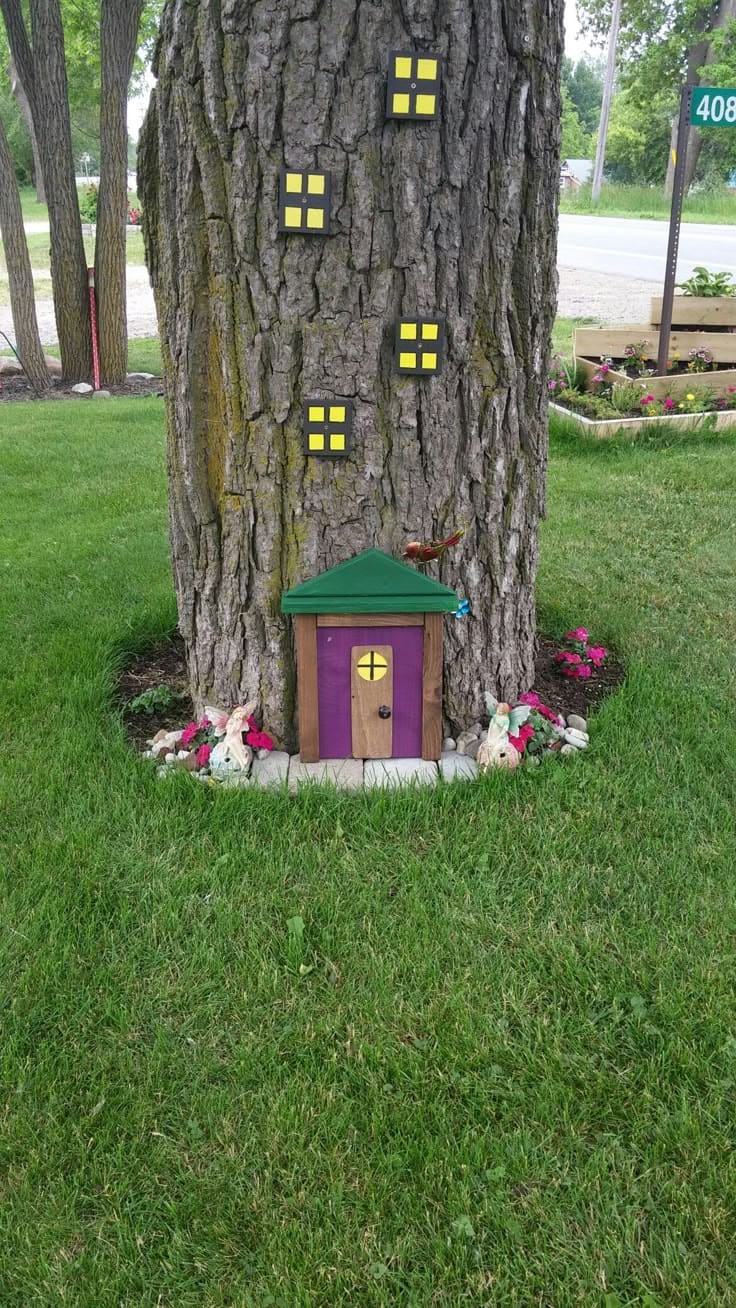
If you’ve ever wanted to believe in fairies just a little more, this project brings that charm right into your front yard.
Nestled at the base of a sturdy tree, this miniature home, with its tiny purple door and glowing yellow windows, feels like a secret world waiting to be discovered.
I made this for my niece’s birthday, and now she insists we knock every time we pass by.
Materials Needed:
- 1 wooden craft door (approx. 8-10” tall)
- Scrap wood for the roof and frame (green-painted optional)
- 5-7 mini wooden squares for windows (about 3×3” each)
- Yellow craft paper or paint for window glow
- Hot glue gun or outdoor adhesive
- Decorative stones, mini gnomes, or faux flowers for accents
Step-by-Step Guide:
Step 1: Start with the door. Either repurpose a small wooden plaque or build a frame using basic scrap wood.
You can paint it a playful color and glue on a knob or button for the doorknob.
Step 2: Cut small wood pieces into squares for windows. Paint them black, and glue yellow paper or paint squares inside for a lit-up look.
Step 3: Attach the door at the base of the tree using strong outdoor glue.
Then arrange your windows above in a scattered pattern to make it feel like a multi-story fairy apartment.
Step 4: Decorate the base with small stones, gnome figures, or silk flowers to complete the scene.
#6. Yarn-Bombed Tree with Pom-Pom Blooms
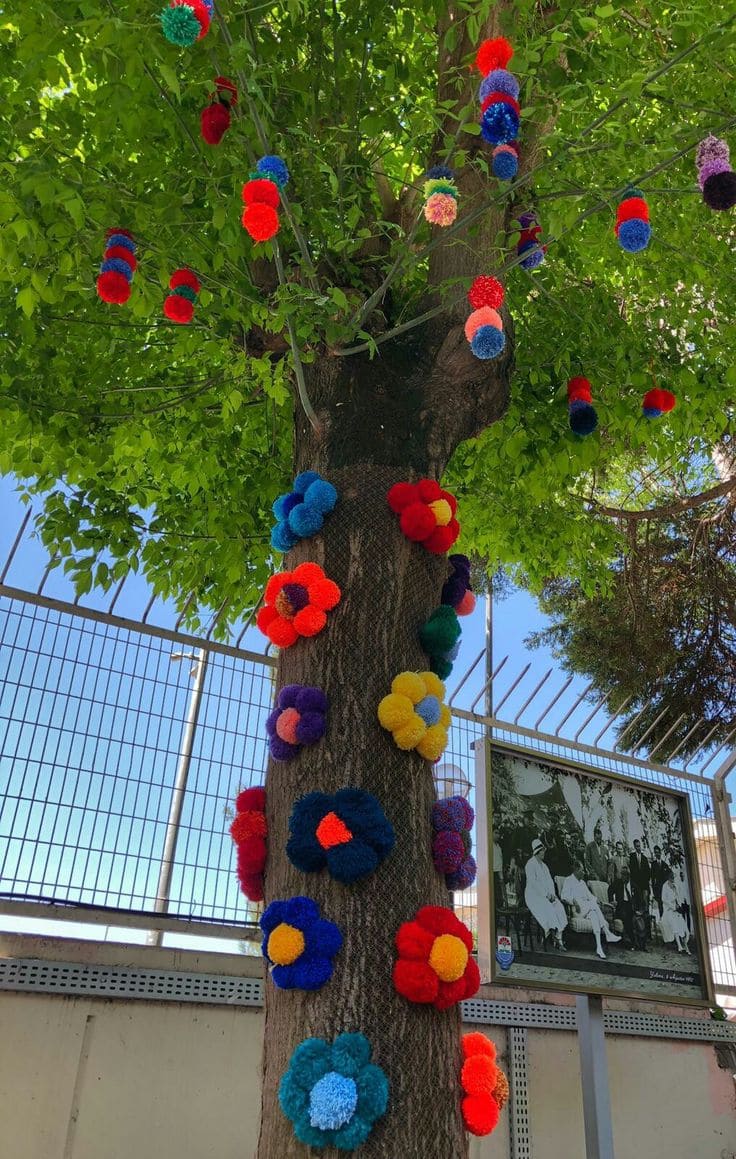
If you’ve ever wanted to bring a little whimsy to your yard without spending a fortune, this pom-pom tree art might be your new favorite project.
I made these on a lazy weekend afternoon with leftover yarn from old crochet projects, and now our tree looks like it belongs in a storybook.
The bright pops of color against the bark? Pure joy. Kids love it. Neighbors smile.
Materials Needed:
- Yarn in assorted colors (roughly 10-15 skeins depending on tree size and pom-pom size)
- Pom-pom makers or cardboard rings (you can DIY these)
- Scissors
- Hot glue gun or outdoor-safe adhesive
- Small fabric flowers or felt (optional)
- Clear outdoor spray sealant (optional, to weatherproof)
Step-by-Step Guide:
Step 1: Start by making your pom-poms. You can use a store-bought pom-pom maker, or just wrap yarn around your fingers or cardboard rings.
Aim for sizes between 2 to 4 inches for variety.
Step 2: Trim each pom to get that full, round shape.
Step 3: If you want floral looks, group 5-6 pom-poms in a circle and glue them together, adding a contrasting color pom or felt piece in the center.
Step 4: Attach your creations to the tree using strong outdoor adhesive, velcro straps, or tie them on with more yarn.
#7. Whimsical Dragonfly Tree Art
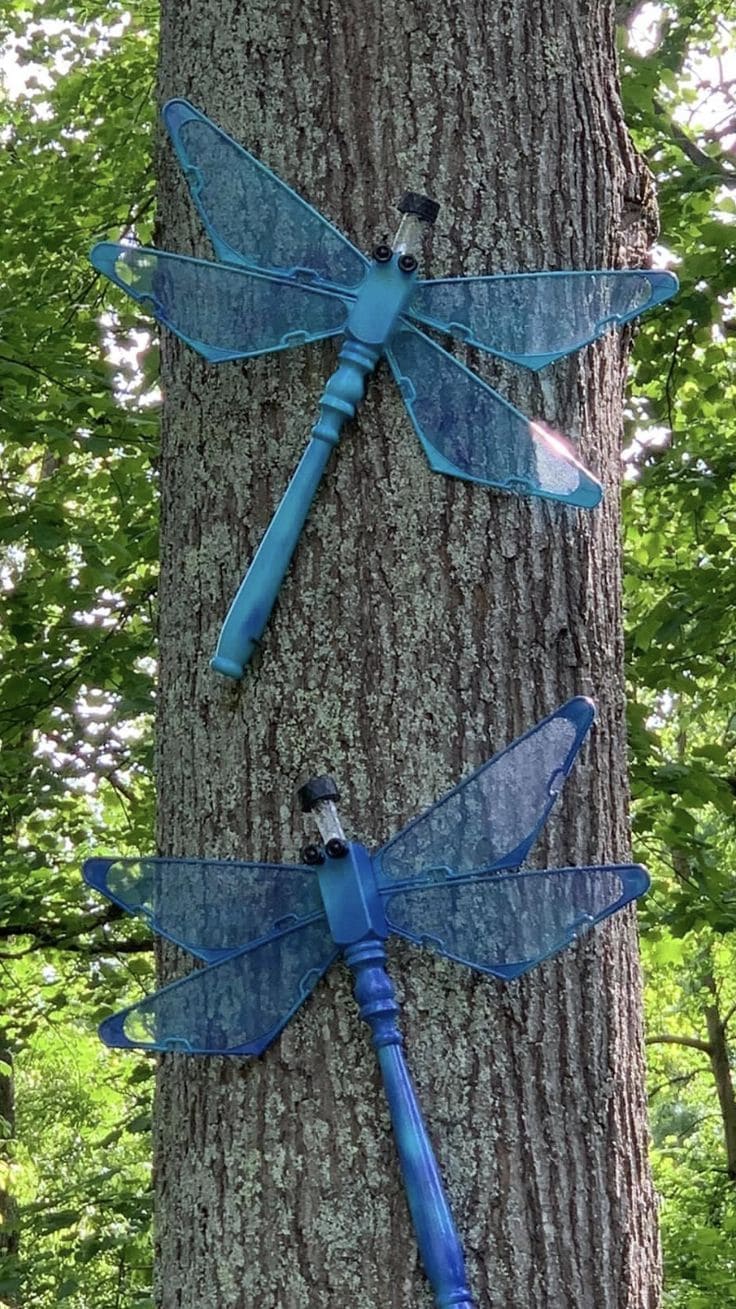
There’s something unexpectedly joyful about turning old junk into garden magic and this dragonfly project totally nails that vibe.
I made mine from an old table leg and a set of ceiling fan blades that had been sitting in the garage forever.
Now, they’re fluttering across the trunk of our oak tree like they belong there.
Materials Needed:
- 1 old wooden table leg or spindle (18-24 inches long)
- 4 ceiling fan blades per dragonfly (any finish works)
- Blue spray paint (or your favorite color)
- 2 big googly eyes or wooden beads
- Screws (1 inch long) + screwdriver or drill
- Strong wood glue (optional but helpful)
- Clear weatherproof spray
Step-by-Step Guide:
Step 1: Wipe down the fan blades and table leg so the paint sticks well. If the wood’s rough, give it a quick sanding.
Step 2: Paint everything! I used a couple of shades of blue for a gradient look, but you can go wild with colors. Let it all dry completely.
Step 3: Lay out the wings in an X shape, two on each side of the table leg. Screw them in from the back or use wood glue if you don’t want to drill.
Step 4: Glue on the eyes near the top, mine were just wooden beads I painted black. You could also use buttons or even nuts from the toolbox.
Step 5: Screw the finished dragonfly directly onto the tree, or attach a hanging hook if you’d rather keep it temporary.
#8. Tree Stump Face Planter
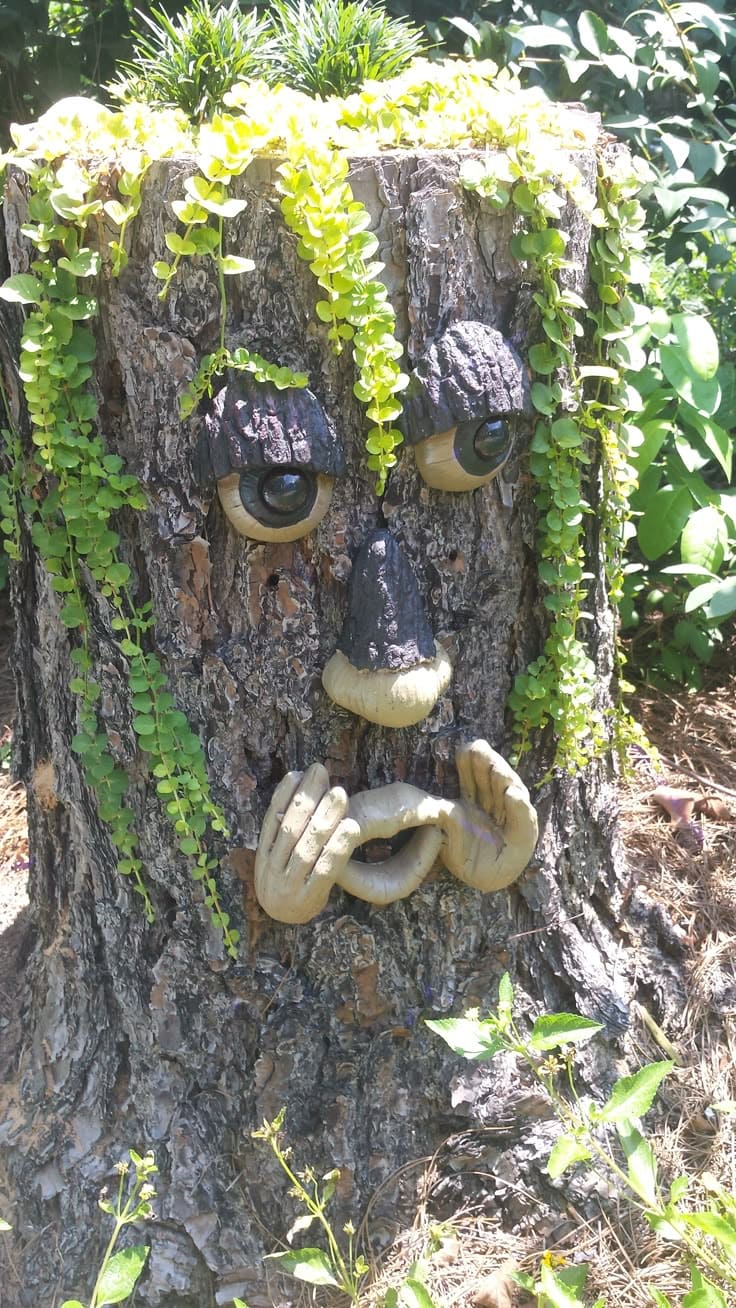
Who says tree stumps have to be boring?
This charming garden feature turns an ordinary stump into a wide-eyed woodland character, complete with expressive eyes, barky brows, and leafy green hair.
The added vines flowing down like dreadlocks and the playful hand gesture give it personality.
Materials Needed:
- One old tree stump, cut flat on top
- Planter insert or soil
- Creeping Jenny, ivy, or any trailing plant
- Decorative tree face and hand set (available online or in garden stores)
- Screws or weatherproof adhesive
Step-by-Step Guide:
Step 1: Clean the surface of the tree stump and let it dry fully before decorating.
Step 2: Attach the face pieces like eyes, nose, mouth, and hands using screws or a strong outdoor adhesive. Play around with expressions!
Step 3: Hollow the center or place a shallow planter bowl on top. Fill with soil and trailing greenery for a hairdo.
Step 4: Water regularly and let nature slowly blend your character into the landscape.
#9. Giant Goofy Tree Faces
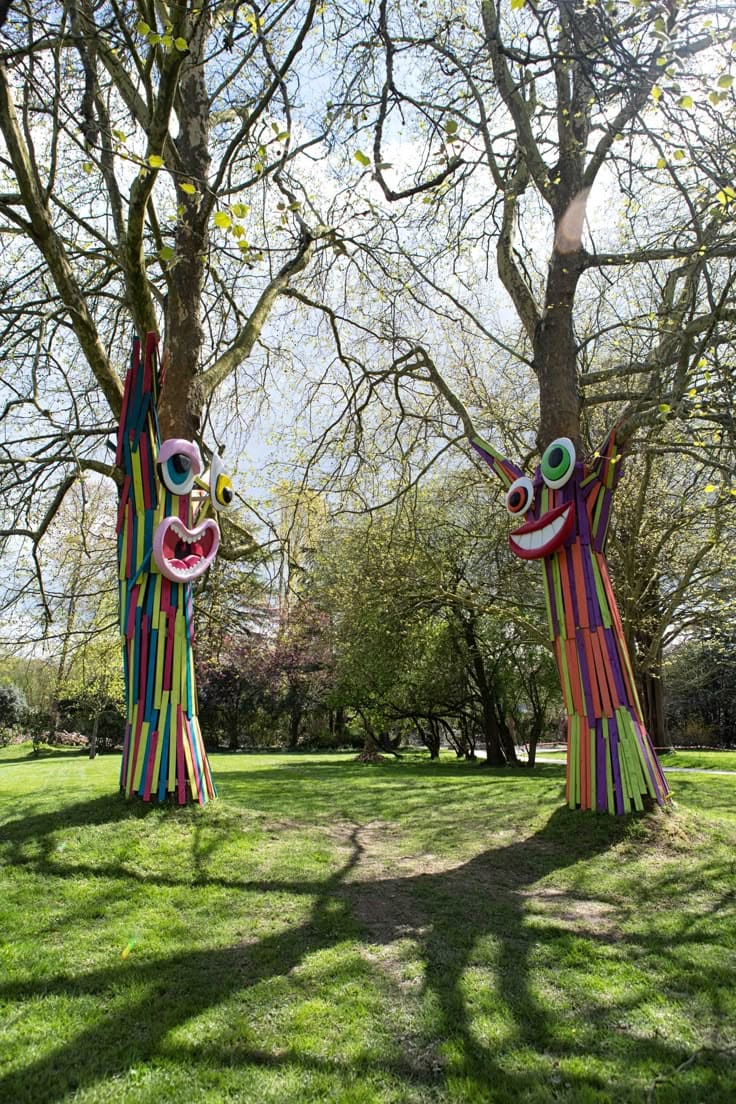
These hilariously animated tree trunks are like something straight out of a children’s storybook, all color, giggles, and character.
Whether you’re hosting a whimsical backyard party or just want to turn your neighborhood park into an open-air comedy stage, this project is a riot to make.
I once helped my nieces craft something similar, and the amount of laughter it sparked from strangers was priceless.
Materials Needed:
- Plywood sheets (½ inch thick, 2-3 sheets per tree face)
- Jigsaw or handsaw
- Sandpaper
- Outdoor acrylic paint in bright colors
- Paintbrushes, detail brushes
- Large googly eyes (or make your own from painted bowls)
- Screws or outdoor-safe mounting tape
- Optional: clear weatherproof sealer spray
Step-by-Step Guide:
Step 1: Sketch the face parts on your plywood such as wide grins, oversized eyes, expressive eyebrows, anything that screams goofy joy.
You then cut them out using a jigsaw and sand the edges smooth.
Step 2: Paint each piece using bright, clashing colors. The more playful, the better. Let everything dry fully, then seal with a weatherproof spray if desired.
Step 3: Attach your wooden hair (planks or strips) vertically to the bottom half of the tree to form the colorful body.
You can vary lengths for a shaggy look.
Step 4: Secure the facial pieces higher up using mounting tape, hooks, or short screws into the bark (only if the tree is mature and healthy).
Make sure everything is snug as these characters might look chaotic, but they need to hold up to wind and rain.
#10. Bottle Cap Mosaic Tree Art
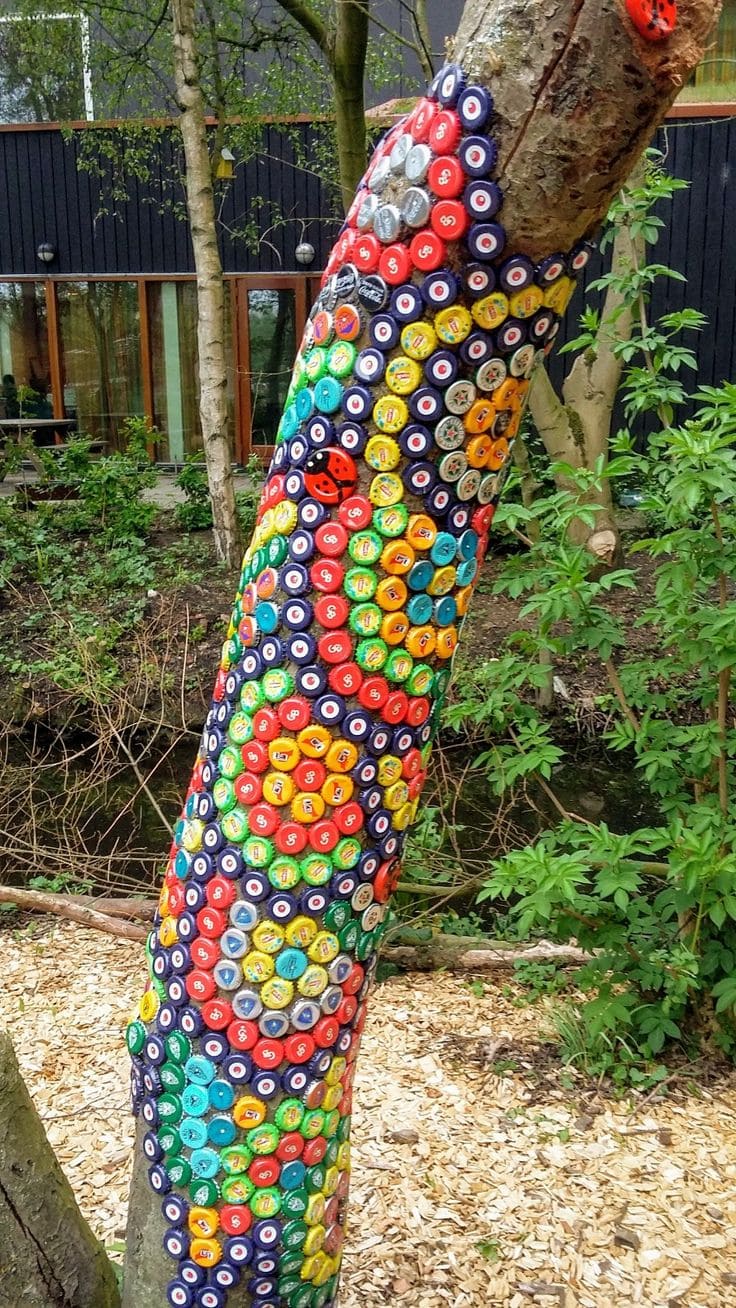
This colorful bottle cap mosaic transforms an ordinary tree trunk into a celebration of upcycled creativity.
Bright reds, blues, greens, and yellows swirl into hypnotic patterns that almost look like stained glass from afar.
What makes this project so charming is its blend of playfulness and eco-consciousness, you’re not just decorating, you’re reusing, honoring both art and nature.
Materials Needed
- Around 300-400 clean metal or plastic bottle caps (mixed colors and sizes)
- Strong outdoor adhesive or waterproof construction glue
- Tweezers or small tongs
- Clear outdoor sealant (optional, for extra weather resistance)
- A few small painted stones or accessories (like mini ladybugs)
- Old clothes or gloves
Step-by-Step Guide
Step 1: Choose a healthy, non-flaky tree trunk or a dead standing tree with sturdy bark for better adhesion.
Step 2: Plan your design on the ground first, lay out the caps by color and shape to form your pattern.
Step 3: Starting from the bottom, apply a small amount of glue to the back of each bottle cap and press it firmly onto the bark. Then hold for 5-10 seconds.
Step 4: Work in sections, moving upward and filling in spaces tightly to create a mosaic effect.
Step 5: Once your pattern is complete, let it cure for 24 hours.
If needed, spray a light coat of outdoor sealant to protect it from the elements.
#11. Painted Reindeer Tree Trunk
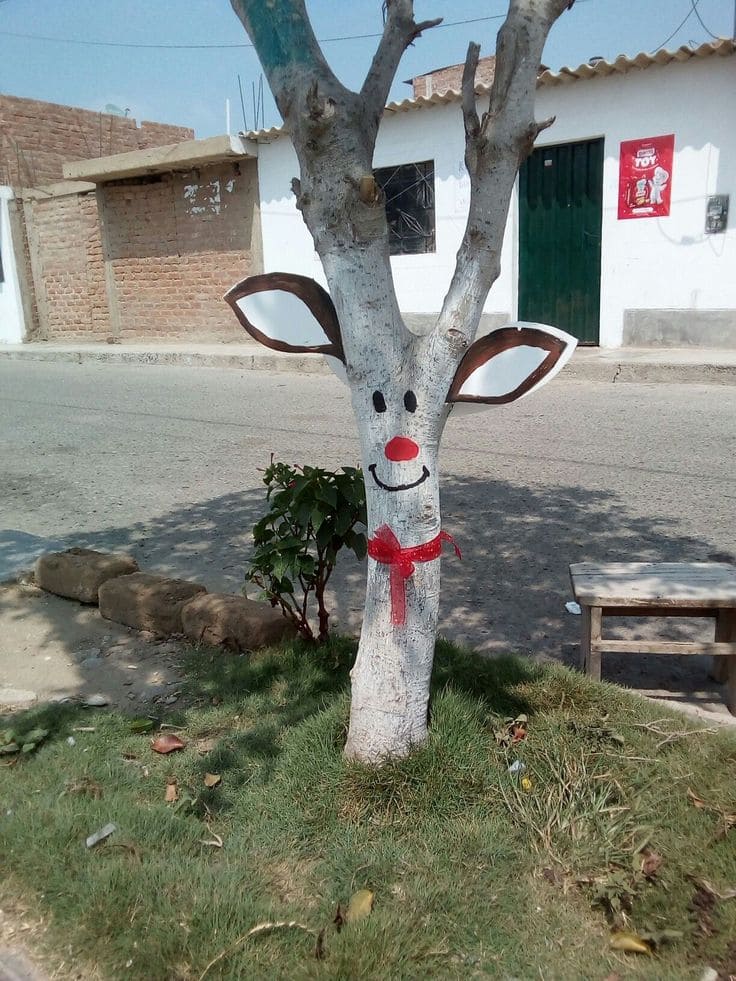
You don’t need a fancy workshop to bring holiday cheer to your street corner. Sometimes, all it takes is a little paint, some cardboard, and a bold red nose.
This playful tree reindeer instantly turns an ordinary trunk into a festive character full of charm and whimsy.
Whether you live in a warm climate or just want to spread some joy in an unexpected way, this project is a heartwarming, low-cost way to make people smile.
Materials Needed
- White outdoor paint (approx. 1 cup)
- Brown and red acrylic paint (small bottles)
- Paintbrushes (1 medium, 1 fine-tip)
- 2 pieces of cardboard (approx. 12 x 10 inches each)
- Scissors or box cutter
- Clear packing tape or thumbtacks
- Red ribbon (at least 18 inches)
Step-by-Step Guide
Step 1: Choose a tree with a smooth, clean surface for easier painting. Wipe away dust or loose bark before starting.
Step 2: Paint the front of the tree trunk white in a vertical strip wide enough to serve as your reindeer’s face. Let it dry completely.
Step 3: Using brown paint, cut and color two cardboard ovals to resemble ears, then add white centers. Tape or tack these on either side of the trunk, angled slightly upward.
Step 4: Paint on two oval eyes with black paint, a red nose (make it round and bright), and a wide, friendly smile below.
Step 5: Finish it off by tying a red ribbon around the trunk like a scarf.
#12. Rainbow-Wrapped Tree Trunks
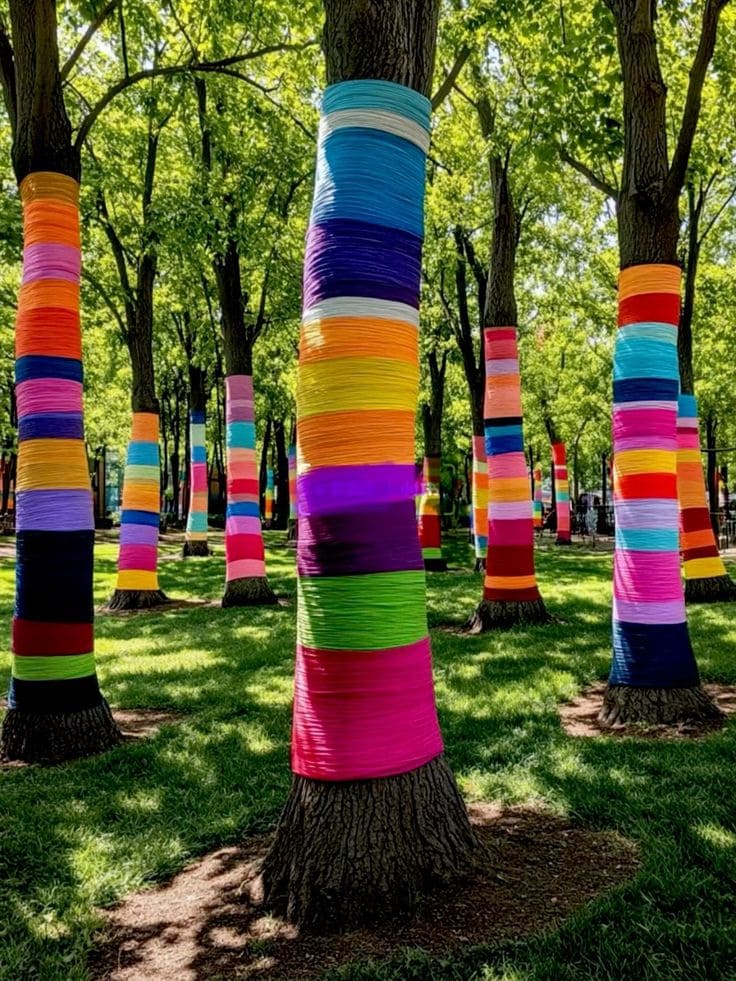
There’s something about wrapping a tree in yarn that feels like giving it a cozy sweater, except this one throws a full-on color party.
These rainbow-wrapped trunks turn an ordinary park or backyard into a joyful art installation.
I tried this on a few trees during a community event, and I swear, the whole space felt instantly more alive.
Materials Needed:
- Yarn in bright, assorted colors (plan for 15-30 yards per tree depending on height and trunk width)
- Scissors
- Yarn needle (optional)
- Ladder (if wrapping higher up)
- Velcro straps, safety pins, or light-duty staples (optional for securing ends)
Step-by-Step Guide:
Step 1: Choose a few trees with smooth bark and minimal low branches. Then clean the trunk gently to remove loose dirt.
Step 2: Start from the base and begin wrapping your yarn around the trunk tightly but not too snug.
You should keep your lines even for a cleaner look, or go wild and layer colors randomly.
Step 3: Switch colors as you go to create stripes or bold contrasts. Then tie each new color to the previous strand, tucking knots neatly on the backside.
Step 4: Once you reach your desired height, secure the end with a gentle knot, a Velcro strap, or a hidden safety pin.
#13. Tree Photo Display
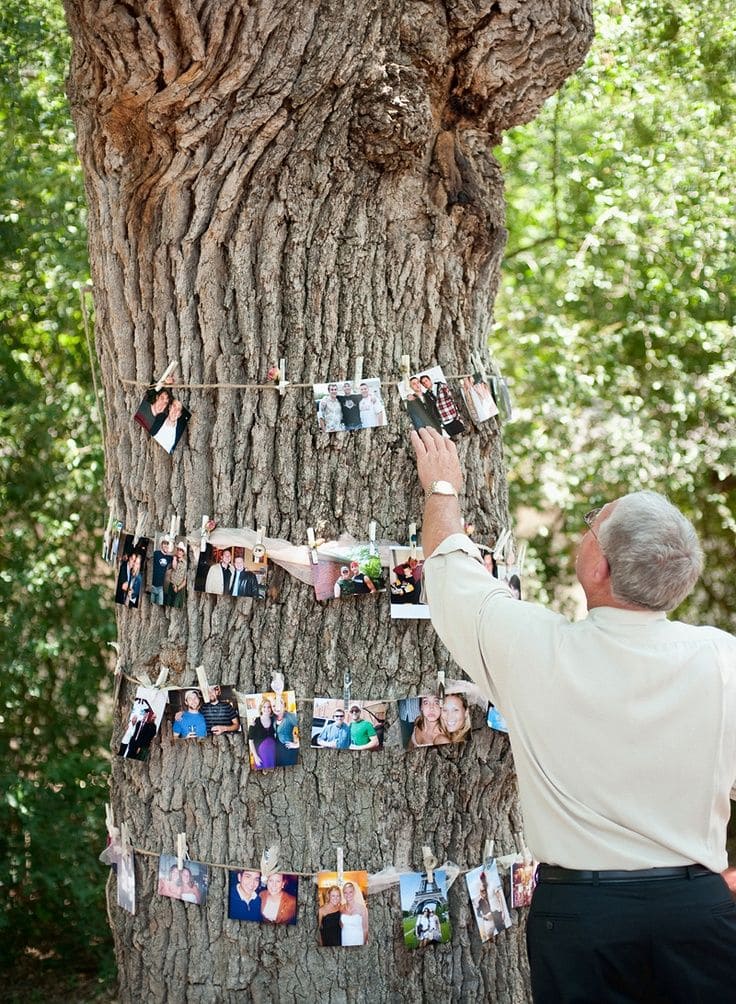
In this heartwarming setup, strands of twine stretch across a sturdy tree trunk, holding snapshots from years past.
It feels like the tree itself is cradling a family’s history, offering shade and stories all at once.
Perfect for weddings, reunions, or backyard anniversaries, this idea brings your photo albums to life under open skies.
Materials Needed:
- 3-5 rolls of twine or jute string (about 6-10 ft each)
- Mini clothespins or clips (about 40-60 pieces)
- Printed photos (preferably matte finish)
- Push pins or tape (to secure string ends to tree bark)
Step-by-Step Guide:
Step 1: Pick a wide, sturdy tree with textured bark and plenty of shade, bonus if it’s meaningful to your event.
Step 2: Wrap or pin twine horizontally around the trunk in tiers, spacing the rows evenly from top to bottom.
Step 3: Clip printed photos onto each row using clothespins. Then mix candid shots with posed ones for a more emotional display.
Step 4: Optional, you can add small paper notes, quotes, or even dried flowers between the photos for a more personal touch.
#14. Crochet Octopus Tree Wrap
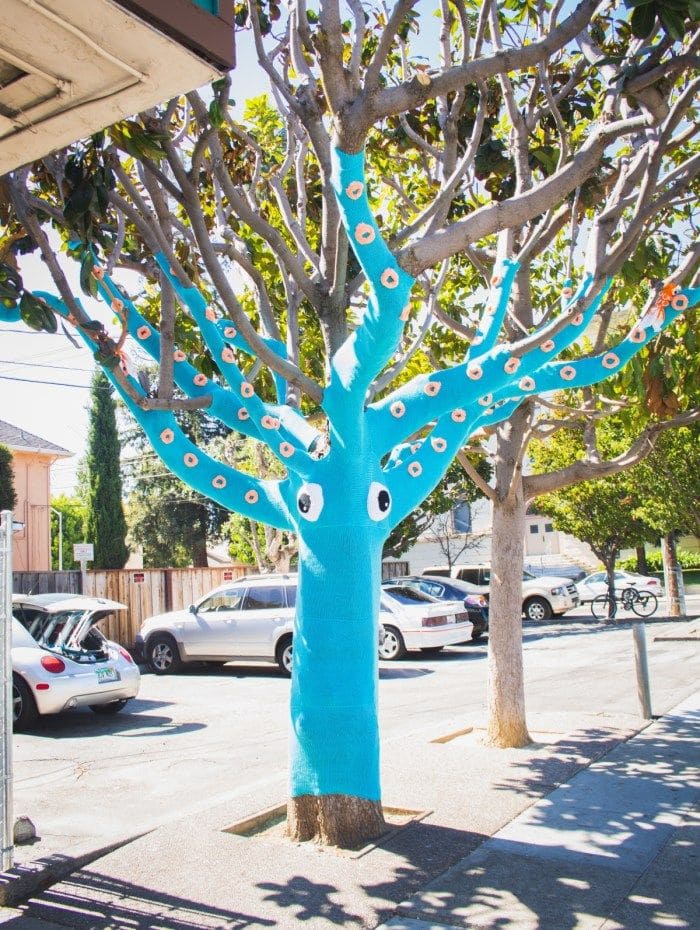
This bright, quirky octopus-themed tree wrap brings a huge splash of personality to the sidewalk.
With its electric-blue yarn hugging the trunk and spreading out to the branches like cheerful tentacles, it turns an everyday tree into an oversized sea creature.
The friendly felt eyes give it a playful character, while the crocheted suckers add clever texture.
Materials Needed
- 2 to 3 skeins of bright blue yarn (depending on tree size)
- Crochet hook (size H/5.0 mm or as needed)
- Orange and white yarn
- Black and white felt
- Scissors and yarn needle
- Velcro strips or outdoor-safe yarn ties
- Optional: ladder and friend to help with top branches
Step-by-Step Guide
Step 1: Measure your tree trunk and main branches to determine how many panels or sections you’ll need to crochet.
Step 2: Use single or half-double crochet stitches to create rectangular panels that wrap around each part of the trunk and limbs.
Step 3: Crochet small round circles using orange and white yarn to make the suction cups. Sew or glue them onto the branch panels.
Step 4: Cut two large circles from white felt and two smaller black circles for the pupils. Then attach them to the center front panel to make the octopus face.
Step 5: Wrap each crochet panel around its designated part of the tree and secure it in place using yarn ties or Velcro for easy removal.
#15. Laughing Tree Spirits
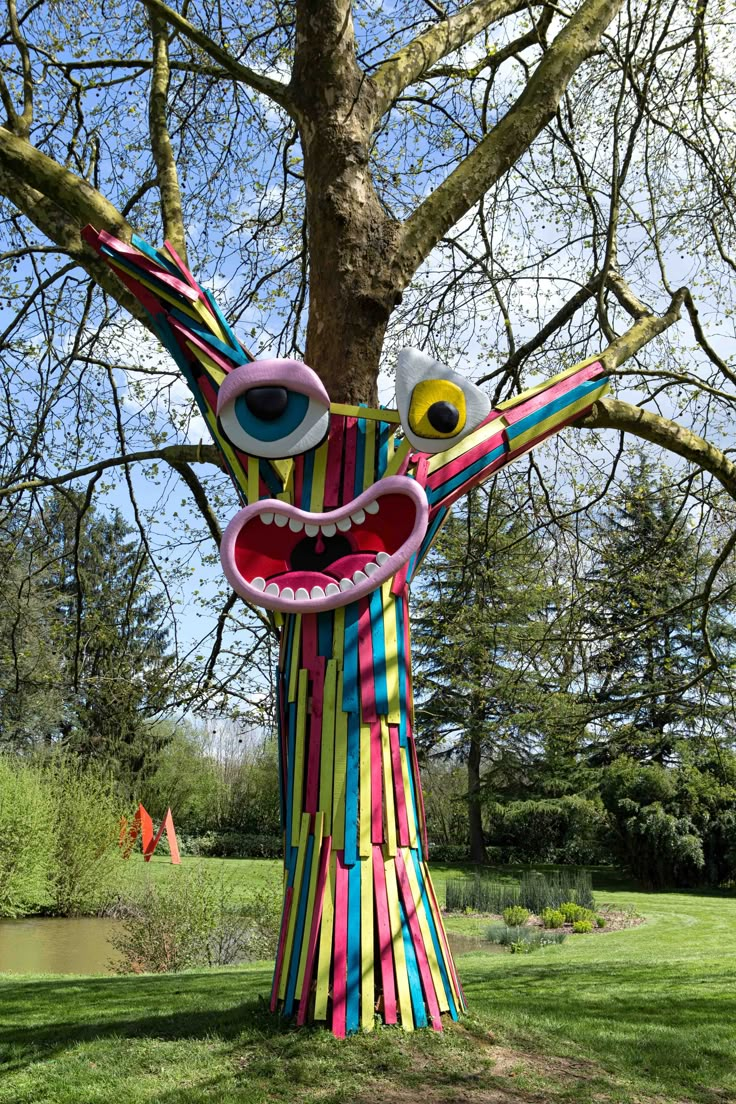
If trees could laugh, this is exactly what they’d look like mid-chuckle.
These oversized, cartoon-like faces give your outdoor space a burst of personality, somewhere between a Muppet reunion and a street art parade.
You don’t need a massive budget, just bold color and the guts to let your inner weirdo play. Kids adore it. Adults turn into kids again.
Materials Needed:
- Wooden planks (various widths, around 3-4 ft long, 40-60 pieces total)
- Outdoor acrylic paint (minimum 6 bright colors)
- Screws or heavy-duty wood-safe adhesive
- Googly eyes (or create from bowls/lids + paint)
- Foam board or plywood
- Jigsaw and sandpaper
- Clear outdoor sealant spray (optional)
Step-by-Step Guide:
Step 1: Start by painting all your wooden planks in vibrant colors. You can go wild here such as stripes, solids, patterns.
Step 2: While your planks dry, create the face components.
Then cut out oversized mouths, wide cartoon eyes, and even goofy eyebrows using foam board or thin plywood. Paint them up and let them dry.
Step 3: Begin attaching the planks vertically to the lower trunk using screws or strong outdoor-safe adhesive.
Next, overlap slightly to create a flowing effect like a crazy patchwork cape.
Step 4: Position and secure your facial features higher up the tree. The more exaggerated the expression, the better.
#16. Yarn-Wrapped Tree
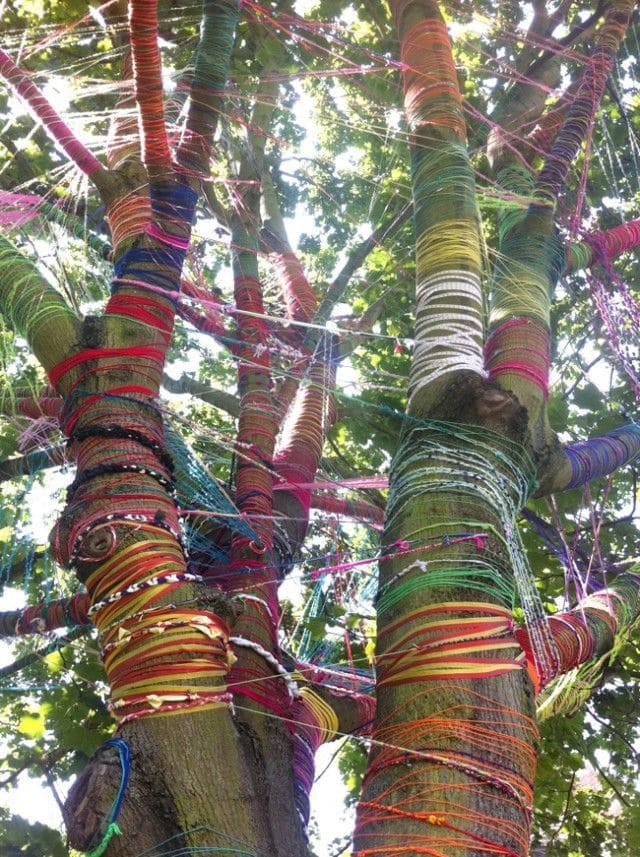
If you’ve ever dreamed of stepping into a fairy tale or wished your trees felt a little more alive, this yarn-wrapping idea is pure magic.
Wrapping tree trunks and branches in layers of vibrant yarn transforms them into glowing pillars of color, almost like a woven celebration.
Whether it’s part of a kid’s outdoor play zone or your personal art statement, this project feels joyful, personal, and full of movement.
Materials Needed:
- Assorted yarn in various colors and textures (thick and thin)
- Scissors
- Step ladder (if you’re wrapping higher sections)
- Optional: beads, pom-poms, ribbons
Step-by-Step Guide:
Step 1: Choose a healthy tree with smooth bark and visible branches. Avoid tight wrapping near any fresh wounds or new growth.
Step 2: Start at the base and wrap the yarn around the trunk, switching colors as you go.
Let the layers crisscross or blend into gradients as it doesn’t need to be perfect.
Step 3: Tie off each color securely at the end or weave it into the layer below. You can also add ribbons, tassels, or beads for texture.
Step 4: If you’d like to go higher, grab a ladder and carefully work your way up, wrapping branches like you’re braiding nature into a wearable artwork.
#17. Fantasy Forest Signpost
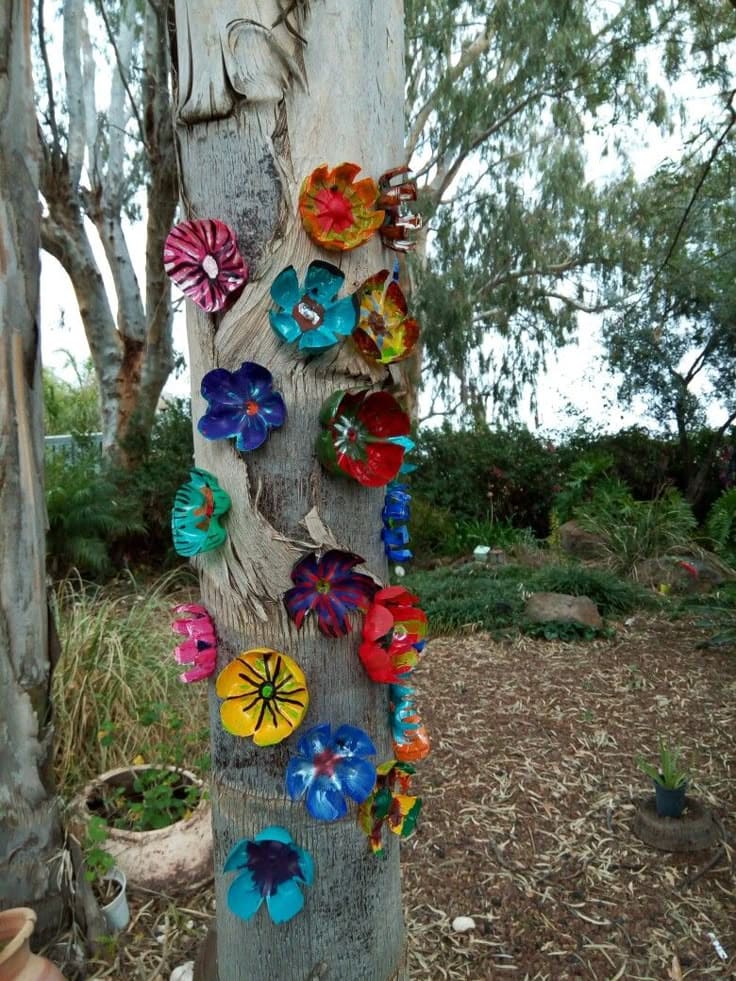
Somewhere between the whisper of pine needles and the soft crunch of forest floor, you might stumble on a place where stories collide.
This enchanted signpost turns an ordinary tree into a gateway to magic, pointing toward Narnia, Hogwarts, Wonderland, and more.
I made a version of this with my niece last fall, and every time we pass it, we argue over which direction we’d actually choose.
Materials Needed:
- 6-8 reclaimed wooden boards 12-18 inches long)
- Outdoor acrylic paint in various colors
- Paint pens or small brushes
- Wood screws or nails
- Optional: stencils for lettering, sandpaper for distressing
- Drill or hammer
Step-by-Step Guide:
Step 1: Lightly sand each board so paint adheres smoothly. If you want a rustic feel, leave some roughness or chip the edges a bit.
Step 2: Choose your favorite fictional places from Narnia to The Shire and paint each name on its own board. You can use whimsical fonts and colors that match the tone of each world.
Step 3: Add directional arrows to the ends of each board.
These don’t have to be accurate, in fact, the wonkier the better. You’re not building GPS, you’re building wonder.
Step 4: Once the paint’s dry, attach each sign to the tree trunk using wood screws or nails. Angle them in different directions for a playful, layered look.
#18. The Dapper Tree Gentleman
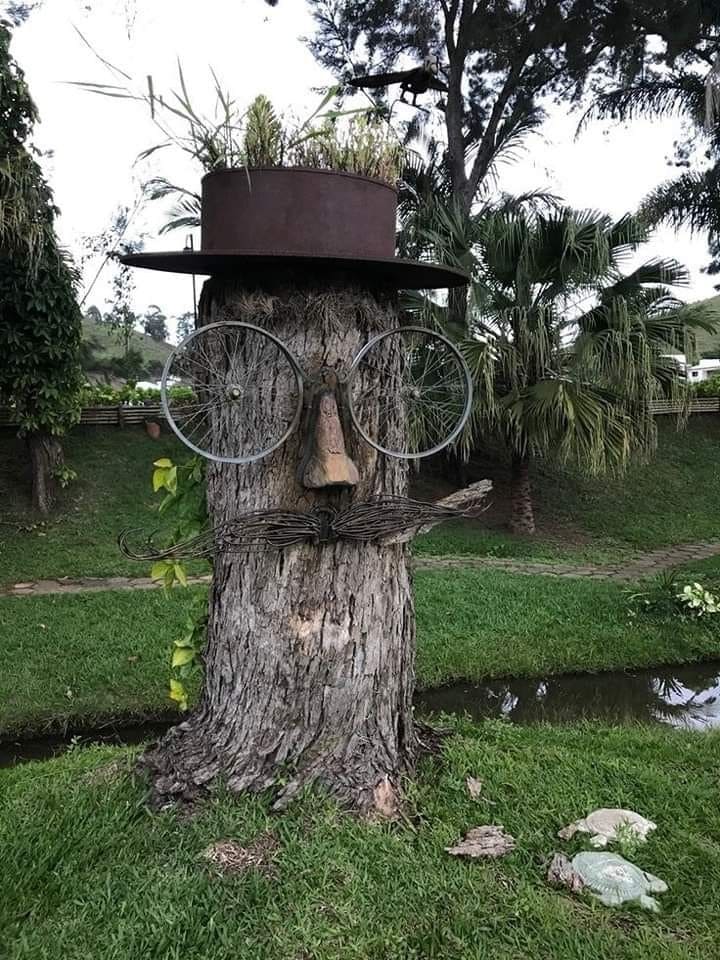
Meet the most sophisticated stump in the garden, a charming old soul with a top hat full of wild grasses and enough character to steal the show.
His quirky round spectacles are made from old bike wheels, perched perfectly on a wooden nose that’s seen a thousand seasons.
And that mustache is a masterpiece of hand-twisted twigs that curls at the ends like a proper gentleman from a bygone era.
Materials Needed
- Tree stump or trunk (about 2.5 to 4 feet tall)
- Old metal planter (12-14 inches in diameter)
- Grass or ornamental plants (fescue, mondo grass, or lemongrass)
- 2 bicycle wheels (12-16 inch diameter)
- Chunk of wood or carved log for the nose (6-8 inches long)
- Flexible twigs or vine branches
- Strong outdoor adhesive or wood screws
- Optional: clear sealant spray
Step-by-Step Guide
Step 1: Pick a tree stump that’s large and stable enough to stand out in your yard. A level top will help the hat planter sit securely.
Step 2: Fill your metal planter with soil and plant tufts of grass to create a wild, whimsical hairdo.
You center it on top of the stump and secure with screws or weather-resistant adhesive.
Step 3: Mount the two bicycle wheels just below the planter, side by side, so they resemble quirky, oversized glasses.
Next, use small nails or screws to fix them into place.
Step 4: Position the carved wood nose between the wheels.
You should choose something with a natural point or curve to resemble a nose shape, and fix it securely.
Step 5: Shape your twigs or vines into a curly mustache, twisting the ends upward or downward depending on your preferred expression.
Step 6: If your creation will face the elements, spray a layer of outdoor sealant over all components to preserve it.
#19. DIY Enchanted Fairy Village Tree
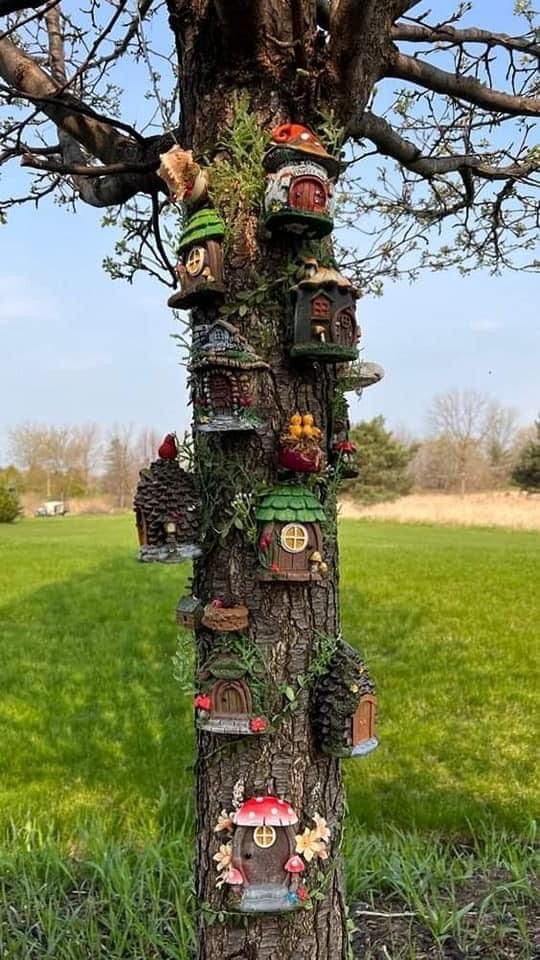
If you’ve ever wished your backyard had just a little more magic, this one’s for you.
With a collection of miniature fairy houses nestled up and down the trunk, this tree has become a vertical village for the tiniest of forest folk.
Creating your own tree village isn’t just a craft, it’s like opening a doorway into a whole new (tiny) world.
Materials Needed:
- 10–15 miniature fairy houses (mix of doors, mushroom homes, tree stumps, etc.)
- Small nails, hooks, or weatherproof adhesive
- Faux moss, ivy, or mini vines
- Optional: tiny fairy figurines, gnomes, or LED lights
Step-by-Step Guide:
Step 1: Choose a tree with a good, textured trunk and a little character. Make sure it’s healthy and sturdy before decorating.
Step 2: Arrange your fairy homes from bottom to top.
You can vary the sizes and shapes, some can nestle close together while others peek out from behind branches.
Step 3: Attach the houses using either small nails or weather-resistant mounting tape. Be gentle to avoid damaging the tree bark.
Step 4: Tuck in strands of faux moss or tiny vines to make it feel like the houses grew there naturally. Then, add in a few fairies, mushrooms, or even tiny welcome signs.
Step 5 (Optional): Wrap solar fairy lights around the trunk and branches so the village glows after dark.
#20. Lace-Covered Tree Trunks
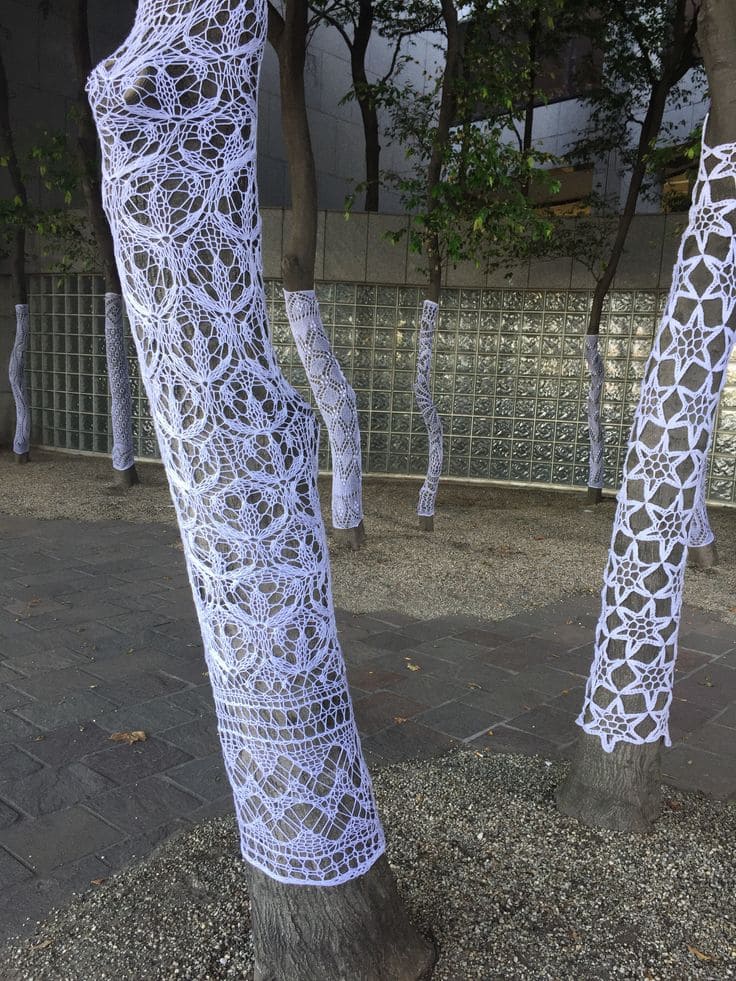
There’s something quietly magical about these lace-wrapped trees.
Each one stands like a woodland ballerina dressed in intricate white patterns, softening the urban surroundings with delicate beauty.
The crochet lace patterns bring an old-world charm to modern concrete, transforming a line of plain tree trunks into a gallery of fiber art.
Materials Needed
- White crochet thread (size 10 or finer)
- Steel crochet hook (size 1.5 mm or suitable for your thread)
- Pattern books or online lace doily motifs
- Tapestry needle
- Transparent thread or white zip ties for outdoor attachment
- Measuring tape
Step-by-Step Guide
Step 1: Measure the circumference and height of your tree trunk to estimate how many lace panels you’ll need.
Step 2: Crochet individual lace motifs like circles, diamonds, or floral patterns, based on your chosen pattern. Each should be around 6-10 inches wide.
Step 3: Join the motifs together into strips that fit the height of your tree trunk, adjusting as needed for shape and curve.
Step 4: Use a tapestry needle to connect motifs or join with slip stitches for a more seamless look.
Step 5: Wrap each strip around the tree and secure it using transparent thread or zip ties that blend with the lace.
