When my cousin graduated from college, I wanted to give her money but handing over a plain envelope felt boring. So, I rolled up the bills like little diplomas, tied them with ribbons, and tucked them into a faux graduation cake.
Then she’s pure delight. That moment taught me something how you give money can be just as meaningful as what you give. Whether it’s for a birthday, graduation, or wedding, turning cash into a creative surprise adds laughter, joy, and unforgettable memories.
If you’re tired of bland envelopes and want to make your gift stand out, these 26 super fun ways to give money will inspire your inner gift-giving genius.
#1. Emergency Money Cards
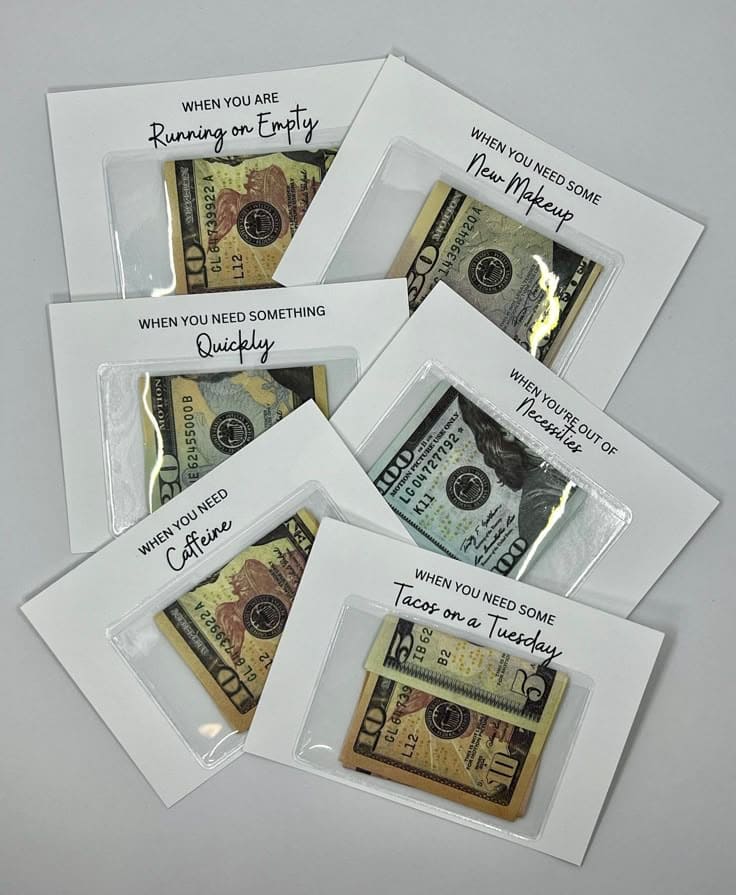
This project turns bills into bite-sized lifesavers for real-life mini emergencies. It’s like giving love, humor, and help all folded into one.
Materials Needed
- 6 cardstock sheets (white, 4×6″ or 5×7″)
- 6 small clear plastic sleeves
- 6 bills of various denominations
- Black pen
- Double-sided tape
- Optional: corner rounder punch, markers, ribbon
Step-by-step Guide
Step 1: Wrap your box in the paper of your choice if you’re creating a gift box to present the cards, or simply prep your cardstock bases by trimming them to size.
Step 2: Fold each bill neatly and place inside a plastic sleeve or resealable bag. Then use tape to secure the sleeve onto the cardstock.
Step 3: Write or print phrases like and place each phrase above or below the plastic sleeve on the card. Next, you can add doodles, emojis, or washi tape for a fun touch.
Step4: Bundle the cards together with ribbon, place them in a gift box, or deliver them as surprise notes over time.
#2. Gum Pack Money Gift
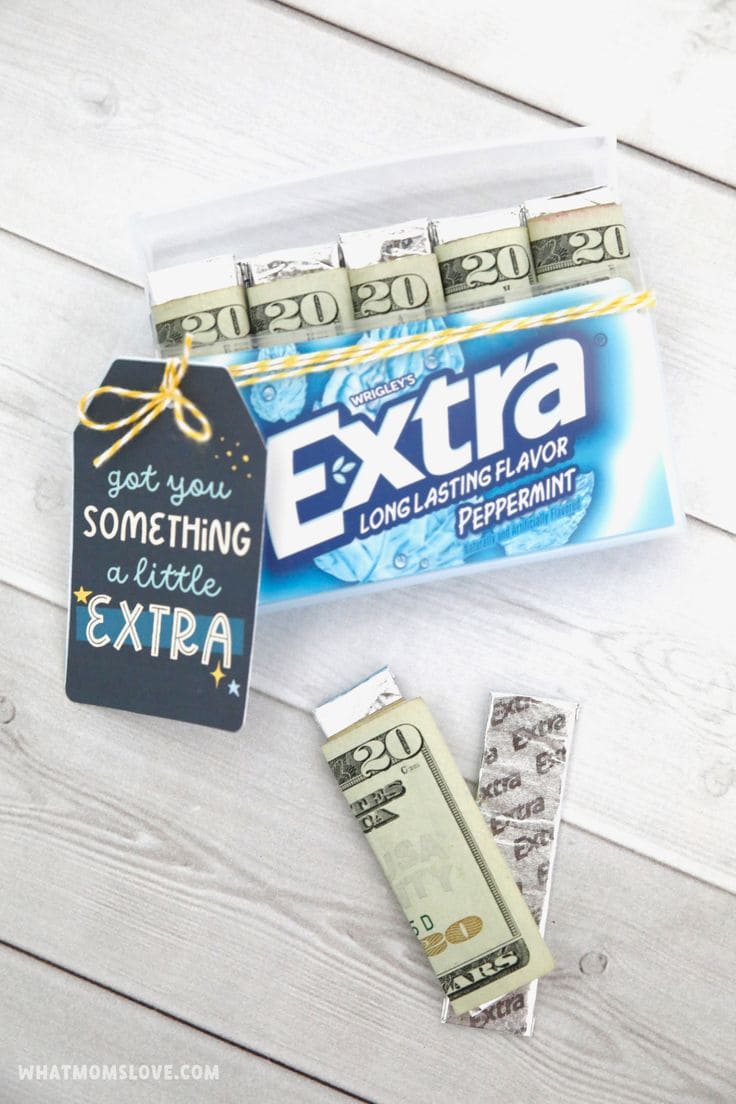
This gift is the definition of playful generosity. It looks like a regular pack of gum, but each stick hides a little surprise.
I love how simple it is to make but how unexpectedly delightful it feels. You’re not just giving money; you’re giving it with a wink.
Materials Needed
- A new pack of Extra gum
- Bills (small denominations or all $20s for drama)
- Scissors
- Double-sided tape
- Custom tag or printable label
- Twine or ribbon (optional)
Step-by-step Guide
Step 1: Wrap your box in the paper of your choice, or just use the gum pack as-is.
Step 2: Carefully open the gum pack from the top without tearing it. Then remove the original gum sticks.
Step 3: Fold each bill to match the shape and size of a stick of gum. You can roll them or accordion-fold for thickness.
Step 4: Use glue dots to wrap foil or a gum wrapper around each folded bill to mimic real sticks.
Step 5: Place your gum sticks back into the original gum tray neatly, then attach a witty tag with twine or tape it on top.
#3. Money Bouquet with Black Wrap
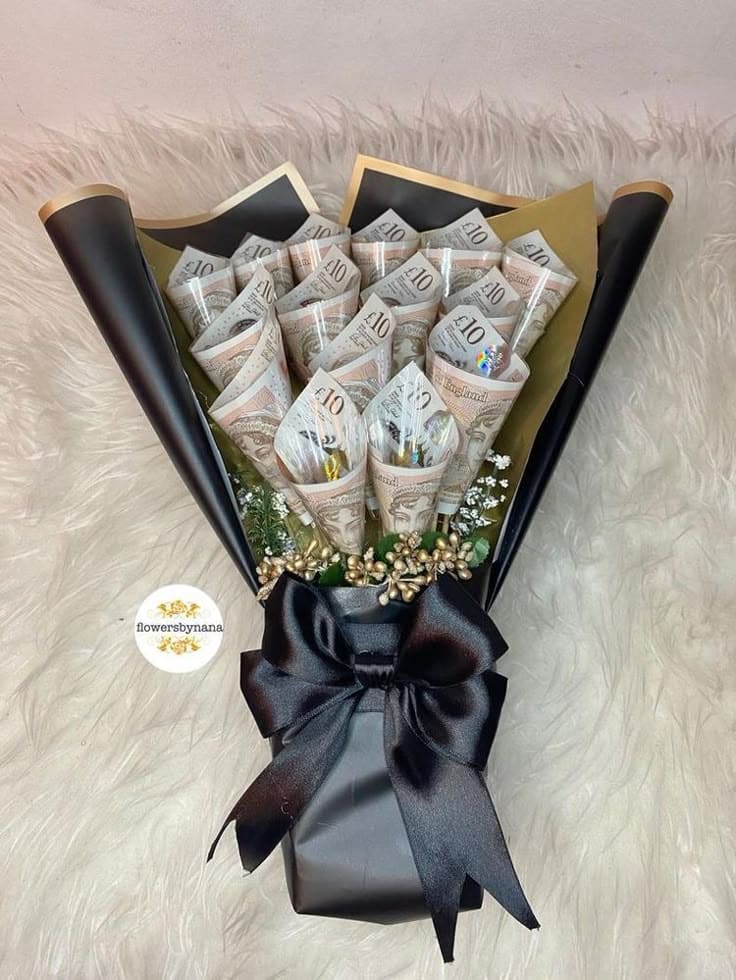
You know that look on someone’s face when they’re handed a bouquet and then realize it’s not roses, but actual money? That’s the kind of pure joy this money bouquet delivers.
It feels luxe without being fussy, and it’s surprisingly easy to make once you get the folds down.
Materials Needed
- 15 paper bills
- 3 sheets of black craft wrapping paper (around 20” x 20” each)
- 2 sheets of contrasting backing paper
- 1 large black satin ribbon (approx. 1.5” wide, 24-30” long)
- Small artificial flowers
- Floral foam
- Floral sticks
- Double-sided tape
Step-by-step Guide
Step 1: Roll each bill into a loose cone, with the queen’s face peeking out at the front, and secure with a tiny piece of double-sided tape at the seam.
Step 2: Attach each money cone to a floral stick using glue or tape, ensuring the cone stands upright like a flower.
Step 3: Insert the floral sticks into the foam base. Then arrange them in a dome shape, denser in the center, fanning outward.
Step 4: Tuck in small golden berries and sprigs of faux greenery between the cones for contrast.
Step 5: Wrap the bouquet with the gold backing paper first for dimension, followed by the black wrap.
#4. Birthday Flip-Flops Made of Cash
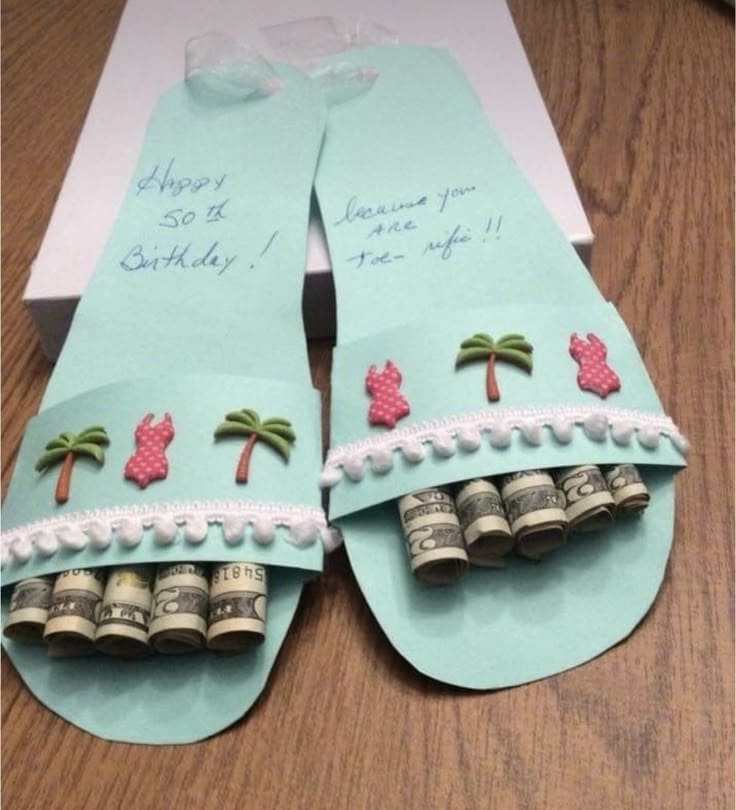
Designed to resemble beachy flip-flops, these adorable cutouts come complete with rolled-up dollar bills for toes and a tropical flair that screams vacation vibes.
This is also the perfect surprise for milestone birthdays like 50, 60, or even retirement parties. Not only does it make people laugh out loud, but it also gives them a little cash to treat themselves.
Materials Needed
- 2 sturdy cardstocks
- 10 rolled-up dollar bills
- Double-sided tape
- Small stickers or embellishments (palm trees, swimsuits, trim)
- Ribbon
- Pen
Step-by-Step Guide
Step 1: Cut out two flip-flop shapes from cardstock. Then use a real flip-flop as a stencil if needed for sizing.
Step 2: Write a fun message like “Happy 50th Birthday!” or “Because you’re toe-rific!” on the upper part.
Step 3: Fold a strip of paper over the foot area to create the illusion of a strap. Tape the ends only so you can tuck in the toes.
Step 4: Roll ten dollar bills tightly and tape or glue each one in place under the strap to resemble toenails.
Step 5: Decorate the top with beach-themed stickers, mini pom-poms, ribbon, or anything that gives it a summery look.
#5. Money Meal Combo
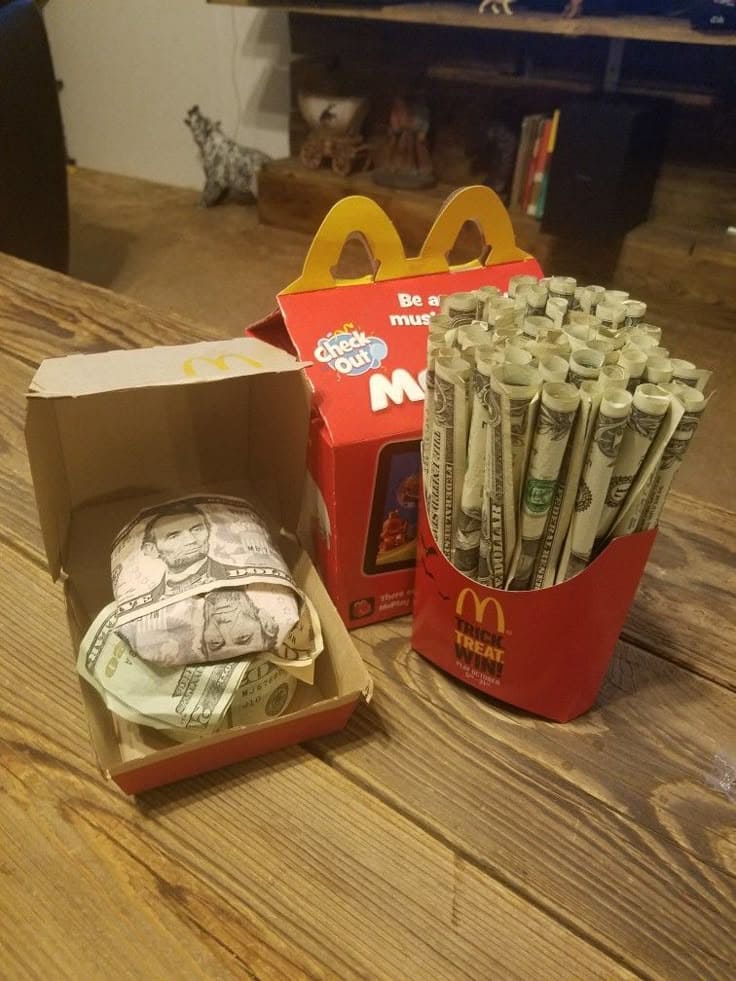
Wow, this hilarious fast-food-inspired money gift is pure genius. Instead of burgers and fries, you’re serving up rolled-up dollars in a fry container and a cash burger made with layered bills.
Materials Needed
- 1 clean McDonald’s fry box and burger box
- 40 dollar bills
- Tape or small binder clips
- Tissue paper or napkins (optional)
- 1 Happy Meal box (optional)
Step-by-step Guide
Step 1: Start by rolling the dollar bills tightly like mini straws and u use tape to keep them from unraveling. Then, insert each rolled bill vertically into the fry box until it’s packed to resemble a real portion of fries.
Step 2: For the burger, fold several bills flat to act as the bun, layering them with different-sized bills to create a stacked effect.
Step 3: Place the cash burger inside the clean burger box. You can stuff some tissue underneath to give it height.
#6. Money Shirt and Tie Gift Wrap
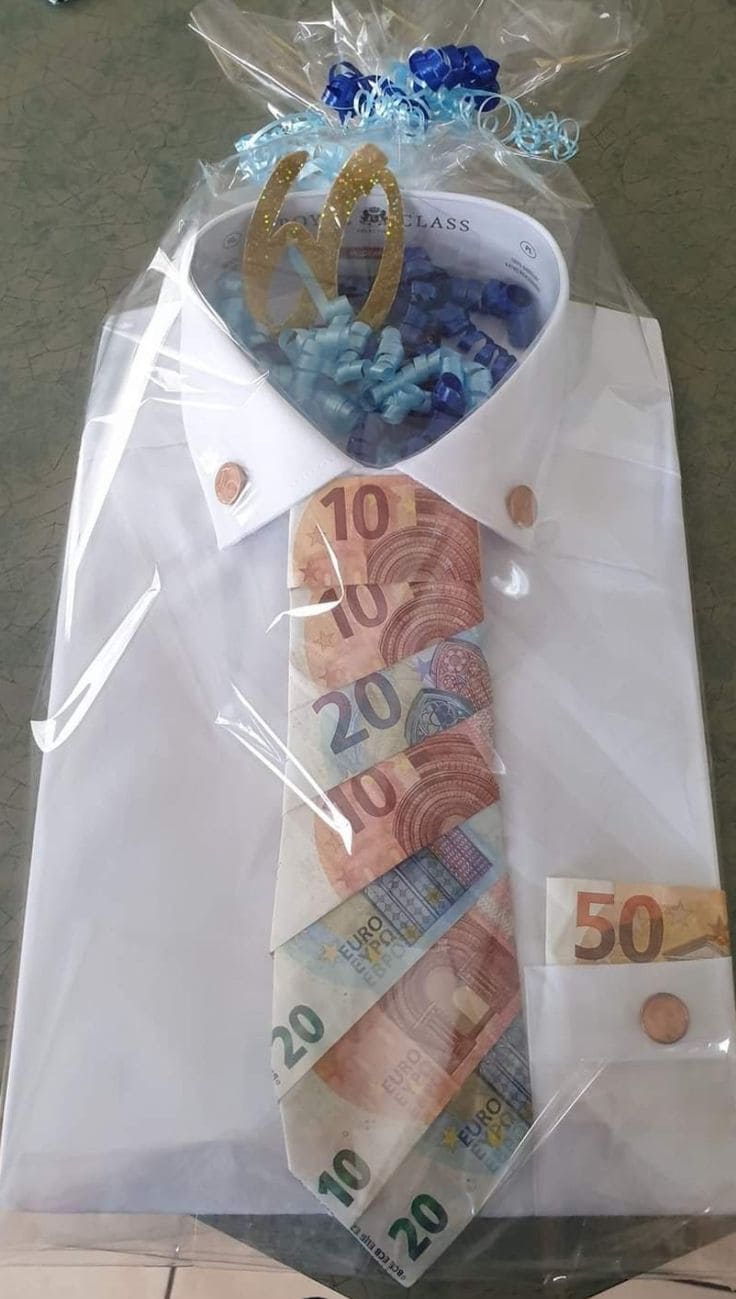
Who says a money gift can’t be dashing? This clever creation turns a simple white shirt box into a dressed-up celebration with a folded cash tie front and center.
Specially, wrapped in cellophane with curly ribbons and a sparkling 60, it’s the perfect gag-meets-glam gift for birthdays, retirements, or anniversaries.
Materials Needed
- 1 crisp white dress shirt
- 8 banknotes of various denominations
- 1 clear cellophane gift wrap sheet (approx. 24×36 inches)
- 1 gift ribbon
- Gold glitter number
- Double-sided tape
Step-by-step Guide
Step 1: Carefully fold each banknote into diagonal segments to mimic the shape of a necktie. You should start at the top with smaller bills (like 10s) and layer them downward, alternating colors or values for contrast.
Step 2: Stick the folded bills onto the front of the shirt using tape or small adhesive dots, forming a tie shape. Then tuck the ends to shape the point.
Step 3: Add a folded bill into the shirt’s pocket and glue a coin on the flap to look like a cufflink.
Step 4: Finally, wrap the whole thing in cellophane, top it with ribbons, and secure a glittery number or tag for flair.
#7. Origami Money Shirt Card
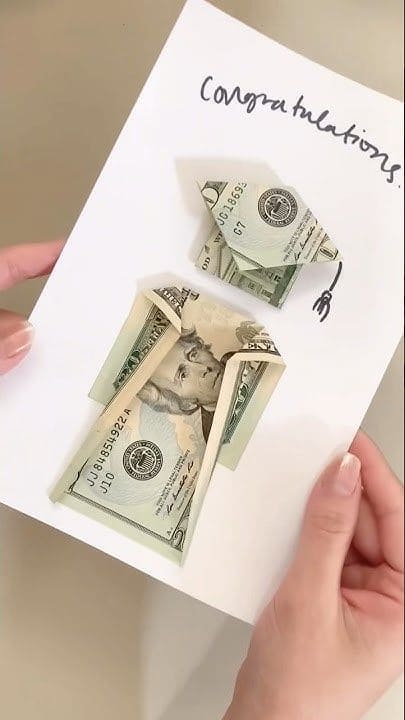
This playful origami idea turns your card into a keepsake. It’s especially great for grads, promotions, or anyone suited up for a new chapter.
Materials Needed
- 2 paper bills (crisp $10s or $20s work best)
- 1 blank greeting card (5×7 inches)
- Double-sided tape
- Black pen or marker
Step-by-step Guide
Step 1: Fold one bill into a shirt: start by making small folds inward lengthwise, then craft a collar at the top and fold the bottom up like a classic button-down. You’ll find tons of tutorials online for money shirt origami.
Step 2: For the pants, fold the second bill in half lengthwise, then again in half crosswise. You can make small creases at the top to mimic a waistband and legs.
Step 3: Use double-sided tape to stick both pieces to the front of your card.
Step 4: Finally, add your message like “Congratulations,” “You’re gonna be a big deal,” or something cheeky and you’re done.
#8. Money Flower Bouquet

This bouquet doesn’t just say “I care”—it says it with a twist of charm and creativity. Each bloom is lovingly crafted from real dollar bills, folded into delicate tulip-like petals and arranged into a lush, elegant bouquet. With green paper-wrapped stems and a bold satin bow, this arrangement is more than a gift—it’s a statement piece. Whether you’re celebrating a graduation, birthday, Mother’s Day, or a special “just because” moment, this bouquet blends beauty with surprise. It’s heartfelt, handmade, and secretly valuable… the perfect combo when flowers alone just don’t cut it.
Materials Needed
- 15-20 crisp dollar bills
- 6 green straws
- Green floral tape
- Blue satin ribbon
- Clear tape
Step-by-step Guide
Step 1: Wrap your box in the paper of your choice if giving as a presentation gift or keep it as a hand-held bouquet.
Step 2: To make a money flower, fold each dollar bill accordion-style lengthwise, then gently curve it into a cone shape and secure with clear tape to hold the petal form.
Step 3: Insert one end of your green straw into the base of the cone, then secure it with tape and wrap green floral tape around the base to give it a polished stem look.
Step 4: Repeat with the remaining bills to create a full bouquet of petals. You can add extra folded bills shaped into leaves by folding them diagonally and securing them to the stem using tape.
Step 5: Once all your flowers are complete, bundle the stems together tightly and tie them with your blue ribbon in a generous bow.
#9. Money Car Gift Idea
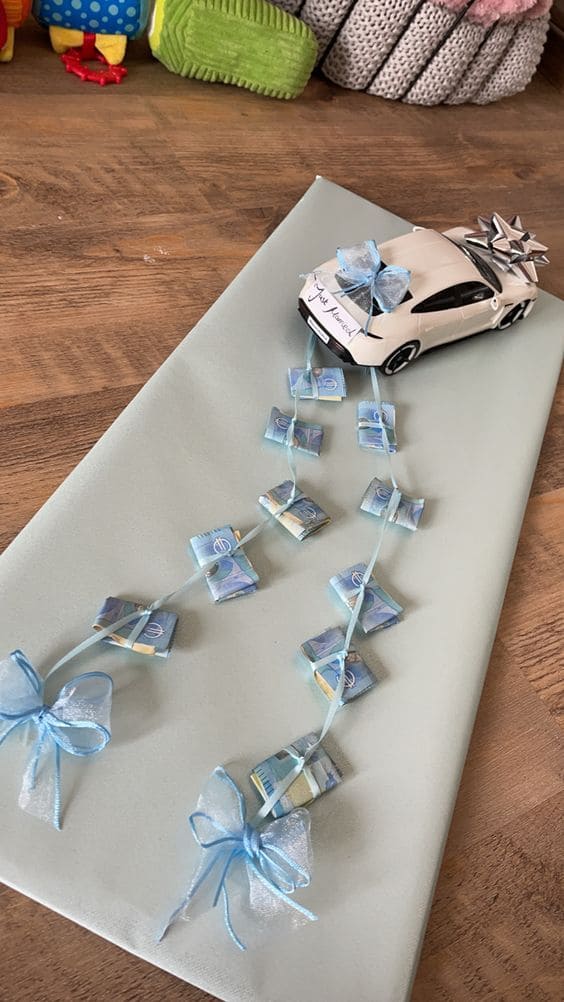
This clever DIY gift turns a simple money present into something whimsical and unforgettable. Whether you’re gifting newlyweds, surprising your partner for an anniversary, or celebrating a couple’s big moment, this idea speaks louder than any envelope ever could.
And the best part is that it’s not just eye-catching, it’s easy to make and customizable with different currencies, colors, or themes to match the couple’s style.
Materials Needed
- 1 gift box (medium size, wrapped in pale or pastel paper)
- 1 small toy car
- 10 banknotes
- 1 meter of thin satin ribbon
- 1 meter of sheer ribbon
- 1 mini “Just Married” sign
- Double-sided tape
- Scissors
- Clear tape
Step-by-step Guide
Step 1: Wrap your box in the paper of your choice to create a clean, elegant background.
Step 2: Place the toy car at the top end of the box, angled slightly to create a sense of motion. Then you use double-sided tape to secure it.
Step 3: Attach a mini sign or handwrite “Just Married” on a small tag and tape it to the back of the car, like a bumper decoration.
Step 4: Cut two equal lengths of the satin ribbon and attach them to the rear of the car using clear tape.
Step 5: Fold each bill into a square and secure the folds with clear tape. Next, you tape the folded money onto the ribbons at regular intervals.
Step 6: Create small bows with the sheer ribbon and attach them at the ends of each ribbon trail or in between the folded bills for a festive look.
#10. DIY Money Cake Using Foam Tiers
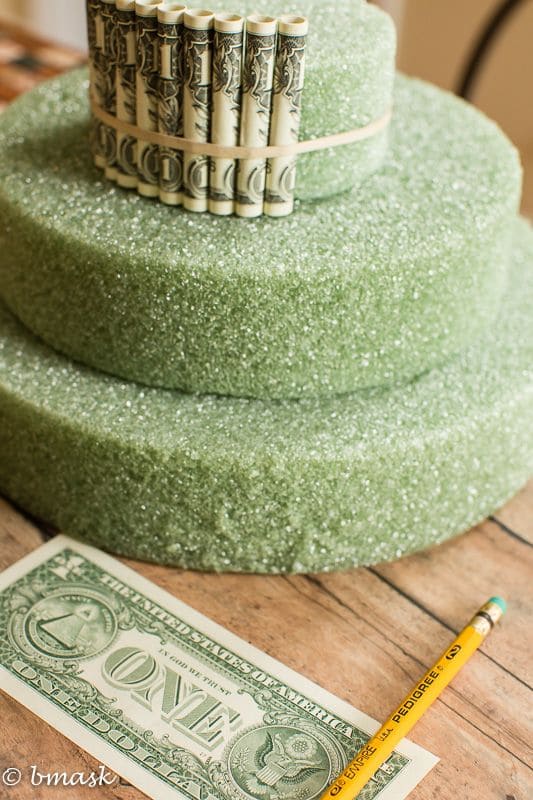
When you want your gift to be unforgettable and practical, a money cake delivers both style and surprise.
This tiered masterpiece looks like a real cake but trades frosting for rolled bills and your recipient will love cutting into it. It’s creative, classy, and just as satisfying to receive as the real thing.
Materials Needed
- 3 foam cake tiers (12”, 9”, and 6” diameter recommended)
- 50-100 crisp dollar bills
- Rubber bands
- Glue dots
- Cake topper (optional)
- Pencil or dowel
Step-by-step Guide
Step 1: Wrap your box in the paper of your choice if using a base or platter, or leave the foam tiers exposed for a rustic look.
Step 2: Roll each dollar bill tightly around a pencil and secure with a small rubber band or dab of tape to hold its shape.
Step 3: Starting from the bottom tier, line up the rolled bills vertically along the edge. Then secure them using a large rubber band wrapped around the tier, or use decorative ribbon for a cleaner finish.
Step 4: Repeat for each tier, working your way up to the top. Make sure the bills are evenly spaced and aligned.
Step 5: Add a decorative cake topper to the center of the top tier.
#11. Little Balloon Money Magic Birthday Card
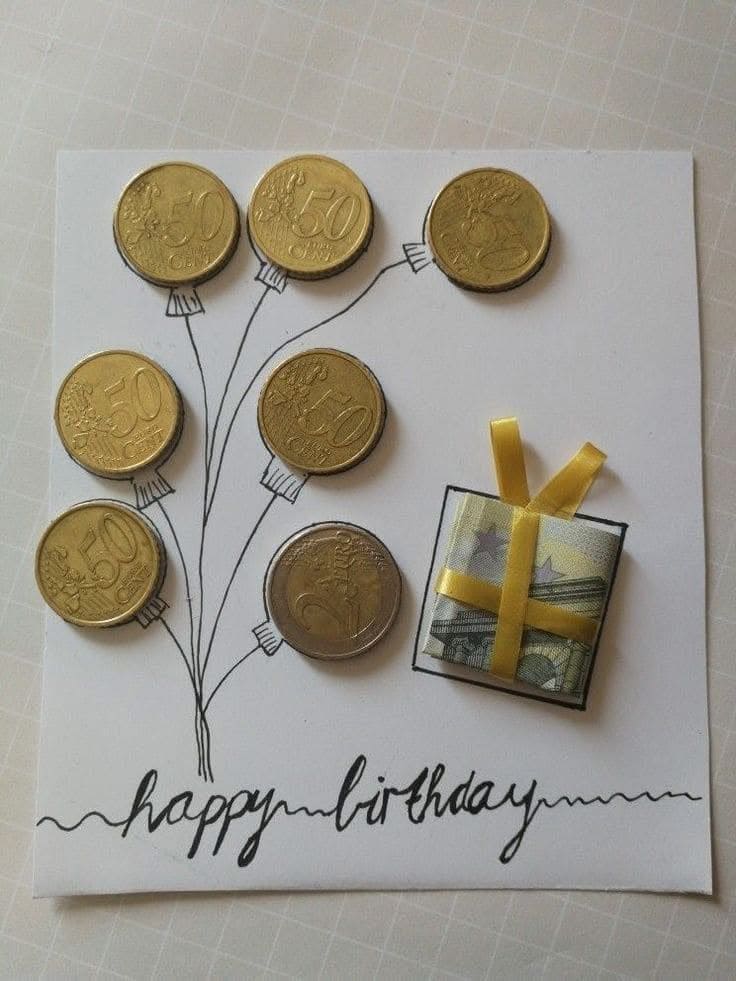
This delightful DIY card proves that giving money doesn’t have to feel impersonal. With a little imagination and a handful of euro coins, this handmade birthday card turns currency into a creative bouquet of balloon-shaped surprises.
Whether you’re crafting this for a friend, sibling, or grandparent, it brings together artistic flair and thoughtful gifting in the most heartwarming way.
Materials Needed
- White cardstock
- 7 Euro coins (50 cent and 2 Euro denominations look great)
- A small folded money
- Yellow ribbon
- Black marker
- Double-sided tape
Step-by-Step Guide
Step 1: Cut your cardstock into a square shape or fold into a card if you want to write inside.
Step 2: Arrange the coins on the upper half of the card to mimic floating balloons. You can use glue dots to fix them in place.
Step 3: Draw strings from each coin downward, letting them meet near the center of the card.
Step 4: Create a tiny gift box by folding a bill into a small square. Then wrap it with ribbon like a present and glue it to the base of the strings.
Step 5: Add a cheerful handwritten message at the bottom with playful, curvy lettering to match the festive feel.
#12. Scrooge McDuck Shadow Box
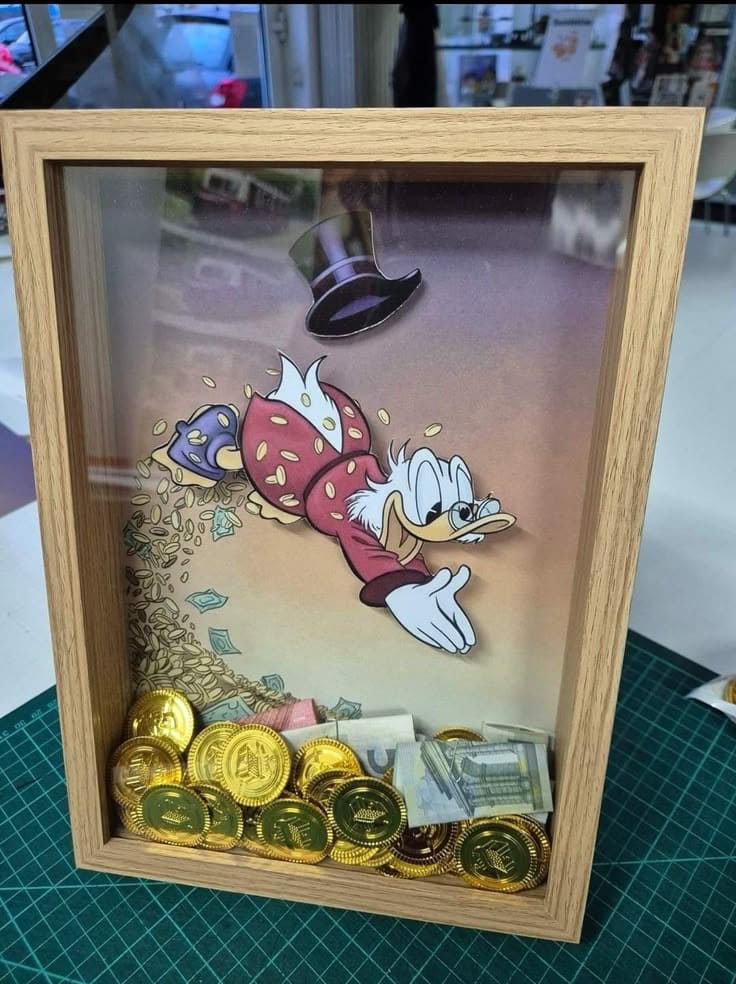
This money gift is pure cartoon magic. Inspired by Scrooge McDuck’s legendary dives into piles of gold, this shadow box turns cash into an experience.
Specially, tucked behind the glass, chocolate coins and rolled-up bills create a whimsical treasure scene that feels both nostalgic and fun.
Materials Needed
- Shadow box frame (depth at least 1.5 inches)
- Cartoon background image (Scrooge McDuck diving into coins)
- Chocolate gold coins
- Real money
- Tape or ribbon (optional)
- Glue dots
Step-by-step Guide
Step 1: Wrap your box in the paper of your choice if you want to personalize the exterior, or leave the wood natural for a clean look.
Step 2: Remove the back of the shadow box and tape or glue your printed Scrooge McDuck background to the inside panel.
Step 3: Roll up bills and secure them with ribbon, or fold them creatively to stand upright.
Step 4: Add a handful of chocolate coins to the base of the frame, mixing them in with the money for that glittering treasure effect.
#13. A Box of Chocolates Made of Cash
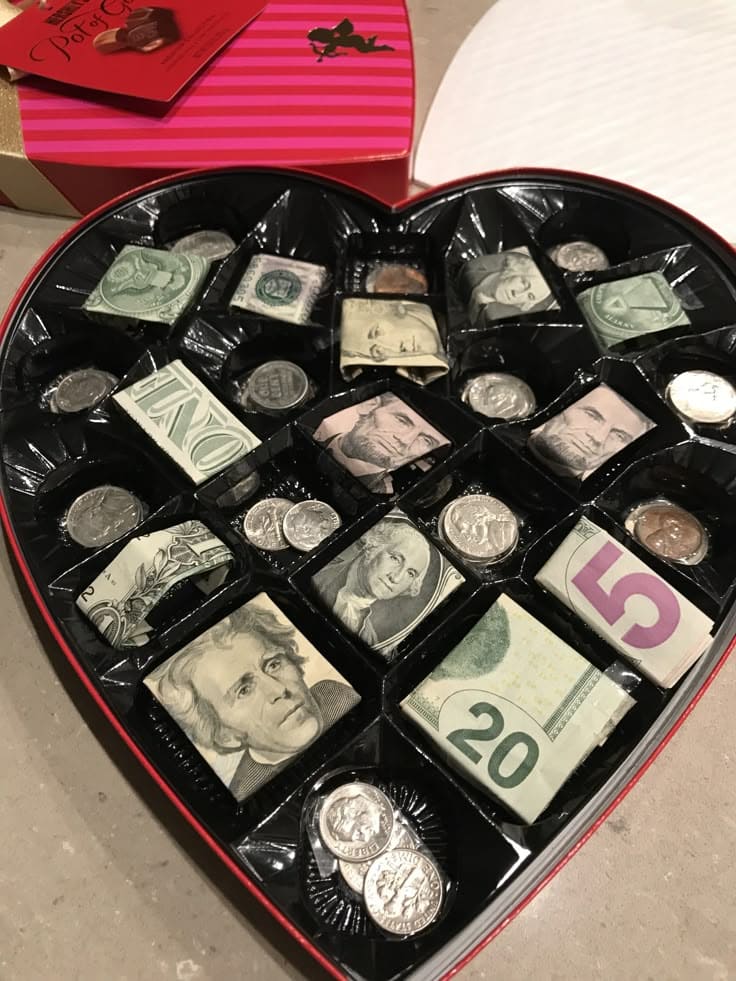
If Forrest Gump had opened this box, he’d be speechless. Swapping out truffles for crisp bills and shiny coins, this playful and clever twist on the classic heart-shaped chocolate box turns money into the ultimate treat.
Materials Needed
- 1 empty heart-shaped chocolate box
- 10-12 bills (variety of $1, $5, $10, $20, etc.)
- Loose change or coins
- Small squares of tissue (optional)
- Scotch tape
Step-by-step Guide
Step 1: Eat or remove the chocolates (you’ve earned it). Then clean out the tray gently, keeping the plastic mold intact.
Step 2: Fold each bill into small squares or creative shapes like fans, rolls, or mini shirts and tuck them into the candy slots.
Step 3: Drop coins into the smaller compartments for sparkle and texture. You can also mix in a few foreign coins for flair if have.
Step 4: Close the box and wrap it with ribbon.
#14. Petals and Pink Gift Tray
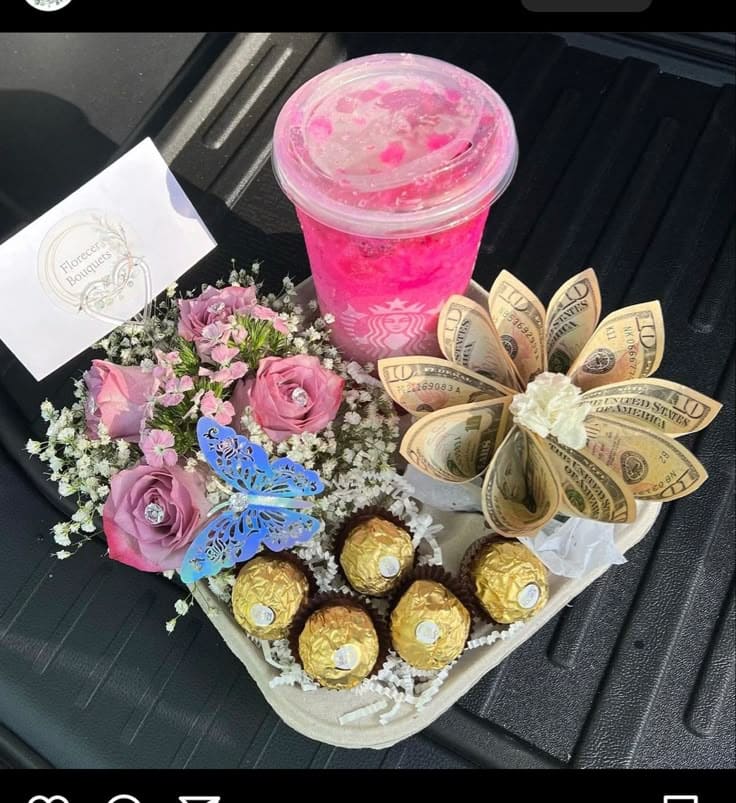
If your goal is to make someone feel spoiled, this charming combo of beauty, sweetness, and surprise money blooms checks every box.
Besides, the handmade money flower, nestled beside soft pink roses, Ferrero Rocher chocolates, and a vibrant Starbucks drink, creates a full sensory moment.
Materials Needed
- 9 crisp $10 or $20 bills
- 1 Starbucks-style cold drink (optional)
- 5 Ferrero Rocher pieces
- Artificial or fresh flowers
- 1 tray or shallow box (12″ x 9″ approx.)
- Tissue paper, paper filler, ribbon, faux butterflies
- Clear adhesive tape
Step-by-step Guide
Step 1: Fold each bill accordion-style, then pinch it in the center and secure with wire or twist tie to create a petal. You can repeat to form a full money flower and tape them together in a circular bloom.
Step 2: Fill a shallow tray with paper filler and arrange flowers in one corner. Then add a butterfly clip or two for a whimsical touch.
Step 3: Place the wrapped chocolates neatly in a line or circle pattern. If adding a drink, secure it using a bit of tape or nestle it into filler to keep it upright.
Step 4: Gently place your money flower on soft tissue and tape it down lightly so it doesn’t shift.
#15. Money Bow Headband
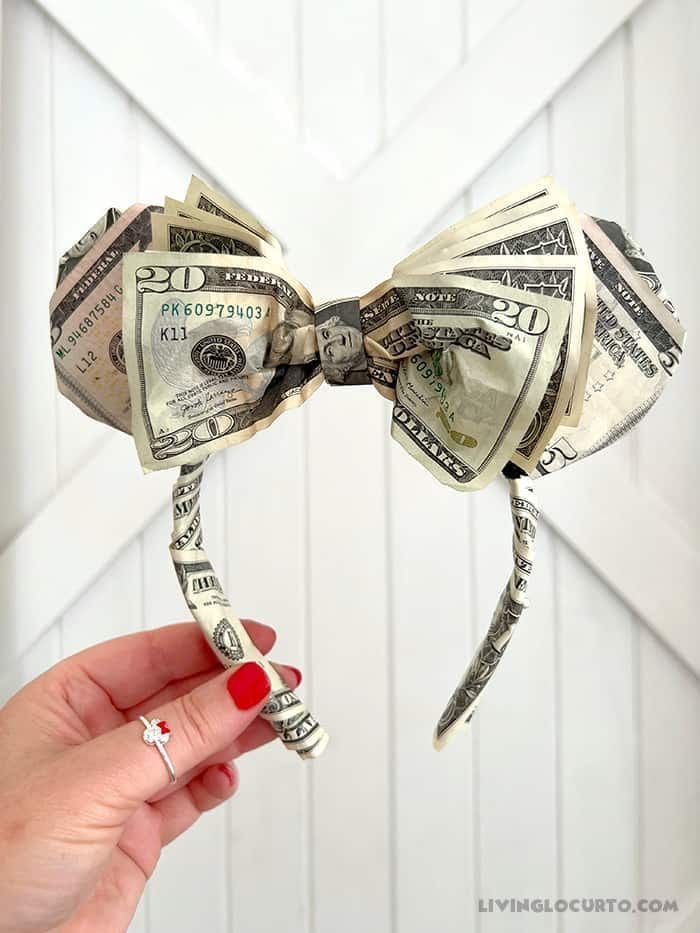
This bold and fun craft turns a simple headband into a showstopping gift. Whether it’s for a graduation, birthday, or a just because moment, this money bow headband guarantees a jaw-drop.
Materials Needed
- 1 plain plastic headband (1″ width)
- 10-16 dollar bill
- Clear tape
- Craft wire
- Hot glue gun (optional)
- Scissors
Step-by-step Guide
Step 1: Wrap your headband in dollar bills by laying one end of a bill against the inside curve, and winding it around in a spiral until it’s fully covered. You can use clear tape to secure the ends.
Step 2: To make the bow, fold several bills accordion-style (back and forth in ½” folds). You’ll need 2 sets of 4-5 bills each for the bow sides.
Step 3: Pinch each stack in the center and secure with craft wire or twist ties. Then fan the edges out into a full bow shape.
Step 4: Next, use another bill to wrap the bow center, covering the wire. Then tape it in place.
Step 5: Attach the bow to the headband by hot gluing the center or using another twist tie underneath for a non-permanent option.
#16. Money Explosion Box Flower
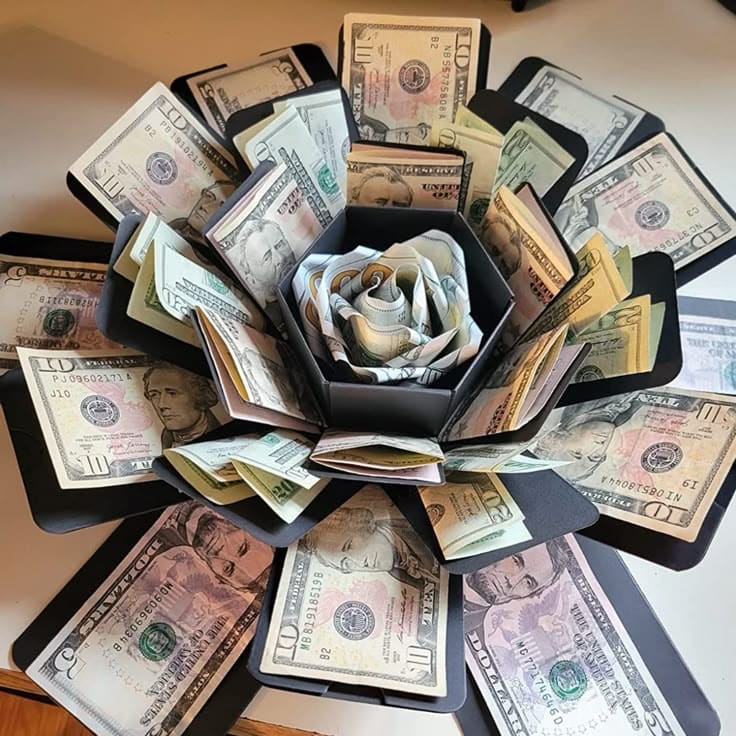
Forget ordinary envelopes, this is how you gift money with drama, beauty, and a whole lot of wow factor.
At first glance, it’s a simple black box. But once opened, it blooms into an elegant flower made entirely of folded bills, layered in petals and spiraled with precision.
Materials Needed
- 1 pre-made explosion box
- 25-30 paper bills
- 1 additional bill
- Double-sided tape
- Cardstock paper
- Scissors
- Bone folder (optional)
- Optional: message tags, glitter stickers, or ribbons
Step-by-step Guide
Step 1: Wrap your box in the paper of your choice if it’s not already styled, or use a pre-decorated explosion box.
Step 2: Unfold the explosion box fully and flatten it out to work easily.
Step 3: Begin attaching bills flat across the panels on each tier. Fold some to create “V” or fan shapes and secure them with glue dots to add petal depth.
Step 4: For the center rose, take a single bill and roll it into a loose spiral. Then fold out the edges slightly to resemble petal curves. Now you tape it into the center slot.
Step 5: Add small layers of cardstock behind each bill if you want to enhance the petal contrast and keep structure.
Step 6: Decorate the surrounding panels or insert personal notes under each bill for added emotion.
#17. Married Money Frame
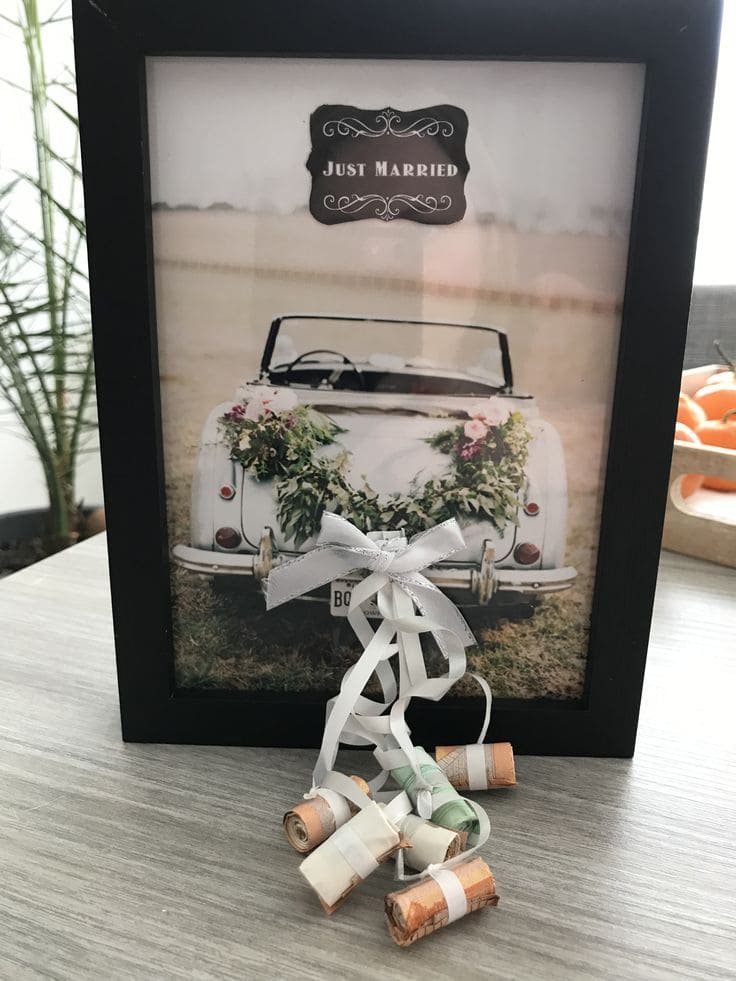
When love is in the air, what better way to send a couple off than with a thoughtful blend of sentiment and surprise?
This charming DIY gift turns a simple wedding photo into a memorable keepsake, complete with little bundles of rolled cash trailing like cans behind a getaway car.
Materials Needed
- Framed photo with a car
- 5 crisp bills
- White or silver curling ribbon
- Small decorative bow
- Double-sided tape
- Scissors
Step-by-step Guide
Step 1: Wrap your box in the paper of your choice or use a plain surface if you’re not adding wrapping.
Step 2: Print a wedding-themed image with a car and place it inside a frame.
Step 3: Roll each bill into a tight cylinder and secure with small bands or tape.
Step 4: Cut lengths of curling ribbon and attach one end to each rolled bill using glue dots or tape.
Step 5: Gather all the ribbons into a bundle and tie them together with a bow, leaving enough length so the bills dangle freely.
Step 6: Attach the gathered ribbons to the back bumper area of the car in the image, making sure it cascades naturally outside the frame for a 3D look.
#18. Keepsake Gift Frame
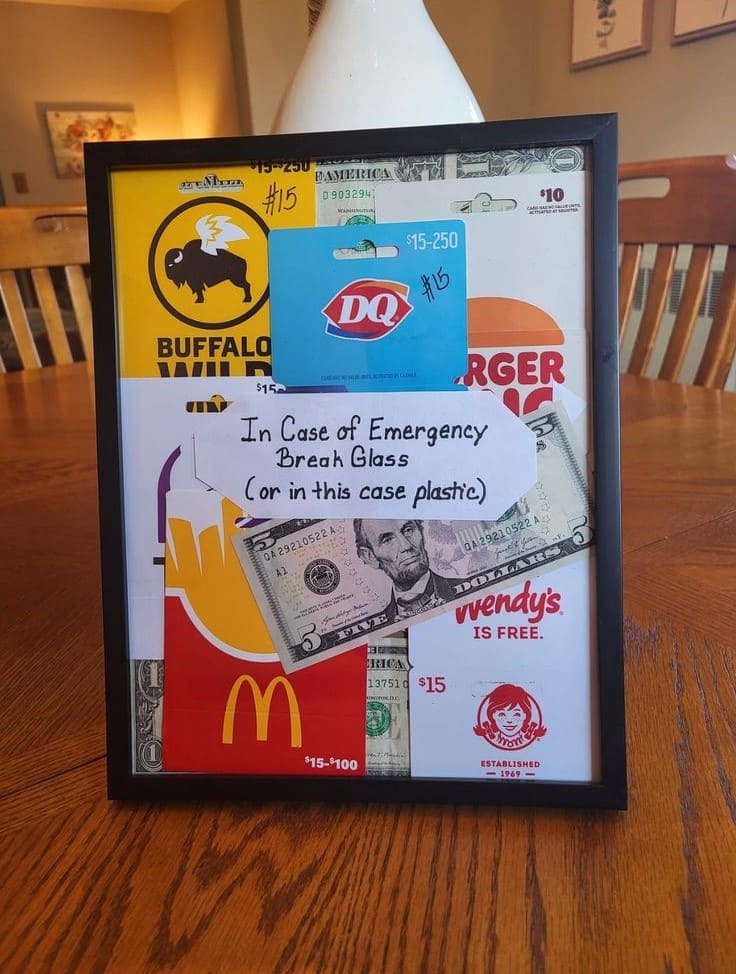
This framed gift is equal parts funny, thoughtful, and perfectly practical for a hungry teenager or young adult.
Behind the glass is a survival stash of fast food gift cards like Wendy’s, McDonald’s, Dairy Queen, Burger King, and Buffalo Wild Wings, each loaded with $15, ready to rescue the recipient from any snack-related crisis.
Materials Needed
- Black or any solid frame (8×10″ size works well)
- Fast food gift cards
- One or two dollar bills
- White cardstock
- Double-sided tape
- Black marker
- Background paper
Step-by-Step Guide
Step 1: Remove the backing and glass from the frame. Then arrange your fast food gift cards and cash on a solid or themed background.
Step 2: Secure each item using double-sided tape or glue dots so they stay in place when the frame is upright.
Step 3: Optionally, you can write your cheeky message on a piece of cardstock.
Step 4: Position the message card and cash in the center or slightly tilted for a fun effect. Then tape them gently over the gift cards.
Step 5: Reassemble the frame, ensuring the glass or plastic cover is clean and firmly in place.
#19. Sweet Cash Candy Bouquet
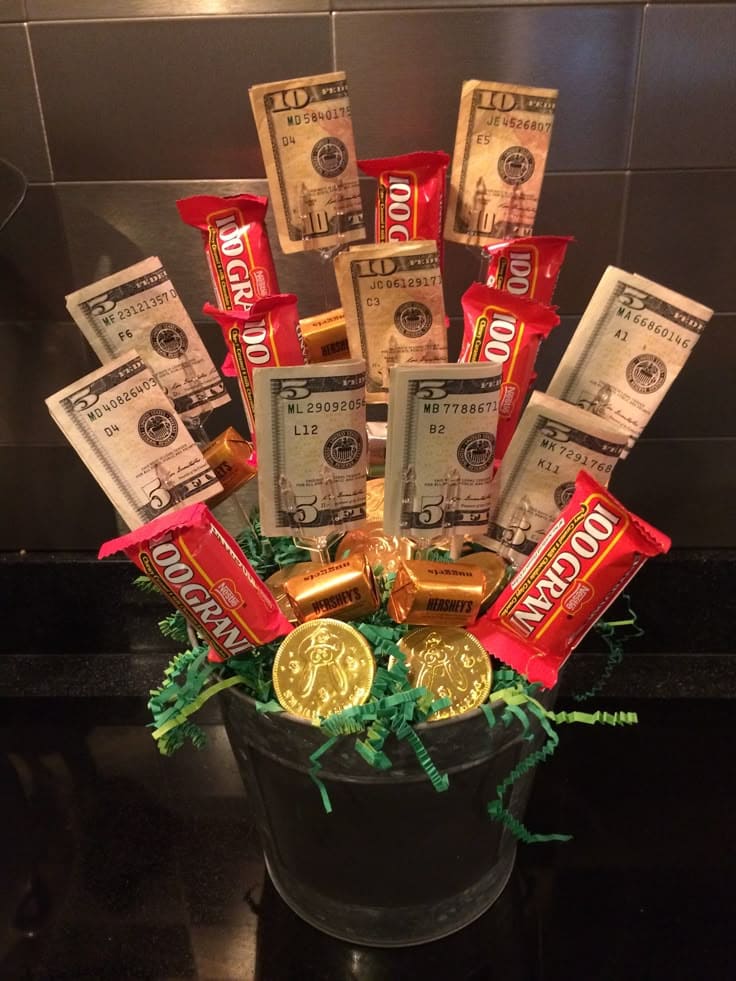
Want to give someone money but still make it scream fun instead of formal? This candy-money bouquet hits the jackpot.
With $5s and $10s peeking out between gold chocolate coins, 100 Grand bars, and mini Hershey’s, it’s a sugar-loaded surprise that’ll make anyone feel like a million bucks. It’s also great for birthdays, graduation, or even a quirky Valentine’s gift.
Materials Needed
- 8 paper bills
- 6 mini 100 Grand bars
- 4-6 gold chocolate coins
- 3-5 mini Hershey’s bars
- 1 small black bucket (6-8” wide)
- Green shredded filler paper
- Floral foam block
- 15 wooden skewers
- Double-sided tape
Step-by-step Guide
Step 1: Roll or accordion-fold each bill and attach it to a skewer using tape.
Step 2: Use the same method to tape candy bars and chocolate coins onto sticks. You should vary the heights to create a bouquet effect.
Step 3: Place the foam block inside the pot, then insert the skewers at angles to give the arrangement fullness and balance.
Step 4: Finally, cover the foam with shredded green filler, tucking it around the base.
#20. DIY Money Umbrella Gift
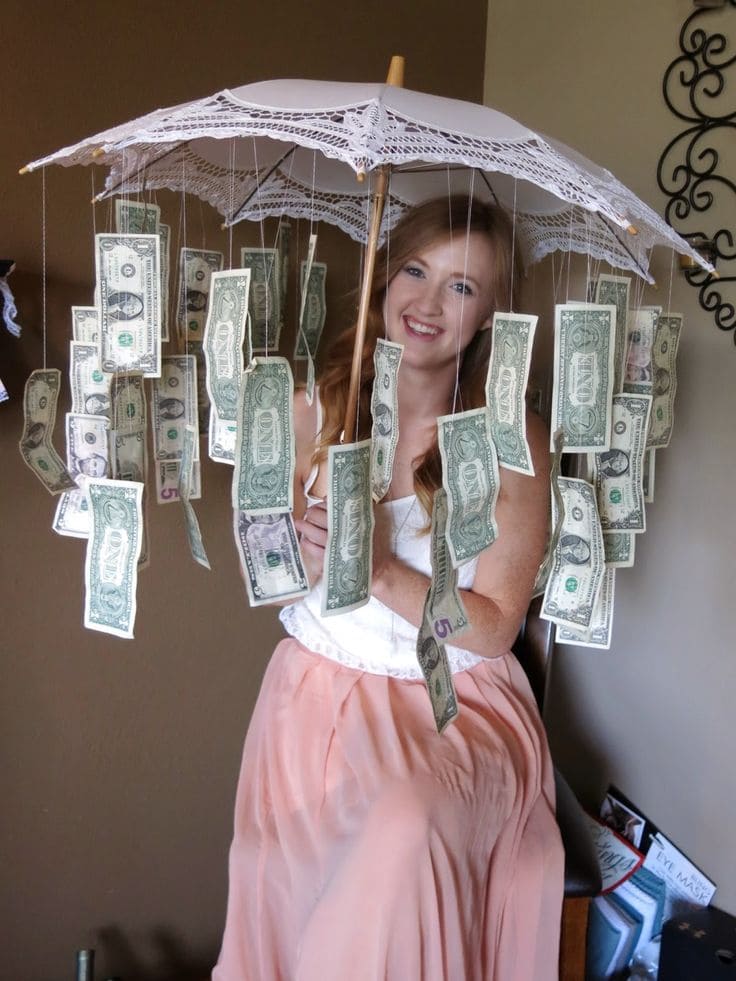
Ideal for birthdays, bridal showers, graduations, or baby showers, this creative display will have everyone smiling and snapping pics.
With bills dangling from every edge, it gives the illusion that fortune is falling from the sky. Plus, the sheer delight on their face when they realize it’s real money? Priceless.
Materials Needed
- 1 decorative umbrella
- 20-40 paper bills
- 1 spool of strong thread
- Transparent tape
- Scissors
Step-by-Step Guide
Step 1: Open the umbrella and set it on a steady surface or hang it from a hook to make assembly easier.
Step 2: Cut strings in varying lengths (8-12 inches) to create a flowing, natural look once the bills are attached.
Step 3: Carefully tape each bill to the end of a string. If you’re taping, fold the bill gently and secure the tape on the backside to avoid damage.
Step 4: Tie the other end of the string around the spokes of the umbrella. Then space them out evenly to make it feel like a true shower of cash.
Step 5: Once all the bills are attached, adjust the height of each string so it doesn’t bunch up or tangle.
#21. The Legendary Money Tree
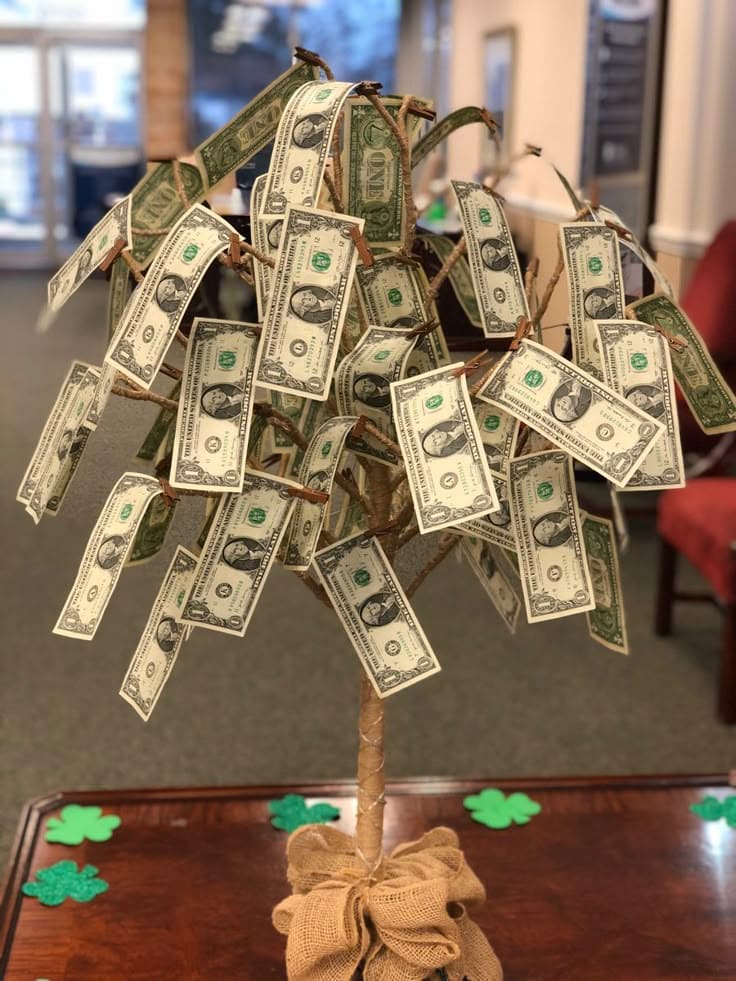
Who says money doesn’t grow on trees? With this magical creation, you can make that dream come true/
Perfect for birthdays, office farewells, graduations, or just because, this money tree delights. It’s the kind of gift people remember and talk about long after the last bill is plucked.
Materials Needed
- Small faux tree (about 2-3 ft tall)
- 40-50 dollar bills
- 50 mini clothespins
- Burlap
- Weighted pot
Step-by-step Guide
Step 1: Sand all wooden pieces to remove roughness if you’re building the base from scratch. Then wrap the trunk in burlap for that earthy, grounded look.
Step 2: Clip dollar bills to each branch using mini clothespins. You can fold them in half or drape them for a flowing effect.
Step 3: Insert the tree into a weighted pot or fill the base with rocks to keep it stable.
Step 4: Add extra flair like paper shamrocks, glittery labels, or a tag.
#22. Graduation Money Frame
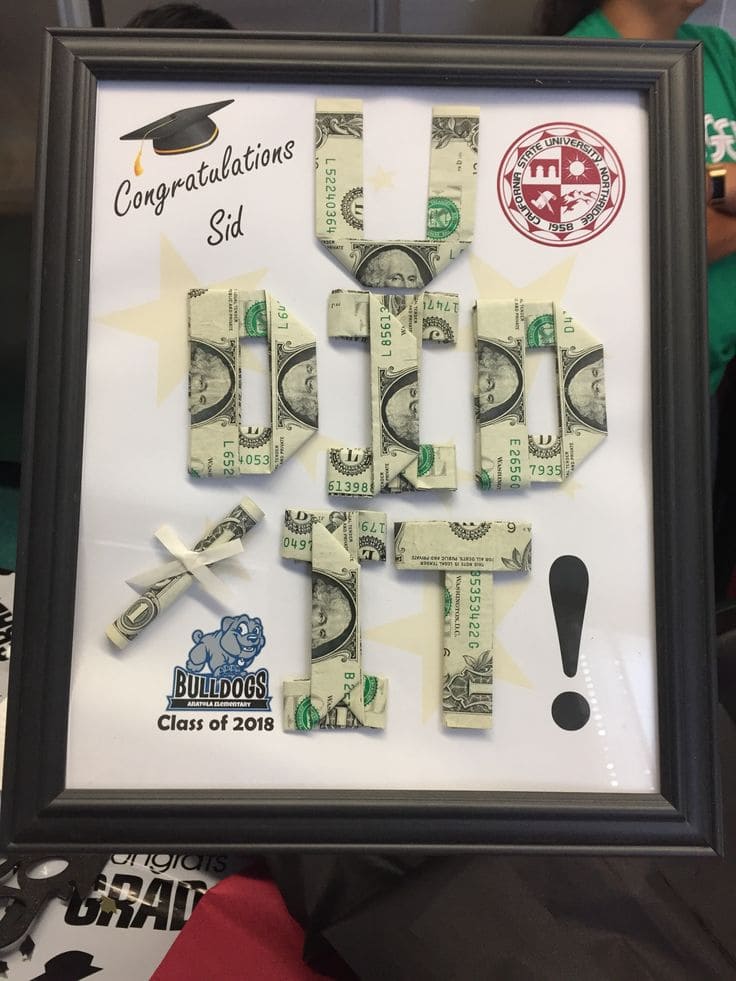
This DIY money frame turns folded cash into a big, bold message that says exactly what every grad deserves to hear: YOU DID IT!
With crisp bills shaped into letters and a neat shadow box presentation, this clever keepsake adds charm to any celebration table. Plus, it’s a gift that keeps giving, literally.
Materials Needed
- 7 crisp dollar bills
- Shadow box
- White cardstock
- Lettering tools or printed “Congratulations” message
- Double-sided tape
- Optional: school logo, graduation cap sticker, printed year or name, ribbon
Step-by-step Guide
Step 1: Wrap your box in the paper of your choice if you want to customize the frame backing, or simply insert a clean white cardstock background.
Step 2: Carefully fold each bill into the shape of a letter like U, D, I, T, etc. You can follow basic money origami tutorials to represent each letter clearly.
Step 3: Use double-sided tape to affix the folded bills onto the background paper, spelling out “YOU DID IT.”
Step 4: Finally, add any personalized touches like the graduate’s name, school logo, class year, or mini graduation cap stickers.
#23. Birthday Money Cake for Hazel
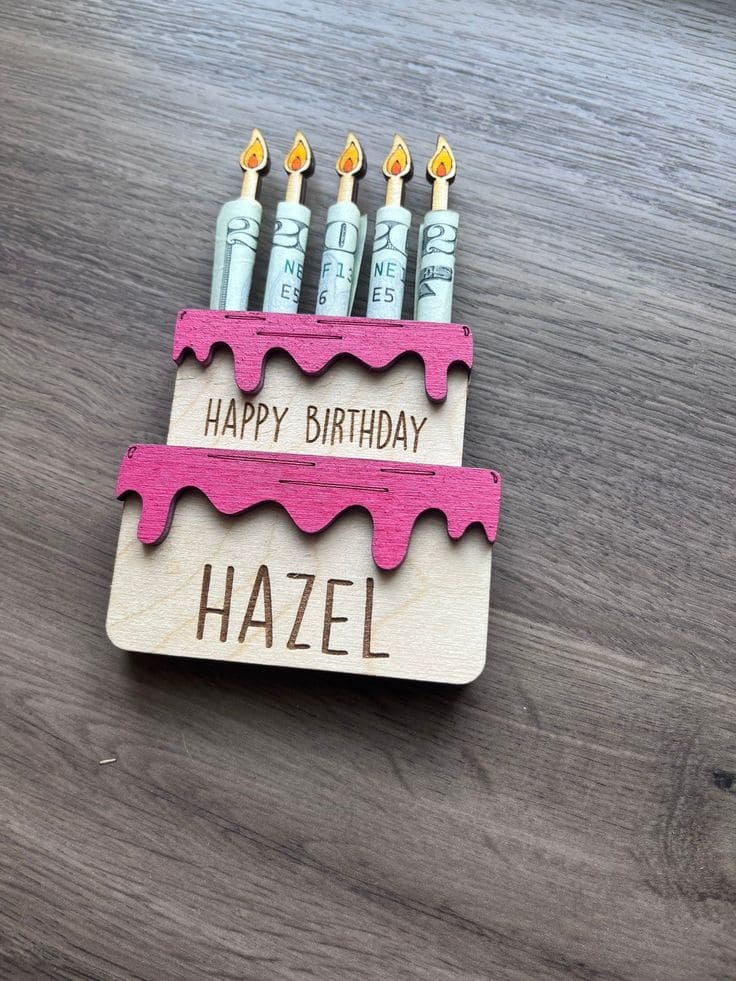
Thoughtful, cute, and delightfully handmade, this wooden birthday cake display is more than a card, it’s a keepsake. Each rolled bill is cleverly used as a candle, complete with tiny flame cutouts on top.
Ideal for milestone birthdays, this craft turns cash into something far more heartfelt.
Materials Needed
- Thin wooden board or pre-cut wooden cake shape
- Pink acrylic paint
- Wood-burning tool
- 5 rolled bills
- Miniature flame cutouts
- Glue dots
Step-by-Step Guide
Step 1: Prepare your wooden base and paint the top layer with your chosen frosting color..
Step 2: Use a wood-burning tool or a wood engraving pen to write “Happy Birthday” and the name of the birthday person. You can stencil first if needed for accuracy.
Step 3: Roll your paper money bills tightly and secure them with a small tape loop. Then place them evenly along the top to resemble birthday candles.
Step 4: Attach tiny flame cutouts to the tops of the rolled bills using a dot of glue.
Step 5: Carefully adhere the bills to the back of the wooden base using strong tape or glue dots so they stand upright.
#24. Slam Dunk Money Basketball Gift
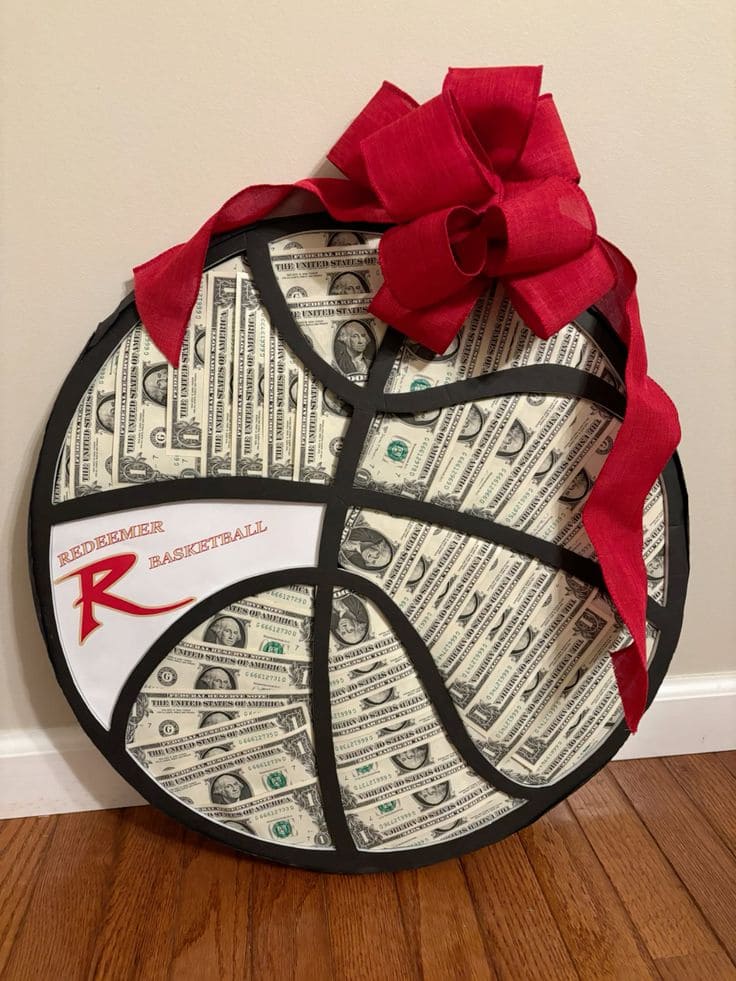
Who says cash gifts can’t be personal? This eye-catching basketball-themed money board is the ultimate slam dunk for any sports fan, especially if they’re part of a basketball team.
Moreover, made in the shape of a full basketball, the design cleverly divides the surface into black-lined panels, each one filled with carefully arranged dollar bills.
Materials Needed
- Poster board
- Black electrical tape
- Dollar bills (about 30-50 depending on size)
- Glue dots
- Red ribbon
- Printable team logo or name (optional)
Step-by-Step Guide
Step 1: Cut your board into a circle large enough to resemble a basketball. Then smooth the edges if needed.
Step 2: Lay out your dollar bills across the surface in sections. You can keep them flat or slightly overlapping.
Step 3: Use black tape or paint to create the curved basketball panel lines.
Step 4: If you want to personalize it, print or write the team name and logo on one of the segments.
Step 5: Add a bold red ribbon and tie it into a big bow, placing it at the top for a finishing touch that pops.
#25. DIY Money Broom Gift Idea
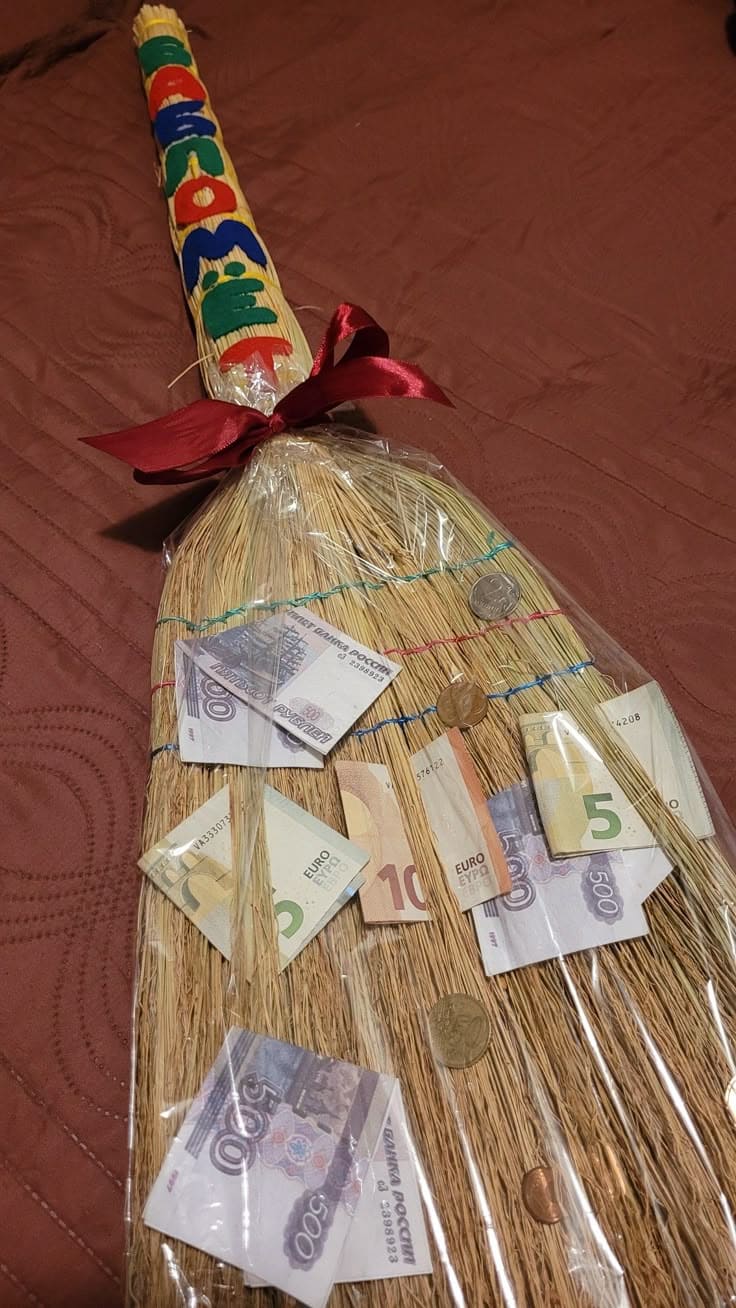
Sometimes, the best blessings come with a bit of humor and a whole lot of creativity. This money broom gift is both symbolic and smart.
In many cultures, gifting a broom signifies sweeping away bad luck and welcoming prosperity into a new home or phase of life.
So, add bills and coins to that tradition, and you’ve just elevated a simple gesture into a heartfelt, witty present that feels magical and memorable.
Materials Needed
- 1 natural straw broom
- 6-12 paper bills
- Assorted coins
- Plastic wrap
- Clear tape
- Colorful ribbon
- Decorative bow (optional)
- Felt letters
Step-by-Step Guide
Step 1: Start by laying the broom flat on a table. If it’s a gift, clean off any dust and smooth down the bristles for a tidy appearance.
Step 2: Place bills and coins across the bristle area, spacing them evenly. Then fold the bills slightly if needed to create visual rhythm and layering.
Step 3: Secure the money using yarn, wrapping it horizontally across the bristles. You can tie small knots at the back or tape the bills underneath so the front stays neat.
Step 4: Wrap the entire broom with a large sheet of plastic wrap to protect the money and create a polished look.
Step 5: Add a ribbon around the handle where the bristles meet, and finish with personalization by gluing on colorful felt letters.
#26. Money Pizza Box
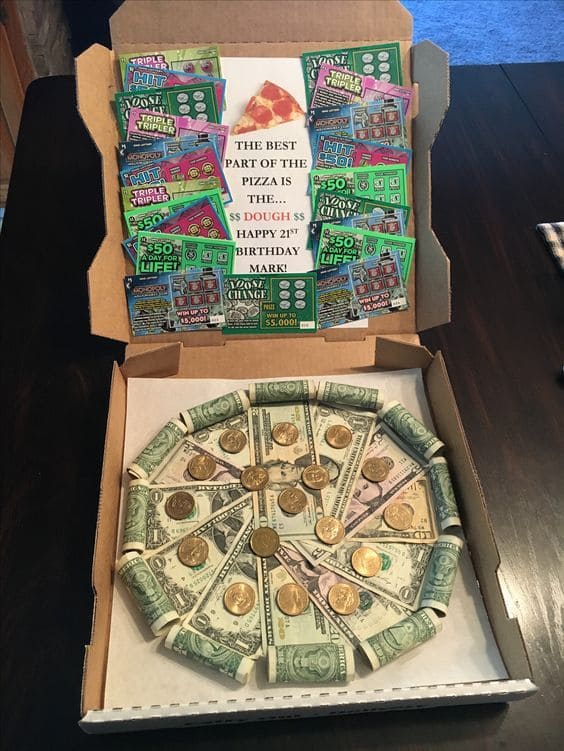
Why give cash in an envelope when you can serve it in a pizza box, with a side of scratch-off lottery tickets and pure delight?
This clever gift idea looks like a pizza, but it’s all made of money, rolled bills as crust, flat bills as slices, and coins as pepperoni.
Materials Needed
- 1 clean, unused pizza box (12″ size works well)
- Assorted dollar bills ($1s, $5s, $10s, $20s)
- 15 coins
- 12-15 scratch-off lottery tickets
- Double-sided tape or removable glue dots
- Ribbon
- White paper
Step-by-step Guide
Step 1: Line the bottom of your pizza box with white paper to give it a clean base.
Step 2: Roll dollar bills around a pen and secure each with a small rubber band. Then line the edge of the circle with 12 of these.
Step 3: Fan out flat bills in triangular slices like pizza wedges. You can layer them slightly or use larger denominations to mimic full slices.
Step 4: Add pepperoni by placing one coin in the middle of each slice.
Step 5:Finally, decorate the pizza box lid with scratch-off lottery tickets and your printed pun. You now arrange them like toppings or a menu board.
