I found it in the back of a dusty drawer, an old box grater, worn at the edges and slightly bent from years of use. Once a kitchen essential, it had long since been replaced by sleeker gadgets.
But as I held it in my hands, I couldn’t bring myself to toss it. There was something oddly charming about it, like it still had more to give.
That’s when I started digging around for ideas and discovered a world of creative magic hidden in those rusty holes. If you’ve got one lying around too, you’re in for a treat. These 18 fantastic upcycled grater ideas will completely change how you see yours.
#1. Whimsical Grater Owls
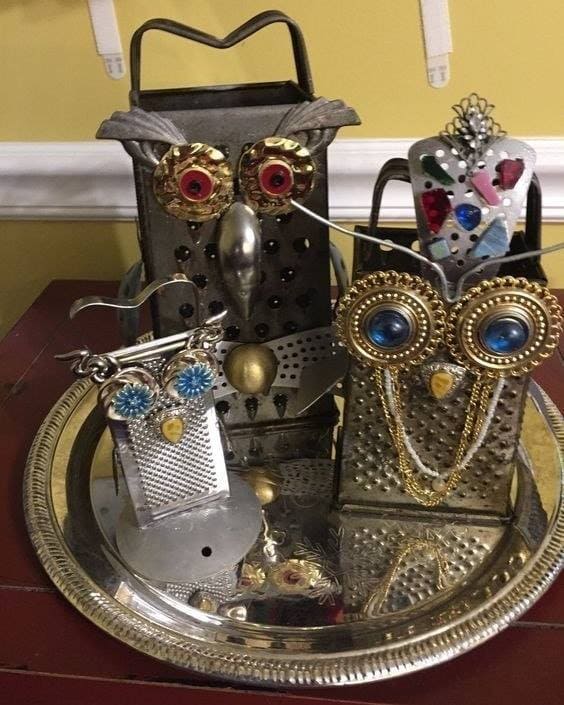
If you’re the kind of person who sees a face in a rusty spoon or a smile in a bent fork, you’re going to love this project.
These adorable, quirky owls are crafted from old kitchen graters and bits of forgotten jewelry, hardware, and silverware. They make for unique shelf decor, conversation starters, or even personalized gifts.
Materials Needed
- 3–4 metal kitchen graters (mix sizes)
- Old spoons, forks, bottle caps, knobs, broken jewelry, buttons
- Hot glue gun
- Wire or chain
- Optional: tray
Step-by-Step Guide
Step 1: Clean each grater thoroughly, but leave the patina if you love that aged, rustic charm.
Step 2: Use large buttons, bottle caps, or earring backs as eyes. Position them near the top of the grater and glue securely. For the beak, a spoon bowl or small nut/bolt works great.
Step 3: Add a pair of vintage clip-on earrings to be eyebrows, a chain to be a necklace or glasses and bent forks tp make excellent wings.
Step 4: Once the glue is dry and pieces are secure, group them together on a tray or line them up on a shelf.
#2. Box Grater Jewelry Holder
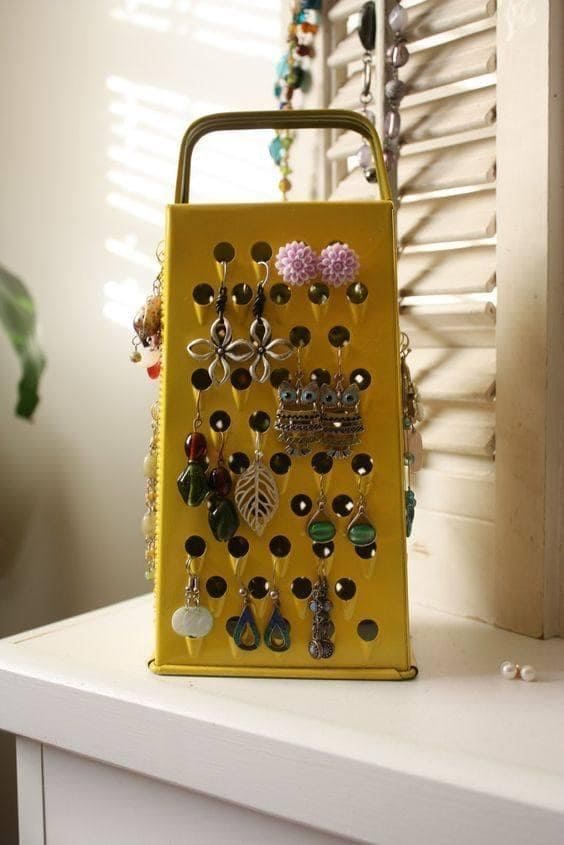
If your earrings tend to vanish like socks in a dryer, this cheerful grater makeover might be exactly what your dresser needs.
This project is unexpected, fun, and functional. Plus, it brings a pop of color and personality to your vanity, bathroom counter, or shelf.
Materials Needed
- 1 box-style metal grater (any condition, around 9″ tall)
- Spray paint
- Optional: rubber stoppers
- Earring collection (studs, dangly, hoops)
- Soft cloth
Step-by-Step Guide
Step 1: Clean your grater thoroughly and gently sand any rough or rusty spots. Then, spray paint it in a bright or pastel color.
Step 2: Set the grater upright on a flat surface, handle side up. You can add rubber bumpers to the base if you’re worried about scratches.
Step 3: Start hanging your earrings through the holes. Larger holes are perfect for dangling styles, while smaller ones fit studs with backings.
Step 4: Use the sides to hang necklaces, chains, or even rings if the grater holes are wide enough.
#3. Grater Pendant Light Chandelier
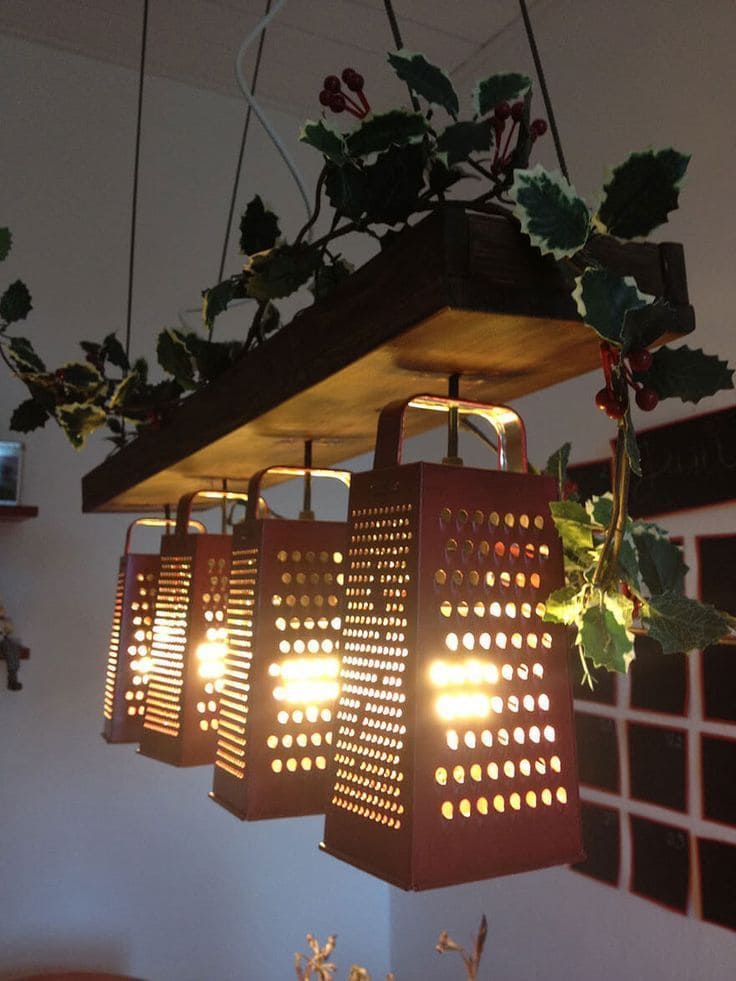
Who says kitchen tools belong in a drawer? This showstopping chandelier proves otherwise.
With its warm glow and playful character, this DIY light fixture turns everyday box graters into glowing lanterns, suspended from a rustic wooden plank.
Materials Needed
- 4 metal box graters
- 1 wooden plank (approx. 30″–36″ long, 6″ wide)
- 4 pendant light sockets with cords
- 4 LED Edison-style bulbs
- Hanging hardware: ceiling hooks, chains, or heavy-duty wire
- Faux garland, holly, or berry vine (optional)
- Drill, screws, and hot glue
Step-by-Step Guide
Step 1: If they’re new or rusty, give them a light sanding or spray-paint them in a festive or modern color.
Step 2: Drill holes in the wooden plank spaced evenly to accommodate the cords. Thread each light cord through a hole from the top side and connect it to a grater.
Step 3: Secure each grater to the wooden plank so it hangs downward with the bulb socket snug inside. Then wire the lights according to your setup.
Step 4: Mount the plank to your ceiling using sturdy hooks or chains. Finish by weaving in decorative garland or faux holly along the top board to give it a seasonal or botanical touch.
#4. Holiday Grater Lantern
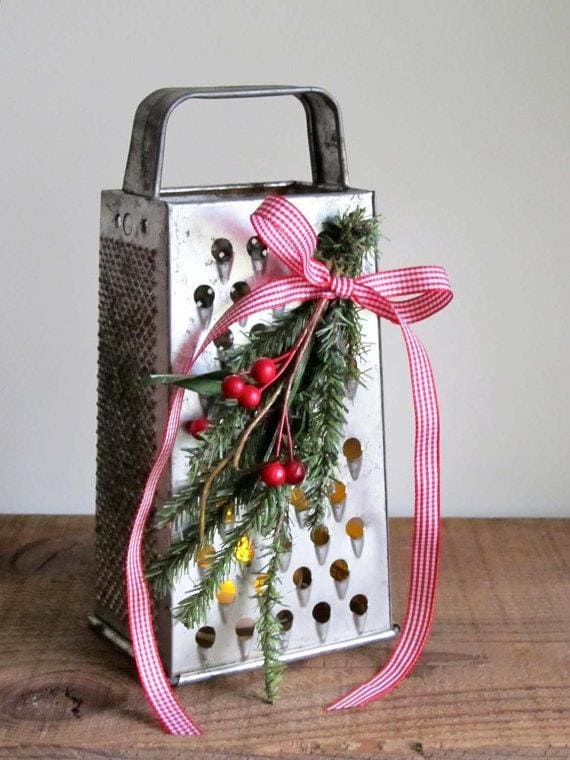
With just a ribbon, a sprig of greenery, and a warm flicker from a tea light inside, this simple DIY adds instant rustic charm to your winter décor.
Whether it sits on a windowsill, mantel, or entry table, it brings a nostalgic glow that feels handmade and heartfelt.
Materials Needed
- 1 metal box grater
- 1 flameless LED tea light
- Faux evergreen sprig with berries (approx. 6–8″)
- Ribbon
- Hot glue
- Optional: twine or tag
Step-by-Step Guide
Step 1: Clean the grater with warm water and dry it completely. You can leave it rustic or polish it up for a shinier finish.
Step 2: Place a flameless tea light or small LED candle inside the grater through the bottom
Step 3: Attach your greenery using hot glue or floral wire. Let the branches drape slightly down the side for a relaxed, natural look.
Step 4 (Optional): Add a handwritten tag or wooden sign with a holiday message like “Merry & Bright” or “Grate Tidings” for an extra wink of charm.
#5. Beaded Key Chime from a Grater
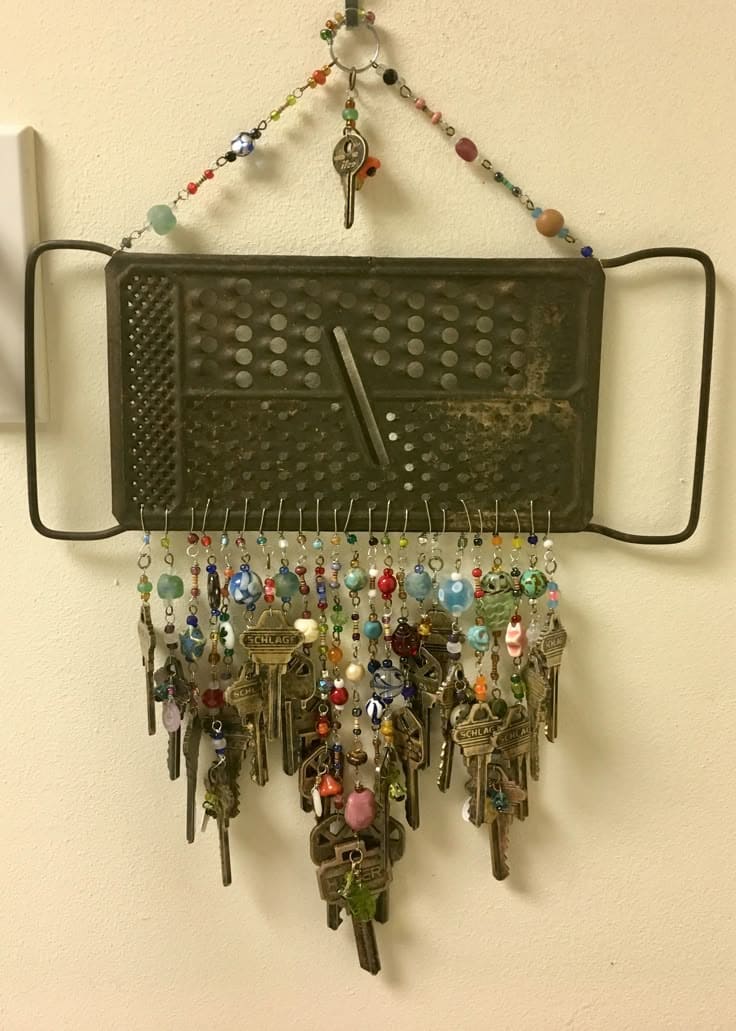
Repurposing a flat grater into a whimsical wall hanging, this DIY project lets you transform your extra keys, old house keys, or purely decorative vintage ones into a colorful, musical art piece.
Also, the added beads shimmer like droplets in the light, while each gentle clink of metal feels like a story echoing softly through your hallway.
Materials Needed
- 1 flat grater with side handles
- 15–25 old keys (mix sizes and shapes)
- Assorted beads (glass, plastic, wood)
- Jewelry wire
- Needle-nose pliers
- Jump rings
- Beaded wire strand or chain
Step-by-Step Guide
Step 1: Clean your grater and lightly sand if needed, but don’t overdo it as you want that antique texture.
Step 2: Use jump rings or wrap jewelry wire through holes at the bottom edge. Begin beading your wire strands: alternate between colorful beads and a single key at the bottom.
Step 3: Attach each finished beaded strand to the holes along the bottom row. Space them evenly or cluster some together for a fuller fringe.
Step 4: Add a beaded or decorative wire strand across the top handles for hanging.
#6. DIY Cheese Grater Birdhouse
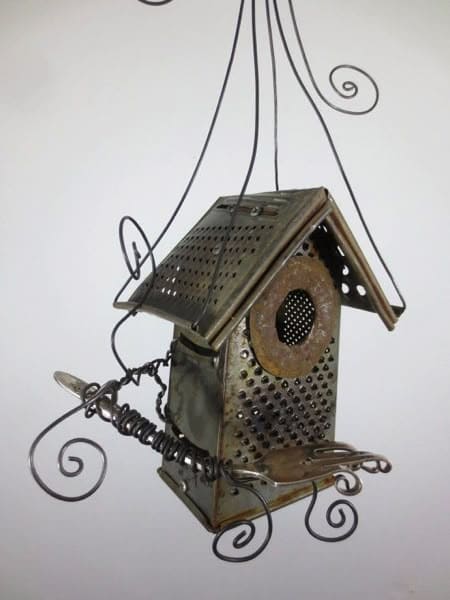
Turning two box graters into a birdhouse might sound odd, but the result is wonderfully quirky and full of heart.
With its rustic character, creative wire flourishes, and spoon perch, this upcycled birdhouse feels like something you’d stumble upon in an enchanted garden.
Materials Needed
- 2 metal box graters (same size, used as the “roof”)
- 1 rectangular metal tin
- 1 large washer
- Sturdy wire
- 1–2 old spoons or forks
- Pliers, drill or metal punch, wire cutter
- Optional: clear outdoor sealant
Step-by-Step Guide
Step 1: Choose a sturdy metal base, then drill or punch a circular hole near the top front side and affix a washer to frame it, forming the bird’s entry.
Step 2: Use two box graters as the roof, facing each other like a triangle. Secure them to the top edges of the base with screws or wire loops.
Step 3: Create curly wire designs for flair. Wrap thick wire around a pencil or dowel to form spirals, then attach to the sides as decoration or to secure the roof.
Step 4: Attach a spoon or fork to the base right below the entry hole to act as a perch. Drill a tiny hole or glue it in place.
Step 5: Add a top loop or hanger made from curled wire, and hang it in a tree or under a porch.
#7. Cheese Grater Clock
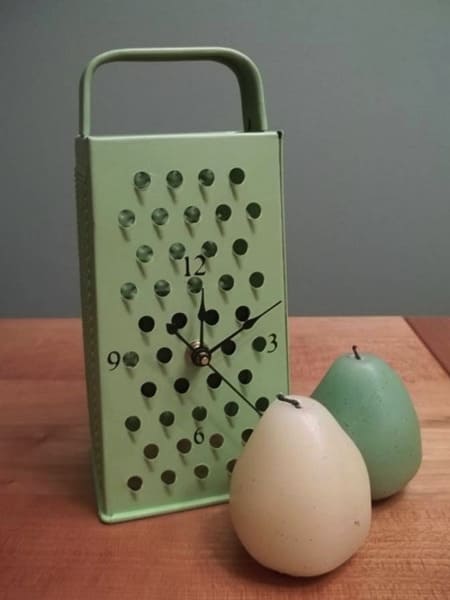
This DIY project transforms an old box grater into a kitchen clock that’s equal parts conversation starter and functional decor.
Whether it’s for your own quirky corner or a handmade gift, this idea proves once again that creativity and upcycling make a beautiful pair.
Materials Needed
- 1 metal box grater
- Spray paint (color of your choice)
- Small clock movement kit (battery-powered, with hands)
- Drill with metal bit
- Number stickers or stencils (optional)
- Sandpaper (optional)
Step-by-Step Guide
Step 1: Start by cleaning the grater thoroughly and removing any rust. Use fine sandpaper if needed, then wipe it dry.
Step 2: Spray paint the entire grater in your chosen color.
Step 3: Mark the center where you want the clock face to be. Carefully drill a hole large enough for the clock movement shaft to fit through.
Step 4: Attach the clock movement from the back, insert the shaft through the hole, and secure the hands on the front.
Step 5: Apply number decals or use a stencil to paint numbers if desired.
#8. Grateful Autumn Grater Wall Decor
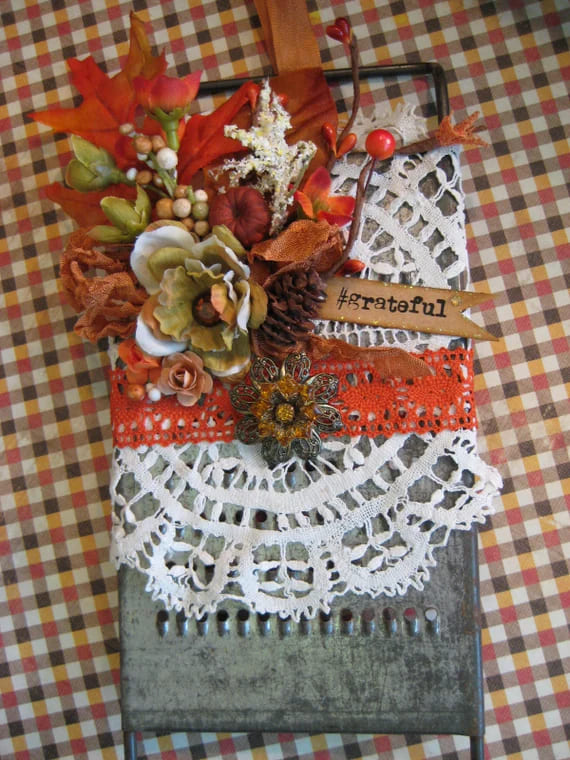
This charming fall-themed upcycled grater decor blends rustic texture and heartfelt sentiment. A lace doily wraps around the base like a delicate skirt, while vibrant faux florals and autumn berries burst from the top, echoing nature’s final flourish before winter.
Materials Needed
- 1 old box grater (flat side forward)
- Assorted faux fall flowers, berries, pinecones
- Crochet lace
- Orange ribbon (approx. 12″)
- Small wood tag + permanent marker
- Hot glue gun and glue sticks
- Optional: brooch, vintage buttons, mini signage
Step-by-Step Guide
Step 1: Start by cleaning your grater, rust adds charm, but grime doesn’t. If needed, give it a light sanding and wipe it down with a damp cloth.
Step 2: Wrap the lace around the base of the grater like a skirt and secure it in place with hot glue.
Step 3: Wrap a piece of ribbon or crocheted trim around the top of the lace for contrast. Again, glue in place at the back or sides.
Step 4: Hot glue your florals and foliage near the top corner.
Step 5: Write a hashtag on a small wooden arrow tag and attach it gently in the floral arrangement. Then you can add embellishments like vintage brooches or buttons near the center as finishing touches.
#9. Framed Grater Organizer
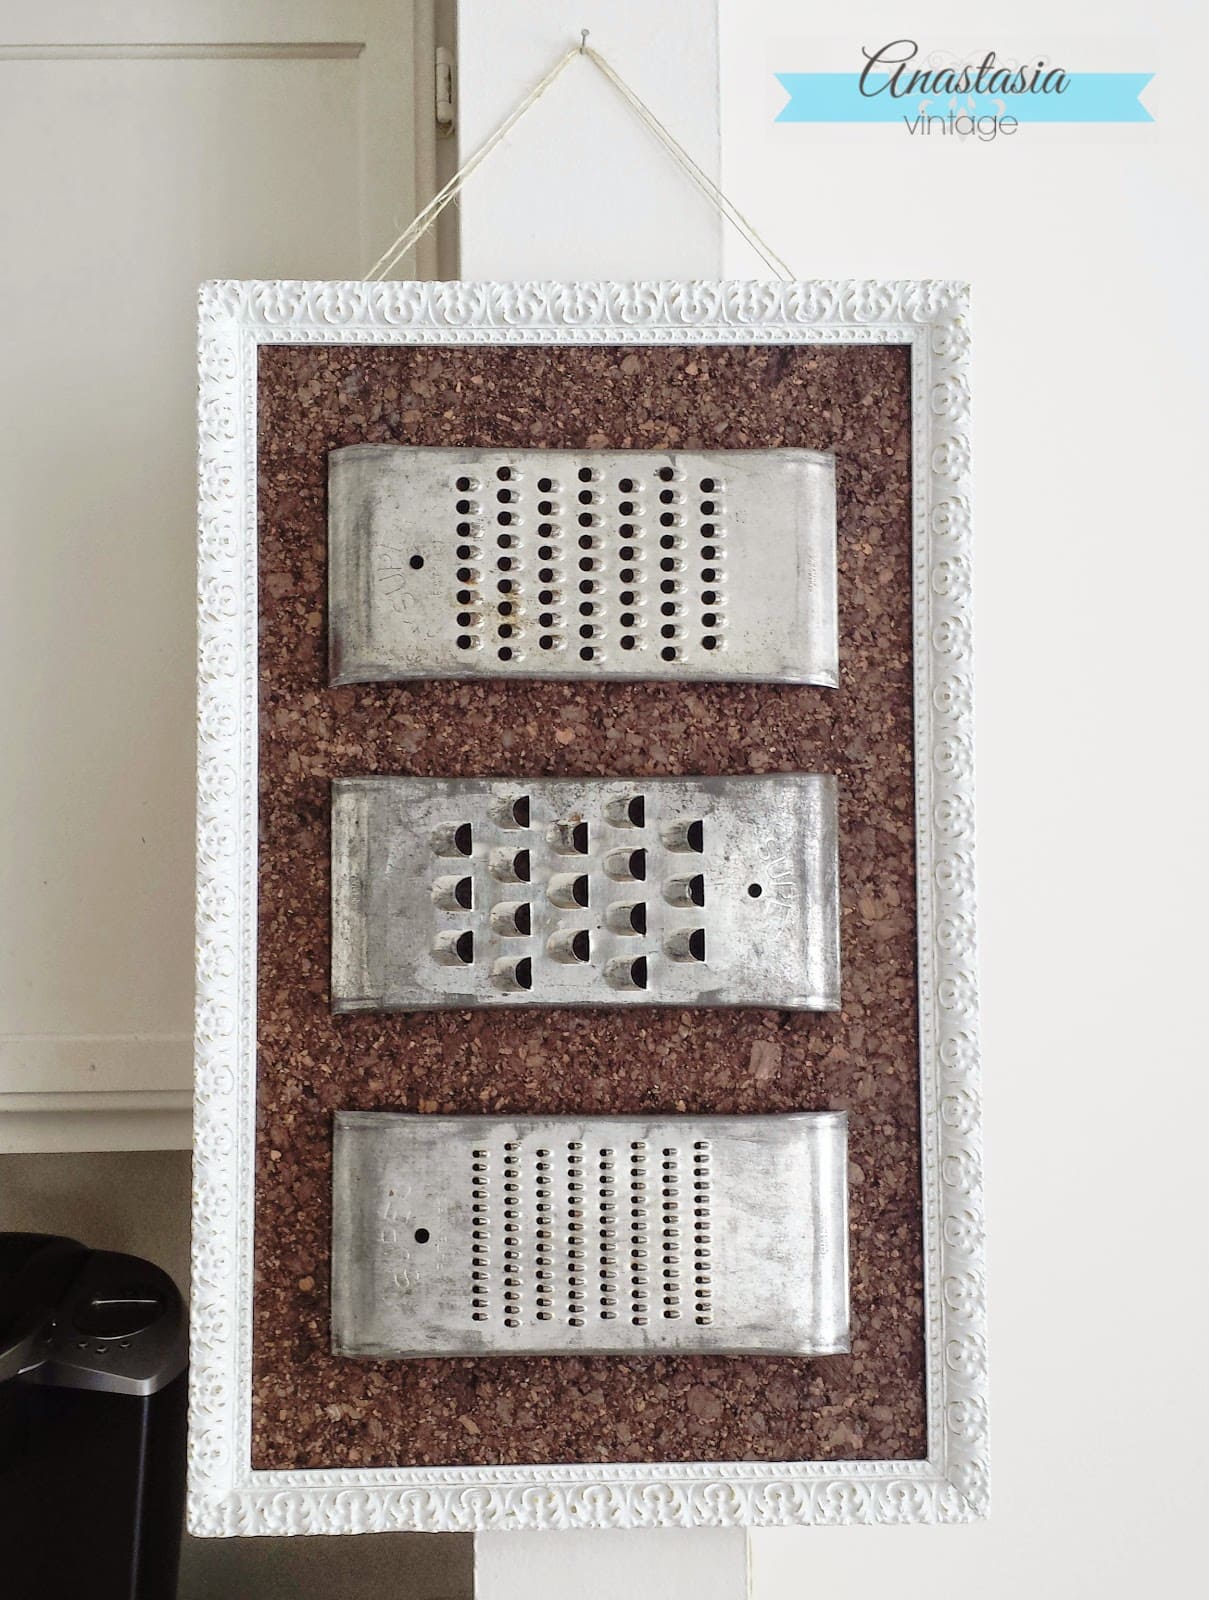
This framed wall organizer turns three flat vintage graters into a stunning and useful piece of wall art. Whether you use it to hang jewelry, craft supplies, or kitchen notes, it brings texture, history, and elegance all in one.
Materials Needed
- 3 flat metal graters
- Corkboard sheet
- Large picture frame (approx. 16″ x 20″)
- White chalk paint (optional)
- Small screws
- Optional: decorative hooks
- Hanging wire
Step-by-Step Guide
Step 1: Start with your frame. Remove any glass and backing, then paint it if desired. Let dry thoroughly.
Step 2: Cut a corkboard piece to fit snugly inside the frame. Glue or staple it into place as the backing.
Step 3: Arrange the flat graters vertically or horizontally (like in the photo), leaving space between them. Once you’re happy with the placement, attach them securely using screws.
Step 4: Add hooks or simply use the grater holes to hang items.
#10. Grater Snowman Decoration

Who says cheese graters are only for kitchens? This snowman grater project proves they’re also perfect for spreading holiday cheer.
Painted white and brought to life with a cheerful carrot nose, plaid bows, and winter greenery, this little guy is more than décor, it’s personality in a grater.
Materials Needed
- 1 box-style metal grater (clean, medium size)
- White spray paint
- Acrylic paint (black and orange)
- Small paintbrushes
- Faux pine sprigs, moss, or berries
- “Let it Snow” mini sign
- Fabric scraps
- Hot glue gun and glue sticks
Step-by-Step Guide
Step 1: Start by painting the entire grater white. Use two thin coats for an even, rustic base. Let dry completely before painting on any features.
Step 2: Paint the snowman face on the front, the carrot nose (orange triangle), two black eyes, and dotted smile.
Step 3: Tie a small plaid bow around the top handle and another around the base as a scarf. Secure with hot glue if needed.
Step 4: Stuff the top opening with faux greenery, moss, and a festive sign like “Let it Snow.” You can even sprinkle a little fake snow or glitter if you’re feeling fancy.
#11. Rustic Display Using a Vintage Hand Grater
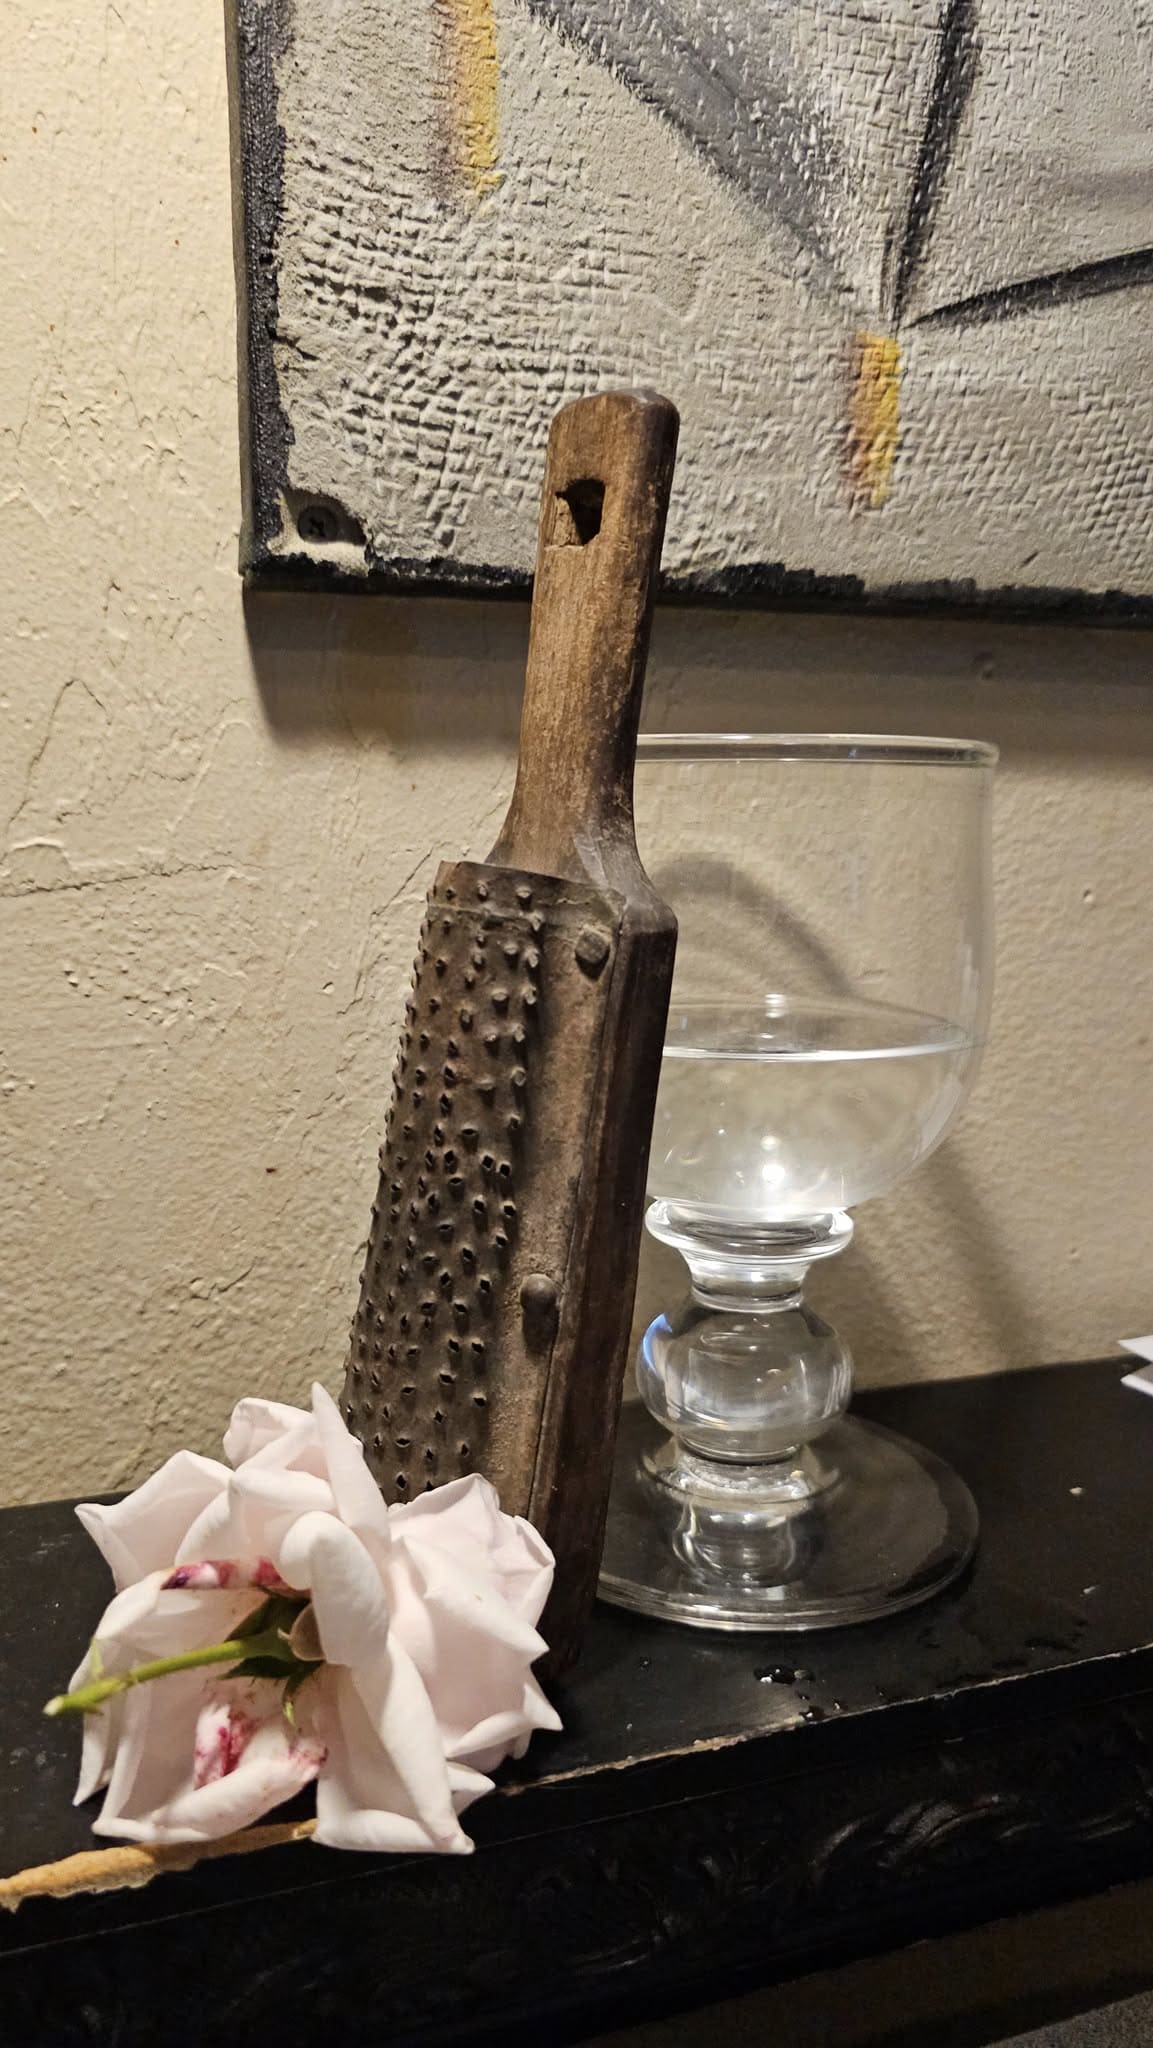
Sometimes, the most beautiful pieces aren’t the ones you build, but the ones you honor.
Instead of tossing it, you can turn it into a sculptural accent for your shelf or entryway. Leaned against a painting, paired with soft petals or a goblet, it instantly adds character and quiet nostalgia.
Materials Needed
- 1 antique hand grater (wood-handled or metal, any size)
- 1 flower (fresh or dried, optional)
- 1 display prop (small frame, glass, or shelf décor)
- Soft cloth
Step-by-Step Guide
Step 1: Gently clean the grater with a dry cloth, don’t scrub away its history.
Step 2: Choose a background that contrasts with the grater’s texture like wood, canvas, or glass work well.
Step 3: Lean or stand the grater as a vertical sculptural element.
Step 4: Add a flower, vintage kitchen item, or handwritten note for a touch of softness
#12. Rustic Grater Holiday Lantern
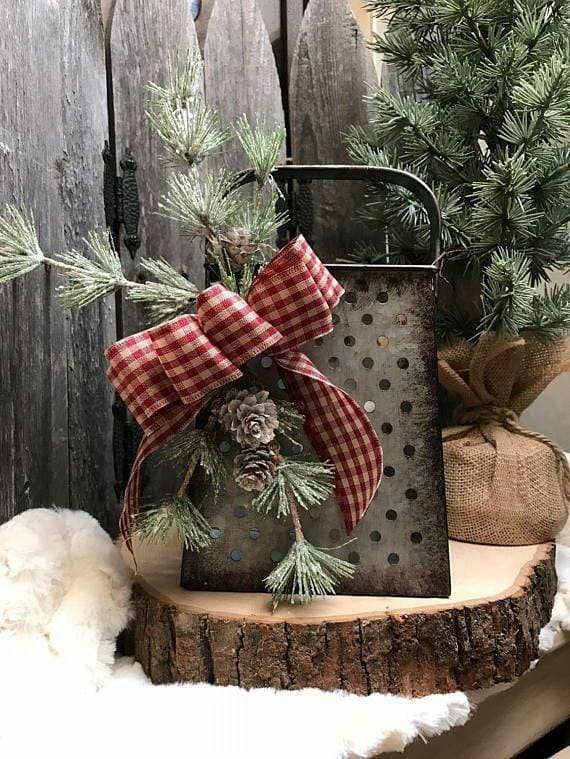
This charming little project turns a humble cheese grater into a rustic winter lantern, perfect for adding a homespun glow to your Christmas decor.
With just a sprig of faux pine, a pinecone or two, and a classic red gingham bow, you can create a decoration that feels like a cup of hot cocoa for your eyes.
Materials Needed
- 1 vintage metal box grater (tall style)
- Faux evergreen sprigs with snow-dusted tips
- Mini pinecones (1–2)
- Red and white gingham ribbon (approx. 20″)
- Optional: battery-powered LED tea light
- Hot glue gun and glue sticks
Step-by-Step Guide
Step 1: Wipe down your grater. You don’t need to repaint it as its aged, darkened patina gives it that farmhouse warmth.
Step 2: Glue or wire the evergreen sprigs to one corner or the top of the grater, letting the branches fan out naturally. Add a pinecone or two nestled in for texture.
Step 3: Tie a generous gingham bow and attach it right above the greenery using hot glue.
Step 4: Place a small LED light or fairy lights inside the grater so it glows through the holes like soft snowlight. You can also leave it unlit and just let it be a daytime showpiece.
Step 5 (Optional): Set it on a slice of wood like shown, or hang it with wire for a more vertical decor piece.
#13. Box Grater Wall Vase
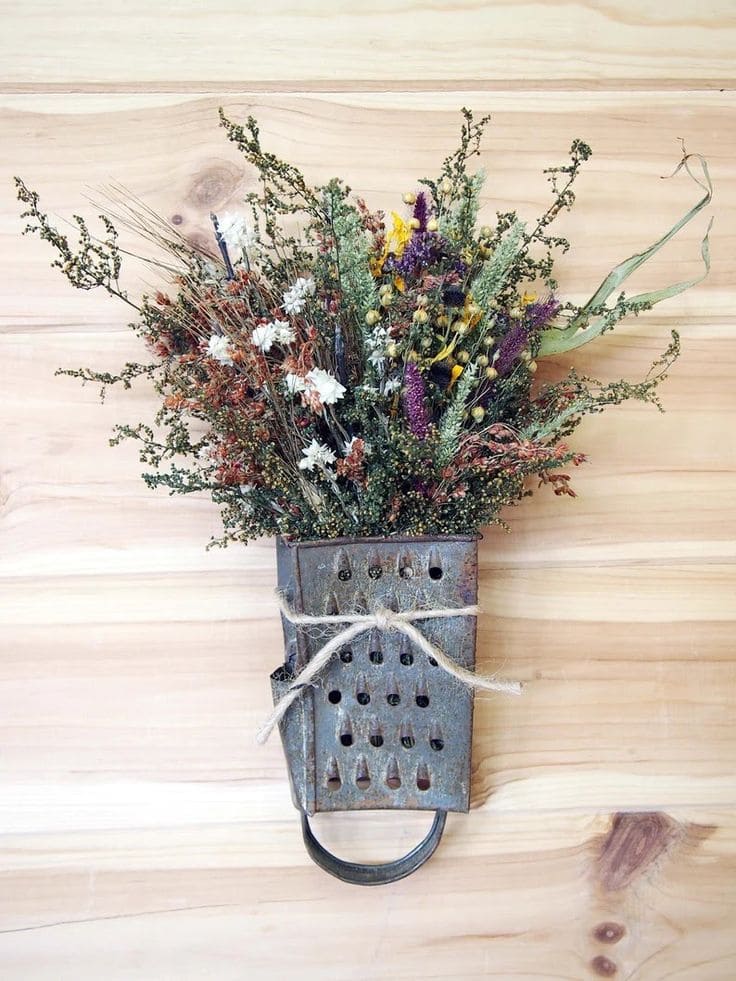
This simple yet stunning DIY brings together raw metal, natural textures, and soft dried blooms in the most poetic way.
Whether hung in a farmhouse kitchen, craft room, or porch nook, it adds a whisper of vintage charm and a whole lot of soul.
Materials Needed
- 1 vintage metal box grater
- 1 bunch of dried or faux flowers
- Twine or jute string (about 20″)
- Optional: small plastic or paper cup
- Wall hook
Step-by-Step Guide
Step 1: Clean the grater, but keep its rustic finish intact, don’t worry about rust or scuffs, they add character.
Step 2: Insert your dried flowers inside the grater from the open top. If they need more support or to stay upright, place a small cup inside to act as a liner or filler.
Step 3: Wrap a piece of jute twine around the center of the grater and tie a knot or bow.
Step 4: Hang your floral grater pocket on a small nail or hook.
#14. Grater Photo Holder
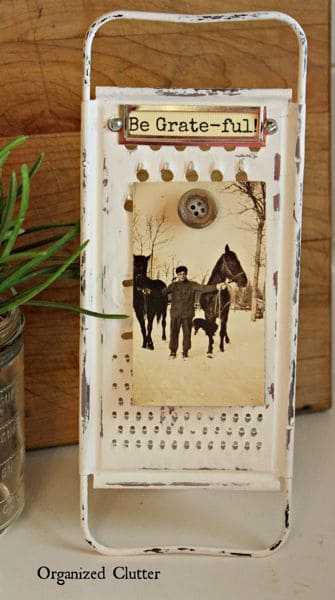
With a touch of paint, a meaningful photo, and a few charming accents, this becomes a sentimental piece you’ll love to see on your desk or shelf.
Whether it holds a family snapshot, a quote that inspires you, or even a recipe from Grandma, it’s a lovely way to blend creativity with memory.
Materials Needed
- 1 flat or box grater
- Chalk or spray paint
- 1 small photo
- Decorative button, clothespin, or brad
- Letter stickers or stamped word tag
- Optional: distressing sandpaper, screws, glue
Step-by-Step Guide
Step 1: Clean and dry the grater thoroughly. If you’re painting it, apply a few light coats and let each one dry fully.
Step 2: Affix your photo to the center of the grater using a decorative button, mini clothespin, or thumbtack-style pin that fits the holes.
Step 3: Add a label or sentiment, this one uses a sweet pun (“Be Grate-ful”) for charm.
Step 4: Place the finished grater on a tabletop stand, mount it on the wall, or lean it on a shelf.
#15. Wall-Mounted Grater Organizer
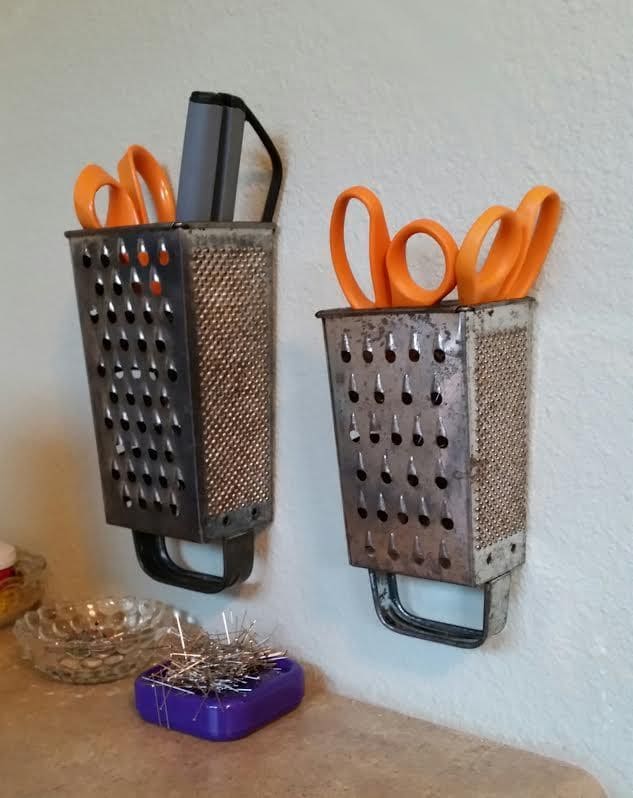
If you’re tired of digging through drawers for scissors, markers, or craft tools, this clever little hack might just become your new favorite thing.
Their tall, open bodies are ideal for upright storage, and the grater sides add a touch of edgy, vintage character to your workspace.
Materials Needed
- 1–2 metal box graters (standard size, any finish)
- Wall screws
- Optional: spray paint
- Screwdriver or drill
Step-by-Step Guide
Step 1: Clean your graters thoroughly. If they’re extra rusty or dull, give them a quick coat of spray paint to freshen them up.
Step 2: Decide where to mount them like near a workspace, sewing table, or utility bench. Use the bottom handle of the grater as the wall contact point and attach it securely with screws.
Step 3: Once mounted, fill the grater with your tools such as scissors, paintbrushes, pens, even zip ties or knitting needles.
Step 4 (Optional): Add small magnets or labels to the front of each grater side if you want to organize by type or personalize the look.
#16. Grater Pocket Wall Art
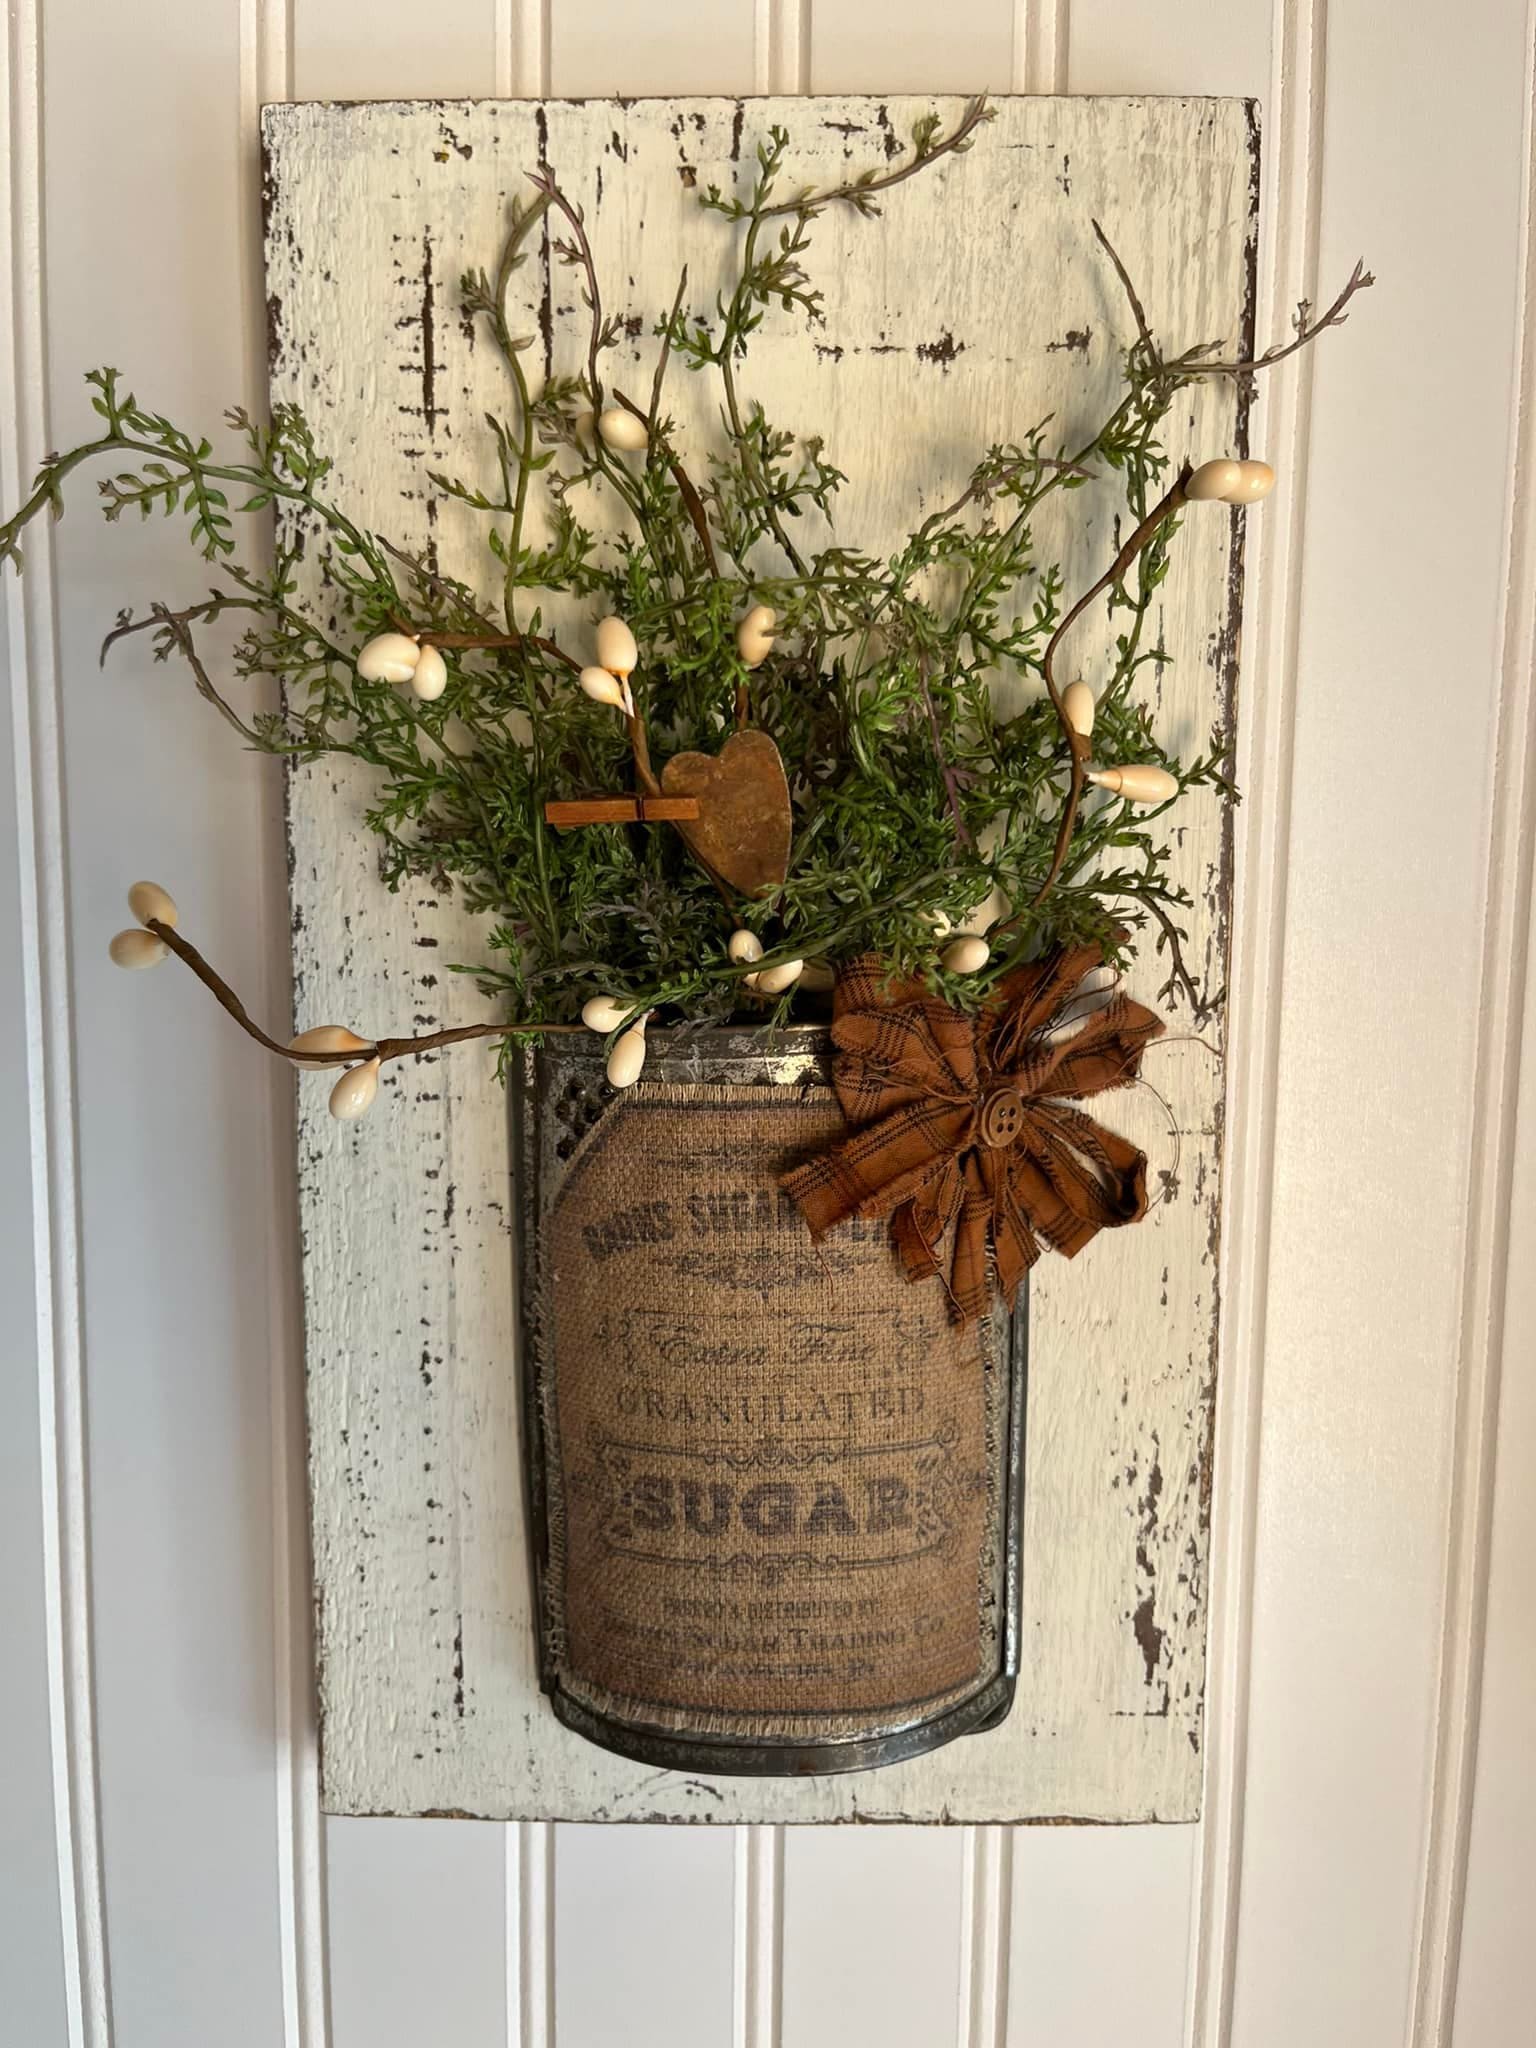
This charming piece feels like something you’d find in a little country shop off a winding backroad.
You can see a repurposed box grater becomes the pocket of a wall-hung arrangement, filled with faux greenery, delicate berry stems, and wrapped in a printed burlap pouch.
Materials Needed
- 1 box-style metal grater
- 1 small wooden board (approx. 10×14″,)
- Printed burlap
- Faux greenery (around 10–12″ tall)
- Embellishments: ribbon flower, rusty heart charm, mini clothespin
- Hot glue gun
- Screws or nails
Step-by-Step Guide
Step 1: You can either paint and distress wood panel for a vintage look or leave it natural if you like the raw feel.
Step 2: Wrap the grater in your burlap or fabric and glue it in place.
Step 3: Secure the grater to the board using glue or small screws. Make sure the open end is facing up to hold your faux floral stems like a pocket.
Step 4: Fill the grater with greenery, cotton stems, or dried flowers.
#17. Wall-Mounted Grater Flower Vases
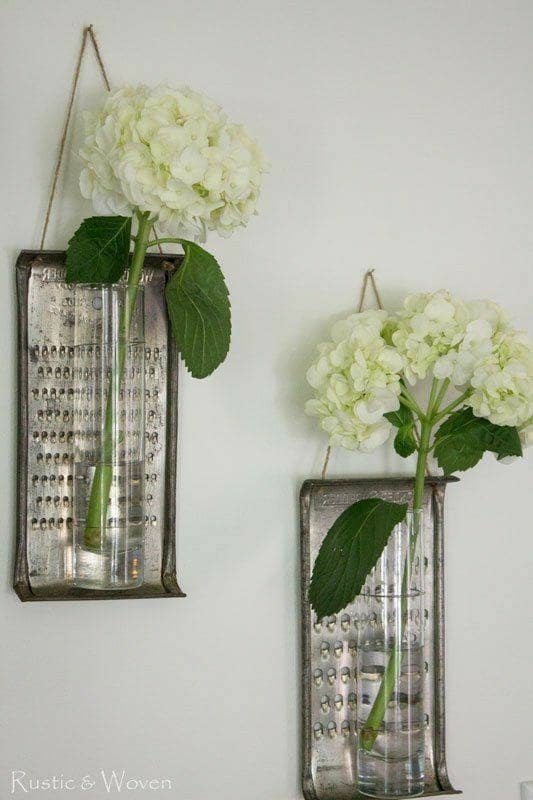
Who knew something as humble as an old flat grater could bloom with charm? These vintage graters have been reborn as minimalist wall vases, each holding a slender glass tube filled with fresh stems.
Hung with twine and softened by hydrangeas, they strike a beautiful balance between rustic utility and delicate beauty.
Materials Needed
- 2–3 flat vintage graters (approx. 10″ x 4″)
- 2–3 small cylindrical glass vases or test tubes (1–2″ diameter)
- Strong glue
- Twine (12–18″ per grater)
- Wall hooks
Step-by-Step Guide
Step 1: Clean your graters gently, leaving some patina for that vintage look.
Step 2: Attach the glass vase securely to the front of the grater using wire or industrial glue.
Step 3: Tie twine to the top holes or handles of the graters for hanging.
Step 4: Fill each vase with water and insert your favorite single-stem flowers.
#18. Grater Owl Garden Sculpture
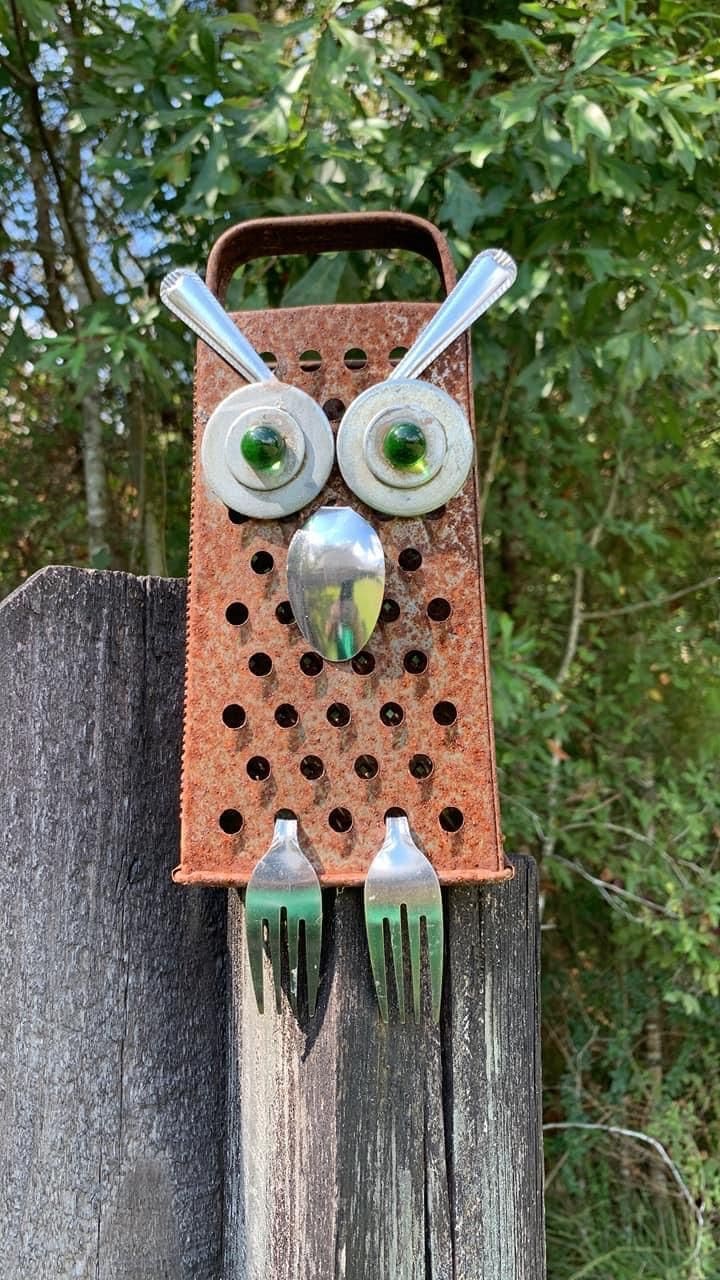
Out in the garden, perched atop a fence post, this wise little fellow watches over the veggies and flowers with a curious charm.
Made entirely from found objects including a rusty grater, old silverware, and a couple of vintage washers, this owl brings personality and playfulness to your outdoor space.
Materials Needed
- 1 box-style grater
- 2 large washers
- 2 marbles, buttons, or glass beads
- 2 small spoons
- 1 spoon
- 2 forks
- Strong outdoor adhesive, epoxy, or small screws
Step-by-Step Guide
Step 1: Clean the grater with a dry cloth, don’t remove the rust if you love that vintage, outdoor patina. It adds a lot of charm.
Step 2: Start with the face. Glue or screw the washers onto the top of the grater for eyes, and place a marble or bead in the center of each. Position the small spoons at angles above the eyes for comical eyebrows.
Step 3: Add the beak in the middle using an upside-down spoon, bowl facing outward. You can use industrial adhesive to fix it in place.
Step 4: Attach the forks to the bottom holes of the grater to create feet.
